Let’s assume a simple scenario. You have two different teams managing your Arista devices. One team is made up of network administrators who need full access to the devices. The other team only needs limited access and should not be able to make any configuration changes.
A common way to handle this is by using role-based access with Radius. You can assign different privilege levels based on who is logging in, without creating local users on every device. In this post, we will look at how to achieve this using Cisco ISE and Radius. You do not have to use Cisco ISE, any Radius server can do the job, but this post focuses on Cisco ISE since it is commonly used in enterprise environments.
Overview
For this example, we will have two users, each belonging to a different group with different access requirements.
- bob is part of the network-admin group and needs full access
- brad is part of the noc-user group and only needs limited access
In most environments, group membership is managed by something like Active Directory. For the sake of simplicity, I am going to use local identity groups on ISE. On Arista devices, there is a concept called roles. A role defines what a user can and cannot do on the device, such as whether they can enter configuration mode or only run specific show commands.
Arista comes with two built-in roles called network-admin and network-operator. You can create your own custom roles, but to keep things simple, we will use these existing ones. I will cover using custom roles at the end of this blog post.
access-01#show user roles
The default role is network-operator

role: network-admin
        10 permit command .*
role: network-operator
        10 deny mode exec command configure|bash|python-shell|\|
        20 permit mode exec command .*
We will use the following components for this example.
- Cisco ISE
- Version - 3.4.0.608 patch 3
- IP address - 10.10.0.13
- Arista
- Version - 4.32.2.1F
- IP address - 10.10.0.140
TL;DR
When a user logs in to an Arista device, the device sends a Radius request to the Radius server, Cisco ISE in this case. ISE first checks the user credentials to see if the login is valid.
If the credentials are valid, ISE then looks at the user’s identity group and evaluates the authorization policy. Based on this, ISE responds with an Access-Accept message and includes vendor-specific attributes that tell the Arista device which role to apply to the user.
If the credentials are invalid or the user does not match any allowed policy, ISE responds with an Access-Reject, and the login is denied.
Arista Configuration
Let’s start with the Arista side configuration, which is pretty straightforward. Ideally, you should configure your Radius server first before making any changes to the network devices.
no aaa root
!
radius-server host 10.10.0.13 key mysecretkey
!
aaa group server radius RADIUS-SERVERS
   server 10.10.0.13
!
aaa group server radius RADIUS-SERVERS
aaa authentication login default group RADIUS-SERVERS local
aaa authorization exec default group RADIUS-SERVERS local
aaa authorization commands all default local
aaa accounting exec default start-stop group RADIUS-SERVERS
aaa accounting commands all default start-stop group RADIUS-SERVERSno aaa root command is used to disable the configuration of the root password through AAA. When this command is issued, the root password must be configured locally on the device, and cannot be set or changed through AAAIf you use a specific VRF for your management interface, you also need to specify it here so the Radius traffic is sent via the correct VRF.
radius-server host 10.10.0.13 vrf management key mysecretkey
!
aaa group server radius RADIUS-SERVERS
   server 10.10.0.13 vrf management
Cisco ISE Configuration
On the Cisco ISE side, there are a few different components that need to be configured for this to work. This includes adding the network device, adding the Arista Radius dictionary, creating authorization profiles, and configuring policy sets. We will go through each of these one by one.
Radius Dictionary
A Radius dictionary defines vendor-specific attributes that are used during authentication and authorization. Arista uses vendor-specific attributes to pass information such as user roles.
A dictionary file that identifies Arista Radius vendor-specific attribute value pairs may look like this.
#
# dictionary.arista
#
VENDOR           Arista    30065
#   Standard Attribute
BEGIN-VENDOR     Arista
ATTRIBUTE        Arista-AVPair    1    string
END-VENDOR       Arista
Save this file as dictionary.arista and import it into Cisco ISE by navigating to Policy, Policy Elements and Dictionaries. Then, navigate to Radius, select Radius Vendors, and click the Import button.
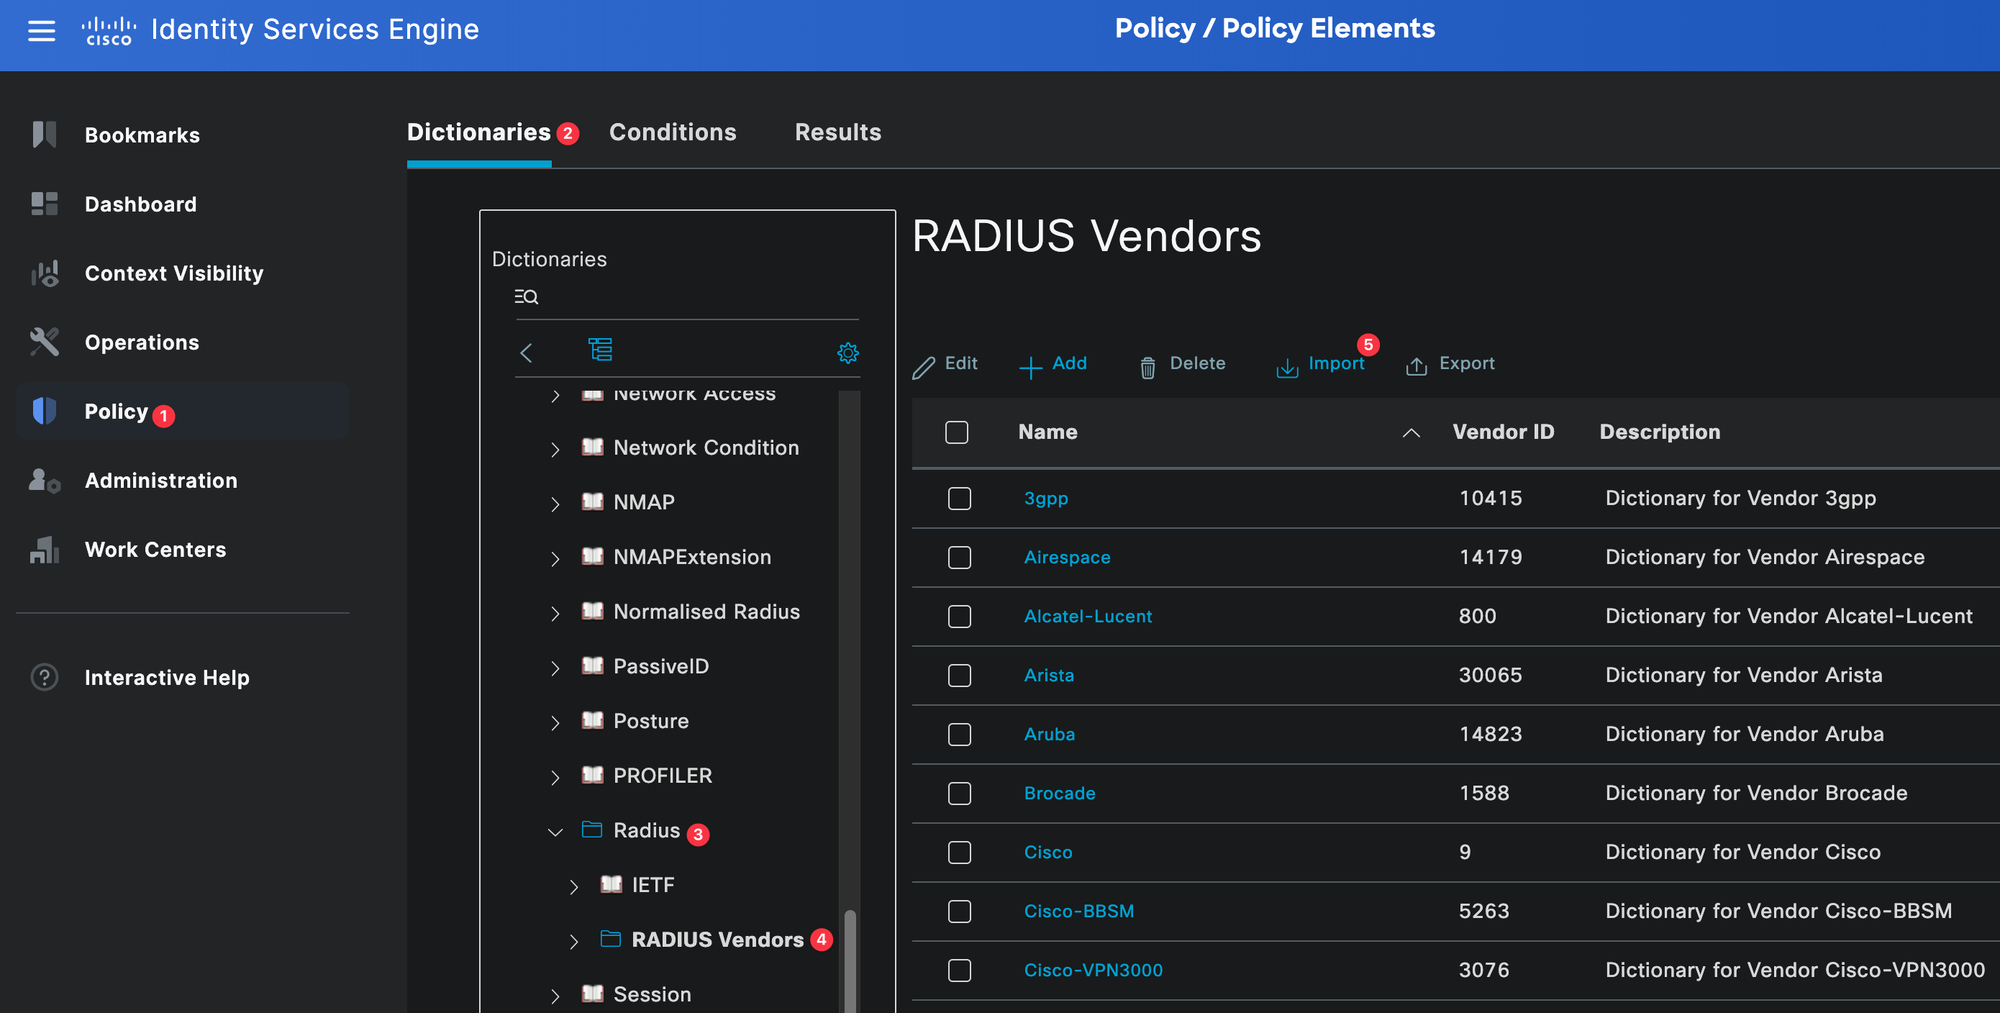
Once imported, it will be listed under Radius Vendors.
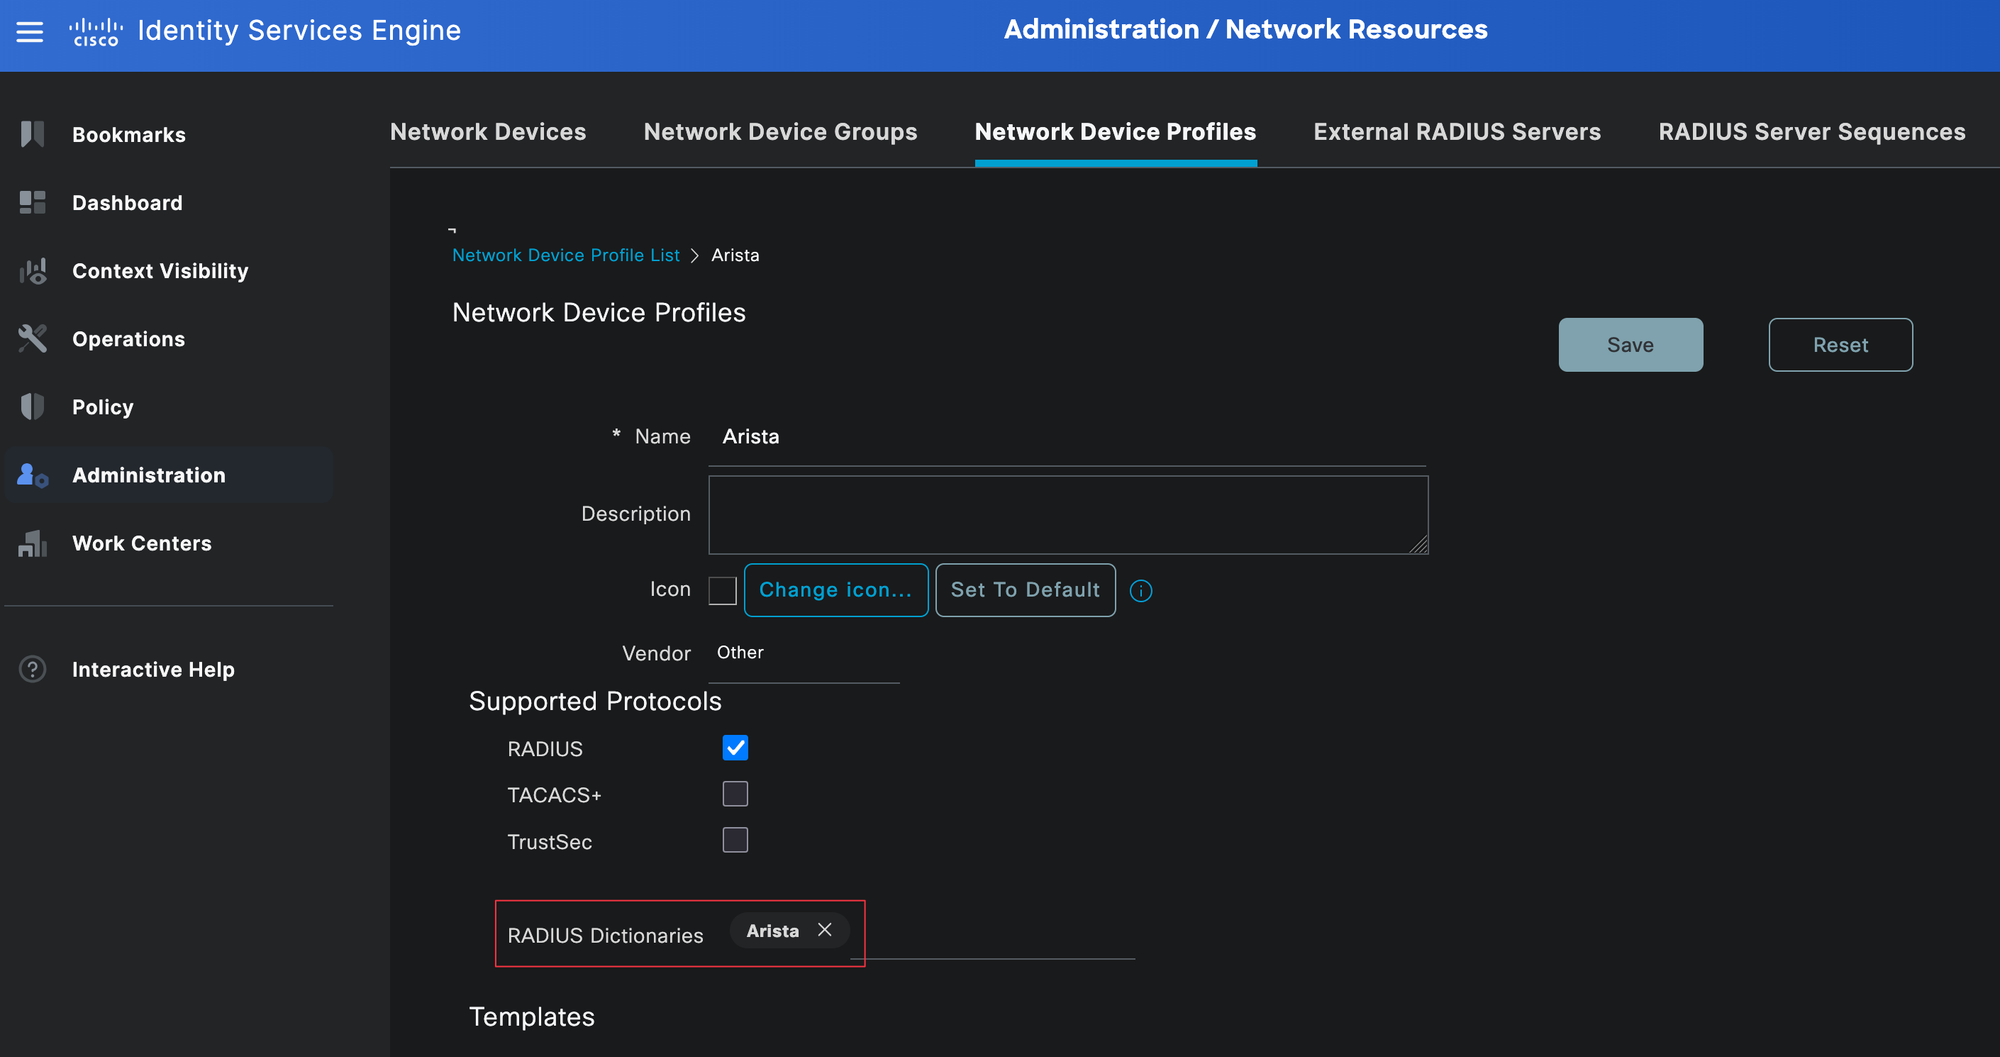
Network Device Profiles
Network device profiles in Cisco ISE are used to define vendor-specific settings, such as which Radius dictionary to use and which protocols are supported. This is important because ISE needs to know how to interpret the attributes sent by the device and which attributes it can return.
To create one, go to Administration, Network Resources, then Network Device Profiles. From here, you can either use an existing profile (if you have one already for Arista) or create a new one and assign the Arista Radius dictionary we created in the previous step.
Add the Network Device
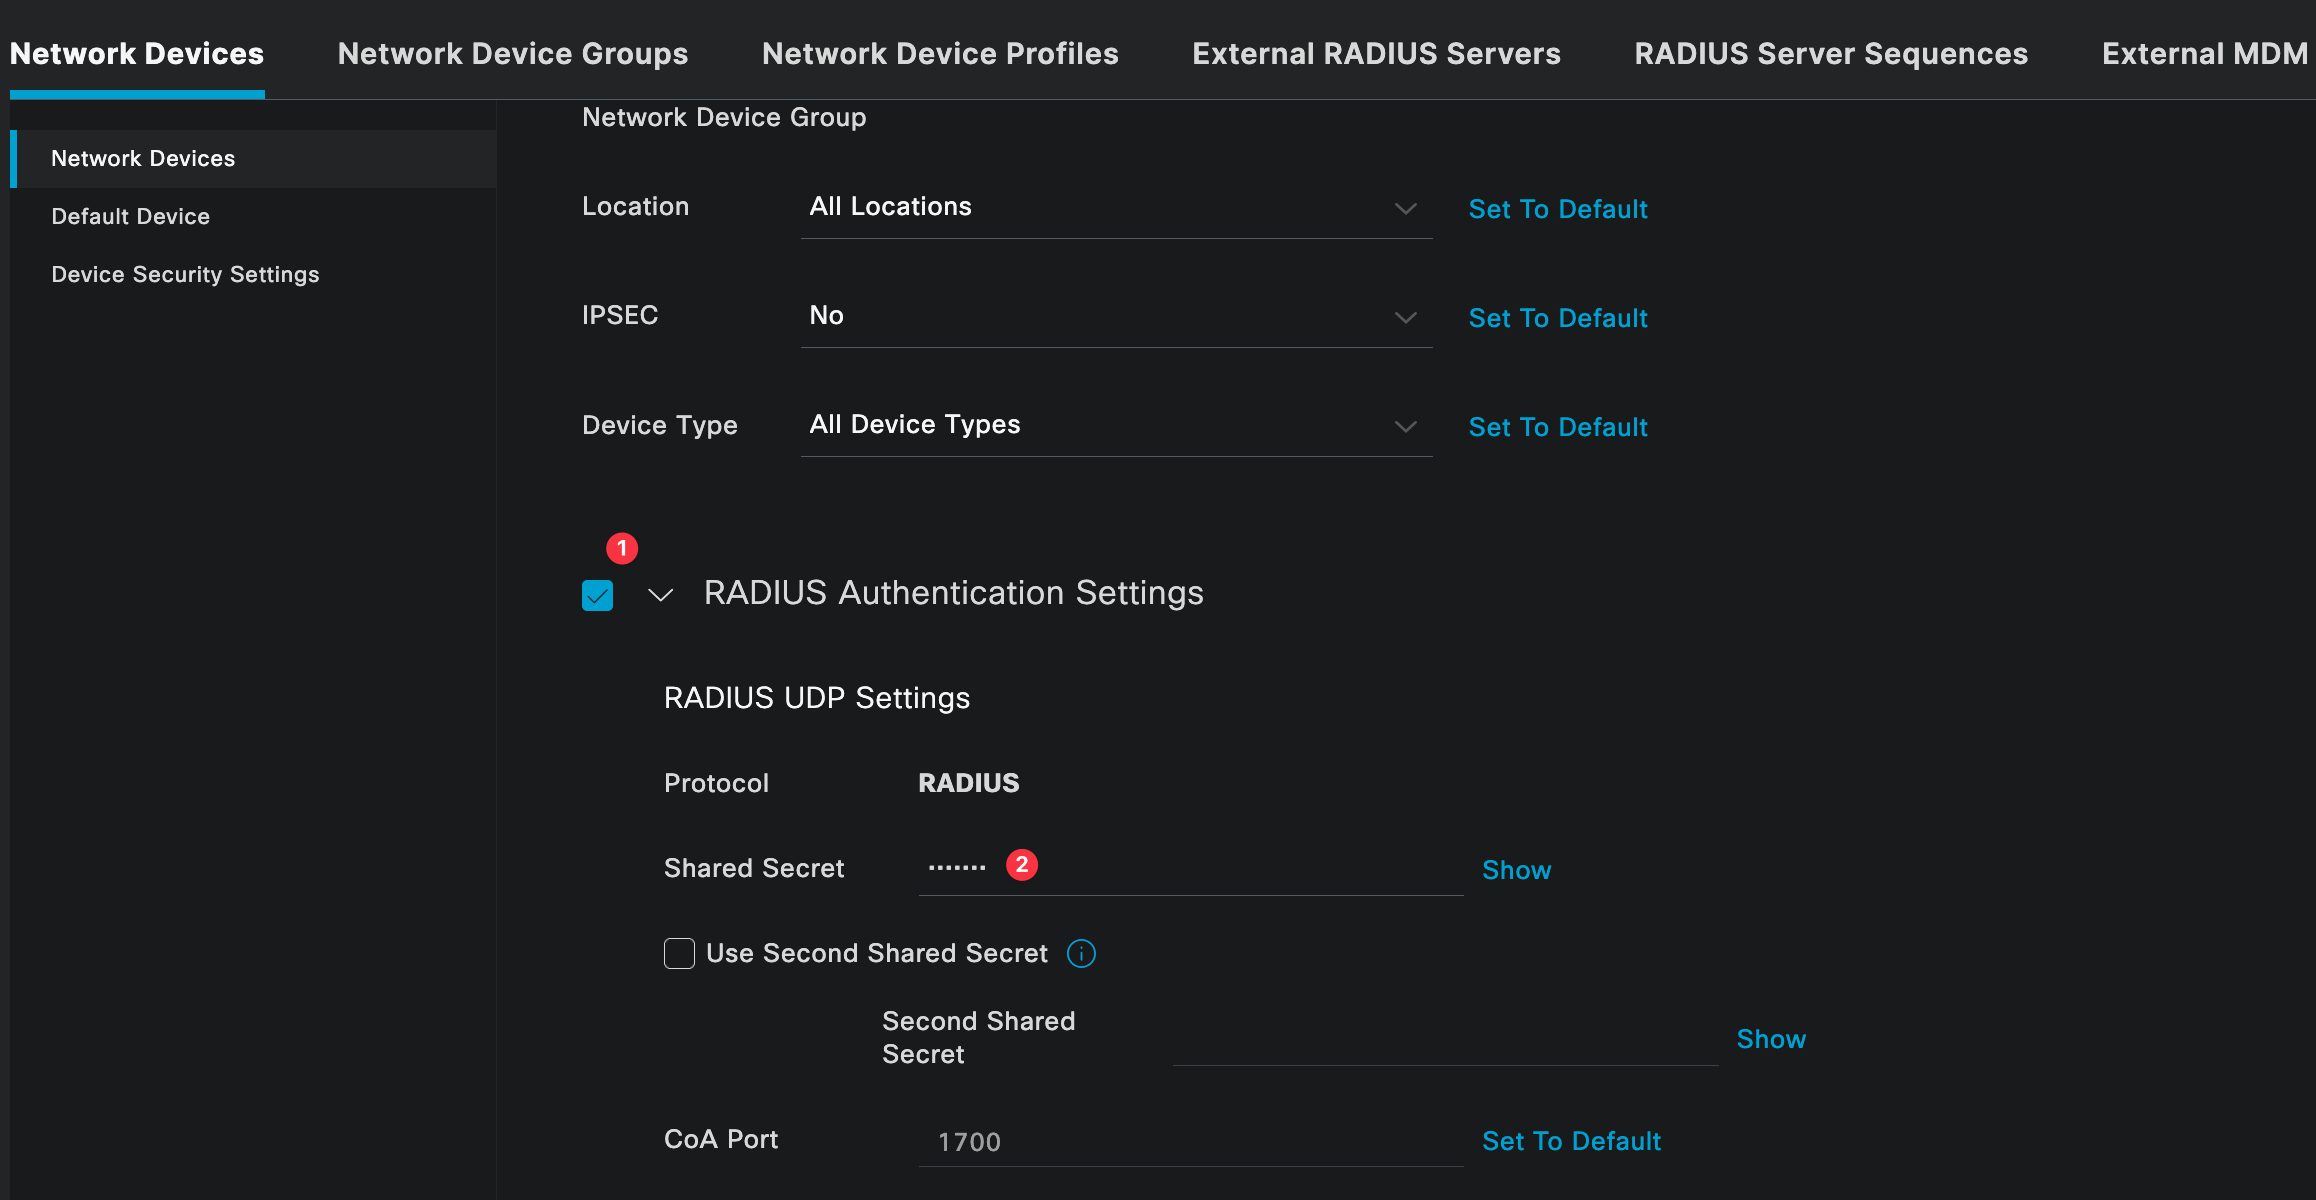
Next, add the Arista device to Cisco ISE. This tells ISE which device will be sending Radius requests.
Navigate to Administration, Network Resources, then Network Devices and create a new device. Specify the hostname and IP address of the Arista switch, then associate it with the device profile we created earlier. You can leave most of the other fields set to their default values.
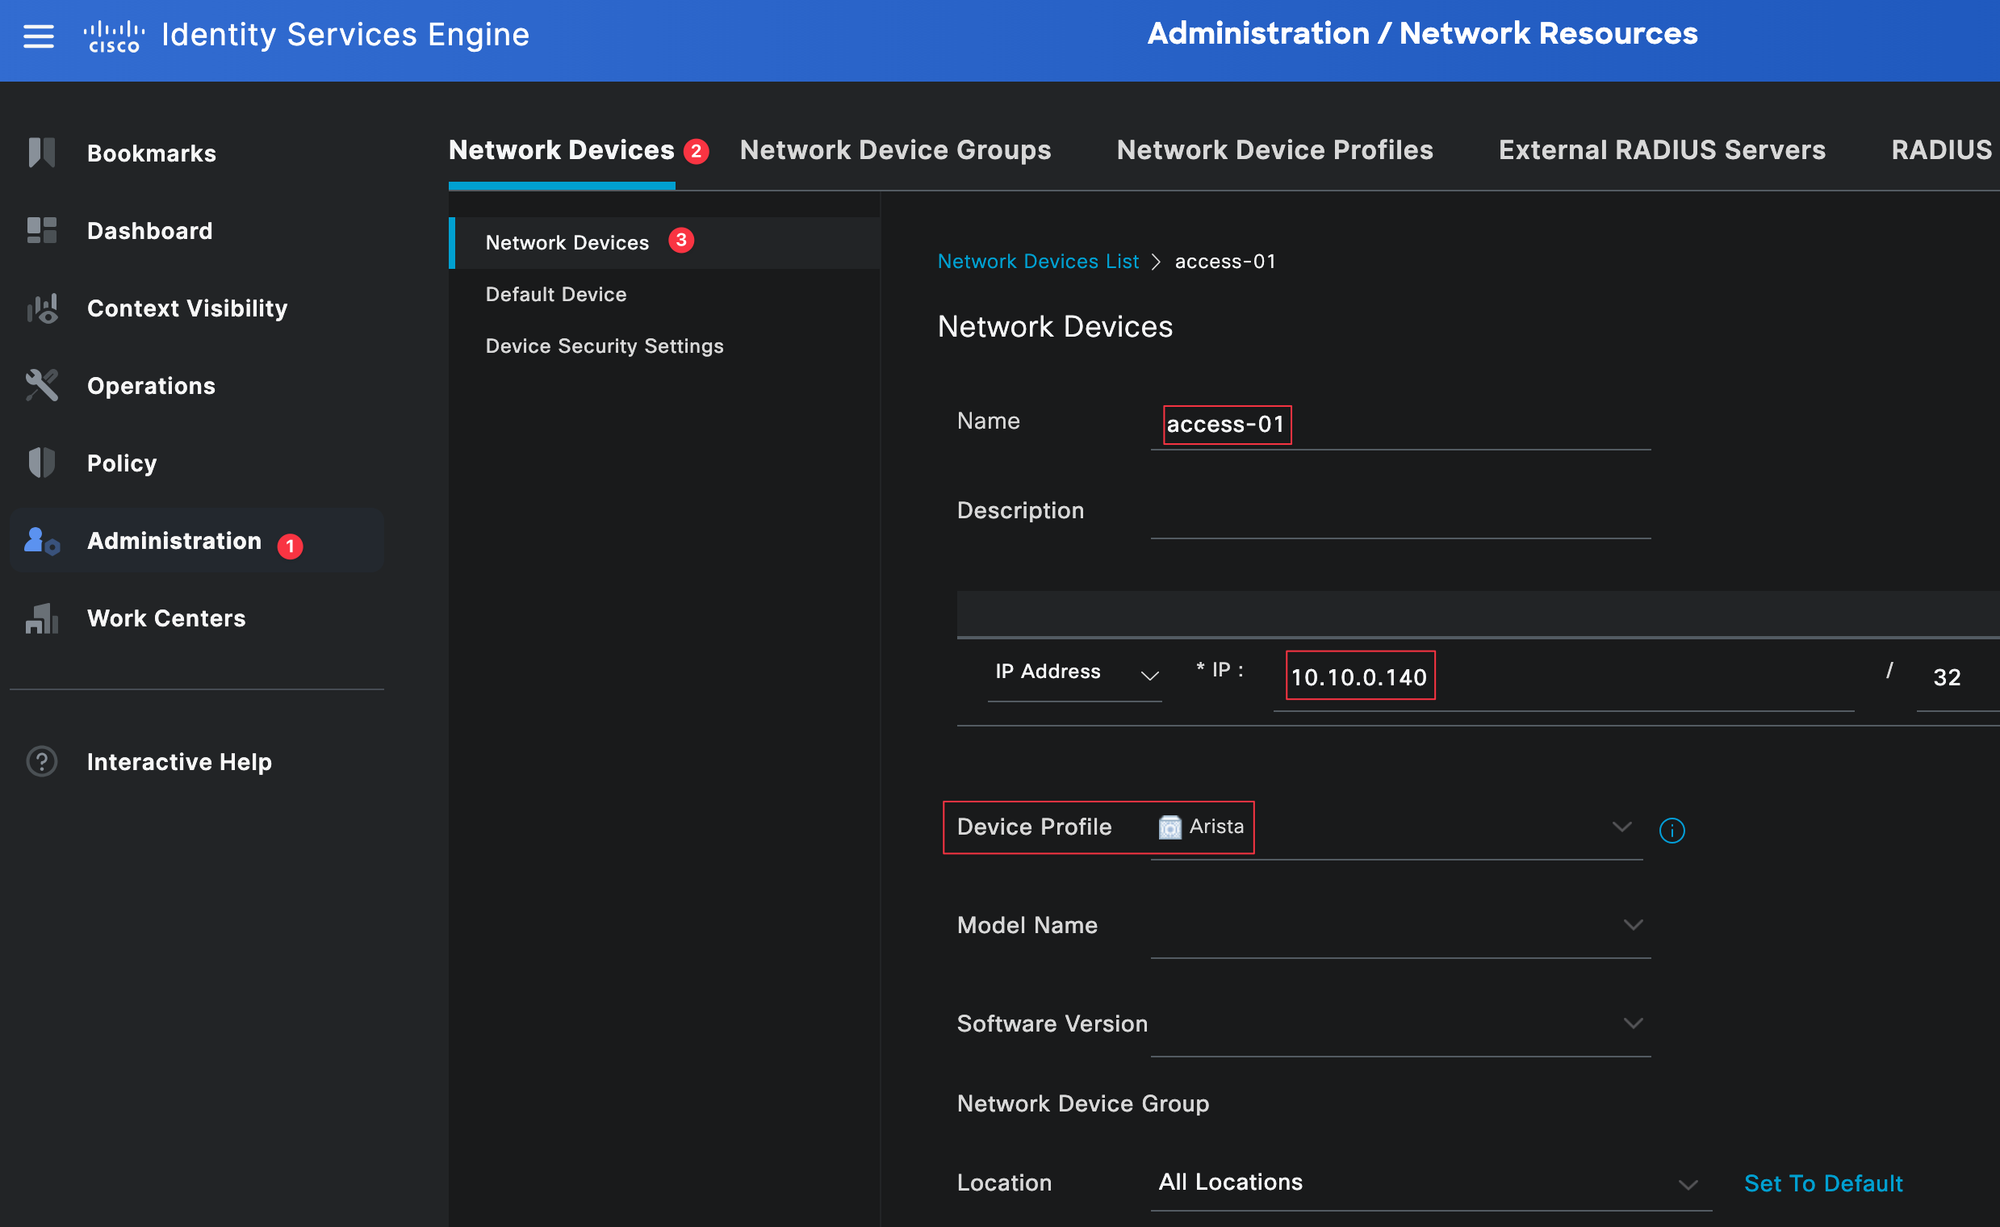
Next, select the tick next to the Radius Authentication Settings and enter the Radius shared secret, ensuring it matches on both sides.
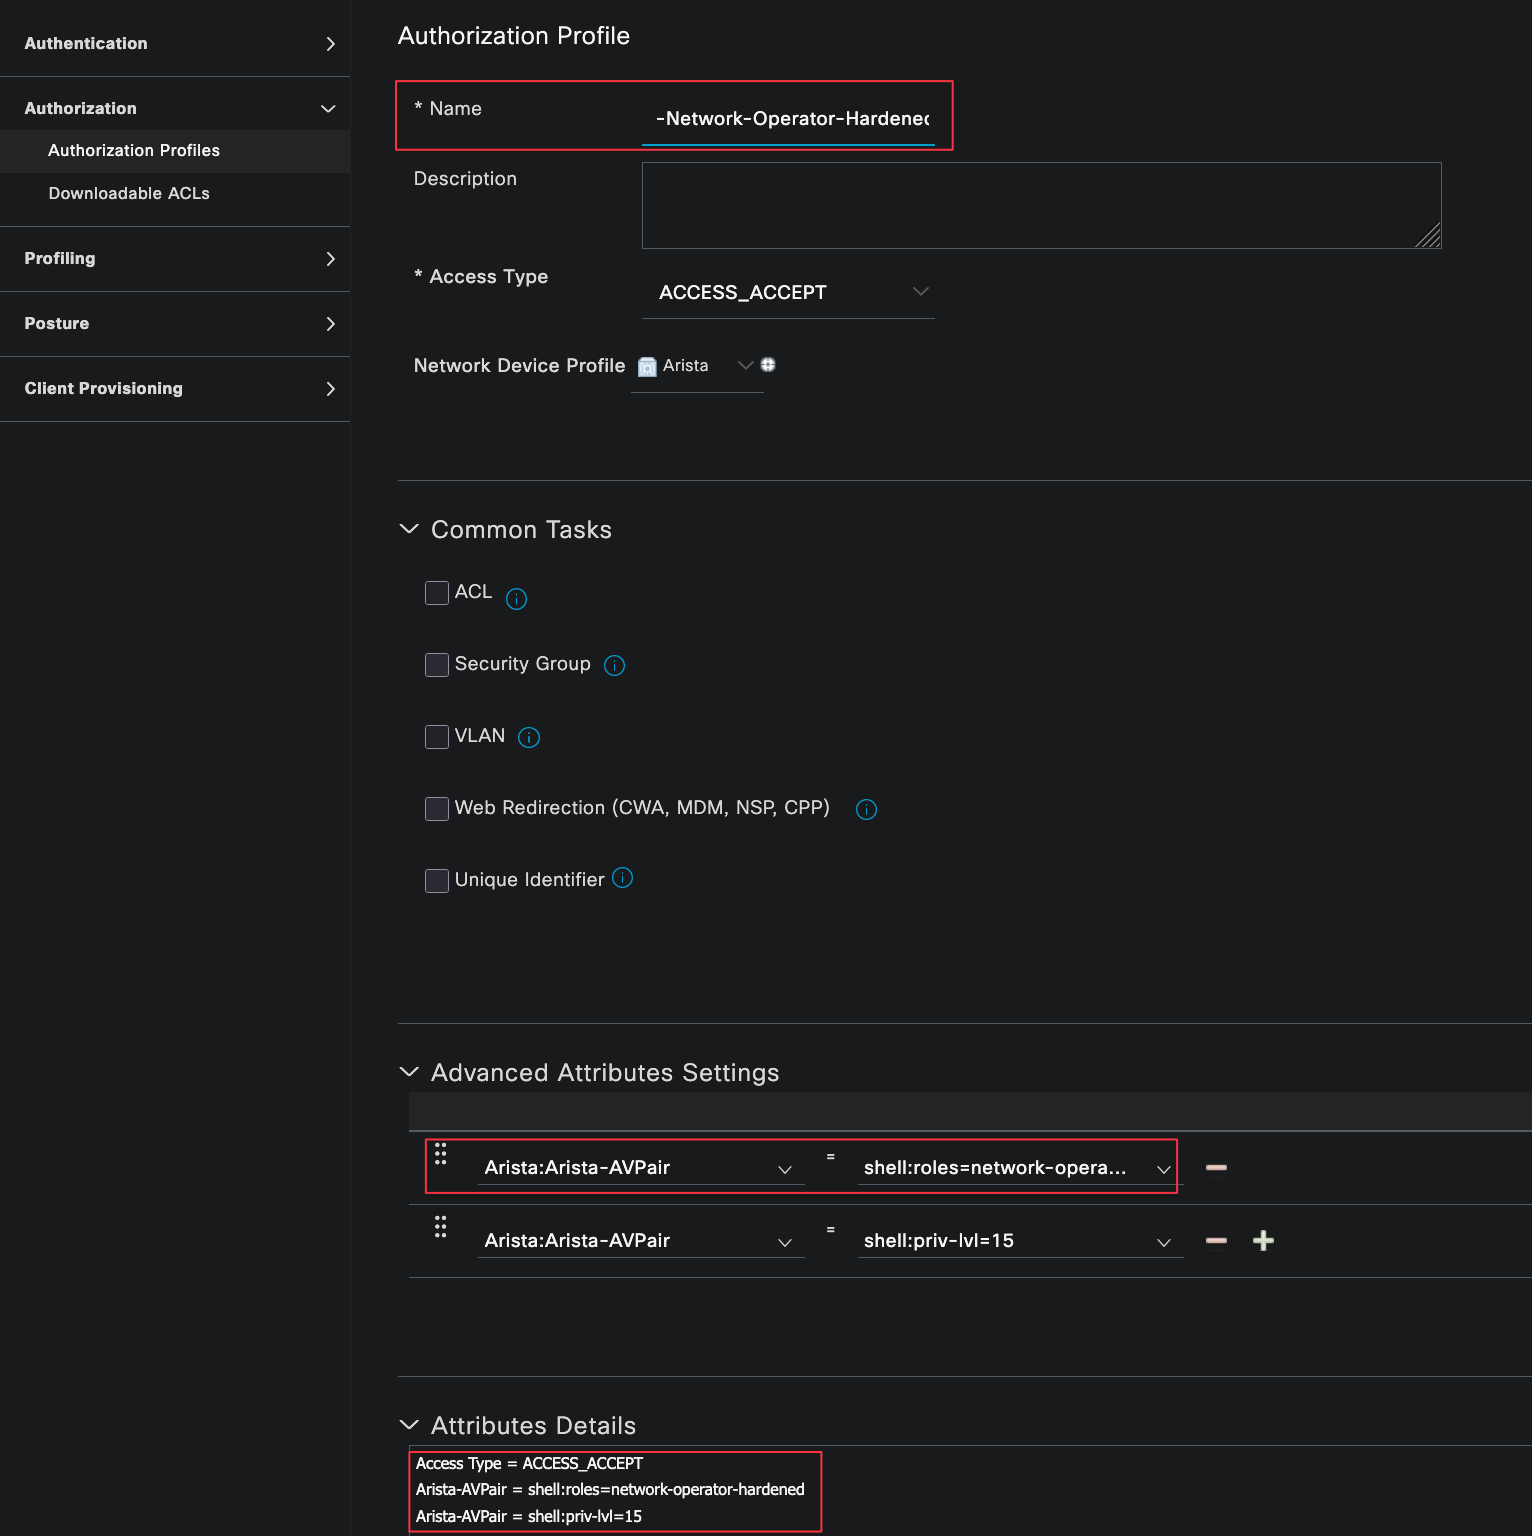
Authorization Profiles
Authorization profiles define what access is granted to a user after they have been successfully authenticated. This is where we tell ISE which attributes to send back to the Arista device, such as the user role and privilege level.
You can navigate to authorization profiles by going to Policy, Policy Elements, then Results, and selecting Authorization Profiles.
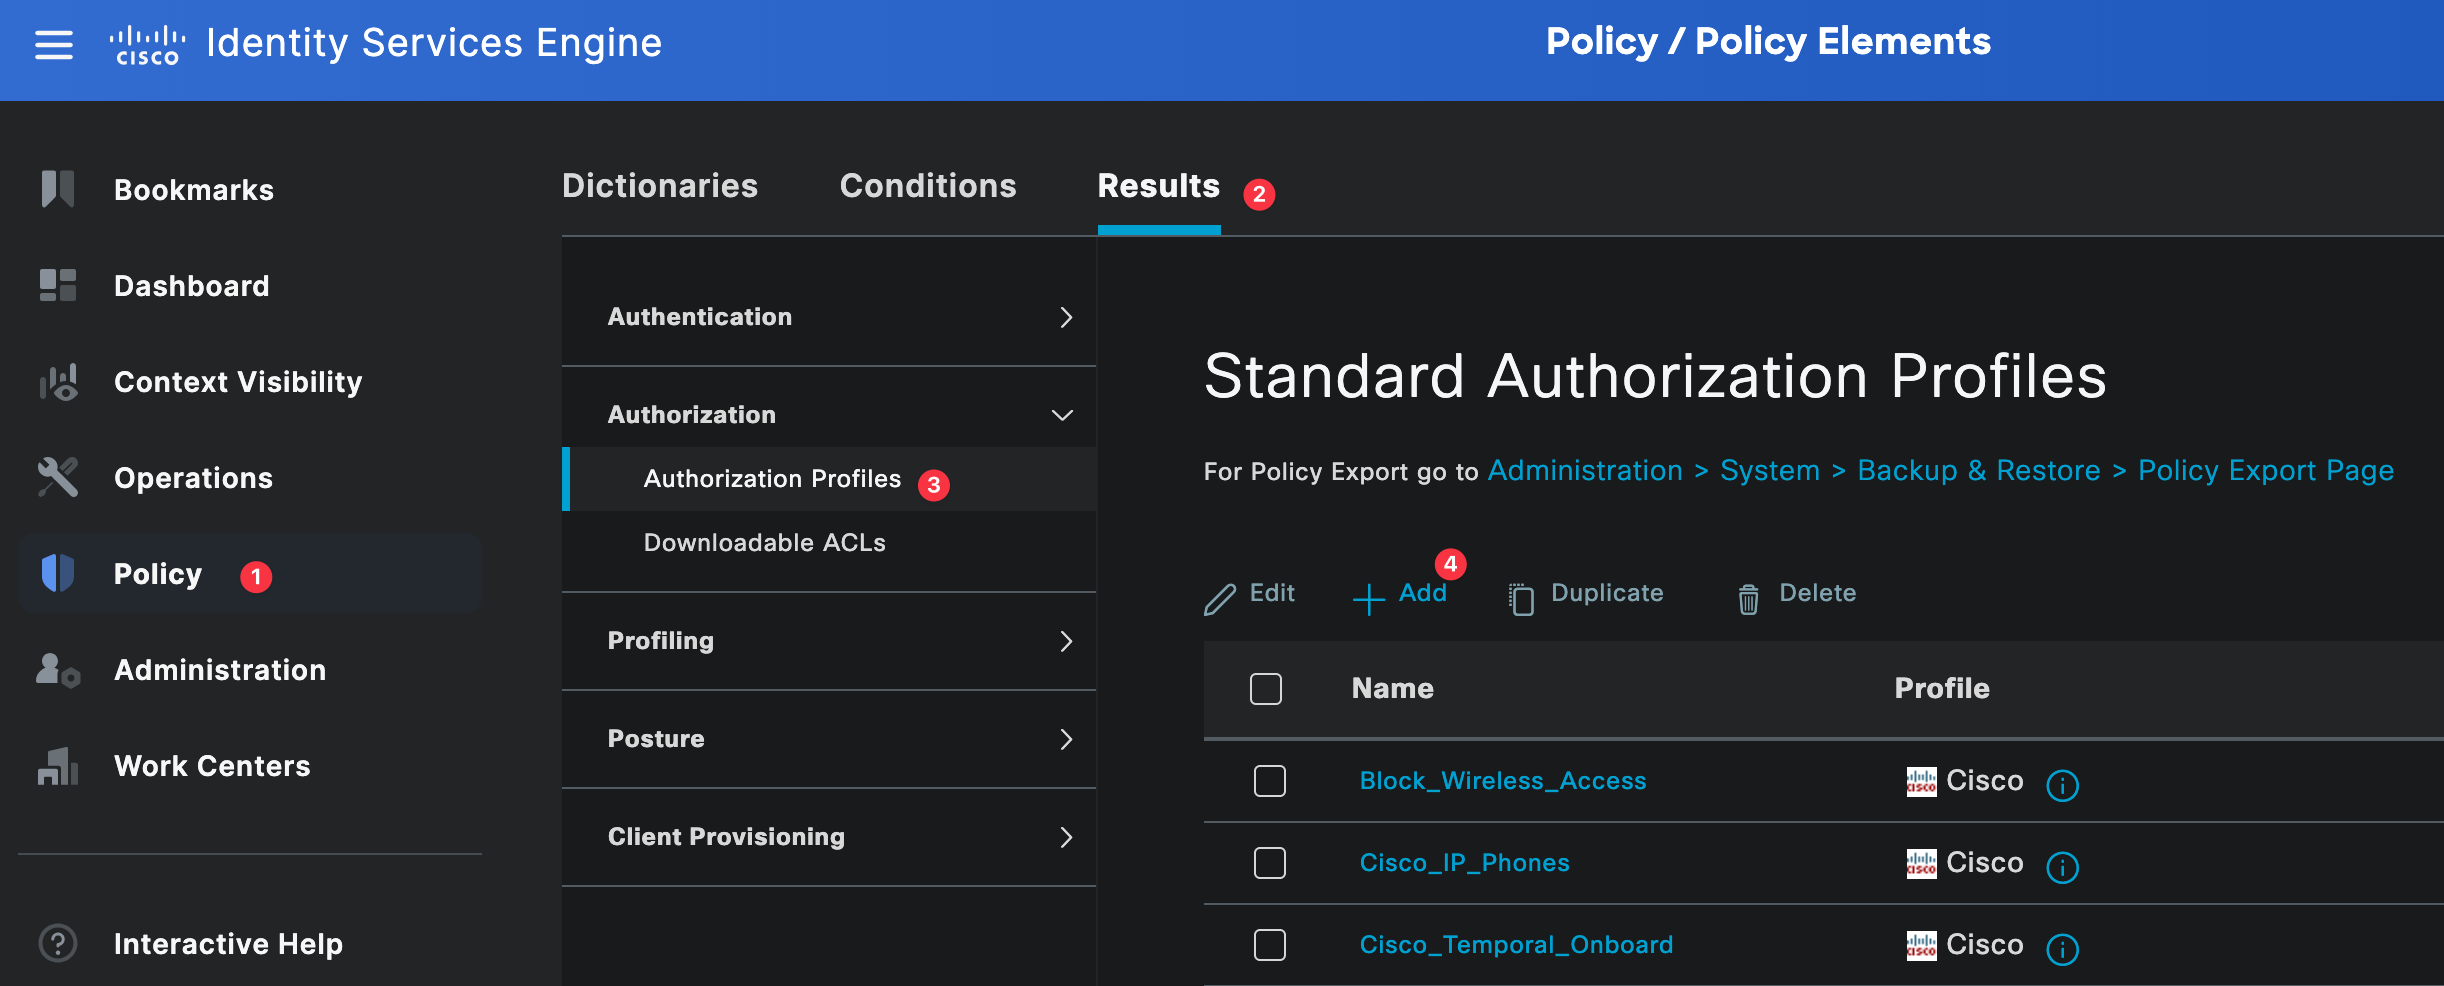
For this example, we need two authorization profiles. One profile is for network-admins and the other is for network-operators. These profiles will be referenced later in the authorization policy.
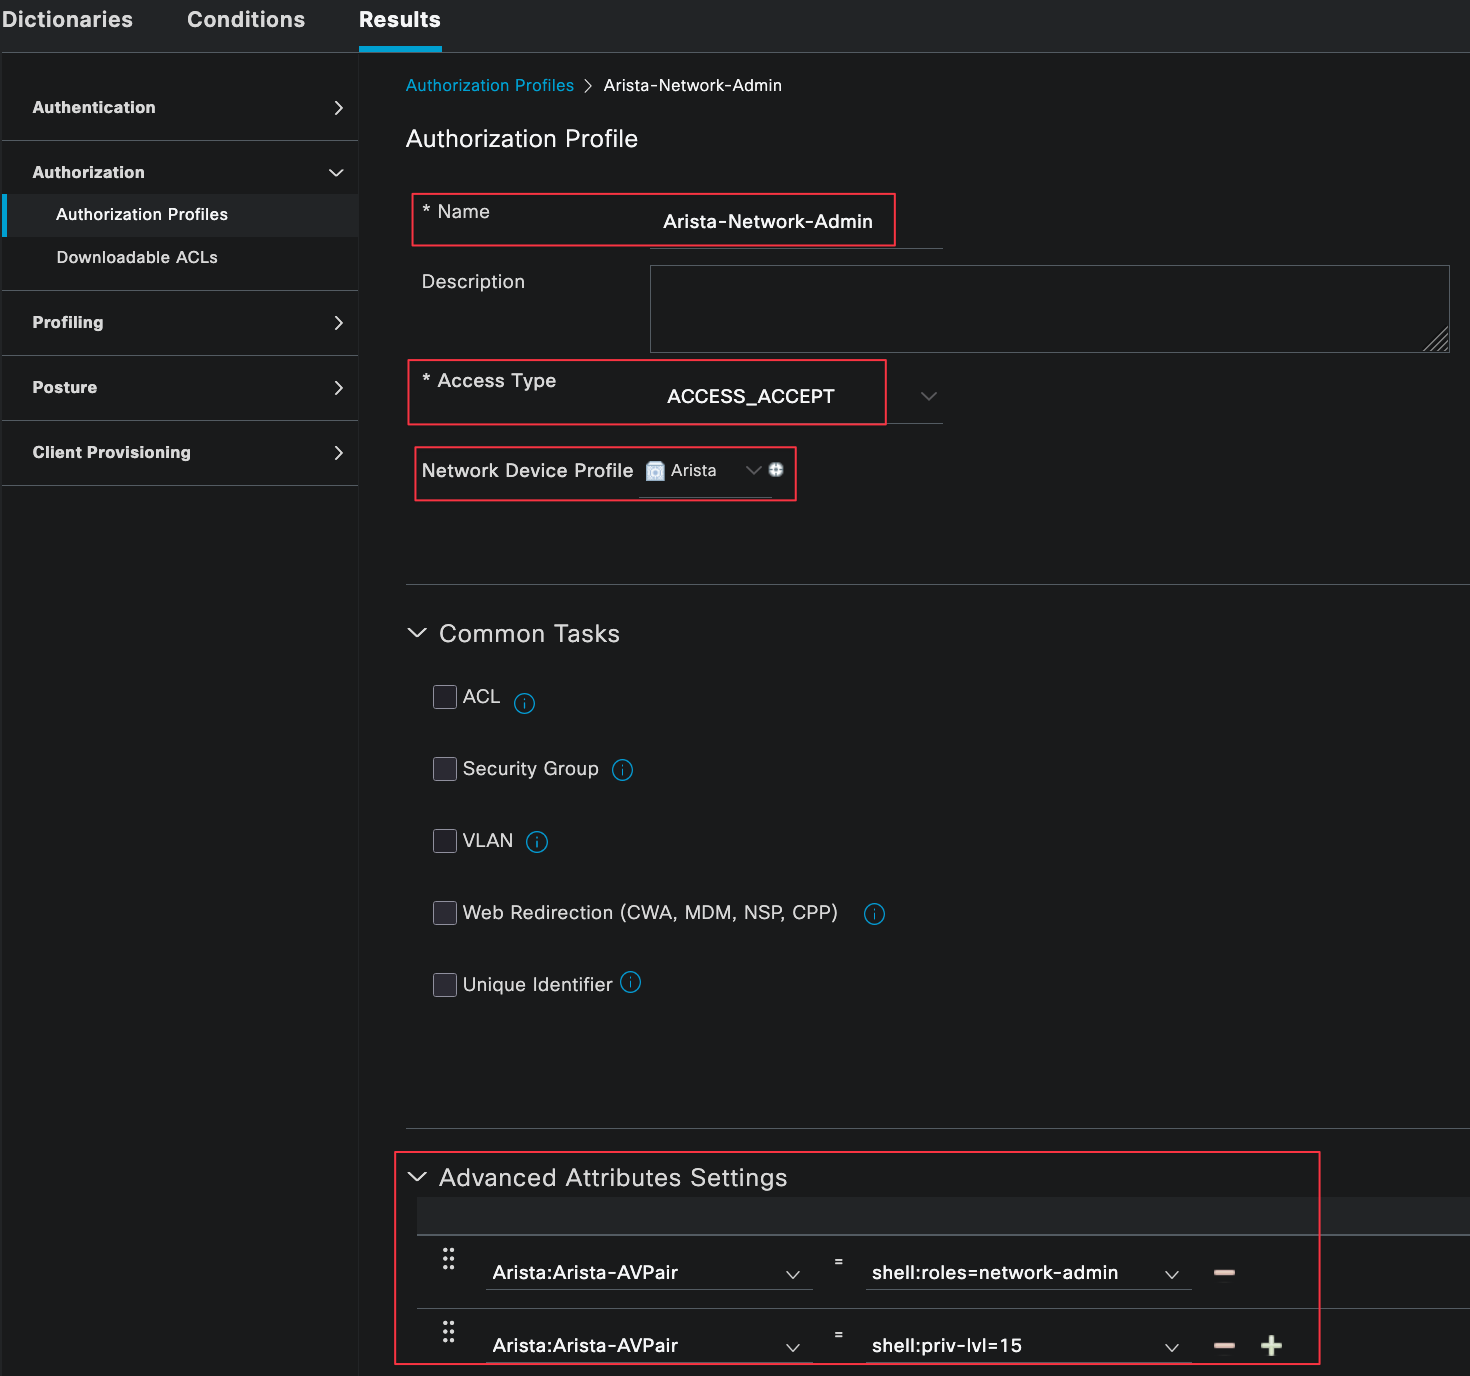
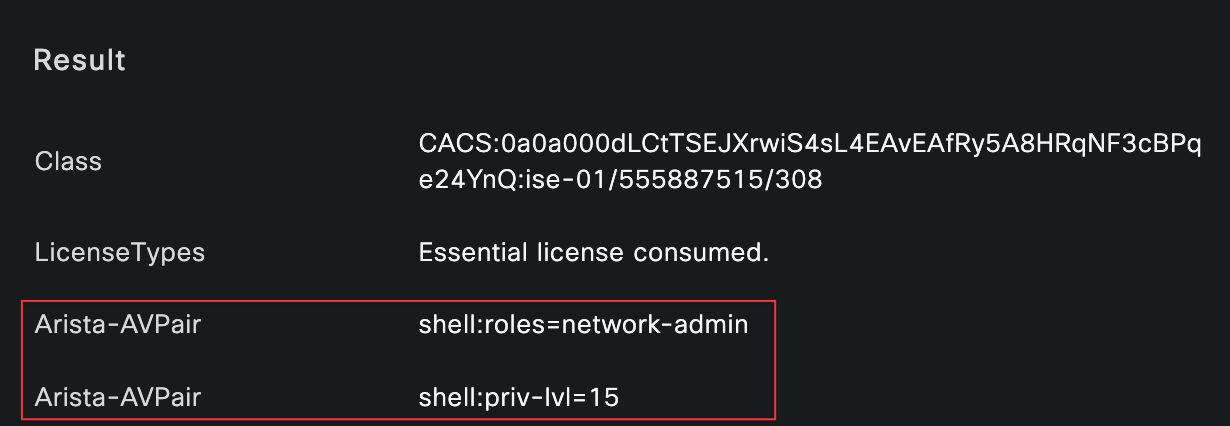
Each profile is set to ACCESS_ACCEPT and associated with the Arista network device profile. Under advanced attributes, we use Arista-specific AV pairs to define the role that should be applied to the device. This is how ISE tells Arista whether the user should get full access or limited access when they log in.
Acceptable string values for Arista-AVPair include.
- shell:priv-lvl=<privilege level of a user, 0-15>
- shell:roles=<list of roles for a user>

Identity Groups and Users
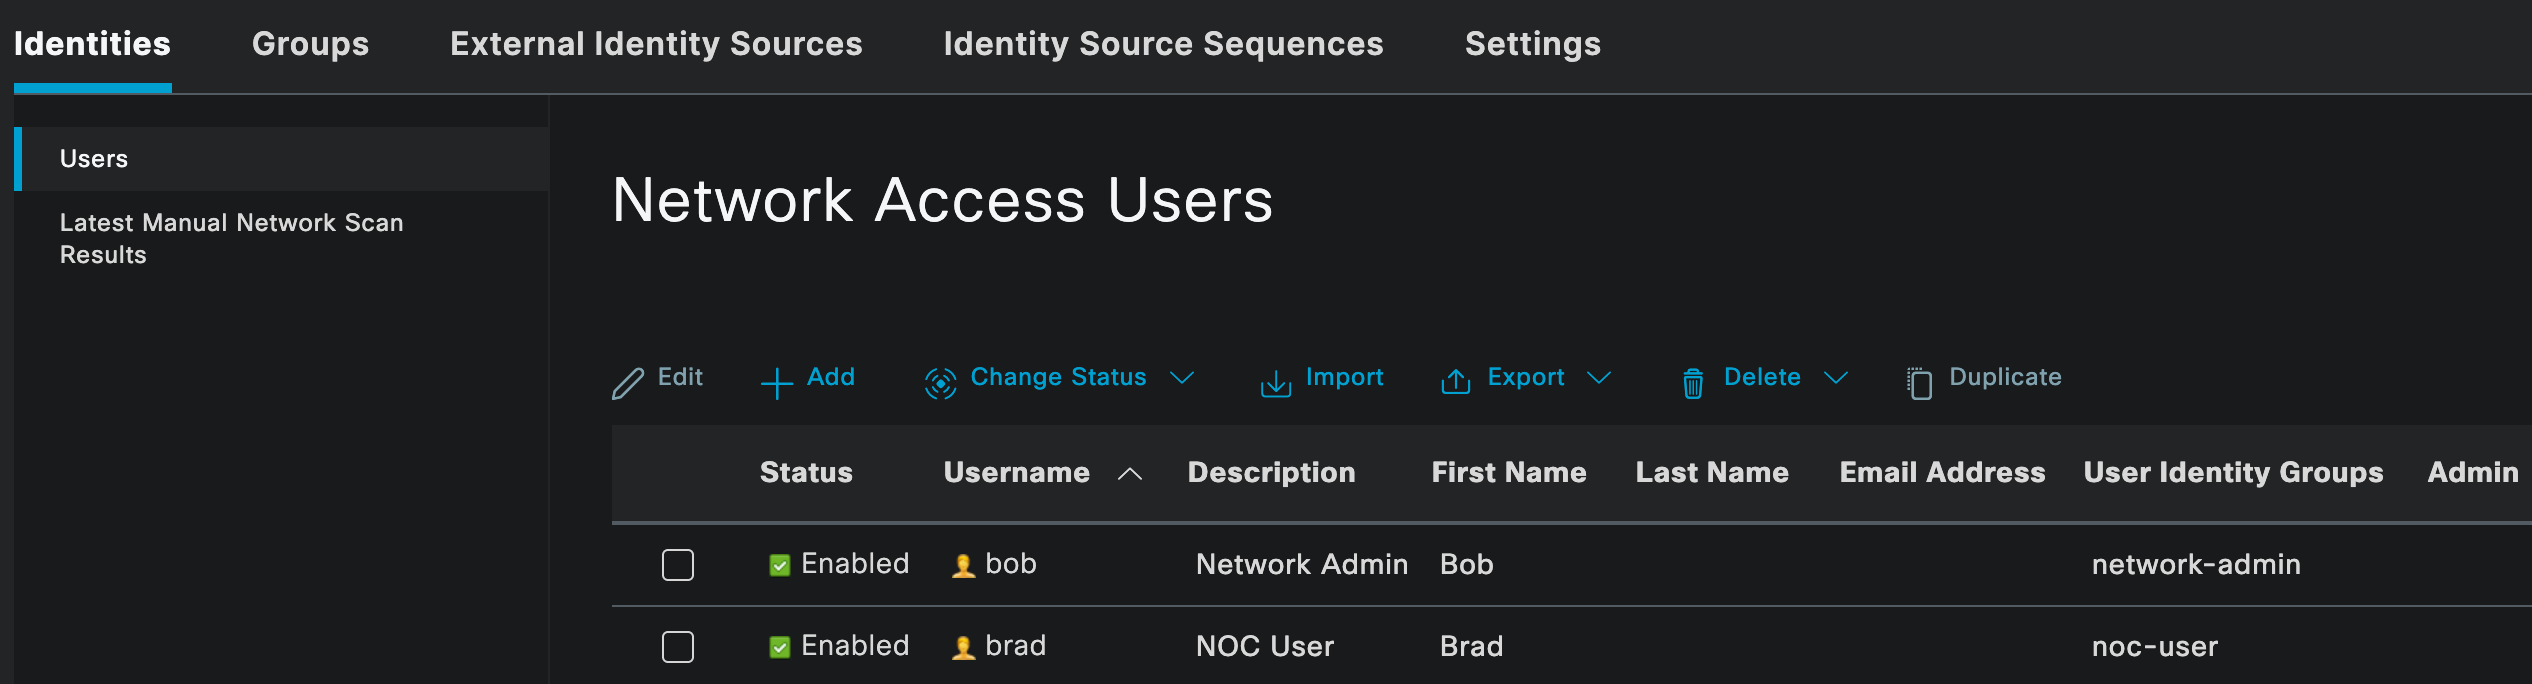
As mentioned earlier, I am using local users and identity groups in Cisco ISE for this example. In most production environments, this would usually be an external identity source such as Active Directory.
Here, you can see two local users, bob and brad, each assigned to their respective identity groups. The network-admin group will later be mapped to the network-admin role on the Arista devices, while the noc-user group will be mapped to the network-operator role.
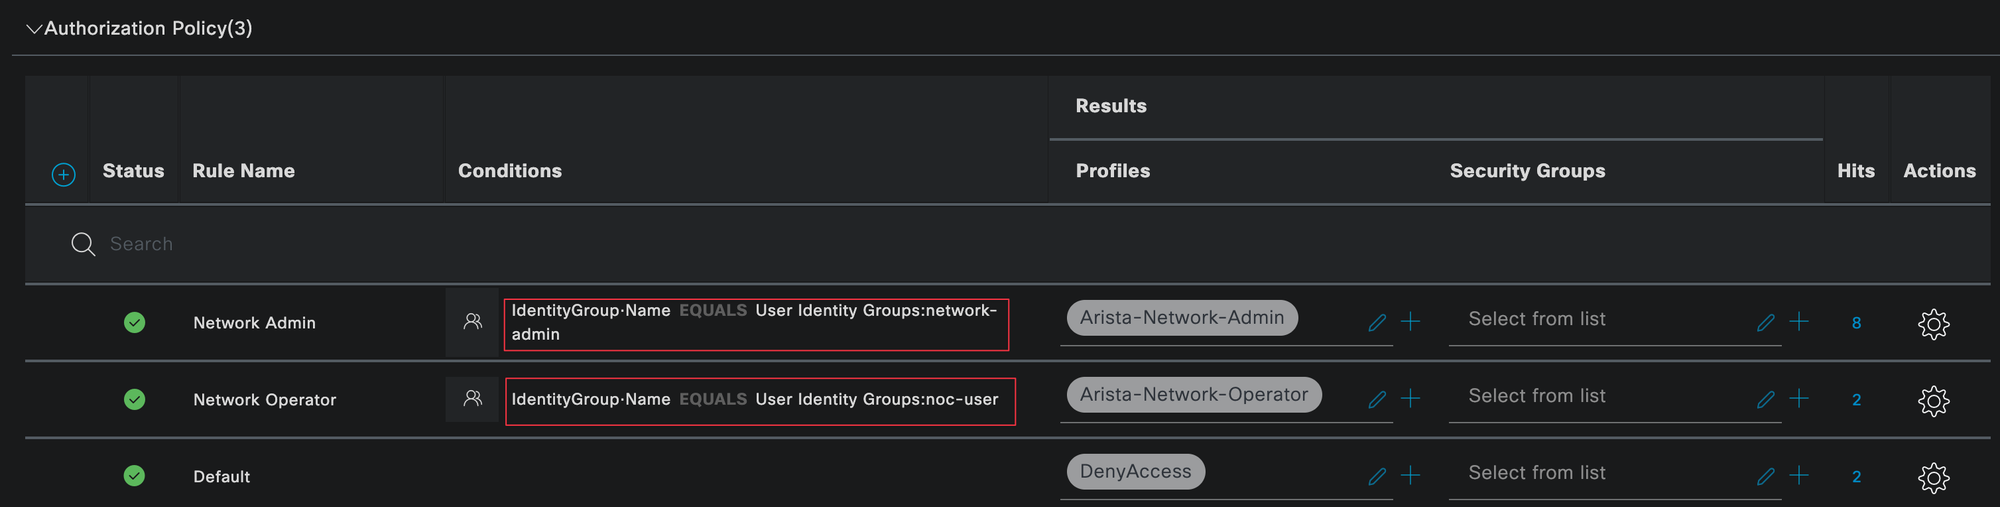
Policy Sets
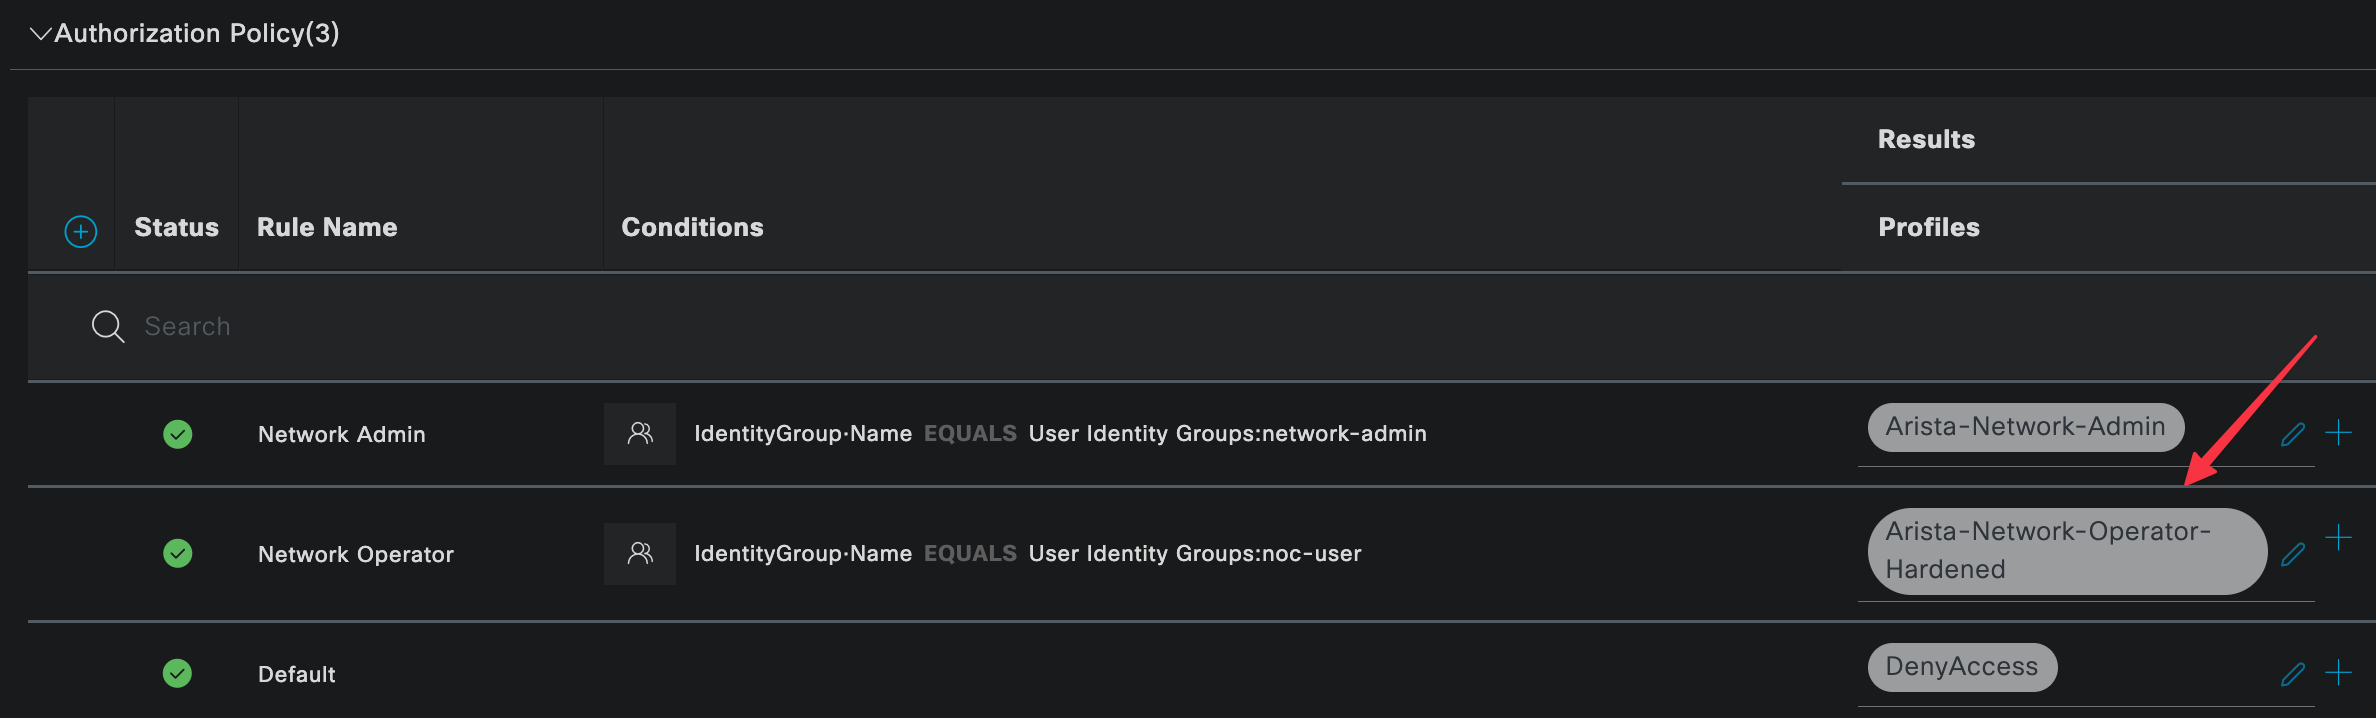
Policy Sets in Cisco ISE define how authentication and authorization requests are handled. They allow you to match incoming requests against specific conditions and then apply the appropriate authentication and authorization logic.
You can navigate to policy sets by going to Policy, then Policy Sets. In this example, we created a dedicated policy set for Arista Radius access.

A policy set can be matched against many conditions, such as device vendor, device location, or protocol type. To keep things simple, we are matching the policy set based on the IP address of the Arista device using the Radius NAS IP address (this doesn't scale well on real environments, as you may have guessed 😄)
Within the policy set, the authentication policy is evaluated first. This step verifies who the user is and checks their credentials. In our case, authentication is done against the internal user database in ISE.

Once authentication is successful, the authorization policy is evaluated. This determines what level of access the user should receive. Here, we match users based on their identity group and return the appropriate authorization profile, which maps the user to either the Arista network-admin role or the network-operator role.
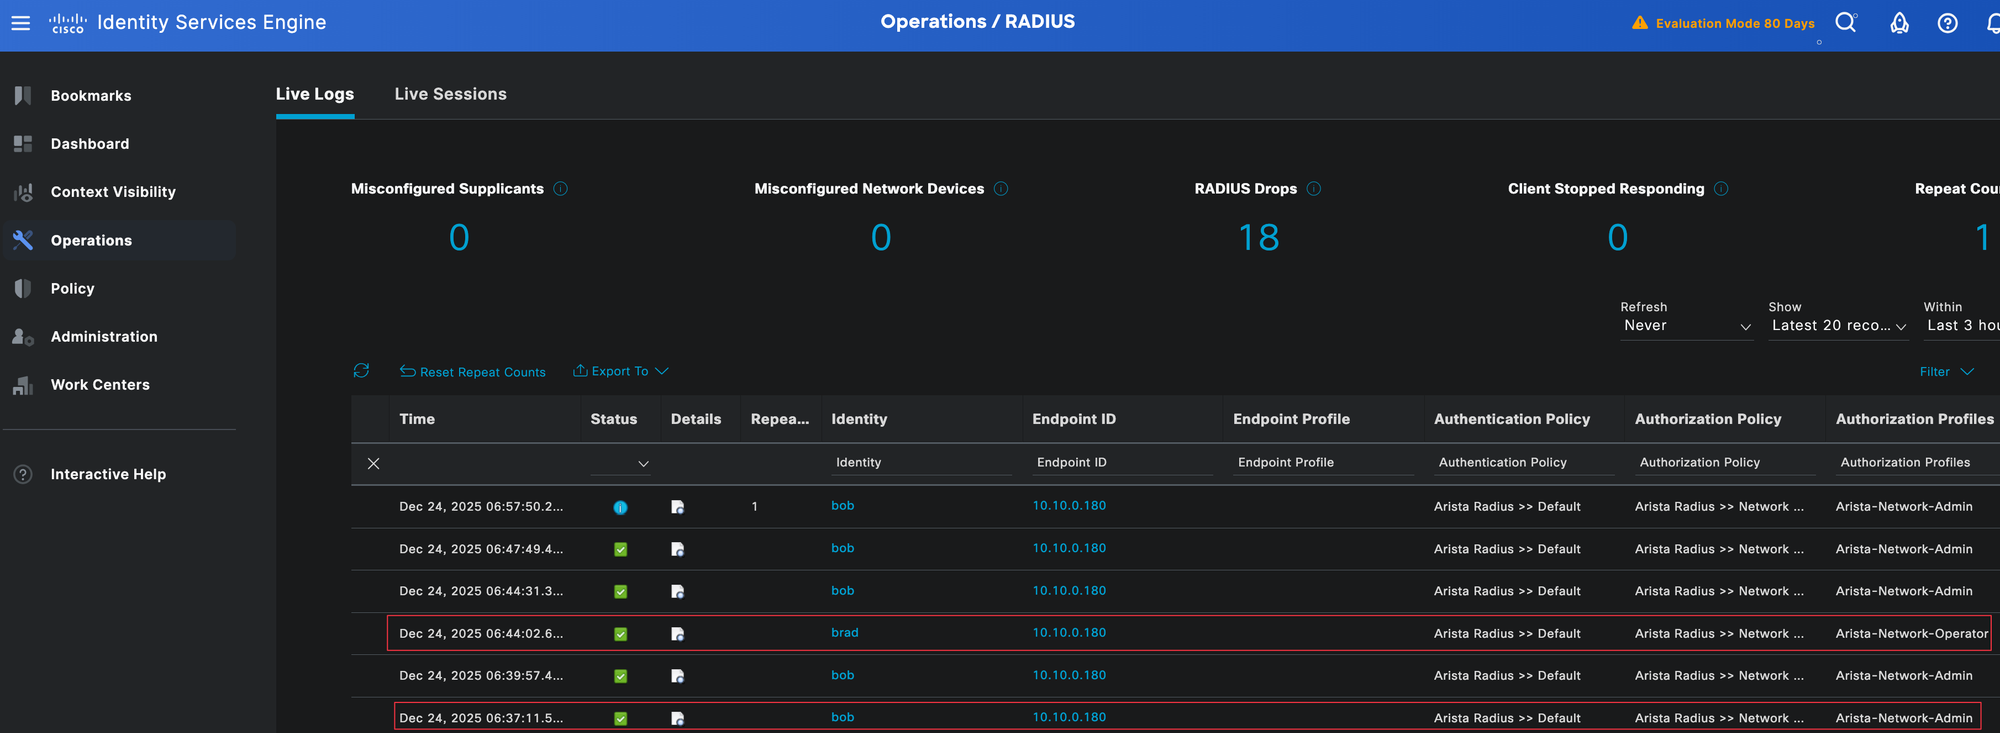
Testing and Verification
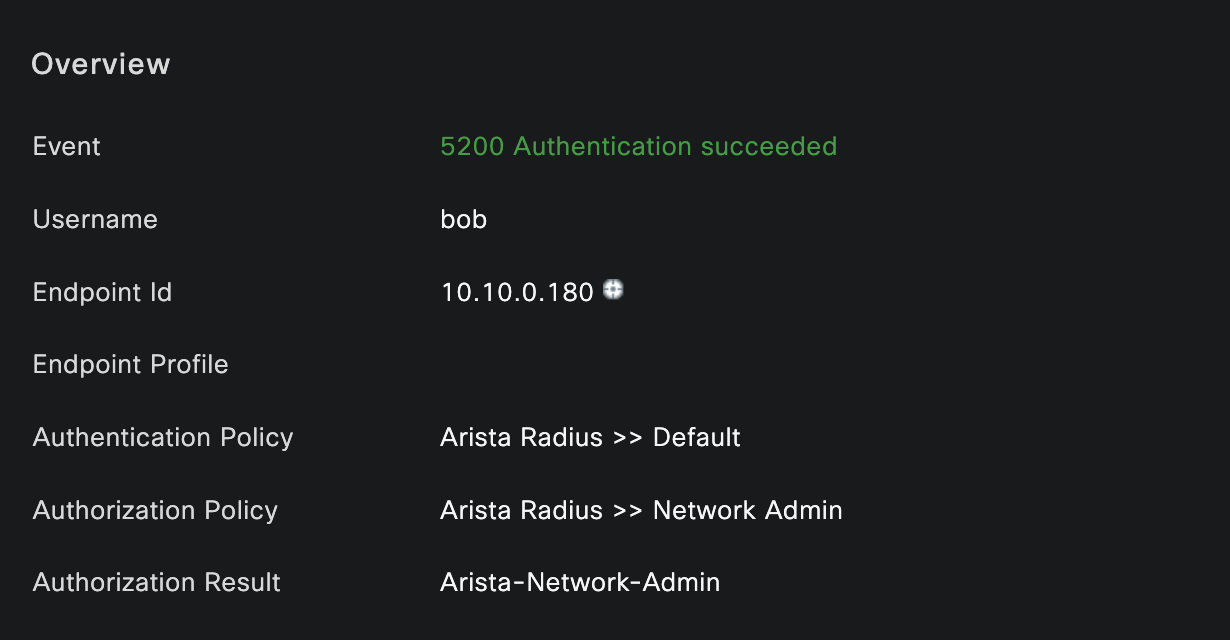
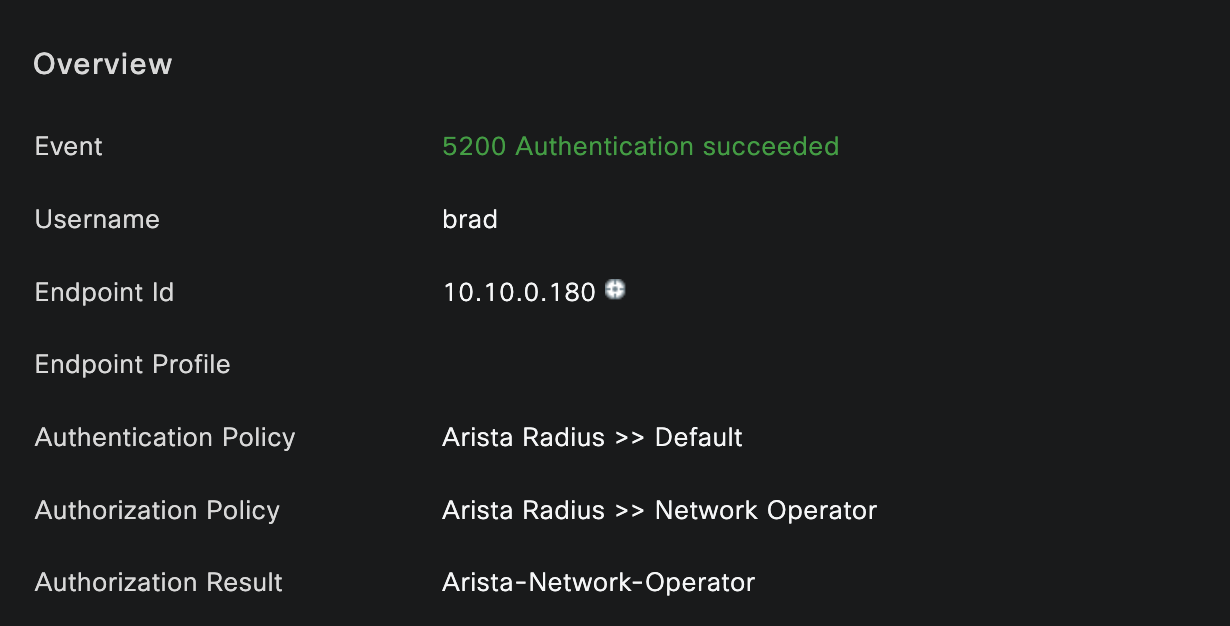
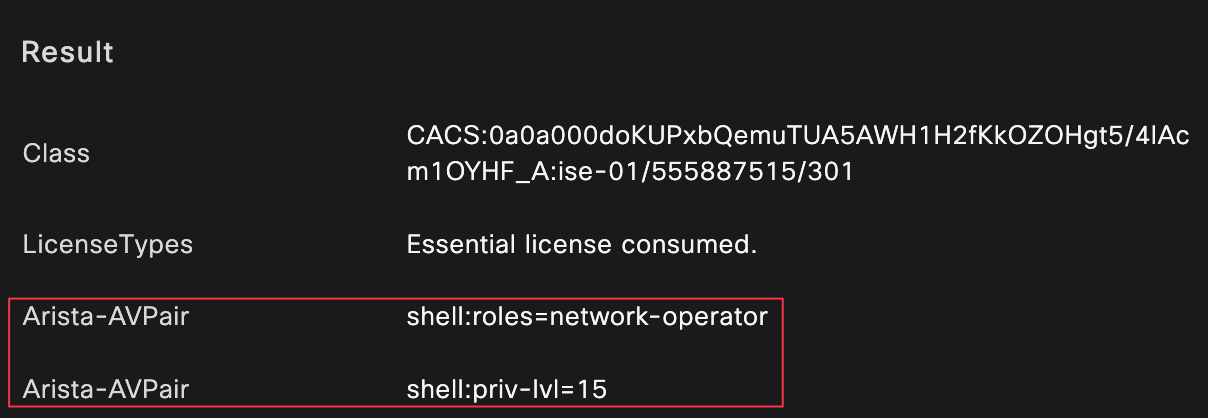
To verify everything is working as expected, you can check the Radius authentication logs in Cisco ISE. Navigate to Operations and look at the Live Logs. Here, you should see successful authentication and authorization events for both users.
I logged in as both bob and brad, and you can clearly see that each user matched the correct authentication and authorization policies, along with the expected authorization profile.
You can also verify this directly from the Arista device. Running the following commands shows which user is logged in and which role has been applied.
access-01#show users detail
Session       Username       Roles               TTY         State       Duration       Auth                       Remote Host
------------- -------------- ------------------- ----------- ----------- -------------- -------------------------- -----------
20            bob            network-admin       vty10       E           0:10:01        group RADIUS-SERVERS       10.10.0.180
access-01#show user detail
Session Username Roles TTY State Duration Auth Remote Host
------------- -------------- ---------------------- ----------- ----------- -------------- -------------------------- -----------
21 brad network-operator vty10 E 0:00:04 group RADIUS-SERVERS 10.10.0.180From the device itself, you can also confirm that the correct permissions are enforced. For example, when logged in as the network operator user and trying to enter configuration mode.
access-01#conf ter
% Authorization denied for command 'configure terminal'
As you can see, the network-operator role does not allow configuration access, which confirms that role-based access control is working as intended.
Using Custom Roles
If you do not want to use the built-in roles, you can create your own custom roles with very specific permissions. This gives you full control over what users are allowed to do on the device. Arista also provides a hardened role that restricts access even further, which is worth checking out if you need tighter controls.
If you look at the built in network-operator role, it already denies some commands such as configure or bash.
role network-operator
   10 deny mode exec command configure|bash|python-shell|\|
   20 permit mode exec command .*
For this example, let’s create a new role that further restricts access by denying copy and write commands. On the Arista device, the role configuration looks like this
role network-operator-hardened
   10 deny mode exec command configure|bash|python-shell|\|
   15 deny mode exec command copy|write
   50 permit mode exec command .*
On the Cisco ISE side, you would create a new authorization profile that references this new role. You then update the authorization policy to include this profile.
Once applied, users in that group will automatically receive the hardened role when they log in.
access-01#show user detail
Session       Username       Roles                           TTY         State       Duration       Auth                       Remote Host
------------- -------------- ------------------------------- ----------- ----------- -------------- -------------------------- -----------
23            brad           network-operator-hardened       vty10       E           0:00:21        group RADIUS-SERVERS       10.10.0.180
access-01#copy run startup-config
% Authorization denied for command 'copy running-config startup-config'
access-01#
access-01#wr
% Authorization denied for command 'write'