
If you manage GlobalProtect VPN certificates on Palo Alto and use Let's Encrypt, at some point you will start thinking about automation. Let's Encrypt certificates have a short lifespan, so renewing them manually every few months isn't really practical. In this post, we will look at automating this process using Ansible, Cloudflare DNS, and the PAN-OS Ansible collection to renew certificates and push them to the firewall.
Prerequisite
Let's say your domain is mydomain.com and it's managed through Cloudflare. You want to generate a certificate for vpn.mydomain.com and have it automatically installed on your Palo Alto firewall as the GlobalProtect portal or gateway certificate, without logging in manually every time it's close to expiry. To do this, you will need:
- Python/Ansible installed
- A domain managed through Cloudflare, so
certbotcan complete the DNS-01 challenge. This doesn't have to be Cloudflare specifically, certbot supports several other DNS providers as well, but this post assumes Cloudflare since that's what we're using here. - A Cloudflare API token with permission to edit DNS records for that zone
- Certbot installed along with the Cloudflare DNS plugin
- Ansible with the
paloaltonetworks.panoscollection installed - An API key from your Palo Alto firewall so Ansible can authenticate and import the certificate
Once these are in place, the playbook manages the rest, from requesting or renewing the certificate to generating the PKCS#12 file and importing it into the firewall. We will be running this from a Linux VM, specifically Ubuntu 22.04, but the steps should work the same on most other Linux distributions with minor adjustments.
What are Let's Encrypt, Certbot, and the DNS Challenge
Let's Encrypt is a free certificate authority that issues SSL/TLS certificates. The catch is that certificates are only valid for 90 days, which is short compared to traditional paid certificates that can last a year or more.
Certbot is the easy-to-use client used to request and renew Let's Encrypt certificates. It manages the entire process of talking to Let's Encrypt, proving domain ownership, and saving the certificate files locally once issued.
To prove that you own a domain, Let's Encrypt needs some form of validation. This is called a challenge. There are a few ways to do this, but in this post we are using the DNS-01 challenge. With this method, certbot creates a specific TXT record in your DNS zone. Let's Encrypt then checks for that record to confirm you have control over the domain. Once validated, it issues the certificate.
The reason we use the DNS challenge here instead of the more common HTTP challenge is that GlobalProtect does not expose a web server on port 80 that certbot could use to validate ownership that way. Since our domain is on Cloudflare, certbot can use the Cloudflare API to create and remove that TXT record automatically, which makes the whole process hands-off.
Cloudflare API Token
To let certbot manage DNS records on your behalf, you need a Cloudflare API token scoped to DNS editing for your zone.
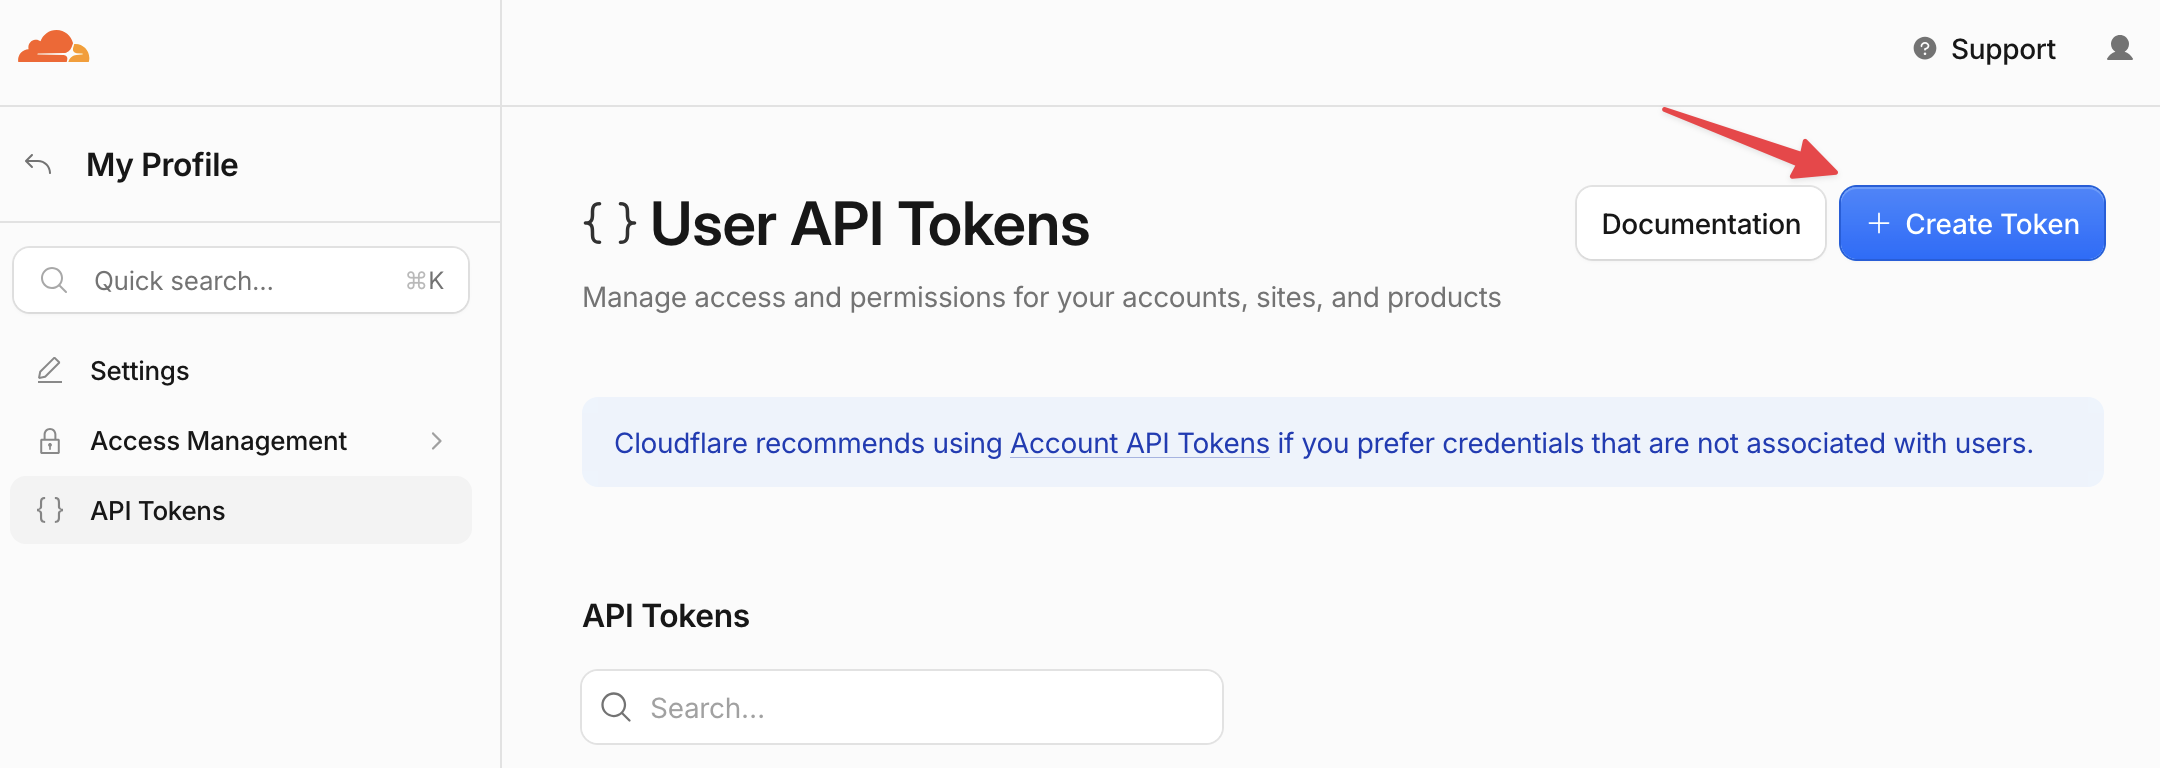
- Log in to Cloudflare and go to My Profile > API Tokens.
- Click Create Token and use the Edit zone DNS template.
- Under Zone Resources, select the specific domain you are using for GlobalProtect.
- Create the token and copy it somewhere safe, since Cloudflare only shows it once.
Once you have the token, create the credentials file that certbot will use.
dns_cloudflare_api_token = your_cloudflare_api_token_here
Save this as .cloudflare.ini in a location of your choice (/home/user/cf/.cloudflare.ini in this example), then lock down the permissions so only your user can read it.
chmod 600 .cloudflare.ini
Palo Alto API Key
Instead of using a full admin account, it's better to create a dedicated admin role with only the permissions needed for this task, then a user tied to that role, and generate the API key from that user.
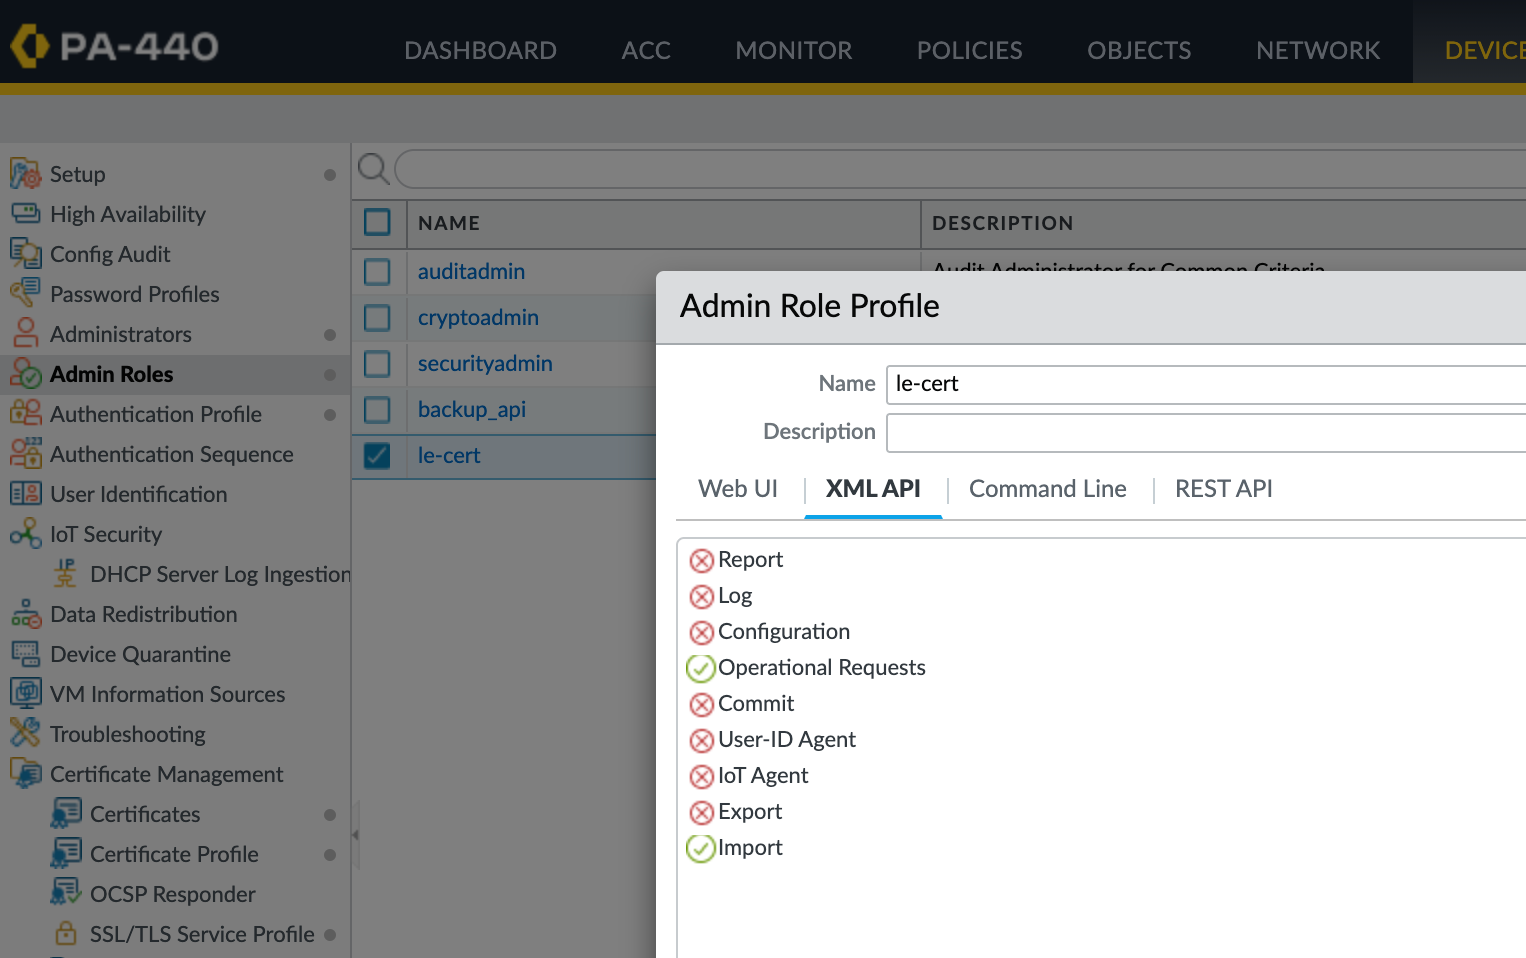
Go to Device > Admin Roles and create a new profile. Under the XML API tab, enable only Operational Requests and Import, and leave everything else disabled.
Next, go to Device > Administrators and create a new admin user. Set the Administrator Type to Role Based and select the profile you just created under Profile.
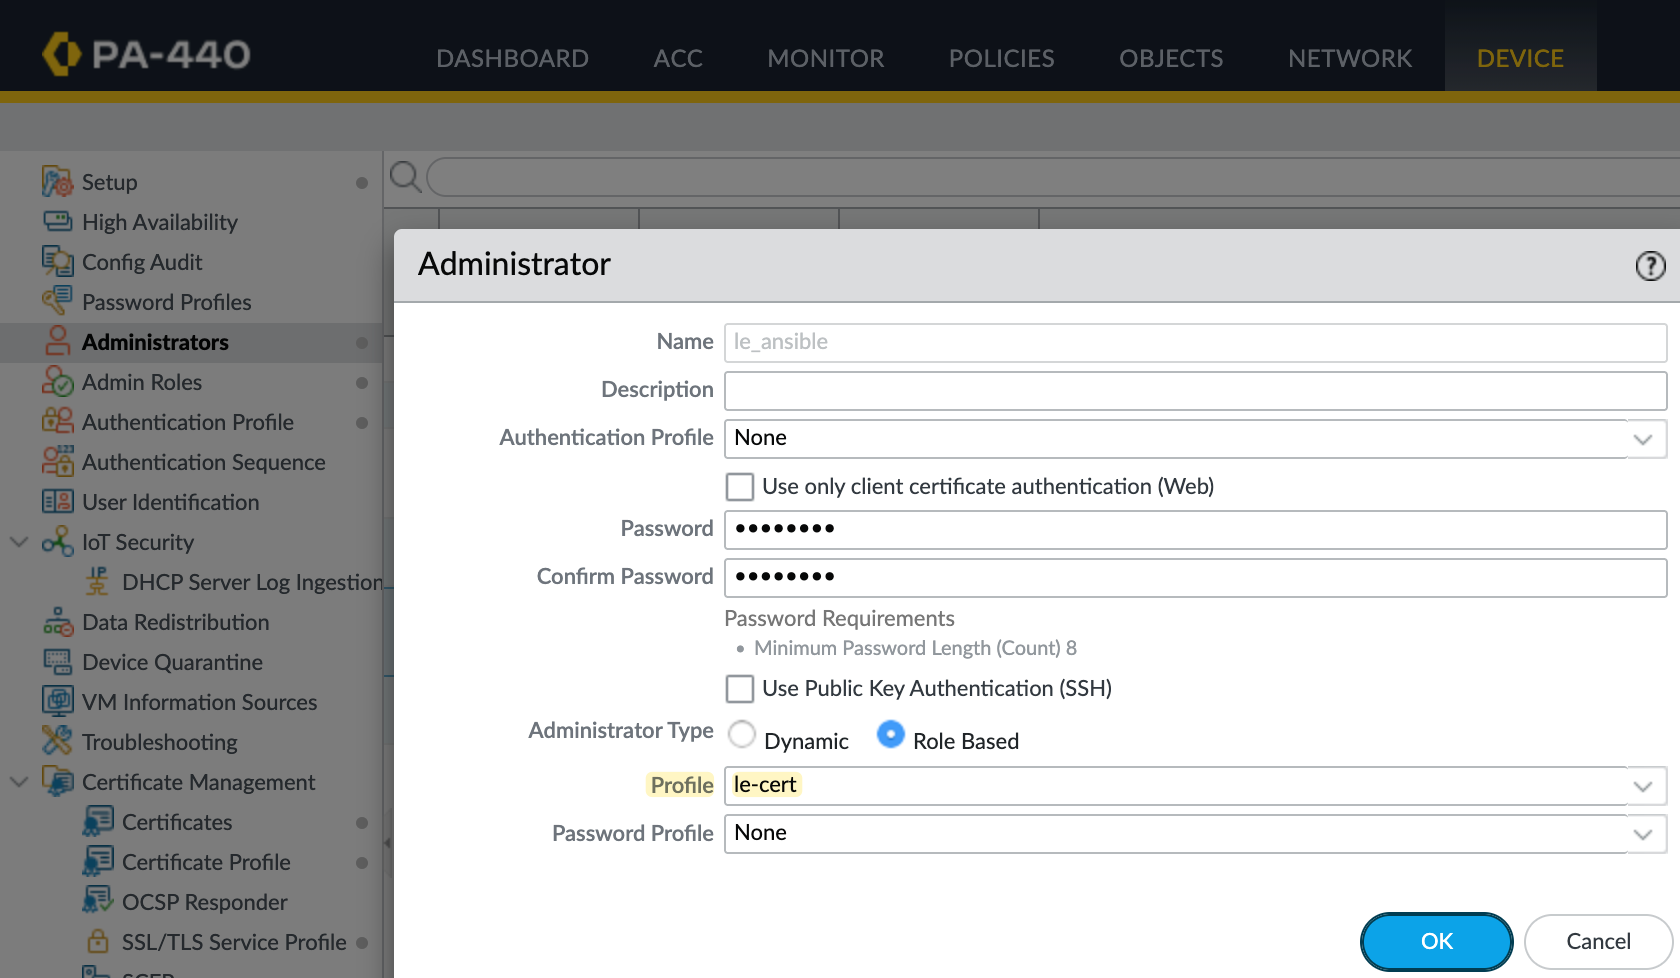
Once the user is created, generate the API key using that account.
curl -k -X GET "https://<firewall_ip>/api/?type=keygen&user=le_ansible&password=<password>"
This returns an XML response containing the key. Copy that key, since this is what gets stored as vault_api_key and referenced in the playbook when authenticating to the firewall. Using a scoped down account like this means the key can only import certificates and run operational requests, nothing else.
Ansible Setup
This post assumes you already have some familiarity with Ansible, so we won't go into the basics of how it works. You can install Ansible using pip or uv.
pip install ansible
uv add ansible
Once Ansible is installed, add the paloaltonetworks.panos collection, which provides the modules used to interact with the firewall.
ansible-galaxy collection install paloaltonetworks.panos
Ansible Vault
Since the playbook needs sensitive values like the Palo Alto API key and the sudo password for the Ansible user, these are stored in an encrypted vault file rather than in plain text. First, create the vault file as shown below.
ansible-vault create my_vault
Inside it, define the variables referenced in the playbook (we will look at the playbook shortly)
vault_api_key: your_palo_alto_api_key
vault_ansible_become_pass: your_sudo_password
The playbook loads this file using vars_files, and pulls in these values wherever vault_api_key and vault_ansible_become_pass are referenced.
Playbook Walkthrough
Now let's go through the playbook itself, task by task.
- name: Palo Alto LE Certificate
  hosts: localhost
  become: yes
  connection: local

  collections:
      - paloaltonetworks.panos

  vars_files:
      - my_vault

  vars:
      domain: vpn.mydomain
      cloudflare_credentials: /home/user/cf/.cloudflare.ini
      certbot_email: user@mydomain
      firewall_ip: "x.x.x.x"
      pan_cert_name: VPN-LE
      output_dir: "{{ lookup('env', 'PWD') }}"
      cert_path: /etc/letsencrypt/live/{{ domain }}
      p12_file: "{{ domain }}.p12"
      install_packages: false
      force_import: false
      ansible_python_interpreter: "{{ playbook_dir }}/venv/bin/python3"
      ansible_become_pass: "{{ vault_ansible_become_pass }}"

  tasks:
      - name: Install required packages
        apt:
            name:
                - openssl
                - certbot
                - python3-certbot-dns-cloudflare
            state: present
            update_cache: yes
        when: install_packages

      - name: Check if certificate already exists
        stat:
            path: "{{ cert_path }}/fullchain.pem"
        register: cert_status

      - name: Obtain new certificate if it doesn't exist
        command: >
            certbot certonly
            --dns-cloudflare
            --dns-cloudflare-credentials {{ cloudflare_credentials }}
            -d {{ domain }}
            -d vpn.internal.mydomain
            -n
            --agree-tos
            --email {{ certbot_email }}
            --no-eff-email
            --quiet
        when: not cert_status.stat.exists

      - name: Renew certificate if it exists
        command: certbot renew --cert-name {{ domain }}
        when: cert_status.stat.exists
        register: renew_result
        changed_when: "'Congratulations' in renew_result.stdout"

      - name: View renewal result
        debug:
            var: renew_result.stdout
        when: cert_status.stat.exists

      - name: Generate PKCS#12 file with random passphrase
        when: (not cert_status.stat.exists) or (renew_result is defined and renew_result.changed) or force_import
        block:
            - name: Generate random passphrase using openssl
              command: openssl rand -base64 18
              register: pkcs12_pass_cmd
              changed_when: false

            - name: Set passphrase fact
              set_fact:
                  pkcs12_pass: "{{ pkcs12_pass_cmd.stdout }}"

            - name: Create PKCS#12 file in current directory
              command: >
                  openssl pkcs12 -export
                  -in {{ cert_path }}/cert.pem
                  -inkey {{ cert_path }}/privkey.pem
                  -out {{ output_dir }}/{{ p12_file }}
                  -name {{ domain }}
                  -passout pass:{{ pkcs12_pass }}

            - name: Change ownership of PKCS#12 file to user
              file:
                  path: "{{ output_dir }}/{{ p12_file }}"
                  owner: user
                  group: user
                  mode: "0600"

            - name: Show generated passphrase
              debug:
                  msg: "PKCS#12 password: {{ pkcs12_pass }}"

      - name: Import certificate
        when: (not cert_status.stat.exists) or (renew_result is defined and renew_result.changed) or force_import
        vars:
            device:
                ip_address: "{{ firewall_ip }}"
                api_key: "{{ vault_api_key }}"
        paloaltonetworks.panos.panos_import:
            provider: "{{ device }}"
            category: "keypair"
            certificate_name: "{{ pan_cert_name }}"
            format: "pkcs12"
            filename: "{{ output_dir }}/{{ p12_file }}"
            passphrase: "{{ pkcs12_pass }}"

      - name: Delete PKCS#12
        file:
            path: "{{ output_dir }}/{{ p12_file }}"
            state: absent
The play targets localhost since certbot and the Ansible modules run locally, not on the firewall itself. become: yes is needed because certbot writes to /etc/letsencrypt, which requires root. The vars file loads our vault, and the vars block defines the domain, Cloudflare credentials path, certbot email, firewall IP, certificate name on the firewall, and a few other paths and flags used throughout the playbook.
The first task installs the required packages, openssl, certbot, and the Cloudflare DNS plugin for certbot. This only runs if install_packages is set to true, so once your environment is set up, you can leave this disabled on future runs.
The second task checks whether a certificate already exists for the domain by looking for fullchain.pem in the expected certbot directory. The result of this check decides whether the playbook obtains a new certificate or renews an existing one.
If no certificate exists, the playbook obtains a new one using certbot with the Cloudflare DNS plugin. In certbot, -d specifies a domain name to include on the certificate, and you can pass it multiple times to get a single certificate that covers several names.
In this playbook, {{ domain }} is your main public name, vpn.mydomain. The second -d vpn.internal.mydomain adds an internal name as a Subject Alternative Name, or SAN, on the same certificate. The reason for this is that if you also have an internal gateway or portal that clients reach using an internal hostname, you will need that name included as a SAN too, otherwise clients connecting to the internal address will get a certificate mismatch warning, since the certificate would only be valid for the public name.
Moving on, if a certificate already exists, the playbook runs certbot renew instead, scoped to that specific certificate name.
Since certbot renew always exits successfully even if no renewal actually happened, the playbook checks the output for the word "Congratulations" to determine if a renewal actually occurred. This result is then displayed so you can see what certbot did.
Why We Generate a Passphrase?
You might be wondering what the passphrase is for in the PKCS#12 generation step. A PKCS#12 file bundles the certificate and private key together into a single file, and that private key needs to be protected. Instead of using a fixed or manually chosen passphrase, the playbook generates a random one each time using openssl rand -base64 18, then uses it to encrypt the PKCS#12 file.
This passphrase is only needed briefly, to protect the file while it's being handed over to Palo Alto during the import. The same passphrase is passed to the panos_import task so the firewall can decrypt the file and pull out the certificate and key. Once the import is done, the playbook deletes the local PKCS#12 file anyway, so there's no need to remember or store the passphrase long term, it's generated fresh on every run.
Running the Playbook
To run the playbook normally, use:
ansible-playbook le.yml --ask-vault-pass
On each run, certbot checks if the certificate is due for renewal, which by default is within 30 days of expiry. If it's not due yet, the PKCS#12 generation and Palo Alto import steps are skipped automatically, so the run is effectively a no-op until renewal is actually needed.
Forcing an Import
There are cases where you want to import the current certificate into Palo Alto without waiting for an actual renewal, for example, right after adding a new SAN to the certificate. You can do this by setting force_import to true:
ansible-playbook le.yml --ask-vault-pass -e force_import=true
This skips the renewal check and pushes whatever certificate currently exists on disk straight to the firewall. This is useful in situations where certbot successfully renews the certificate, but the import into Palo Alto fails for some reason, maybe the firewall was unreachable, or the API key had expired. If you run the playbook again normally, certbot will see that the certificate isn't due for renewal yet, since it just renewed, and skip straight past the renewal and import steps entirely. Setting force_import=true lets you bypass that and push the existing certificate to the firewall without waiting for the next renewal window, which could be weeks away.
Adding a SAN
If you need to add another domain to the certificate later, for example, an internal hostname, you first need to expand the existing certificate manually.
sudo certbot certonly --expand \
  --dns-cloudflare \
  --dns-cloudflare-credentials {{ cloudflare_credentials }} \
  -d {{ domain }} \
  -d vpn.internal.mydomain
Once that's done, add the new -d entry to the certbot certonly command inside the playbook itself, so future renewals include the same SAN. Then run the playbook with force_import=true to push the updated certificate to Palo Alto straight away. From that point on, renewals will automatically include all the SANs on the certificate.
Known Issue - Incomplete Certificate Chain
After importing, you may notice a warning on the firewall along the lines of:
Warning: cannot find complete certificate chain for certificate VPN-LE
This happens because the PKCS#12 file is built using cert.pem, which only contains the leaf certificate, not the intermediate CA certificates that Let's Encrypt uses to chain up to the root. Right now, the playbook doesn't import those intermediates, so the firewall can't validate the full chain.
This is something I plan to address by extending the playbook to import the intermediate certificates from fullchain.pem separately, using fixed object names so they get overwritten on each renewal rather than piling up. Since Let's Encrypt rotates its intermediates from time to time, this needs to happen automatically as part of the renewal process rather than being a one-off fix.
Automating the Renewal with Cron
Running the playbook manually defeats the point of automating this in the first place, so the last step is to schedule it to run on its own. That said, if this is running in your home lab, you could also just run it manually every month or so. It's not ideal, but it works if you don't want to deal with cron.
Since --ask-vault-pass requires interactive input, that won't work in a cron job. Instead, save your vault password in a file and point Ansible to it at runtime. Create the password file and lock down its permissions:
echo "your_vault_password" > ~/.vault_pass
chmod 600 ~/.vault_pass
Then open your crontab:
crontab -e
Add a line to run the playbook, for example once a day at 2 AM:
0 2 * * * cd /home/user/le_cert_ansible && /usr/bin/ansible-playbook le.yml --vault-password-file ~/.vault_pass >> /home/user/le_cert_ansible/cron.log 2>&1
This runs the playbook daily, logs the output to cron.log so you can check on it later, and relies on the vault password file instead of prompting interactively. Since certbot only renews when the certificate is within 30 days of expiry, running this daily is safe, most runs will simply do nothing until renewal is actually due.
Closing Up
That's pretty much it for this post. This setup isn't perfect, the intermediate certificate chain issue is still on my list to fix, but it gets the job done and saves you from manually renewing and importing certificates every few months.
Feel free to tweak this to suit your own environment. For example, you could extend the playbook to handle separate certificates for the portal and gateway if you run them on different hostnames, or adjust the renewal schedule to suit how often you want it to check. As always, take what's useful here and adapt it to your own setup.
Reference
Thanks to https://github.com/psiri/letsencrypt_paloalto, I got most of the idea for this playbook from that repo, so kudos to the author for putting this together.