

What if I told you that all it takes to build a simple BGP lab with two eBGP peers (or even a hundred, for that matter) is a single YAML file? No need to add nodes on a GUI, connect links, or configure interface IPs manually. You just define the lab in a YAML file as shown below, and in about two minutes, you’ll have two routers of your choice fully configured with BGP and an established eBGP session.
provider: clab
defaults.device: eos
defaults.devices.eos.clab.image: ceos:4.34.2

addressing:
  mgmt:
    ipv4: 192.168.200.0/24

nodes:
  - name: r1
    module: [ bgp ]
  - name: r2
    module: [ bgp ]

bgp:
  as_list:
    100:
      members: [ r1]
    200:
      members: [ r2 ]

links:
  - r1-r2
r1#show ip bgp summary
BGP summary information for VRF default
Router identifier 10.0.0.1, local AS number 100
Neighbor Status Codes: m - Under maintenance
Description Neighbor V AS MsgRcvd MsgSent InQ OutQ Up/Down State PfxRcd PfxAcc PfxAdv
r2 10.1.0.2 4 200 5 5 0 0 00:00:15 Estab 1 1 1r2#show ip bgp summary
BGP summary information for VRF default
Router identifier 10.0.0.2, local AS number 200
Neighbor Status Codes: m - Under maintenance
Description Neighbor V AS MsgRcvd MsgSent InQ OutQ Up/Down State PfxRcd PfxAcc PfxAdv
r1 10.1.0.1 4 100 5 5 0 0 00:00:37 Estab 1 1 1That’s how easy it is with Netlab. You focus on what you want to test or learn, and Netlab takes care of everything else.
What Exactly is Netlab?
Netlab is an open source tool that automates the creation and configuration of network labs. Instead of manually building topologies and configuring devices, you define your lab in a simple YAML file, and Netlab takes care of deploying everything from IP addressing to routing protocols and custom configurations. It works with different backends like containerlab and Vagrant, making it flexible and easy to reproduce.
I’ve already covered Netlab in detail, including the setup and installation steps, in the blog post linked below.
When using Netlab, it still relies on Containerlab (or Vagrant) to bring up the nodes, so you’ll need Containerlab installed. When you install Netlab, it can also install Containerlab for you, so you don’t have to install them separately.
So, moving forward, I’ll assume you already have Netlab installed and ready to use. You should also have at least a couple of network images available, like Cisco or Arista, in your Netlab setup. This will let you follow along and bring up the BGP lab without any extra setup steps.
Who Is It For?
This post is for people who are already familiar with BGP and want to skip the repetitive setup work. If you know how to configure BGP and simply want a quick way to build a lab for testing specific features, Netlab is perfect for that.
For example, if you want to experiment with BGP path attributes like weight, local preference, or AS path prepending, Netlab can manage all the base configuration for you so you can focus on the actual testing.
If you’re new to BGP or haven’t configured it before, this might not be the right starting point. You’ll first need to understand the basics of how BGP works and how to configure it manually.
Prerequisites
To follow along with this lab, you’ll need a few things in place.
- A Linux host (I’m using Ubuntu 22.04 as a VM)
- At least 4 CPU cores and 16 GB of RAM
- Netlab and Containerlab installed (version 25.10 as of writing this post)
- Network images such as Cisco or Arista
I’ve already covered most of these setup steps in the blog post linked above, so feel free to check that out if you need help getting started. I also covered how to use Cisco IOL images with Containerlab in the blog post linked below.

A Simple BGP Lab
Let’s revisit the simple lab with two routers we saw earlier. In this example, we start by defining which image (Arista cEOS in this example) to use for our devices and setting a management network for them.
At a high level, the way you use Netlab is simple. You create a topology.yml file that defines your lab, then run a single command netlab up. Within a few minutes, the containers come up, and Netlab automatically pushes the required configurations using Ansible.
provider: clab
defaults.device: eos
defaults.devices.eos.clab.image: ceos:4.34.2

addressing:
  mgmt:
    ipv4: 192.168.200.0/24

nodes:
  - name: r1
    module: [ bgp ]
  - name: r2
    module: [ bgp ]

bgp:
  as_list:
    100:
      members: [ r1]
    200:
      members: [ r2 ]

links:
- r1-r2- Provider and defaults - We’re using
clab(containerlab) as the provider and specifying Arista cEOS as the default device image. - Addressing - Defines the management network (
192.168.200.0/24) that Netlab uses to assign management IP addresses to the devices. - Nodes - Creates two routers,
r1andr2, both using thebgpmodule. This tells Netlab to automatically configure BGP on them. - BGP section - Assigns AS numbers,
r1belongs to AS 100 andr2to AS 200. - Links - Defines a single physical connection between
r1andr2.
That’s all that’s needed. Netlab takes this YAML file, deploys the devices in Containerlab, and once the routers are up, it automatically pushes all the required configurations like interface IPs and BGP. Within a couple of minutes, you’ll have a working eBGP lab without touching the CLI.
r1#show run | sec bgp
router bgp 100
   router-id 10.0.0.1
   no bgp default ipv4-unicast
   bgp advertise-inactive
   neighbor 10.1.0.2 remote-as 200
   neighbor 10.1.0.2 description r2
   neighbor 10.1.0.2 send-community standard large
   !
   address-family ipv4
      neighbor 10.1.0.2 activate
      network 10.0.0.1/32
r2#show run | sec bgp
router bgp 200
router-id 10.0.0.2
no bgp default ipv4-unicast
bgp advertise-inactive
neighbor 10.1.0.1 remote-as 100
neighbor 10.1.0.1 description r1
neighbor 10.1.0.1 send-community standard large
!
address-family ipv4
neighbor 10.1.0.1 activate
network 10.0.0.2/32Please note, if you’ve never configured BGP before, this might not be the best place to start. You still need to understand the basics like setting interface IPs and bringing up BGP neighbors.
This setup is meant for those who already know how BGP works and just want a quick lab to test specific scenarios, such as path attributes or policy behaviour, without spending time building everything from scratch.
Changing Vendors
Remember, I mentioned that Netlab is flexible. What I meant is that you can easily switch to a different vendor whenever you need. For example, if you want to use Cisco instead of Arista, all you have to do is update the image section at the top of the YAML file.
provider: clab
defaults.device: iol
defaults.devices.iol.clab.image: iol:17.12.01
Just change the defaults to use the Cisco image, and Netlab will build the same lab using Cisco routers instead. Everything else in the YAML stays the same.
Customize IP Addressing
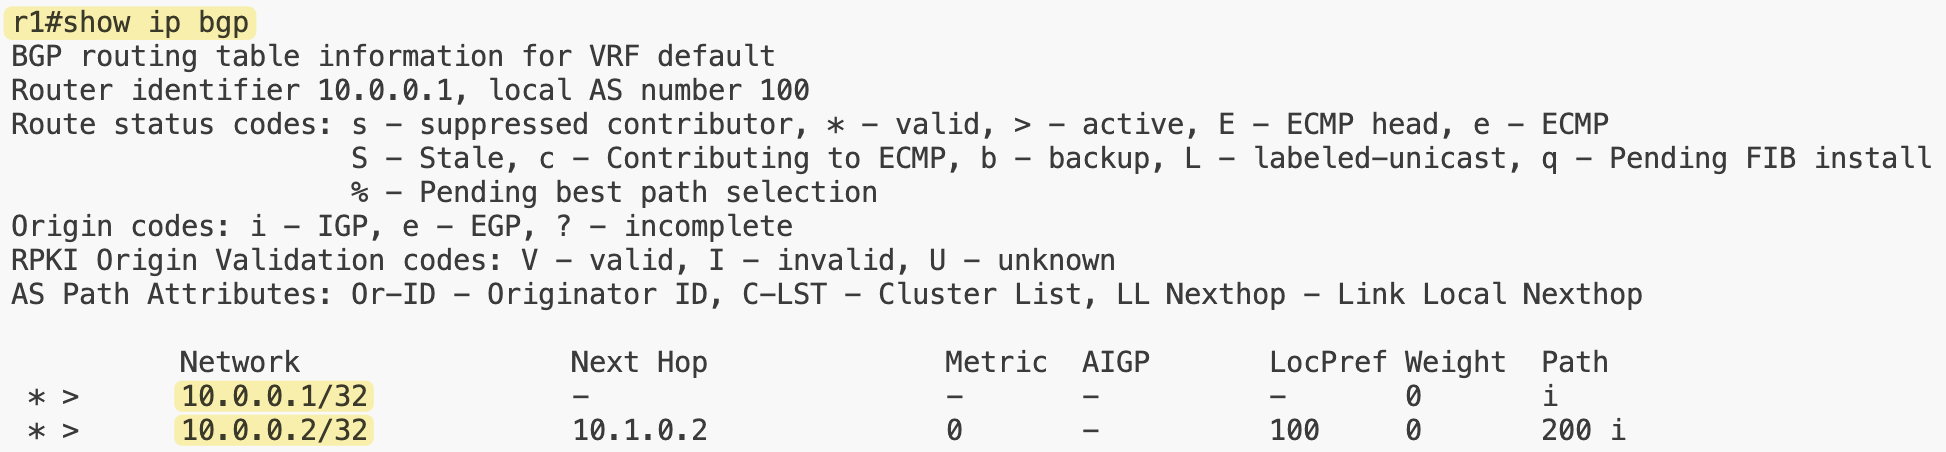
If we look at the IP addresses that Netlab assigned to r1, we can see the management IP 192.168.200.x as expected.
- for the physical link, it used
10.1.0.1/30 - for the loopback,
10.0.0.1/32.

We can also see that the loopback address is being advertised to the BGP peer.
Netlab comes with a few built-in address pools, as shown here.
l2only: {}
lan:
  ipv4: 172.16.0.0/16
  prefix: 24
loopback:
  ipv4: 10.0.0.0/24
  prefix: 32
mgmt:
  ipv4: 192.168.121.0/24
  mac: 08-4F-A9-00-00-00
  prefix: 24
  start: 100
p2p:
  ipv4: 10.1.0.0/16
  prefix: 30
router_id:
  ipv4: 10.0.0.0/24
  prefix: 32
vrf_loopback:
  ipv4: 10.2.0.0/24
  prefix: 32
So, that’s where the p2p and loopback IPs came from. In most cases, you don’t need to worry about it since Netlab manages addressing automatically. But if you want predictable IP assignments or prefer to use your own addressing scheme, you can easily override these defaults.
Three Node BGP Lab with Customized IP Addressing
In this example, we made a few changes to make the lab a bit more customized.
provider: clab
defaults.device: eos
defaults.devices.eos.clab.image: ceos:4.34.2

addressing:
  mgmt:
    ipv4: 192.168.200.0/24
  p2p:
    ipv4: 172.16.1.0/24
    prefix: 31
  loopback:
    ipv4: 10.100.100.0/24
    prefix: 32

nodes:
  - name: r1
    module: [ bgp ]
  - name: r2
    module: [ bgp ]
  - name: r3
    loopback:
      ipv4: 3.3.3.3/32
    module: [ bgp ]

bgp:
  advertise_loopback: false
  as_list:
    100:
      members: [ r1]
    200:
      members: [ r2 ]
    300:
      members: [ r3 ]

links:
  - r1-r2
  - prefix: 172.30.1.0/31
    r2:
    r3:
  - prefix: 100.100.100.0/24
    r3:
First, we added a third router, r3. We also defined our own IP ranges for the point-to-point and loopback subnets instead of using the default Netlab pools. We’re using 172.16.1.0/24 for p2p links (with /31 mask for each p2p) and 10.100.100.0/24 for loopback (with /32 mask)

At the device level, we can override values if needed. Here, r3 has a custom loopback address of 3.3.3.3/32 instead of pulling one from the loopback pool. For the links, the first one between r1 and r2 doesn’t specify any IPs, so Netlab automatically assigns them from the p2p pool we defined. The link between r2 and r3 uses a custom prefix, 172.30.1.0/31, to show that we can set our own addressing when needed.

We also added a stub network for r3 with the prefix 100.100.100.0/24. The expectation here is that this prefix will be advertised through BGP and visible on r1’s routing table.
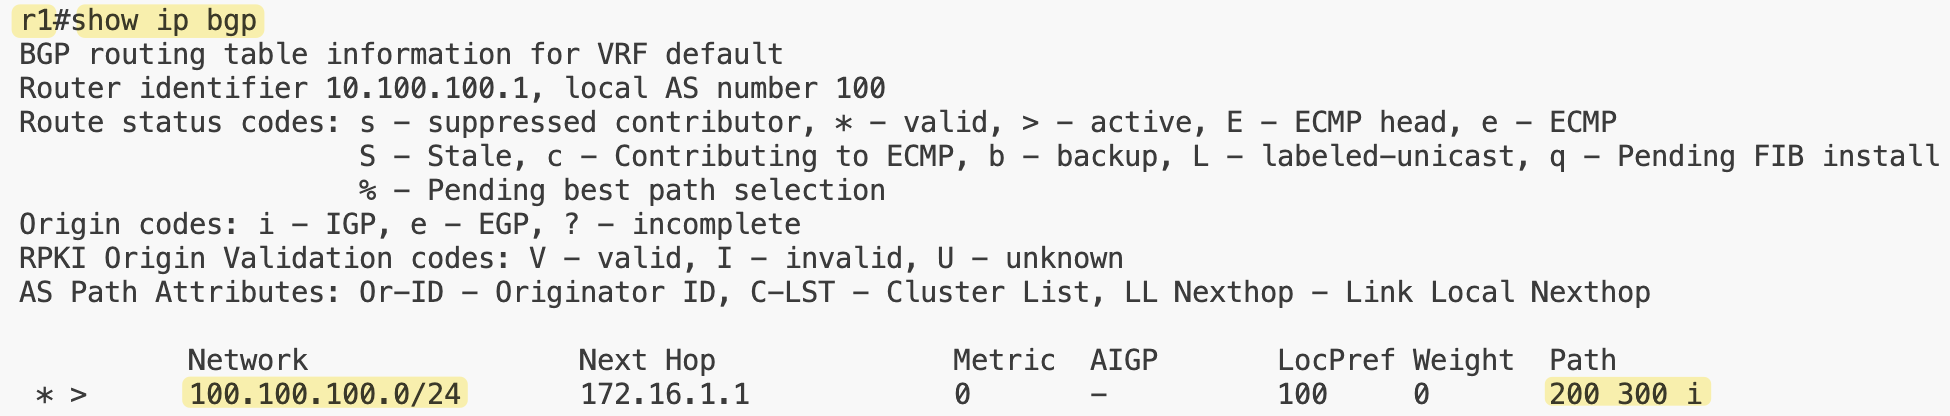
Finally, we set advertise_loopback to false, meaning the routers won’t automatically advertise their loopback interfaces into BGP.
iBGP and OSPF
iBGP requires a full mesh between all routers in the same autonomous system, so in most networks, you’d run an IGP like OSPF within the AS to provide connectivity. Netlab automatically creates a full mesh of iBGP sessions for routers in the same AS and expects you to include an IGP module as well. If you don’t, you’ll see a warning when you run netlab up.
provider: clab
defaults.device: iol
defaults.devices.iol.clab.image: iol:17.12.01
addressing:
mgmt:
ipv4: 192.168.200.0/24
p2p:
ipv4: 172.16.1.0/24
prefix: 30
nodes:
- name: r1
module: [ ospf, bgp ]
- name: r2
module: [ ospf, bgp ]
- name: r3
module: [ ospf, bgp ]
- name: r4
module: [ bgp ]
- name: r5
module: [ bgp ]
bgp:
advertise_loopback: false
as_list:
100:
members: [ r1, r2, r3 ]
200:
members: [ r4 ]
300:
members: [ r5 ]
links:
- r1
- r1-r2
- r1-r3
- r2-r3
- r2-r4
- r3-r4
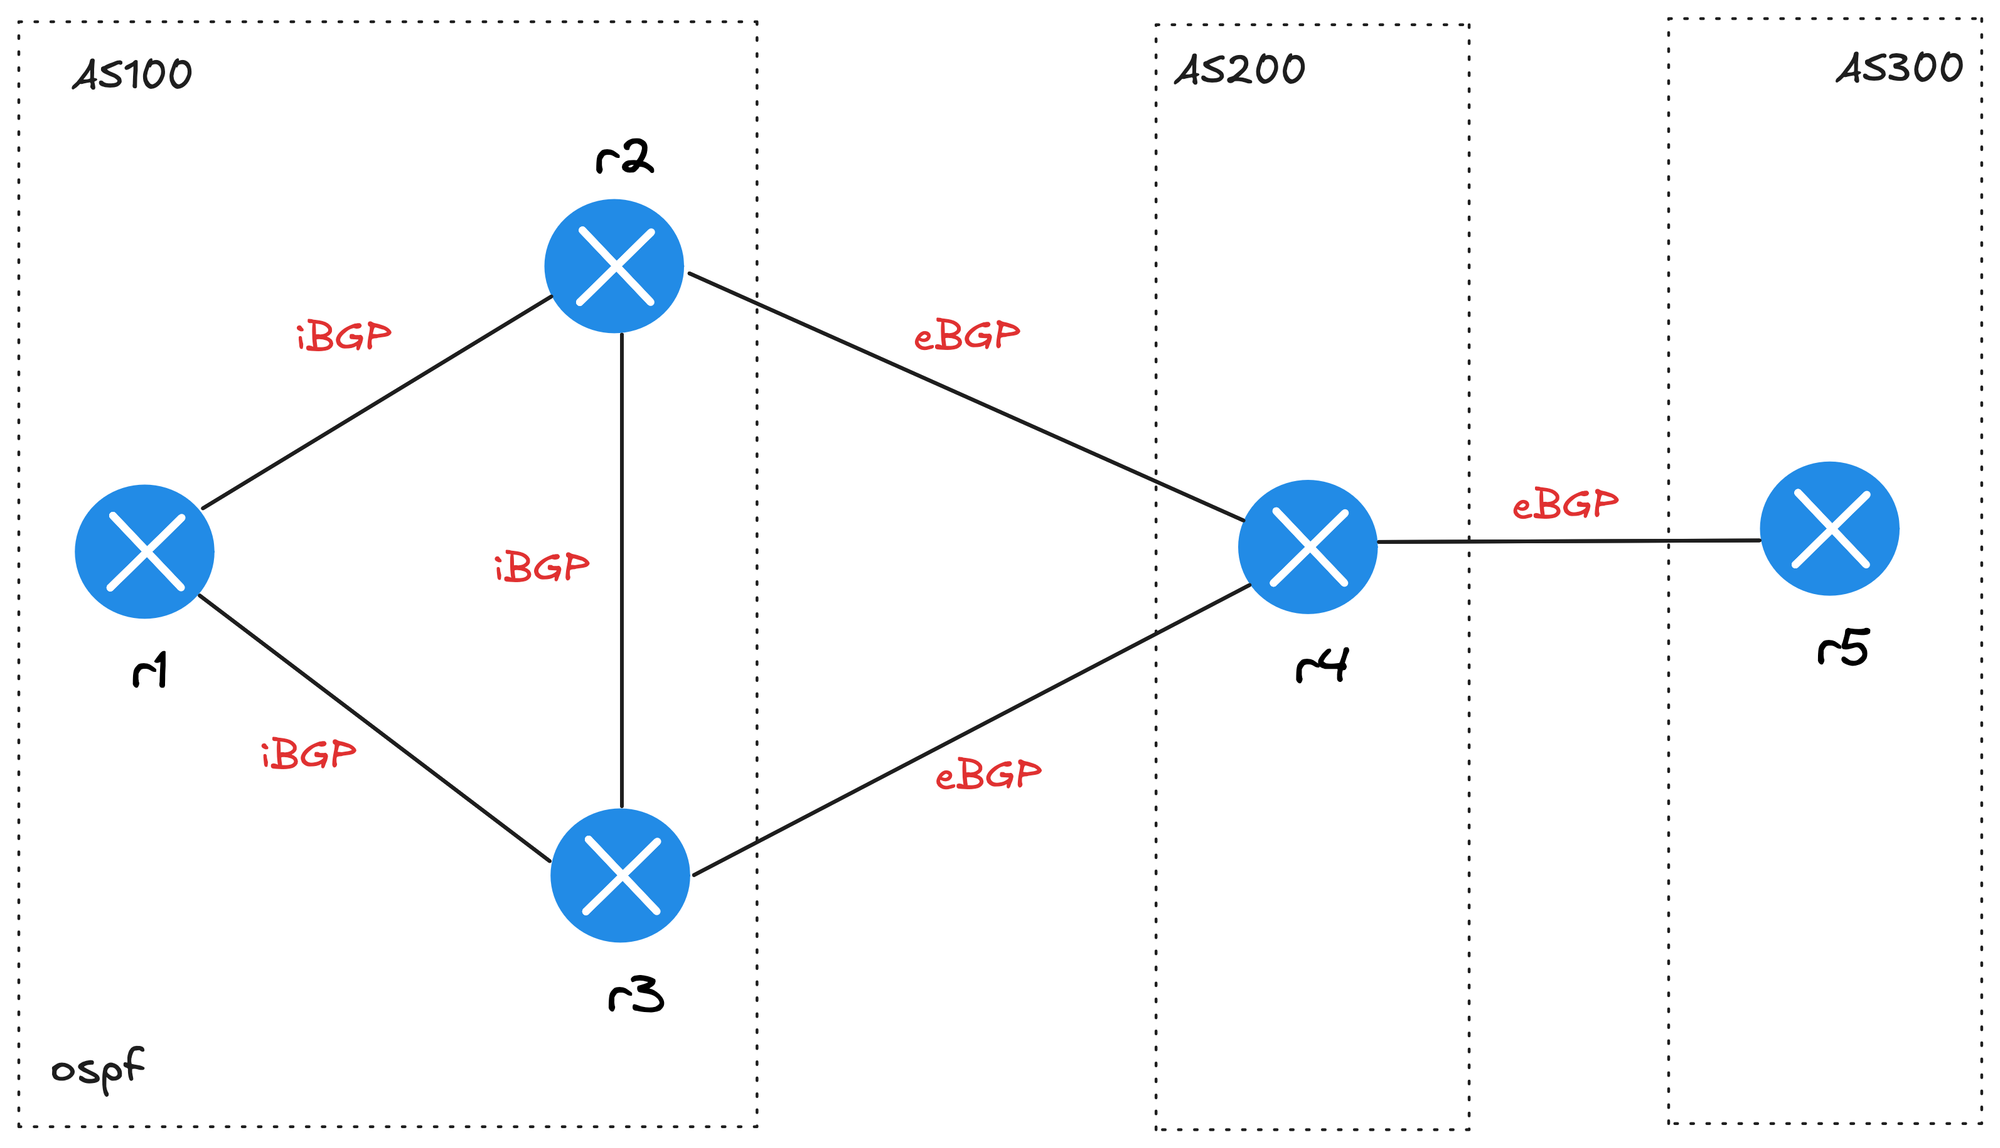
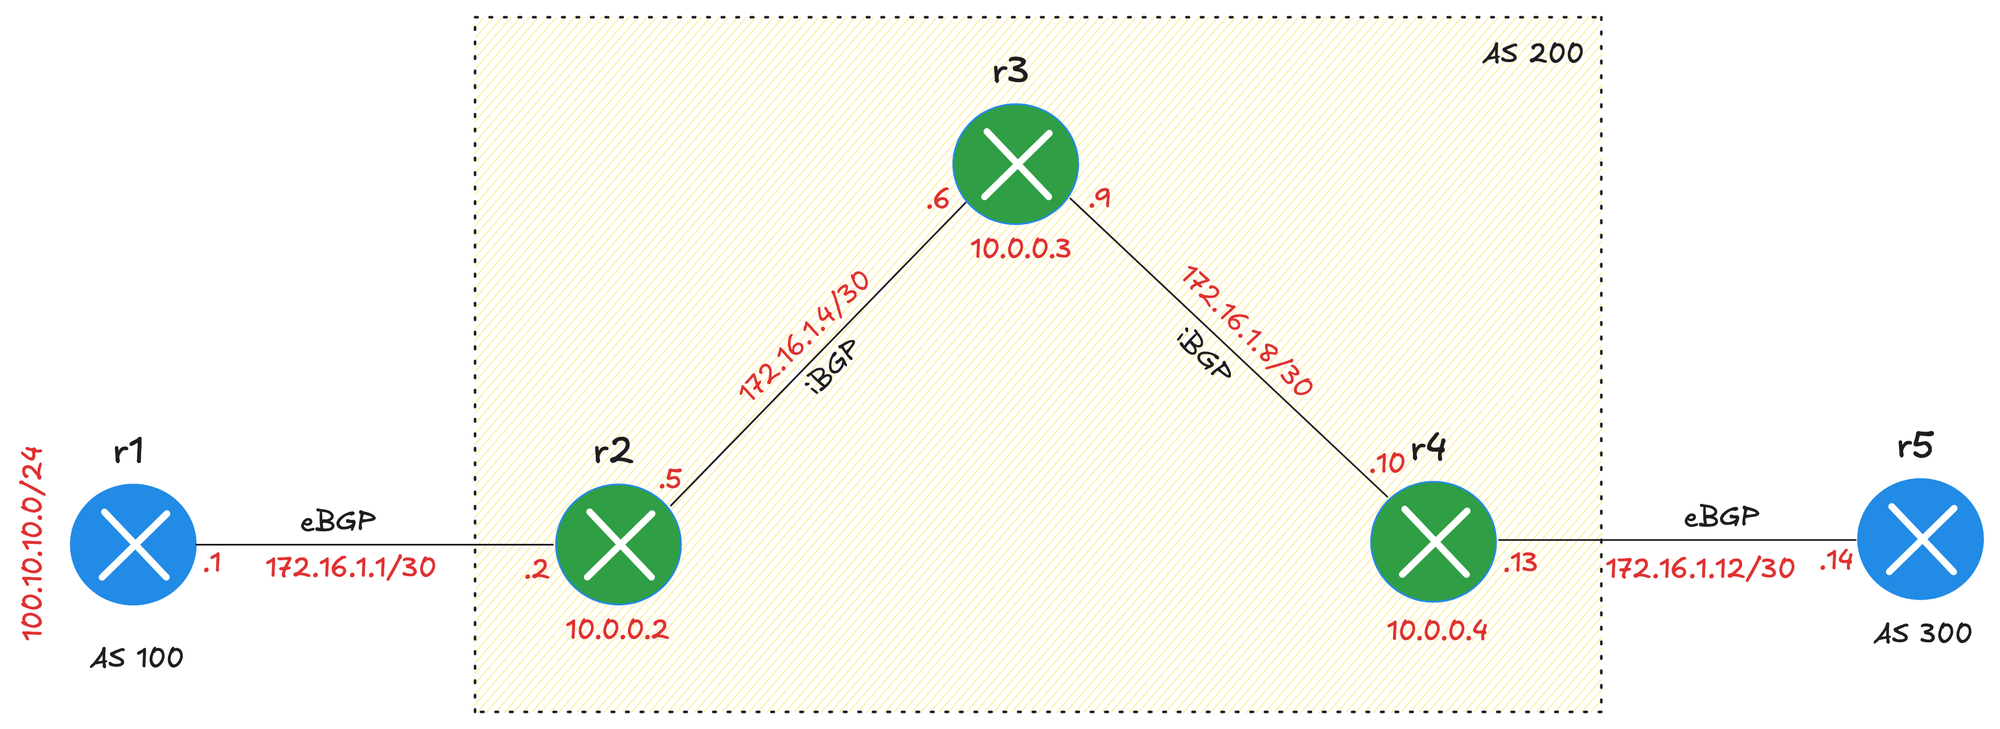
- r4-r5In this example, we’re using OSPF inside AS 100 with routers r1, r2, and r3. Routers r4 and r5 belong to different ASNs and connect externally through eBGP. We’re using default settings to keep the topology file simple, but it still builds a realistic multi-AS lab with both iBGP and eBGP sessions.

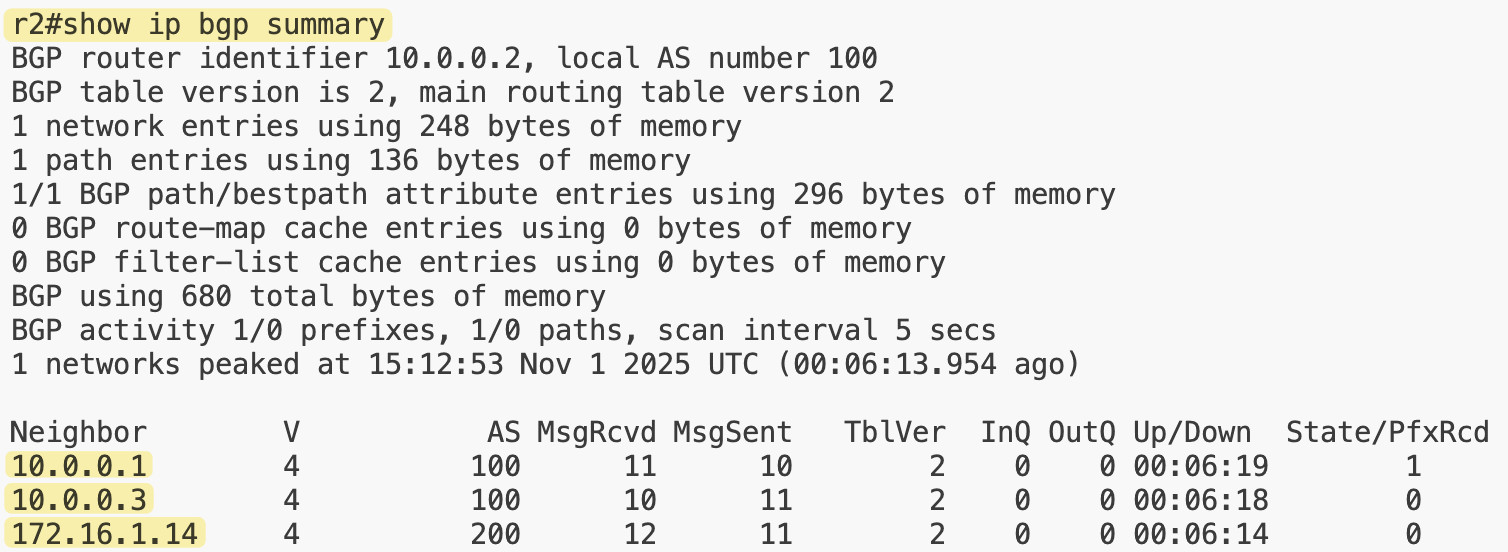
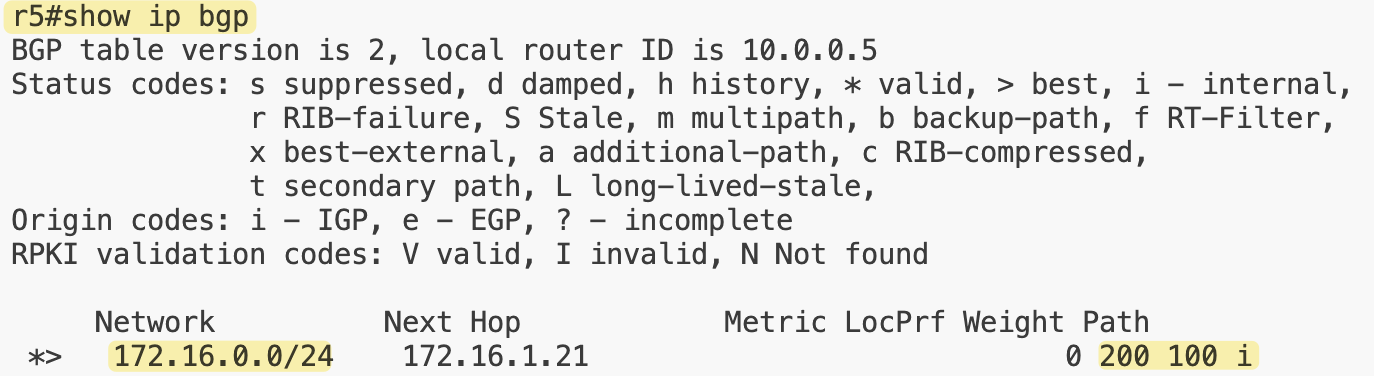
Here on r2, we can see two iBGP sessions with r1 and r3, and one eBGP session with r4. On r5, we can also see the stub route that originates on r1 being advertised and learned through BGP.
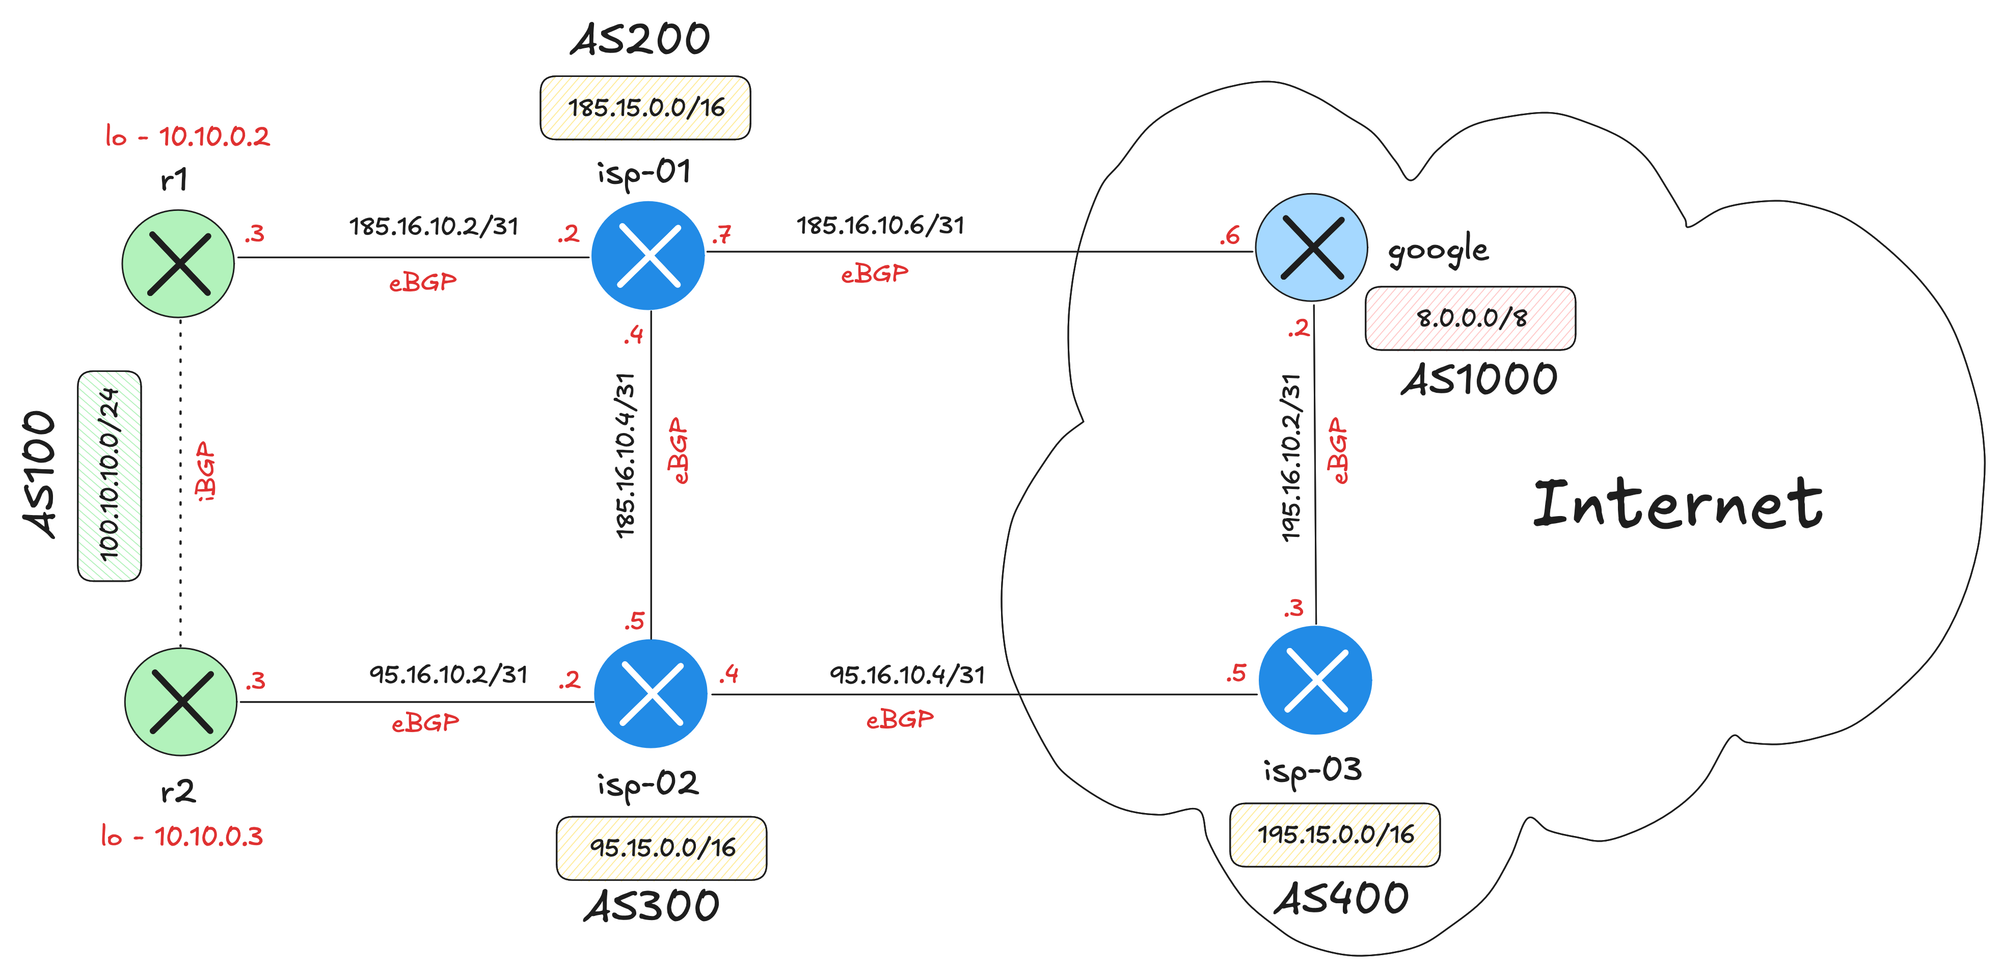
BGP Multi-Homed Lab
Let’s take this a step further and build a multi-homed BGP lab that connects to two ISPs using two routers.
provider: clab
plugin: [ files ]
defaults.device: iol
defaults.devices.iol.clab.image: iol:17.12.01
defaults.devices.ioll2.clab.image: ioll2:iol-l2-17.12.01
addressing:
mgmt:
ipv4: 192.168.200.0/24
nodes:
- name: host1
id: 150
image: alpine:latest
device: linux
config.inline: |
ip route add 8.0.0.0/8 via 100.10.10.1 dev eth1
ip route add 185.15.0.0/16 via 100.10.10.1 dev eth1
ip route add 95.15.0.0/16 via 100.10.10.1 dev eth1
ip route add 195.15.0.0/16 via 100.10.10.1 dev eth1
- name: sw1
device: ioll2
role: bridge
- name: r1
id: 2
module: [ gateway, bgp, ospf ]
- name: r2
id: 3
module: [ gateway, bgp, ospf ]
- name: isp-01
module: [ bgp ]
- name: isp-02
module: [ bgp ]
- name: isp-03
module: [ bgp ]
- name: google
module: [ bgp ]
gateway:
protocol: vrrp
id: 1
bgp:
advertise_loopback: false
community: []
as_list:
100:
members: [ r1, r2 ]
200:
members: [ isp-01 ]
300:
members: [ isp-02 ]
400:
members: [ isp-03 ]
1000:
members: [ google ]
links:
- bridge: sw1
prefix: 100.10.10.0/24
host1:
r1:
gateway.vrrp.group: 1
gateway.vrrp.priority: 110
bgp:
advertise: true
r2:
gateway.vrrp.group: 1
gateway.vrrp.priority: 100
bgp:
advertise: true
- prefix: 172.18.1.0/31
r1:
r2:
- prefix: 185.16.10.2/31
r1:
isp-01:
- prefix: 95.16.10.2/31
r2:
isp-02:
- prefix: 185.16.10.4/31
isp-01:
isp-02:
- prefix: 185.16.10.6/31
isp-01:
google:
- prefix: 95.16.10.4/31
isp-02:
isp-03:
- prefix: 195.16.10.2/31
isp-03:
google:
- prefix: 185.15.0.0/16
isp-01:
- prefix: 95.15.0.0/16
isp-02:
- prefix: 195.15.0.0/16
isp-03:
- prefix: 8.0.0.0/8
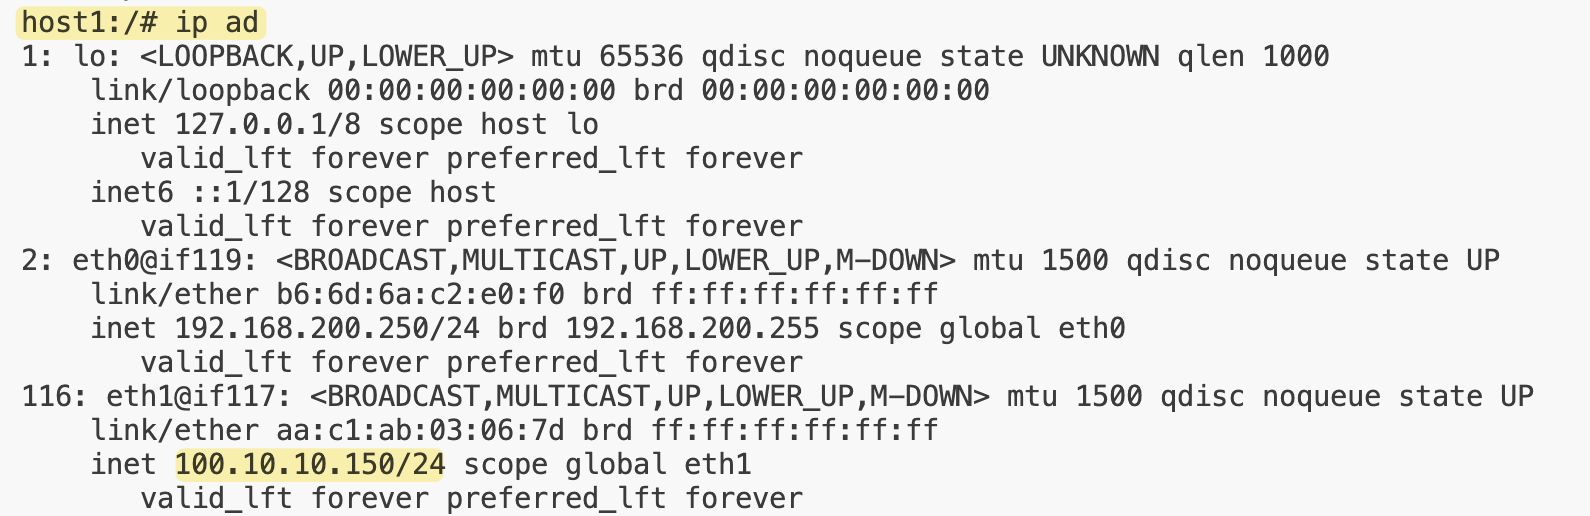
google:Here, I’ve also added a new line plugin: [ files ] and included a Linux host (alpine). Using config.inline: |, we can pass custom configurations directly to the host, such as static routes pointing to the gateway. You can learn more about this here.
You’ll also notice a new id key for host1, r1, and r2. Since we’re using the VRRP gateway module, if we don’t assign IDs, the routers might automatically get IPs like .1 and .2. I wanted to reserve .1 for the VRRP virtual IP, so I set id: 2 for r1, which ensures it gets .2, and the host gets .150.

The beauty of this setup is that you can simply download this YAML file and have the exact same lab running in just a few minutes. Of course, you’ll need Netlab installed and Cisco IOL images added to your setup.

BGP Route Reflectors
A route reflector reduces the need for full mesh by allowing certain routers to reflect routes to others. With this design, you only need a few sessions instead of a full mesh, making the iBGP setup much more scalable. If you have the same 10 routers, with RR, you only need 9 sessions.
provider: clab
defaults.device: iol
defaults.devices.iol.clab.image: iol:17.12.01

addressing:
  mgmt:
    ipv4: 192.168.200.0/24
  p2p:
    ipv4: 172.16.1.0/24
    prefix: 30

nodes:
  - name: r1
    module: [ bgp ]
  - name: r2
    module: [ bgp, ospf ]
  - name: r3
    module: [ bgp, ospf ]
  - name: r4
    module: [ bgp, ospf ]
  - name: r5
    module: [ bgp ]

bgp:
  advertise_loopback: false
  as_list:
    100:
      members: [ r1]
    200:
      members: [ r2, r3, r4 ]
      rr: [r3]
    300:
      members: [ r5 ]

links:
  - prefix: 100.10.10.0/24
    r1:
  - r1-r2
  - r2-r3
  - r3-r4
  - r4-r5
In this example, routers r2, r3, and r4 are part of AS 200, and r3 is defined as the route reflector, using the rr key. This means r3 will maintain iBGP sessions with its clients (r2 and r4) and reflect routes between them, removing the need for a full mesh within the AS. Routers r1 and r5 belong to different ASNs, forming eBGP sessions.

BGP Routing Policies
Let’s finish off with an example that includes BGP routing policies. With Netlab, you can easily apply routing policies to control attributes like local preference or weight. I don’t use this feature often, but it’s good to point out how simple it is to include in your topology.
This lab is useful for testing attributes like local preference, weight, and AS path prepending. In this example, we’re applying a local preference of 120 on r2 for routes received from r4.
provider: clab
defaults.device: iol
defaults.devices.iol.clab.image: iol:17.12.01

addressing:
  mgmt:
    ipv4: 192.168.200.0/24
  p2p:
    ipv4: 172.16.1.0/24
    prefix: 31
  loopback:
    ipv4: 10.100.100.0/24
    prefix: 32

plugin: [ bgp.policy ]

bgp:
  advertise_loopback: false

routing.policy:
  set_locpref:
    locpref: 120

nodes:
  - name: r1
    module: [ bgp, ospf ]
    bgp.as: 100
    ospf:
      area: 0.0.0.0
  - name: r2
    module: [ bgp, ospf, routing ]
    bgp.as: 100
    ospf:
      area: 0.0.0.0
  - name: r3
    module: [ bgp ]
    bgp.as: 300
  - name: r4
    module: [ bgp ]
    bgp.as: 400
  - name: r5
    module: [ bgp ]
    bgp.as: 500
  - name: r6
    module: [ bgp ]
    bgp.as: 600

links:
  - r1-r2
  - r1-r3
  - r2:
      bgp.policy.in: set_locpref
    r4:
  - r3-r6
  - r4-r5
  - r5-r6
  - prefix: 6.6.6.0/24
    r6:
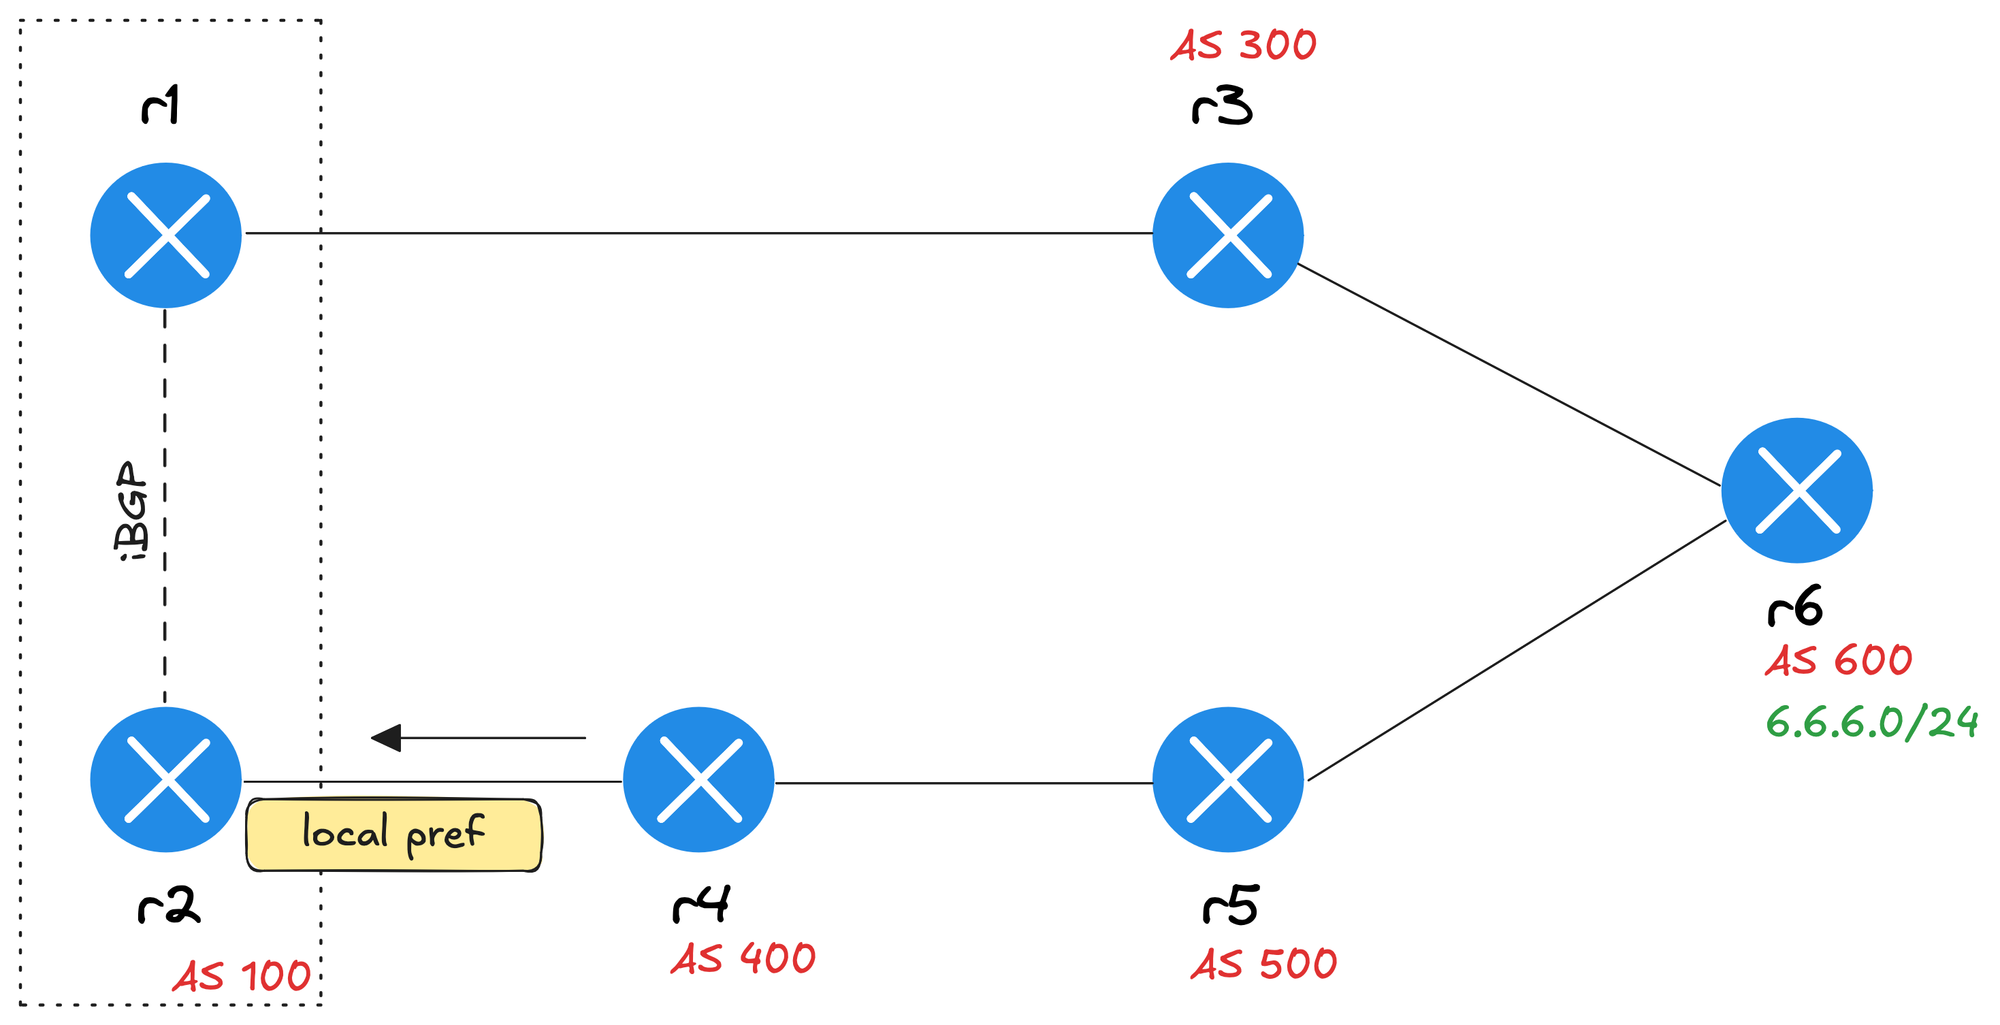
In this example, we’re making a few changes from the previous ones. We added the plugin: [ bgp.policy ] line to enable the policy feature, and we’re also defining the BGP AS numbers directly under each node instead of grouping them under as_list.
We introduced a routing policy named set_locpref, which sets the local preference to 120. On the link between r2 and r4, we apply this policy inbound (bgp.policy.in: set_locpref). This means any routes received by r2 from r4 will have their local preference modified as defined in the policy.
#r2 generated configs
route-map set_locpref-ipv4 permit 10
set local-preference 120
!
router bgp 100
bgp router-id 10.100.100.2
bgp log-neighbor-changes
bgp nopeerup-delay cold-boot 1
bgp nopeerup-delay user-initiated 1
bgp update-delay 5
no bgp default ipv4-unicast
neighbor 10.100.100.1 remote-as 100
neighbor 10.100.100.1 description r1
neighbor 10.100.100.1 update-source Loopback0
neighbor 172.16.1.5 remote-as 400
neighbor 172.16.1.5 description r4
!
address-family ipv4
bgp scan-time 5
neighbor 10.100.100.1 activate
neighbor 10.100.100.1 send-community both
neighbor 10.100.100.1 next-hop-self
neighbor 172.16.1.5 activate
neighbor 172.16.1.5 send-community
neighbor 172.16.1.5 advertisement-interval 0
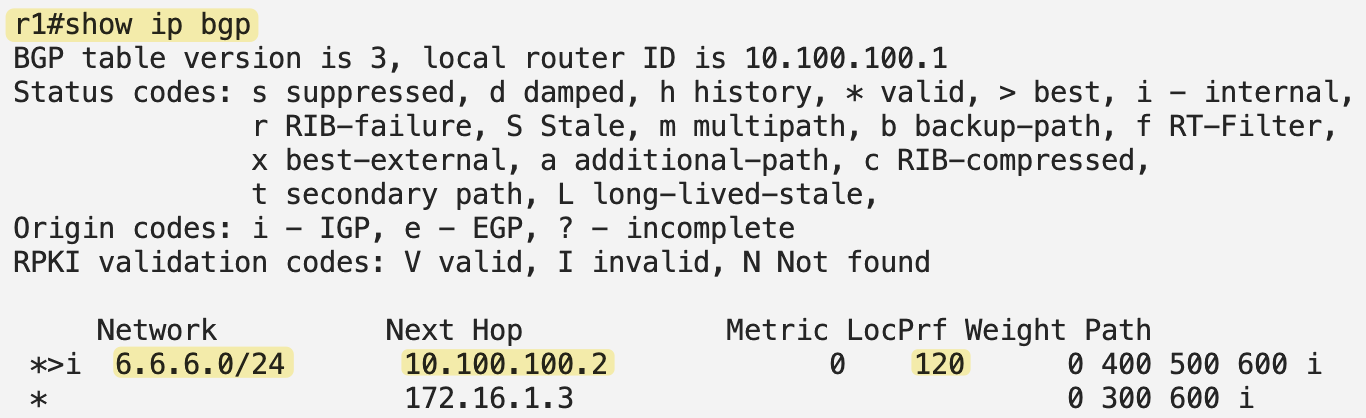
neighbor 172.16.1.5 route-map set_locpref-ipv4 inIf we look at the BGP prefixes on r1, we can see that the best path to reach 6.6.6.0/24 is now through r2. This is because of the higher local preference value applied to routes received from r4.
Closing Up
That’s all for this post. We went through several examples to see how easy it is to build and customize BGP labs using Netlab. It takes care of all the heavy lifting so you can focus on testing and learning.
If you want to learn more about Netlab or the BGP configuration module, feel free to check out the official guide.