Let’s assume a simple scenario. You have two different teams managing your Palo Alto firewalls. One team is made up of network administrators who need full access to the firewalls. The other team only needs limited access and should not be able to make any configuration changes.
A common way to handle this is by using Admin Roles and a remote Radius server. You can assign different admin roles based on who is logging in, without creating local users on every firewall. In this post, we will look at how to achieve this using Cisco ISE and Radius. You do not have to use Cisco ISE, any Radius server can do the job, but this post focuses on Cisco ISE since it is commonly used in enterprise environments.
Overview
For this example, we will have two users, each belonging to a different group with different access requirements. In most environments, group membership is managed by something like Active Directory. For the sake of simplicity, I am going to use local identity groups on ISE.
On the Palo Alto firewalls, there is a concept called Admin Roles. An Admin Role defines what a user can and cannot do on the firewall, such as whether they can enter configuration mode or only run specific show commands. Palo Alto firewalls come with a few built-in roles. Out of those few, we will use the two roles superuser and superreader.
- bob is part of the network-admin group and needs full access (superuser)
- brad is part of the noc-user group and only needs limited access (superreader)
We will use the following components for this example.
- Cisco ISE
- Version - 3.4.0.608 patch 3
- IP address - 10.10.0.13
- Palo Alto PA-440
- Version - 11.2.4-h7
- IP address - 10.10.0.5
TL;DR
When a user logs in to the firewall, the firewall sends a Radius request to the Radius server, Cisco ISE in this case. ISE first checks the user credentials to see if the login is valid.
If the credentials are valid, ISE then looks at the user’s identity group and evaluates the authorization policy. Based on this, ISE responds with an Access-Accept message and includes vendor-specific attributes that tell the firewall which Admin Role to apply to the user.
If the credentials are invalid or the user does not match any allowed policy, ISE responds with an Access-Reject, and the login is denied.
Palo Alto Configuration
Let’s start with the Palo Alto side configuration, which is pretty straightforward. Ideally, you should configure your Radius server first before making any changes to the firewall.
Configure Radius Server
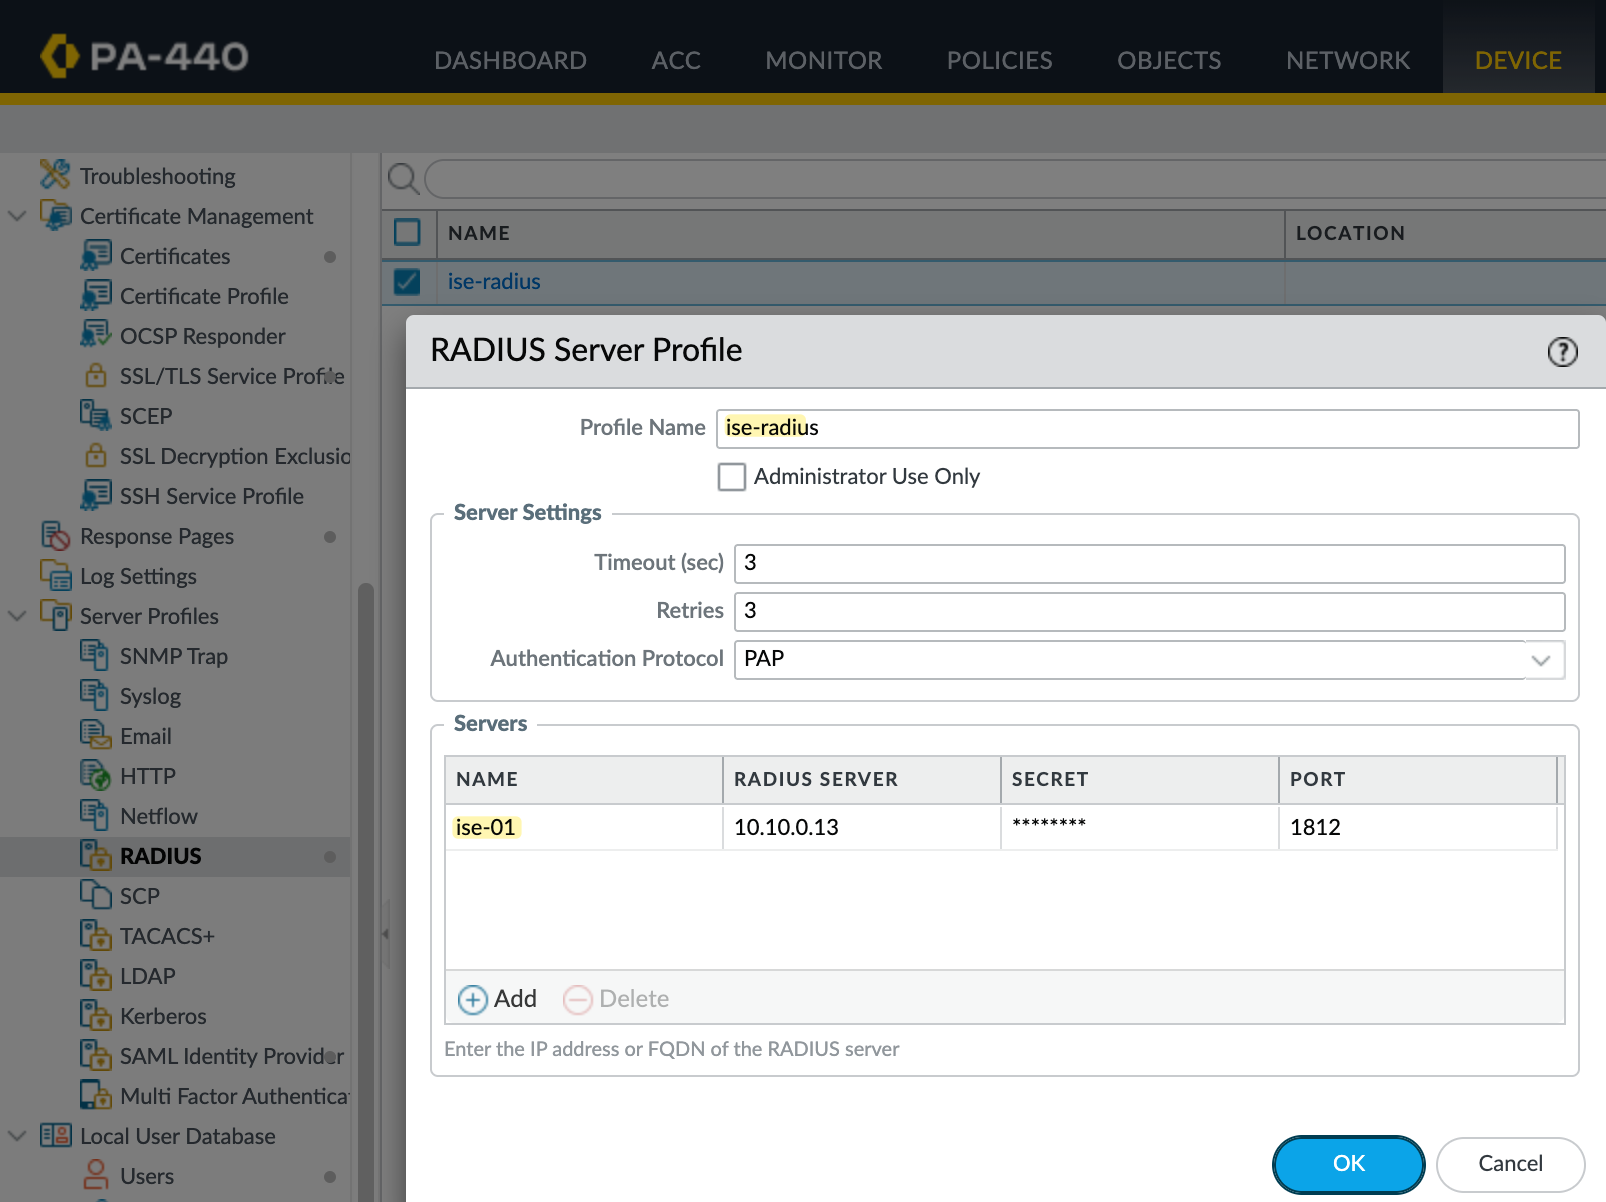
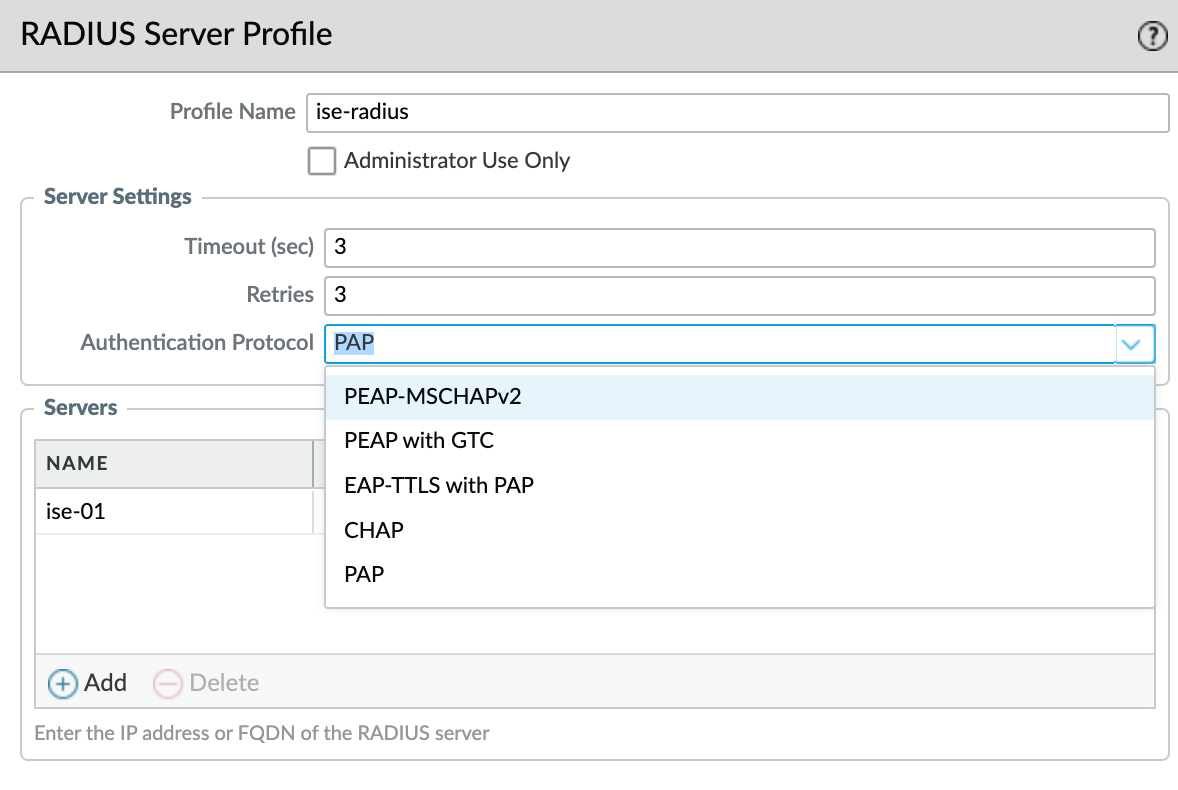
First, add the Radius server on the Palo Alto firewall. Navigate to Device, then Server Profiles, and select Radius. Create a new Radius server profile and give it a name, for example ise-radius. Under server settings, configure the timeout, retries, and authentication protocol, PAP in this case (more on PAP later). In most cases, the default values are fine.
Next, add the Radius server itself by specifying the IP address of the Cisco ISE server and the shared secret. Once done, save the profile.
Create Authentication Profile
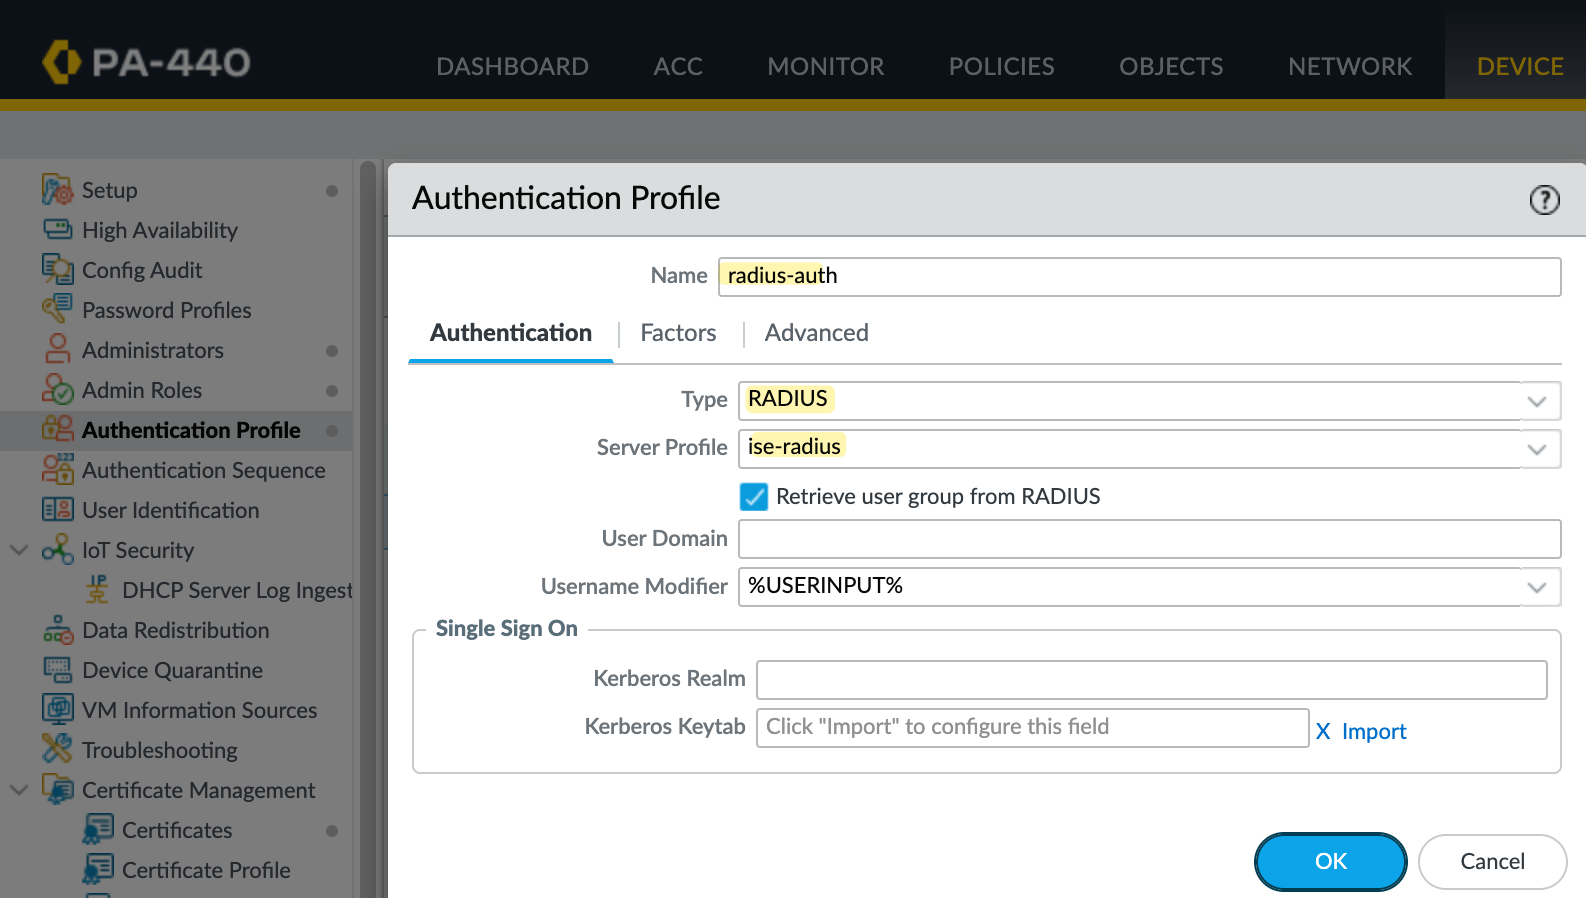
Next, create an authentication profile by navigating to Device, then Authentication Profile, and create a new profile. Set the type to Radius and select the Radius server profile you created earlier.
Under the Advanced tab, add an allow list entry and set it to all.
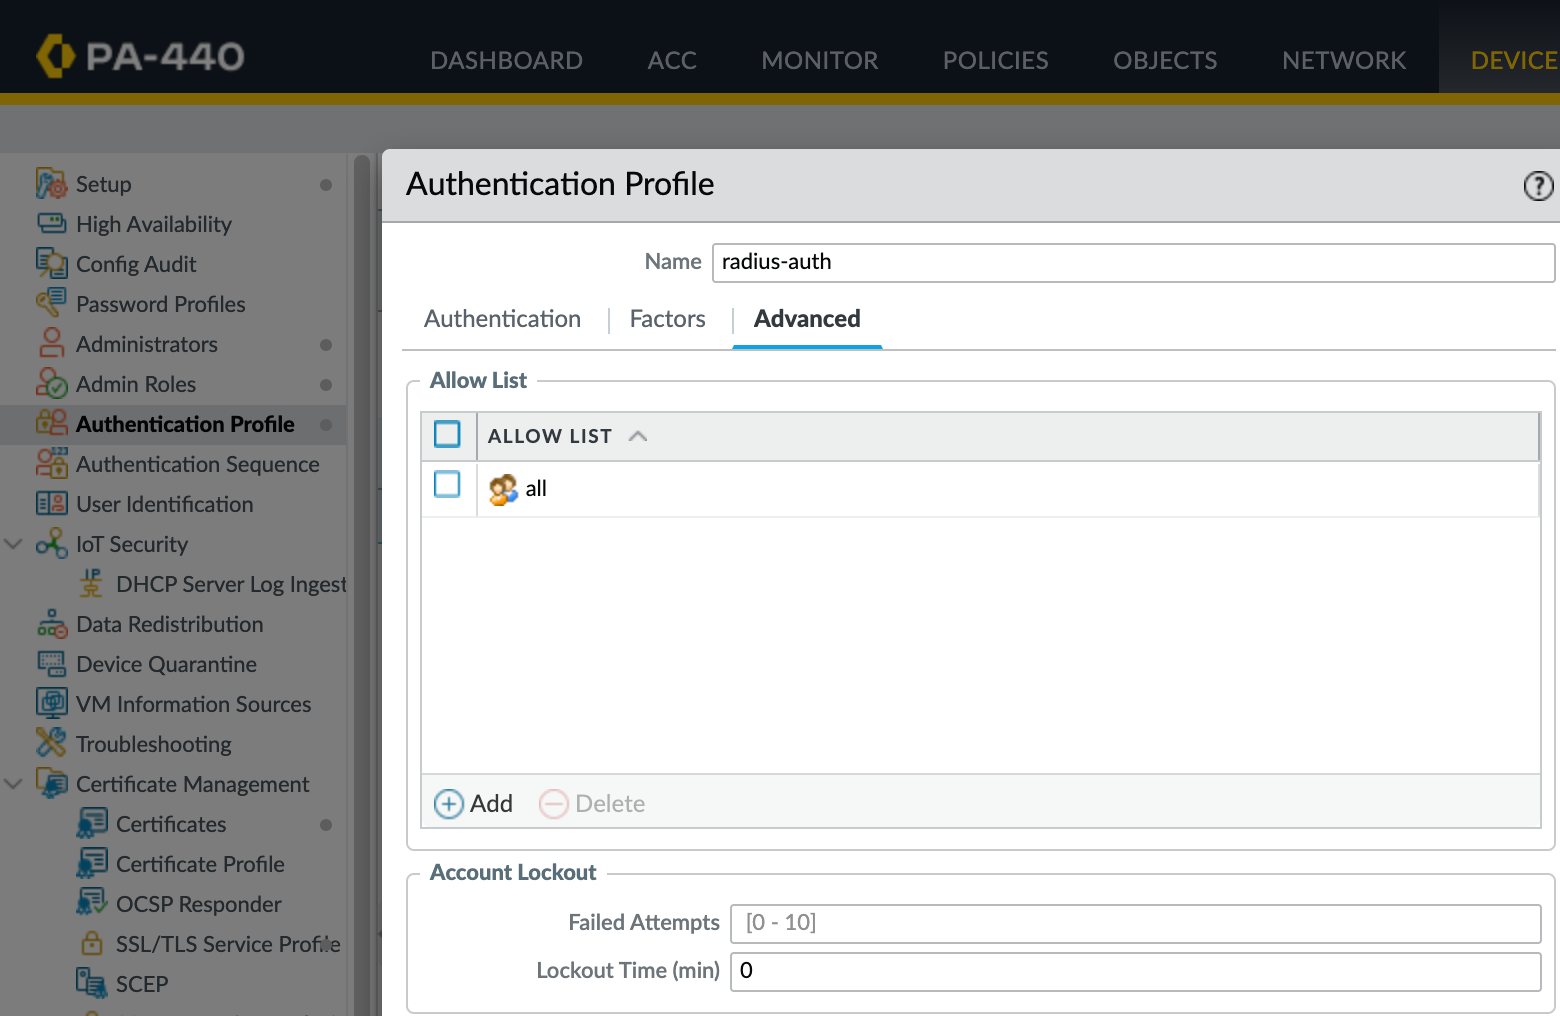
The all entry in the allow list means the firewall will accept any user that is successfully authenticated by the Radius server. You could restrict this further by adding individual users or groups here, but we want all access decisions to be managed by the Radius server.
If a user is not allowed to log in, the Radius server will simply return an access reject, and the firewall will deny the login.
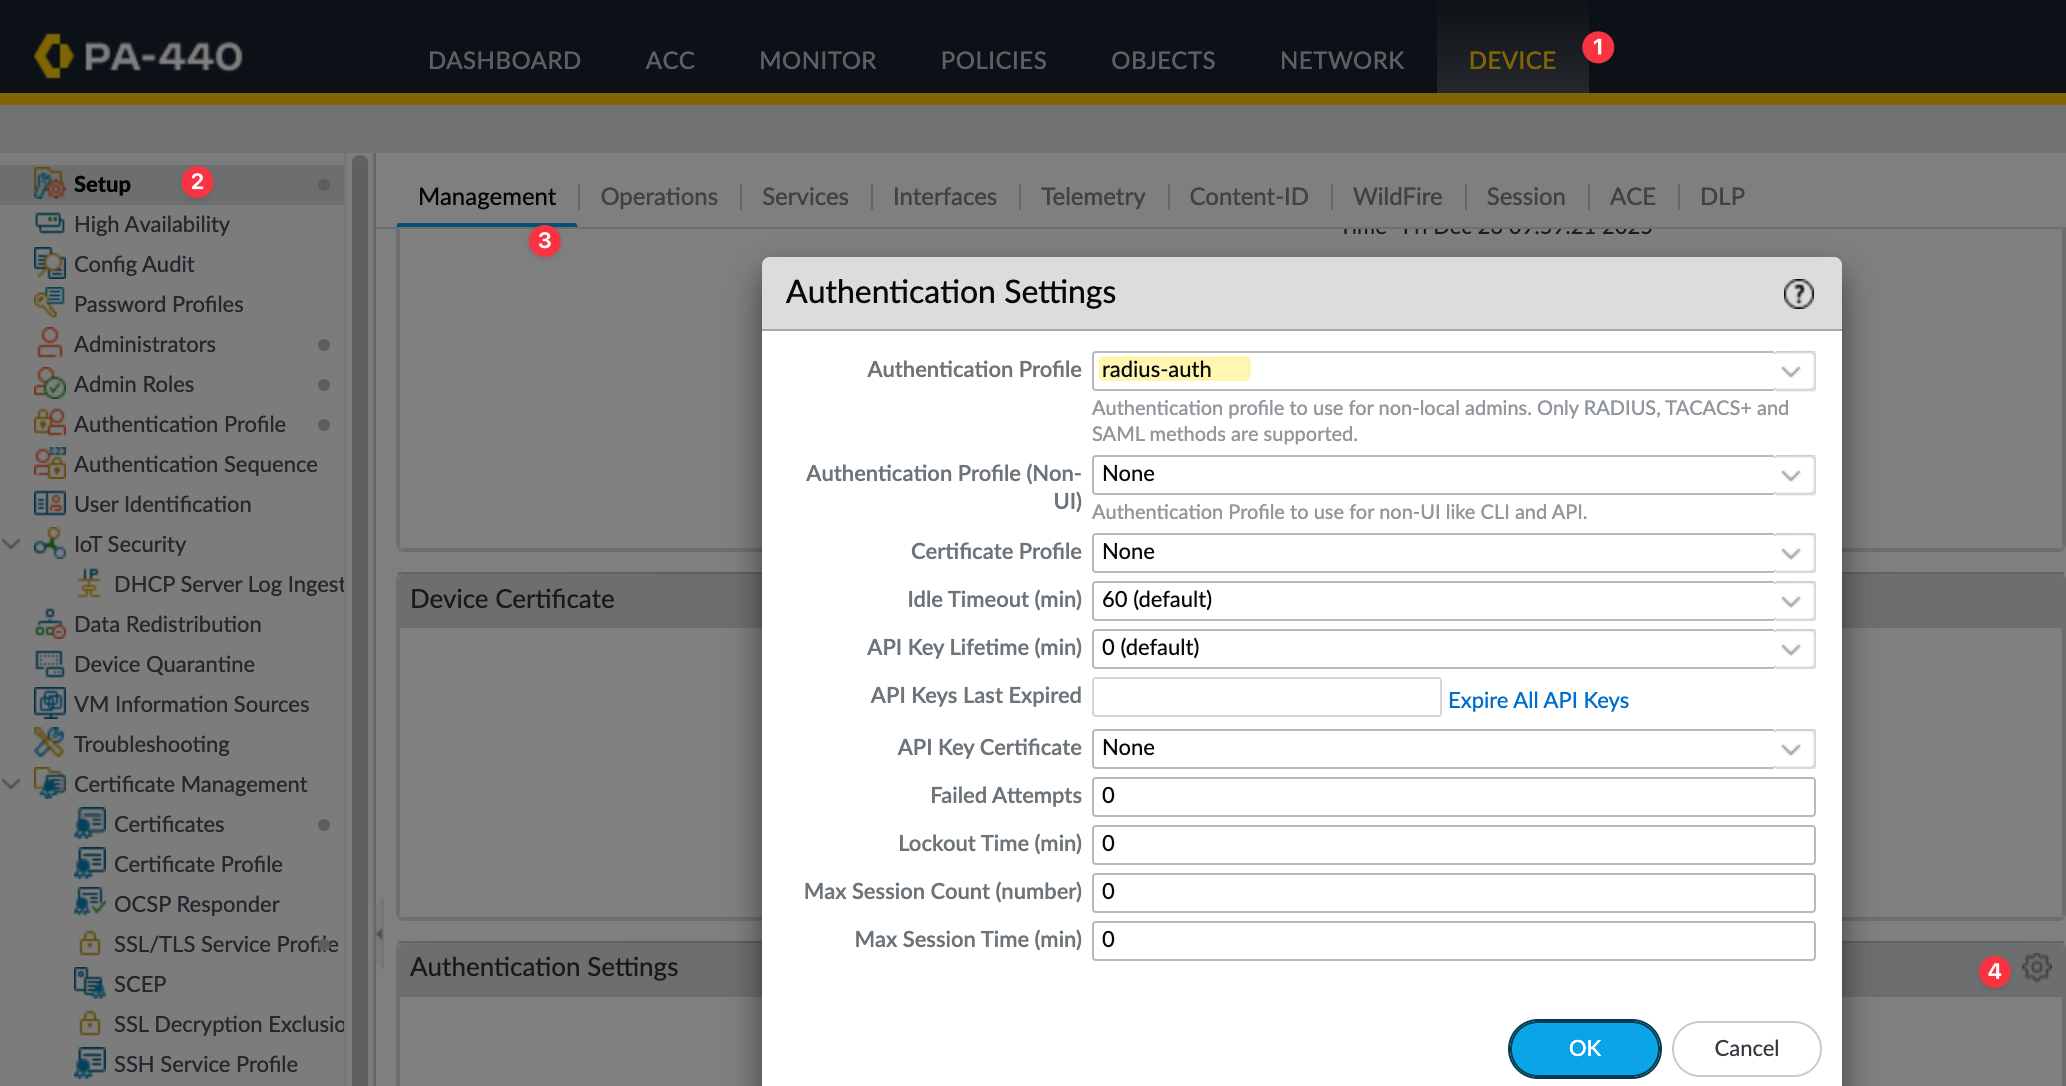
Authentication Settings
Finally, apply the authentication profile to the firewall management settings. Navigate to Device, then Setup, and open the Management tab. Click on Authentication Settings and select the radius-auth profile we created earlier as the authentication profile for administrators.
This tells the firewall to use Radius for administrator authentication. Once applied, all non-local admin logins to the GUI and CLI will be authenticated against the Radius server.
Cisco ISE Configuration
On the Cisco ISE side, there are a few different components that need to be configured for this to work. This includes adding the firewall, adding the Palo Alto Radius dictionary, creating authorization profiles, and configuring policy sets. We will go through each of these one by one.
Radius Dictionary
A Radius dictionary defines vendor-specific attributes that are used during authentication and authorization. Palo Alto uses vendor-specific attributes to pass information such as Admin Role.
Save this file as dictionary.paloalto and import it into Cisco ISE by navigating to Policy, Policy Elements and Dictionaries. Then, navigate to Radius, select Radius Vendors, and click the Import button.
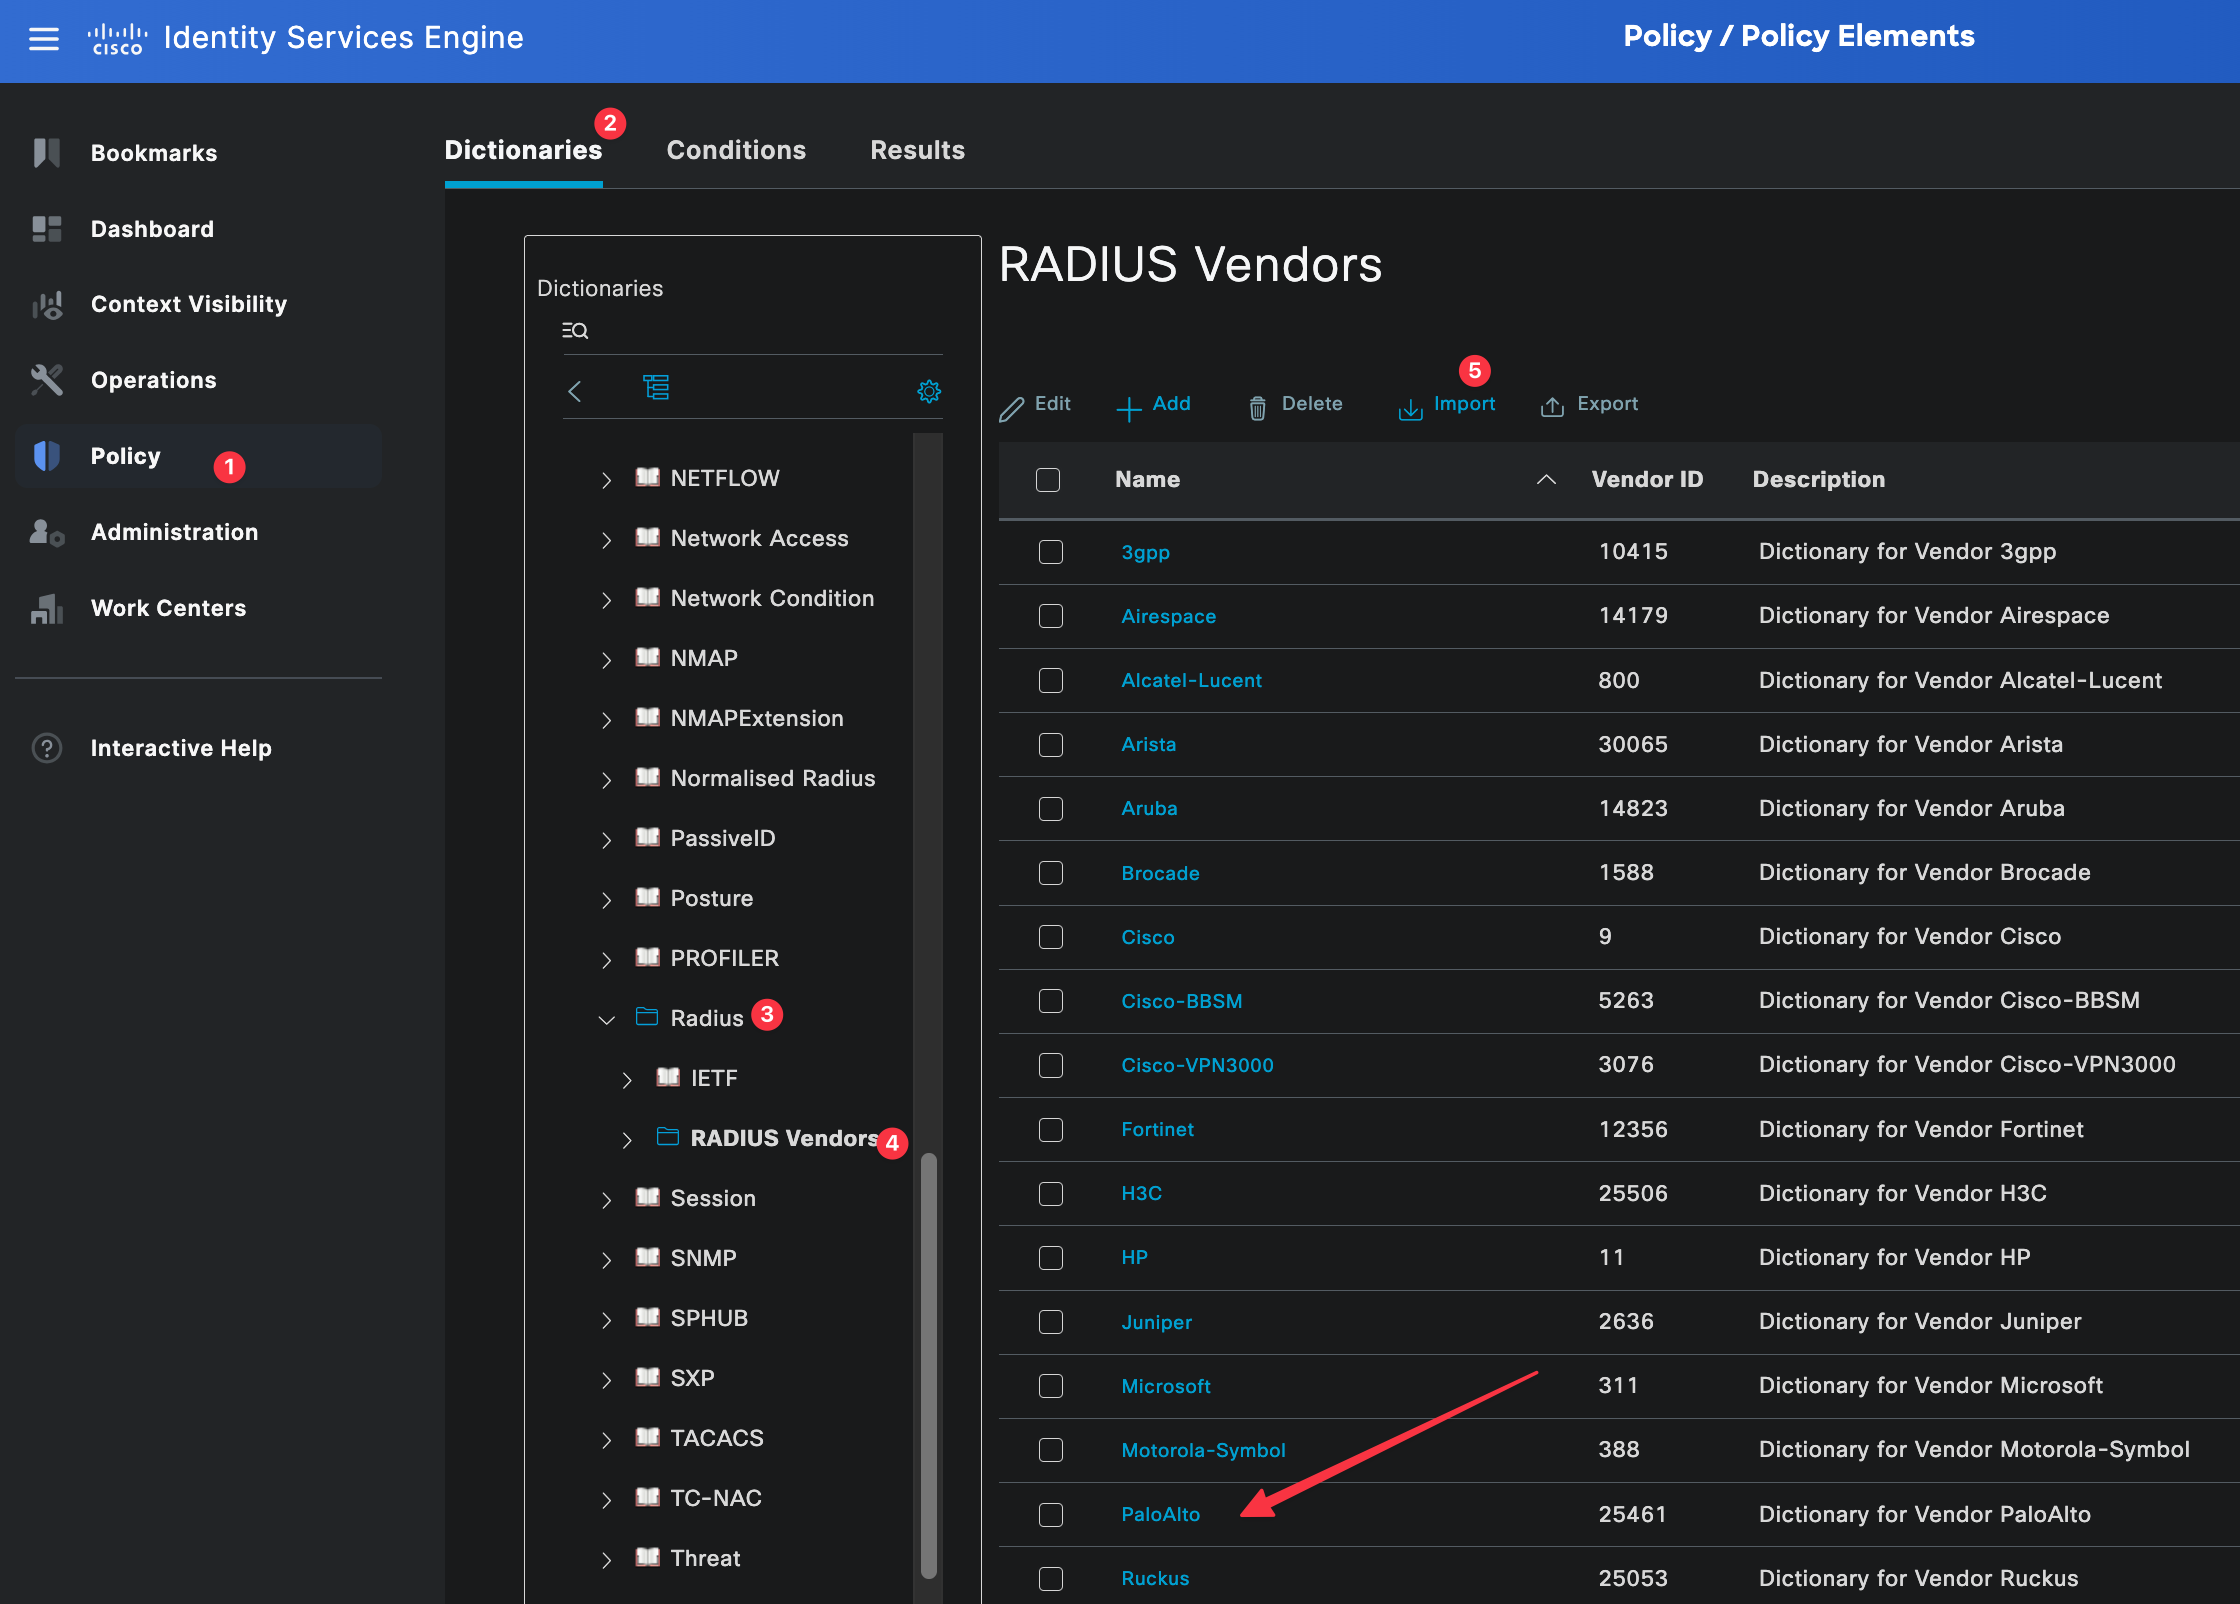
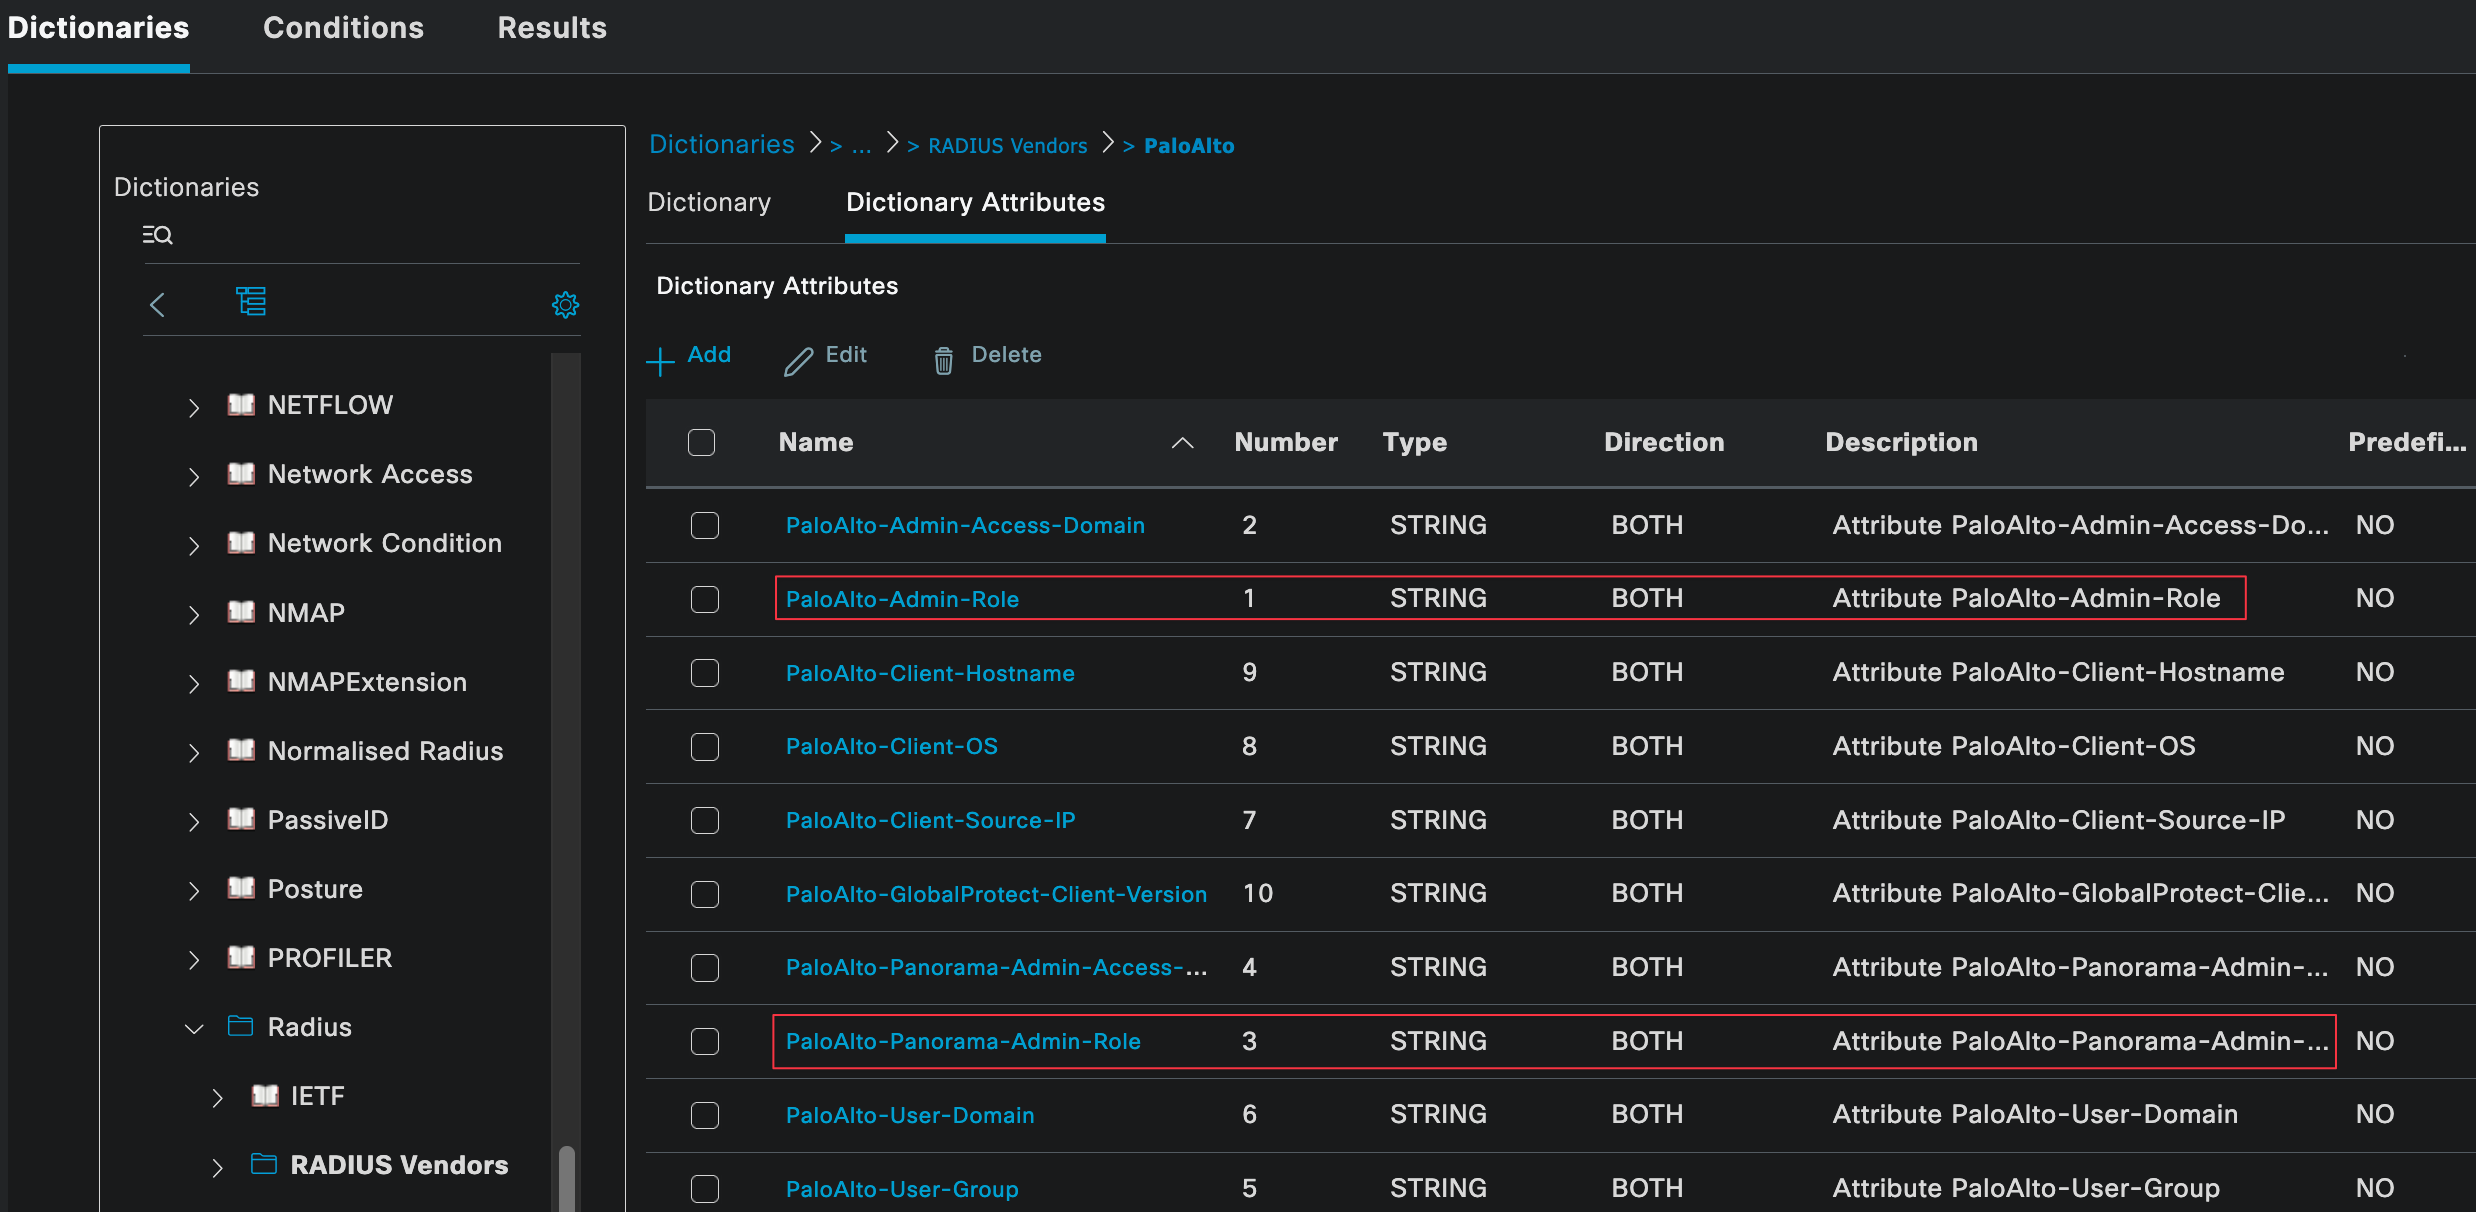
Once imported, it will be listed under Radius Vendors. Out of all the available attributes, the one we will be using is called PaloAlto-Admin-Role (PaloAlto-Panorama-Admin-Role for Panorama). This attribute is used to tell the firewall which admin role should be applied to the user after a successful login.
Network Device Profiles
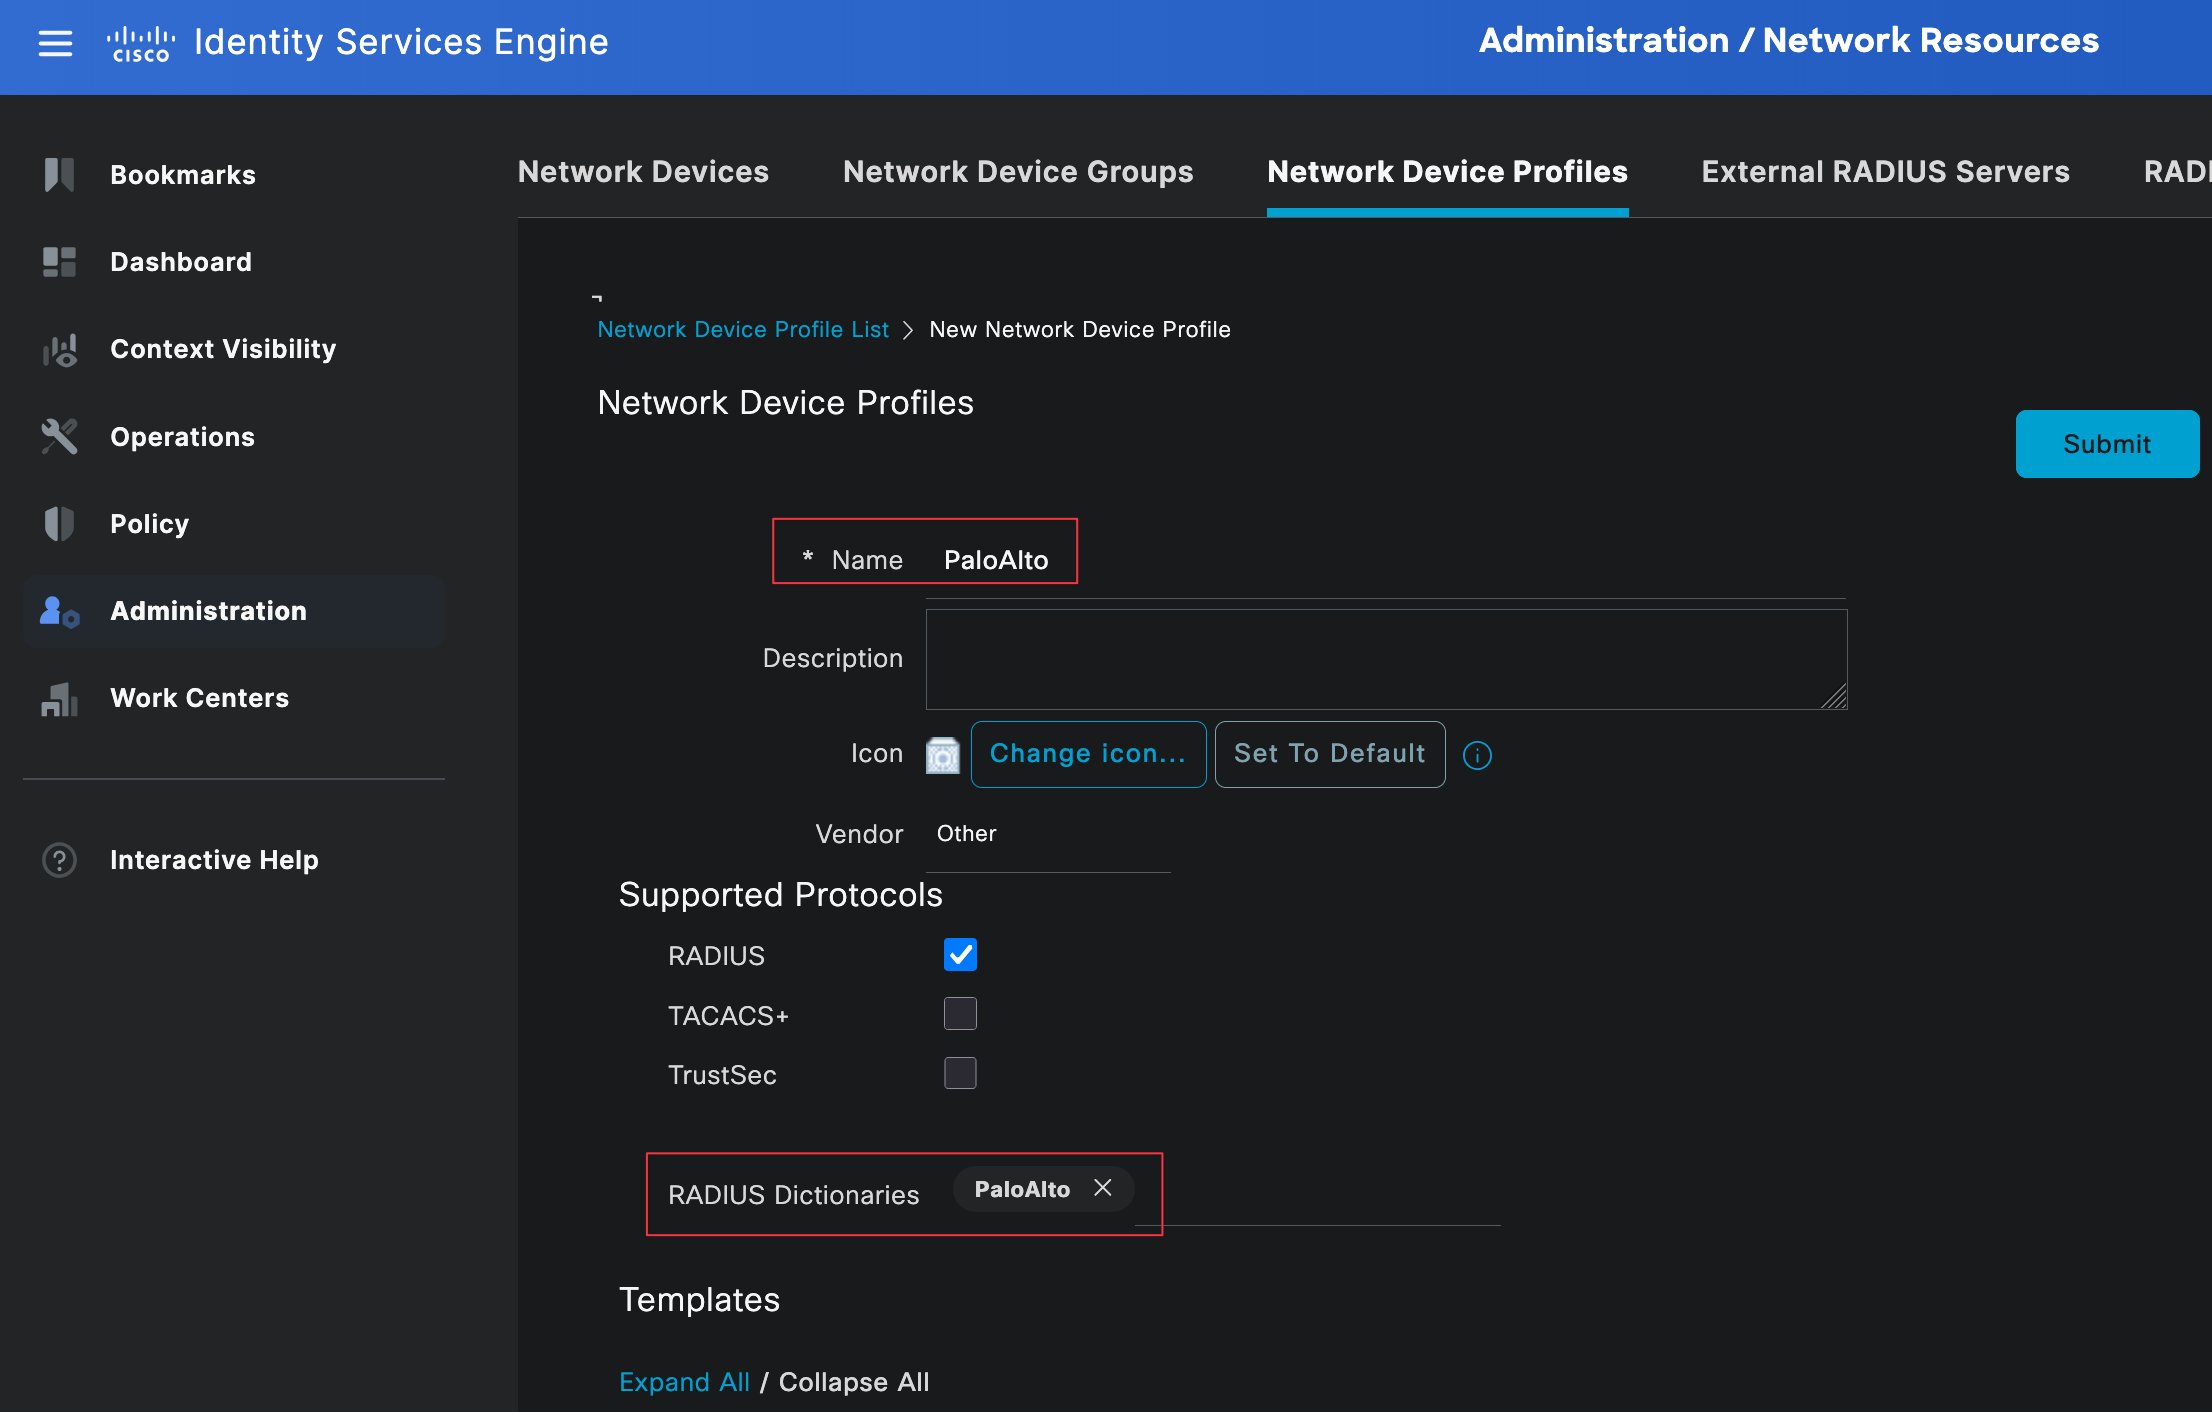
Network device profiles in Cisco ISE are used to define vendor-specific settings, such as which Radius dictionary to use and which protocols are supported. This is important because ISE needs to know how to interpret the attributes sent by the device and which attributes it can return.
To create one, go to Administration, Network Resources, then Network Device Profiles. From here, you can either use an existing profile (if you have one already for Palo Alto) or create a new one and assign the Palo Alto Radius dictionary we created in the previous step.
Add the Network Device
Next, add the Firewall to Cisco ISE. This tells ISE which device will be sending Radius requests.
Navigate to Administration, Network Resources, then Network Devices and create a new device. Specify the hostname and IP address of the firewall, then associate it with the device profile we created earlier. You can leave most of the other fields set to their default values.
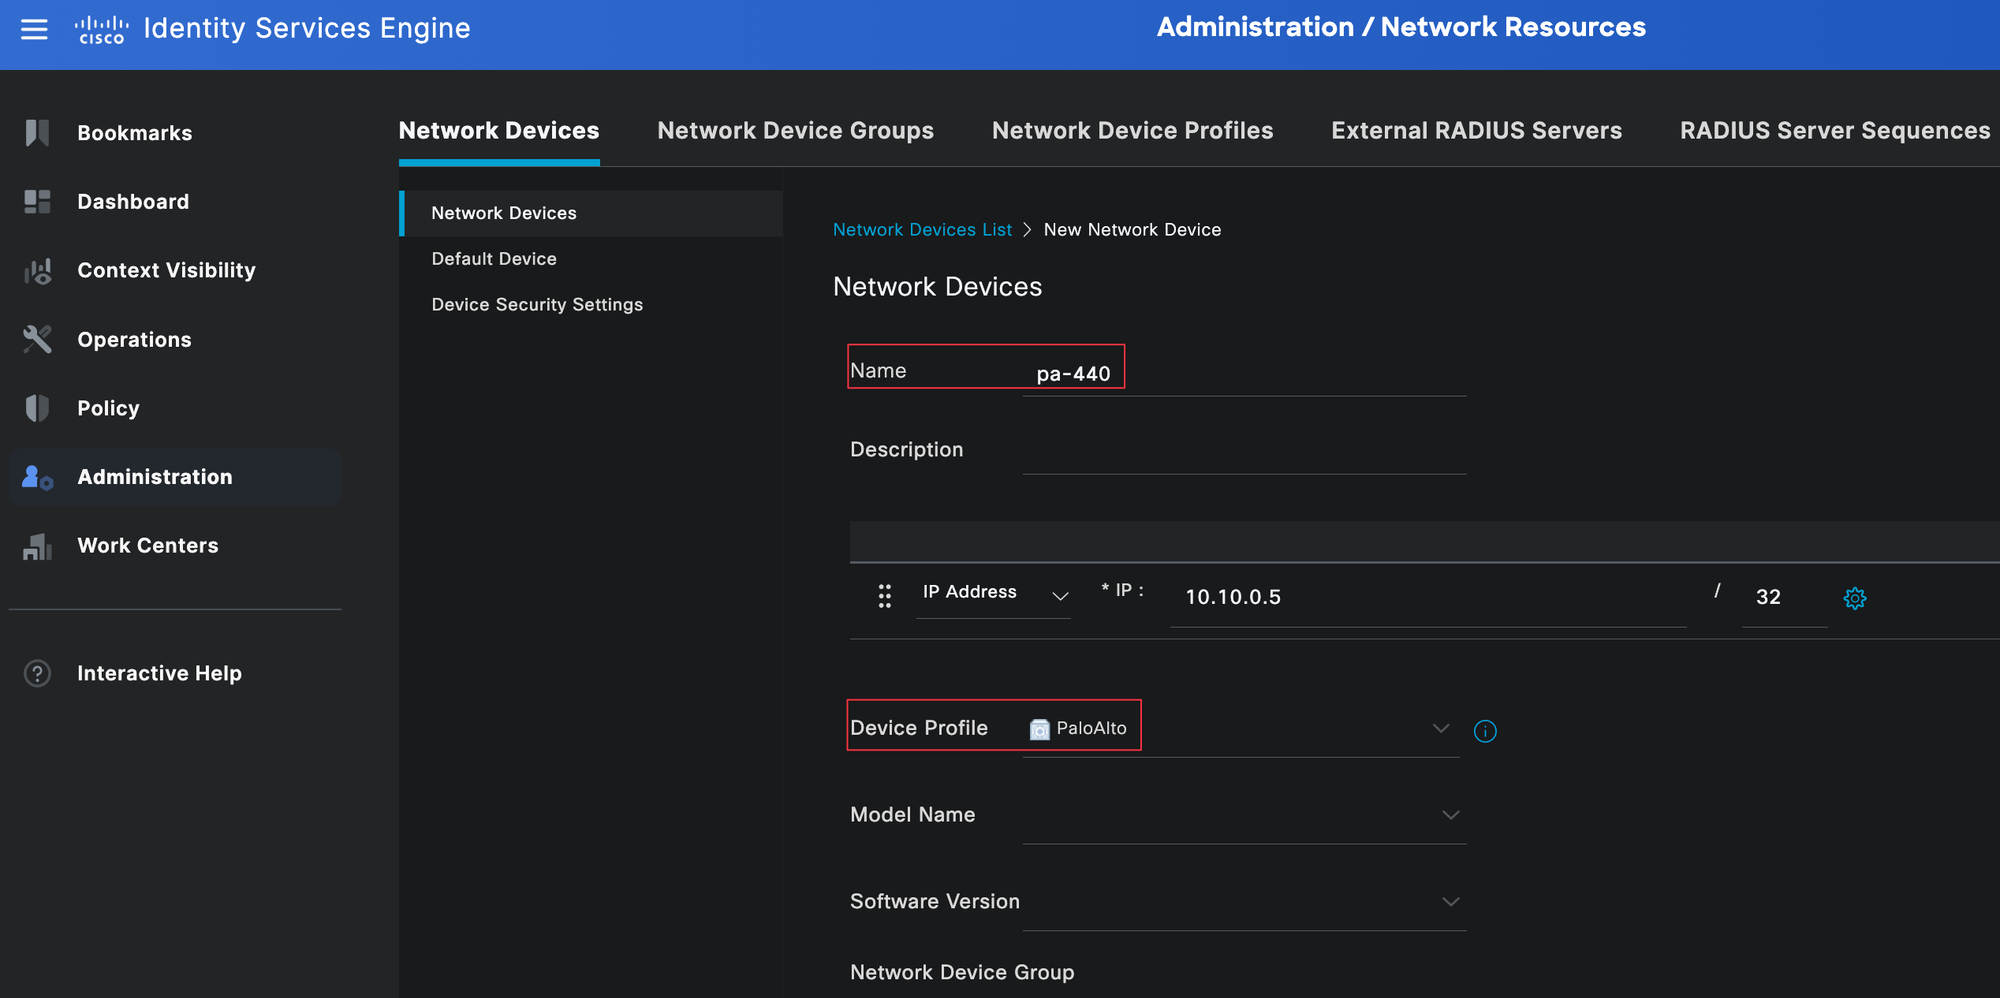
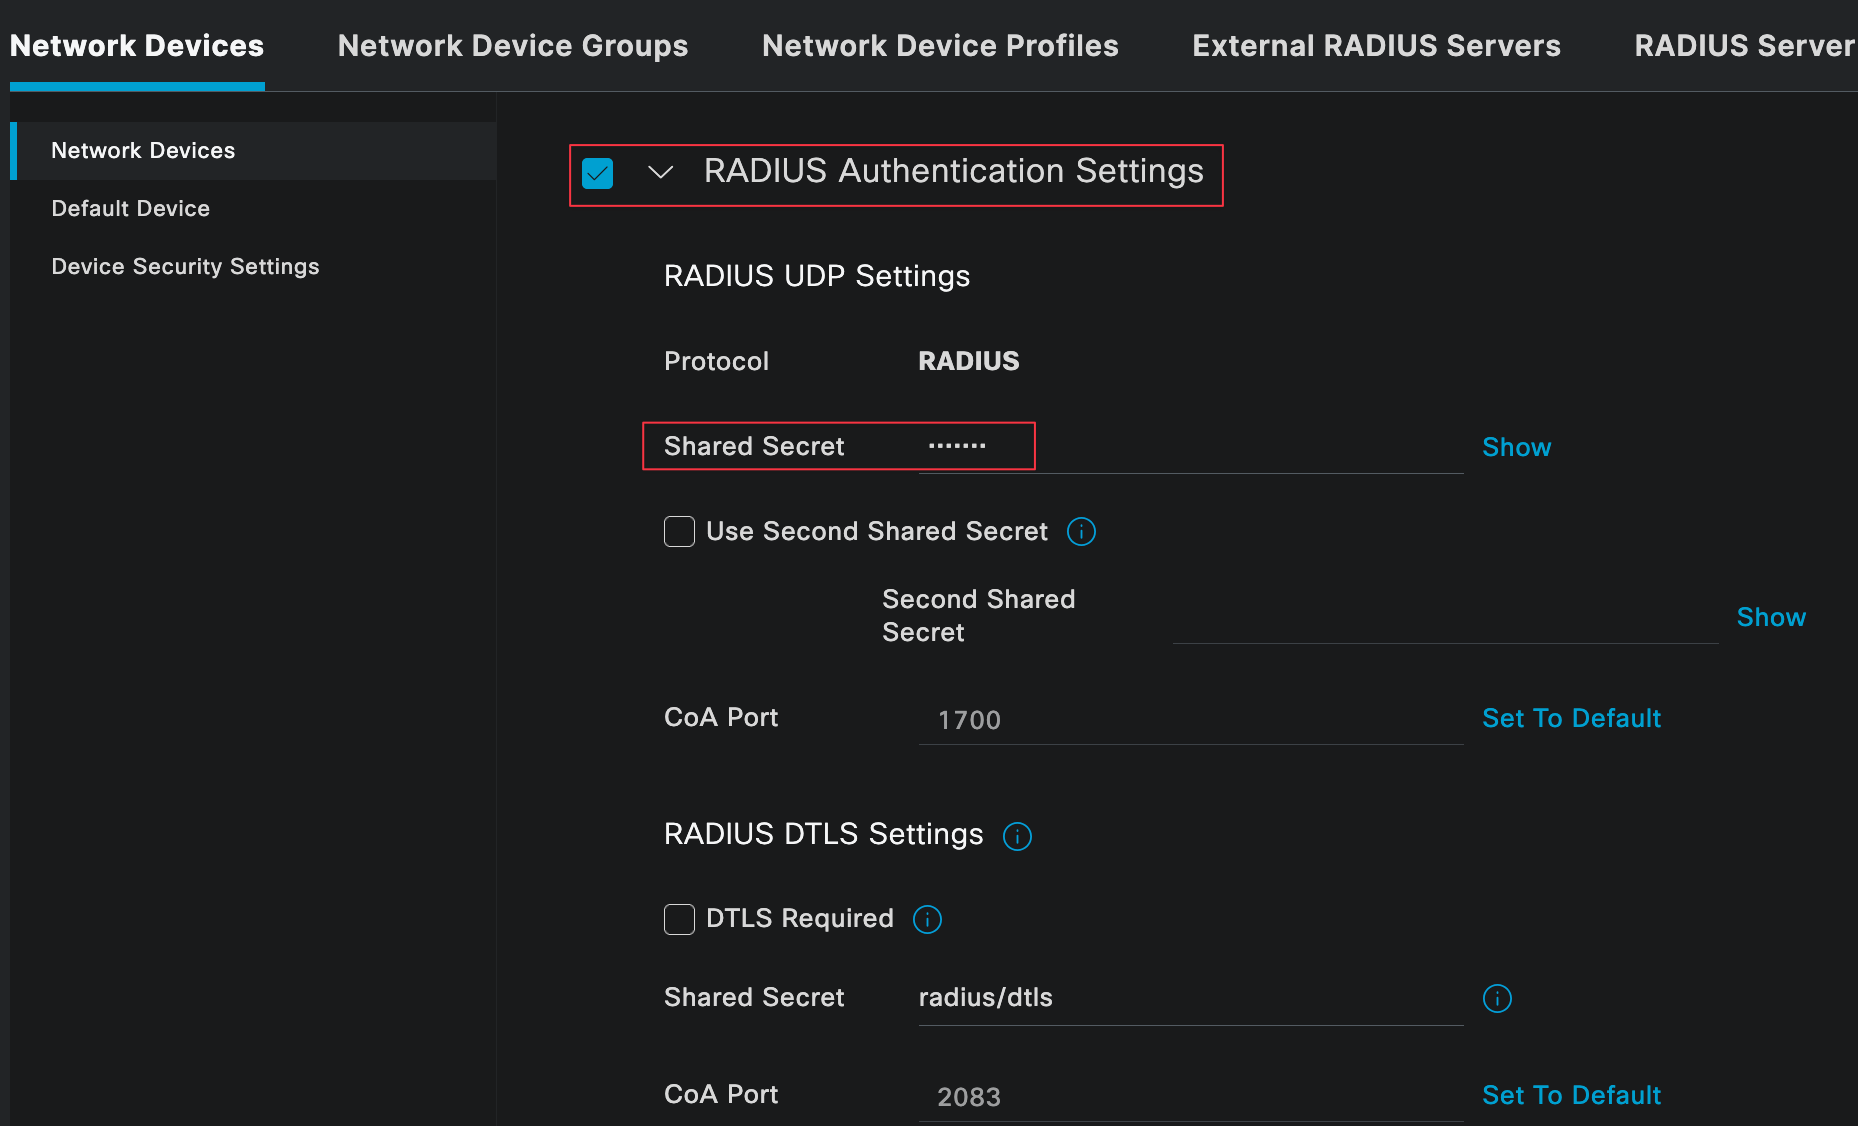
Next, select the tick next to the Radius Authentication Settings and enter the Radius shared secret, ensuring it matches on both sides.
Authorization Profiles
Authorization profiles define what access is granted to a user after they have been successfully authenticated. This is where we tell ISE which attributes to send back to the firewall, such as the admin role.
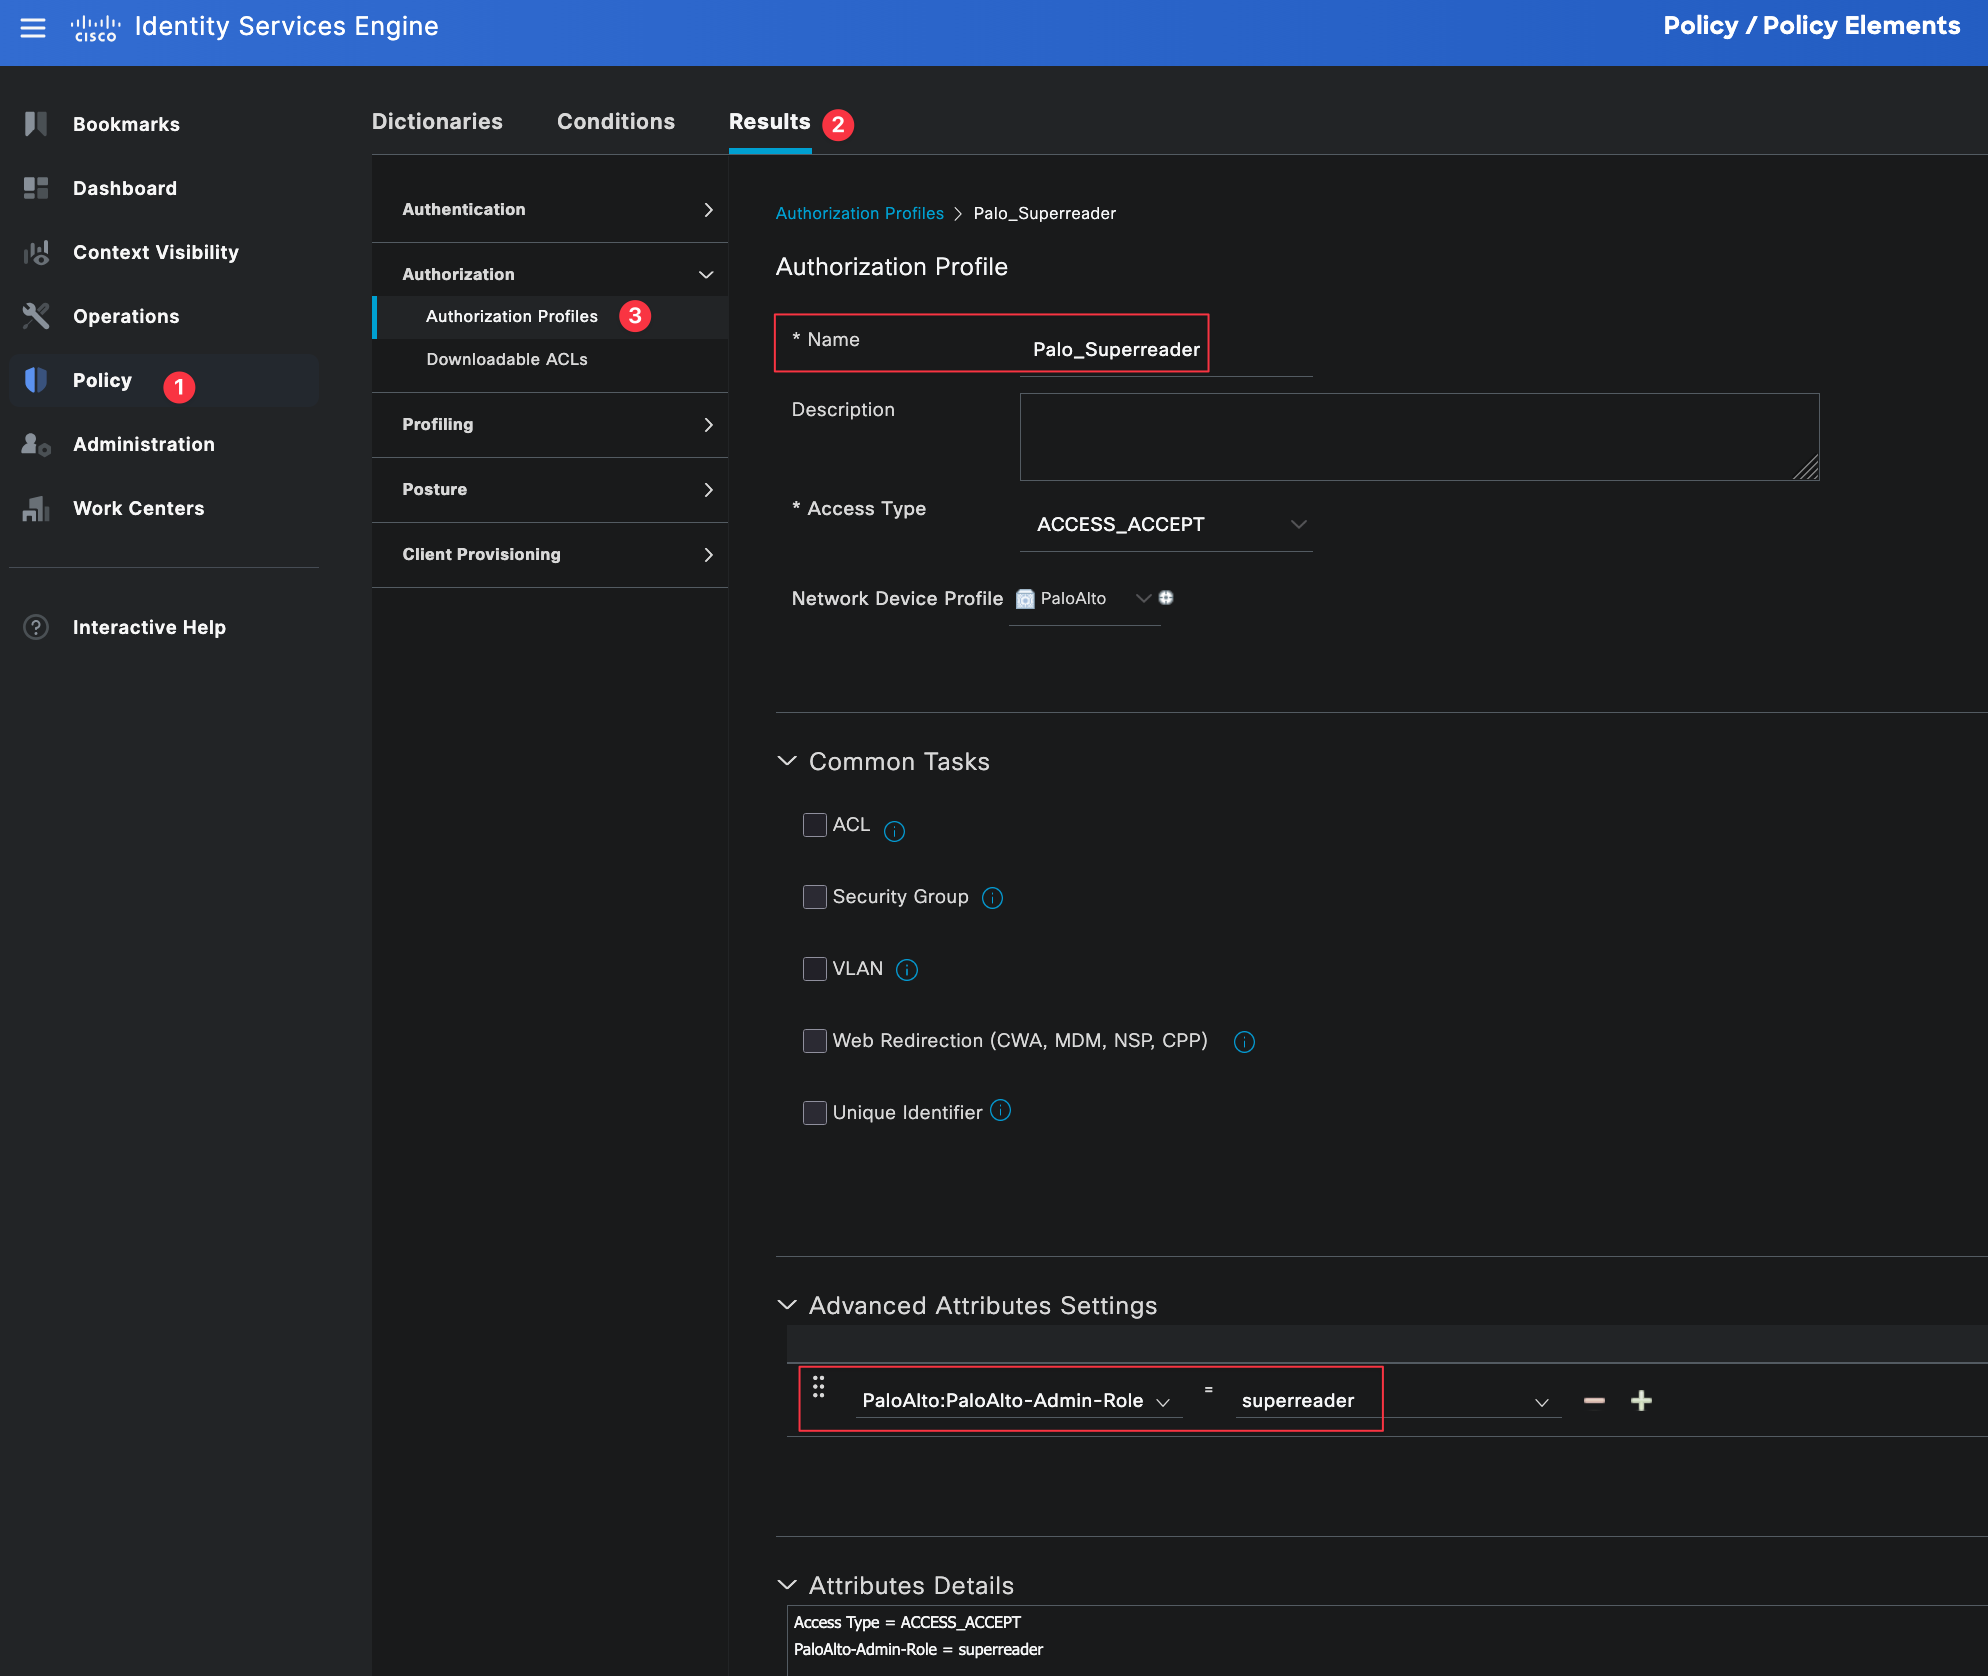
You can navigate to authorization profiles by going to Policy, Policy Elements, then Results, and selecting Authorization Profiles.
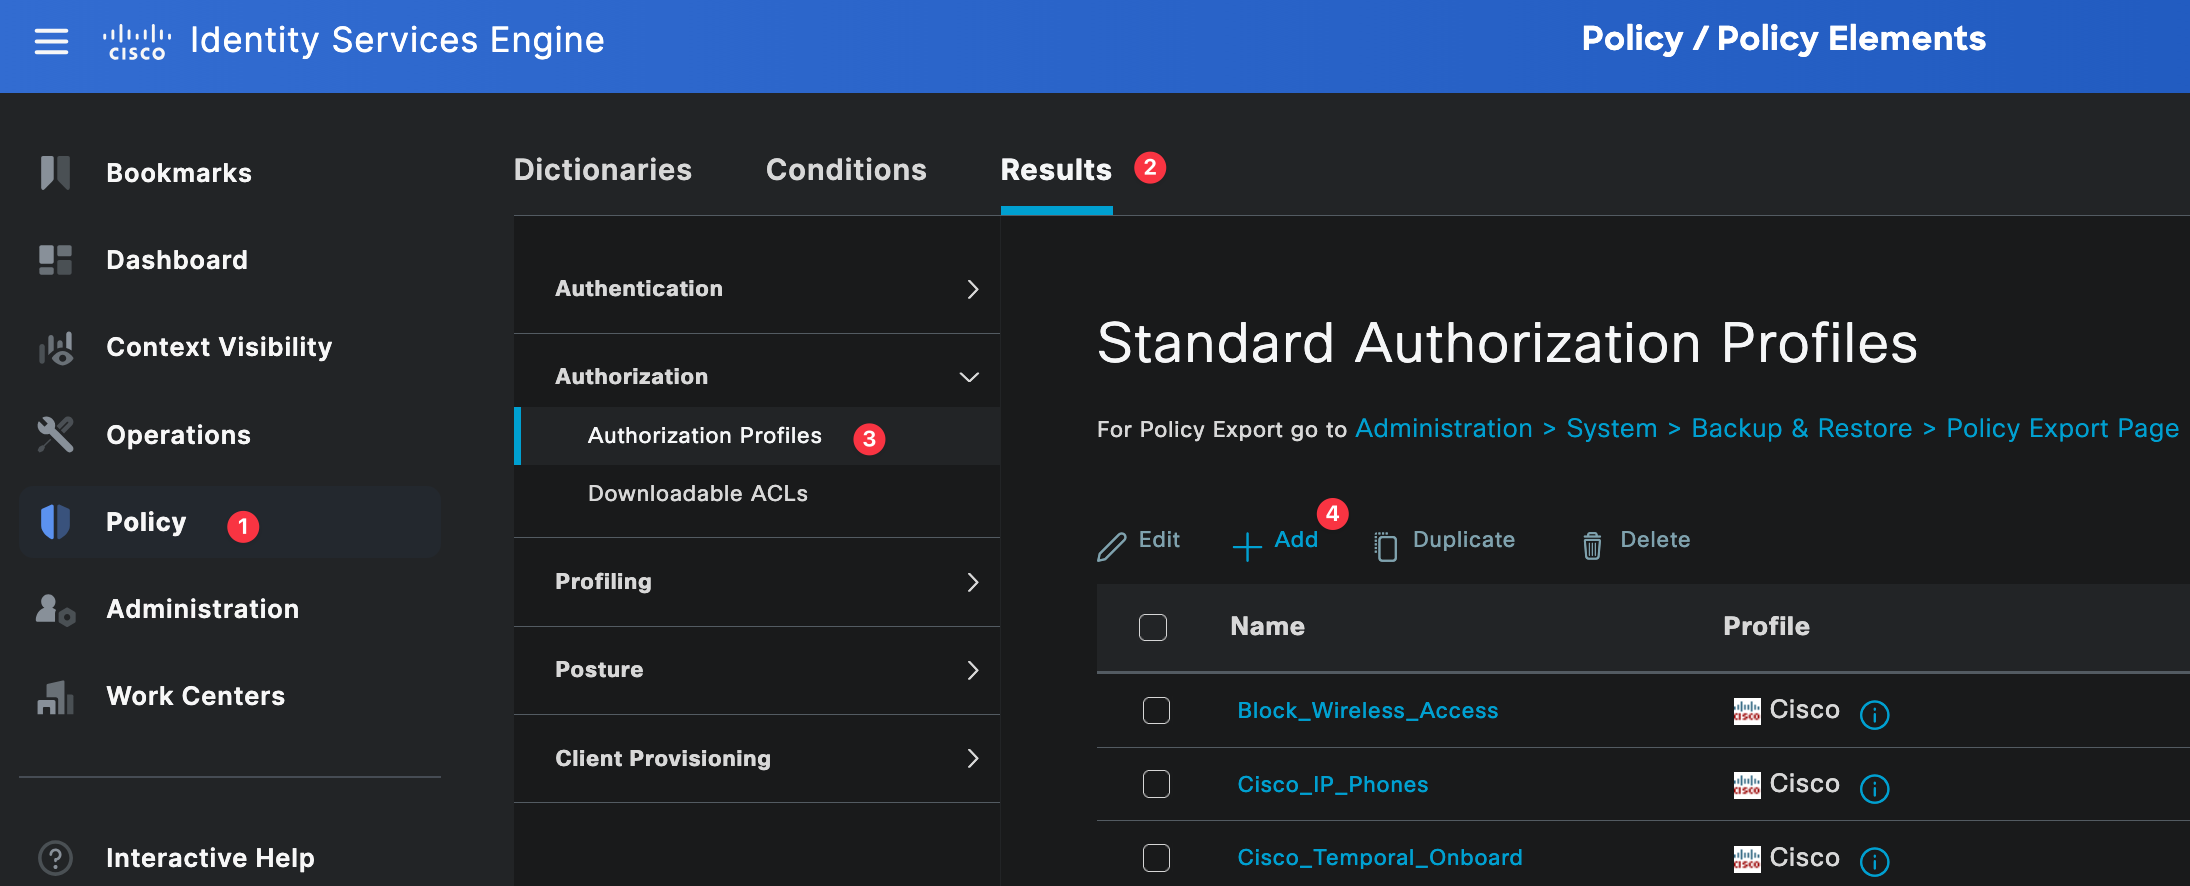
For this example, we need two authorization profiles. One profile is for network-admins and the other is for noc-users. These profiles will be referenced later in the authorization policy.
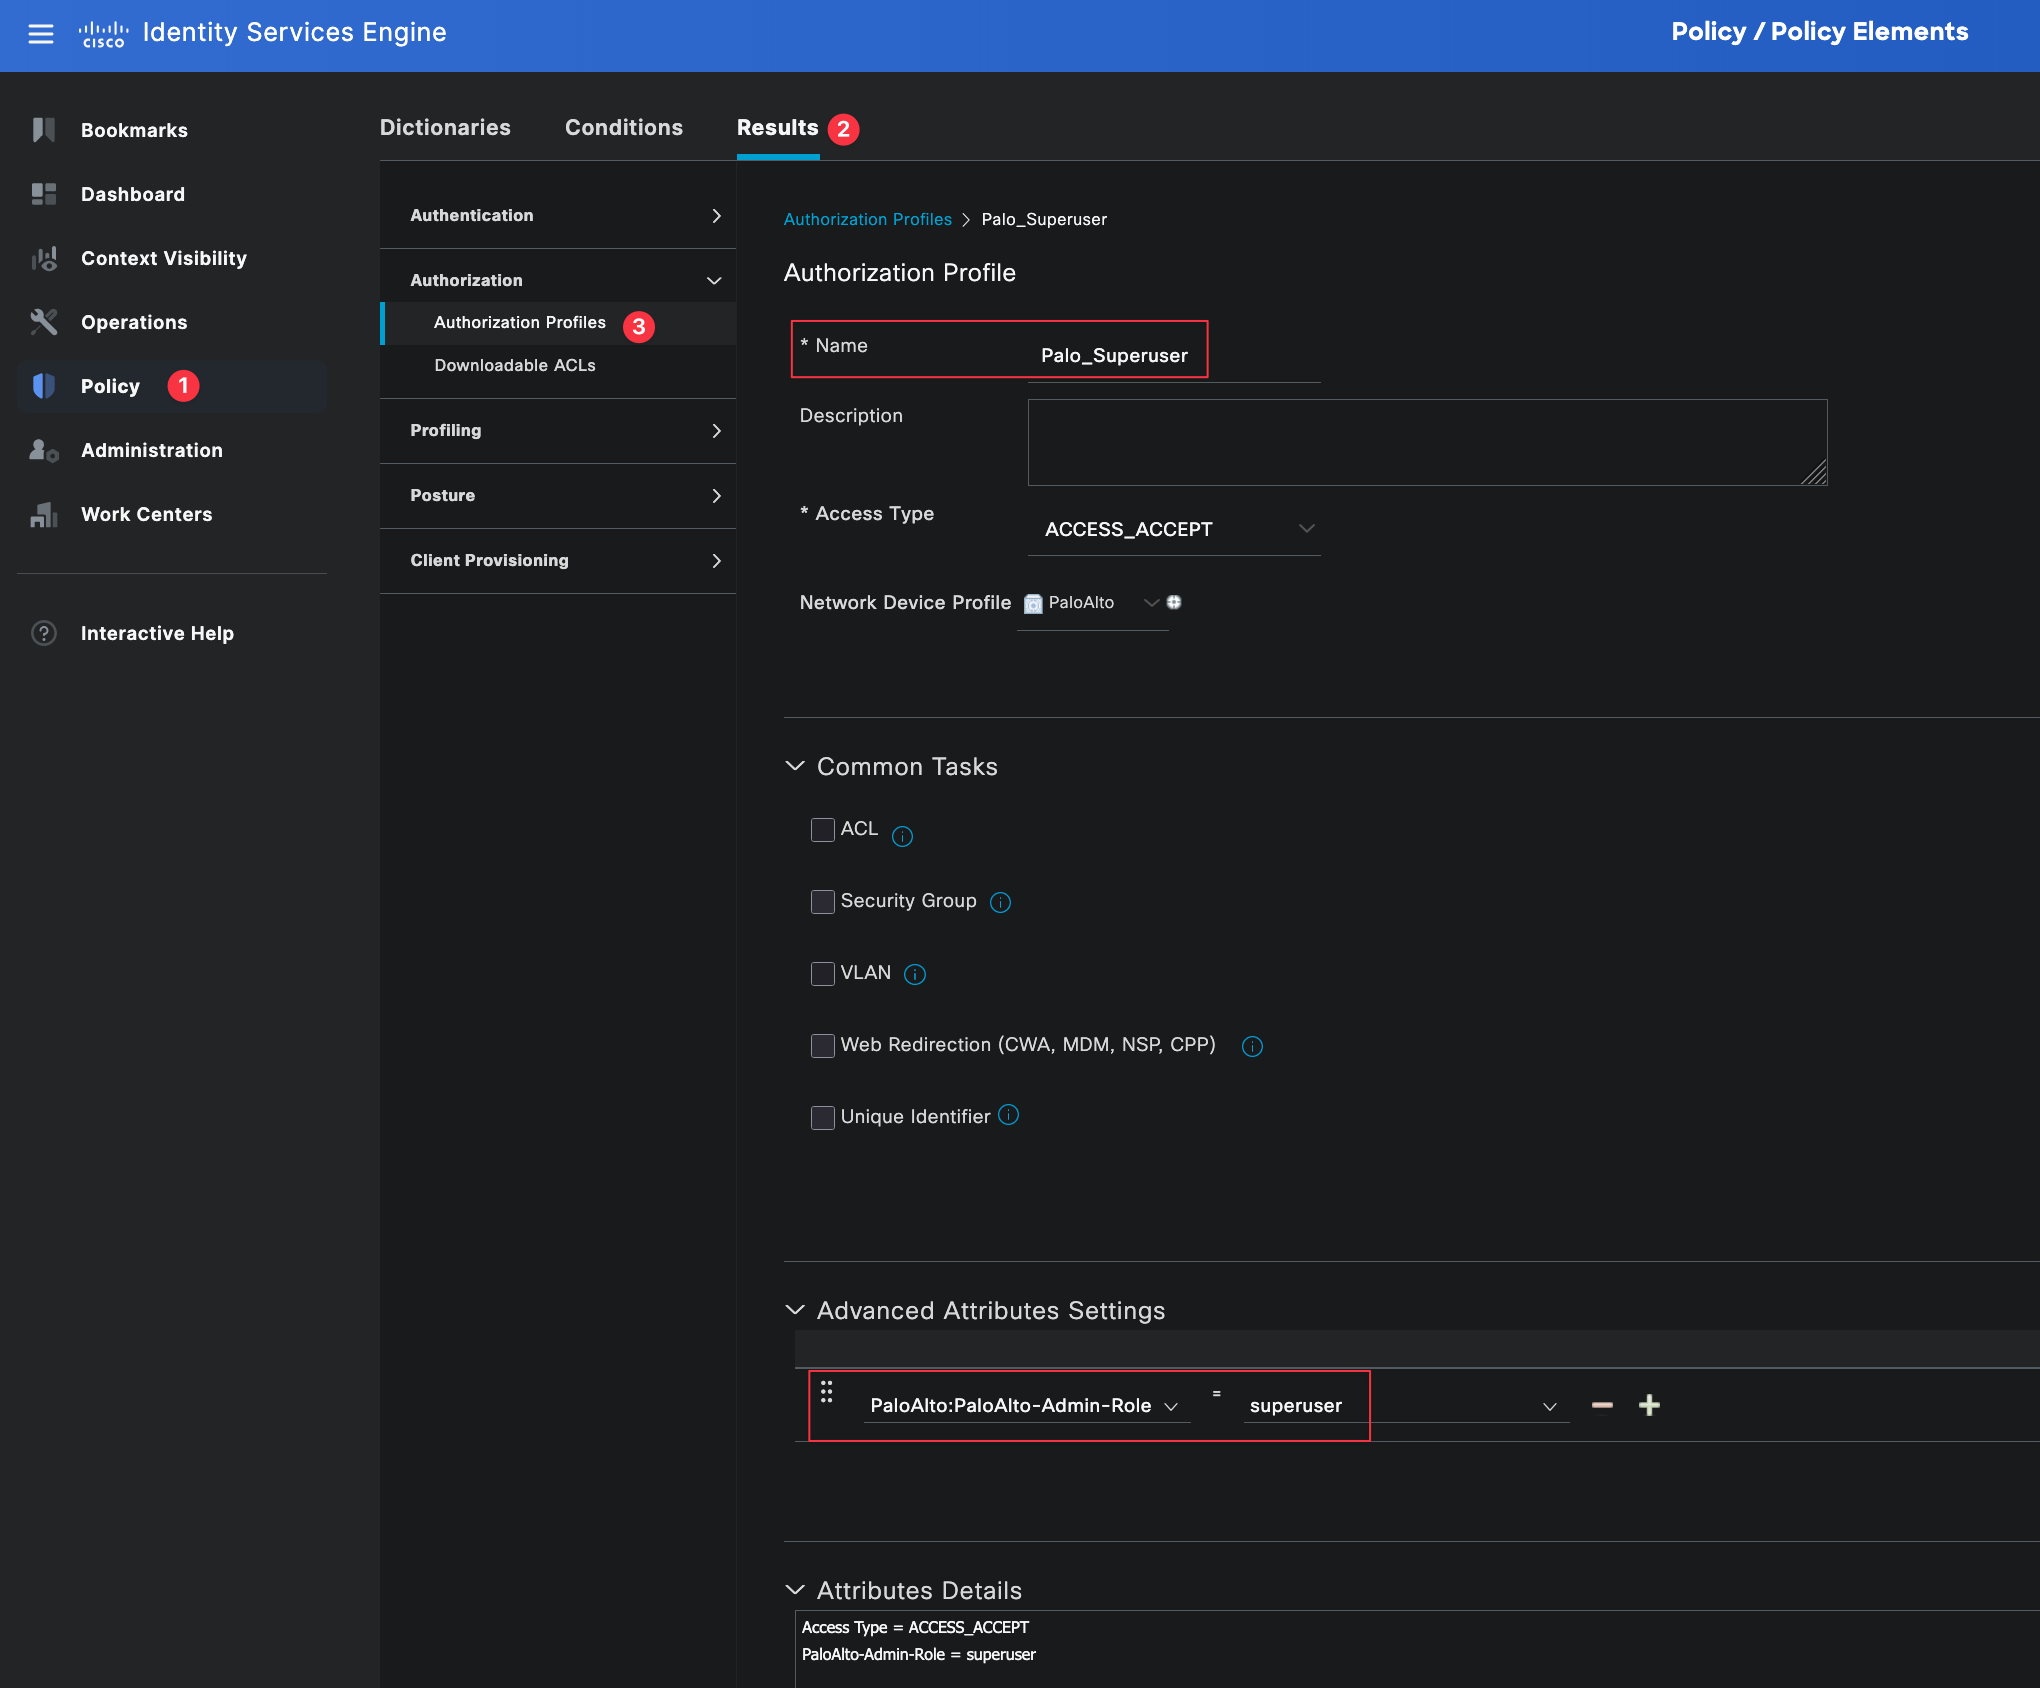
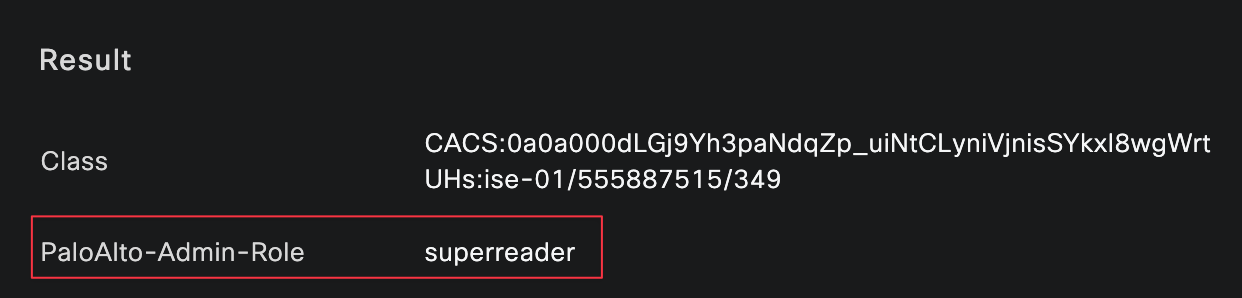
Each profile is set to ACCESS_ACCEPT and associated with the Palo Alto Admin Role. Under advanced attributes, we will use the PaloAlto-Admin-Role attribute to tell the firewall which admin role should be applied to the user. Make sure the profile name sent by the Radius server matches exactly the admin role name configured on the firewall (superuser and superreader in this case, these are the built-in roles).
Identity Groups and Users
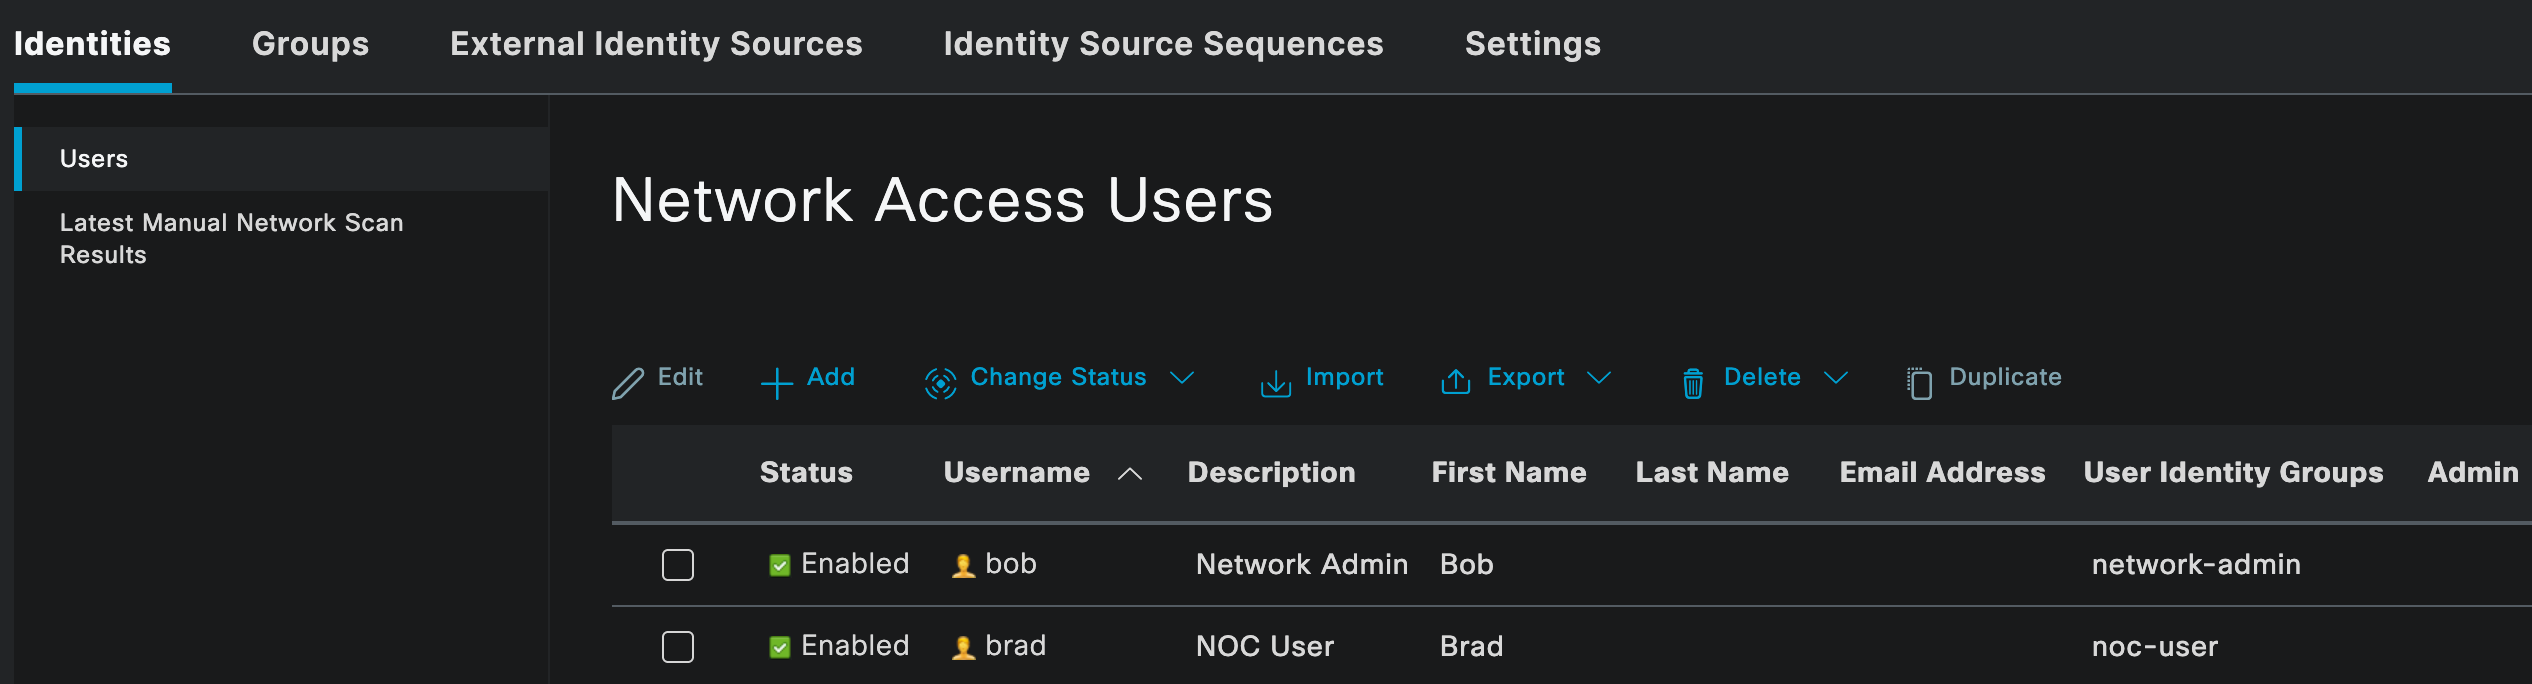
As mentioned earlier, I am using local users and identity groups in Cisco ISE for this example. In most production environments, this would usually be an external identity source such as Active Directory.
Here, you can see two local users, bob and brad, each assigned to their respective identity groups. The network-admin group will later be mapped to the superuser profile on the firewall, while the noc-user group will be mapped to the superreader profile.
Policy Sets
Policy Sets in Cisco ISE define how authentication and authorization requests are handled. They allow you to match incoming requests against specific conditions and then apply the appropriate authentication and authorization logic.
You can navigate to policy sets by going to Policy, then Policy Sets. In this example, we created a dedicated policy set for Palo Alto firewalls.
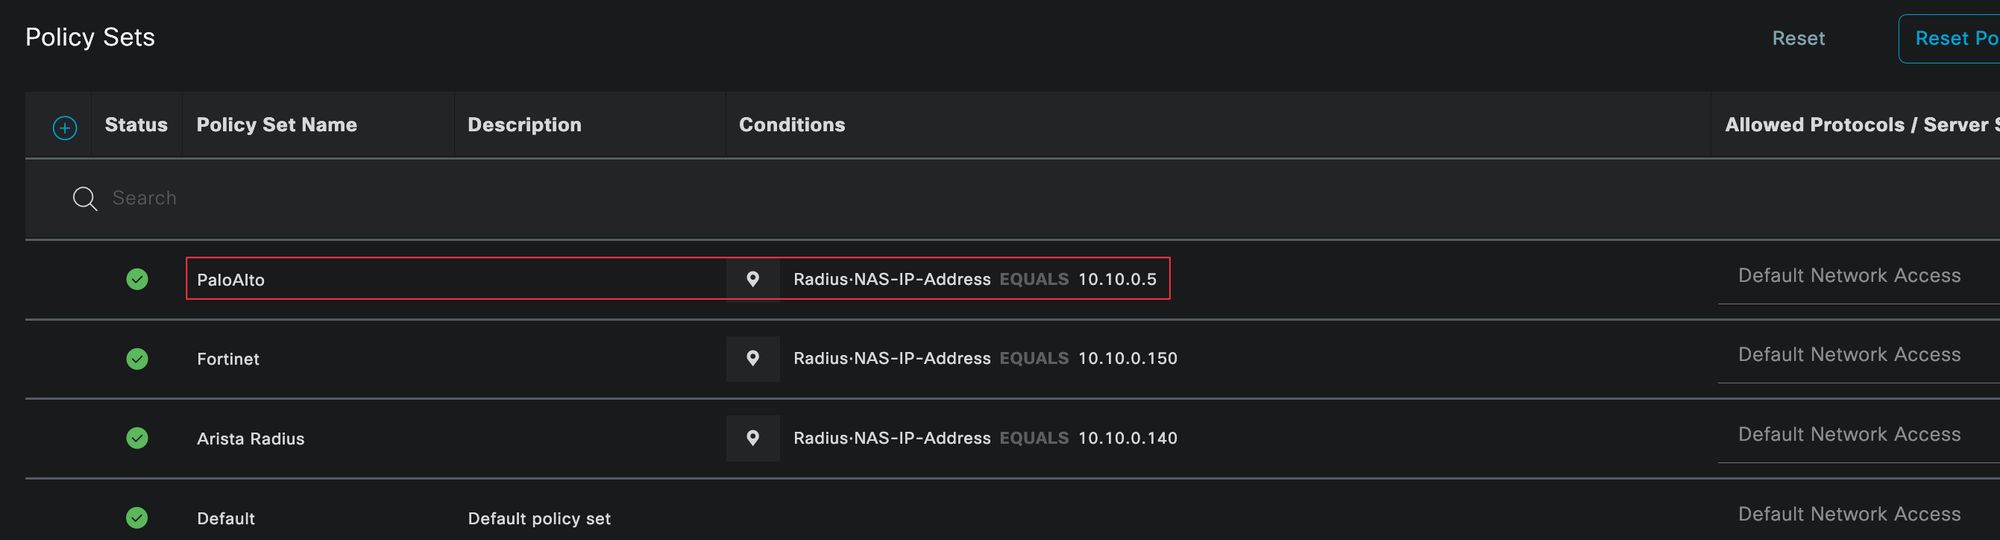
A policy set can be matched against many conditions, such as device vendor, device location, or protocol type. To keep things simple, we are matching the policy set based on the IP address of the firewall using the Radius NAS IP address (this doesn't scale well on real environments, as you may have guessed 😄)
Within the policy set, the authentication policy is evaluated first. This step verifies who the user is and checks their credentials. In our case, authentication is done against the internal user database in ISE.
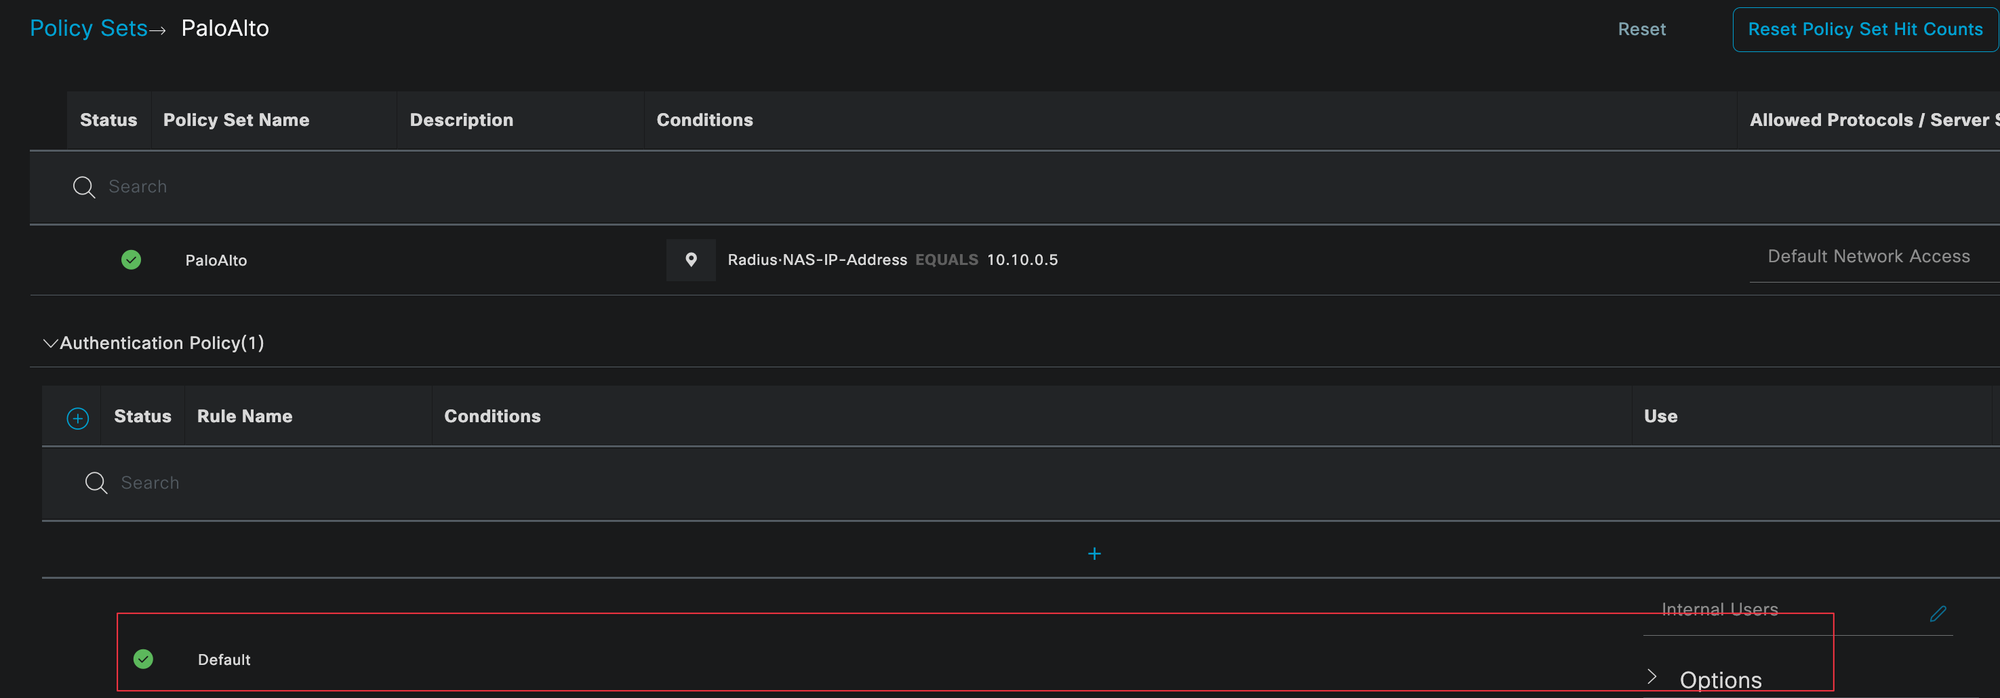
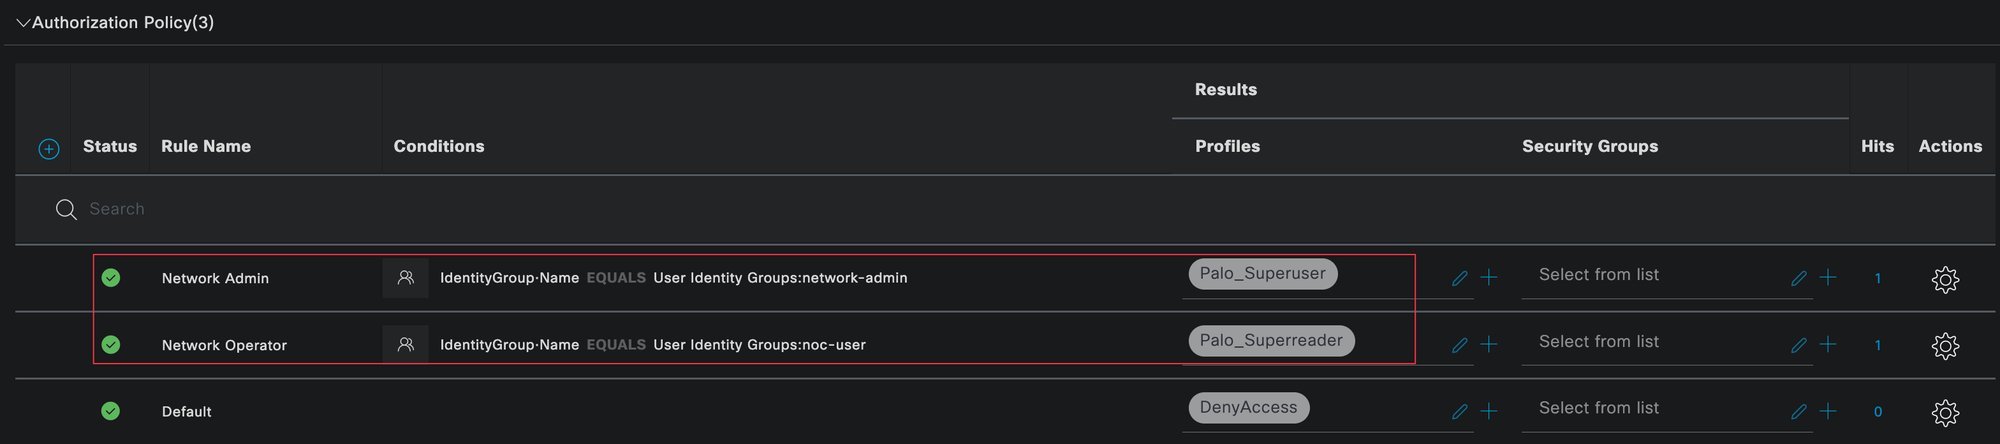
Once authentication is successful, the authorization policy is evaluated. This determines what level of access the user should receive. Here, we match users based on their identity group and return the appropriate authorization profile, which maps the user to either the superuser profile or the superreader profile.
Testing and Verification
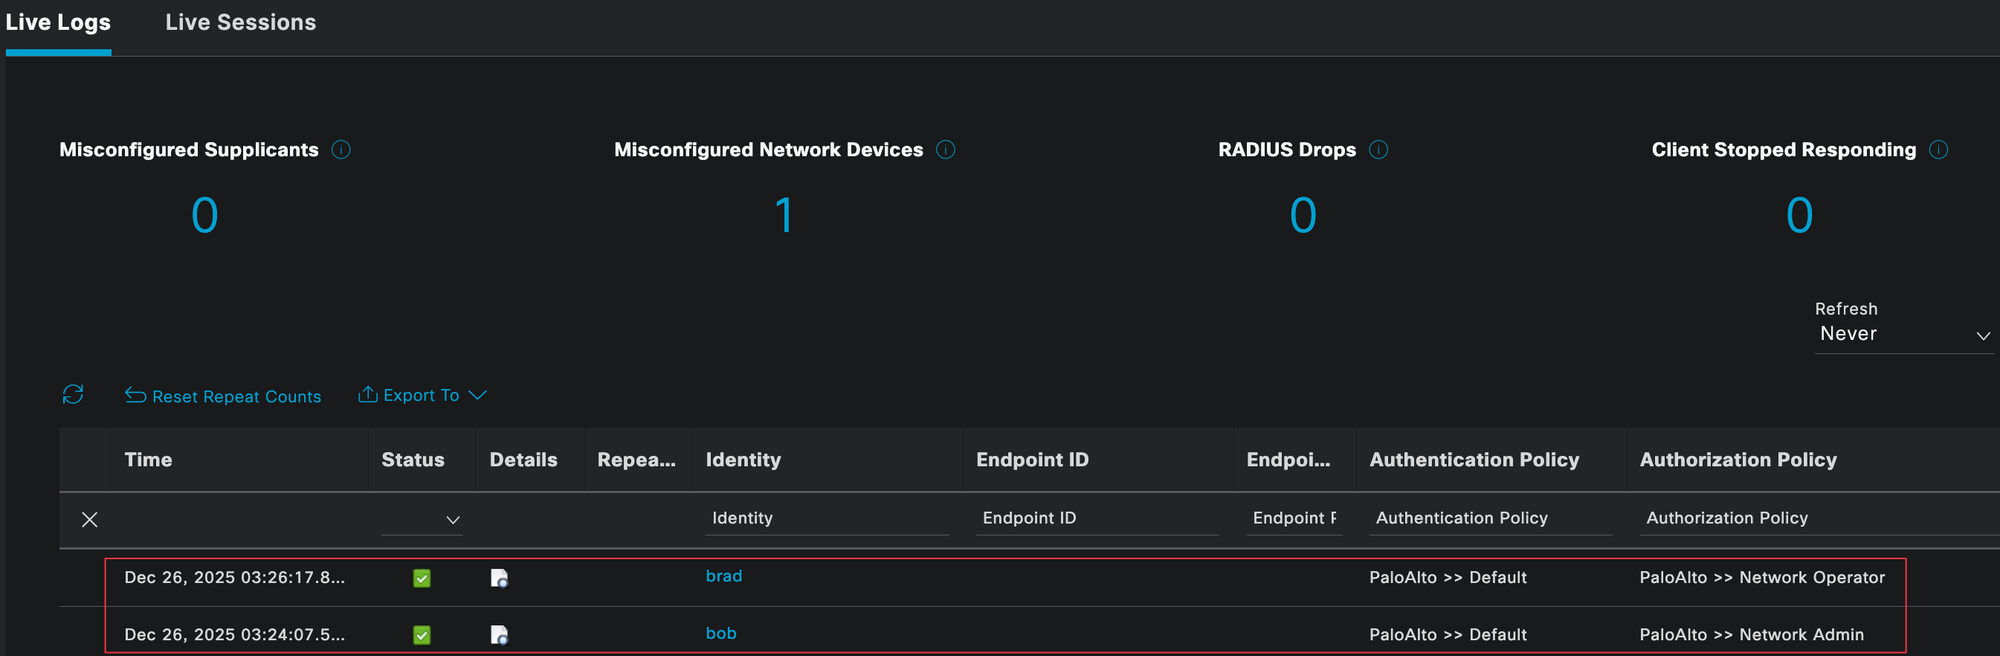
To verify everything is working as expected, you can check the Radius authentication logs in Cisco ISE. Navigate to Operations and look at the Live Logs. Here, you should see successful authentication and authorization events for both users.
I logged in as both bob and brad, and you can clearly see that each user matched the correct authentication and authorization policies, along with the expected authorization profile.


Creating Custom Admin Roles
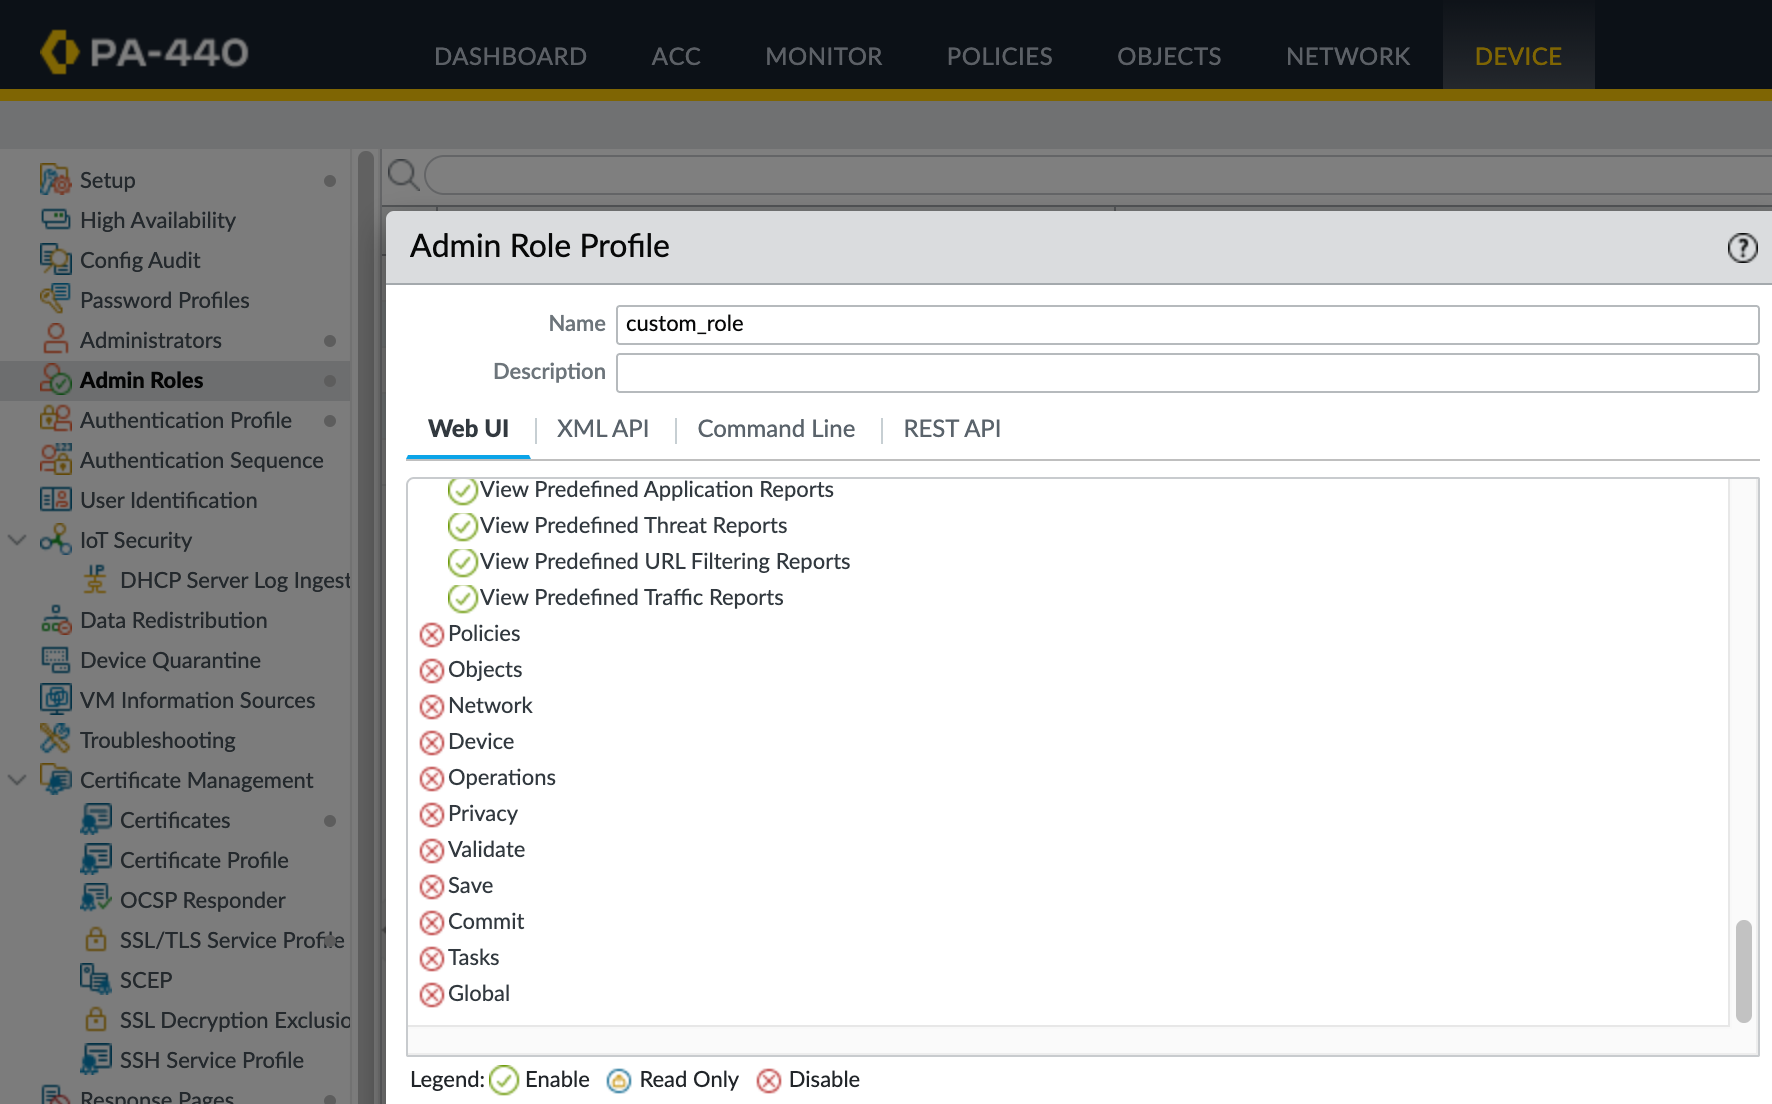
So far, we have only used the built-in admin roles such as superuser and superreader. Palo Alto also allows you to create custom admin roles with very fine grained control over what an administrator can and cannot do.
To create a custom role, navigate to Device, then Admin Roles, and create a new role. From here, you can allow, deny, or set read-only access for each section of the GUI, CLI, and APIs.
If you create a custom role, you also need to update Cisco ISE. Specifically, you need to create a new authorization profile on ISE and reference the exact name of this custom role. That role name is what ISE will send back to the firewall during login, and it must match what is configured on the Palo Alto firewall.
PEAP-MSCHAPv2
When we created the Radius server profile earlier, we selected PAP as the authentication protocol. Password Authentication Protocol (PAP) is one of the simplest authentication methods for Radius, but it transmits credentials with minimal protection. While Radius encrypts the password attribute, PAP's basic design makes it vulnerable to packet sniffing and man-in-the-middle attacks, especially if the Radius shared secret is leaked.
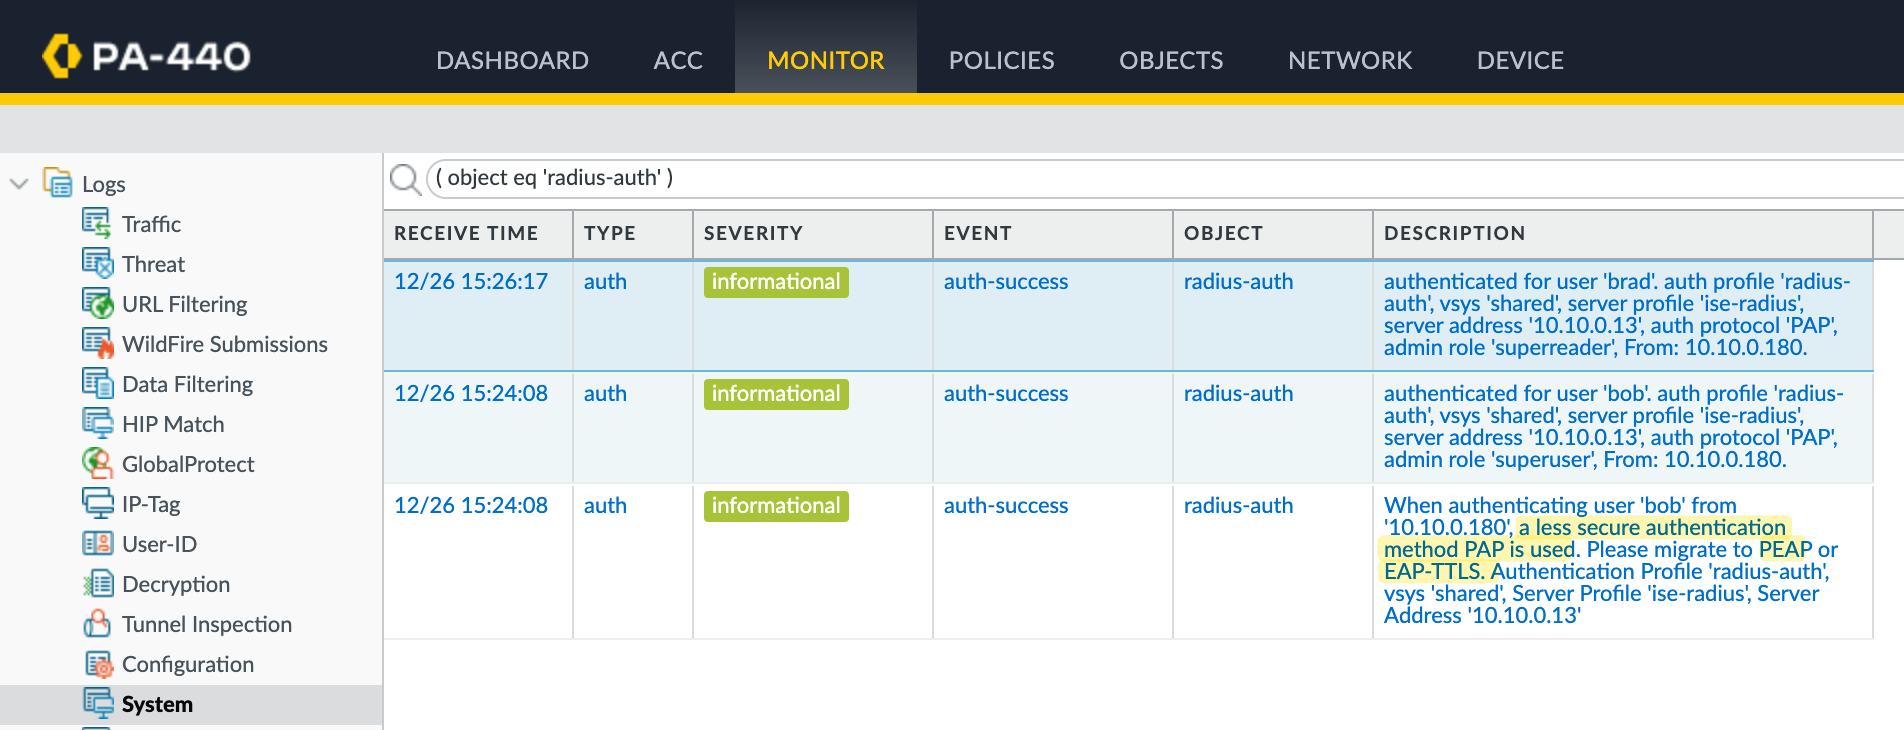
If you look at the Palo Alto logs, you will see a warning stating that PAP is a less secure authentication method and recommending PEAP or EAP-TTLS instead.
PEAP-MSCHAPv2 offers significantly stronger security by establishing an encrypted TLS tunnel before any credentials are exchanged. Instead of transmitting passwords, it uses a challenge-response mechanism within this protected channel, providing mutual authentication.
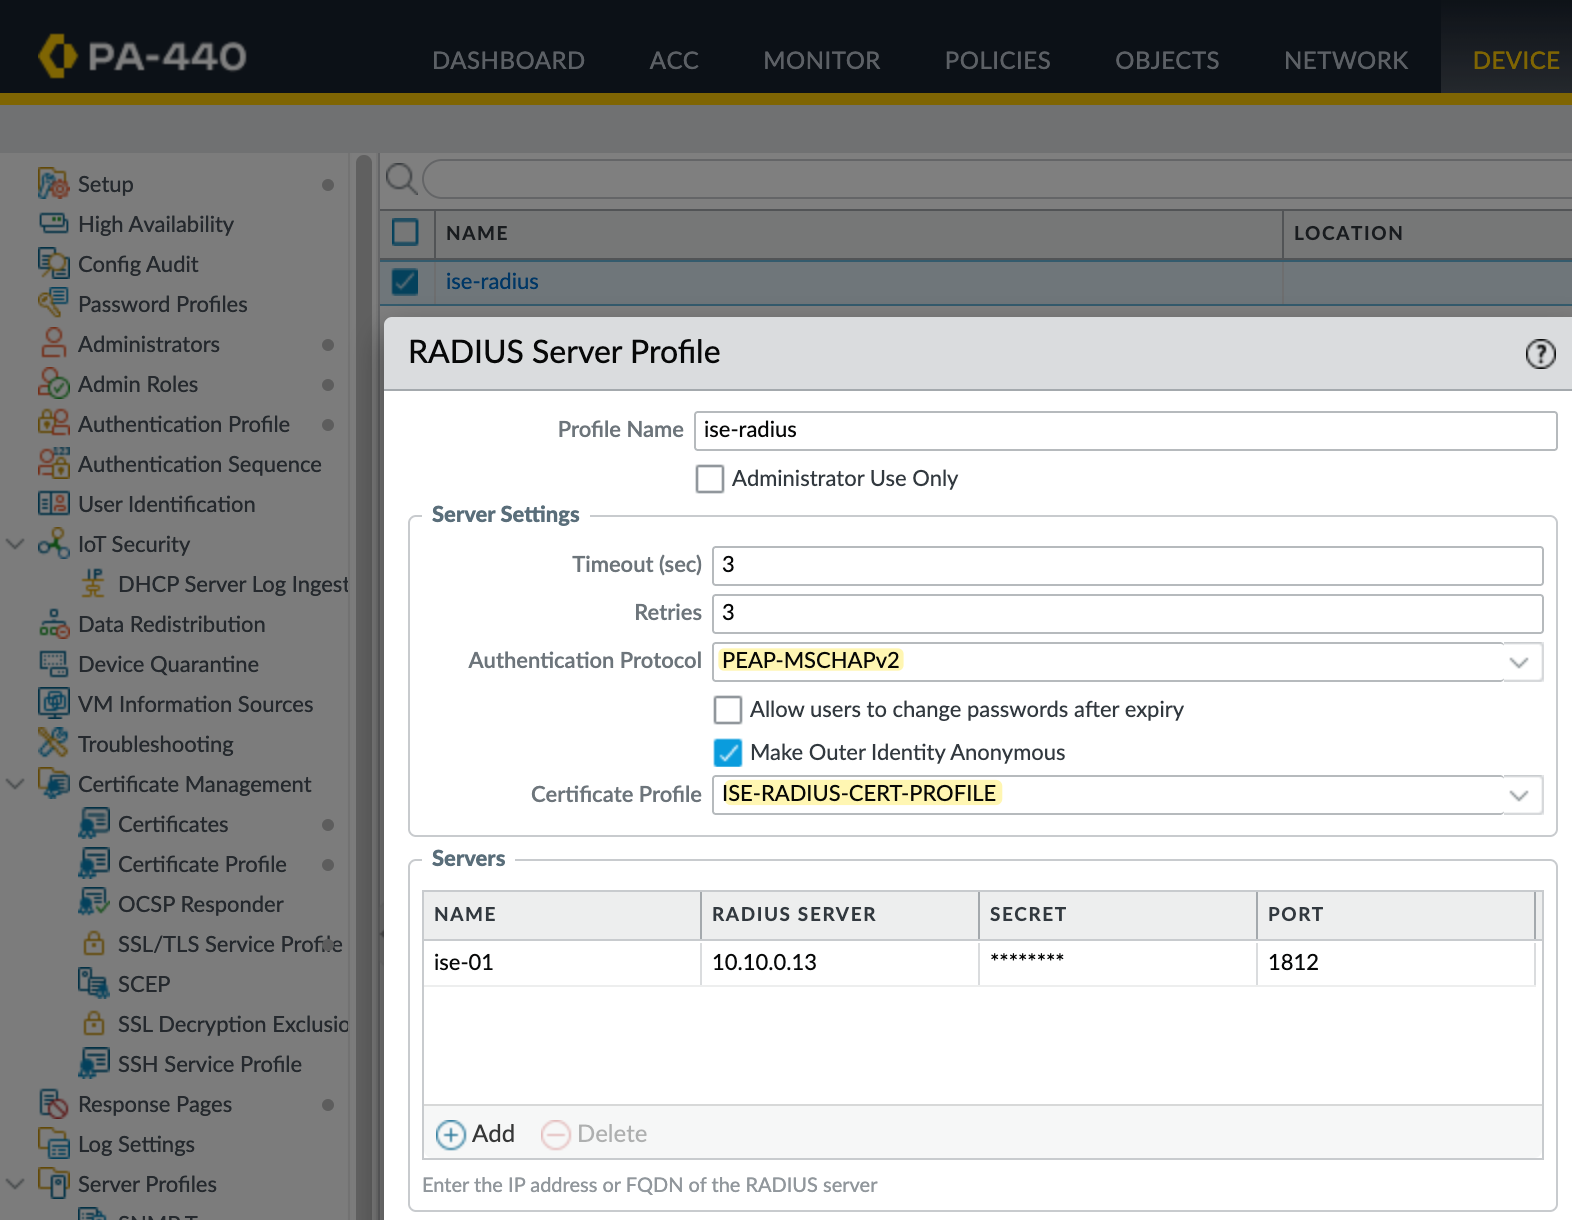
To use PEAP with MSCHAPv2, you need to configure a Certificate Profile on the firewall. This is required because PEAP establishes a TLS tunnel between the firewall and the Radius server before any user credentials are exchanged. The Radius server must have a certificate that it presents during the TLS handshake. This certificate is used to prove the identity of the Radius server.
On the firewall, you need to trust the Certificate Authority that issued the Radius server certificate. This is done by importing the CA certificate and referencing it in a certificate profile. In a production environment, you would normally use an internal CA to issue a server certificate for Cisco ISE. The firewall would then trust the CA.
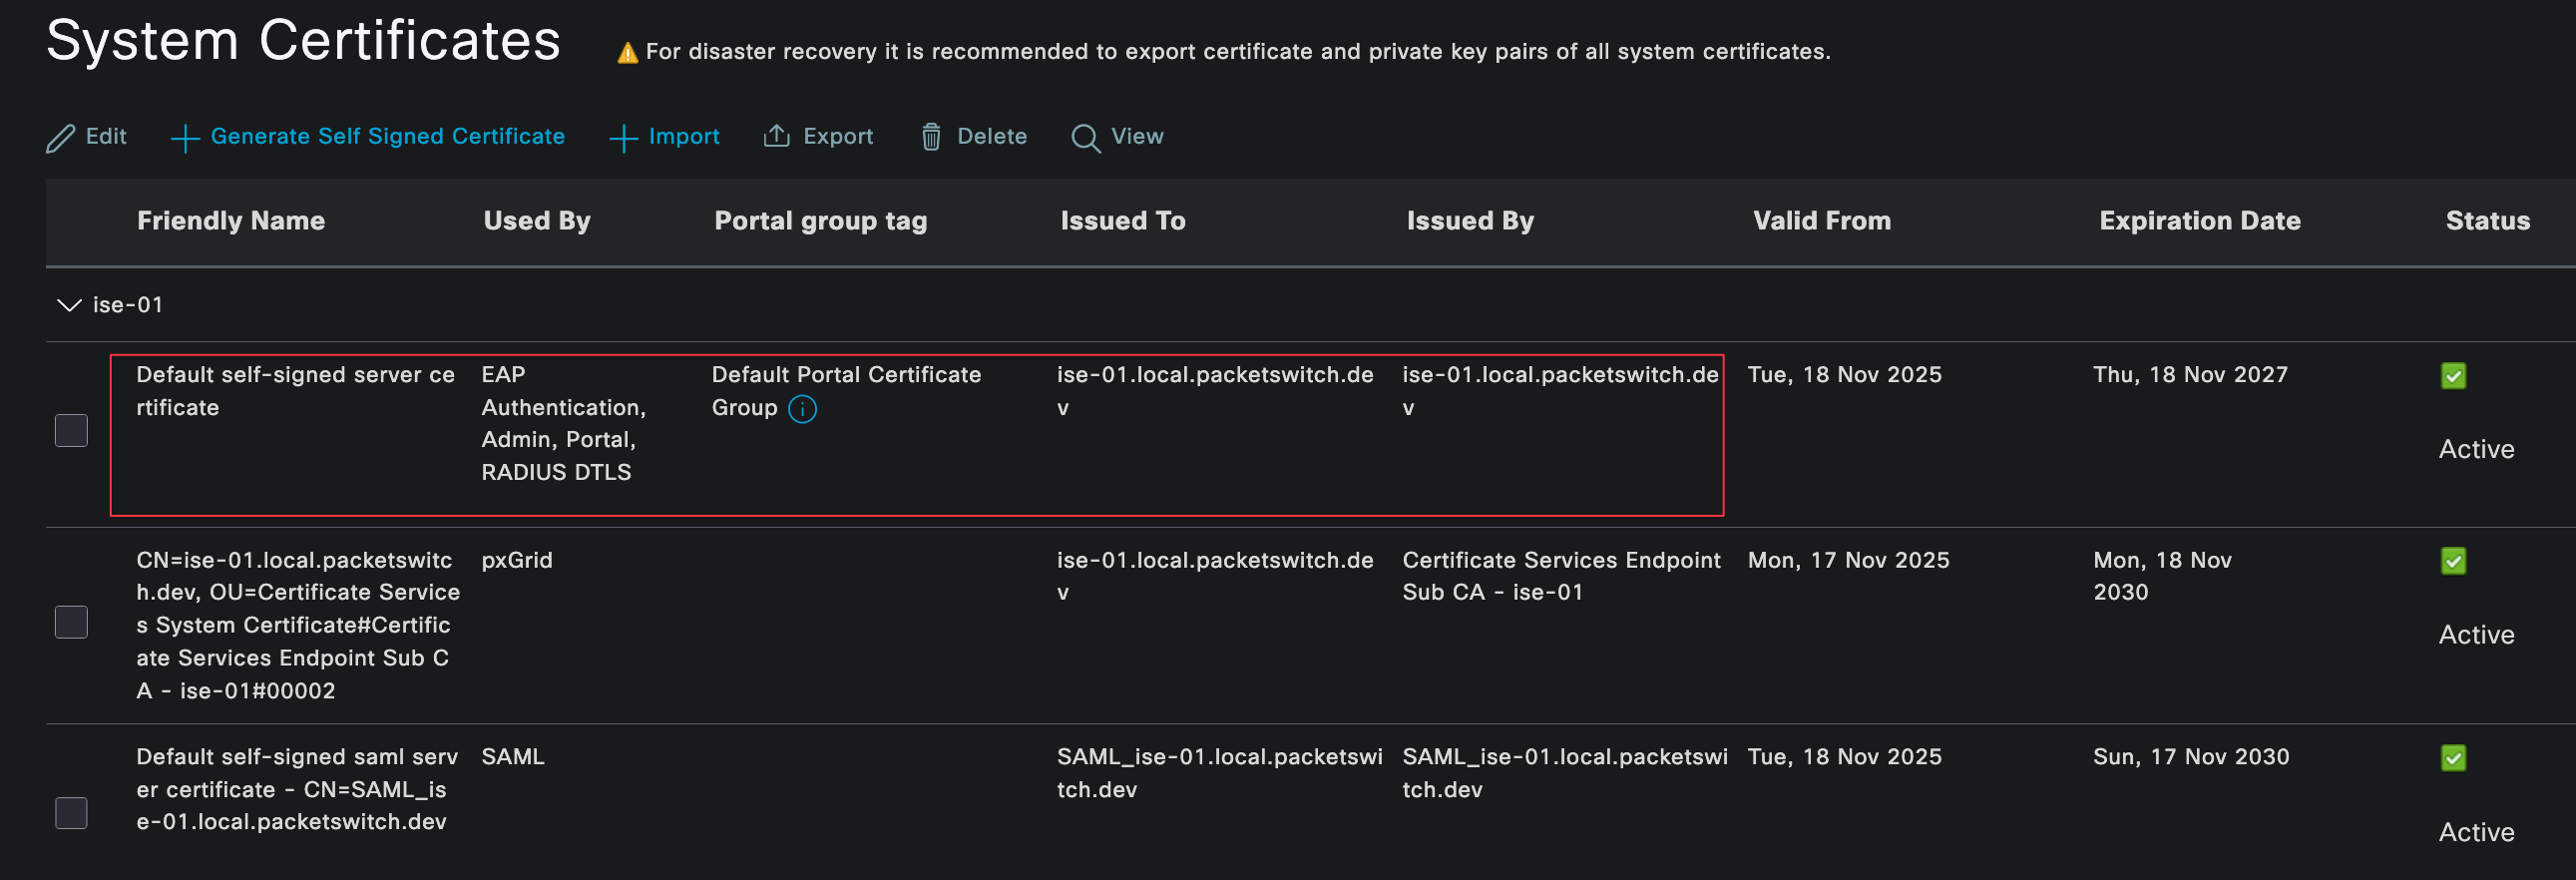
Since this is a lab setup, I am keeping things simple. I exported the self-signed server certificate from ISE and imported it into the firewall. I then created a certificate profile that trusts this certificate.
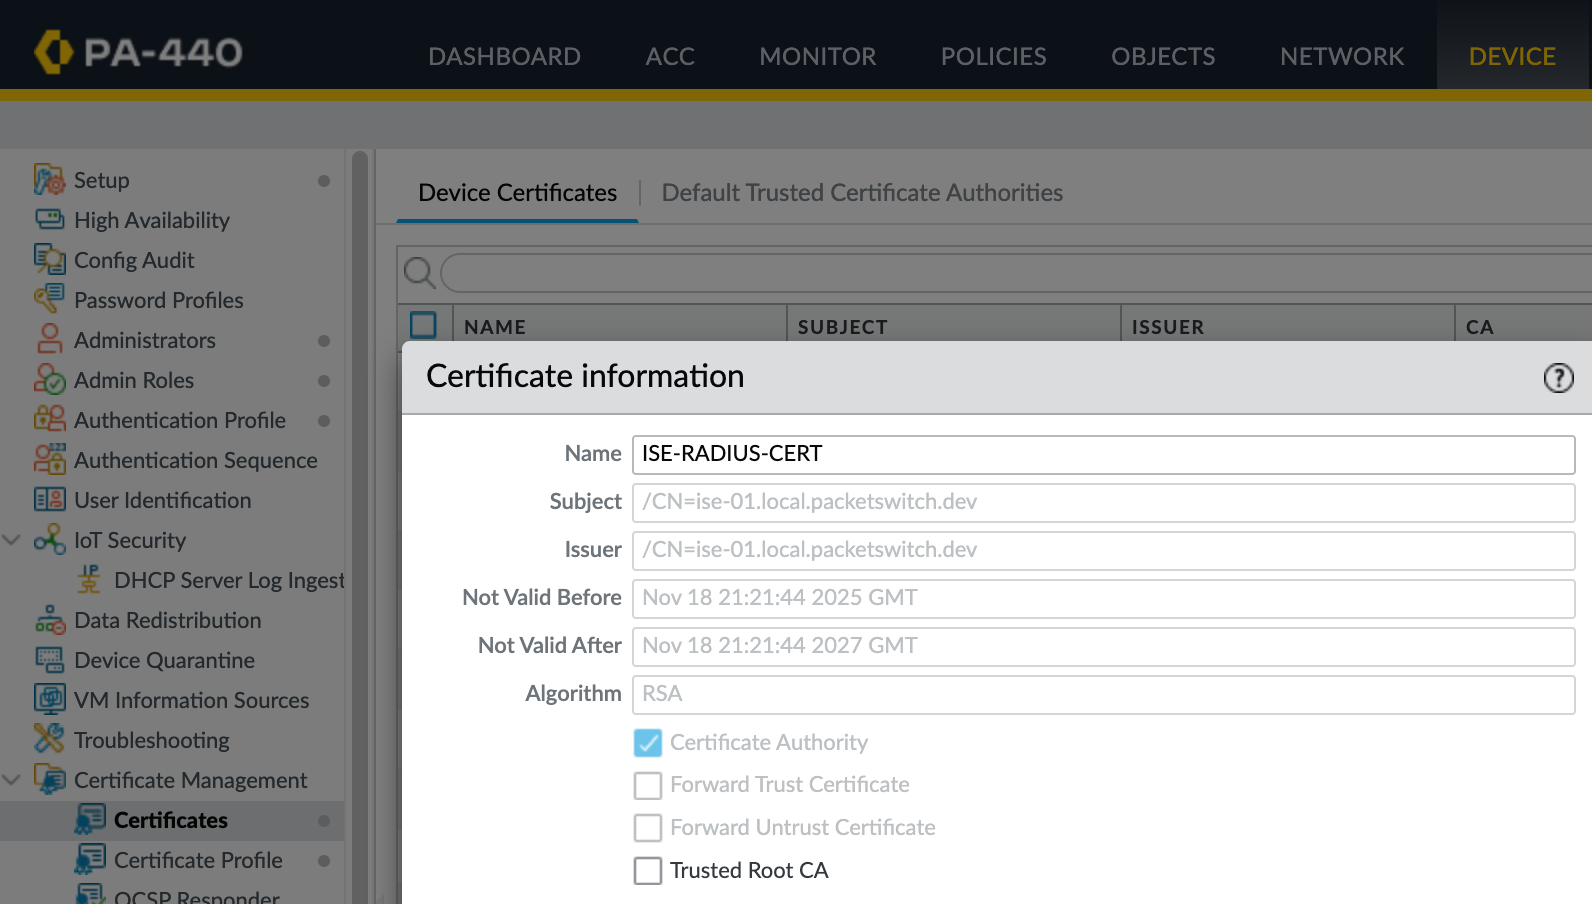

Finally, I referenced that profile in the Radius server configuration.
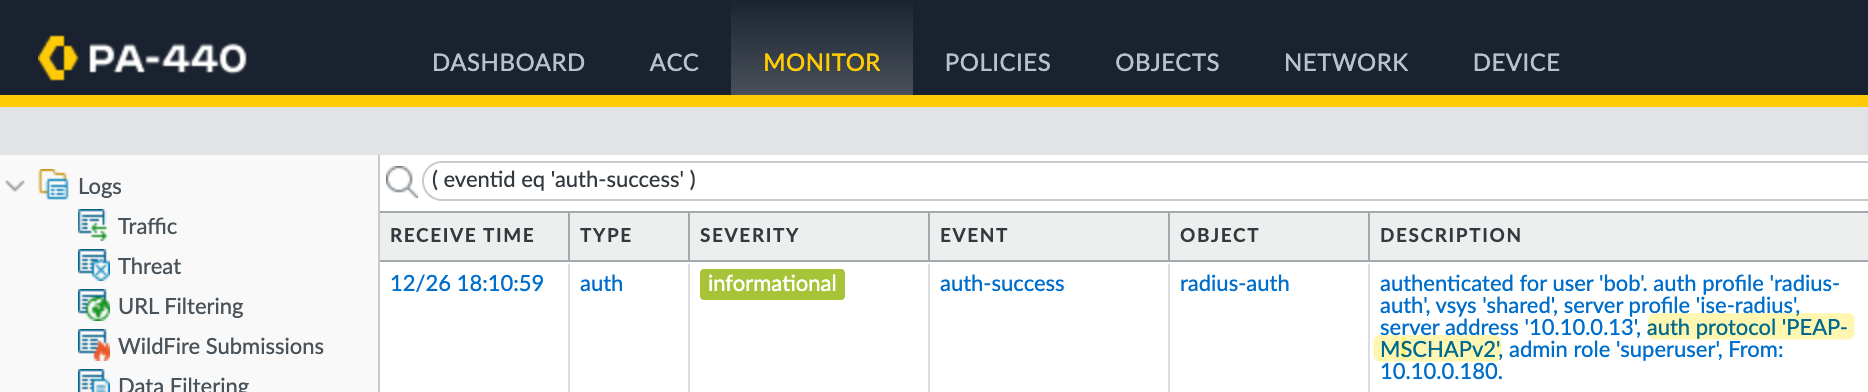
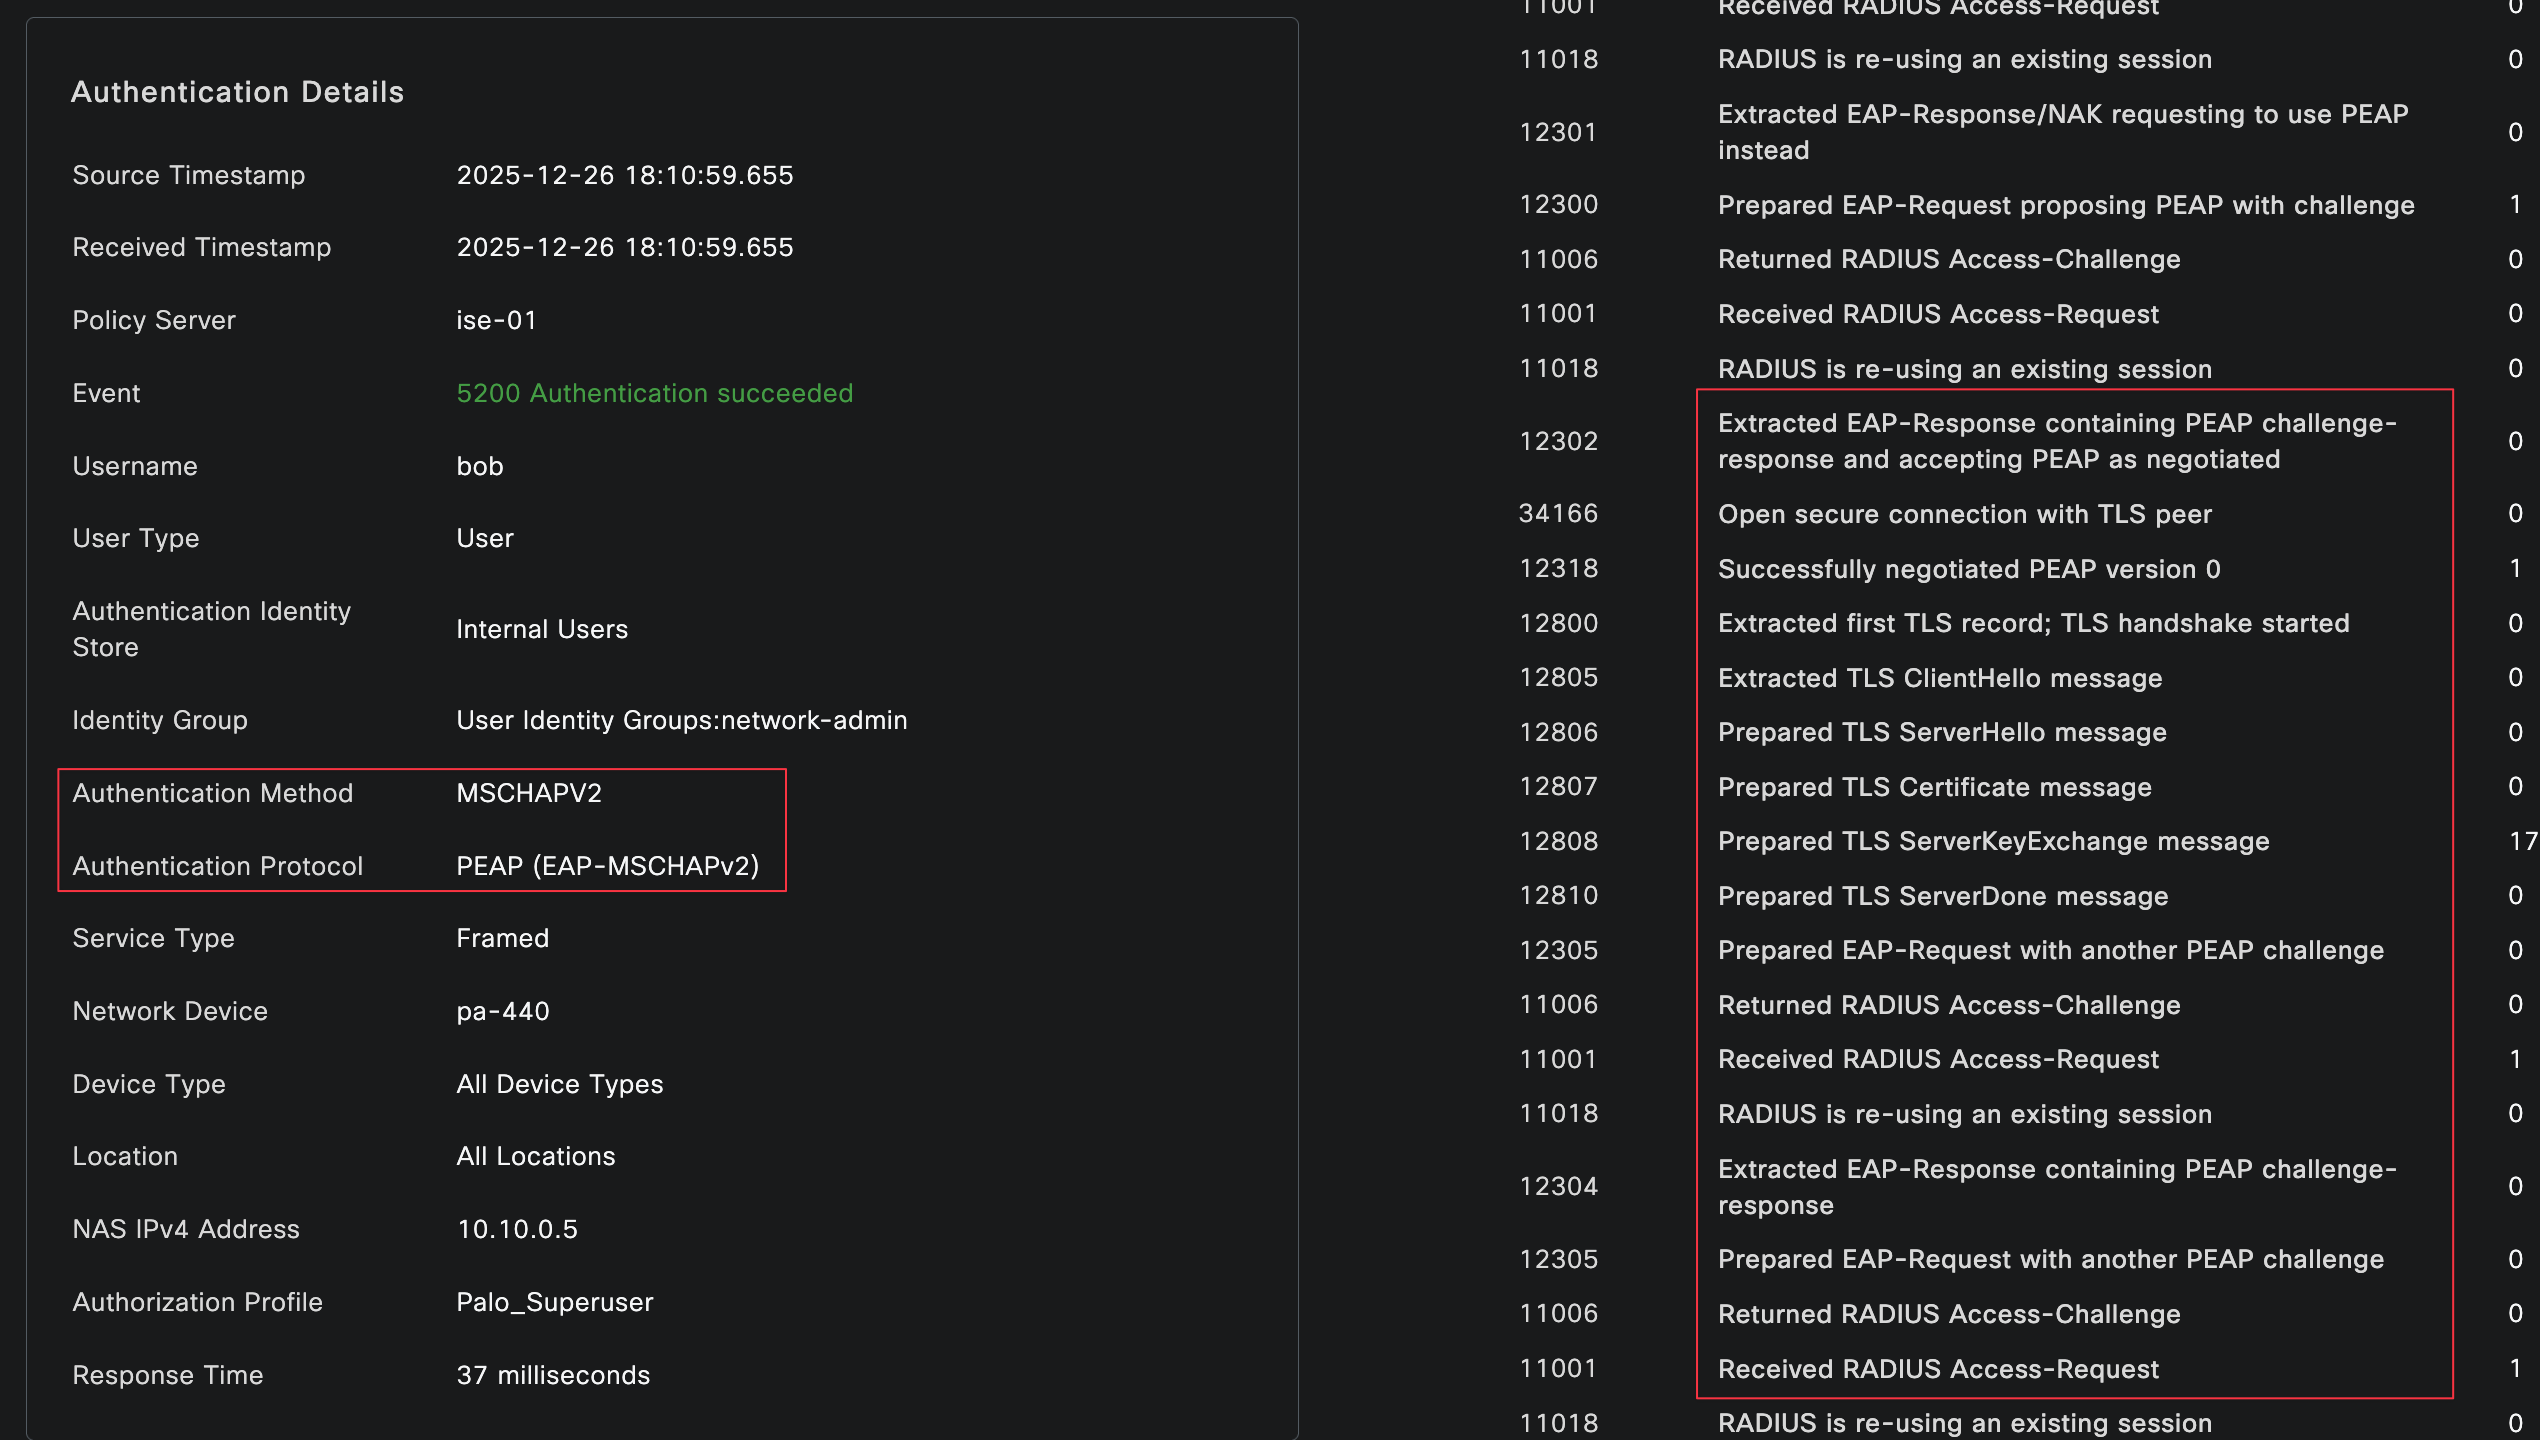
Now, if I reauthenticate, we can see that PEAP MSCHAPv2 is being used by checking the authentication logs on both the firewall and Cisco ISE.