I’ve worked with Cisco, Arista, and Juniper switches most of my life, but when I first started using UniFi switches in my homelab, I found myself a bit confused. The way VLANs are configured on UniFi switches is slightly different from what I was used to. In this post, I’ll go through how to configure VLANs on UniFi switches, specifically focusing on the USW-Pro-Max-16 and USW-Lite-8 models.
Quick Recap on VLANs
VLAN stands for Virtual LAN, and it's a way to logically segment a network, even if all devices are connected to the same physical switch. Different vendors use slightly different terms when it comes to VLAN port types. For example, Cisco calls them access and trunk ports, while others might refer to them as untagged and tagged ports.
An untagged (or access) port is typically used to connect end devices like PCs or printers. These devices have no awareness of VLANs, they just send regular Ethernet frames. When the switch receives a frame on an access port, it tags it with the VLAN configured for that port before forwarding it internally or out via a trunk port.
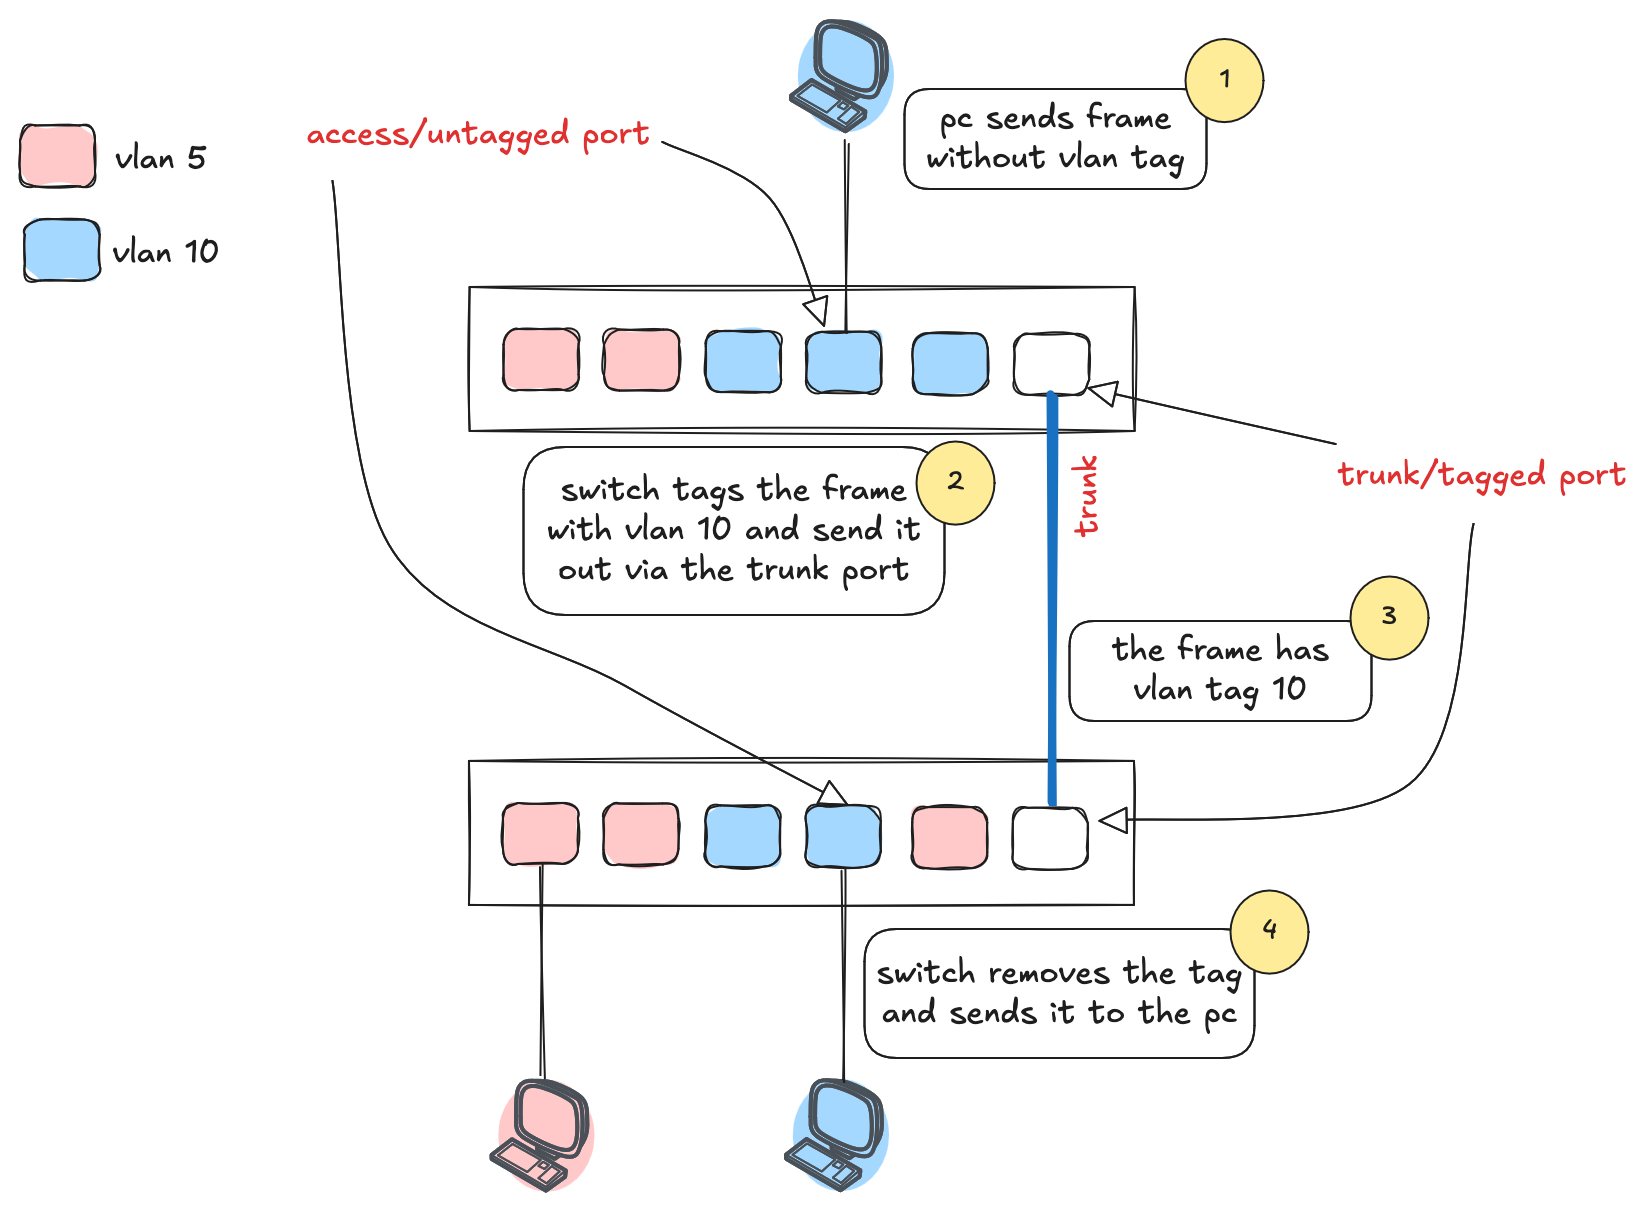
Tagged (or trunk) ports are used between switches or to other network devices that understand VLAN tagging. When a tagged frame arrives at the other end, the switch looks at the VLAN tag and forwards it accordingly. If the destination is an access port, the switch strips the tag before sending the frame to the end device. As shown in the diagram, the PC sends a plain frame, the switch tags it with VLAN 10, forwards it through a trunk port, and the receiving switch removes the tag before delivering it to the second PC.
Native VLAN
The native VLAN is the VLAN ID that a switch assigns to untagged traffic arriving on a trunk (tagged) port. It’s essentially the default VLAN for any traffic that comes in without a tag on a trunk port. If a switch receives a tagged frame on an access (untagged) port, it drops the frame; that port expects only untagged traffic from end devices.
On the other hand, when a trunk port receives an untagged frame, the switch tags it with the native VLAN configured on that port. However, if the frame already has a VLAN tag and it matches the native VLAN ID configured on that port (say VLAN 20), the switch drops the frame.

VLAN Summary
- VLANs are used to logically segment a network on the same physical switch
- Cisco uses the terms access and trunk ports; other vendors may call them untagged and tagged
- Access/untagged ports connect to end devices and expect untagged frames
- Trunk/tagged ports carry VLAN-tagged frames between switches or VLAN-aware devices
- End devices are not VLAN-aware; the switch tags frames based on the port’s VLAN
- If a tagged frame arrives on an access port, the switch drops it
- Native VLAN is used to tag untagged frames arriving on a trunk port
- If a tagged frame arrives on a trunk port and the VLAN tag matches the native VLAN, the switch drops it
Creating VLANs on UniFi
You can create VLANs in the UniFi controller by going to Settings > Networks. Here, you simply provide a name and specify the VLAN ID.
In my setup, I use my own firewall, so I selected Third-party Gateway as the router option. If you're using a UniFi gateway, the available options might look slightly different depending on your setup.

Assigning VLANs to the Port
In the Cisco world, the process typically starts with creating VLANs on the switch. Once the VLANs are created, you configure individual ports, marking them as access ports and assigning them to specific VLANs. For uplinks, you configure trunk ports and specify which VLANs are allowed on those trunks. You also assign a native VLAN to handle any untagged traffic on those trunk links.
With UniFi, the approach is slightly different. By default, all ports on a UniFi switch act as trunk (tagged) ports. This means every VLAN you've created in the UniFi controller is automatically allowed on all ports, unless you explicitly change it. So unlike Cisco, you don’t need to manually define which VLANs are allowed on each trunk unless you want to restrict them.
By default, the Native VLAN is set to VLAN 1, and Tagged VLAN Management is set to Allow All. This means the port will treat untagged traffic as part of VLAN 1, and it will also accept and forward tagged traffic for any VLANs you've created in the controller.
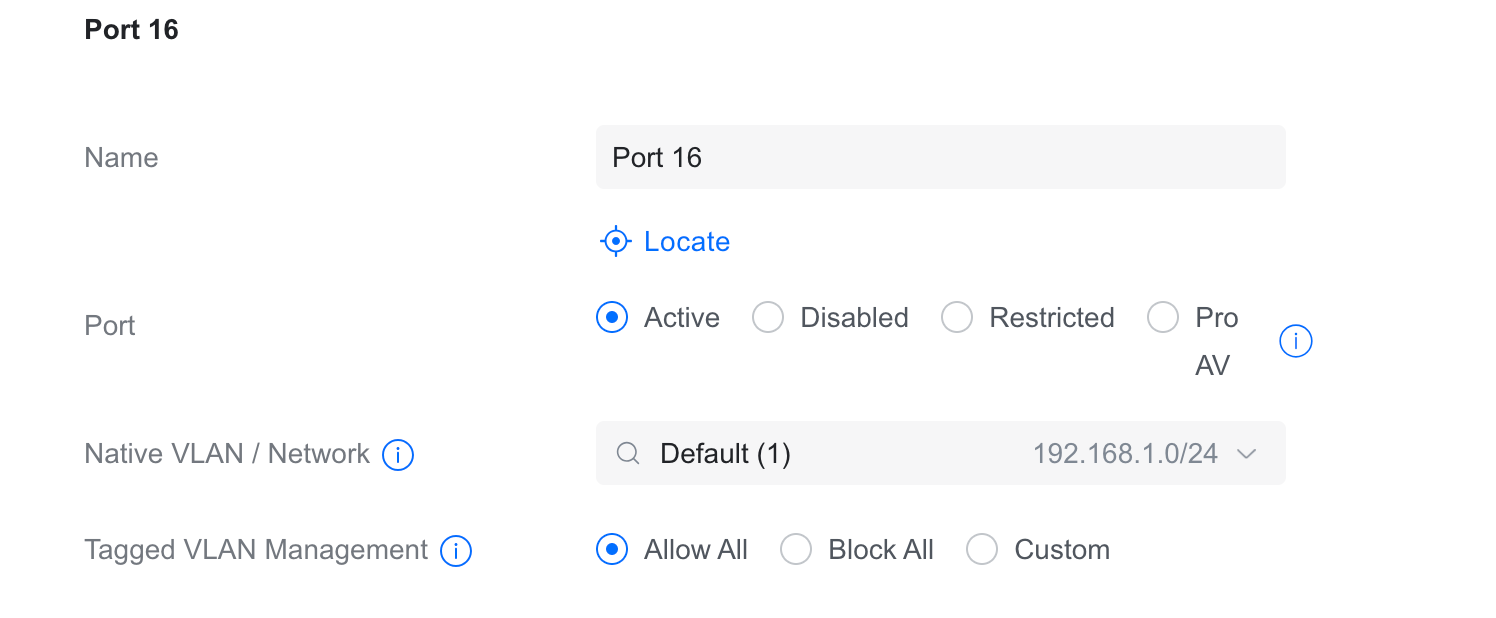
To convert a port into an access (untagged) port in UniFi, you set the Native VLAN on that port to the VLAN to which you want it to belong. This tells the switch: “Any untagged traffic on this port belongs to this VLAN.”

You can leave the Allowed VLANs setting as it is, which means the port can still technically carry traffic for any VLAN, but in practice, no tagged frames should be arriving on an access port. You can set the port truly untagged/access by blocking all the tagged VLANs by selecting 'Block All'.
So, if you're connecting a device that doesn't understand VLANs or won’t send tagged frames like most end-user devices, you can simply set the Native VLAN to the VLAN you want that port to use. Under Tagged VLAN Management, you can either leave it at the default 'Allow All', which means the port will still accept tagged frames for any VLANs, or if you want to treat it as a true access port that only allows untagged traffic for that specific VLAN, you can select 'Block All'.

UniFi Port Profiles
UniFi also gives you the option to create Port Profiles, which can save a lot of time when you need to apply the same VLAN settings across multiple switch ports. Instead of configuring each port individually, like setting the native VLAN, allowed VLANs, PoE, and other options, you can define a profile with all those settings and apply it wherever needed.

For example, you might have a port profile for IoT devices that assigns VLAN 20 as native VLAN and blocks all other VLANs. Once the profile is created, you just assign it to any port that needs that configuration.

UniFi VLAN Viewer
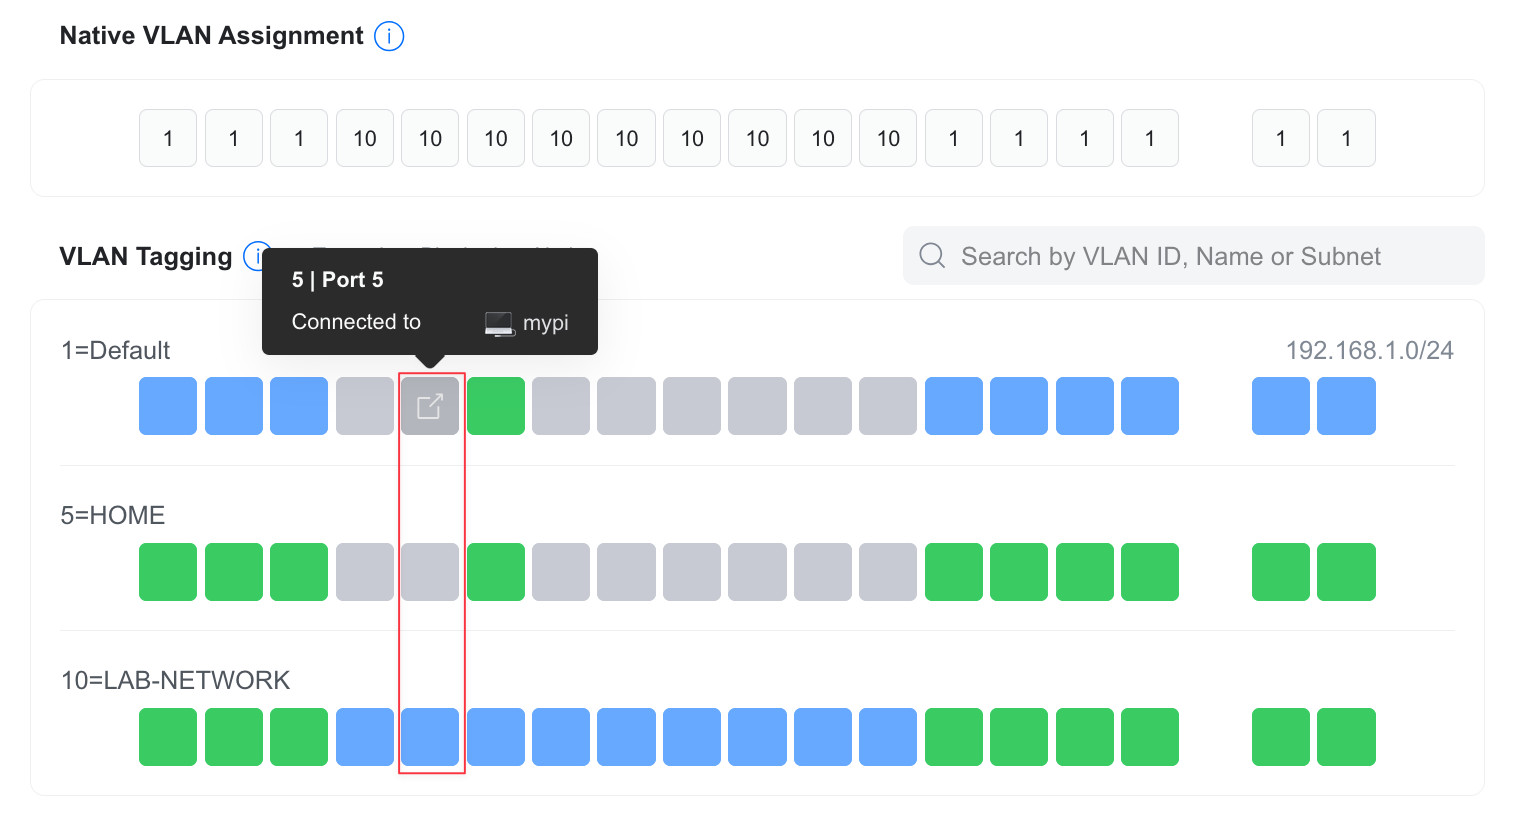
Before wrapping up, let’s take a quick look at the VLAN Viewer - a helpful visual tool in the UniFi controller that shows how each VLAN is applied across your switch ports.

At first, it might be a bit confusing to interpret, but let’s use port 6 as an example. I configured this port with Native VLAN 10 (LAB-NETWORK) and left Tagged VLAN Management set to Allow All, which is the default.
Each row here represents a VLAN. In this case, we have three - VLAN 1 (Default), VLAN 5 (HOME), and VLAN 10 (LAB-NETWORK). Each box represents a port. The color coding is key.
- Green means the VLAN is tagged (trunked) on that port
- Blue means that VLAN is set as native (untagged) on that port
- Grey means that VLAN is blocked on that port
Looking at port 6
- VLAN 10 is blue, meaning it's the native VLAN for this port
- VLAN 1 and VLAN 5 are green, meaning they're tagged VLANs allowed on this trunk
So, port 6 accepts untagged traffic as VLAN 10 and will also pass tagged traffic for VLANs 1 and 5.
If we now look at port 5 now, it is connected to a device named 'mypi' and is configured with VLAN 10 (LAB-NETWORK) as its native VLAN, shown in blue. In the VLAN 1 and VLAN 5 rows, this port is grey, meaning tagged traffic for those VLANs is blocked. This setup makes port 5 behave like a classic access port for VLAN 10, only accepting untagged traffic and dropping any tagged frames from other VLANs.