The Infrahub Python SDK allows you to interact with Infrahub programmatically and can be used to query, create, modify, and delete data. In a previous blog post, we looked at how to query data using the Python SDK and explored various examples, including filters, relationships, and how to retrieve related data.
OpsMill has partnered with me for this post, and they also support my blog as a sponsor. The post is originally published under https://opsmill.com/blog/infrahub-python-sdk-create-modify-delete/
In this post, we’ll focus on how to create, modify, delete and upsert data using the SDK. We’ll walk through practical examples that show how to add new resources, update existing ones, and delete data from Infrahub.
Throughout this post, we’ll be using the Infrahub sandbox, which is freely available. The sandbox already has some data in it, so if you’d like to follow along or try this yourself, you can use it without needing to set up anything.
Initial Setup
In the previous post, we covered the basics of using the Python SDK, including how to install it and set up the client object. If you’re new to the SDK, I recommend going back to that first article to start from the install.
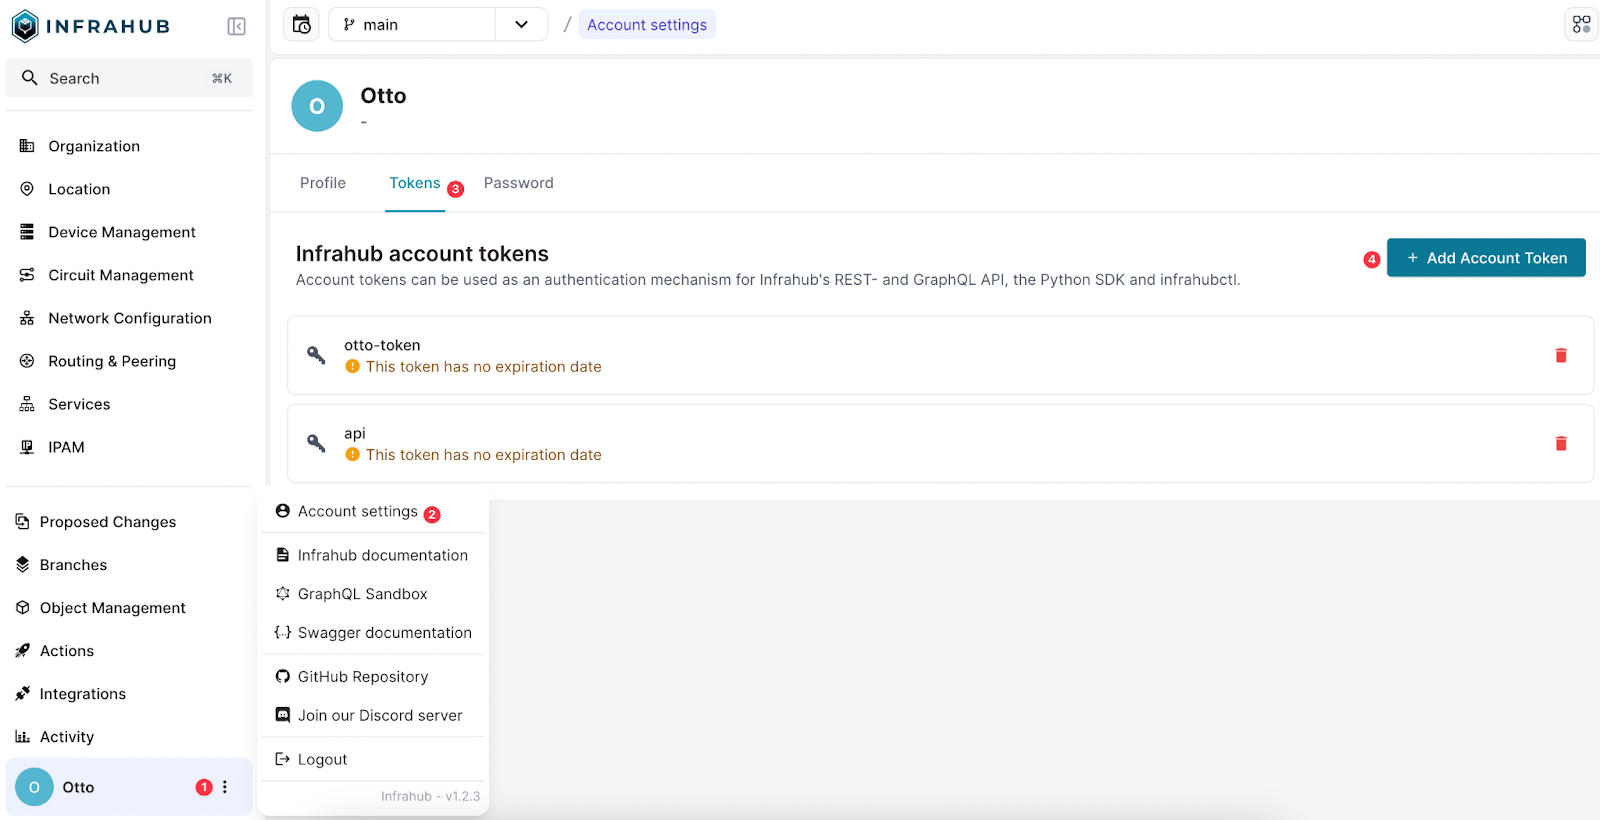
To get started today, I’ve generated an API token on the Infrahub demo instance and set up a client object using that token. This client object will be used for all the examples in this post to interact with Infrahub.
You can create an API token by going to Account settings, then selecting the Tokens tab. From there, click on Add Account Token to generate a new token for use with the Python SDK. The Infrahub demo instance resets every day, so if you return more than 24 hours later, you may need to re-create the token. Keep this in mind if your token suddenly stops working.
from infrahub_sdk import InfrahubClientSync, Config

config = Config(
	address="https://demo.infrahub.app",
	api_token="183623df-4cbb-8787-d4e8-10656448bdf9",
)
client = InfrahubClientSync(config=config)
Please note that for the purpose of this post, we’re adding the credentials directly in the script, but in production, you should never hardcode API tokens or passwords in plain text.
Creating a Node
A node can be created using the create() method. In the context of networking, a node can represent many types of objects, such as a device, VLAN, BGP ASN, site, or interface. Each of these is a distinct kind of resource in Infrahub. The available kinds depend on the schema that you’ve defined or loaded into your Infrahub instance.
The create()method constructs a Python object based on the kind you’re creating. The structure and properties of the object are defined by your schema. Once the object is created, it must be saved to Infrahub using the save method. You can pass the attributes and relationships as arguments to the create method, or provide them using a dictionary.
To kick things off, let’s create a simple VLAN. In this first example, we’re not doing anything complex, just creating a VLAN using the SDK by passing the attributes like name, VLAN ID, status, and role.
vlan = client.create(
	kind="InfraVLAN", name="myvlan", vlan_id=100, status="provisioning", role="user"
)
vlan.save()
Once the object is created, we use the save() method to store this new node in Infrahub. If we head over to the Infrahub UI, we can see the newly created VLAN listed there with the values we provided.

We can also pass the attributes as a dictionary instead of providing them as keyword arguments.
my_vlan = {
"name": "myvlan_dict",
"vlan_id": 101,
"status": "provisioning",
"role": "user",
}
vlan = client.create(kind="InfraVLAN", data=my_vlan)
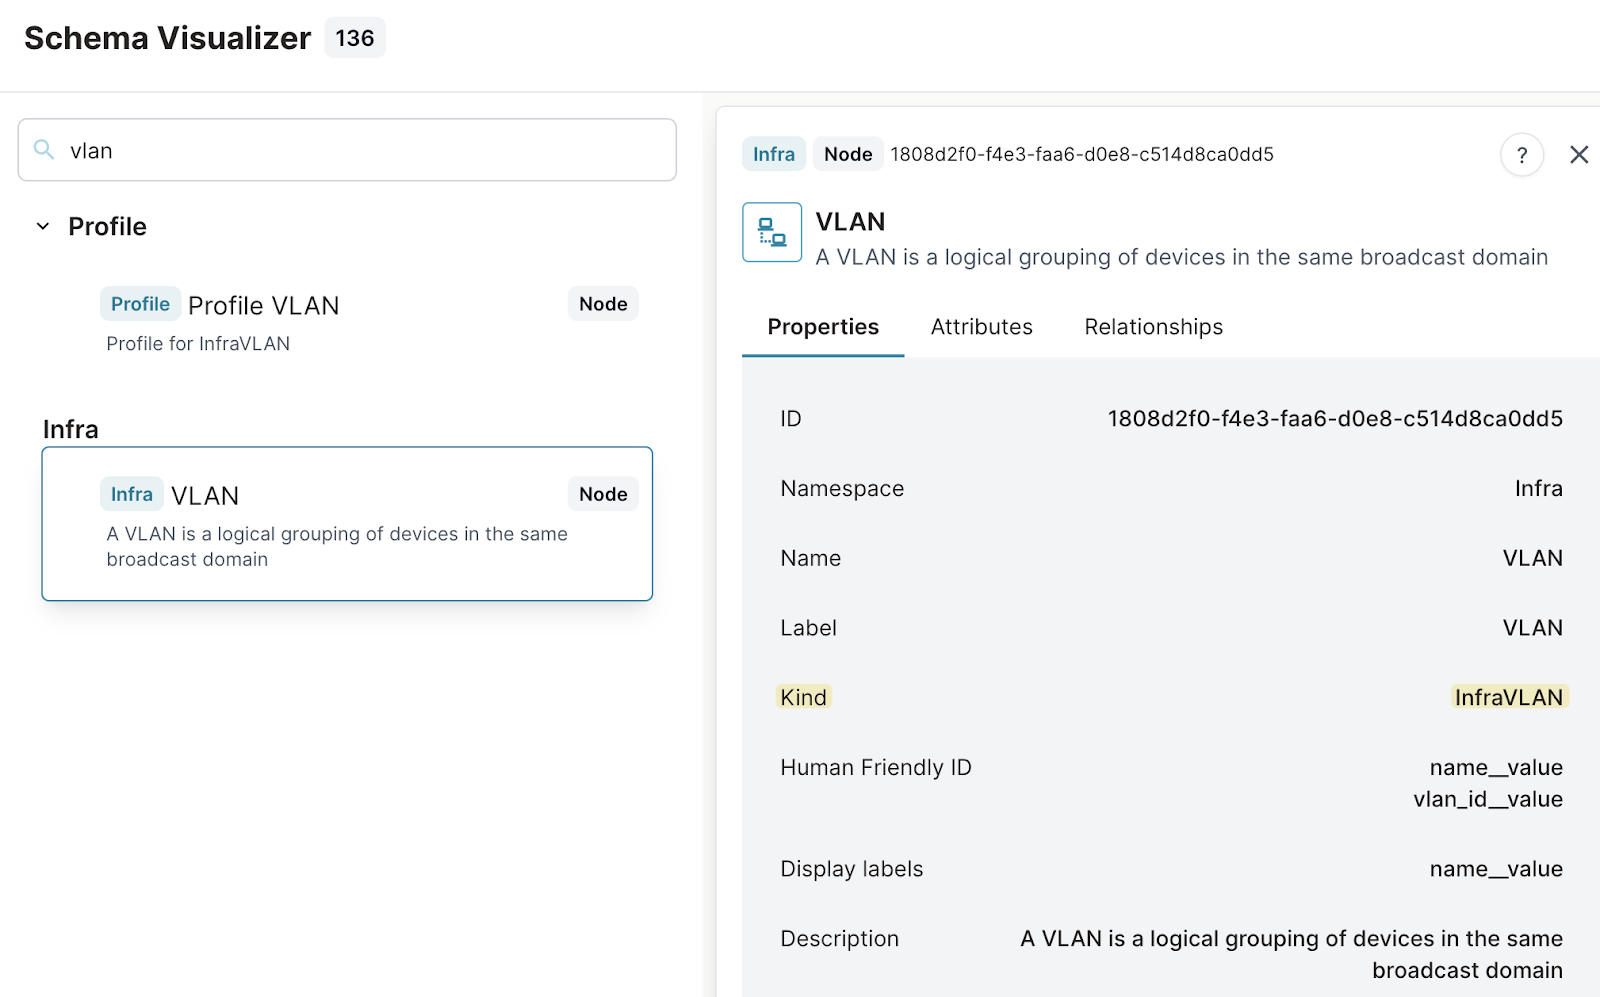
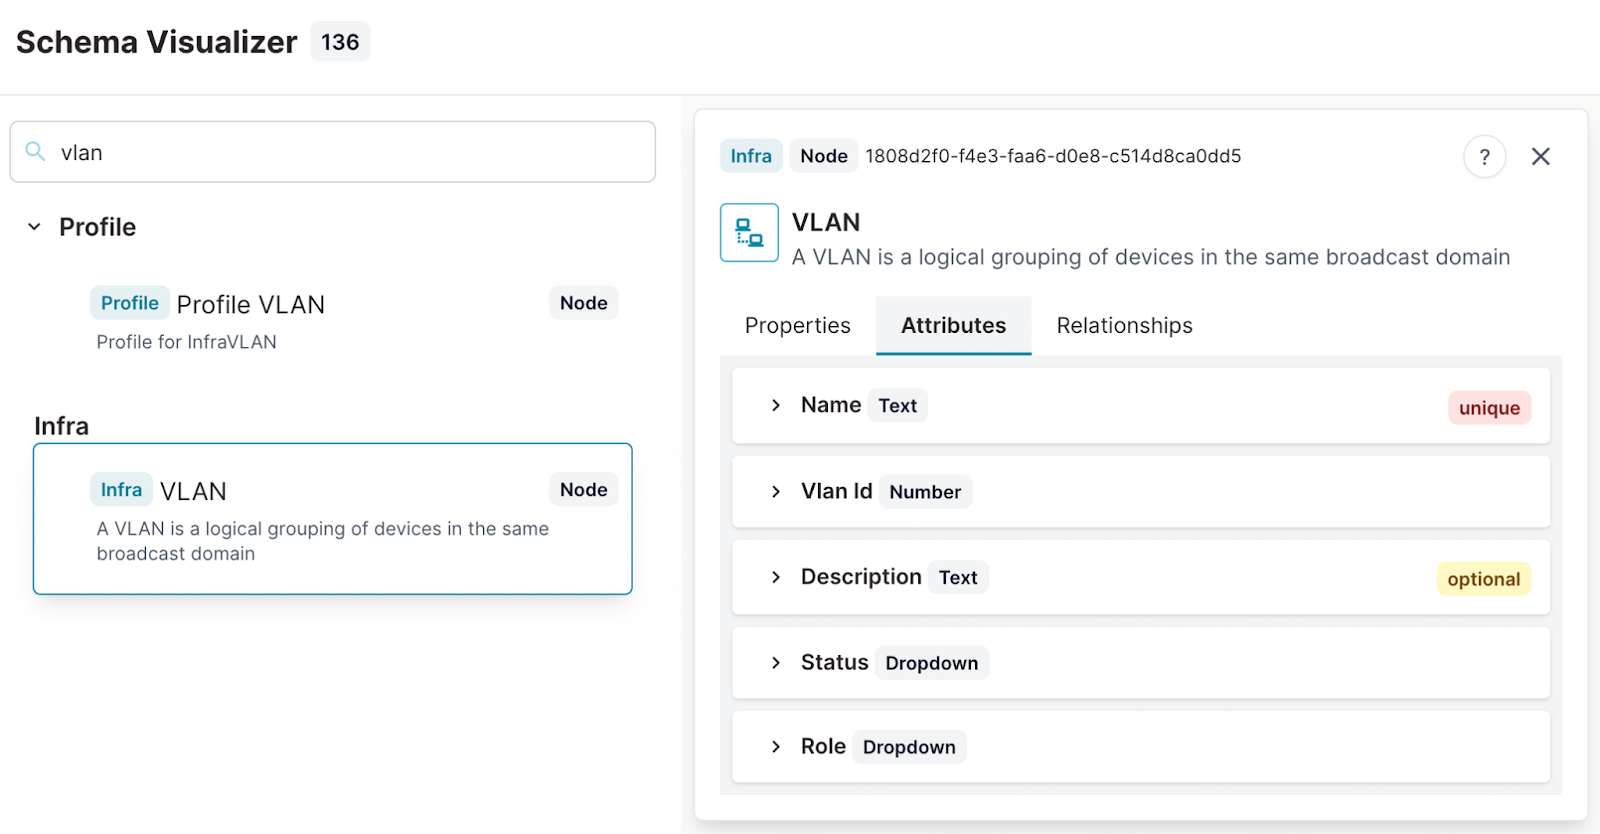
vlan.save()If you’re wondering how I knew which attributes to include when creating a VLAN, the answer lies in the schema. You can access the schema directly from the VLAN page by clicking on the question mark icon and selecting Schema.
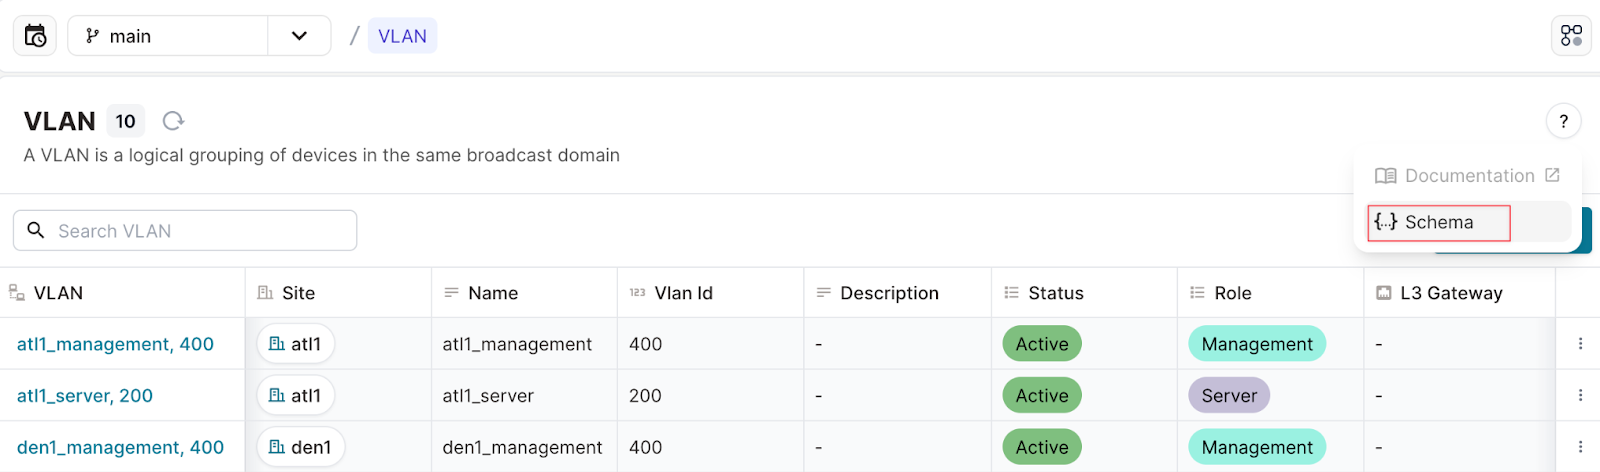
Once inside the Schema Visualizer, you can inspect the VLAN node to see its kind (in this case, InfraVLAN) along with the list of attributes it supports.
Some attributes, such as Name, Vlan id, Status, and Role are mandatory, while others are optional. Optional attributes (Description, in this example) are clearly marked with a label in the schema, making it easy to identify which fields are required when creating a node.
Creating a node with a relation of cardinality one
Next, let’s try creating a new VLAN and associating it with a specific site. If we look at the schema, we can see that VLAN has a relationship to the LocationSite kind, and the cardinality of this relationship is marked as one. This means that each VLAN can be linked to one site.

We first query the site using the get() method, which returns a Python object representing the site. We then reference that object when creating the VLAN.
site = client.get(kind="LocationSite", name__value="atl1")
vlan = client.create(
	kind="InfraVLAN",
	name="atl1_vlan",
	vlan_id=102,
	status="provisioning",
	role="user",
	site=site,
)
vlan.save()
You can also reference relationships without first fetching them from the database, like we did in this example. Instead of using the get method to retrieve the site and passing the resulting object, you can directly reference the site using its ID or HFID while creating the VLAN.
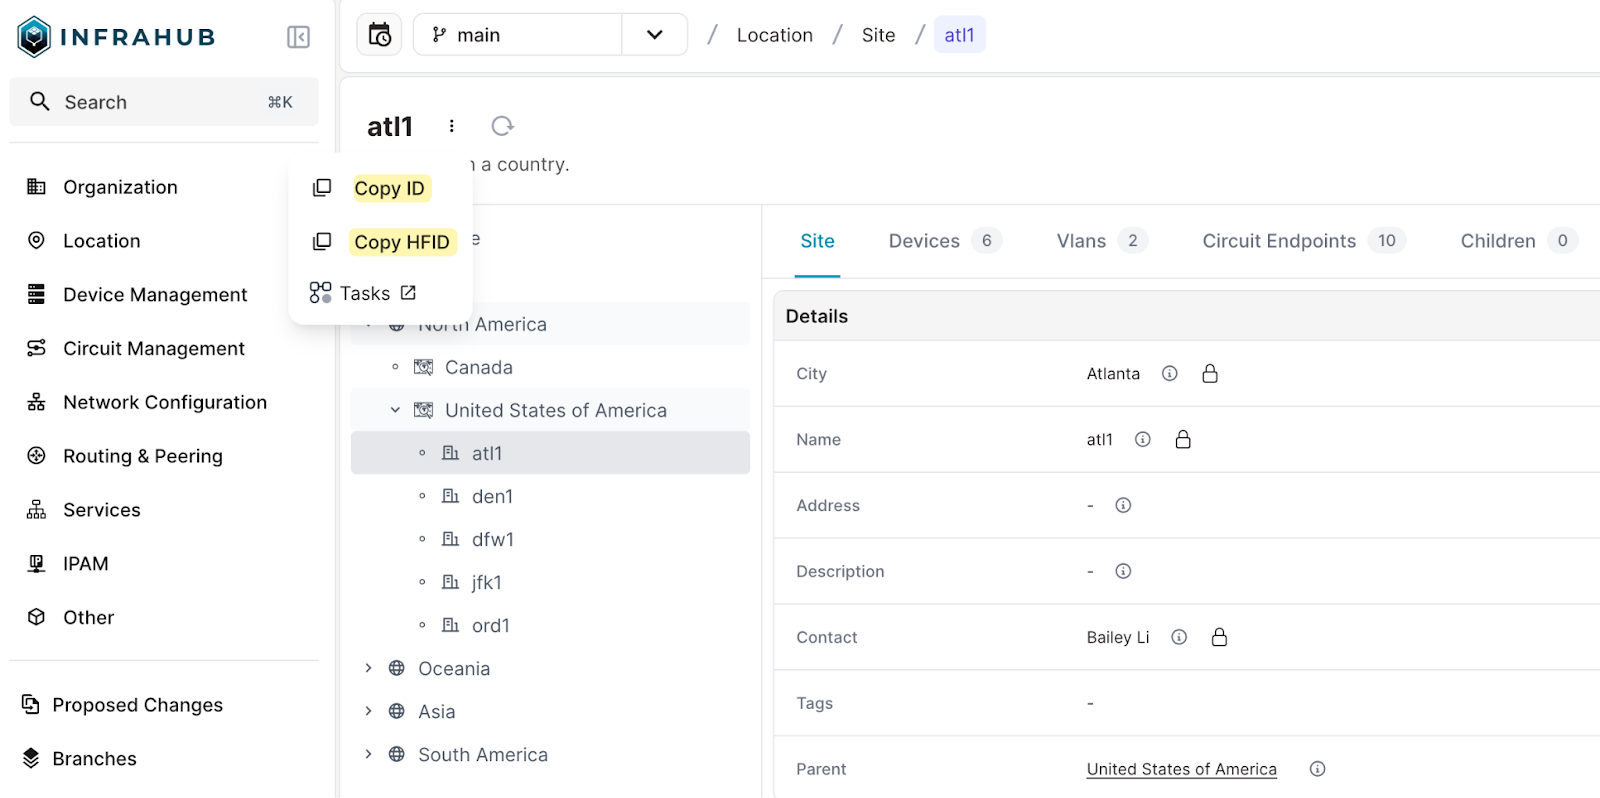
You can obtain the ID or HFID by clicking the three dots next to the site node in the web UI and selecting Copy ID or Copy HFID.
vlan = client.create(
	kind="InfraVLAN",
	name="atl1_vlan",
	vlan_id=102,
	status="provisioning",
	role="user",
	site="1808d320-afbd-9656-d0e7-c515cf3a1de4"
)
vlan.save()
In addition to referencing the ID as a string, you can also pass it in as a dictionary using either the id or hfid key.
vlan = client.create(
	kind="InfraVLAN",
	name="atl1_vlan",
	vlan_id=102,
	status="provisioning",
	role="user",
	site={"id": "1808d320-afbd-9656-d0e7-c515cf3a1de4"}
)
vlan.save()
vlan = client.create(
kind="InfraVLAN",
name="atl1_vlan",
vlan_id=102,
status="provisioning",
role="user",
site={"hfid": ["atl1"]}
)
vlan.save()ID and HFID
Before moving on, it’s helpful to understand what ID and HFID mean. The ID is a unique identifier (UUID) automatically assigned to each node in Infrahub.
The HFID, or Human-Friendly Identifier, is a readable identifier that can be used to refer to a node in a more intuitive way.
Unlike the ID, which is system-generated, the HFID can be composed of one or more attributes or relationships of cardinality one, as defined in the schema for a given kind. When referencing an HFID, it’s passed as a list, even if it contains only a single attribute. If multiple attributes are part of the HFID, they’re included in the list in the defined order.
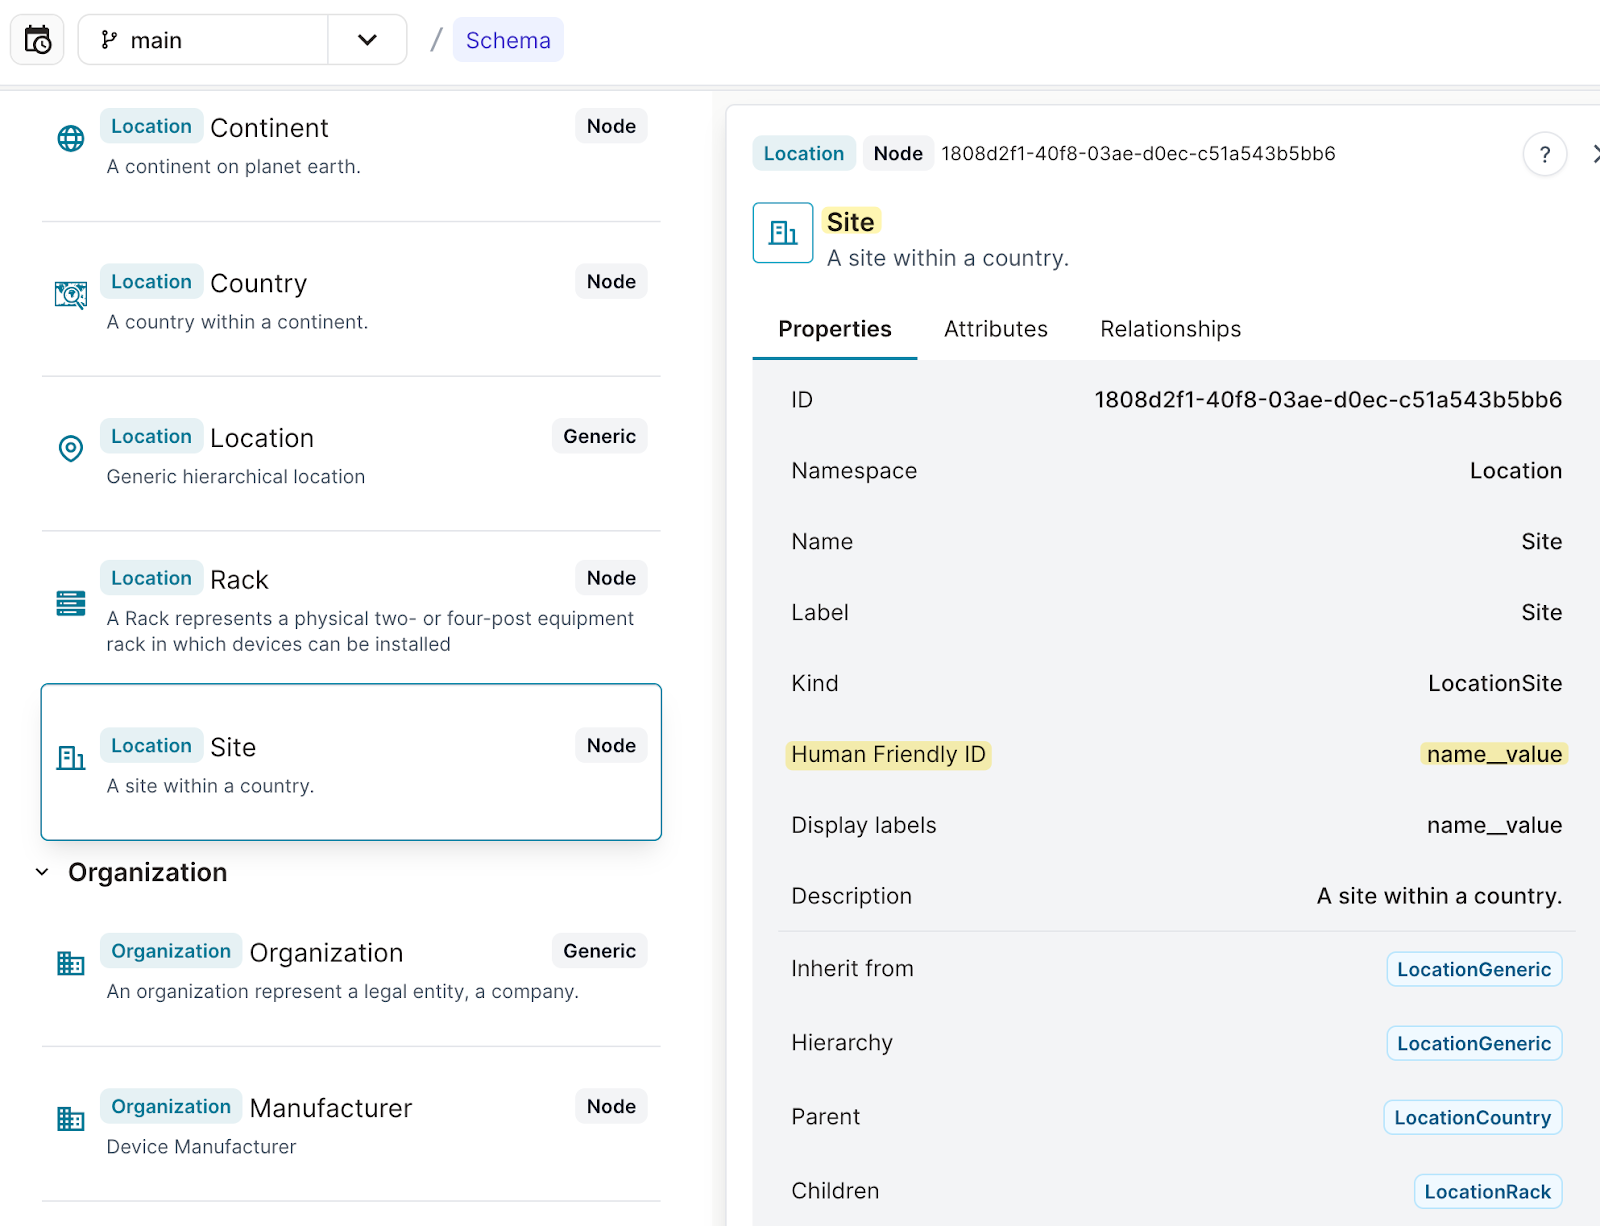
If we inspect the schema for the Site kind, we can see that it’s using name__value as its Human-Friendly ID (HFID). This means the name attribute is what uniquely identifies the node in a human-readable way and can be used to reference it in queries.
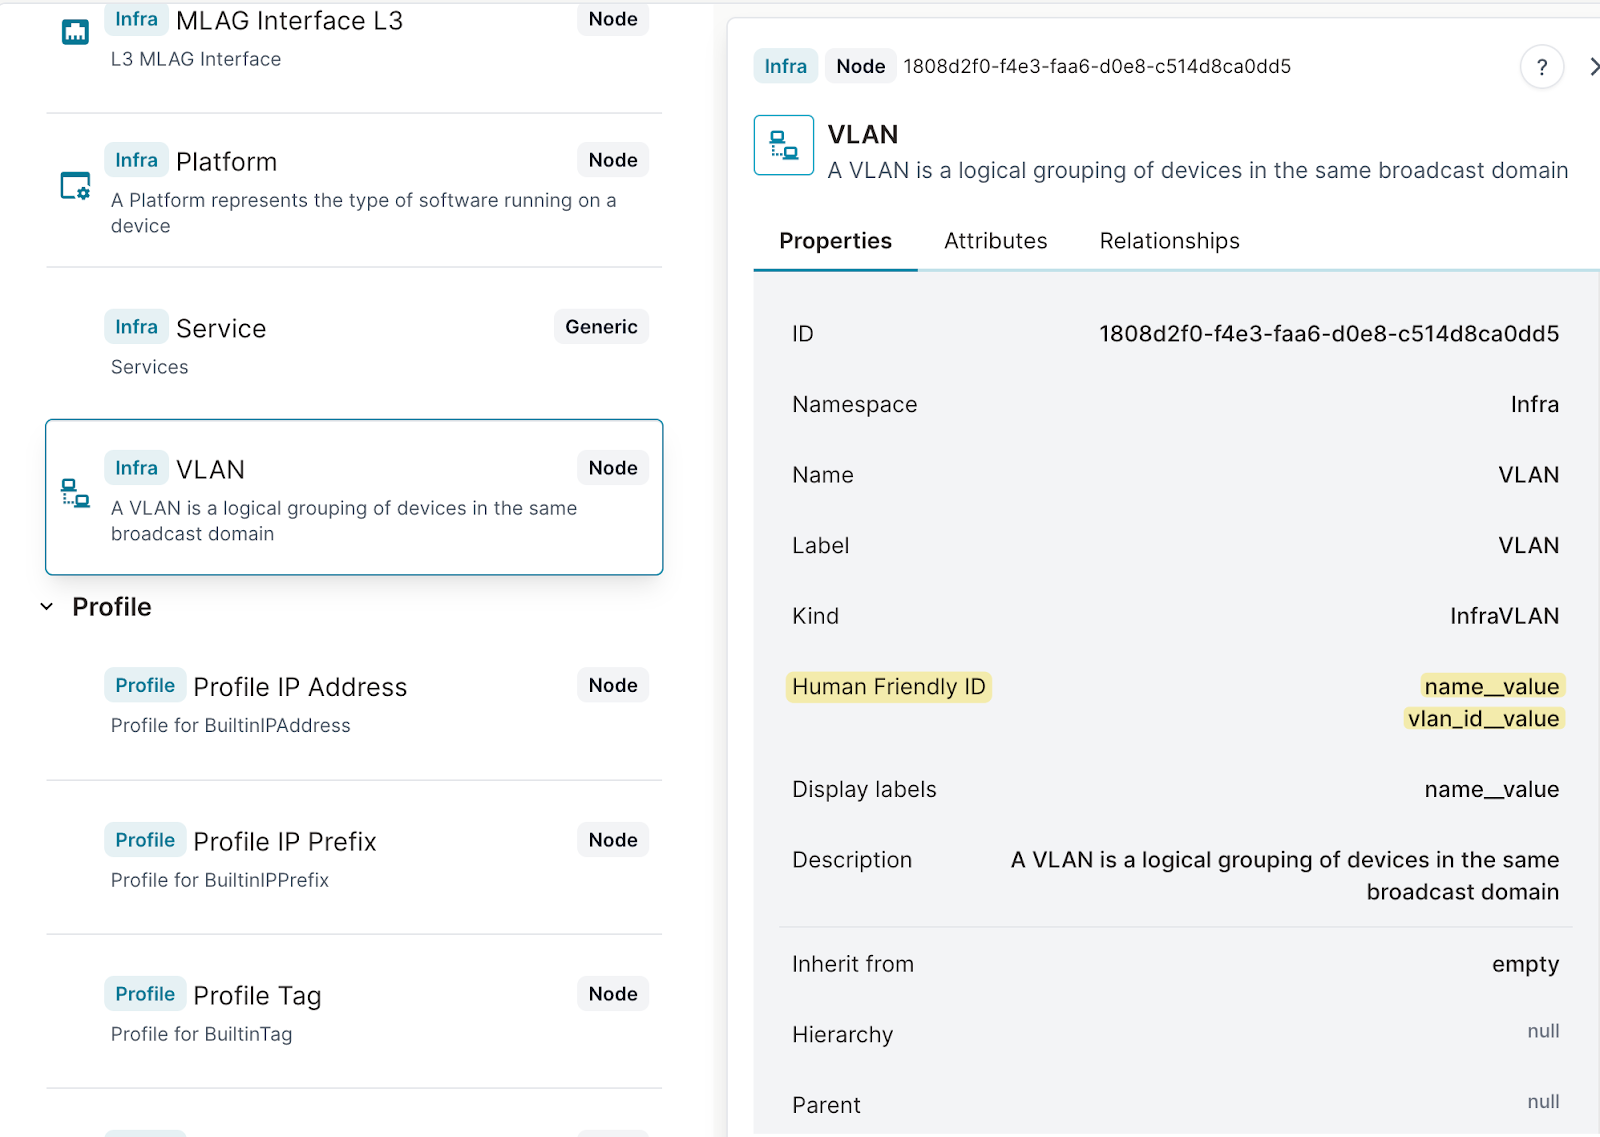
If we look at the VLAN kind, the HFID is made up of two attributes: name__value and vlan_id__value. This means when referencing a VLAN by its HFID, both values must be provided in the same order as listed in the schema.
Creating a node with a relation of cardinality many
If we have a relationship with cardinality many, like BuiltinTag, we can associate multiple tags with a single device. In other words, a device can have multiple tags.

In this example, we’ll create a new device called mydevice and add multiple tags to it. First, we use the filters() method to get all the tags we want to associate with the device. Once we have the list of tag objects, we pass it to the tags field when creating the device.
site = client.get(kind="LocationSite", name__value="atl1")
tags = client.filters(kind="BuiltinTag", name__values=["blue", "green"])

device = client.create(
	kind="InfraDevice", name="mydevice", type="PA-440", site=site, tags=tags
)
device.save()
Similar to the previous example, instead of fetching the tags and storing them in a Python object, you can also reference them directly using their ID or HFID. You can pass the IDs as plain strings in a list, or as dictionaries using either the id or hfid keys, whichever format is more convenient based on the information you have.
tags = ['1808d312-56dc-5cd3-d0e8-c519e8f739c1', '1808d312-58de-1000-d0e6-c51aeb1e4919']tags = [{"id": "1808d312-56dc-5cd3-d0e8-c519e8f739c1"}, {"id": "1808d312-58de-1000-d0e6-c51aeb1e4919"}]tags = [{"hfid": ["blue"]}, {"hfid": ["green"]}]Updating a Node
To update a node using the SDK, we first have to retrieve the node using one of the query methods (get, filters), then update the attributes and/or relations of the node and save the node.
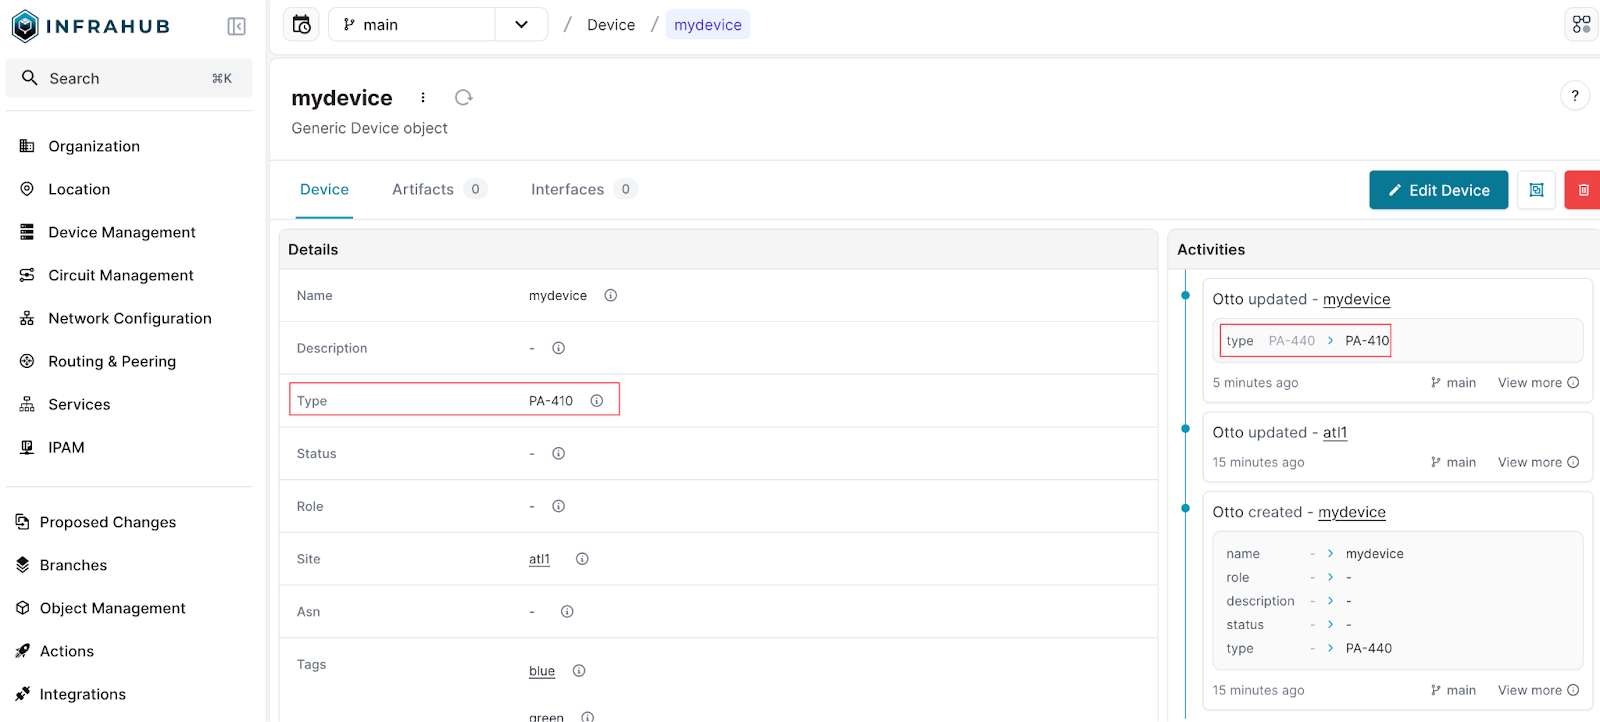
Let’s look at how we can update existing nodes using the Infrahub SDK. Continuing from our previous example, let’s try changing the type of the device we just created. Initially we set the type to PA-440. Let’s try changing it to PA-410.
First, we retrieve the device using the get() method, then update the type attribute, and finally, save the changes back to Infrahub using the save() method.
device = client.get(kind="InfraDevice", name__value="mydevice")
device.type.value = "PA-410"
device.save()
You can see that the type of device was updated as expected. This change is also reflected in the Activities section on the right, which was introduced in Infrahub v1.2.0 and provides a clear view of changes made to that specific node.
Updating a node with a relation of cardinality one
Moving forward, let’s look at how to update a relationship to a node with cardinality one. In this example, we’re updating the site relationship of the device. Since the site has a cardinality of one, each device can only be associated with a single site. We first retrieve the device and the new site using the get() method, then assign the site object to device.site and call save() method to apply the changes in Infrahub.
device = client.get(kind="InfraDevice", name__value="mydevice")
site = client.get(kind="LocationSite", name__value="den1")

device.site = site
device.save()
Similar to the examples we saw when creating a node, instead of fetching the site object, you can also assign the relationship directly using the ID or HFID. You can simply set device.site to a string representing the id of the site (den1 in this case).
device = client.get(kind="InfraDevice", name__value="mydevice")
device.site = "1808d351-4e1d-90c1-d0ed-c51d7bd00782"
device.save()
Or use a dictionary with either the id or hfid of the site den1.
device = client.get(kind="InfraDevice", name__value="mydevice")
device.site = {"id": "1808d351-4e1d-90c1-d0ed-c51d7bd00782"}
device.save()
device = client.get(kind="InfraDevice", name__value="mydevice")
device.site = {"hfid":["den1"]}
device.save()Updating a node with a relation of cardinality many
Next, let’s look at how to update relationships with cardinality many. Using our previous example where we created a device and associated it with the blue and green tags (remember, tags have a many-to-one relationship with devices), we can update this relationship by adding another tag, associating multiple tags at once, or removing tags.
add() method
Let’s start by adding one more tag. In this case, we retrieve the tag named red and use the add() method to associate it with the existing device. Finally, we call save() to apply the changes.
device = client.get(kind="InfraDevice", name__value="mydevice")
tags = client.get(kind="BuiltinTag", name__value="red")

device.tags.add(tags)
device.save()
As you may have already guessed, instead of retrieving the tag first, you can also use its ID or HFID directly. This can be done by passing the UUID as a string, or by using a dictionary with the id or hfid.
device.tags.add("1808d312-8990-aa9e-d0e2-c51303331ef8")
device.tags.add({"id": "1808d312-8990-aa9e-d0e2-c51303331ef8"})
device.tags.add({"hfid": ["red"]})
extend() method
Before we proceed with the next example, I deleted both the blue and green tags from the device, so it currently only has the red tag associated with it. Now, if we want to associate multiple tags again, we can use the extend() method. This allows us to add a list of related nodes, in this case, tags, back to the device. As usual, we can retrieve the tags we want to associate using the filters() method and pass them to extend().
device = client.get(kind="InfraDevice", name__value="mydevice")
tags = client.filters(kind="BuiltinTag", name__values=["red", "blue"])

device.tags.extend(tags)
device.save()
Alternatively, you can directly reference the tags using their ID or HFID. You can provide them as a list of UUID strings, or as dictionaries using either the id or hfid keys. Please note that to use HFID with cardinality many relationships, you need infrahub-sdk v1.11.1 or higher. If you’re using an older version, you can upgrade it by running pip install infrahub-sdk --upgrade.
device = client.get(kind="InfraDevice", name__value="mydevice")

device.tags.extend(["1808d312-56dc-5cd3-d0e8-c519e8f739c1", "1808d312-58de-1000-d0e6-c51aeb1e4919"])
device.save()
device = client.get(kind="InfraDevice", name__value="mydevice")
device.tags.extend([{"id": "1808d312-56dc-5cd3-d0e8-c519e8f739c1"}, {"id": "1808d312-58de-1000-d0e6-c51aeb1e4919"}])
device.save()device = client.get(kind="InfraDevice", name__value="mydevice")
device.tags.extend([{"hfid": ["blue"]}, {"hfid": ["green"]}])
device.save()remove() method
Next, let’s try removing the tag blue from the device using the remove() method. At this point, it might feel a bit repetitive, but just like with add() and extend(), you can reference the tags in multiple ways. You can pass the tag as a UUID string, or use a dictionary with either the id or hfid key. All of these approaches work the same way when calling remove(). As always, don’t forget to call save() to apply the changes.
device = client.get(kind="InfraDevice", name__value="mydevice")
tags = client.get(kind="BuiltinTag", name__value="blue")

device.tags.remove(tags)
device.save()
device = client.get(kind="InfraDevice", name__value="mydevice")
device.tags.remove({"id": "1808d312-56dc-5cd3-d0e8-c519e8f739c1"})
device.save()Taking a Different Approach
Updating related nodes of cardinality many can also be done using the add_relationships() method. The main benefit of using this approach compared to methods like add() or extend() is that add_relationships() allows you to add related nodes without needing to initialize the relationship first.
In our previous examples, when we were adding tags to a device, it worked without having to initialize the relationship first because tags are a relationship of kind attribute, which means they’re automatically initialized when querying the device.
However, if we were working with a relationship like interfaces, where the cardinality is many and the kind is component, we would need to explicitly fetch the interfaces first before using methods like extend(). With add_relationships(), you can directly add the related nodes without having to initialize the relationship manually.
For example, after retrieving a device, if you check device.tags.initialized, it will return True. On the other hand, device.interfaces.initialized will return False and you would need to explicitly fetch or include them in the query if you want to access them.
device = client.get(kind="InfraDevice", name__value="mydevice")

device.tags.remove({"hfid": ["blue"]})
device.save()
device = client.get(kind="InfraDevice", name__value="mydevice")
Device.tags.initiazlized
True
Device.interfaces.initiazlized
FalseYou can learn more about relationships and initialization in the previous Python SDK blog post. It goes deeper into how Infrahub handles relationships when querying a node.
Here’s a quick example to show how it works. You simply provide the relation_to_update (e.g. tags) and a list of nodes to be associated using the related_nodes argument.
device = client.get(kind="InfraDevice", name__value="mydevice")
tags = client.filters("BuiltinTag", name__values = ["green", "blue"])

device.add_relationships(relation_to_update="tags", related_nodes=[tag.id for tag in tags])
Similarly, you can use the remove_relationships() method to delete related nodes from a relationship of cardinality many.
device = client.get(kind="InfraDevice", name__value="mydevice")
tags = client.filters("BuiltinTag", name__values = ["green", "blue"])

device.remove_relationships(relation_to_update="tags", related_nodes=[tag.id for tag in tags])
Deleting a Node
To delete a node using the SDK, as usual, we first have to retrieve the node using one of the query methods (get, filters). Once we have the object, we simply call the delete() method on it to remove it from Infrahub.
Let’s go ahead and test this by deleting the device we created in our previous examples.
device = client.get(kind="InfraDevice", name__value="mydevice")
device.delete()
Upserting a Node
The word upsert is formed from a combination of update and insert. It refers to the action of creating a node if it doesn’t yet exist, or to update the existing node if it already exists.
One important thing to keep in mind when using upsert is that the schema for the kind you’re working with must have a Human-Friendly ID (HFID) defined, either explicitly or implicitly. This is because Infrahub needs a way to determine whether a given object already exists or not, in order to decide whether it should create a new one or update the existing one. Without an HFID, there’s no clear way to uniquely identify the object, which means upserting won’t work as expected.
When we say an HFID is defined explicitly, it means the schema clearly specifies which attribute should be used as the HFID, for example, setting the name field as the identifier. On the other hand, if a node has only one unique attribute and no HFID is explicitly defined in the schema, Infrahub will automatically treat that unique attribute as the HFID.
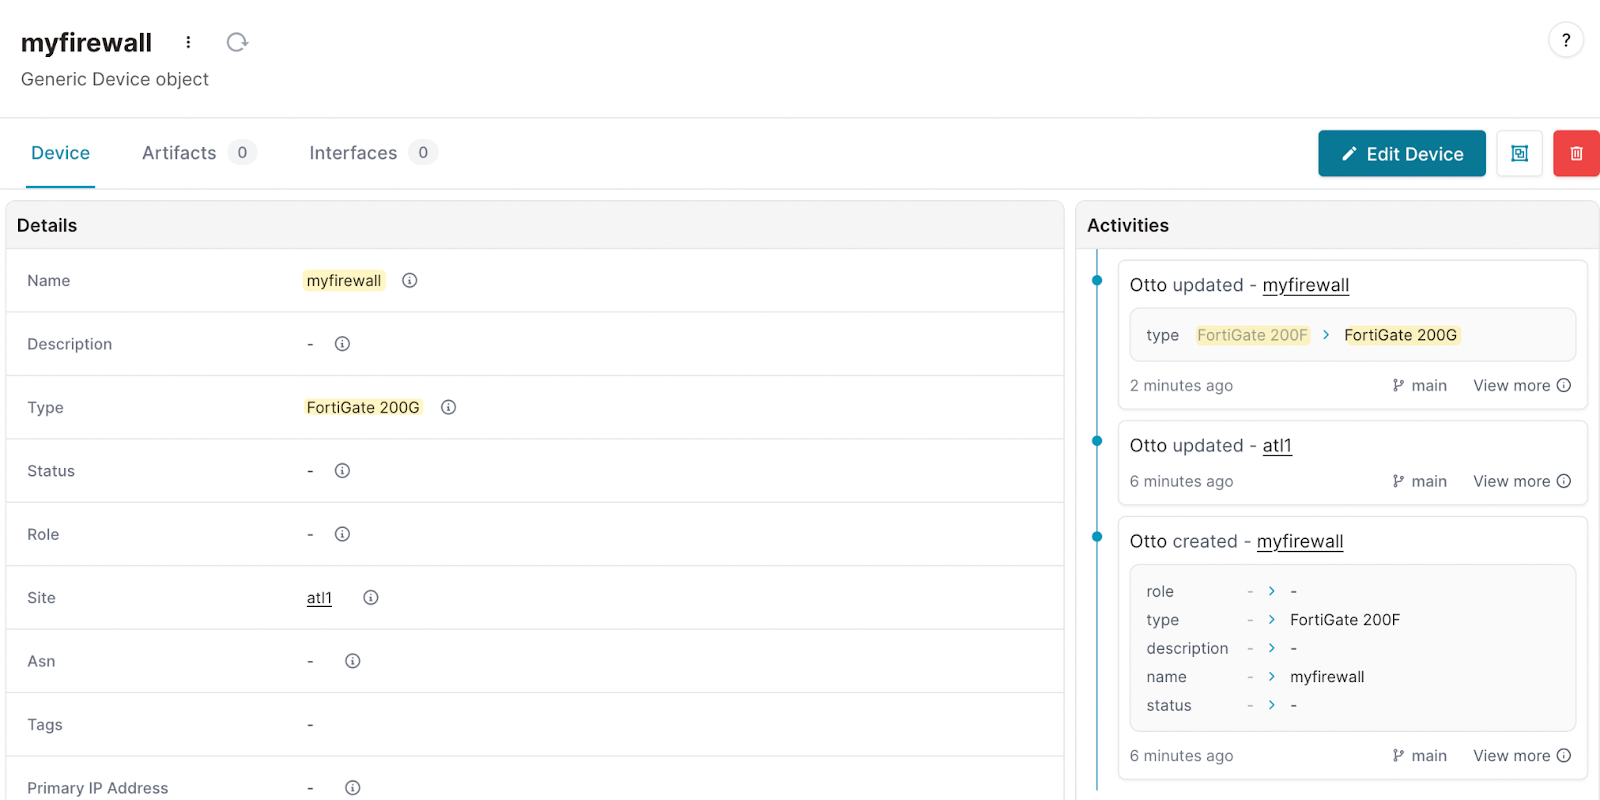
Let’s go ahead and create a new device called myfirewall. In this example, we’re associating the device with the site atl1. If we were to re-run this code, it would result in an error because the object already exists in Infrahub.
site = client.get(kind="LocationSite", name__value="atl1")

device = client.create(
	kind="InfraDevice", name="myfirewall", type="FortiGate 200F", site=site
)
device.save()
However, we can handle this by using the save() method with the allow_upsert=True argument. This tells Infrahub to update the existing node if it already exists, instead of trying to create a new one. For instance, if we wanted to update the type of the device, we could modify the value and then call save(allow_upsert=True) to apply the change safely without running into an error.
site = client.get(kind="LocationSite", name__value="atl1")

device = client.create(
	kind="InfraDevice", name="myfirewall", type="FortiGate 200G", site=site
)
device.save(allow_upsert=True)
As usual, you can see the changes reflected in the Activities section. It shows both the original creation of the device and the recent update where the type was changed from FortiGate 200F to FortiGate 200G.
Closing Up
That wraps up our look at creating, updating, and deleting data using the Infrahub Python SDK. I highly recommend trying these examples yourself using the Infrahub sandbox.
Before we finish, it’s also worth mentioning that the Infrahub Python SDK supports strict typing using Python protocols. This can be helpful if you want better editor support and type checking. You can learn more about Python typing in the Infrahub documentation.
If you have any questions or feedback, reach out in the OpsMill Discord community. Our team is always happy to help.