You've probably come across countless books, videos, and articles online explaining how to get Docker up and running or diving deep into how it works. And they do a fantastic job, much better than I could. But I’m not here to compete with them. Instead, I want to take you down a different path.
As always, my goal is to explain what Docker is using plain language and relatable examples. I hope this gives you a clear understanding of what Docker is. Rather than starting with how to use Docker, I want to focus on questions like why you even need it and what benefits it brings. This series isn’t meant to replace books or official documentation. It’s for people who are just looking for a quick intro to Docker without having to read hundreds of pages or sift through massive documentation.
As always, if you find this post helpful, press the ‘clap’ button. It means a lot to me and helps me know you enjoy this type of content.
What is Docker?
Docker is a tool that simplifies the process of managing and deploying applications in an isolated environment. It allows developers to package an application with all of its dependencies into a standardized unit called a container. This container can then be easily transported and run on any system that has Docker installed, ensuring the application works seamlessly in any environment.
And here's the fun part - with Docker, the old excuse "it works on my computer" goes out the window. With Docker, it's more like, "It works on my computer, your computer, their computer - any computer!"
Why Should You Use It?
If you’re wondering - hey, I’m just a network engineer (you don’t need to be a network engineer to follow along, but most of my readers are 🙂) why should I learn Docker? Here’s a simplified answer for you.
I think of Docker containers as similar to running apps on my phone. I can go to the app store, download an app, try it out or use it, and once I’m done, I just delete it - and it’s completely gone. If I want someone else to use the same app, they can download it on their phone, and it would work exactly the same. Of course, there are minor differences between how apps behave on iPhone versus Android, but you get the idea.
Docker works the same way. Let’s say I want to install a cool open-source application that works with PDF files, I can edit, delete, or modify files using that app. Normally, I’d install it on Linux by running various commands. Now, if I need to run the same app on a different Linux machine, I just hope and pray it works. If I need to install it on Windows or Mac, well... forget about it.
But with Docker, you use the same Docker app (the container) that works on anything - Linux, Windows, Mac with little to no extra configuration. There are countless applications available, such as GitLab, Apache web server, LibreNMS, NetBox, and many more. You just install them, and when you’re done, you can remove them completely without messing around with leftover files or Linux commands.
Here are some of the applications I have in my home lab, and all of them are running as Docker containers. If you ever need them, all I have to do is send you a single YAML file. You run one command, and boom - you’ll have all the applications running on your own device, whether it’s Windows, Mac, or Linux.
VM vs Docker
When comparing Docker to Virtual Machines (VMs), think of it like this - VMs are like having separate servers, each with its own full setup, all inside your one physical server. It's like having many full-fledged servers packed into one. Docker, on the other hand, is more efficient. Instead of setting up a whole new server for each app, Docker shares the main system resources but keeps the apps separate. It's like having just the necessary parts for each app, making it lighter and faster.
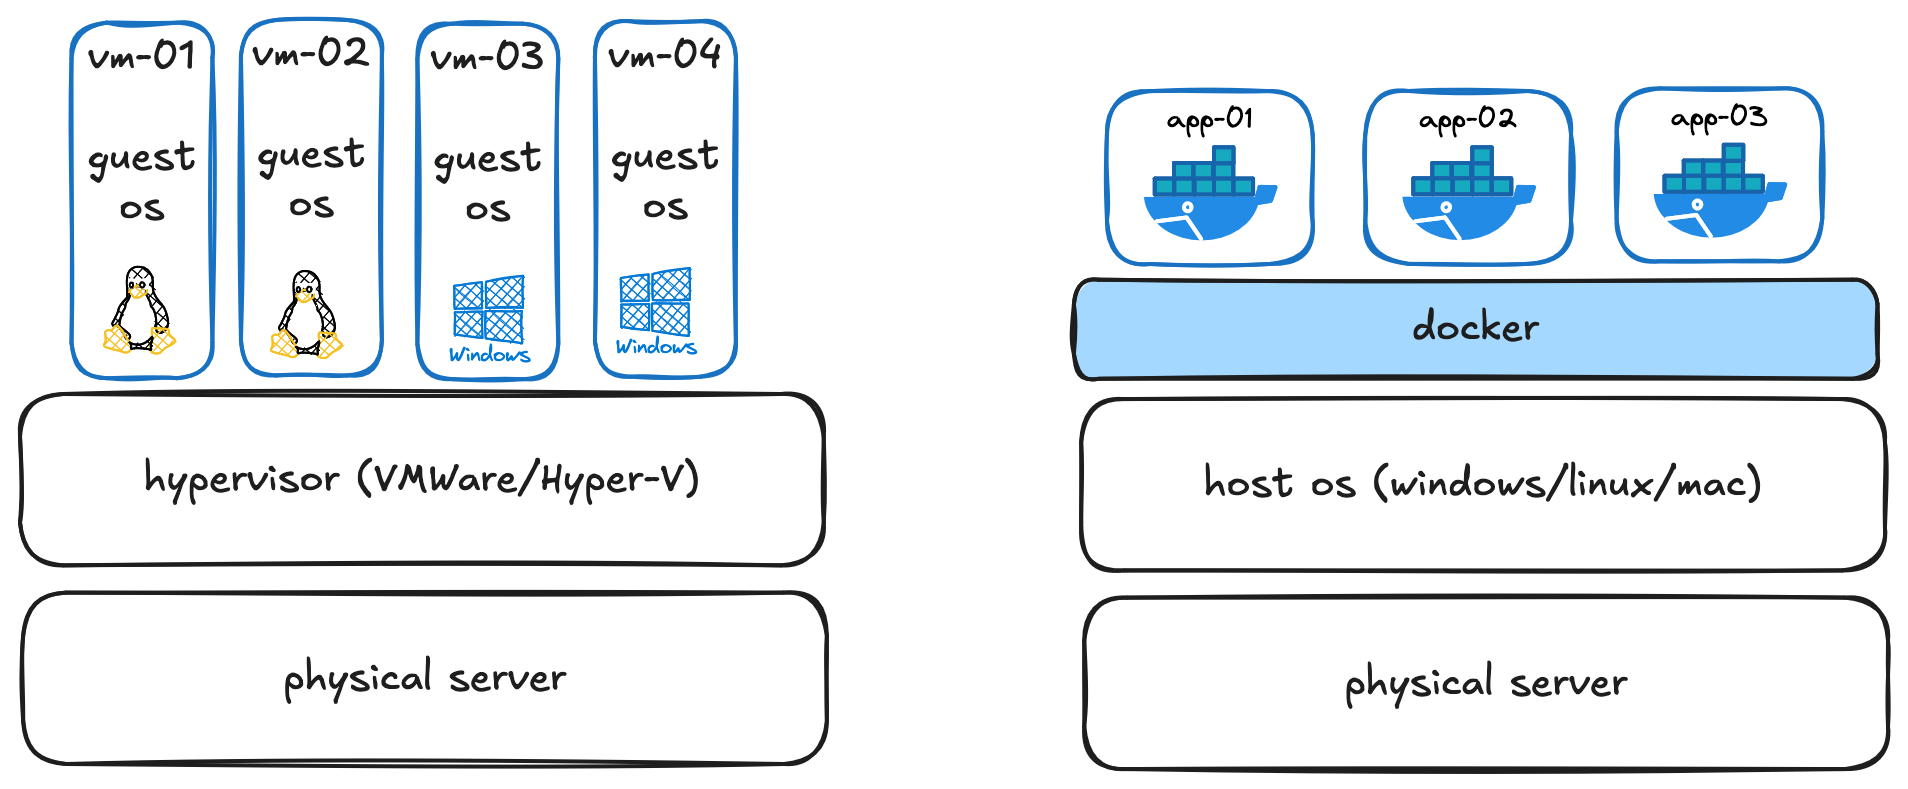
Unlike VMs, where you have to manually download large ISO files to create new instances, Docker lets you pull these images from a repository, like Docker Hub, with a simple command such as docker pull ubuntu.
Another key difference is size and startup time. Docker images are usually much smaller than ISO files, so they take up less storage and are quicker to download. Also, starting a Docker container from an image takes just a few seconds as opposed to a VM, which can take a few minutes to boot up.
Docker Images and Containers
In the Docker world, you'll often hear about "images" and "containers". While they're closely related, they're not the same thing.
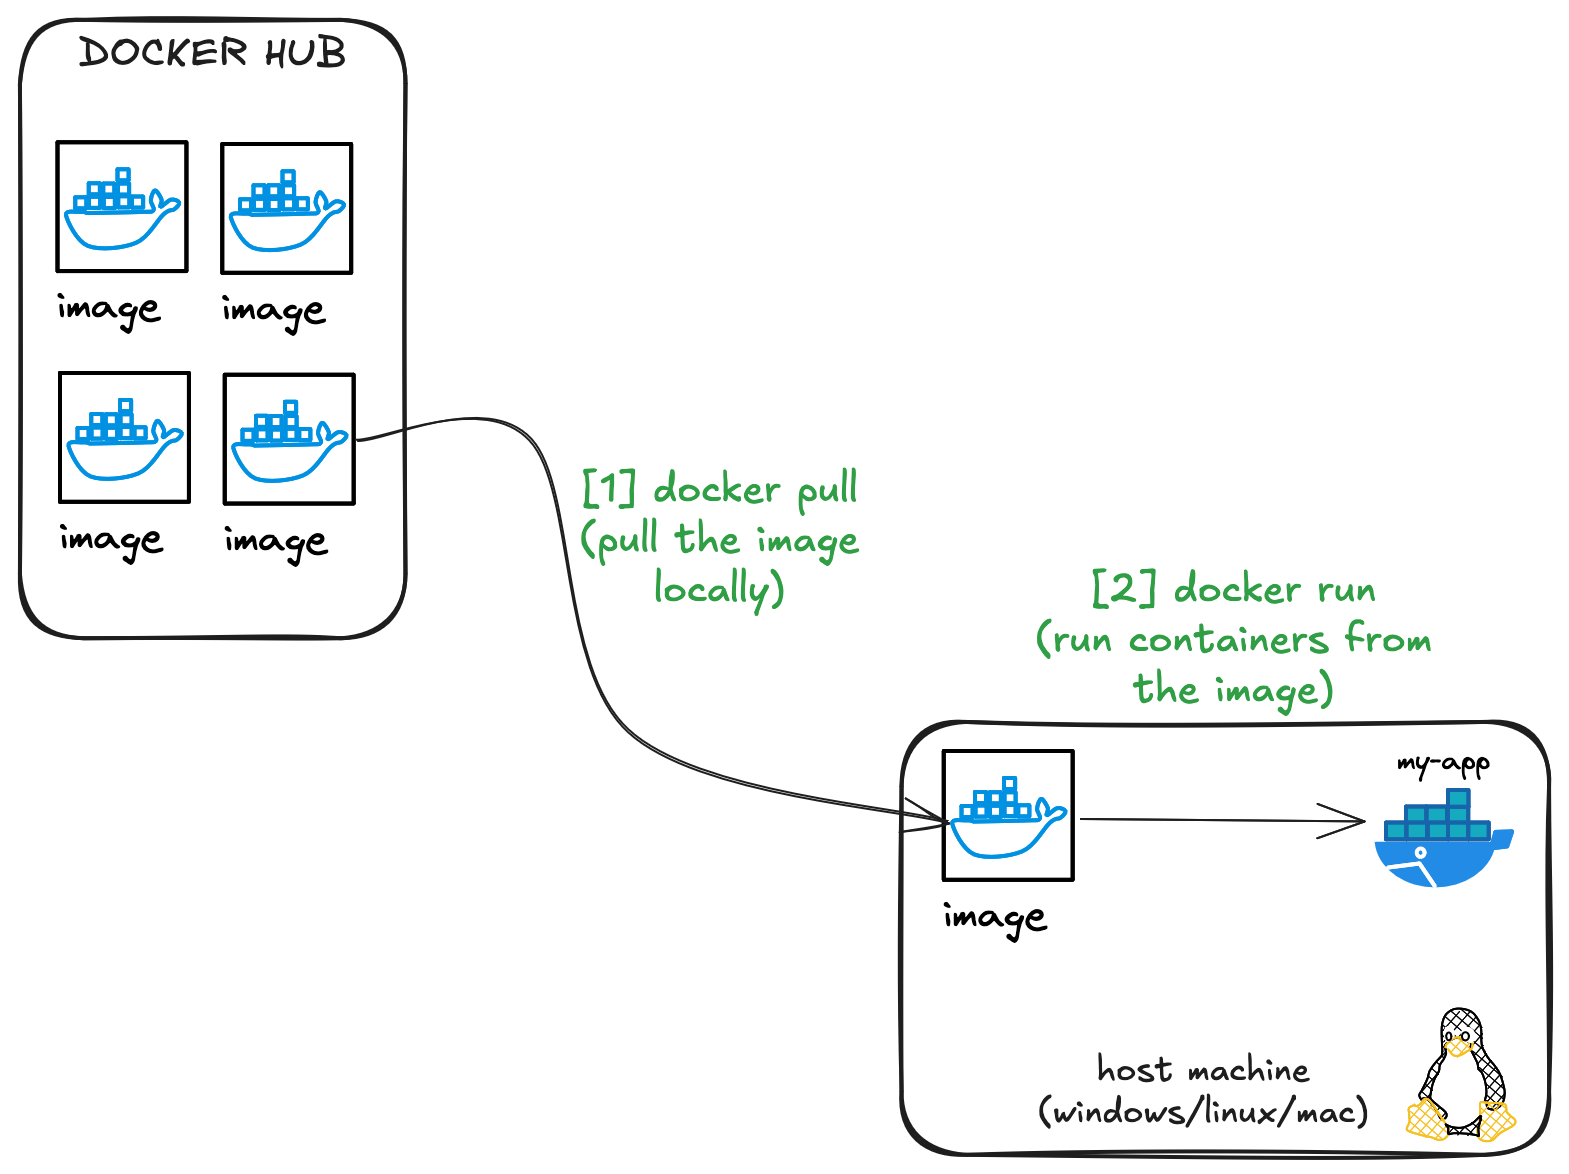
Think of a Docker image as a recipe or a blueprint. It's a lightweight, standalone, executable package that includes everything you need to run a piece of software - the code, a runtime, libraries, and config files.
A Docker container, on the other hand, is a running instance of an image. It's the real-world application of the blueprint. You can create as many containers as you like from a single image. Just like you can build multiple houses using the same blueprint, each with its own separate existence.
Basic Docker Commands
Let's have a quick look at some of the basic Docker commands. Now, if you're just starting out, this might seem a bit overwhelming. But don't worry too much about understanding every little detail right now. We'll be exploring each of these commands more in-depth in our upcoming examples section.
- docker pull: This is the command to download Docker images from a registry like Docker Hub. For example,
docker pull ubuntuwill pull the Ubuntu image to your local machine. - docker run: Now that you have your Docker image, you'll want to run it as a container. For example,
docker run ubuntuwill create a new container from the Ubuntu image and start it. - docker ps: You can use this command to check what Docker containers are currently running on your system. If you want to see all containers (not just the running ones), add the
-aflag,docker ps -a. - docker stop: When you're done with a container, you can use
docker stopto stop it from running. To stop a container, you'll need to know its ID or name, which you can get fromdocker ps. For example,docker stop my_container. - docker rm: If you want to remove a container entirely, use
docker rm. Be careful, though - you can't undo it, and anything you had stored inside the container will be gone. Likedocker stop, you'll need the container's ID or name,docker rm my_container - docker images: This command shows you all the Docker images you've downloaded.
- docker rmi: If you want to delete an image that you're not using anymore, you can use
docker rmi. Likedocker rm, this can't be undone. For example,docker rmi ubuntu.
These are some of the most fundamental Docker commands that you'll use regularly. Of course, Docker has many more commands and options, but these should be enough to get you started on your Docker journey.
Docker Installation
Installing Docker is straightforward, and the good folks at Docker have put together an easy-to-follow guide for various operating systems. Please follow the official Docker installation guide to get Docker up and running on your machine.
If you are on Windows or Mac, you will most likely need 'Docker Desktop', which you can easily download and install. If you are on Linux, here is how you can install docker.
curl -fsSL https://get.docker.com -o get-docker.sh
sudo sh get-docker.sh
By default, Docker requires root privileges to run commands, which can be inconvenient if you want to manage containers as a regular user. To avoid using sudo every time, you can create a docker group and add your user to it.
This way, anyone in the docker group can run Docker commands without root access. To do this, you first create the group with sudo groupadd docker, then add your user with sudo usermod -aG docker $USER. After that, you need to log out and log back in for the changes to take effect.
Simple Example
Now that we have installed Docker, one of the simplest ways to understand Docker is to use it to start an interactive Bash shell in a Docker container. This way, you can "enter" the container and interact with it as if it were a small Linux machine. We'll use an Ubuntu image for this example.
1. Pull an Ubuntu Docker Image
Our first step is to get an Ubuntu Docker image. Docker Hub hosts an official Ubuntu image that's perfect for our needs. To pull this image, you'd use the command docker pull ubuntu. Once the image is pulled, we will run docker run to create a container from the image.
Let me run docker images to list all the images that are currently on my laptop. I'm using PowerShell Terminal to run the commands, you can also use the command line if you prefer. As you can see below, I don't have any images. Let's pull the Ubuntu image and check again.
PS C:\Users\vsurr> docker images
REPOSITORY   TAG       IMAGE ID   CREATED   SIZE
PS C:\Users\vsurr> docker pull ubuntu
Using default tag: latest
latest: Pulling from library/ubuntu
3153aa388d02: Pull complete
Digest: sha256:0bced47fffa3361afa981854fcabcd4577cd43cebbb808cea2b1f33a3dd7f508
Status: Downloaded newer image for ubuntu:latest
docker.io/library/ubuntu:latest
PS C:\Users\vsurr> docker images
REPOSITORY TAG IMAGE ID CREATED SIZE
ubuntu latest 5a81c4b8502e 5 weeks ago 77.8MB2. Start an Interactive Bash Shell
Now that we have our Ubuntu image, we can start an interactive Bash shell in a Docker container based on this image. To do this, we use the docker run command with a few additional flags: -it. The -i flag starts the container in interactive mode, and the -t flag assigns a terminal inside our new container. We also specify /bin/bash at the end of the command to start a Bash shell. The complete command is docker run -it ubuntu /bin/bash.
PS C:\Users\vsurr> docker run -it ubuntu /bin/bash
root@0cff7573f442:/#
And there you go! You're inside a Docker container running Ubuntu, and you have an interactive Bash shell at your disposal.
While in the container, you can run any command you'd usually run in a Linux environment. For instance, try running ls to list files, or echo "Hello, World!" to print a message to the terminal.
root@0cff7573f442:/# echo "Hello World"
Hello World
root@0cff7573f442:/# ls
bin  boot  dev  etc  home  lib  lib32  lib64  libx32
Remember, whatever you do in this container doesn't affect your host machine. This isolation is one of the many beauties of Docker. When you're done exploring, you can exit the container by typing exit into the shell.
Here's what happens when you type exit to leave your interactive Docker session.
- Stopping the Shell Process: When you type
exitin the terminal, it sends a signal to stop the Bash shell process that you were interacting with. - Container Shutdown: As Docker containers run as long as the main process they were started with (in this case, the Bash shell), when the Bash process stops, Docker recognizes this and subsequently stops the container.
- Container Cleanup: Depending on how you started the container, Docker might also automatically clean up and remove the container from your system after it stops. If you started your Docker container with the
--rmflag (as indocker run --rm -it ubuntu /bin/bash), Docker will automatically remove the container once it's stopped. However, if you didn't use the--rmflag, the container will be stopped but not removed. It remains on your system in a 'stopped' state and can be seen with thedocker ps -acommand. - Return to Host: Once the container stops, you're automatically returned to the command prompt of your host machine. You're no longer inside the Docker container.
root@0cff7573f442:/# exit
exit
PS C:\Users\vsurr>
PS C:\Users\vsurr> docker ps -a
CONTAINER ID   IMAGE     COMMAND       CREATED         STATUS                     PORTS     NAMES
0cff7573f442   ubuntu    "/bin/bash"   4 minutes ago   Exited (0) 5 seconds ago             elastic_bardeen
So, typing exit not only ends your session in the Docker container, but it also sets in motion a sequence of events that leads to the graceful shutdown of the Docker container. This allows you to maintain a clean Docker environment on your machine. Please note that if you run a web-server inside a container for example, and exit from the bash, it won't stop the container as the main process is now the web-server and not bash.
Removing Docker Containers and Images
Once you're done experimenting with your Docker containers, it's good practice to clean up. This helps save resources on your system.
Removing Docker Containers
To remove a stopped Docker container, you first need to find its container ID. You can list all containers (running and stopped) on your system with the command docker ps -a
Look for your container in the list (it'll likely be the one with 'ubuntu' in the image column and 'Exited' in the status column). Note down the container ID.
PS C:\Users\vsurr> docker ps -a
CONTAINER ID   IMAGE     COMMAND       CREATED         STATUS                     PORTS     NAMES
0cff7573f442   ubuntu    "/bin/bash"   4 minutes ago   Exited (0) 5 seconds ago             elastic_bardeen
To remove the container, use the command docker rm <Container-ID>, replacing <Container-ID> with the ID you just noted down.
PS C:\Users\vsurr> docker rm 0cff7573f442
0cff7573f442
Removing Docker Images
To remove the Docker image that was used to create the container, you first need to find its image ID. List all images on your system using the command docker images
PS C:\Users\vsurr> docker images
REPOSITORY   TAG       IMAGE ID       CREATED       SIZE
ubuntu       latest    5a81c4b8502e   5 weeks ago   77.8MB
Look for your image in the list (it'll likely be the one with 'ubuntu' in the repository column). Note down the image ID.
Now, remove the image with the command docker rmi <Image-ID>, replacing <Image-ID> with the ID you noted down.
PS C:\Users\vsurr> docker rmi 5a81c4b8502e
Untagged: ubuntu:latest
Untagged: ubuntu@sha256:0bced47fffa3361afa981854fcabcd4577cd43cebbb808cea2b1f33a3dd7f508
Deleted: sha256:5a81c4b8502e4979e75bd8f91343b95b0d695ab67f241dbed0d1530a35bde1eb
Deleted: sha256:59c56aee1fb4dbaeb334aef06088b49902105d1ea0c15a9e5a2a9ce560fa4c5d
Closing Up
So, we've got Docker running, pulled down an Ubuntu image, and even fired up a bash shell inside a container.
The interesting part? This is just the start. With Docker, you can run pretty much anything. Fancy a web server? Docker's got you. Need a database for your app? Docker can do that, too. And the best part - it's all neat and tidy, isolated in its own container.