
We are at the tail end of our multicast series. So far, we have covered multicast basics, IGMP, PIM Dense Mode, PIM Sparse Mode, and Auto-RP. In this post, we will look at Bootstrap Router, or BSR.

Bootstrap Router (BSR) Overview
In the previous post, we looked at Auto-RP, which is Cisco's proprietary method for dynamically distributing RP information to all routers in the network. BSR solves the same problem but is defined in the PIM standards (RFC 5059), making it vendor-neutral and interoperable across different platforms. The core idea is the same. Instead of manually configuring the RP address on every router, BSR allows routers to learn RP information automatically. A router called the Bootstrap Router collects RP information from Candidate RPs and distributes it to all PIM routers in the network.
The key difference is in how this information flows. With Auto-RP, the Mapping Agent sends RP mappings to the specific multicast group 224.0.1.40. This creates the chicken-and-egg problem we discussed in the previous post, where routers need to receive multicast to learn where the RP is, but multicast routing depends on knowing the RP. Auto-RP solves this with sparse-dense mode or the autorp listener command.
BSR avoids this problem entirely. Instead of relying on multicast delivery, BSR messages are flooded hop-by-hop between PIM neighbors using the All-PIM-Routers address 224.0.0.13 with a TTL of 1. Each router receives the message, processes it, and forwards it out to all other PIM-enabled interfaces. Because this is baked into the PIM standard, there is no need for sparse-dense mode or autorp to bootstrap the RP discovery process.
BSR Roles
BSR uses two roles that are similar to what we saw in Auto-RP.
- The first role is the Candidate RP. This works the same way as in Auto-RP. A router configured as a Candidate RP advertises itself as a potential rendezvous point. The difference is that instead of sending announcements to a multicast group, the Candidate RP unicasts its messages directly to the BSR.
- The second role is the Bootstrap Router itself. This is similar to the Mapping Agent in Auto-RP, but with one important difference. The Mapping Agent in Auto-RP receives candidate announcements, selects the best RP for each group, and then advertises only the winning RP. The BSR does not make this selection. Instead, it collects all Candidate RP information and floods the entire RP-set to every router in the network. Each router then runs the same selection algorithm locally to decide which RP to use for each group. This means every router in the network independently arrives at the same answer.
Just like with Auto-RP, a single router can act as both the BSR and a Candidate RP at the same time. You can also configure multiple BSRs for redundancy. When multiple BSRs exist, they hear each other's bootstrap messages, and only one becomes the active BSR. The router with the highest priority value wins. If priorities are equal, the highest IP address wins. The losing BSR stops sending its own messages and remains in standby until the active BSR fails.
RP Selection
Since the BSR sends all Candidate RP information to every router, each router must independently decide which RP to use for each multicast group. The selection follows a specific order.
- The first check is the longest prefix match. If one Candidate RP advertises a more specific group range than another, it wins for those groups. For example, if one router advertises itself as the RP for 239.1.1.0/24 and another advertises for 239.0.0.0/8, the first router wins for any group in the 239.1.1.0/24 range.
- If the prefix lengths match, the next check is priority. Lower priority values are preferred. The default priority in Cisco IOS is 0.
- If priorities are also equal, the hash algorithm determines the winner. The BSR includes a hash mask length value in its messages. Each router applies this mask to the group address and the Candidate RP addresses to calculate a hash value. The Candidate RP with the highest hash value wins for that group.
- If the hash value is the same, the final tiebreaker is the highest IP address.
BSR Lab
Let's look at an example using the following topology. We have six routers in total. The sender is connected to r1, and the receiver is connected to r6. All point-to-point links use the 172.16.x.x range for IP addressing. Each router has a loopback interface with the address 10.0.0.x, where x is the router number. For example, r3 has 10.0.0.3, r4 has 10.0.0.4, and so on.
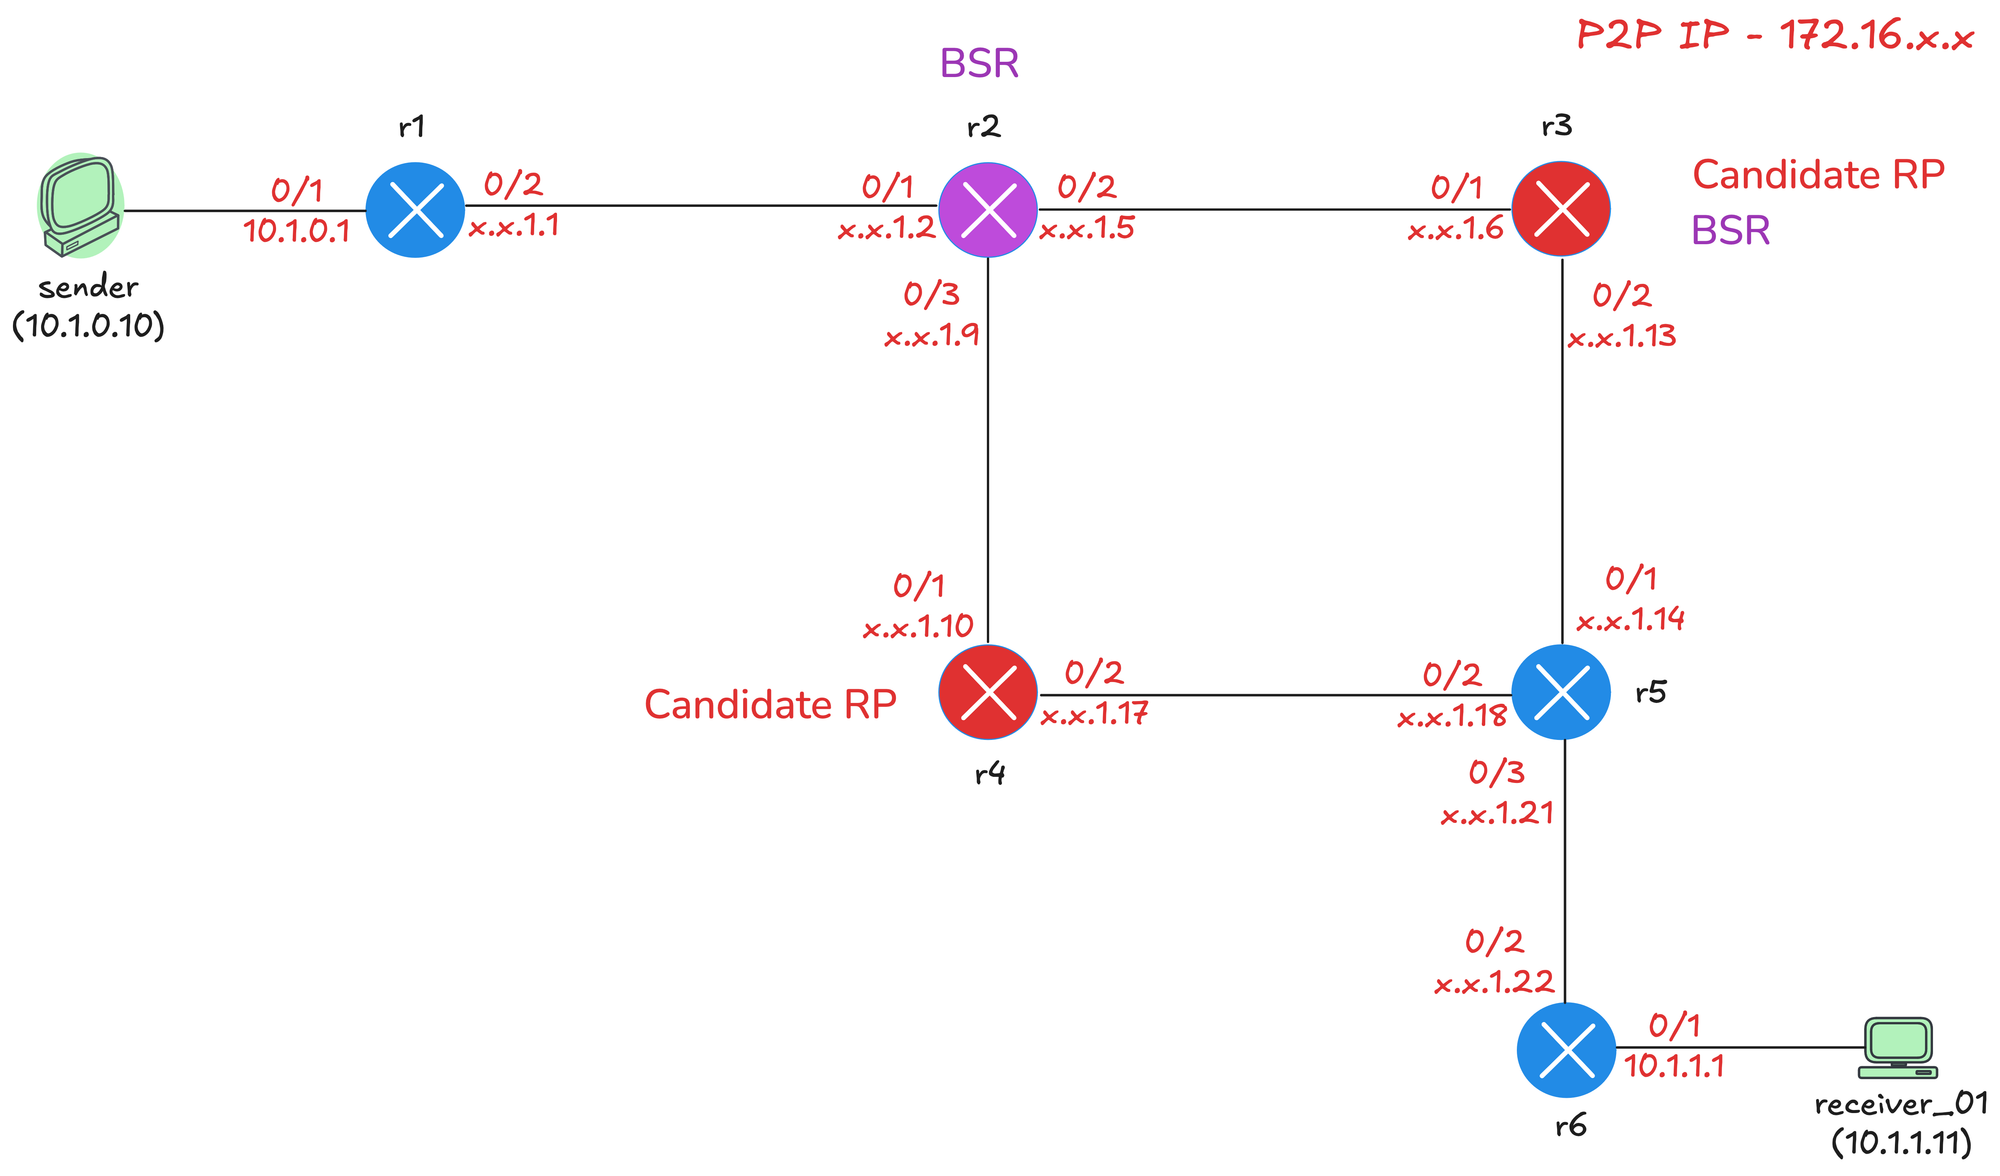
For this lab, r3 will act as both the BSR and a Candidate RP. We will also configure r2 as a second BSR for redundancy, and r4 as a second Candidate RP so we can see how the RP selection process works when multiple candidates exist.
- r2 - BSR
- r3 - BSR and Candidate RP
- r4 - Candidate RP
- r1 - Connected to sender
- r6 - Connected to receiver
Initial Configs
Before configuring BSR, we have a few prerequisites in place. OSPF is enabled on all routers (including the loopback interfaces) so we have full unicast reachability across the network. On top of that, multicast routing is enabled globally on every router, and Auto-RP is disabled. PIM sparse mode is enabled on all interfaces, including the loopbacks. Here is a sample configuration from r2.
!r2 config

ip multicast-routing
no ip pim autorp
!
router ospf 1
 router-id 10.0.0.2
!
interface Loopback0
 ip address 10.0.0.2 255.255.255.255
 ip pim sparse-mode
 ip ospf 1 area 0.0.0.0
!
interface Ethernet0/1
 description r2 -> r1
 ip address 172.16.1.2 255.255.255.252
 ip pim sparse-mode
 ip ospf network point-to-point
 ip ospf 1 area 0.0.0.0
!
interface Ethernet0/2
 description r2 -> r3
 ip address 172.16.1.5 255.255.255.252
 ip pim sparse-mode
 ip ospf network point-to-point
 ip ospf 1 area 0.0.0.0
!
interface Ethernet0/3
 description r2 -> r4
 ip address 172.16.1.9 255.255.255.252
 ip pim sparse-mode
 ip ospf network point-to-point
 ip ospf 1 area 0.0.0.0
!
BSR Config
Next, we will configure r2 and r3 as BSR candidates by running the following command on each router.
! r2 and r3

ip pim bsr-candidate Loopback0
The command syntax is ip pim bsr-candidate <interface> [hash-mask-length] [priority]. The interface specifies which IP address the router will use as its BSR identifier. We use the loopback address since it is always reachable as long as the router is up. For this lab, we are going with all defaults, so the command is simply ip pim bsr-candidate Loopback0 on both r2 and r3.
Candidate RP Configuration
Next, we will configure r3 and r4 as Candidate RPs by running the following command on each router.
! r3 and r4

ip pim rp-candidate Loopback0
The command syntax is ip pim rp-candidate <interface> [group-list <acl>] [interval <seconds>] [priority <0-255>]. The interface specifies which IP address the router will advertise as the RP address. We use the loopback address for the same reason as the BSR configuration.
The group-list option allows you to specify which multicast groups this router will serve as the RP for using a standard ACL (we will cover this later). If omitted, the router advertises itself as a candidate for all multicast groups. The interval controls how often the Candidate RP sends advertisements to the BSR. The default is 60 seconds.
The priority influences RP selection when multiple Candidate RPs exist for the same group range. Lower priority is preferred. The default priority in Cisco IOS is 0. For this lab, we are going with all defaults, so the command is simply ip pim rp-candidate Loopback0 on both r3 and r4.
What Happens Next?
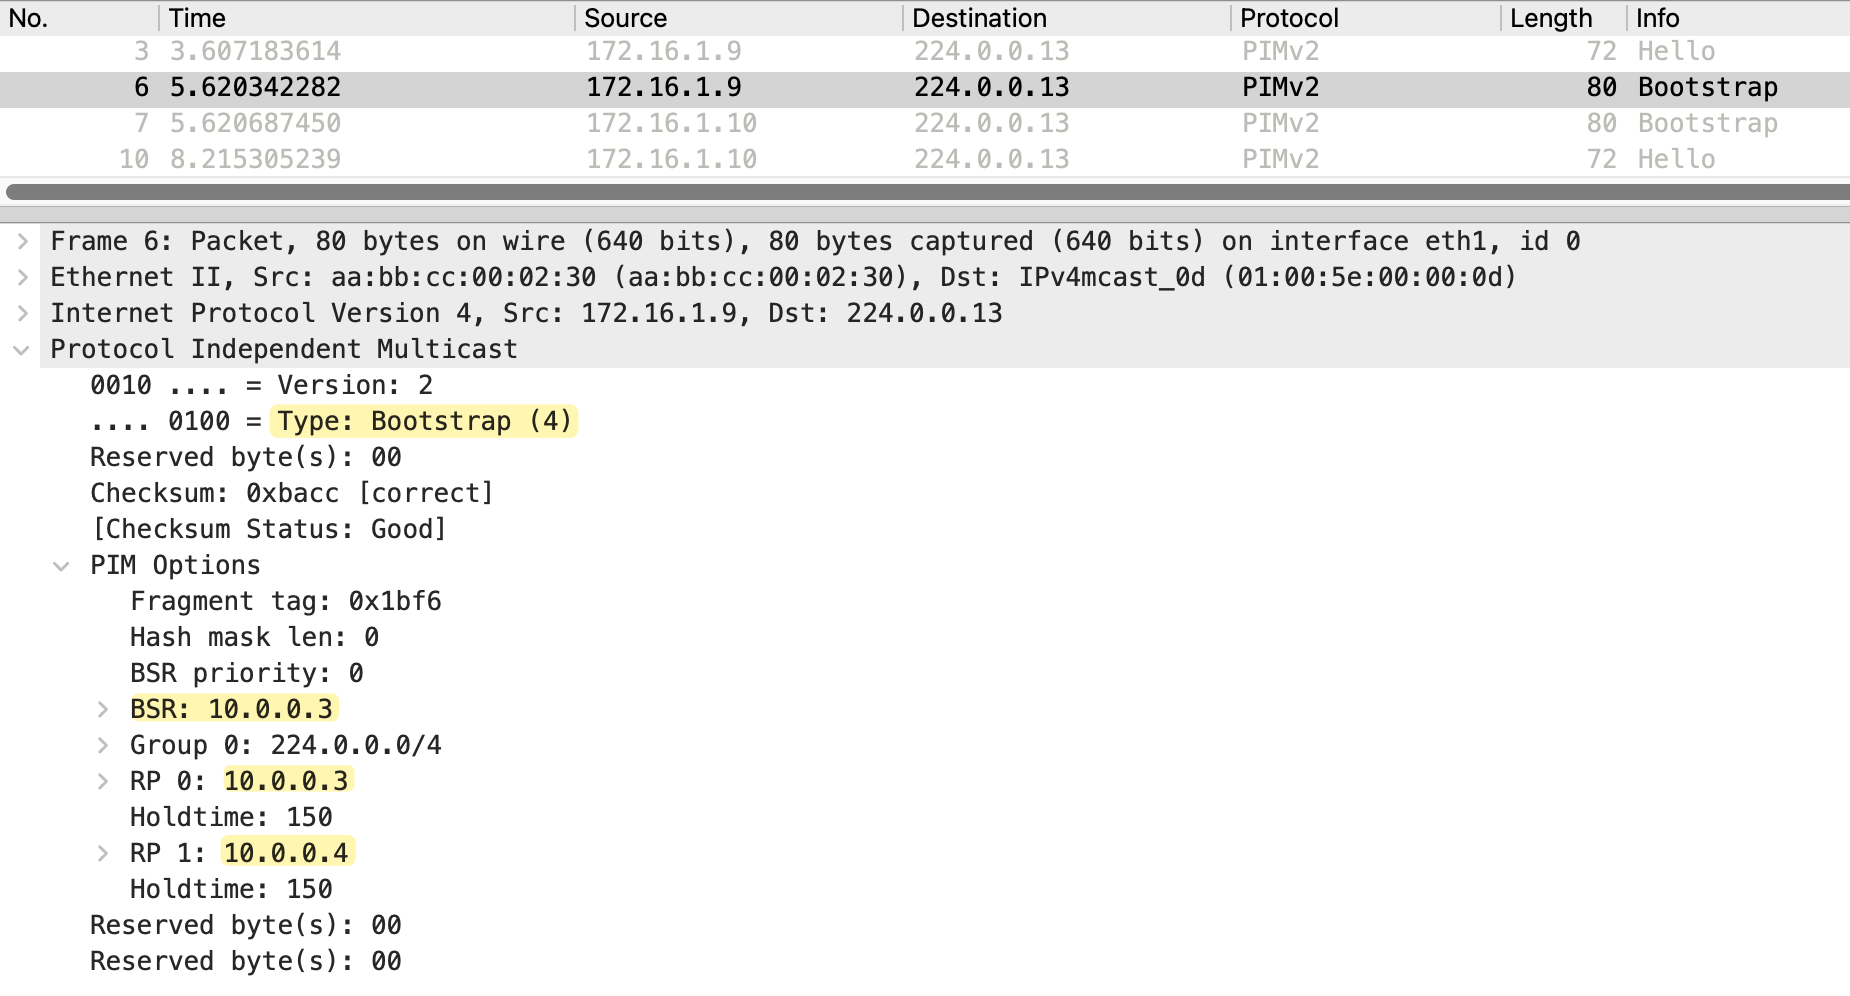
As soon as we configure the BSR candidates, r2 and r3 start sending bootstrap messages (every 60 seconds) out of all PIM-enabled interfaces. These messages are sent to the All-PIM-Routers address 224.0.0.13 with a TTL of 1, so they only reach directly connected PIM neighbors. Each neighbor receives the message, processes it, and floods it out all other PIM-enabled interfaces.
Both r2 and r3 will hear each other's bootstrap messages. Since both are using the default priority of 0, the tiebreaker is the highest IP address. r3 has loopback 10.0.0.3 and r2 has loopback 10.0.0.2, so r3 wins and becomes the active BSR. r2 stops sending its own bootstrap messages and remains in standby. At this point, every router in the network knows that r3 is the BSR. Here are the outputs from r2, r3 and r6.
r2#show ip pim  bsr-router
PIMv2 Bootstrap information
  BSR address: 10.0.0.3 (r3)
  Uptime:      1d14h, BSR Priority: 0, Hash mask length: 0
  Expires:     00:01:12
This system is a candidate BSR
  Candidate BSR address: 10.0.0.2, priority: 0, hash mask length: 0
r3#show ip pim bsr-router
PIMv2 Bootstrap information
This system is the Bootstrap Router (BSR)
BSR address: 10.0.0.3 (?)
Uptime: 1d14h, BSR Priority: 0, Hash mask length: 0
Next bootstrap message in 00:00:27
Candidate RP: 10.0.0.3(Loopback0)
Holdtime 150 seconds
Advertisement interval 60 seconds
Next advertisement in 00:00:56r6#show ip pim bsr-router
PIMv2 Bootstrap information
BSR address: 10.0.0.3 (r3)
Uptime: 1d14h, BSR Priority: 0, Hash mask length: 0
Expires: 00:01:57Once the Candidate RPs are configured, r3 and r4 start sending unicast Candidate RP advertisement messages to the BSR. These messages contain the RP address and the group ranges the RP is willing to serve. Since we did not specify a group-list, both r3 and r4 advertise themselves as candidates for all multicast groups.
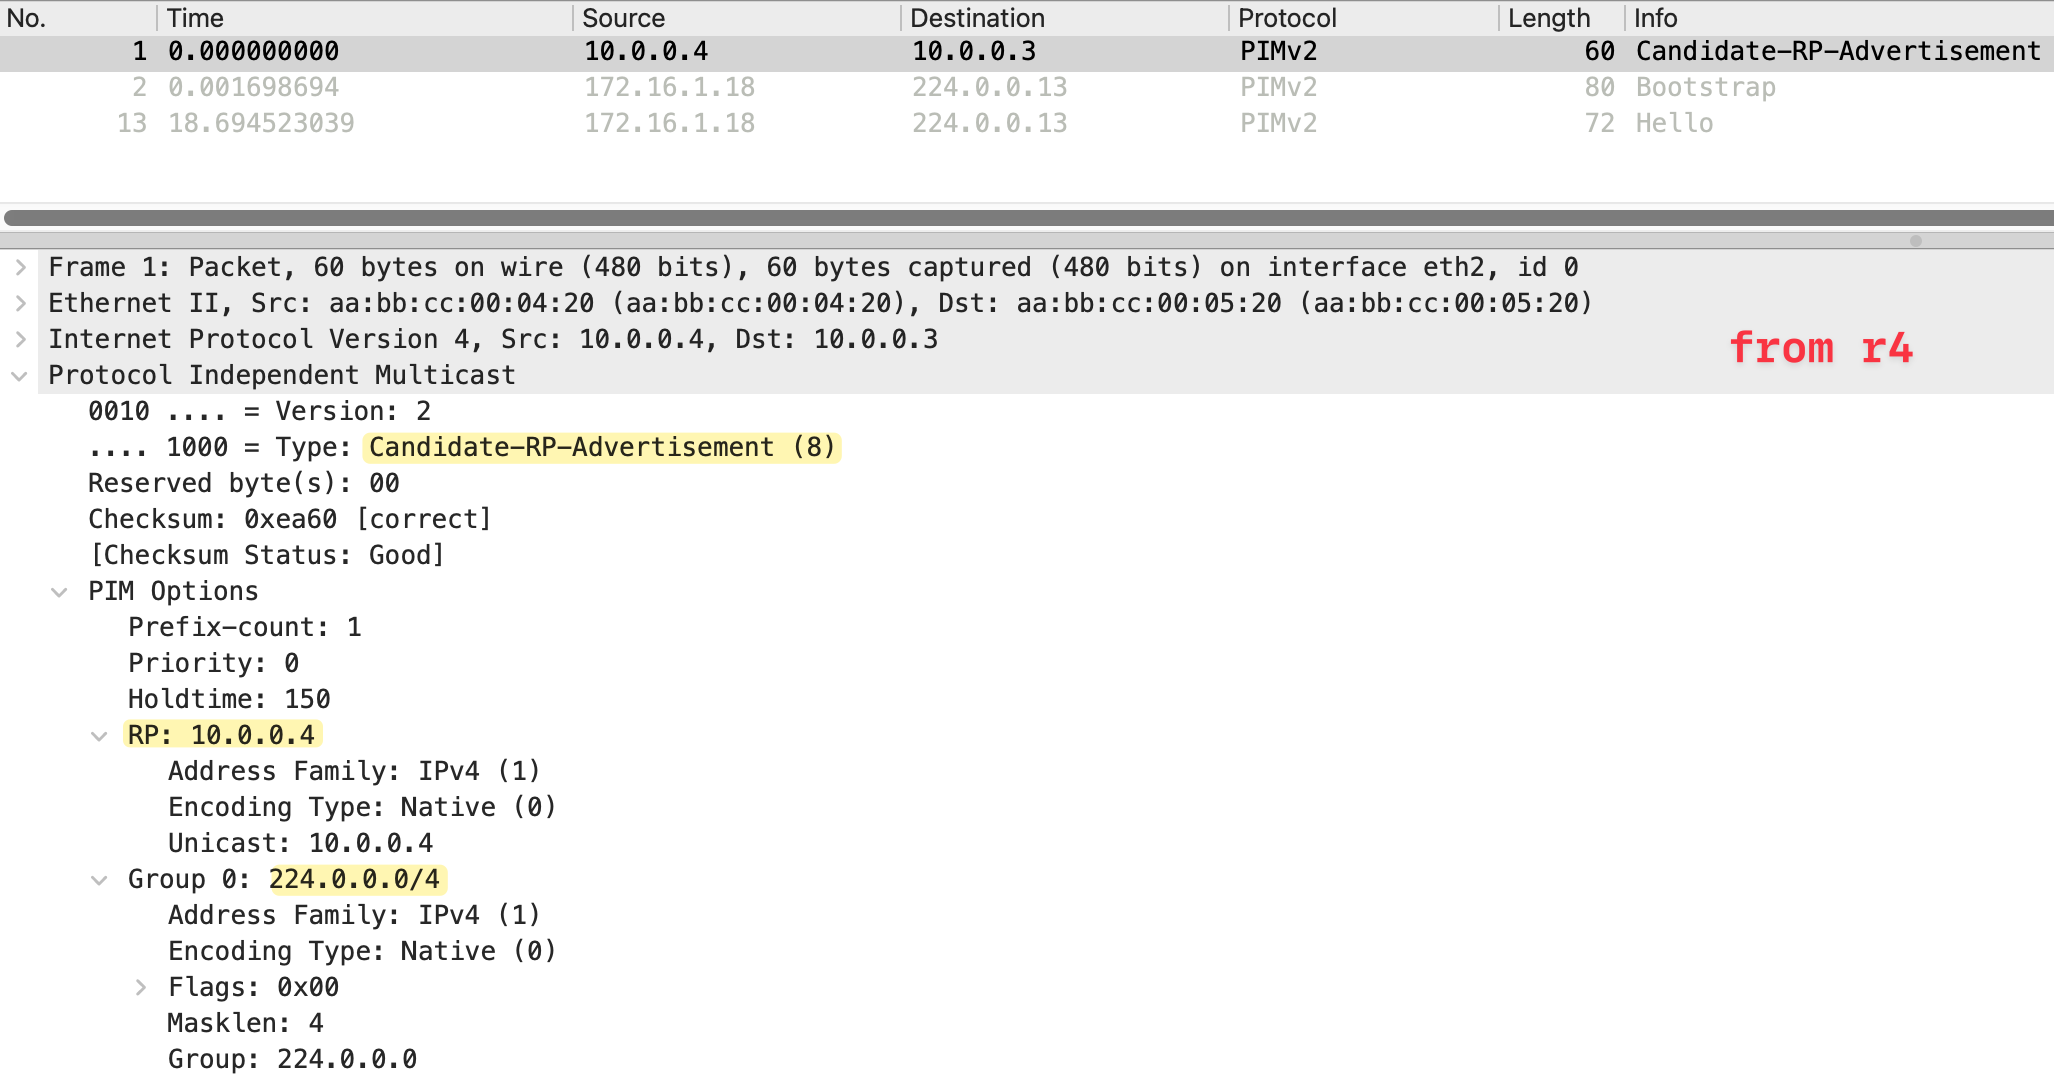
The BSR collects this information and includes it in its bootstrap messages. Now every router in the network receives the full RP-set containing both r3 and r4 as Candidate RPs. Each router independently runs the selection algorithm to decide which RP to use.
RP Selection
We can verify the RP selection using the show ip pim rp mapping command. The output shows that r6 has learned about both Candidate RPs (10.0.0.3 and 10.0.0.4) via bootstrap messages from the BSR at 10.0.0.3. Both have the same priority of 0.
r6#show ip pim rp mapping
Auto-RP is not enabled
PIM Group-to-RP Mappings

Group(s) 224.0.0.0/4
  RP 10.0.0.3 (r3), v2
    Info source: 10.0.0.3 (r3), via bootstrap, priority 0, holdtime 150
         Uptime: 00:11:45, expires: 00:02:13
  RP 10.0.0.4 (r4), v2
    Info source: 10.0.0.3 (r3), via bootstrap, priority 0, holdtime 150
         Uptime: 00:11:06, expires: 00:02:13
To see which RP is actually selected for a specific group, we use the show ip pim rp-hash 239.1.1.1 command. This shows the hash values calculated for each Candidate RP. r3 has a hash value of 1470260459 and r4 has a hash value of 485838898. Since r3 has the higher hash value, r3 wins and becomes the RP for this group.
r6#show ip pim rp-hash 239.1.1.1
  RP 10.0.0.3 (r3), v2
    Info source: 10.0.0.3 (r3), via bootstrap, priority 0, holdtime 150
         Uptime: 00:13:28, expires: 00:01:34
  PIMv2 Hash Value (mask 0.0.0.0)
    RP 10.0.0.3, via bootstrap, priority 0, hash value 1470260459
    RP 10.0.0.4, via bootstrap, priority 0, hash value 485838898
This confirms what we discussed earlier. The hash algorithm does not simply pick the highest IP address as the tiebreaker. It calculates a hash value based on the RP addresses, and the highest hash value wins. In this case, 10.0.0.3 produces a higher hash value than 10.0.0.4.
The multicast routing table also confirms this. Looking at the (*, 239.1.1.1) entry, we can see RP 10.0.0.3 which tells us that r3 is the RP for this group.
r6#show ip mroute
IP Multicast Routing Table

(*, 239.1.1.1), 1d14h/stopped, RP 10.0.0.3, flags: SJC
  Incoming interface: Ethernet0/2, RPF nbr 172.16.1.21
  Outgoing interface list:
    Ethernet0/1, Forward/Sparse, 1d14h/00:02:10, flags:

(10.1.0.10, 239.1.1.1), 00:00:08/00:02:51, flags: JT
  Incoming interface: Ethernet0/2, RPF nbr 172.16.1.21
  Outgoing interface list:
    Ethernet0/1, Forward/Sparse, 00:00:08/00:02:51, flags:
Limiting Candidate RP to Specific Groups
Let's configure r3 to only serve as the RP for a single multicast group 239.5.5.5. We create a standard ACL that permits only this address and apply it to the rp-candidate command using the group-list option.
!r3

ip access-list standard ONLY_239.5.5.5
 10 permit 239.5.5.5
!
ip pim rp-candidate Loopback0 group-list ONLY_239.5.5.5
The RP mapping output on r6 now shows two separate entries. For the 224.0.0.0/4 range, r4 is the only Candidate RP. For 239.5.5.5/32 specifically, r3 is the Candidate RP.
r6#show ip pim rp mapping
Auto-RP is not enabled
PIM Group-to-RP Mappings

Group(s) 224.0.0.0/4
  RP 10.0.0.4 (r4), v2
    Info source: 10.0.0.3 (r3), via bootstrap, priority 0, holdtime 150
         Uptime: 00:46:05, expires: 00:01:46
Group(s) 239.5.5.5/32
  RP 10.0.0.3 (r3), v2
    Info source: 10.0.0.3 (r3), via bootstrap, priority 0, holdtime 150
         Uptime: 00:02:13, expires: 00:01:46
When we check the RP hash for 239.1.1.1, only r4 appears as a candidate since r3 is no longer advertising itself for that group. The multicast routing table confirms this with RP 10.0.0.4 in the (*, 239.1.1.1) entry.
r6#show ip pim rp-hash 239.1.1.1
  RP 10.0.0.4 (r4), v2
    Info source: 10.0.0.3 (r3), via bootstrap, priority 0, holdtime 150
         Uptime: 00:47:35, expires: 00:02:09
  PIMv2 Hash Value (mask 0.0.0.0)
    RP 10.0.0.4, via bootstrap, priority 0, hash value 485838898
r6#show ip mroute
IP Multicast Routing Table
(*, 239.1.1.1), 1d14h/stopped, RP 10.0.0.4, flags: SJC
Incoming interface: Ethernet0/2, RPF nbr 172.16.1.21
Outgoing interface list:
Ethernet0/1, Forward/Sparse, 1d14h/00:02:32, flags:
(10.1.0.10, 239.1.1.1), 00:05:23/00:01:25, flags: JT
Incoming interface: Ethernet0/2, RPF nbr 172.16.1.21
Outgoing interface list:
Ethernet0/1, Forward/Sparse, 00:05:23/00:02:32, flags: When we check the RP hash for 239.5.5.5, r3 is selected because it is the only candidate advertising a more specific match for that group. The longest prefix match rule applies here.
r6#show ip pim rp-hash 239.5.5.5
  RP 10.0.0.3 (r3), v2
    Info source: 10.0.0.3 (r3), via bootstrap, priority 0, holdtime 150
         Uptime: 00:03:45, expires: 00:02:06
  PIMv2 Hash Value (mask 0.0.0.0)
    RP 10.0.0.3, via bootstrap, priority 0, hash value 1470260459
Candidate RP Priority
Let's revert the previous change and instead use priority to influence RP selection. We remove the group-list from r3 and configure a priority of 10.
! r3

ip pim rp-candidate Loopback0 priority 10
The RP mapping output shows both r3 and r4 advertising themselves for all multicast groups. r4 has the default priority of 0, and r3 now has a priority of 10.
r6#show ip pim rp mapping
Auto-RP is not enabled
PIM Group-to-RP Mappings

Group(s) 224.0.0.0/4
  RP 10.0.0.4 (r4), v2
    Info source: 10.0.0.3 (r3), via bootstrap, priority 0, holdtime 150
         Uptime: 00:55:30, expires: 00:02:24
  RP 10.0.0.3 (r3), v2
    Info source: 10.0.0.3 (r3), via bootstrap, priority 10, holdtime 150
         Uptime: 00:02:47, expires: 00:02:21
When we check the RP hash for 239.1.1.1, r4 is selected as the RP. Even though r3 has a higher hash value (1470260459 vs 485838898), the priority is checked first. Lower priority is preferred for Candidate RP selection, so r4 with priority 0 wins over r3 with priority 10.
r6#show ip pim rp-hash 239.1.1.1
  RP 10.0.0.4 (r4), v2
    Info source: 10.0.0.3 (r3), via bootstrap, priority 0, holdtime 150
         Uptime: 00:55:56, expires: 00:01:58
  PIMv2 Hash Value (mask 0.0.0.0)
    RP 10.0.0.4, via bootstrap, priority 0, hash value 485838898
RP 10.0.0.3, via bootstrap, priority 10, hash value 1470260459BSR Priority
We know that r3 is currently the active BSR. We can verify this with the show ip pim bsr-router command, which shows 10.0.0.3 as the BSR address with priority 0.
r6#show ip pim bsr-router
PIMv2 Bootstrap information
  BSR address: 10.0.0.3 (r3)
  Uptime:      1d15h, BSR Priority: 0, Hash mask length: 0
  Expires:     00:01:51
Now we increase the priority on r2 to 10 using the following command.
 ! r2

 ip pim bsr-candidate Loopback0 0 10
After this change, r2 becomes the active BSR. The output now shows 10.0.0.2 as the BSR address with priority 10.
r6#show ip pim bsr-router
PIMv2 Bootstrap information
  BSR address: 10.0.0.2 (r2)
  Uptime:      00:00:01, BSR Priority: 10, Hash mask length: 0
Expires: 00:02:08Hash Mask Length
When multiple Candidate RPs exist with the same priority, the hash algorithm determines which RP is selected for each group.. The algorithm takes the group address and the RP address as inputs and produces a hash value. The RP with the highest hash value wins.