What is pyATS?
Cisco already has excellent documentation about PyATS, so, I will dive straight into an example of how to use it. If you would like to learn more about PyATS or Genie, please check out the following link - https://developer.cisco.com/docs/pyats/#!introduction/cisco-pyats-network-test--automation-solution
pyATS vs Genie
When I first started working with pATS, the most confusing part was trying to figure out the difference between pyATS and Genie. After reading through the documentation, they appear to be interchangeable with each other. Cisco says,
pyATS and Genie were developed side by side in the same team, in proper software stack/layers, with pyATS being the generic all-purpose framework, and Genie extending its capabilities and specializing in network device automation & validation. As such - today, the two together forms the Cisco pyATS Solution, or simplyknown as pyATS.
Our Goal
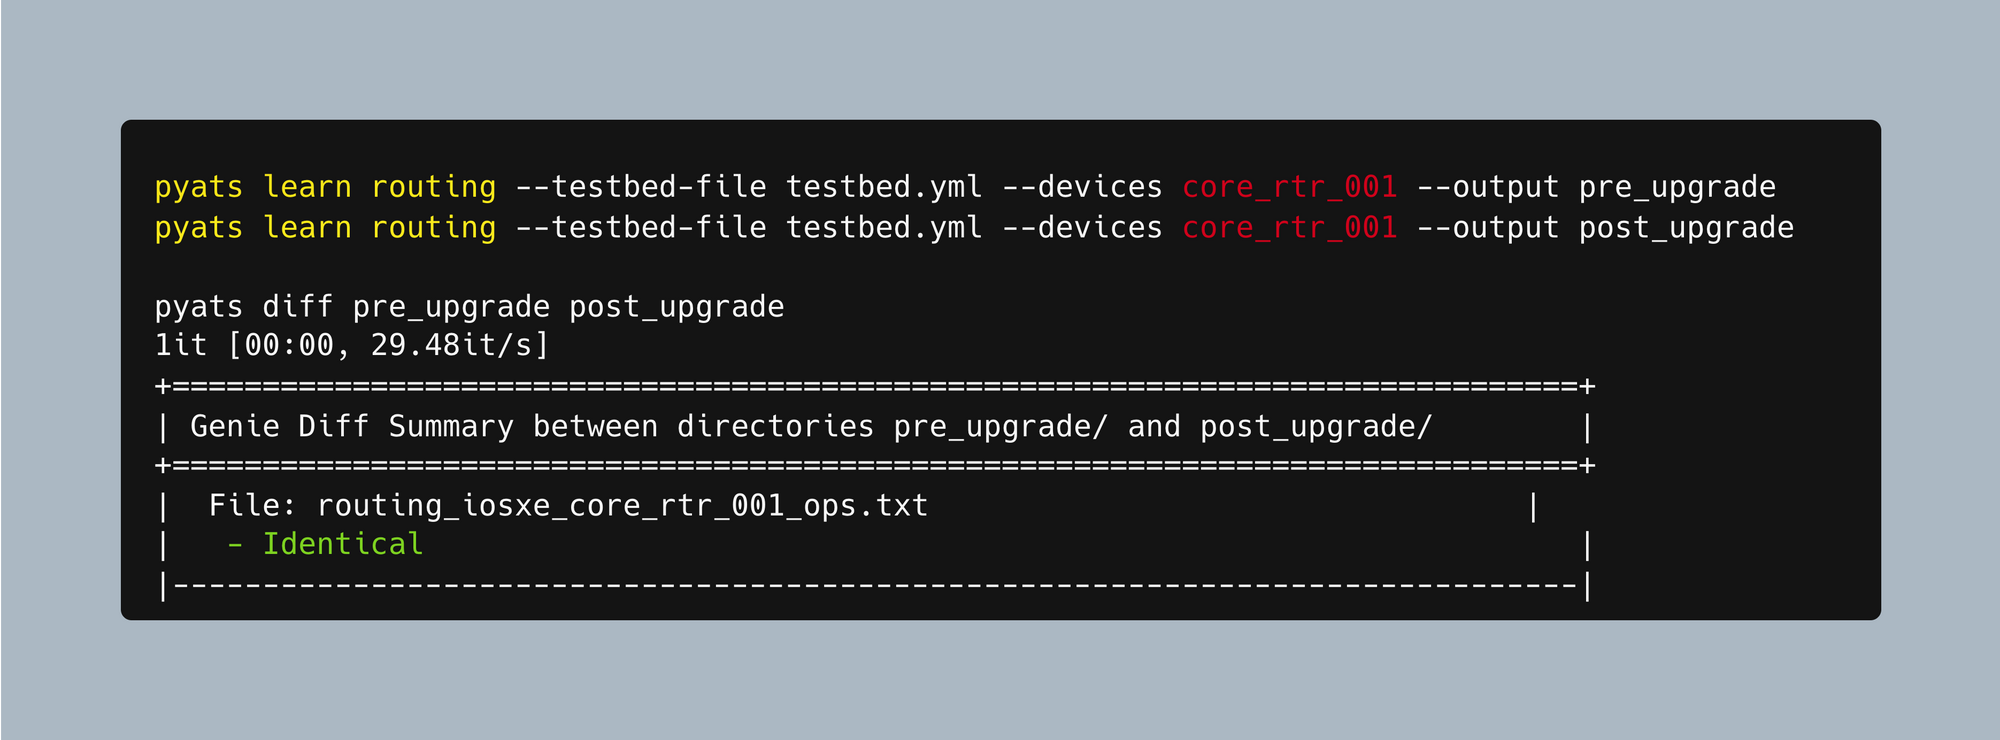
If you are doing a migration or an OS upgrade, you might find yourself comparing the state of the device before and after the change. I usually run show commands on the device before the change, save the output to a file and then compare the output after the change to find any diff.
pyATS / Genie can do exactly that with just a few lines of CLI commands. For example, pyATS can learn everything about 'routing' or 'ospf' (alongside other features) before and after a change and will provide a diff if there are any difference.
Installation
The post assumes both Python and PIP have already been installed on your PC. If you don't have Python installed, please check out the following articles.
macOS / Linux
Installing pyATS on macOS and Linux is very straightforward, install it using pip
pip install "pyats[full]"You can find the full installation options here - https://pubhub.devnetcloud.com/media/pyats-getting-started/docs/install/installpyATS.html
Windows
The pyATS ecosystem does not support Windows. You can set up Windows Subsystem for Linux (WSL) if you use Windows. With WSL, you can run pyATS and the pyATS Library in your local environment.
Testbed File
Don't be alarmed by the name of it. The Testbed file is where we define our devices' IP addresses, type of device, credentials etc. This testbed YAML file provides many sections to describe your physical devices, and how they link together to form the topology.
Let's create a test file for this example. In that file, I'm going to define the name of the device, OS, IP address, protocol, username and password.
# a simpe testbed yaml containing a single device

devices:                # all device definition goes under devices block
  rtr_01:           	# start a device definition with its HOSTNAME
    os: ios       		# the type of os
    platform: iosv
    credentials:
        default:        # login credentials
            username: admin
            password: Cisco123
    connections:        # give the block on how to connect to the device
      cli:
        protocol: ssh
        ip: 10.10.50.21
To ensure everything is working as expected and Genie can establish a successful connection to the device, let me just run a test command on the CLI. I'm going to use Genie to run show ip interface brief command on the router and get the output in a structured format.
The genie parse CLI command executes the specified show command on the device and outputs structured data as shown below.
sureshv@mac:~/Documents/pyats_project|⇒  genie parse 'show ip interface brief' --testbed-file testbed.yml --devices rtr_01
  0%|                 | 0/1 [00:00<?, ?it/s]{
  "interface": {
    "GigabitEthernet0/0": {
      "interface_is_ok": "YES",
      "ip_address": "unassigned",
      "method": "NVRAM",
      "protocol": "down",
      "status": "down"
    },
    "GigabitEthernet0/1": {
      "interface_is_ok": "YES",
      "ip_address": "unassigned",
      "method": "NVRAM",
      "protocol": "down",
      "status": "administratively down"
    },
    "GigabitEthernet0/2": {
      "interface_is_ok": "YES",
      "ip_address": "unassigned",
      "method": "NVRAM",
      "protocol": "down",
      "status": "administratively down"
    },
    "GigabitEthernet0/3": {
      "interface_is_ok": "YES",
      "ip_address": "unassigned",
      "method": "NVRAM",
      "protocol": "down",
      "status": "administratively down"
    },
    "GigabitEthernet0/4": {
      "interface_is_ok": "YES",
      "ip_address": "unassigned",
      "method": "NVRAM",
      "protocol": "down",
      "status": "administratively down"
    },
    "GigabitEthernet0/5": {
      "interface_is_ok": "YES",
      "ip_address": "unassigned",
      "method": "NVRAM",
      "protocol": "down",
      "status": "administratively down"
    },
    "GigabitEthernet0/6": {
      "interface_is_ok": "YES",
      "ip_address": "unassigned",
      "method": "NVRAM",
      "protocol": "down",
      "status": "administratively down"
    },
    "GigabitEthernet0/7": {
      "interface_is_ok": "YES",
      "ip_address": "10.10.50.21",
      "method": "NVRAM",
      "protocol": "up",
      "status": "up"
    }
  }
}
100%|█████████████████████████████| 1/1 [00:01<00:00,  1.89s/it]
Example Lab
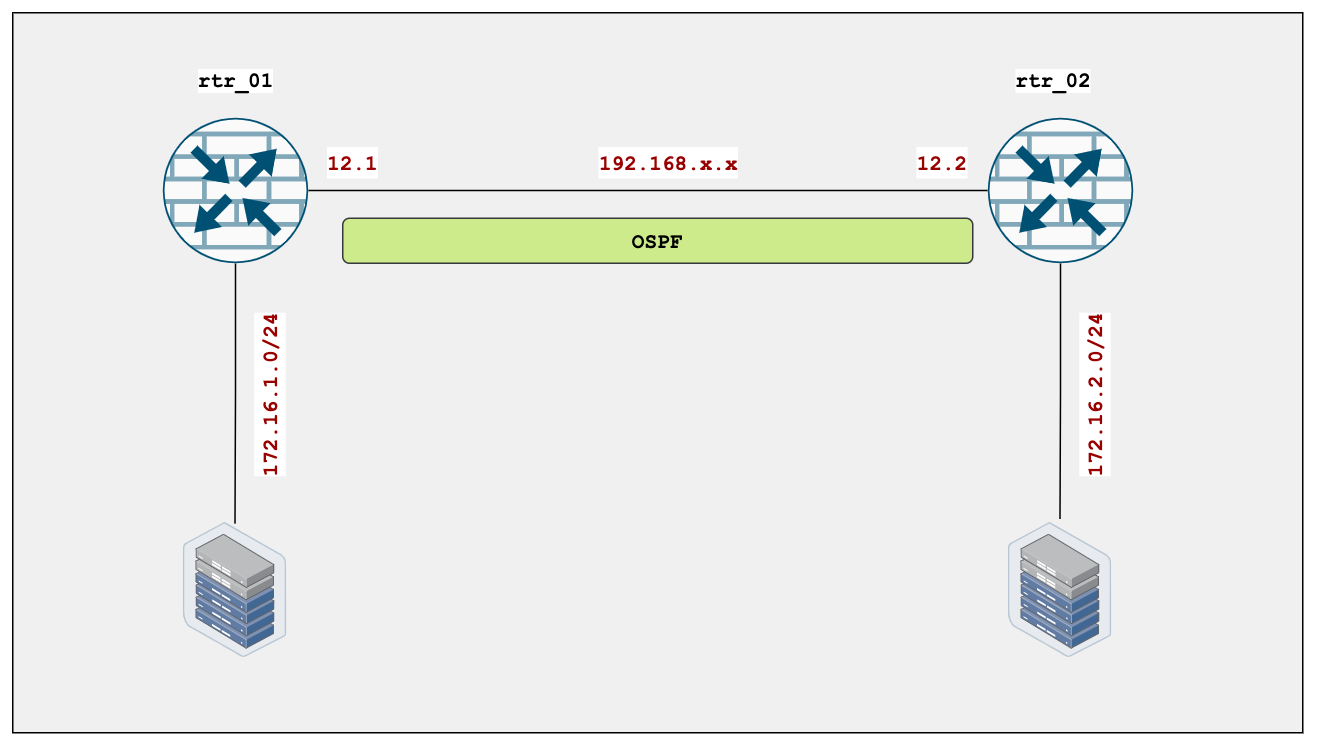
Now that we are comfortable working pyATS, let's go through an example. As you can see below, we have two IOS routers that are running OSPF between them. Each router has a directly connected subnet on them that are 172.16.1.0/24 and 172.16.2.0/24
Task 1 - Verify OSPF and Route Table
Router-01
rtr_01#show ip ospf neighbor

Neighbor ID     Pri   State           Dead Time   Address         Interface
2.2.2.2           1   FULL/BDR        00:00:32    192.168.12.2    GigabitEthernet0/0
As you can see below, rtr_01 is learning the route 172.16.2.0/24 via OSPF (line #9)
rtr_01#show ip route

      10.0.0.0/8 is variably subnetted, 2 subnets, 2 masks
C        10.10.0.0/16 is directly connected, GigabitEthernet0/7
L        10.10.50.21/32 is directly connected, GigabitEthernet0/7
      172.16.0.0/16 is variably subnetted, 3 subnets, 2 masks
C        172.16.1.0/24 is directly connected, GigabitEthernet0/6
L        172.16.1.1/32 is directly connected, GigabitEthernet0/6
O        172.16.2.0/24 [110/2] via 192.168.12.2, 00:10:09, GigabitEthernet0/0
      192.168.12.0/24 is variably subnetted, 2 subnets, 2 masks
C        192.168.12.0/29 is directly connected, GigabitEthernet0/0
L        192.168.12.1/32 is directly connected, GigabitEthernet0/0
Router-02
Similar output for rtr_02 as well.
rtr_02#show ip ospf neighbor

Neighbor ID     Pri   State           Dead Time   Address         Interface
1.1.1.1           1   FULL/DR         00:00:39    192.168.12.1    GigabitEthernet0/0
rtr_02#show ip route
10.0.0.0/8 is variably subnetted, 2 subnets, 2 masks
C 10.10.0.0/16 is directly connected, GigabitEthernet0/7
L 10.10.50.22/32 is directly connected, GigabitEthernet0/7
172.16.0.0/16 is variably subnetted, 3 subnets, 2 masks
O 172.16.1.0/24 [110/2] via 192.168.12.1, 00:10:38, GigabitEthernet0/0
C 172.16.2.0/24 is directly connected, GigabitEthernet0/6
L 172.16.2.1/32 is directly connected, GigabitEthernet0/6
192.168.12.0/24 is variably subnetted, 2 subnets, 2 masks
C 192.168.12.0/29 is directly connected, GigabitEthernet0/0
L 192.168.12.2/32 is directly connected, GigabitEthernet0/0pyATS / Genie Learn
In the previous steps, we ran the show commands manually on the routers to get the desired output. Genie does the same thing by executing various show commands on the router and 'learn' about a specific feature. Let's tell Genie to learn about 'routing' on both routers.
First thing first, let's create a testbed file that includes both routers. Since the credentials are the same for both routers, I moved them to the top of the file.
#testbed.yml file
testbed:
  name: testbed
  credentials:
    default:
      username: admin
      password: Cisco123
    enable:
      password: Cisco123

devices:
  rtr_01:
    os: ios
    platform: iosv
    connections:
      cli:
        protocol: ssh
        ip: 10.10.50.21
  rtr_02:
    os: ios
    platform: iosv
    connections:
      cli:
        protocol: ssh
        ip: 10.10.50.22
Run pyats learn routing CLI command to learn about 'routing' on both routers and save it to a directory called v1 (You can also use genie learn routing )
sureshv@mac:~/Documents/pyats_project|⇒  pyats learn routing --testbed-file testbed.yml --output v1

Learning '['routing']' on devices '['rtr_01', 'rtr_02']'
100%|██████████████████████████████████████| 1/1 [00:03<00:00,  3.85s/it]
+==============================================================================+
| Genie Learn Summary for device rtr_01                                        |
+==============================================================================+
|  Connected to rtr_01                                                         |
|  -   Log: v1/connection_rtr_01.txt                                           |
|------------------------------------------------------------------------------|
|  Learnt feature 'routing'                                                    |
|  -  Ops structure:  v1/routing_ios_rtr_01_ops.txt                            |
|  -  Device Console: v1/routing_ios_rtr_01_console.txt                        |
|==============================================================================|


+==============================================================================+
| Genie Learn Summary for device rtr_02                                        |
+==============================================================================+
|  Connected to rtr_02                                                         |
|  -   Log: v1/connection_rtr_02.txt                                           |
|------------------------------------------------------------------------------|
|  Learnt feature 'routing'                                                    |
|  -  Ops structure:  v1/routing_ios_rtr_02_ops.txt                            |
|  -  Device Console: v1/routing_ios_rtr_02_console.txt                        |
|==============================================================================|
Now that Genie has learnt about 'routing', let's look inside the files. It actually created two files for each router, the one end with ops.txt is the file that has the structured output. The one end with console.txt has the actual output from the show commands as shown below.
+++ rtr_01 with via 'cli': executing command 'show vrf detail' +++
show vrf detail
VRF mgmt (VRF Id = 1); default RD <not set>; default VPNID <not set>
  New CLI format, supports multiple address-families
  Flags: 0x1808
  No interfaces
Address family ipv4 unicast (Table ID = 0x1):
  Flags: 0x0
  No Export VPN route-target communities
  No Import VPN route-target communities
  No import route-map
  No global export route-map
  No export route-map
  VRF label distribution protocol: not configured
  VRF label allocation mode: per-prefix
Address family ipv6 unicast not active
Address family ipv4 multicast not active

rtr_01#
+++ rtr_01 with via 'cli': executing command 'show ip route vrf mgmt' +++
show ip route vrf mgmt

Routing Table: mgmt
Codes: L - local, C - connected, S - static, R - RIP, M - mobile, B - BGP
       D - EIGRP, EX - EIGRP external, O - OSPF, IA - OSPF inter area
       N1 - OSPF NSSA external type 1, N2 - OSPF NSSA external type 2
       E1 - OSPF external type 1, E2 - OSPF external type 2
       i - IS-IS, su - IS-IS summary, L1 - IS-IS level-1, L2 - IS-IS level-2
       ia - IS-IS inter area, * - candidate default, U - per-user static route
       o - ODR, P - periodic downloaded static route, H - NHRP, l - LISP
       a - application route
       + - replicated route, % - next hop override

Gateway of last resort is not set

rtr_01#
+++ rtr_01 with via 'cli': executing command 'show ip route' +++
show ip route
Codes: L - local, C - connected, S - static, R - RIP, M - mobile, B - BGP
       D - EIGRP, EX - EIGRP external, O - OSPF, IA - OSPF inter area
       N1 - OSPF NSSA external type 1, N2 - OSPF NSSA external type 2
       E1 - OSPF external type 1, E2 - OSPF external type 2
       i - IS-IS, su - IS-IS summary, L1 - IS-IS level-1, L2 - IS-IS level-2
       ia - IS-IS inter area, * - candidate default, U - per-user static route
       o - ODR, P - periodic downloaded static route, H - NHRP, l - LISP
       a - application route
       + - replicated route, % - next hop override

Gateway of last resort is not set

      10.0.0.0/8 is variably subnetted, 2 subnets, 2 masks
C        10.10.0.0/16 is directly connected, GigabitEthernet0/7
L        10.10.50.21/32 is directly connected, GigabitEthernet0/7
      172.16.0.0/16 is variably subnetted, 3 subnets, 2 masks
C        172.16.1.0/24 is directly connected, GigabitEthernet0/6
L        172.16.1.1/32 is directly connected, GigabitEthernet0/6
O        172.16.2.0/24 [110/2] via 192.168.12.2, 00:01:57, GigabitEthernet0/0
      192.168.12.0/24 is variably subnetted, 2 subnets, 2 masks
C        192.168.12.0/29 is directly connected, GigabitEthernet0/0
L        192.168.12.1/32 is directly connected, GigabitEthernet0/0
rtr_01#
+++ rtr_01 with via 'cli': executing command 'show ipv6 route' +++
show ipv6 route
rtr_01#
Could not learn <class 'genie.libs.parser.iosxe.show_routing.ShowIpv6RouteDistributor'>
Parser Output is empty
+====================================================================================================================================================+
| Commands for learning feature 'Routing'                                                                                                            |
+====================================================================================================================================================+
| - Parsed commands                                                                                                                                  |
|----------------------------------------------------------------------------------------------------------------------------------------------------|
|   cmd: <class 'genie.libs.parser.iosxe.show_vrf.ShowVrfDetail'>                                                                                    |
|   cmd: <class 'genie.libs.parser.iosxe.show_routing.ShowIpRouteDistributor'>, arguments: {'vrf':'mgmt'}                                            |
|   cmd: <class 'genie.libs.parser.iosxe.show_routing.ShowIpRouteDistributor'>, arguments: {'vrf':''}                                                |
|====================================================================================================================================================|
| - Commands with empty output                                                                                                                       |
|----------------------------------------------------------------------------------------------------------------------------------------------------|
|   cmd: <class 'genie.libs.parser.iosxe.show_routing.ShowIpv6RouteDistributor'>, arguments: {'vrf':''}                                              |
|====================================================================================================================================================|
The file ends with ops.txt has the structured output.
{
  "_exclude": [
    "updated"
  ],
  "attributes": null,
  "commands": null,
  "connections": null,
  "context_manager": {},
  "info": {
    "vrf": {
      "default": {
        "address_family": {
          "ipv4": {
            "routes": {
              "10.10.0.0/16": {
                "active": true,
                "next_hop": {
                  "outgoing_interface": {
                    "GigabitEthernet0/7": {
                      "outgoing_interface": "GigabitEthernet0/7"
                    }
                  }
                },
                "route": "10.10.0.0/16",
                "source_protocol": "connected",
                "source_protocol_codes": "C"
              },
              "10.10.50.21/32": {
                "active": true,
                "next_hop": {
                  "outgoing_interface": {
                    "GigabitEthernet0/7": {
                      "outgoing_interface": "GigabitEthernet0/7"
                    }
                  }
                },
                "route": "10.10.50.21/32",
                "source_protocol": "local",
                "source_protocol_codes": "L"
              },
              "172.16.1.0/24": {
                "active": true,
                "next_hop": {
                  "outgoing_interface": {
                    "GigabitEthernet0/6": {
                      "outgoing_interface": "GigabitEthernet0/6"
                    }
                  }
                },
                "route": "172.16.1.0/24",
                "source_protocol": "connected",
                "source_protocol_codes": "C"
              },
              "172.16.1.1/32": {
                "active": true,
                "next_hop": {
                  "outgoing_interface": {
                    "GigabitEthernet0/6": {
                      "outgoing_interface": "GigabitEthernet0/6"
                    }
                  }
                },
                "route": "172.16.1.1/32",
                "source_protocol": "local",
                "source_protocol_codes": "L"
              },
              "172.16.2.0/24": {
                "active": true,
                "metric": 2,
                "next_hop": {
                  "next_hop_list": {
                    "1": {
                      "index": 1,
                      "next_hop": "192.168.12.2",
                      "outgoing_interface": "GigabitEthernet0/0",
                      "updated": "00:01:57"
                    }
                  }
                },
                "route": "172.16.2.0/24",
                "route_preference": 110,
                "source_protocol": "ospf",
                "source_protocol_codes": "O"
              },
              "192.168.12.0/29": {
                "active": true,
                "next_hop": {
                  "outgoing_interface": {
                    "GigabitEthernet0/0": {
                      "outgoing_interface": "GigabitEthernet0/0"
                    }
                  }
                },
                "route": "192.168.12.0/29",
                "source_protocol": "connected",
                "source_protocol_codes": "C"
              },
              "192.168.12.1/32": {
                "active": true,
                "next_hop": {
                  "outgoing_interface": {
                    "GigabitEthernet0/0": {
                      "outgoing_interface": "GigabitEthernet0/0"
                    }
                  }
                },
                "route": "192.168.12.1/32",
                "source_protocol": "local",
                "source_protocol_codes": "L"
              }
            }
          }
        }
      }
    }
  },
  "list_of_vrfs": [
    "mgmt",
    ""
  ],
  "raw_data": false
}
pyATS / Genie Diff
Now that we have learnt about 'routing' on both routers, let's make a small change by shutting down 172.16.1.0/24 on rtr_01. From the routing perspective, there is one change on each router.
rtr_01loses its connected route for 172.16.1.0/24rtr_02loses its OSPF route for 172.16.1.0/24
I'm going to shutdown the interface that has 172.16.1.0/24 subnet, re-learn 'routing' on both routers and save the output to a directory called v2
rtr_01(config)# interface Gi0/6
rtr_01(config-if)# shut
pyats learn routing --testbed-file testbed.yml --output v2Now that we have both snapshots about 'routing', let's run a diff between them using the genie diff command and save the output to a directory called diff_output
sureshv@mac:~/Documents/pyats_project|⇒  genie diff v1 v2 --output diff_output
1it [00:00, 84.52it/s]
+==============================================================================+
| Genie Diff Summary between directories v1/ and v2/                           |
+==============================================================================+
|  File: routing_ios_rtr_01_ops.txt                                            |
|   - Diff can be found at diff_output/diff_routing_ios_rtr_01_ops.txt         |
|------------------------------------------------------------------------------|
|  File: routing_ios_rtr_02_ops.txt                                            |
|   - Diff can be found at diff_output/diff_routing_ios_rtr_02_ops.txt         |
|------------------------------------------------------------------------------|
As per the output, the 'diff' has been saved to the above files. Let's open one by one and verify them.
As we expected, rtr_01 shows that the local/connected route for 172.16.1.0/24 has disappeared from the routing table (denoted by the - sign, lines 15 and 16)
--- v1/routing_ios_rtr_01_ops.txt
+++ v2/routing_ios_rtr_01_ops.txt
 info:
  vrf:
   default:
    address_family:
     ipv4:
      routes:
-      172.16.1.0/24:
-       active: True
-       next_hop:
-        outgoing_interface:
-         GigabitEthernet0/6:
-          outgoing_interface: GigabitEthernet0/6
-       route: 172.16.1.0/24
-       source_protocol: connected
-       source_protocol_codes: C
-      172.16.1.1/32:
-       active: True
-       next_hop:
-        outgoing_interface:
-         GigabitEthernet0/6:
-          outgoing_interface: GigabitEthernet0/6
-       route: 172.16.1.1/32
-       source_protocol: local
-       source_protocol_codes: L
Similarly, rtr_02 shows that the ospf route for 172.16.1.0/24 has disappeared from the routing table (denoted by the - sign, lines 9 and 21)
--- v1/routing_ios_rtr_02_ops.txt
+++ v2/routing_ios_rtr_02_ops.txt
 info:
  vrf:
   default:
    address_family:
     ipv4:
      routes:
-      172.16.1.0/24:
-       active: True
-       metric: 2
-       next_hop:
-        next_hop_list:
-         1:
-          index: 1
-          next_hop: 192.168.12.1
-          outgoing_interface: GigabitEthernet0/0
-          updated: 00:01:58
-       route: 172.16.1.0/24
-       route_preference: 110
-       source_protocol: ospf
-       source_protocol_codes: O
Closing Thoughts
In this example, we only had two routers and a single route. Imagine you have 100s of routes and multiple routers, it would be extremely hard to run diff on all of them manually. With pyATS, all you have to do is, take a snapshot of all the routers, perform your change, take another snapshot and compare the results. If the output is identical then you can be confident that your change didn't break anything.
Genie can not only learn about 'routing' but also 'ospf', 'arp', 'vlan', 'hsrp' and many more. You can find the full list here https://pubhub.devnetcloud.com/media/genie-feature-browser/docs/#/models