Pytest is a Python testing framework. It is primarily used by developers to test their code and make sure it behaves as expected. For example, if you write a function that adds two numbers, you can write a test to verify that the function returns the correct result. If it does, the test passes. If not, the test fails, and pytest tells you exactly where things went wrong.
That is the traditional use case, but pytest is not limited to testing code. You can use it to test anything that can be scripted in Python, and that includes testing your network.
In this series, we will use pytest to write tests that connect to network devices and verify their state. For example, we can write a test that connects to a router and checks whether BGP is up. If BGP is up, the test passes. If not, the test fails. We can also check things like interface states, routing table entries, OSPF neighbours, or really anything else you can pull from a device.
Why Not Just Use a Monitoring Tool?
You might be wondering why you need this when you already have monitoring tools like SNMP, Nagios, or Zabbix. Those tools are great at telling you when something is down or when a metric crosses a threshold. But they are not really designed for testing specific network conditions in a structured way.
For example, SNMP can tell you that a BGP session is down, but it cannot easily verify that the correct prefixes are being advertised, or that the right communities are set, or that traffic is taking the expected path. You would need to build a lot of custom logic around it to get anywhere close to that level of detail.
Pytest gives you full control. You write the test, you decide exactly what to check, and you get a clear pass or fail result. You can test one device or a hundred. You can run the tests manually, on a schedule, or as part of a CI/CD pipeline before pushing a config change to production. If something fails, you know exactly what failed and why.
It also keeps everything in code, which means your tests live in version control alongside your other automation, and the whole team can see, update, and reuse them.
Getting Started with Pytest
Installing pytest is straightforward. You can install it using pip or uv. uv is what I personally use and recommend.
pip install pytestuv add pytestSimple Pytest Example
To understand how pytest works, let's look at a simple example before we get into network testing.
- Say you have a function that takes a list of numbers and returns the total.
- Before summing them up, the function converts the list to a set to remove any duplicates.
- Most of the time, there are no duplicates, but there is always a chance that there could be, and the function needs to handle that correctly.
#my_func.py
def add_total(list_of_numbers):
    toset = set(list_of_numbers)
    total = sum(toset)
    return total
Now imagine someone comes along and refactors the code. They see the set conversion and remove it, thinking it is unnecessary, without realising what it is there for. The function still works fine for the common case, but it is now broken for any input that contains duplicates.
This is exactly the kind of thing pytest catches. Using Pytest, you can create another Python file with tests in it. The test file includes a test that passes a list with duplicate numbers and expects the correct result. The moment that set conversion is removed, that test fails. Pytest tells you exactly which test failed and what the actual output was versus what was expected. The broken change never makes it any further. That is the real value of tests in a large codebase. Not just verifying that things work today, but making sure they keep working as the code evolves.
#test_total.py
from my_func import add_total

def test_simple_total():
    assert add_total([1, 2, 3]) == 6

def test_total_with_duplicates():
    assert add_total([1, 2, 3, 3]) == 6

def test_empty_list():
    assert add_total([]) == 0

def test_same_numbers():
    assert add_total([5, 5, 5]) == 5
The test file has four tests, each covering a different scenario.
- The first test is basic; it passes a simple list with no duplicates and checks that the total is correct. This is the most common case and the one that would pass even without the set conversion.
- The second test passes a list that contains a duplicate number and expects the result to reflect that the duplicate was removed.
- The third test checks what happens with an empty list.
- The fourth test passes a list where all the numbers are the same.
The key part of every test is the assert statement. When you write assert add_total([1, 2, 3]) == 6, you are telling pytest to run the function with that input and check that the result equals 6. If it does, the test passes. If it does not, the test fails. That is really all there is to it. Assert is just a way of saying "I expect this to be true, and if it is not, something is wrong."
Running the Tests
Together, these tests cover the normal case, the duplicate case, and two edge cases. If anyone changes the function in a way that breaks any of these scenarios, pytest will catch it immediately. You can create the test file anywhere in your project, but the simplest approach is to keep it in the same directory as the code you are testing. For larger projects, it is common to have a dedicated tests directory where all your test files live. Either way, for Pytest to discover the tests, you need to follow the guidelines.
- The file name must start with
test_, for example,test_total.py - Or ends with
test_liketotal_test.py - Pytest automatically discovers any file that follows this naming convention, so you do not need to tell it where to look.
- Test methods and functions should be named
test_<something>
To run your tests, simply run pytest from the same directory. Pytest automatically discovers any file that starts with test_ and runs the functions inside it that also start with test_.
pytest

============================== test session starts ==============================
platform darwin -- Python 3.12.10, pytest-9.0.3, pluggy-1.6.0
rootdir: /Users/suresh/Documents/code/blog/pytest_automated_tests
configfile: pyproject.toml
collected 4 items

test_total.py ....                                                        [100%]

=============================== 4 passed in 0.01s ==============================
When you run pytest, it prints a summary of the test session. You can see the Python version, the pytest version, and the directory it ran from. It also shows how many tests were collected, which in this case is 4. The four dots next to the test file name each represent a single test. A dot means the test passed. If a test fails, you will see an F instead, and pytest will show you exactly which test failed and why. At the bottom, you get a simple summary, 4 passed in 0.01s. That is all you need to know.
If you add the -v flag, pytest prints a more detailed output. Instead of dots, you get the full name of each test and whether it passed or failed. I typically use -v because it is easier to see exactly which tests ran and what the result was for each one.
pytest -v

========================= test session starts =========================
platform darwin -- Python 3.12.10, pytest-9.0.3, pluggy-1.6.0 --
/blog/pytest_automated_tests/.venv/bin/python
cachedir: .pytest_cache
rootdir: /Users/suresh/Documents/code/blog/pytest_automated_tests
configfile: pyproject.toml
collected 4 items

test_total.py::test_simple_total PASSED                         [ 25%]
test_total.py::test_total_with_duplicates PASSED                [ 50%]
test_total.py::test_empty_list PASSED                           [ 75%]
test_total.py::test_same_numbers PASSED                         [100%]

========================== 4 passed in 0.00s ==========================
Catching a Mistake
Let's see a failing test in action. Someone removes the set conversion from the function, thinking it is not needed. When you run pytest now, two tests fail immediately.
def add_total(list_of_numbers):
    total = sum(list_of_numbers)
    return total
pytest -v
========================= test session starts =========================
platform darwin -- Python 3.12.10, pytest-9.0.3, pluggy-1.6.0 --
/blog/pytest_automated_tests/.venv/bin/python
cachedir: .pytest_cache
rootdir: /Users/suresh/Documents/code/blog/pytest_automated_tests
configfile: pyproject.toml
collected 4 items
test_total.py::test_simple_total PASSED [ 25%]
test_total.py::test_total_with_duplicates FAILED [ 50%]
test_total.py::test_empty_list PASSED [ 75%]
test_total.py::test_same_numbers FAILED [100%]
============================== FAILURES ===============================
_____________________ test_total_with_duplicates ______________________
def test_total_with_duplicates():
> assert add_total([1, 2, 3, 3]) == 6
E assert 9 == 6
E + where 9 = add_total([1, 2, 3, 3])
test_total.py:7: AssertionError
__________________________ test_same_numbers __________________________
def test_same_numbers():
> assert add_total([5, 5, 5]) == 5
E assert 15 == 5
E + where 15 = add_total([5, 5, 5])
test_total.py:13: AssertionError
======================= short test summary info =======================
FAILED test_total.py::test_total_with_duplicates - assert 9 == 6
FAILED test_total.py::test_same_numbers - assert 15 == 5
===================== 2 failed, 2 passed in 0.02s =====================The output tells you exactly what went wrong. For the duplicate test, the function returned 9, but the expected result was 6. For the same numbers test, it returned 15 instead of 5. In both cases, the duplicates were not removed before summing.
The other two tests still pass because they do not involve duplicates, so the function behaves correctly for those inputs. This is the whole point. Without these tests, this change could easily slip through unnoticed, especially in a large codebase where no one is manually verifying every function after every change.
You can also use the --tb=no flag to suppress the traceback output. Instead of showing the full failure details, pytest just prints a clean summary of which tests passed and which failed.
pytest -v --tb=no
============================ test session starts ============================
platform darwin -- Python 3.12.10, pytest-9.0.3, pluggy-1.6.0 --
/blog/pytest_automated_tests/.venv/bin/python
cachedir: .pytest_cache
rootdir: /Users/suresh/Documents/code/blog/pytest_automated_tests
configfile: pyproject.toml
collected 4 items

test_total.py::test_simple_total PASSED                               [ 25%]
test_total.py::test_total_with_duplicates FAILED                      [ 50%]
test_total.py::test_empty_list PASSED                                 [ 75%]
test_total.py::test_same_numbers FAILED                               [100%]

========================== short test summary info ==========================
When I run network tests, I use this flag because the traceback is not always useful in that context. If a BGP test fails, I already know what to look at. I do not need pytest to tell me the assert values; I just need to know which tests failed so I can go and investigate on the device directly.
When you have a set of tests like this, typically, you integrate them into a CI/CD pipeline. This means every time someone pushes a code change, the tests run automatically. If any test fails, the pipeline stops and the change does not get merged or deployed. This way, nothing broken ever makes it to production without someone explicitly knowing about it.
How Do We Test Our Network with Pytest?
Now that we have a basic understanding of pytest, let us think about how we can apply this to network testing.
The idea is exactly the same (or sort of the same). Instead of passing numbers into a function and checking the result, we SSH into a network device, pull some information, and assert that it matches what we expect. For example, we can SSH into a router, check the BGP neighbour state, and assert that it is established. If it is, the test passes. If not, the test fails.
The only difference is that instead of testing a Python function, we are testing the state of a real network device.
A Simple Example with Arista
For this example, I have an Arista device with two BGP sessions, both in an established state.
r1#show ip bgp summary
BGP summary information for VRF default
Router identifier 10.0.0.1, local AS number 64512
Neighbor Status Codes: m - Under maintenance
  Description      Neighbor V AS         Up/Down State   PfxRcd PfxAcc PfxAdv
  r2               10.0.0.2 4 64512     00:00:02 Estab   0      0      1
  r3               10.0.0.3 4 64512     00:00:02 Estab   1      1      1
Let's say we want to write a test that connects to this device and checks that both sessions are established. With Arista, you can use the eAPI to get structured output directly from the device, which makes it very easy to work with in Python. To get started, install the pyeapi library using pip or uv
pip install pyeapiuv add pyeapiThe following code connects to the Arista device over HTTPS and runs the show ip bgp summary command. Instead of raw text, you get a structured response back that you can work with directly in Python, which is exactly what we need for writing tests.
import pyeapi

connection = pyeapi.client.connect(
    transport="https",
    host="192.168.200.101",
    username="admin",
    password='admin',
    port=443
)

node = pyeapi.client.Node(connection)
response = node.enable(["show ip bgp summary"])
print(response)
[
{
"command": "show ip bgp summary",
"result": {
"vrfs": {
"default": {
"vrf": "default",
"routerId": "10.0.0.1",
"asn": "64512",
"peers": {
"10.0.0.2": {
"description": "r2",
"version": 4,
"msgReceived": 97,
"msgSent": 97,
"inMsgQueue": 0,
"outMsgQueue": 0,
"asn": "64512",
"prefixAccepted": 1,
"prefixReceived": 1,
"upDownTime": 1776591987.51807,
"underMaintenance": false,
"peerState": "Established",
"prefixAdvertised": 1
},
"10.0.0.3": {
"description": "r3",
"version": 4,
"msgReceived": 96,
"msgSent": 95,
"inMsgQueue": 0,
"outMsgQueue": 0,
"asn": "64512",
"prefixAccepted": 1,
"prefixReceived": 1,
"upDownTime": 1776591987.068655,
"underMaintenance": false,
"peerState": "Established",
"prefixAdvertised": 1
}
}
}
}
},
"encoding": "json"
}
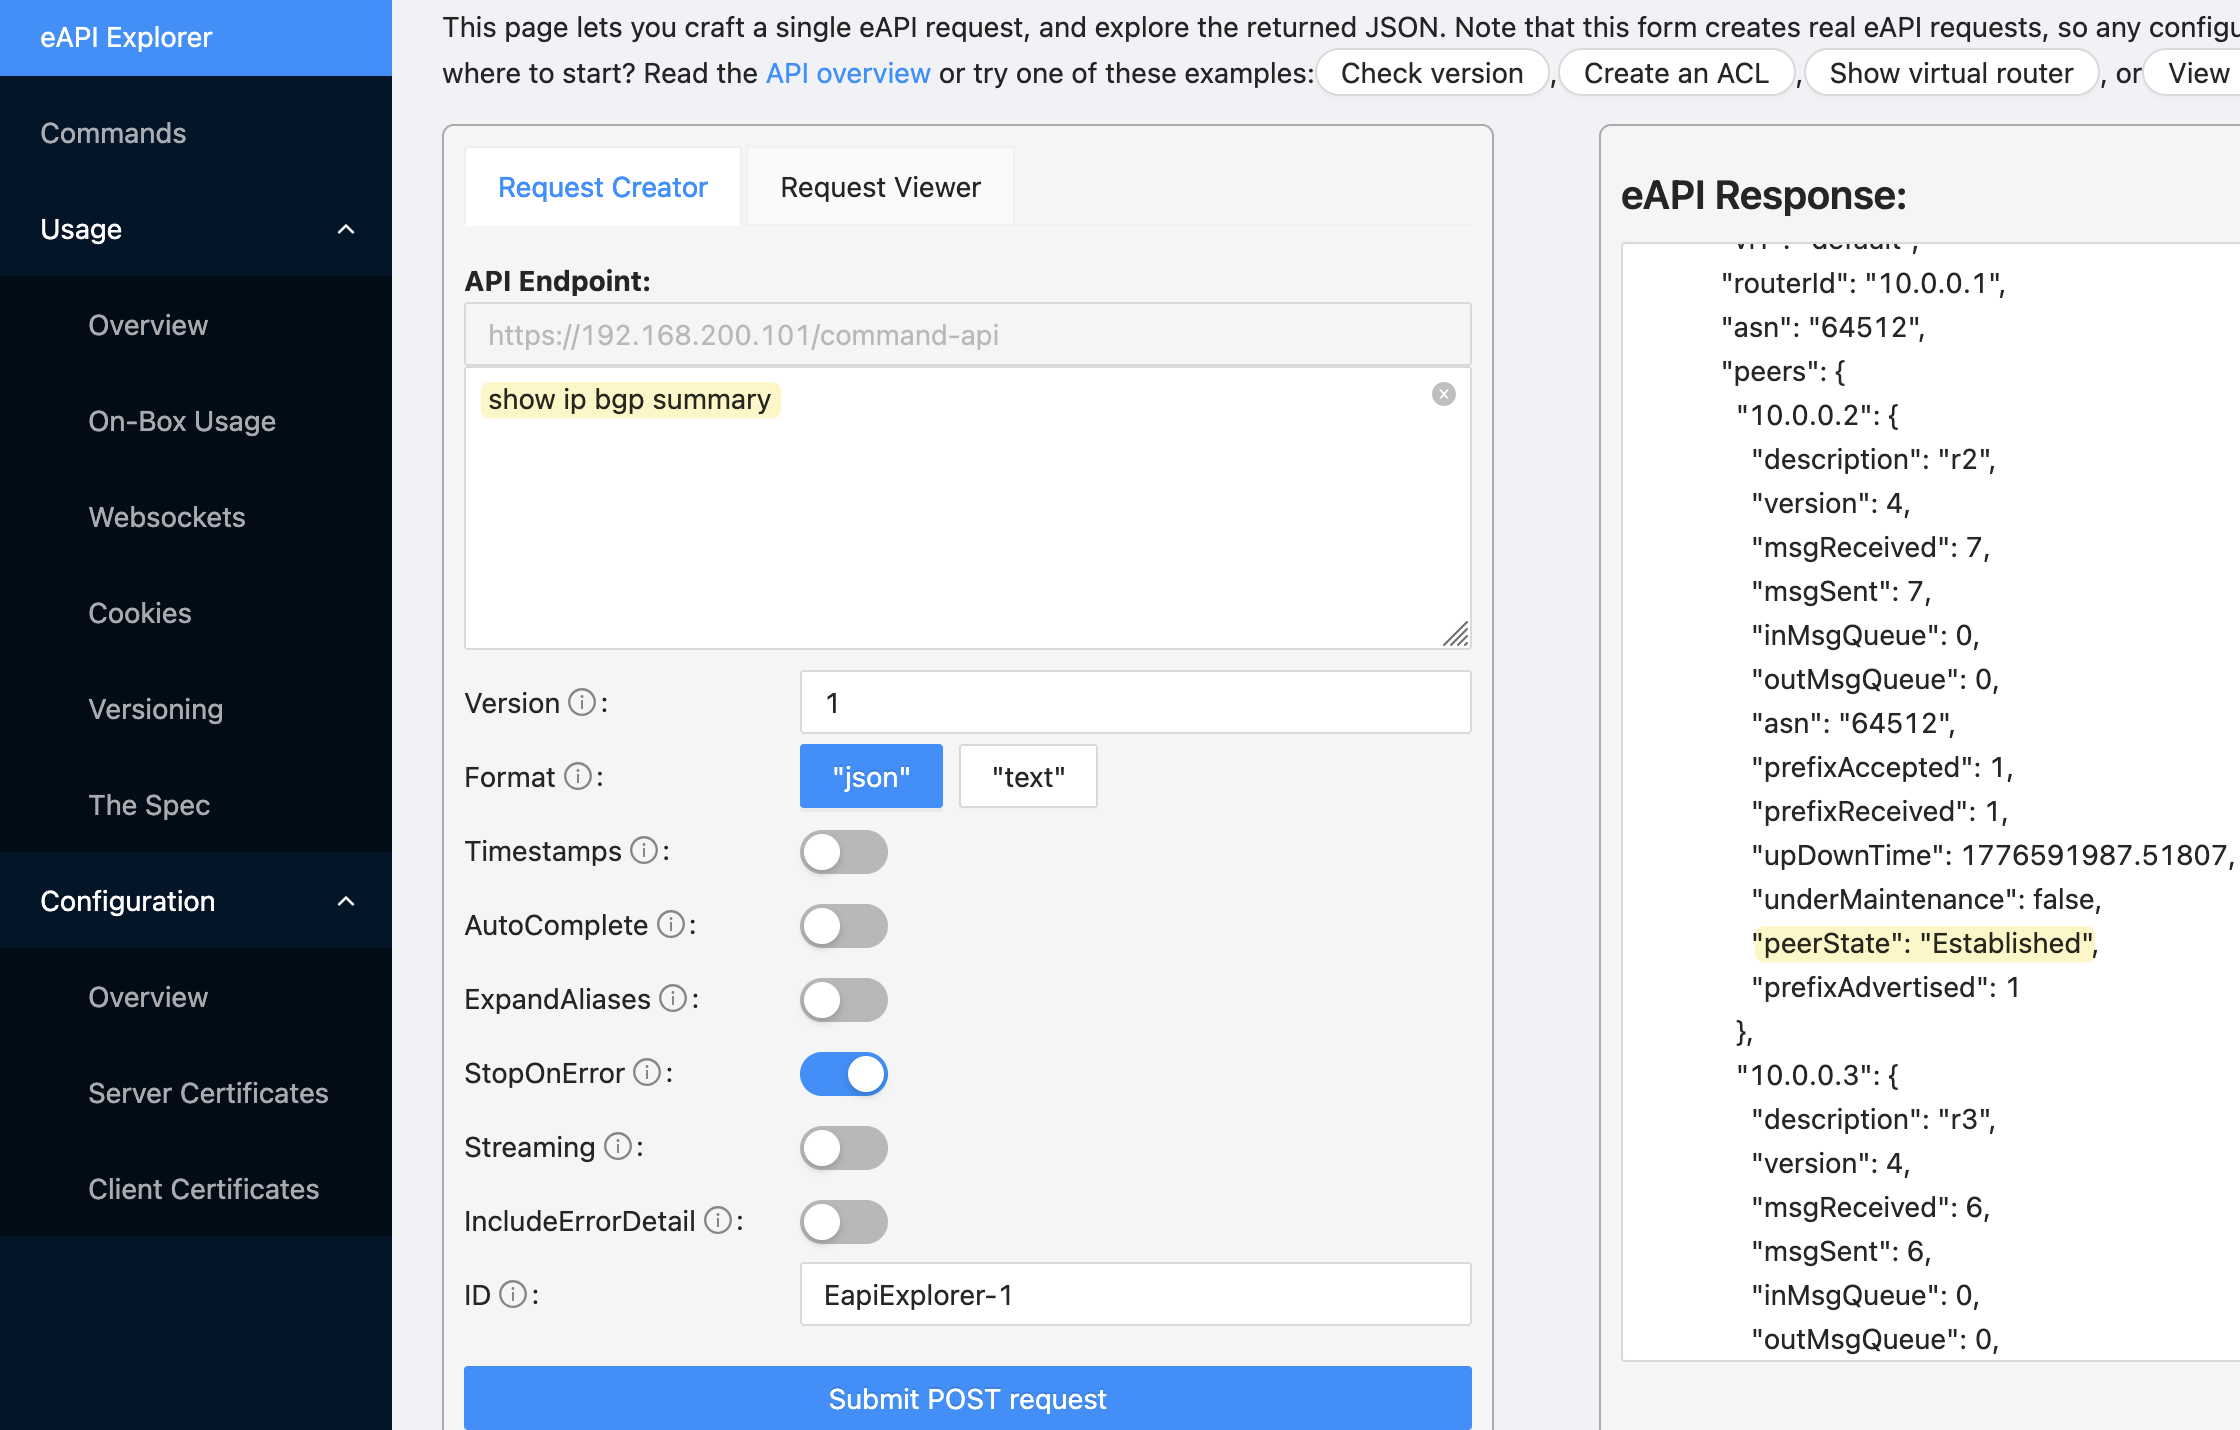
]You can also verify the API is working by visiting https://device_ip in your browser. Arista has a built-in eAPI explorer where you can run commands and see the response directly. Here I ran show ip bgp summary and you can see the response on the right. Each neighbour has a peerState field, and that is exactly what we are going to assert in our test.
Writing the Test
The test connects to the Arista device using the same pyeapi code we looked at earlier. Once connected, it runs show ip bgp summary and pulls the structured response. From that response, it navigates into the default VRF and gets the peers dictionary, which contains an entry for each BGP neighbour.
It then loops through every peer and asserts that the peerState is Established. If all peers are established, the test passes. If any peer is not established, the test fails and prints a message telling you exactly what failed and what its current state is. This is the custom message we pass to the assert statement, which makes it much easier to understand the failure without having to dig into the raw output.
import pyeapi

def test_bgp_peer_state_established():
    connection = pyeapi.client.connect(
        transport="https",
        host="192.168.200.101",
        username="admin",
        password="admin",
        port=443,
    )
    node = pyeapi.client.Node(connection)
    response = node.enable(["show ip bgp summary"])
    bgp_peers = response[0]["result"]["vrfs"]["default"]["peers"]
    for peer_ip, peer_info in bgp_peers.items():
        assert peer_info["peerState"] == "Established", (
            f"BGP peer {peer_ip} is not Established, state: {peer_info['peerState']}"
        )
pytest -v --tb=no test_bgp.py

========================== test session starts ==========================
platform darwin -- Python 3.12.10, pytest-9.0.3, pluggy-1.6.0 --
/blog/pytest_automated_tests/.venv/bin/python
cachedir: .pytest_cache
rootdir: /Users/suresh/Documents/code/blog/pytest_automated_tests
configfile: pyproject.toml
collected 1 item

test_bgp.py::test_bgp_peer_state_established PASSED               [100%]

=========================== 1 passed in 0.12s ===========================
Scaling Beyond a Single Device
That looks simple enough, but things get more complicated when you move beyond a single device.
- Right now, we have a single test function that loops through all the peers. If one peer is down, the entire test is marked as failed. What we really want is to treat each peer as a separate test, so each one gets its own pass or fail result. That way, if two peers are down out of a hundred, you see two failures instead of one test marked as failed.
- Then there is the question of scale. Running this test against one device is easy, but what about running it against hundreds or thousands of devices? You need a way to manage your inventory, define which devices to test, and run the tests efficiently without writing a separate test file for every device.
- On top of that, you are not just testing BGP. You might want to test OSPF neighbours, ISIS adjacencies, interface states, routing table entries, and more. As your test suite grows, you need a way to organise everything cleanly.
- You also need to think about multi-vendor environments. The pyeapi library works great for Arista, but what about Cisco or Juniper devices? You need a consistent way to run the same tests across different platforms.
Pytest is comprehensive enough to handle all of this. It has features like fixtures, parametrize, and plugins that are designed exactly for these kinds of problems. We will cover each of these in the upcoming posts and build toward a setup that can scale across your entire network.
Separating the Logic from the Tests
Before we solve the problem of treating each peer as a separate test, I moved the connection and data retrieval logic out of the test file and into its own file. The test file now imports the function and calls it directly.
#arista_bgp.py
import pyeapi

def get_bgp_peers():
    connection = pyeapi.client.connect(
        transport="https",
        host="192.168.200.101",
        username="admin",
        password='admin',
        port=443
    )
    node = pyeapi.client.Node(connection)
    response = node.enable(["show ip bgp summary"])
    return response[0]["result"]["vrfs"]["default"]["peers"]
We are filtering the response down to just the peers dictionary, which is the only part we care about for this test.
from arista_bgp import get_bgp_peers

def test_bgp_peer_state_established():
    bgp_peers = get_bgp_peers()
    for peer_ip, peer_info in bgp_peers.items():
        assert peer_info["peerState"] == "Established", (
            f"BGP peer {peer_ip} is not Established, state: {peer_info['peerState']}"
        )
This is a good habit to get into. Your test file should only contain tests, not connection logic or data processing. As your test suite grows, you will likely reuse the same connection logic across multiple test files, and having it in one place makes it much easier to maintain.
Parametrization
Parametrization is a pytest feature that lets you run the same test function multiple times with different inputs. Instead of looping inside a single test function, pytest creates a separate test for each input. This is exactly what we need to solve the problem we described earlier.
import pytest
from arista_bgp import get_bgp_peers

bgp_peers = get_bgp_peers()

@pytest.mark.parametrize("peer_ip", bgp_peers.keys())
def test_bgp_peer_state_established(peer_ip):
    peer_info = bgp_peers[peer_ip]
    assert peer_info["peerState"] == "Established", (
        f"BGP peer {peer_ip} is not Established, state: {peer_info['peerState']}"
    )
The @pytest.mark.parametrize decorator takes two arguments. The first is a string that defines the parameter name, in this case peer_ip (the name can be anytihng). The second is the list of values to iterate over, which is bgp_peers.keys(), so 10.0.0.2 and 10.0.0.3.
The second argument needs to be an iterable, such as a list or tuple. In our case the result of .keys() which is a dict_keys object, but pytest treats it the same as a list since it is iterable. Pytest will loop through whatever you pass and run the test once for each value. When pytest runs this, it creates two separate tests. The first run passes 10.0.0.2 as the peer_ip argument, and the second run passes 10.0.0.3.
Inside the function, we use the peer_ip to look up the full peer information from the bgp_peers dictionary. We then assert that the peerState is Established. If it is not, the test fails and prints the peer IP and its current state so you know exactly what to look at.
pytest -v --tb=no test_bgp.py

============================= test session starts =============================
platform darwin -- Python 3.12.10, pytest-9.0.3, pluggy-1.6.0 --
/blog/pytest_automated_tests/.venv/bin/python
cachedir: .pytest_cache
rootdir: /Users/suresh/Documents/code/blog/pytest_automated_tests
configfile: pyproject.toml
collected 2 items

test_bgp.py::test_bgp_peer_state_established[10.0.0.2] PASSED           [ 50%]
test_bgp.py::test_bgp_peer_state_established[10.0.0.3] PASSED           [100%]

============================== 2 passed in 0.12s ==============================
You can now see that Pytest creates two separate tests, one for each peer.
Now, to simulate a failure, I shut down one of the BGP peers. The test for 10.0.0.2 passes, and the test for 10.0.0.3 fails. The failure message tells you exactly which peer is down and what its current state is, which in this case is Active. This is exactly the behaviour we wanted.
pytest -v --tb=no test_bgp.py
========================== test session starts ===========================
platform darwin -- Python 3.12.10, pytest-9.0.3, pluggy-1.6.0 --
/blog/pytest_automated_tests/.venv/bin/python
cachedir: .pytest_cache
rootdir: /Users/suresh/Documents/code/blog/pytest_automated_tests
configfile: pyproject.toml
collected 2 items

test_bgp.py::test_bgp_peer_state_established[10.0.0.2] PASSED      [ 50%]
test_bgp.py::test_bgp_peer_state_established[10.0.0.3] FAILED      [100%]

======================== short test summary info =========================
FAILED test_bgp.py::test_bgp_peer_state_established[10.0.0.3] -
AssertionError: BGP peer 10.0.0.3 is not Established, state: Active
====================== 1 failed, 1 passed in 0.12s =======================
Parametrization in Plain Terms
If you are still unsure about how parametrization works, here is a simple example. Here we have a list of numbers, and we want to test that every item in the list is an integer.
import pytest

list = [1, 2, 3]

def test_integer_in_list():
    for num in list:
        assert isinstance(num, int), f"{num} is not an integer"
Without parametrization, you would loop through the list inside the test function. The entire loop is considered a single test.
With parametrization, pytest creates a separate test for each value in the list. Each number gets its own test.
import pytest

list = [1, 2, 3]

@pytest.mark.parametrize("num", list)
def test_integer_in_list(num):
    assert isinstance(num, int), f"{num} is not an integer"
Think of it as passing two arguments to the decorator. The one on the right is the list of values, and the one on the left is the name you give to each individual value as pytest iterates through the list. You are essentially telling pytest 'hey, for each item in this list, run the test once and call that item num'.
Adding a Second Test (OSPF)
Following the same pattern as the BGP test, we first create a new Python file to pull the OSPF data. Creating a separate file for each protocol is not ideal, and we will look at refactoring this shortly. As usual, it connects to the device, runs show ip ospf neighbor, and filters the response down to just the list of neighbour entries, which is what we need for the test.
#arista_ospf.py
import pyeapi

def get_ospf_neighbors():
    connection = pyeapi.client.connect(
        transport="https",
        host="192.168.200.101",
        username="admin",
        password='admin',
        port=443
    )
    node = pyeapi.client.Node(connection)
    response = node.enable(["show ip ospf neighbor"])
    return response[0]["result"]["vrfs"]["default"]["instList"]["1"]["ospfNeighborEntries"]
The output is a list of dictionaries, where each dictionary represents a single OSPF neighbour and contains details like the router ID, interface, and adjacency state. That adjacencyState field is what we are going to assert against.
[
  {
    "routerId": "10.0.0.3",
    "interfaceAddress": "172.16.1.6",
    "interfaceName": "Ethernet2",
    "priority": 0,
    "adjacencyState": "full",
    "drState": null,
    "options": {
      "multitopologyCapability": false,
      "externalRoutingCapability": true,
      "multicastCapability": false,
      "nssaCapability": false,
      "linkLocalSignaling": false,
      "demandCircuitsSupport": false,
      "opaqueLsaSupport": false,
      "doNotUseInRouteCalc": false
    },
    "inactivity": 1776621219.7304854,
    "details": {
      "areaId": "0.0.0.0",
      "designatedRouter": "0.0.0.0",
      "backupDesignatedRouter": "0.0.0.0",
      "numberOfStateChanges": 7,
      "stateTime": 1776620701.730508,
      "inactivityDefers": 0,
      "retransmissionCount": 1,
      "bfdState": "adminDown",
      "bfdRequestSent": false,
      "grHelperTimer": null,
      "grNumAttempts": 0,
      "grLastRestartTime": null
    }
  },
  {
    "routerId": "10.0.0.1",
    "interfaceAddress": "172.16.1.1",
    "interfaceName": "Ethernet1",
    "priority": 0,
    "adjacencyState": "full",
    "drState": null,
    "options": {
      "multitopologyCapability": false,
      "externalRoutingCapability": true,
      "multicastCapability": false,
      "nssaCapability": false,
      "linkLocalSignaling": false,
      "demandCircuitsSupport": false,
      "opaqueLsaSupport": false,
      "doNotUseInRouteCalc": false
    },
    "inactivity": 1776621218.7308135,
    "details": {
      "areaId": "0.0.0.0",
      "designatedRouter": "0.0.0.0",
      "backupDesignatedRouter": "0.0.0.0",
      "numberOfStateChanges": 6,
      "stateTime": 1776620709.7308302,
      "inactivityDefers": 0,
      "retransmissionCount": 0,
      "bfdState": "adminDown",
      "bfdRequestSent": false,
      "grHelperTimer": null,
      "grNumAttempts": 0,
      "grLastRestartTime": null
    }
  }
]
I also renamed the test file to test_network.py since it now contains tests for multiple protocols.
#test_network.py
import pytest
from arista_bgp import get_bgp_peers
from arista_ospf import get_ospf_neighbors

bgp_peers = get_bgp_peers()
ospf_neighbors = get_ospf_neighbors()

@pytest.mark.parametrize("peer_ip", bgp_peers.keys())
def test_bgp_peer_state_established(peer_ip):
    peer_info = bgp_peers[peer_ip]
    assert peer_info["peerState"] == "Established", (
        f"BGP peer {peer_ip} is not Established, state: {peer_info['peerState']}"
    )


@pytest.mark.parametrize("neighbor", ospf_neighbors)
def test_ospf_adjacency_full(neighbor):
    assert neighbor["adjacencyState"] == "full", (
        f"OSPF neighbor {neighbor['routerId']} is not full"
    )
We add the OSPF test following the exact same pattern as BGP. Each OSPF neighbour is treated as its own independent test, and if any adjacency is not full, that specific test fails.
pytest -v --tb=no test_network.py
============================ test session starts =============================
platform darwin -- Python 3.12.10, pytest-9.0.3, pluggy-1.6.0 --
/blog/pytest_automated_tests/.venv/bin/python
cachedir: .pytest_cache
rootdir: /Users/suresh/Documents/code/blog/pytest_automated_tests
configfile: pyproject.toml
collected 4 items

test_network.py::test_bgp_peer_state_established[10.0.0.2] PASSED      [ 25%]
test_network.py::test_bgp_peer_state_established[10.0.0.3] PASSED      [ 50%]
test_network.py::test_ospf_adjacency_full[neighbor0] PASSED            [ 75%]
test_network.py::test_ospf_adjacency_full[neighbor1] PASSED            [100%]

============================= 4 passed in 0.12s ==============================
All four tests pass. Two for BGP, one for each peer, and two for OSPF, one for each neighbour. You can also see that the OSPF tests are named neighbor0 and neighbor1which is not really ideal when looking at the outputs. With BGP, we are parametrizing over the dictionary keys, which are the peer IP addresses, so pytest uses those directly as the test names. With OSPF, we are parametrizing over a list of dictionaries, so pytest has no obvious value to use as the test name and falls back to a numeric index instead.
Using ids for Better Test Names
We can fix this by passing the ids argument to the parametrize decorator.
@pytest.mark.parametrize(
    "neighbor",
    ospf_neighbors,
    ids=[n["routerId"] for n in ospf_neighbors],
)
def test_ospf_adjacency_full(neighbor):
    assert neighbor["adjacencyState"] == "full", (
        f"OSPF neighbor {neighbor['routerId']} is not full"
    )
Here, we use a list comprehension to pull the routerId from each neighbour dictionary and use that as the test name. The result is that pytest will now name the tests using the router ID instead of a numeric index, which makes the output much easier to read.
pytest -v --tb=no test_network.py
============================ test session starts =============================
platform darwin -- Python 3.12.10, pytest-9.0.3, pluggy-1.6.0 --
/blog/pytest_automated_tests/.venv/bin/python
cachedir: .pytest_cache
rootdir: /Users/suresh/Documents/code/blog/pytest_automated_tests
configfile: pyproject.toml
collected 4 items

test_network.py::test_bgp_peer_state_established[10.0.0.2] PASSED      [ 25%]
test_network.py::test_bgp_peer_state_established[10.0.0.3] PASSED      [ 50%]
test_network.py::test_ospf_adjacency_full[10.0.0.3] PASSED             [ 75%]
test_network.py::test_ospf_adjacency_full[10.0.0.2] PASSED             [100%]

============================= 4 passed in 0.11s ==============================
Where We Are So Far?
At this point, your project structure should look something like this.
.
├── arista_bgp.py
├── arista_ospf.py
└── test_network.py
Here we have two separate files for collecting BGP and OSPF data, which is not ideal because the connection logic is identical in both and only the show command changes. So to refactor, we combine everything into a single file called arista_collect.py.
#arista_collect.py
import pyeapi

connection = pyeapi.client.connect(
    transport="https",
    host="192.168.200.101",
    username="admin",
    password='admin',
    port=443
)

node = pyeapi.client.Node(connection)
response = node.enable(["show ip bgp summary", "show ip ospf neighbor"])

bgp_peers = response[0]["result"]["vrfs"]["default"]["peers"]
ospf_neighbors = response[1]["result"]["vrfs"]["default"]["instList"]["1"]["ospfNeighborEntries"]
Arista's pyeapi supports passing multiple commands in a single call. So, we create one connection and pass both commands to node.enable() in a single call. The response is a list, so response[0] contains the BGP data and response[1] contains the OSPF data. We then filter each one down to what we need and store them as variables.
#test_network.py
import pytest
from arista_collect import bgp_peers, ospf_neighbors

@pytest.mark.parametrize("peer_ip", bgp_peers.keys())
def test_bgp_peer_state_established(peer_ip):
    peer_info = bgp_peers[peer_ip]
    assert peer_info["peerState"] == "Established", (
        f"BGP peer {peer_ip} is not Established, state: {peer_info['peerState']}"
    )

@pytest.mark.parametrize(
    "neighbor",
    ospf_neighbors,
    ids=[n["routerId"] for n in ospf_neighbors],
)
def test_ospf_adjacency_full(neighbor):
    assert neighbor["adjacencyState"] == "full", (
        f"OSPF neighbor {neighbor['routerId']} is not full"
    )
The test file is now much cleaner as well. Instead of importing functions and calling them, we just import the variables directly. Everything else stays exactly the same.
Testing Multiple Devices
So far, we have been testing a single device. To test this across multiple devices, we define a list of host IP addresses and loop through them. For each host, we create a connection, run both show commands, and append the results to the bgp_peers and ospf_neighbors lists.
#arista_collect.py
import pyeapi

hosts = ["192.168.200.101", "192.168.200.102", "192.168.200.103"]

bgp_peers = []
ospf_neighbors = []

for host in hosts:
    connection = pyeapi.client.connect(
        transport="https",
        host=host,
        username="admin",
        password='admin',
        port=443
    )
    node = pyeapi.client.Node(connection)
    response = node.enable(["show ip bgp summary", "show ip ospf neighbor"])

    for peer_ip, peer_info in response[0]["result"]["vrfs"]["default"]["peers"].items():
        bgp_peers.append((host, peer_ip, peer_info))

    for neighbor in response[1]["result"]["vrfs"]["default"]["instList"]["1"]["ospfNeighborEntries"]:
        ospf_neighbors.append((host, neighbor))
The key change here is how we store the data. Previously, bgp_peers was a dictionary and ospf_neighbors was a list of dictionaries. Now both are lists of tuples.
- For BGP, each tuple contains the host IP, the peer IP, and the peer info dictionary.
- For OSPF, each tuple contains the host IP and the neighbour dictionary. We include the host IP in each tuple, so we know which device each result came from.
#test_network.py
import pytest
from arista_collect import bgp_peers, ospf_neighbors

@pytest.mark.parametrize(
    "host,peer_ip,peer_info",
    bgp_peers,
    ids=[f"{host}-{peer_ip}" for host, peer_ip, _ in bgp_peers],
)
def test_bgp_peer_state_established(host, peer_ip, peer_info):
    assert peer_info["peerState"] == "Established", (
        f"{host}: BGP peer {peer_ip} is not Established, state: {peer_info['peerState']}"
    )

@pytest.mark.parametrize(
    "host,neighbor",
    ospf_neighbors,
    ids=[f"{host}-{n['routerId']}" for host, n in ospf_neighbors],
)
def test_ospf_adjacency_full(host, neighbor):
    assert neighbor["adjacencyState"] == "full", (
        f"{host}: OSPF neighbor {neighbor['routerId']} is not full"
    )
The test file changes slightly as well. The parametrize decorator now unpacks three values for BGP and two for OSPF, matching the tuple structure we defined in the collection file. The ids are also updated to include the host IP alongside the peer IP or router ID, so the test names in the output clearly show which device and which peer or neighbour each test belongs to. The assertion messages are updated the same way, so if a test fails, you immediately know which device it came from.