
In today's blog post, we're diving deep into AWS Transit Gateway, focusing specifically on Route Tables, Attachments, and Propagations. If you're new to Transit Gateway, you might find it a bit confusing to see how all these pieces fit together. I'll use straightforward examples to break down these concepts, making it easy for you to grasp how they all connect.
What is AWS Transit Gateway?
If you've been working with AWS before 2018, or even before VPC peering came into the picture, you'd remember the headache of connecting multiple VPCs. We used to set up a central VPC and connect others to it using VPNs or something along those lines. But let's leave those days in the past, shall we?
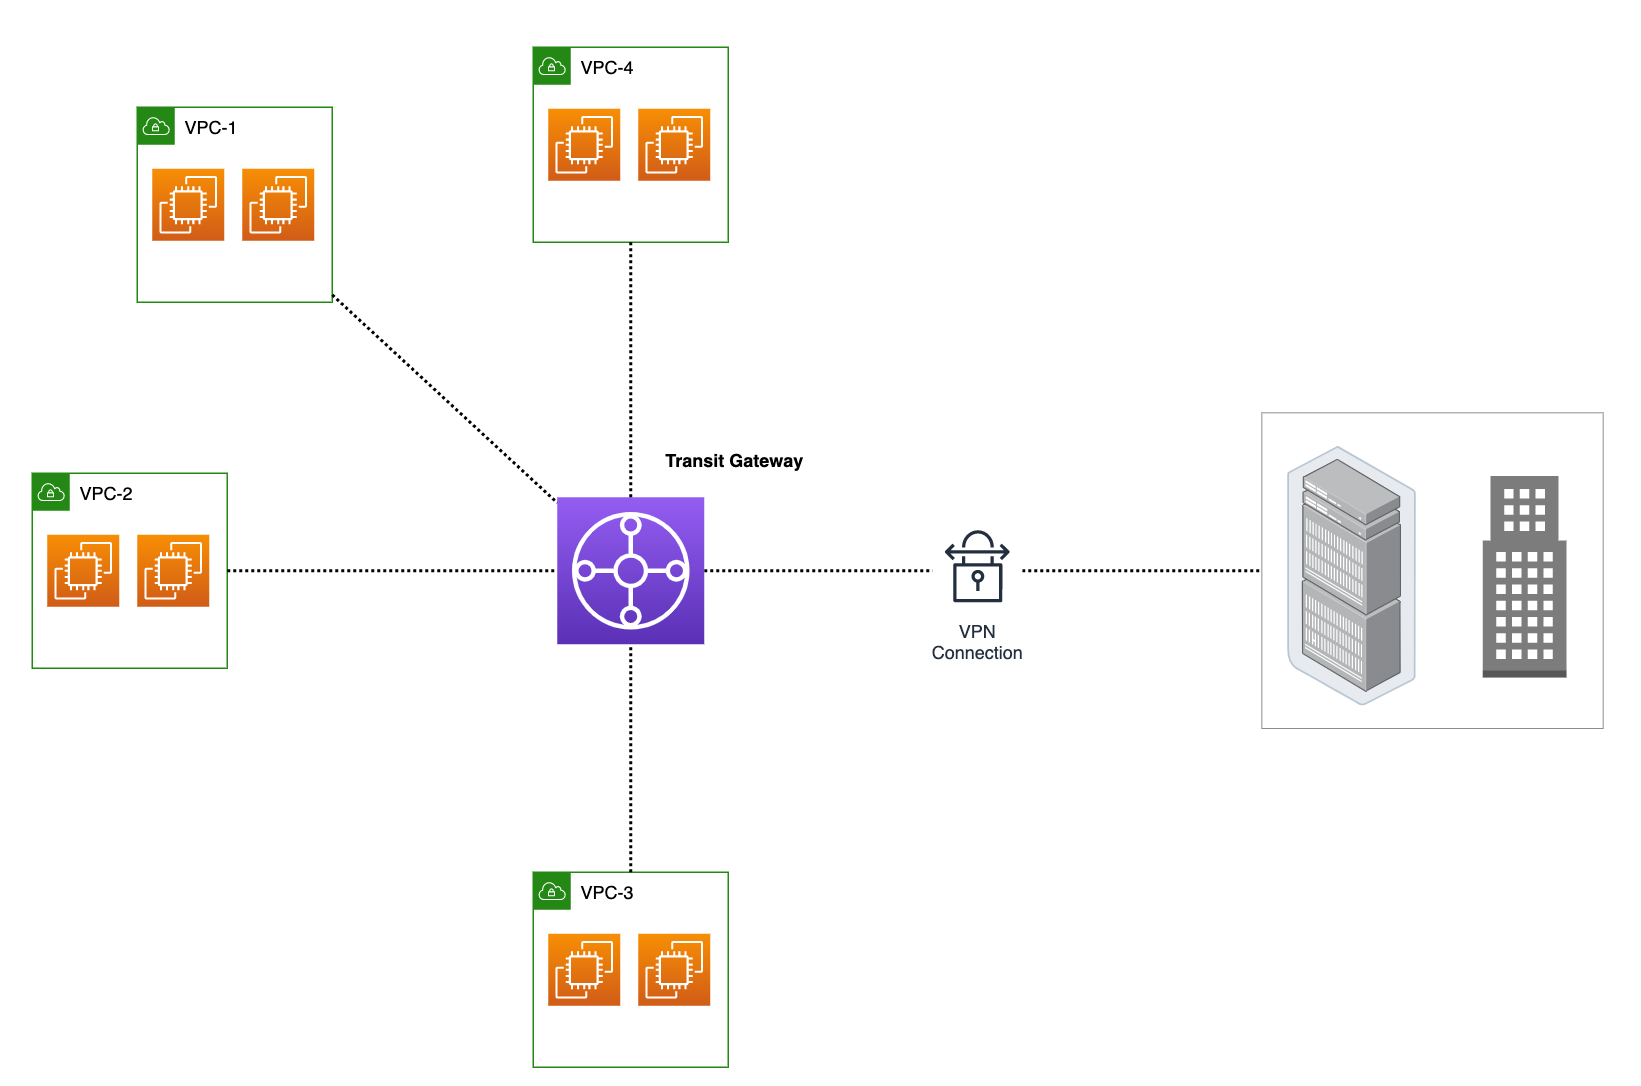
With Transit Gateway, you can attach all your VPCs, Direct Connects, and on-prem VPNs. Think of it like the main hub in a hub-and-spoke network setup. Just attach your VPCs or VPNs to the TGW, and it routes the traffic between them. Just simple as that.
A simple Example with 2 VPCs
Let's dive into a simple example to kick this off. Imagine you have just two VPCs, and each VPC has some instances that need to talk to each other. Now, I know in a real-world scenario, you'd have way more than two VPCs, but let's keep it simple for this example.
Overview and VPC Attachment
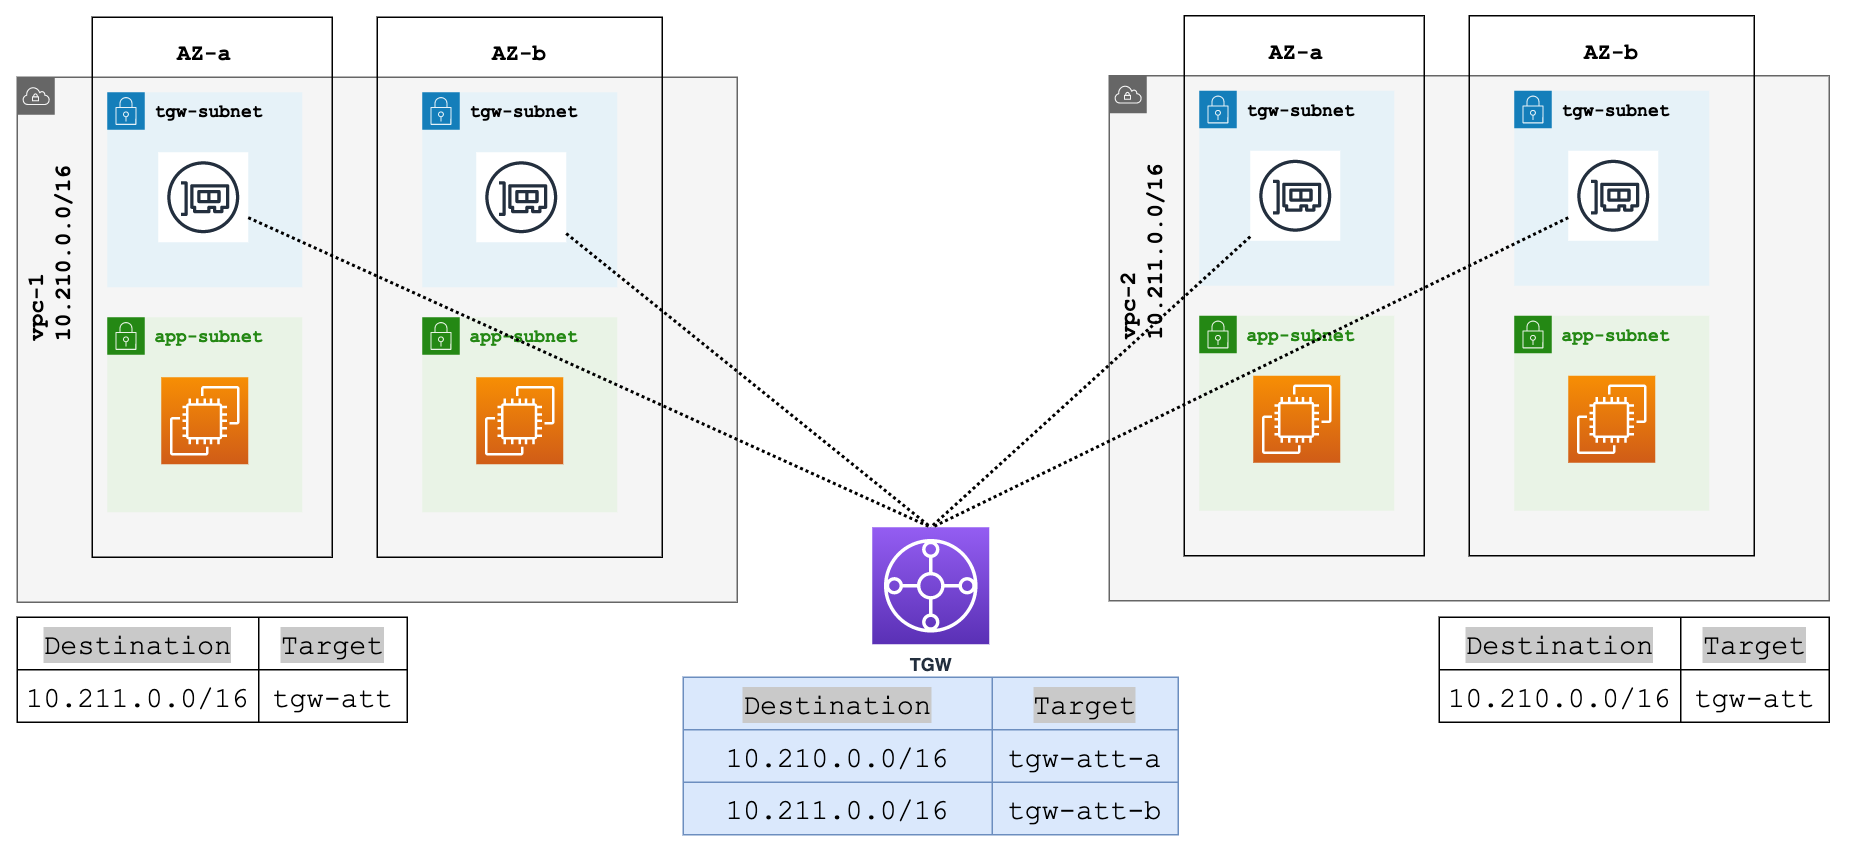
Let's also assume that all instances are within a single subnet (app-subnet) per AZ for each VPC. When you go to attach a VPC to the Transit Gateway, you'll have to decide where TGW should place its network interfaces. You've got two options here, use an existing subnet or create a new one just for TGW. I usually like to create a new subnet specifically for TGW use. It keeps things clean and organized.
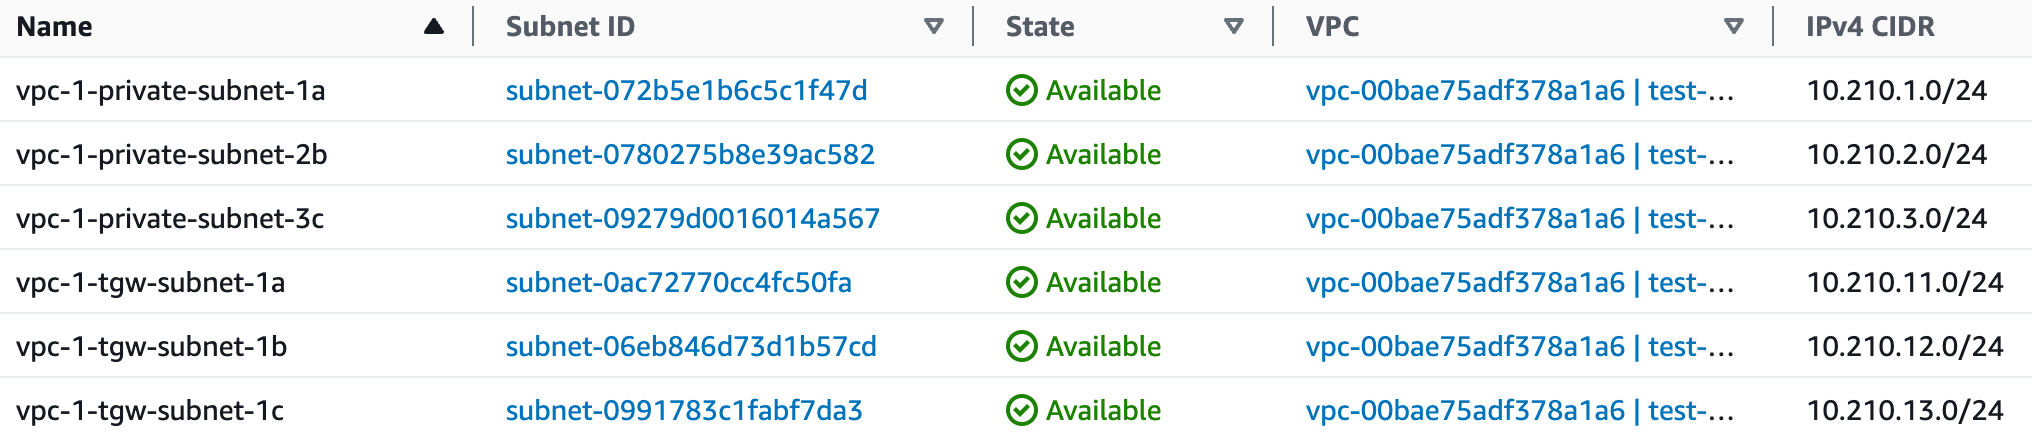
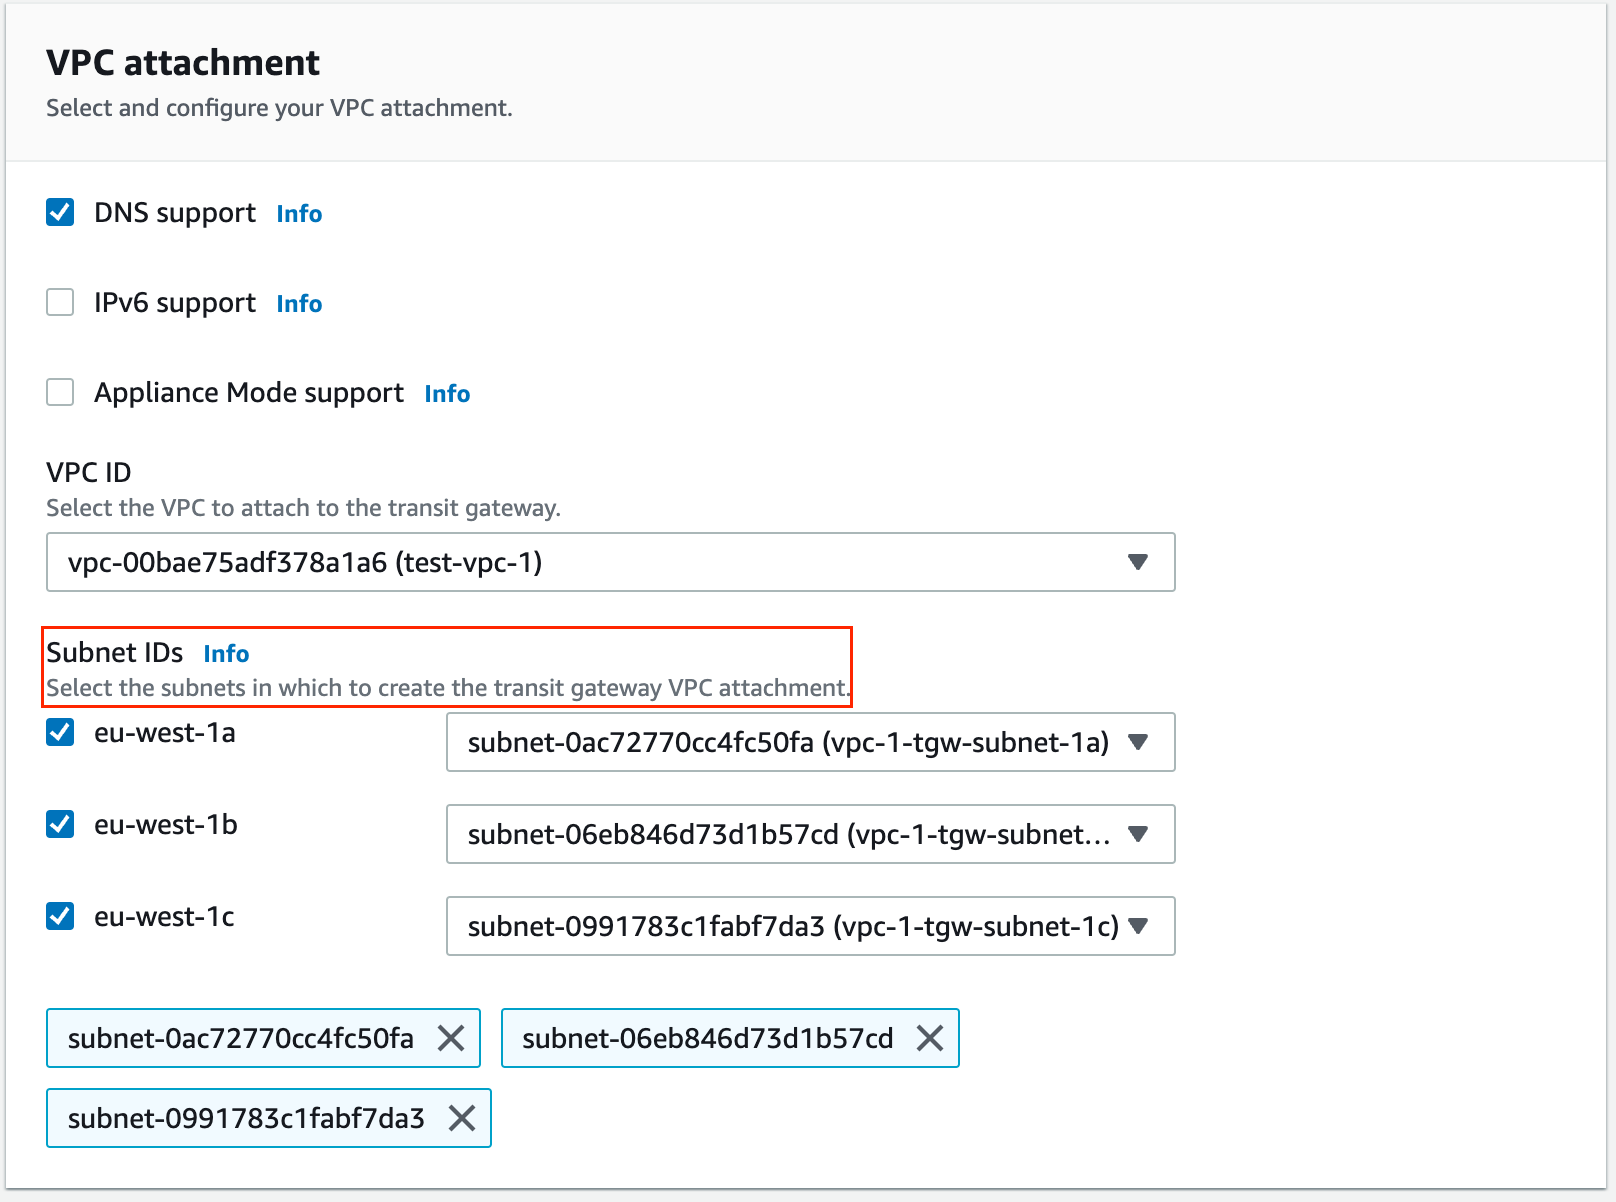
One crucial thing to keep in mind, if your setup has three Availability Zones, you'll need to place a TGW network interface in each of those zones. So, when you're creating a new subnet for TGW, make it three, each one in its own Availability Zone. This ensures that all your zones can connect with the Transit Gateway.
Transit Gateway Route Tables and Associations
By default, Transit Gateway comes with a default route table. This route table is the default association route table and the default propagation route table. Alternatively, if you disable route propagation and route table association, AWS does not create a default route table for the transit gateway.
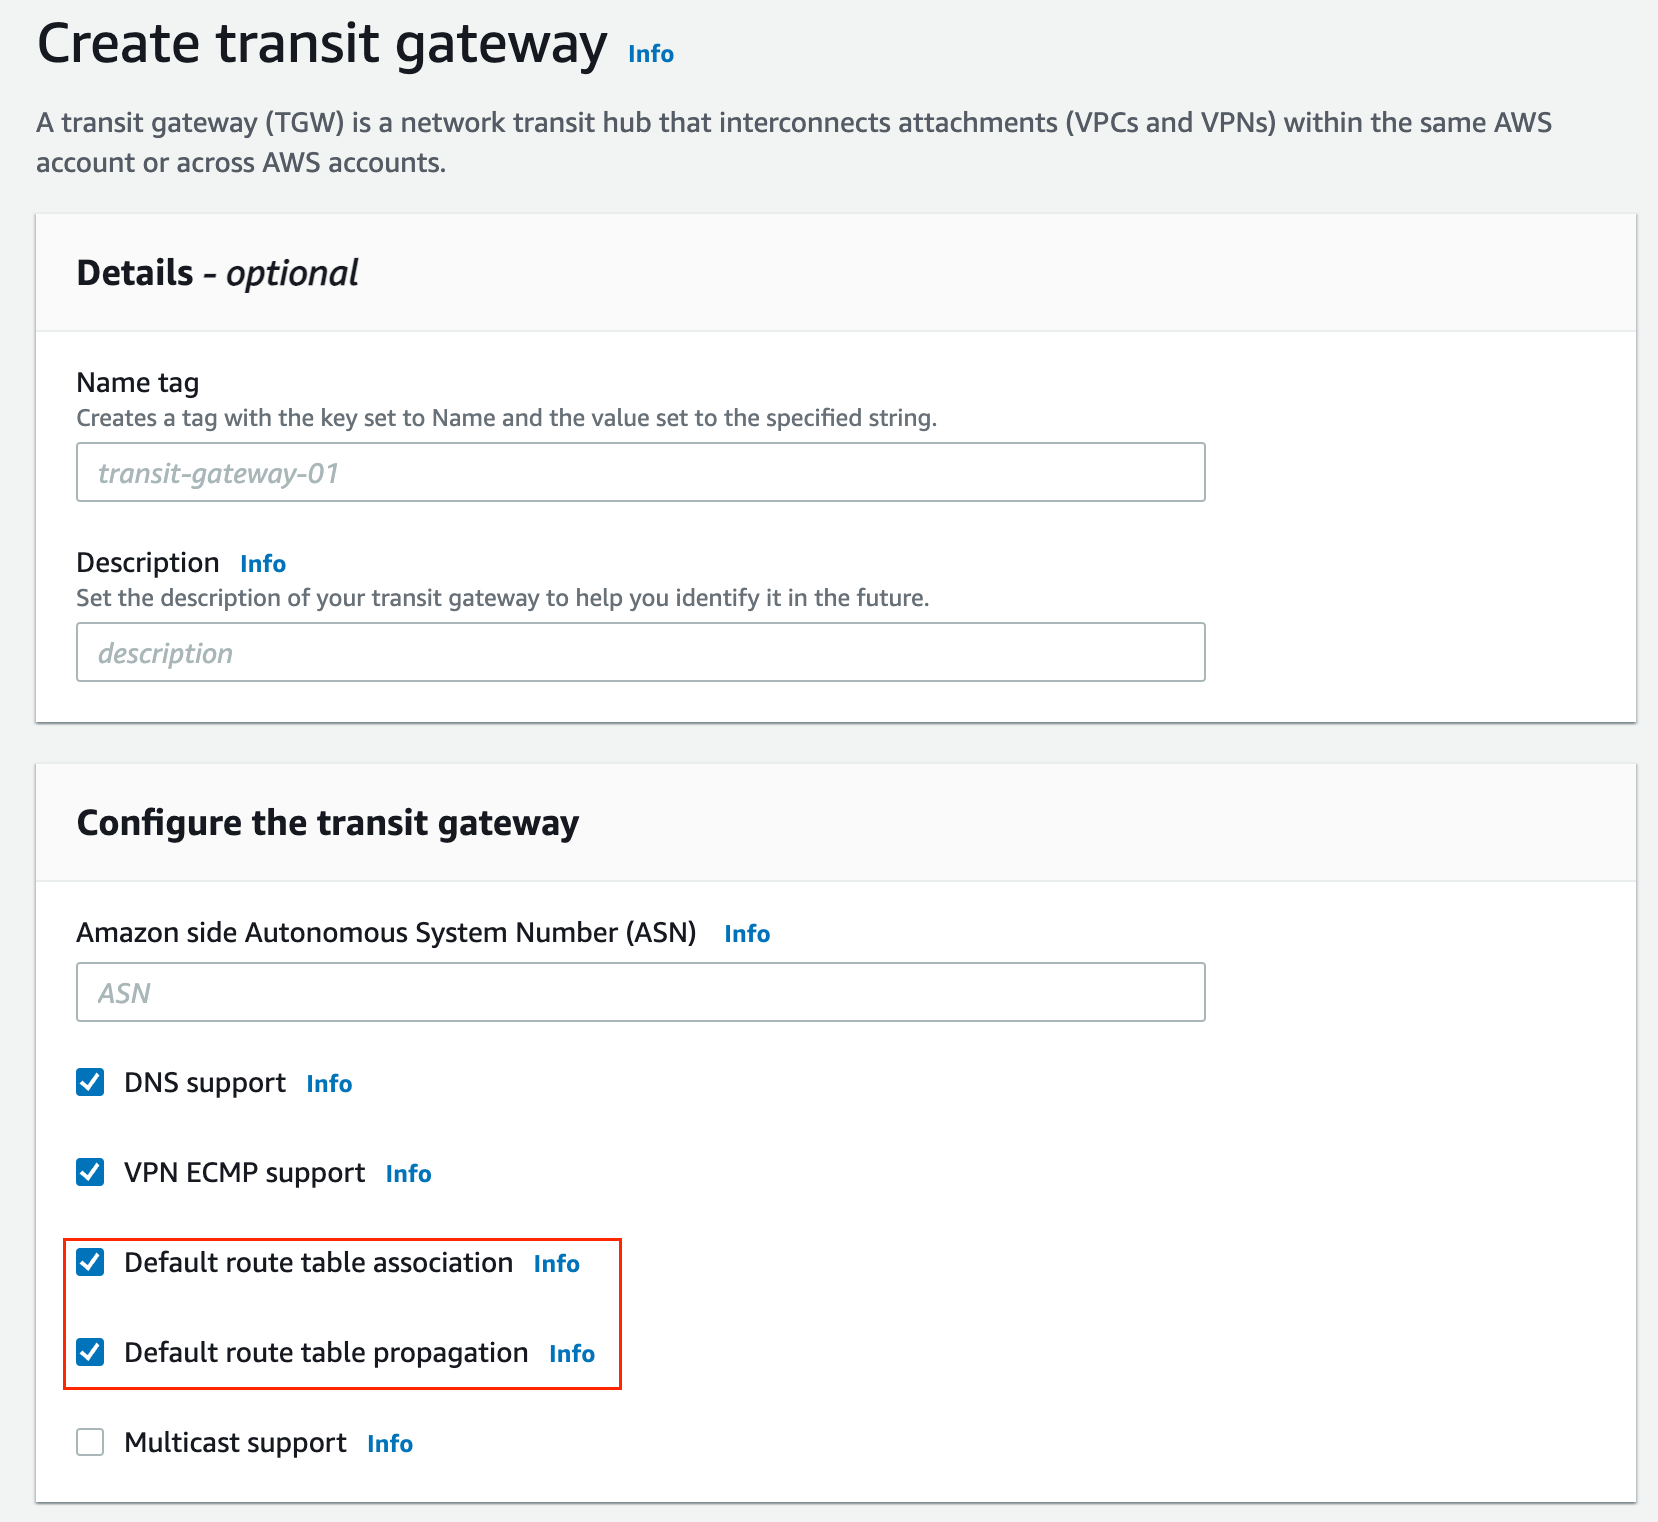
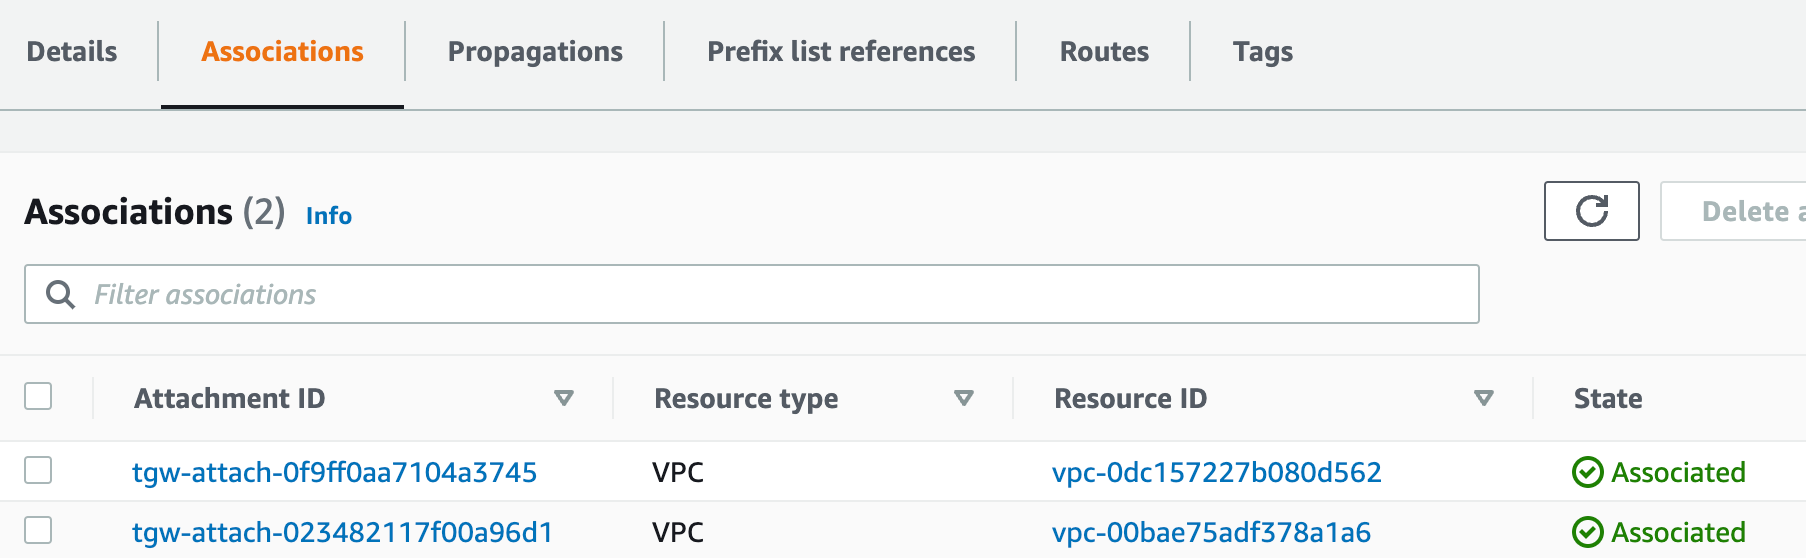
You can of course create additional route tables which enable us to isolate subsets of attachments. Each attachment can be associated with one route table. But an attachment can propagate its routes to one or more route tables (more on this later) For this example, I'm going to use the default route table so, that when you attach the VPC to the TGW, it will automatically associate itself to this default route table and propagate the route into it.

When you attach a VPC to a Transit Gateway, you must add a route to your subnet route table in order for traffic to route through the transit gateway.
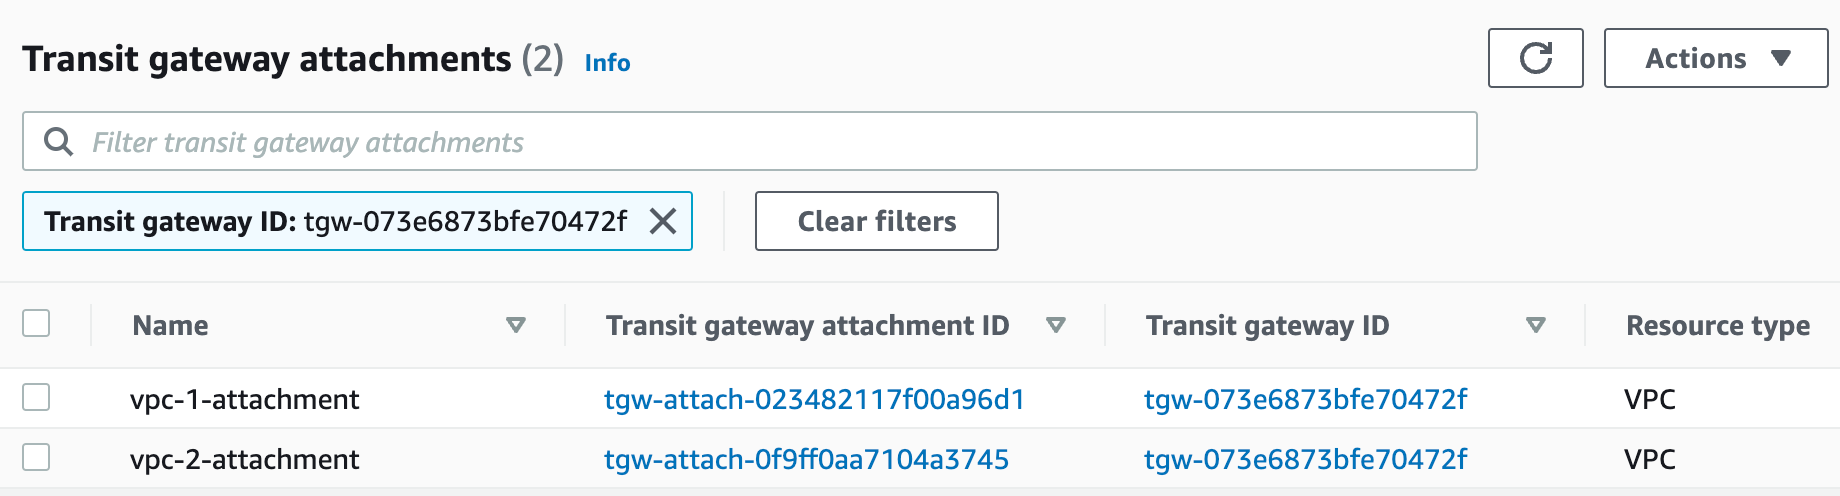
Attaching both VPCs
I'm going to go ahead and attach the second VPC to the TGW as well. Just to jog the memory, we are associating both VPCs to the same Default Route Table and also propagating the routes. At this point, if we deploy instances to the VPCs, they should be able to communicate with each other.

Traffic Flow
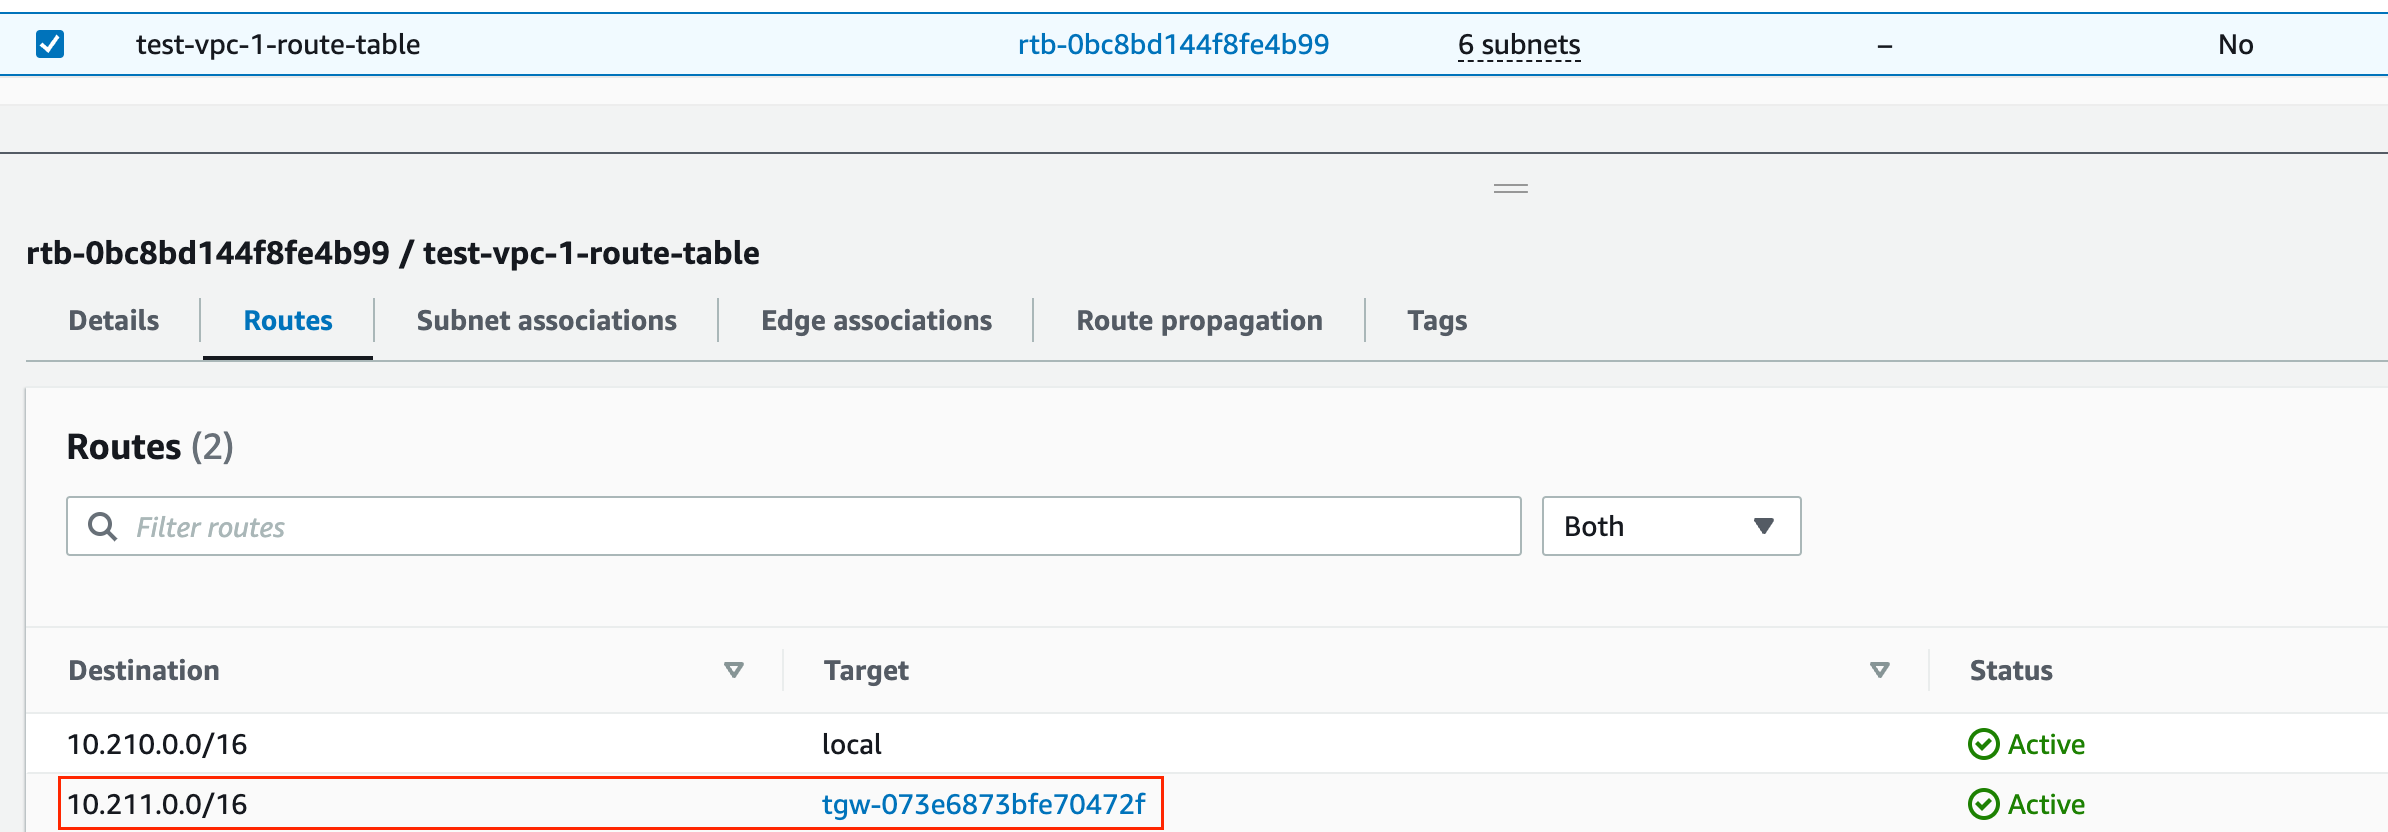
Now let's talk about how traffic flows between these instances and VPCs. Let's say instance-1 with an IP address of 10.210.x.x in VPC-1 wants to talk to instance-2, which has an IP of 10.211.x.x in VPC-2. The subnet where instance-1 resides is associated with a route table. This route table has an entry that directs traffic for the 10.211.0.0/16 range to the Transit Gateway as the next hop.
So, when instance-1 wants to reach out to instance-2, the traffic heads straight to the Transit Gateway. The traffic arrives at the VPC-1 attachment, which is associated with the default route table. This default route table has the necessary route to 10.211.0.0/16, thanks to our earlier route propagation. So, the traffic now heads toward the VPC-2 attachment to reach its final destination, instance-2.
Now, what about the return path? Well, it's pretty much the same in reverse. The traffic from instance-2 will follow a similar route back, going through its own VPC's route table and attachment, and then back through the Transit Gateway, finally landing back on instance-1 in VPC-1.
Example with Multiple VPCs
Moving on, let's consider a more realistic scenario where you're juggling multiple VPCs across several AWS accounts. First things first, how do you share a Transit Gateway across different accounts? The answer is Resource Access Manager. Generally, you'd create the TGW in a dedicated account and then share it with other accounts. Once you share it, it appears in the other accounts as if you created it there. But remember, you'll still manage route tables, propagations, and associations from that dedicated account.
Mutliple Route Tables
Now, think about the different environments you'll have—dev, stag, preprod, and prod. You'll likely want to keep these environments separate. You don't want your dev VPCs mingling with your prod VPCs, right? This is where Transit Gateway route tables really shine.
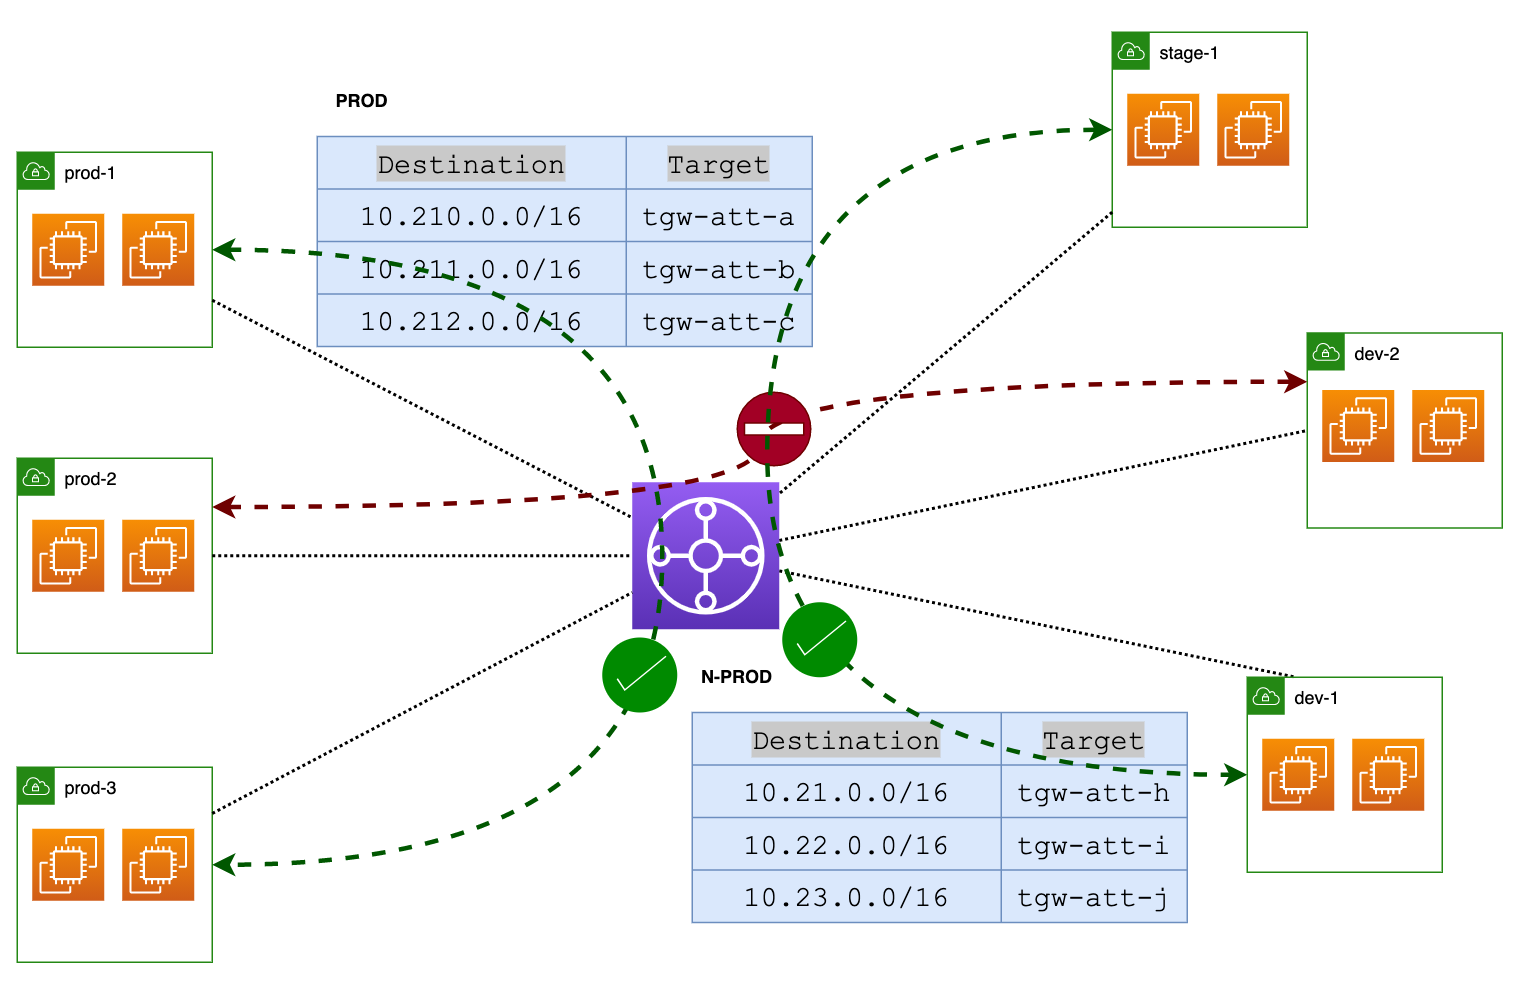
In our earlier example, we just used the default route table. But here, you can create multiple route tables. You might set up a PROD route table specifically for your production VPCs, and a separate NON-PROD table for your dev, stage, and preprod environments.
By doing this, you're ensuring complete isolation between the environments. The nonprod route table won't have any routes leading to the PROD VPCs, so there's no risk of them talking to each other.
Route Propagation
You must be wondering why I mentioned earlier that we can propagate the routes to more than one route table. Why though? Well, let's look into a use case to clarify.
Now that we've got one route table for Prod and another one for all non-production environments like Dev, Stage, and PreProd. Now, we introduce another Monitoring VPC with its own dedicated route table, let's call it the mnt-rout-table.
- First, we will attach this VPC to TGW and associate it with the mnt-rout-table.
- Your Monitoring VPC likely needs to access the resources across all environments for tasks like logging, monitoring, and sending out alerts. It doesn't make sense for us to go and add static routes manually into it, it won't scale well.
- So, we propagate the routes from your Prod and NonProd route tables to this new route table.
- On the flip side, you'd also want your Monitoring VPC to be accessible from all other VPCs (for returning the traffic, for example) So, make sure you propagate the Monitoring VPC routes back into both your Prod and NonProd route tables.
By doing this, your Monitoring VPC can communicate with every other VPC, but you still maintain the isolation between the Prod and the non-production environments. So, you see, propagating routes to more than one route table makes sense here.
As you can see below, you have a dedicated Propogation section under the Route Tables. Here you can propagate the routes from other VPCs even if they are not associated with this particular route table.

Conclusion
In summary, AWS Transit Gateway simplifies the routing between multiple VPCs, Direct Connects, and on-prem VPNs. We've gone through how to set it up, from choosing the right subnets and Availability Zones to understanding the flow of traffic.
If you're working with multiple AWS accounts or diverse environments, TGW route tables help you manage everything in a more structured way. As we saw with our Monitoring VPC example, being able to propagate routes to different route tables can offer a great balance between accessibility and security.
If you have any questions or feedback, don't hesitate to let me know in the comments. Thanks for reading!


