In this blog post, we'll go through the key steps you'll likely encounter when looking to fully automate the deployment of Palo Alto VM-Series firewalls in AWS behind Gateway Load Balancer (GWLB). We'll use two main automation tools, first is Terraform, which helps us provision and manage our cloud resources such as VPC, GWLB, Palo Alto VM-Series Firewalls, Elastic IPs etc. Second is Ansible, which manages the configuration of the Firewalls/Panorama. The aim is to make our cloud deployment fast and flexible, allowing us to build, destroy, and rebuild everything through 100% code without ever needing to login into the firewalls.
Assumptions
Please note, this post assumes that you are already comfortable with Terraform, Ansible, basic AWS networking, and specifically, the workings of the Gateway Load Balancer (GWLB). We won't go into every little detail about AWS, like setting up VPCs, GWLBs, EIPs, and so on. Our main goal is to help you with Automating Palo Alto firewalls.
The primary purpose of this post is to highlight the caveats and various options you might come across during the process. As such, we won't go in-depth into areas like deploying the Palo VM-Series firewall EC2 instances, but rather, focus on areas that could prove tricky or have multiple valid approaches.
Gateway Load Balancer Components
Our main objective here is to develop a centralized Security-VPC with a group of firewalls that inspects east-west and north-south traffic from all of the other VPCs, we call them Client-VPCs. In a nutshell, if one client-vpc needs to communicate with another client-vpc, the traffic should traverse the security-vpc and the Palo Alto Firewalls.
TGW Route Tables and Attachments
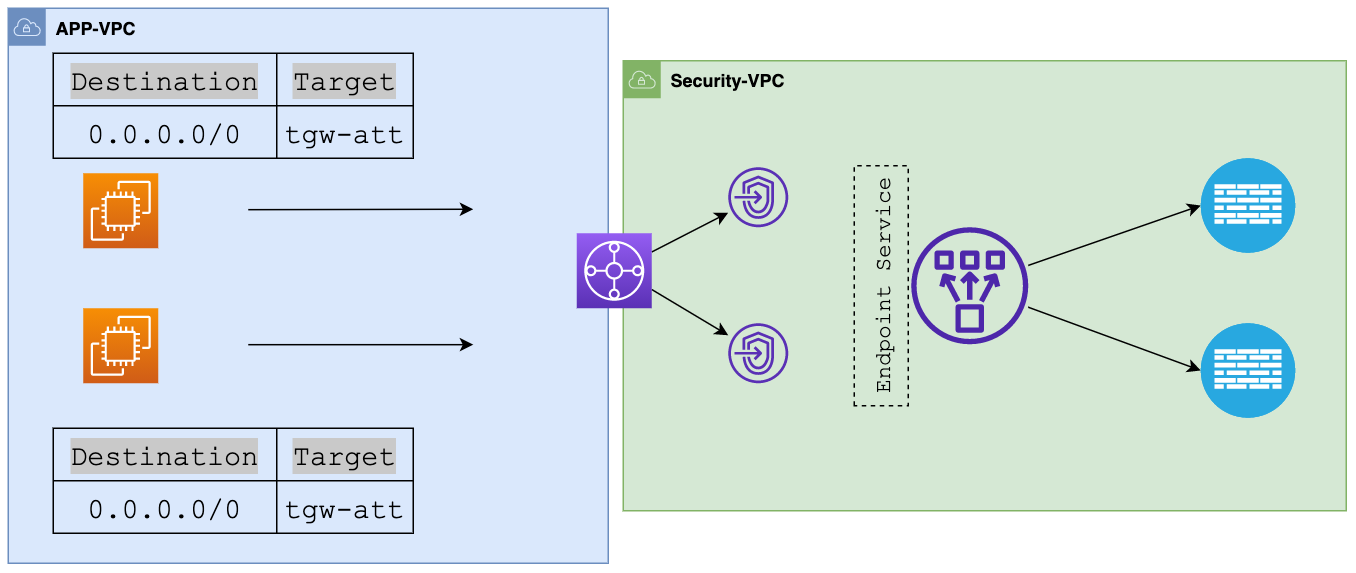
In this example, we're working with two VPCs, a 'security_vpc' where the VM-Series Firewalls will be deployed and an 'app-vpc' (Client-VPC) where our applications reside. Both VPCs are attached to the Transit Gateway for connectivity. Please note that I'm only using one Client-VPC for simplicity, in reality, you might have dozens or even hundreds of VPCs.
The Transit Gateway (TGW) uses two route tables: client-rt, where client VPCs attach, and security-rt, where our Security VPC attaches. The client-rt has a single default route pointing to the Security VPC ensuring all traffic from client VPCs must pass through the firewalls in the Security VPC.
When we attach the app-vpc to the TGW, it only propagates its route to the security-rt, not the client-rt. Since the client-vpc's route propagates to the security-rt, when the returned inspected traffic comes back from the firewalls to the security-rt, it is then sent to the appropriate VPC attachment.
Security VPC Subnets and Route Tables
Security VPC has three subnets that are management-subnet, data-subnet and tgw-subnet. Palo Alto's management interface will be on the management-subnet, the data interface will be on the data-subnet and the TGW attachments will be on the tgw-subnet.
The route table associated with data subnets will have two routes, the default route points to the NAT gateway and RFC-1918 points to TGW. The tgw route table has a single default route that points to the Gateway Load Balancer Endpoint (more on this later)
Traffic Flow
Next, let's look at the traffic flow where the packets leaving the app-vpc subnets first arrive at TGW and then routed to security-vpc attachment. As we've mentioned before, the tgw attachment is associated with tgw-route-table which has a default route points to the Gateway Load Balancer Endpoint (GWLBe)
When traffic hits this endpoint, it's sent to the GWLB, which then forwards the packets to a healthy firewall. This data is wrapped in a GENEVE tunnel protocol (UDP 6081). The firewall then checks the data after removing the GENEVE encapsulation.
After the firewall inspection, the data goes back to the GWLB and then to the GWLB endpoint.
- If the destination is for the Internet (north-south), It's then sent to a NAT Gateway, where it's processed for Network Address Translation. Lastly, this packet is sent from the NAT Gateway to an Internet Gateway, and finally out to the Internet.
- If the destination is for another VPC or on-prem (east-west), GWLBe routes the traffic back to the TGW which then will be sent out to the appropriate destination.
That's enough of AWS, in the next section let's focus on our main topic of Automating the Palo Alto Firewalls.
1. Management Interface Swap
In a typical setup, the GWLB uses a single listener and target group. We've chosen to specify the GWLB target as an instance (VM-Series Firewall) rather than an IP address, given that the IP could change if we redeploy. When we set the target as an instance, the GWLB directs traffic to the instance's first interface, which is, by default, the firewall's management interface. However, for our use case, we need the first interface to be a dataplane interface. So, we enable the swap-interface option on the firewall to achieve this.
When you launch the firewall, you can either enter the mgmt-interface-swap=enable command in the User data field on the AWS management console or you can include the new mgmt-interface-swap operational command in the bootstrap configuration. We will use that latter later in this blog post.
2. Palo Alto VM-Series Licensing Options
You can purchase licenses for VM-Series firewalls on AWS through the AWS Marketplace (PAYG) or through Palo Alto Networks (BYOL).
With the PAYG license, a VM-Series firewall is licensed and ready for use as soon as you deploy it and you are billed hourly. If you go with PAYG, you don't have to do anything in terms of Automation, just specify the correct AMI and off you go.
A bring-your-own license (BYOL) model allows you to purchase a license from a reseller, or directly from Palo Alto Networks. The BYOL model uses Software NGFW Credits for licensing.
With BYOL, you allocate credits by creating a Deployment Profile in the Customer Support Portal (CSP) and including the auth-codes in the bootstrap files which we will discuss in detail later. The license authorization code maps the firewall to the deployment profile you created. After you apply the code to the device, the device registers with the Palo Alto Support Portal and obtains information about its capacity and subscriptions.
3. Bootstrapping the Firewalls (Terraform)
Bootstraping the firewalls is an important step in our automation process. Picture this - you've deployed your firewalls but now you need to log into each one individually to apply licenses, register them with Panorama, and more. This can take up a lot of time.
Bootstraping is like giving our firewalls a set of instructions they can follow on their own. With bootstrapping, the firewalls can register themselves, obtain licenses, connect to Panorama, and even pull in all the configurations they need.
Automating the bootstrapping process consists of the following.
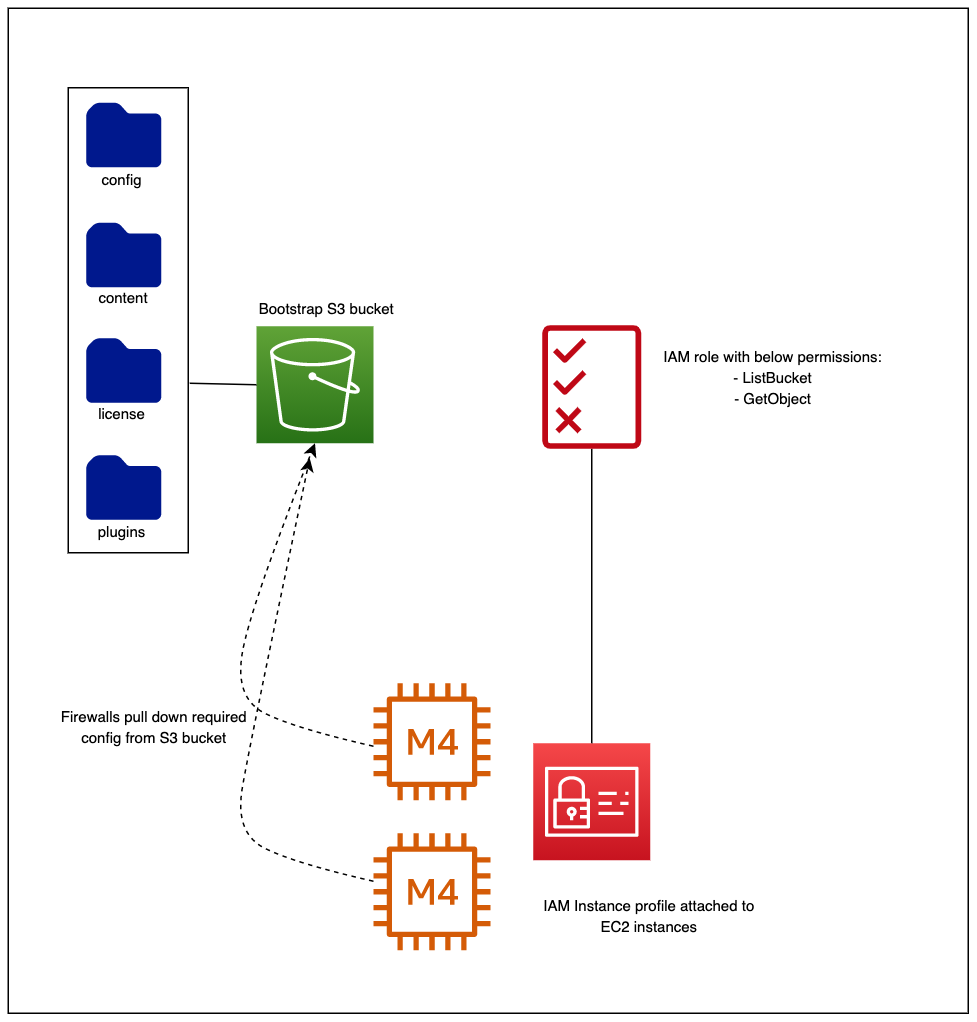
- An S3 bucket consists of the following folders - config, content, plugins, license
- An IAM role with ‘ListBucket’ and ‘GetObject’ permissions
- Create an instance profile that uses the above IAM role and attach it to the firewalls.
suresh@mac:~/Documents/create_s3|⇒  s3-tree palo-bootstrap-contents
palo-bootstrap-contents
├── config
│   └── init-cfg.txt
├── content
│   ├── panup-all-antivirus-4391-4908
│   ├── panupv2-all-contents-8686-7925
│   └── panupv3-all-wildfire-751341-754782
├── license
│   └── authcodes
└── plugins
    └── vm_series-2.0.2

4 directories, 6 filesinit-cfg.txt and authcodes are necessary. Both init-cfg.txt and authcodes contain sensitive information so, we don't want to keep them in our Git repo. The solution for that is to keep sensitive information (auth-key, registration pin-id and registration-value) in AWS Secrets Manager and generate the files using the secrets.
First, create a template file that defines the bootstrap file.
type=dhcp-client
dhcp-send-client-id=yes
dhcp-accept-server-hostname=yes
dhcp-accept-server-domain=yes
panorama-server=${panorama-server}
panorama-server-2=${panorama-server-2}
vm-auth-key=${vm-auth-key}
tplname=${tplname}
dgname=${dgname}
cgname=${cgname}
op-command-modes=mgmt-interface-swap
plugin-op-commands=aws-gwlb-inspect:enable
vm-series-auto-registration-pin-id=${vm-series-auto-registration-pin-id}
vm-series-auto-registration-pin-value=${vm-series-auto-registration-pin-value}
init-cfg.txt.tmpl
- For Panorama to manage the VM-Series firewalls that you are bootstrapping, you must generate a VM auth key on Panorama and include the key in the basic configuration (init-cfg.txt) file. The VM auth key allows Panorama to authenticate the newly bootstrapped VM-Series firewall.
- The auto-registration PIN enables you to automatically register your firewalls at launch with the CSP and retrieve the licenses.
Then, create a terraform file that replaces the placeholders with the actual values.
data "aws_secretsmanager_secret_version" "bootstrap_secrets" {
  secret_id = "bootstrap_secrets_test"
}

locals {
  secrets = jsondecode(data.aws_secretsmanager_secret_version.bootstrap_secrets.secret_string)
}


resource "aws_s3_object" "init_cfg" {
  bucket = "my_test_bucket"
  key    = "config/init-cfg.txt"
  content = templatefile("templates/init-cfg.txt.tmpl",
    {
      "panorama-server"                       = "10.10.1.10",
      "panorama-server-2"                     = "10.15.1.15",
      "tplname"                               = "test_tp",
      "dgname"                                = "test_dg",
      "cgname"                                = "default",
      "vm-auth-key"                           = local.secrets["vm-auth-key"],
      "vm-series-auto-registration-pin-id"    = local.secrets["vm-series-auto-registration-pin-id"],
      "vm-series-auto-registration-pin-value" = local.secrets["vm-series-auto-registration-pin-value"],
    }
  )
}

resource "aws_s3_object" "authcodes" {
  bucket  = "my_test_bucket"
  key     = "license/authcodes"
  content = local.secrets["virtual-ngfw-credits-auth-code"]
}
Now that the firewalls get their bootstrap files, as soon as they are online, they connect back to Panorama and fetch the latest configurations.
4. Managing Palo Alto Configurations (Ansible)
When it comes to managing firewall configurations, Panorama takes the lead. After Terraform takes care of provisioning the firewalls, they automatically connect to Panorama to get the latest configurations. As simple as this process sounds, there are a few caveats to be aware of. We'll dive into the details of the configuration process and discuss these exceptions in the upcoming section.
Firewall/Panorama Credentials
To let Ansible manage the firewalls and their configurations, we need to give it the necessary credentials. While there are many ways to keep these credentials safe in Ansible, for this example, we're using AWS Secrets Manager. This is a tool provided by AWS that securely stores and manages sensitive information like usernames and passwords.
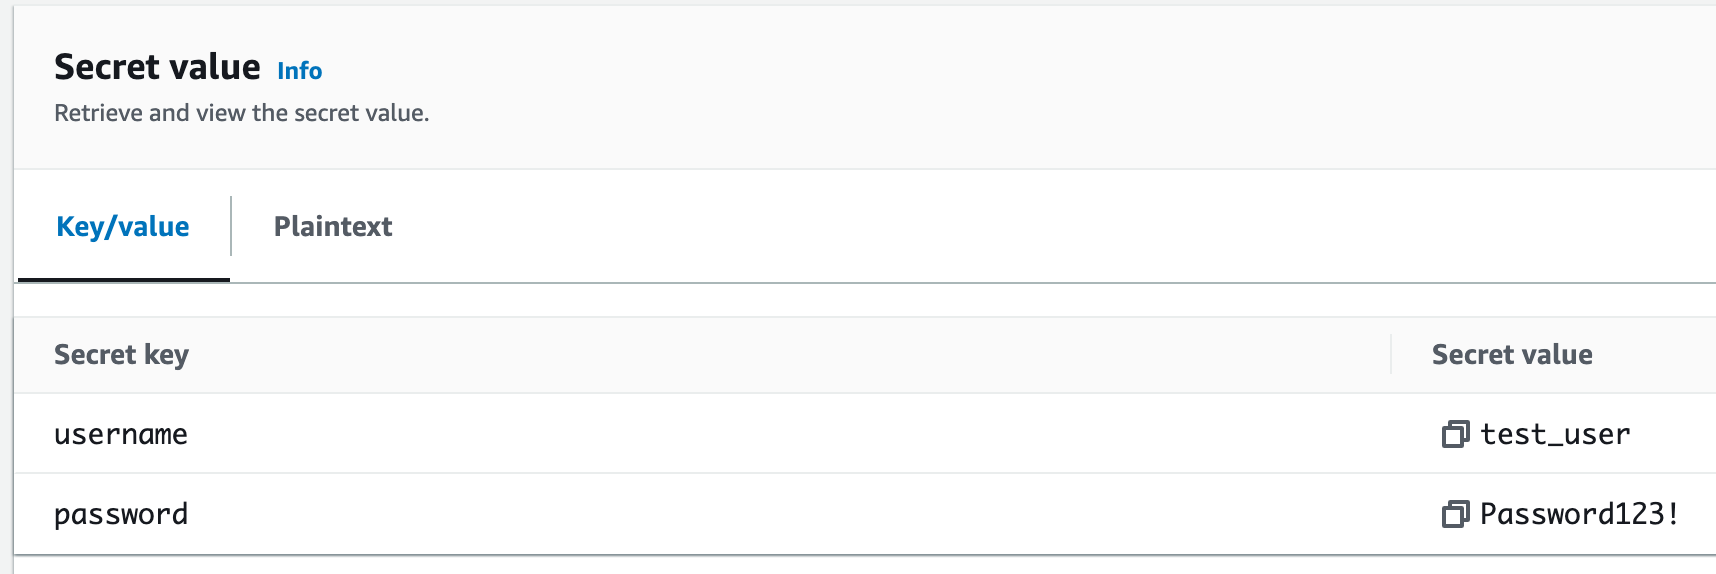
access_key, access_secret and access_token.The following Ansible playbook retrieves the above credentials from AWS Secrets Manager.
---
panorama:
    fqdn: test_panorama.local

aws:
  region: eu-west-1
  role_arn: "arn:aws:iam::4564321456:role/AllowAccessTest"
---
# Assume an existing role
- name: Assume Role
community.aws.sts_assume_role:
region: "{{ aws.region }}"
role_arn: "{{ aws.role_arn }}"
role_session_name: "PaloAssumeRoleSession"
register: assumed_role
no_log: true
- set_fact:
connection_args:
aws_access_key: "{{ assumed_role.sts_creds.access_key }}"
aws_secret_key: "{{ assumed_role.sts_creds.secret_key }}"
aws_security_token: "{{ assumed_role.sts_creds.session_token }}"
region: "{{ aws.region }}"
no_log: true
Use the assumed role above to retrive the credentials
- name: "Create the Palo Provider"
set_fact:
provider:
username: "{{ lookup('amazon.aws.aws_secret', 'palo-credentials', **connection_args) | from_json | json_query('username') }}"
password: "{{ lookup('amazon.aws.aws_secret', 'palo-credentials', **connection_args) | from_json | json_query('password') }}"
ip_address: "{{ panorama.fqdn }}"
no_log: trueobtain_credentials.yml
The first part is the YAML configuration with two sections. The first, panorama, contains the fully qualified domain name (FQDN) for Panorama. The second, aws, holds details about the AWS region and the ARN for a specific role that Ansible will use to access AWS resources.
In the playbook part, we first use the community.aws.sts_assume_role module to assume an AWS role using STS. This AWS role, and the region where the role exists, are obtained from the initial configuration. This step provides Ansible with temporary credentials to access AWS services. The output of this task, including the temporary credentials, is registered into the assumed_role variable.
Next, set_fact is used to define a new fact, connection_args, using the credentials obtained from the assumed_role variable. The no_log: true argument means that the output of this task will not be logged, keeping the temporary credentials secret.
Finally, using the lookup function, Ansible retrieves the credentials for Palo Alto (username and password) from AWS Secrets Manager. The secret's name is palo-credentials. The temporary AWS credentials are used to access the Secrets Manager. These Palo Alto credentials, along with the Panorama IP address from the initial configuration, are then used to set up the Panorama provider in the provider fact.
Managing General Configurations
With the Panorama credentials in hand, we can now start making configuration changes. An example of a typical task is creating address objects.
---
address_object:
  - name: web_server
    address_type: fqdn
    value: web_test.local
  - name: app-suubnet
    value: 10.85.10.0/24
    description: webhooks-lambda
    tag: ['APPS']
  - name: db-subnet
    value: 10.86.10.0/24
    description: mo-aws-account-pj-cps109-prod
    tag: ['DB']
address_objects.yml
---
  - name: create_address_objects
    hosts: localhost
    gather_facts: no
    vars_files:
      - "../vars/address_objects.yml"
    pre_tasks:
      - include_tasks: obtain_credentials.yml
    tasks:
      - name: Creating address objects
        paloaltonetworks.panos.panos_address_object:
          provider: "{{ provider }}"
          device_group: "{{ device_group_name }}"
          name: "{{ item.name }}"
          address_type: "{{ item['address_type'] | default(omit) }}"
          value: "{{ item.value }}"
          description: "{{ item['description'] | default(omit) }}"
          tag: "{{ item['tag'] | default(omit) }}"
          commit: no
        with_items: "{{ address_object }}"
The first variable file starts with the declaration of address objects for a web server, an application subnet, and a database subnet, each with unique attributes.
Following that, an Ansible playbook is outlined. It includes a tasks section which creates these address objects in Palo Alto Networks using the paloaltonetworks.panos.panos_address_object module. It loops over each object in the address_object list, passing the object's attributes to the module. This playbook relies on a variables file named address_objects.yml and includes a task file named obtain_credentials.yml (that we used in the previous step)
5. Caveats
Certain elements, like the default admin user and local time zone, have to be manually removed directly from each firewall. These values override those from Panorama. To save time and ensure consistency, we'll leverage Ansible to automate the process of logging into each firewall and deleting these values. We'll detail how to achieve this in the following section. First thing first, we need to know the IPs of each firewall.
---
- name: Find firewall IPs
  paloaltonetworks.panos.panos_op:
    provider: "{{ provider }}"
    cmd: "<show><devicegroups><name>aws_test_group</name></devicegroups></show>"
    cmd_is_xml: true
  register: cmd_output_xml

- set_fact:
    cmd_output_dict: "{{ cmd_output_xml.stdout_xml | from_xml }}"

- name: set_fact
  set_fact:
    firewall_ips: "{{ firewall_ips }} + [ '{{ item['ip-address'] }}' ]"
  with_items:
    - "{{ cmd_output_dict.response.result.devicegroups.entry.devices.entry }}"
  vars:
      firewall_ips: []
find_ips.yml
This Ansible playbook does three things
- It runs a command to find the IP addresses of the firewalls in the
aws_test_groupdevice group using thepaloaltonetworks.panos.panos_opmodule. The output of this command is registered in the 'cmd_output_xml' variable. - It converts the XML output from the previous command to a Python dictionary using the
from_xmlfilter, and saves it to thecmd_output_dictvariable. - It iterates over the dictionary of devices and extracts their IP addresses, appending each IP address to the
firewall_ipslist. Thefirewall_ipslist will eventually hold the IP addresses of all the firewalls in theaws_test_groupdevice group.
Next step, create another playbook that logins to each device deletes the local values and commits the changes.
---
  - name: Remove Default Values
    hosts: localhost
    gather_facts: no
    pre_tasks:
      - include_tasks: obtain_credentials.yml
    tasks:
      - name: Find IPs
        import_tasks: find_ips.yml

      - name: Delete default admin user
        paloaltonetworks.panos.panos_type_cmd:
          provider:
            username: '{{provider.username}}'
            password: '{{provider.password}}'
            ip_address: '{{item}}'
          cmd: "delete"
          xpath: "/config/mgt-config/users/entry[@name='admin']"
        loop: '{{firewall_ips}}'

      - name: Delete default timezone
        paloaltonetworks.panos.panos_type_cmd:
          provider:
            username: '{{credentials.username}}'
            password: '{{credentials.password}}'
            ip_address: '{{item}}'
          cmd: "delete"
          xpath: "/config/devices/entry[@name='localhost.localdomain']/deviceconfig/system/timezone"
        loop: '{{firewall_ips}}'

       - name: Commit Config
        paloaltonetworks.panos.panos_commit_firewall:
          provider:
            username: '{{credentials.username}}'
            password: '{{credentials.password}}'
            ip_address: '{{item}}'
          description: 'Deleted local values'
        loop: '{{firewall_ips}}'
delete_default_values.yml
6. Unmanaging and Deactivating the Firewalls
As we operate within AWS, agility is key, particularly when it comes to redeploying our firewalls. In scenarios such as blue/green deployments, we need to efficiently clean up our old environment when we switch over. This cleanup involves removing the firewalls from Panorama's device-groups/templates, deactivating their licenses, and ultimately destroying the firewalls themselves. Running the terraform destroy command can easily accomplish the latter, however, the former tasks might require a bit more effort. In the following sections, we'll delve into the steps needed to accomplish these tasks.
Deactivating the Firewalls
When it comes to deactivating the firewalls, you essentially have two choices. One option is to manually navigate to the Palo Alto customer support portal and deactivate the licenses from there. However, that contradicts our objective of streamlining and automating our processes. The other, more automation-friendly option, is to run CLI commands directly from the firewalls to handle the deactivation. This is the approach we will be focusing on as it aligns with our commitment to automation.
---
- name: Deactivate Firewall Licenses
  hosts: localhost
  gather_facts: no
  pre_tasks:
      - include_tasks: obtain_credentials.yml

    tasks:
      - name: Find IPs
        import_tasks: find_ips.yml

    #To deactivate the licenses of a firewall, the firewall must have an API key set to allow authentication to Palo Alto CSP
    - name: Set API key for firewalls to authenticate to CSP
      paloaltonetworks.panos.panos_op:
        provider:
          username: '{{provider.username}}'
          password: '{{provider.password}}'
          ip_address: '{{item}}'
        cmd: 'request license api-key set key API-KEY-HIDDEN'
      loop: '{{firewall_ips}}'

    - name: Delete licenses
      paloaltonetworks.panos.panos_op:
        provider:
          username: '{{credentials.username}}'
          password: '{{credentials.password}}'
          ip_address: '{{item}}'
        cmd: '<request><license><deactivate><VM-Capacity><mode>auto</mode></VM-Capacity></deactivate></license></request>'
        cmd_is_xml: true
      loop: '{{firewall_ips}}'
      ignore_errors: yes
Unamanaging the Firewalls from Panorama
Similar to the previous example, we want to automate this step too as shown below.
---
- name: Deactivate Firewall Licenses
  hosts: localhost
  gather_facts: no
  pre_tasks:
      - include_tasks: obtain_credentials.yml

  tasks:
      - name: Get the Serial Numbers from Device Group
        paloaltonetworks.panos.panos_op:
          provider: "{{ provider }}"
          cmd: "<show><devicegroups><name>{{ device_group_name }}</name></devicegroups></show>"
          cmd_is_xml: true
        register: cmd_output_xml

      - set_fact:
          cmd_output_dict: "{{ cmd_output_xml.stdout_xml | from_xml }}"

      - name: set_fact
        set_fact:
          device_group_serial_numbers: "{{ device_group_serial_numbers }} + [ '{{ item.serial }}' ]"
        with_items:
          - "{{ cmd_output_dict.response.result.devicegroups.entry.devices.entry }}"
        vars:
          device_group_serial_numbers: []

      - name: Print device_group_serial_numbers
        debug:
          var: device_group_serial_numbers

      - name: Delete the Devices from the Template-Stack
        paloaltonetworks.panos.panos_type_cmd:
          provider: "{{ provider }}"
          cmd: "delete"
          xpath: "/config/devices/entry[@name='localhost.localdomain']/template-stack/entry[@name='{{ template_stack_name }}']/devices/entry[@name='{{ item }}']"
        with_items: "{{ device_group_serial_numbers }}"

      - name: Delete the Devices from the Device-Group
        paloaltonetworks.panos.panos_type_cmd:
          provider: "{{ provider }}"
          cmd: "delete"
          xpath: "/config/devices/entry[@name='localhost.localdomain']/device-group/entry[@name='{{ device_group_name }}']/devices/entry[@name='{{ item }}']"
        with_items: "{{ device_group_serial_numbers }}"

      - name: Delete the Devices from the Log Collector Group
        paloaltonetworks.panos.panos_type_cmd:
          provider: "{{ provider }}"
          cmd: "delete"
          xpath: "/config/devices/entry[@name='localhost.localdomain']/log-collector-group/entry[@name='default']/logfwd-setting/devices/entry[@name='{{ item }}']"
        with_items: "{{ device_group_serial_numbers }}"

      - name: Delete the Managed Devices
        paloaltonetworks.panos.panos_type_cmd:
          provider: "{{ provider }}"
          cmd: "delete"
          xpath: "/config/mgt-config/devices/entry[@name='{{ item }}']"
        with_items: "{{ device_group_serial_numbers }}"
Conclusion
And that concludes our post! Due to the complexity and wide-ranging aspects of the process, I've not been able to cover every single element, like the creation of VPCs, LBs, EIPs, etc. Our main focus here has been on the Palo Alto firewalls and the automation of their deployment in AWS. If you have any questions, or if there's something you'd like me to explain further, feel free to drop a comment below. I'll be more than happy to help clarify any points. Thank you for reading.