In my opinion, learning cloud networking is easier compared to traditional networking. You’ll see why as we go through the posts. Even if you're completely new to the cloud, you can get a simple lab up and running within a few hours. You don't need physical devices, cables, or complex topologies to get started.
Of course, you won’t become an expert in a few months, but you will build a solid foundation from which you can grow. The key is to start small, understand the basics, and experiment as you go.
There are multiple cloud providers out there, such as AWS, Azure, GCP, Alibaba Cloud, and so on. At a basic level, they all function the same from a networking point of view, though each has its own nuances and differences. As long as you're familiar with one provider, the knowledge is usually transferable. That said, our focus here is AWS. AWS has the largest market share in the cloud space, and it's also where I got started.
As always, if you find this post helpful, press the ‘clap’ button. It means a lot to me and helps me know you enjoy this type of content. If I get enough claps for this series, I’ll make sure to write more on this specific topic.
Audience
If you're brand new to AWS, don't worry. This post covers the basics and serves as a simple introduction to AWS networking for beginners. General networking knowledge is helpful but not required - I'll try to explain things clearly so everyone can follow along.
If you're a Network Engineer or already familiar with another cloud provider, you should find this guide easy to follow. The concepts here will likely feel familiar and should map well to what you already know.
An important thing to keep in mind is that AWS has hundreds of services, and most of them are not relevant to us. So don’t make it your goal to learn everything. In most real-world scenarios, we end up using only 10 to 20 core services. AWS or any cloud, for that matter, is like walking into a supermarket. There are hundreds of products, but we’re only there for a few specific things. I’d be surprised if you walked through every single aisle trying to learn about every item on the shelf (unless you’re into that, then maybe I’m wrong 🙂).
Some Cloud Basics
If you come from a traditional networking background, you're probably used to dealing with switches, VLANs, cables, ISPs, firewalls and so on. Just forget about all of that. VLANs? What VLAN? The cloud works differently, and most of the traditional networking pieces are abstracted away from us.
When setting up a physical data centre, we have to think about a lot of things like ordering devices, cabling, redundancy, and connecting to other data centres. Even getting an Internet connection means setting up a default route pointing to an ISP, having at least one backup ISP, and running routing protocols to decide the best path.

In the cloud, none of that applies (at least not to us). Let’s say we have a single Linux VM running in AWS, and we want to give it Internet access. All we have to do is create something called an Internet Gateway (IGW). It's a simple resource that takes a couple of seconds to create. The IGW is already scalable and redundant, so we don’t have to worry about creating a second one for resilience. Most AWS networking resources are designed to be redundant by default (though not all).
So keep in mind, things work differently here. Don’t try to apply traditional networking concepts directly. Of course, your networking knowledge is still a huge advantage and will help you a lot, especially compared to someone with no networking background. But just remember that the cloud is more agile and behaves differently. Keep this in mind as we go further in this series.
This is one of the reasons why developers and other teams can deploy things in the cloud within days, instead of waiting weeks or even months for the networking team to get everything set up. This isn't a criticism at all, I'm a network engineer myself, but I can definitely see why the cloud has taken off the way it has.
Your First Step - Creating an AWS Account
The very first step for anyone to get familiar with AWS is to sign up for an AWS account. This account gives you access to the entire AWS ecosystem and will be the home for all the networking components and services you create.
To help you get started without any financial commitment, AWS offers a very generous 'Free Tier'. This is more than enough to get a simple lab running, launch a small virtual server, and experiment with the networking basics we'll be covering.
To sign up, you'll need to go to the AWS sign-up page. The process is straightforward and similar to signing up for any other online service, but keep in mind that you will be asked to provide your credit card details. AWS uses this for identity verification and to have a payment method ready in case you decide to use services that go beyond the Free Tier limits.
It’s a standard practice, and as long as you are mindful of what you deploy and make a habit of deleting resources once you are done with your experiments, you can comfortably operate within the Free Tier and avoid any unexpected bills.
Core AWS Concepts for Networking
Before we start building things, it's helpful to understand a few core concepts about how AWS structures its global infrastructure. Learning the basic building blocks will make it much easier to understand where your network components live and how they connect to each other. We're going to keep it simple and focus on what you need to know for networking. First up are two of the most fundamental concepts - Regions and Availability Zones.
AWS Regions
Imagine you want to set up a server for a new application. One of the first questions you'd need to answer is, "Where in the world should this server live?" This is where AWS Regions come into play. A Region is simply a specific geographical area in the world where AWS has a presence, like Ohio in the United States, London in the United Kingdom, or Tokyo in Japan.
When you create resources in AWS, you choose a Region for them to reside in. This is an important decision because it can affect things like the speed of your service for your users (you generally want to be close to them) and the cost, as prices can vary slightly from one Region to another. For our purposes, think of a Region as the city or country where your virtual data centre will be.
AWS Availability Zones
Now, let's zoom in a little closer on a Region. To ensure that applications are highly available and can withstand failures, AWS doesn't just have a single data centre in each Region. Instead, each Region is made up of multiple, isolated locations called Availability Zones, or AZs for short. You can think of an AZ as a distinct data centre facility within a Region.
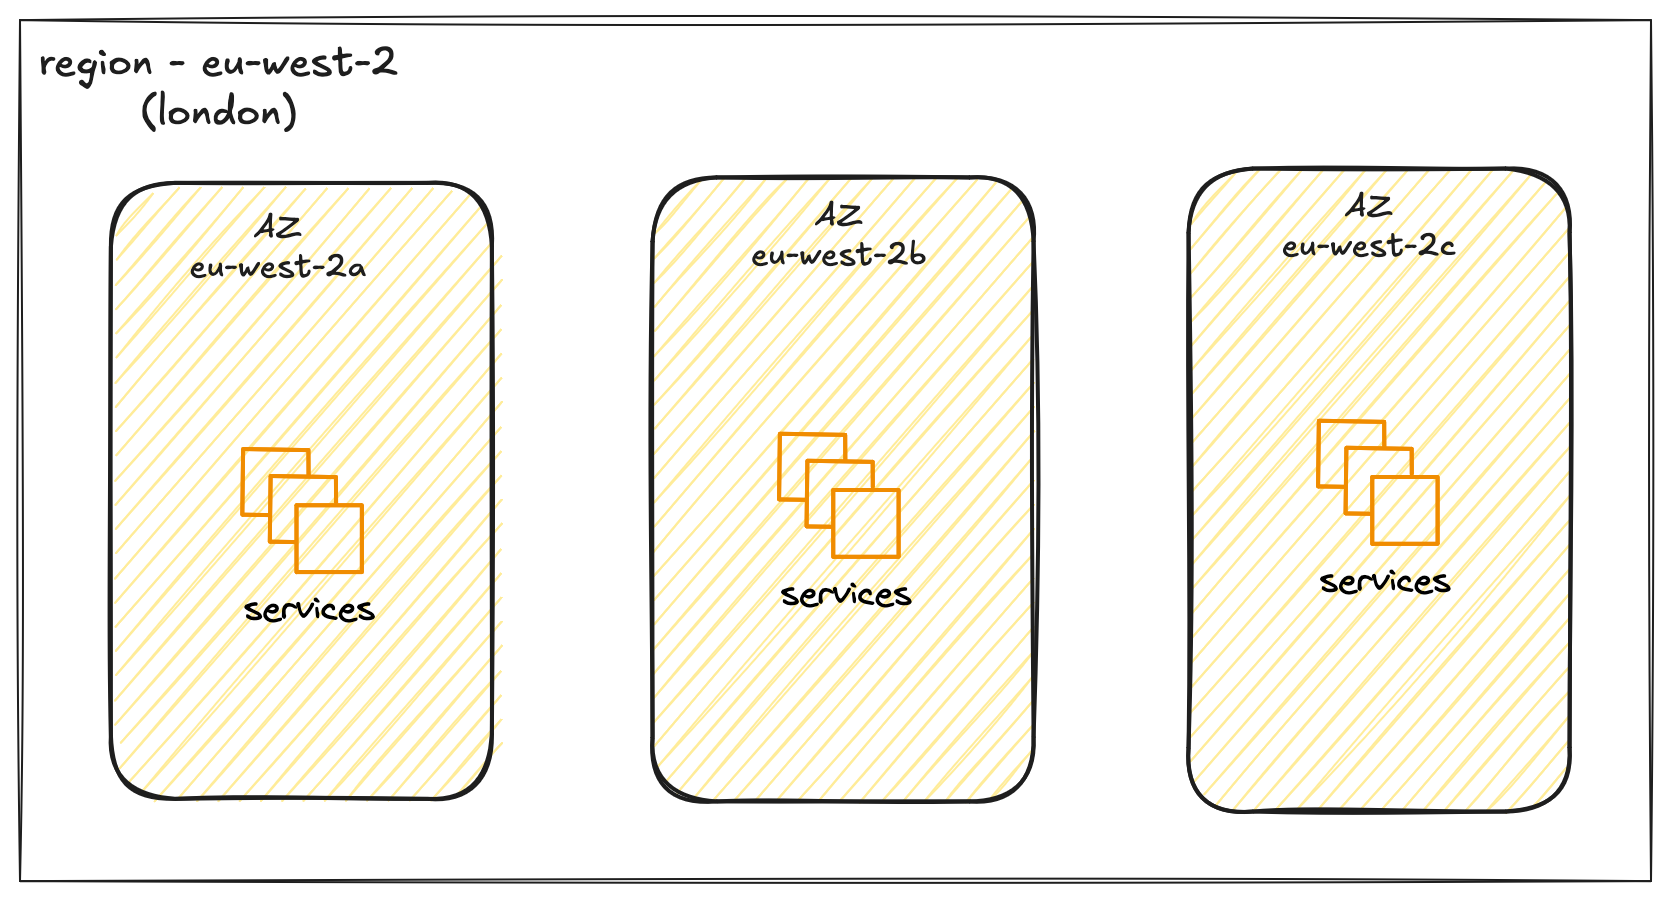
Each AZ has its own independent power, cooling, and networking, so they are insulated from each other's failures. For example, a power outage in one AZ is unlikely to affect another. These AZs within a Region are connected to each other with fast, private network links. This allows you to build applications that are spread across multiple AZs. If something were to go wrong in one AZ, your application could continue to run from the other, keeping your services online. When you launch a resource like a virtual server, you'll place it not just in a Region, but within a specific AZ in that Region.
AWS Virtual Private Cloud (VPC)
Now that we have looked at Regions and understand that it contains multiple Availability Zones, the next step is to create a network for our resources. In AWS, you do this with a Virtual Private Cloud, or VPC. This is a foundational networking component that you must set up.
A VPC is your own private network within the AWS cloud. When you create a VPC, you assign a private IP address range to it in the form of a CIDR block. When you launch a resource, such as a virtual server, you place it inside this VPC. It gets a private IP address from the range you defined, which allows it to communicate with other resources inside that same VPC. By default, resources inside your VPC are isolated from all other customers and networks in AWS or even isolated from your own other VPCs, providing a secure and private environment.
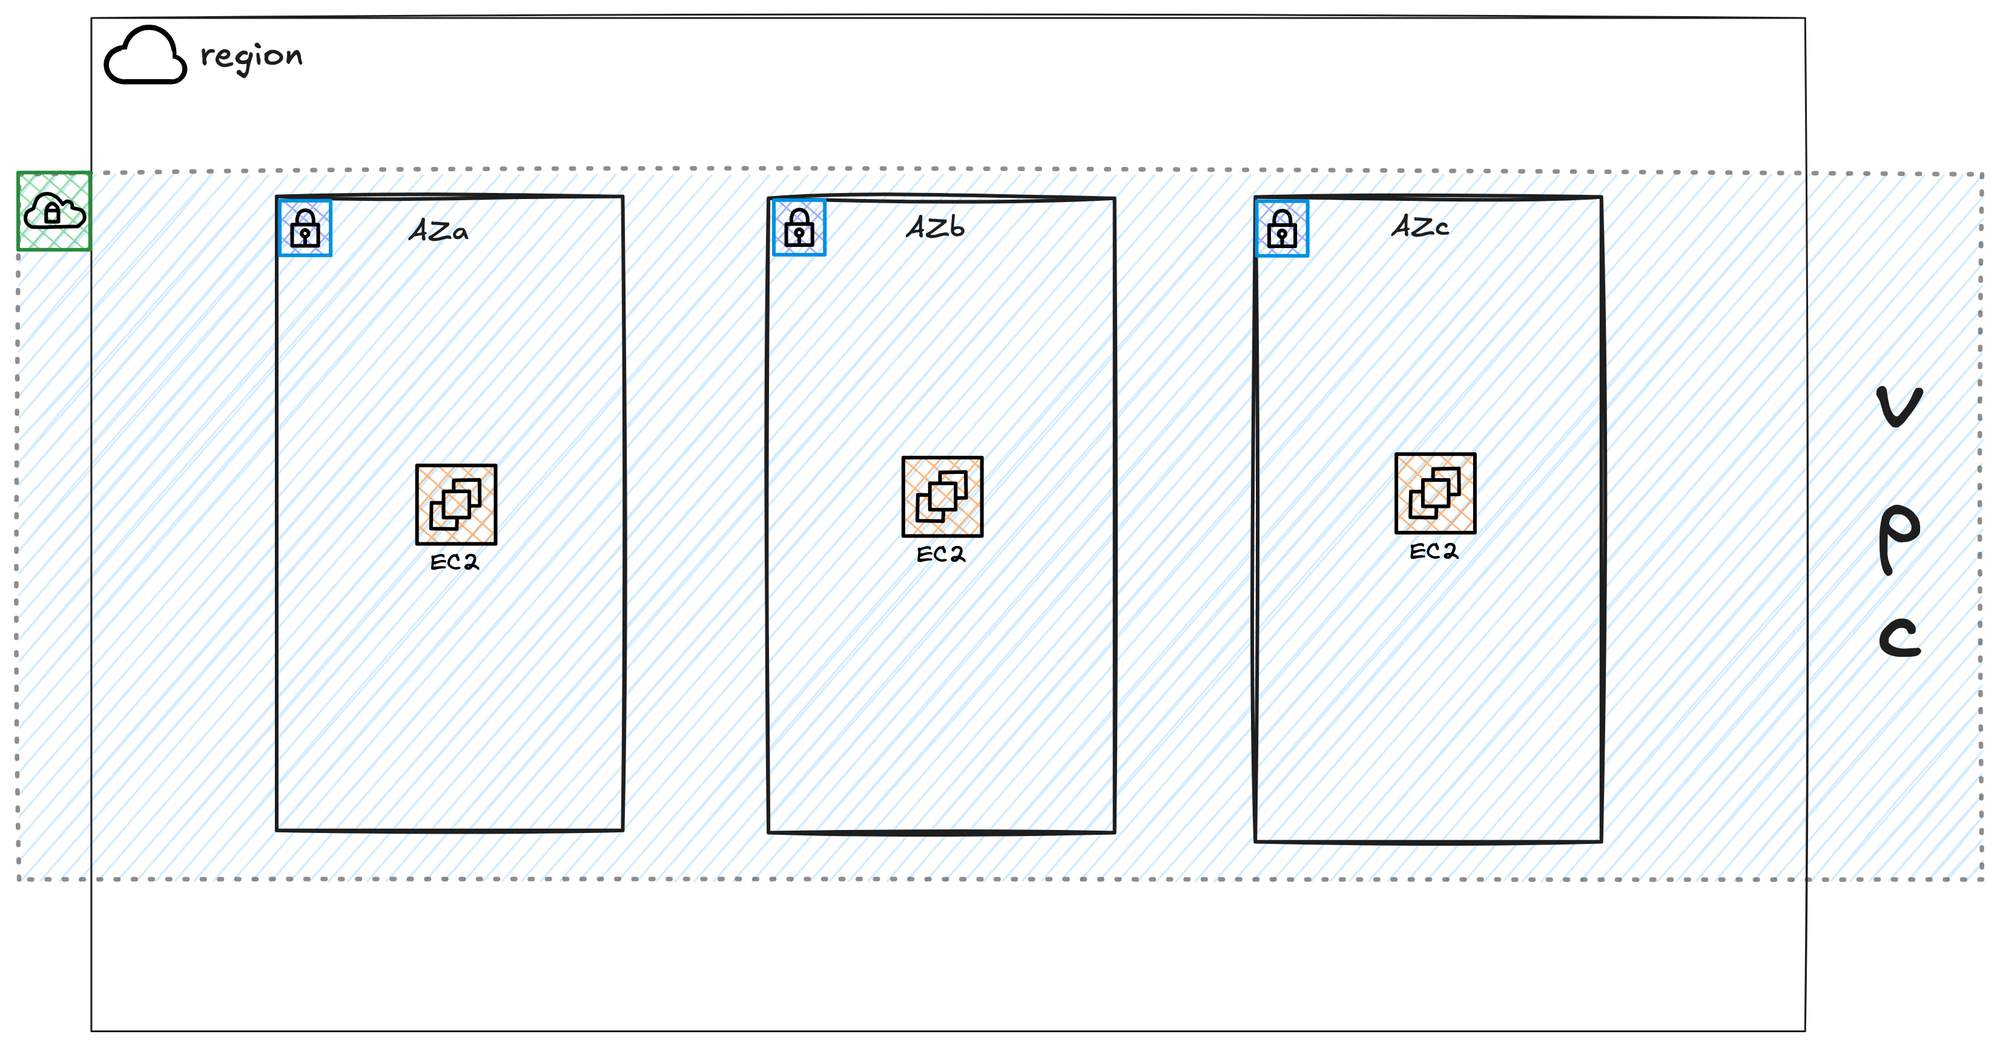
Your VPC is created within a single AWS Region. It cannot exist in more than one Region. However, it is automatically available across all the Availability Zones within that chosen Region. This allows you to place your resources in different AZs for high availability, while still having them all connected to the same private network. This means a server in one AZ can easily communicate with a server in another AZ using their private IP addresses, all within the VPC.
Default VPC
In each AWS Region, a default VPC is automatically created for you with the CIDR block 172.31.0.0/16. I would highly recommend not using it for anything other than quick, temporary tests. It is much better to create a new VPC from scratch, even for your own labs. Building your own VPC is the best way to understand how all the different networking components work together.
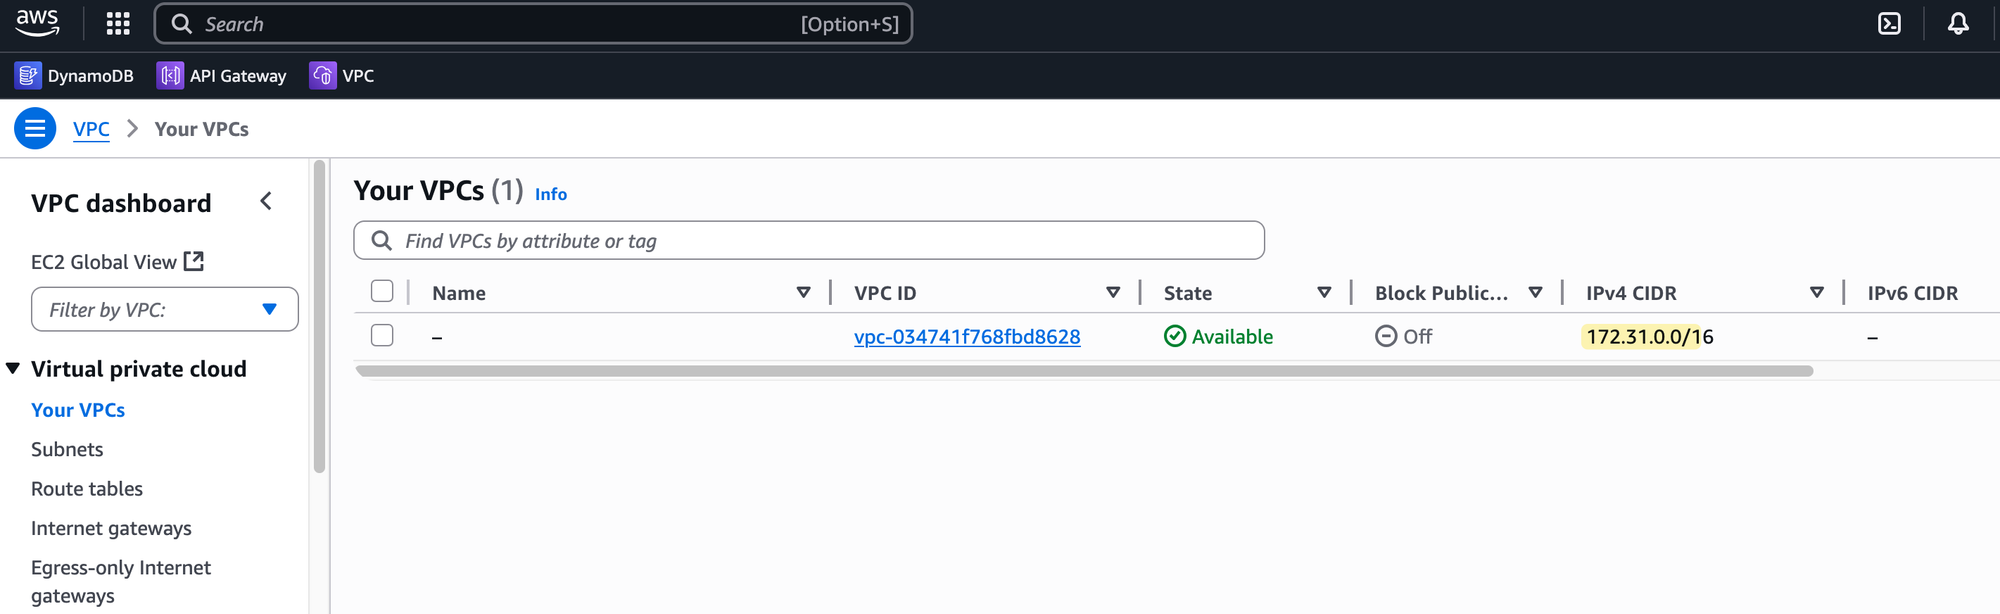
There's another important reason to avoid the default VPC. Since every AWS account starts with the same 172.31.0.0/16 CIDR, you will run into problems with overlapping IP addresses if you ever need to connect your network to another VPC or your own on-premises network down the line. It's a good habit to start with a unique IP range from the beginning to prevent future conflicts.
Subnets and Route Tables
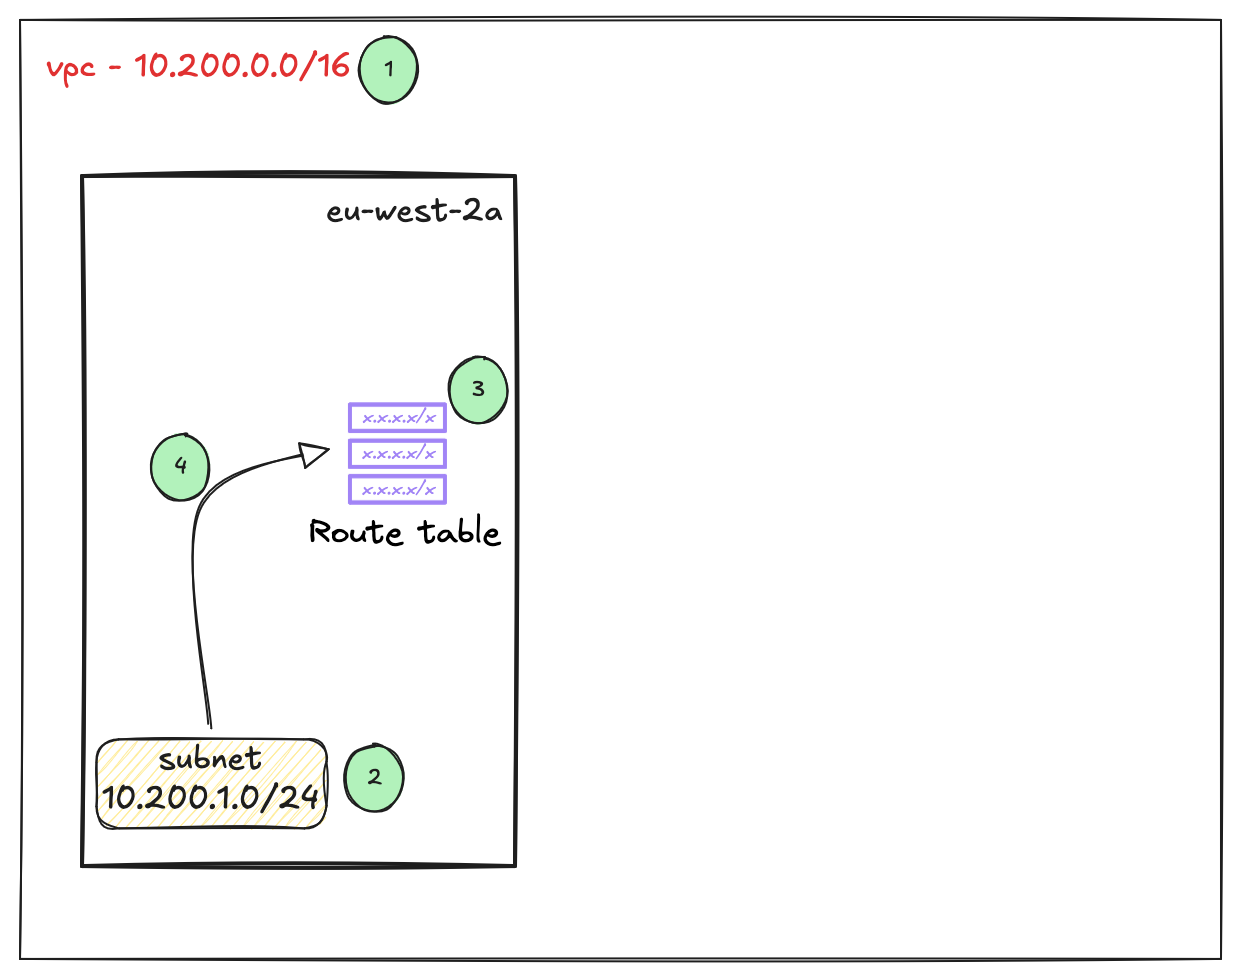
After creating a VPC and assigning it an IP address range, the next step is to divide that range into smaller, more manageable pieces. These pieces are called Subnets. You don't place resources like servers directly into a VPC; you place them into a subnet within that VPC.
Each subnet you create must exist entirely within a single Availability Zone. This is a critical point - while your VPC spans all AZs in a Region, a subnet is tied to only one. This is how you control the physical location of your resources. For example, to make an application resilient, you would create at least two subnets, each in a different Availability Zone, and place your servers across both. The IP address range you give to a subnet must be a portion of the larger IP range of the VPC it belongs to.
Once you have subnets, you need a way to control how traffic moves out of them. This is done using Route Tables. A route table contains a set of rules, called routes, that act similarly to how route tables work in traditional networking. Each rule specifies that traffic going to a certain destination IP address range should be sent to a specific gateway or network interface. Every subnet in your VPC must be associated with a route table. When traffic leaves a resource in a subnet, the system checks the subnet's associated route table to determine where to send that traffic. A single route table can be associated with multiple subnets, which is useful when many subnets need the same routing rules.
Let's Create the Resources
Enough of the theory for now. It's time to log into the AWS console and put the theory into practice.
It can be confusing at the start, but once you log in, always make sure you are working in the correct AWS Region. For example, if you create your resources in the London region but later log back in and the console defaults to the Ireland region, you won't see any of your resources. So, if you can't find your work, the first thing to check is that you are in the correct region; you can switch it from the top right-hand corner of the console.
Similarly, AWS has hundreds of services for different tasks, like VPC, EC2, Route 53, Direct Connect, and so on. You will find yourself switching between these service consoles frequently. For example, you create most of the core network resources in the VPC service, whereas you manage your virtual servers in the EC2 service. You just need to switch back and forth depending on what exactly you are doing.
Creating a VPC
We are going to create a new VPC with the CIDR 10.200.0.0/16. First, you need to choose your working Region. When you first log into the AWS Management Console, you can see and select your desired Region from the top right corner of the page. Everything we do from this point on will be deployed inside the Region we select here.
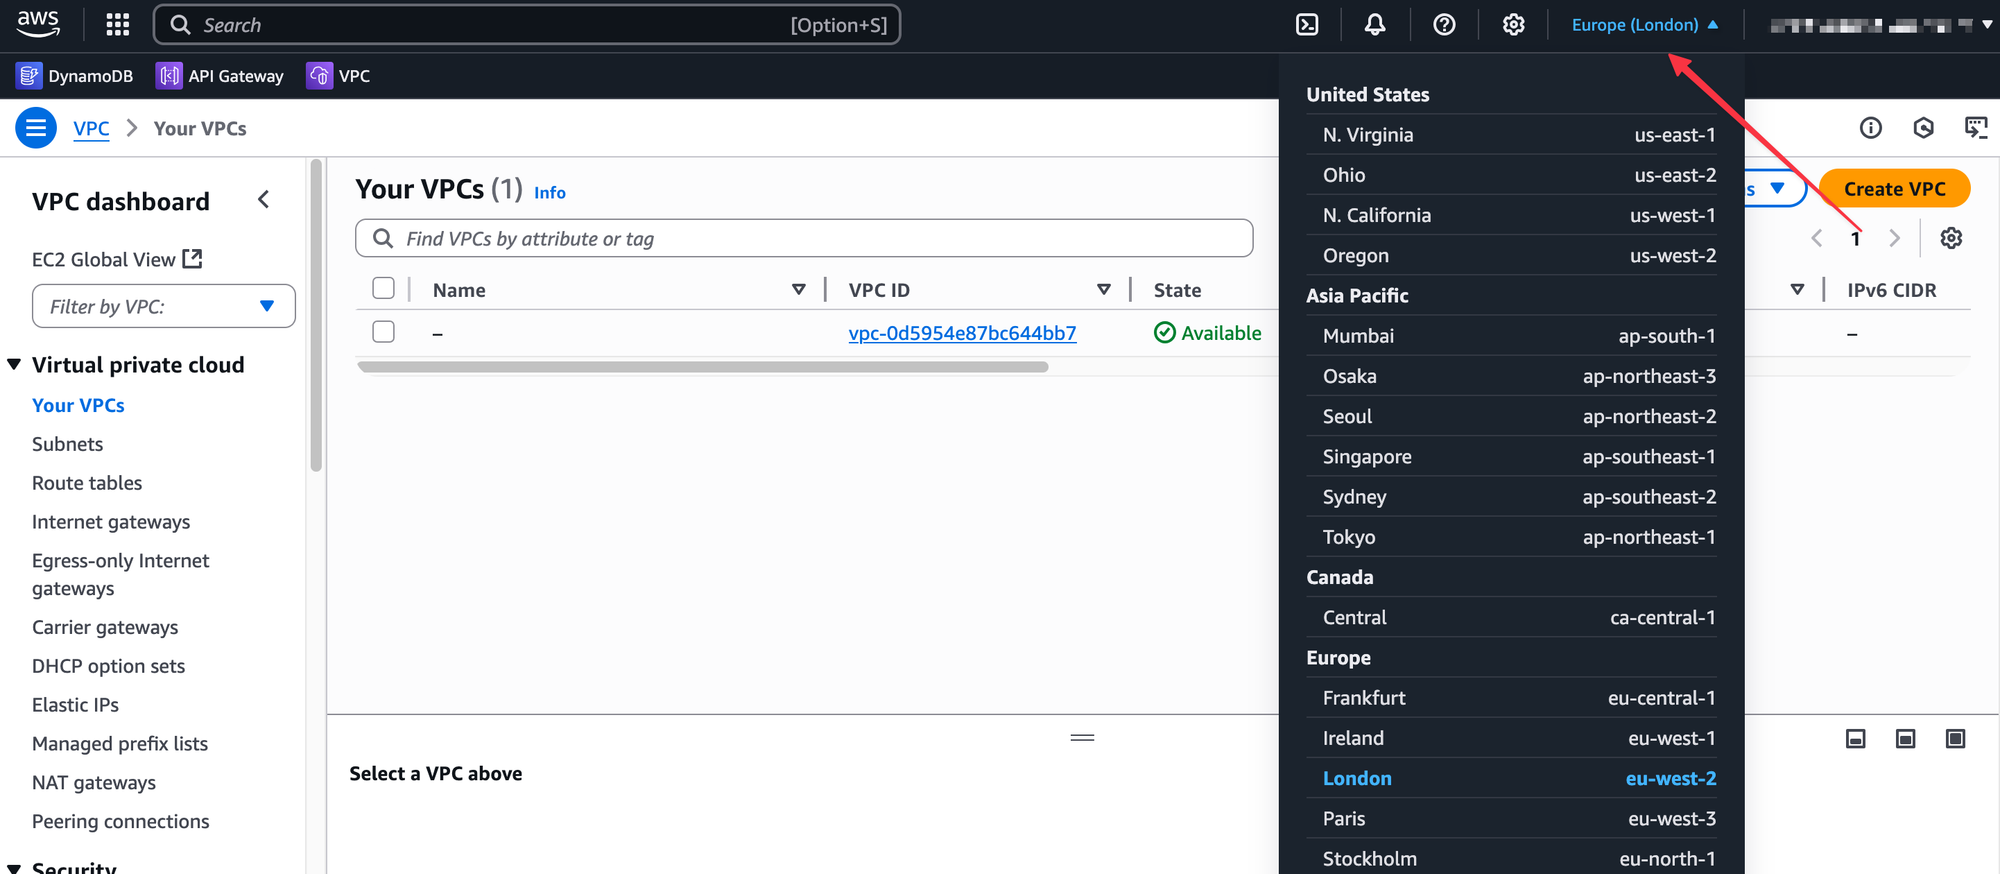
You can choose any Region you want; the configuration steps will be identical. It's often a good idea to pick one that is geographically close to you. Since I'm in London, I will be using the Europe (London) region, which has the code eu-west-2.
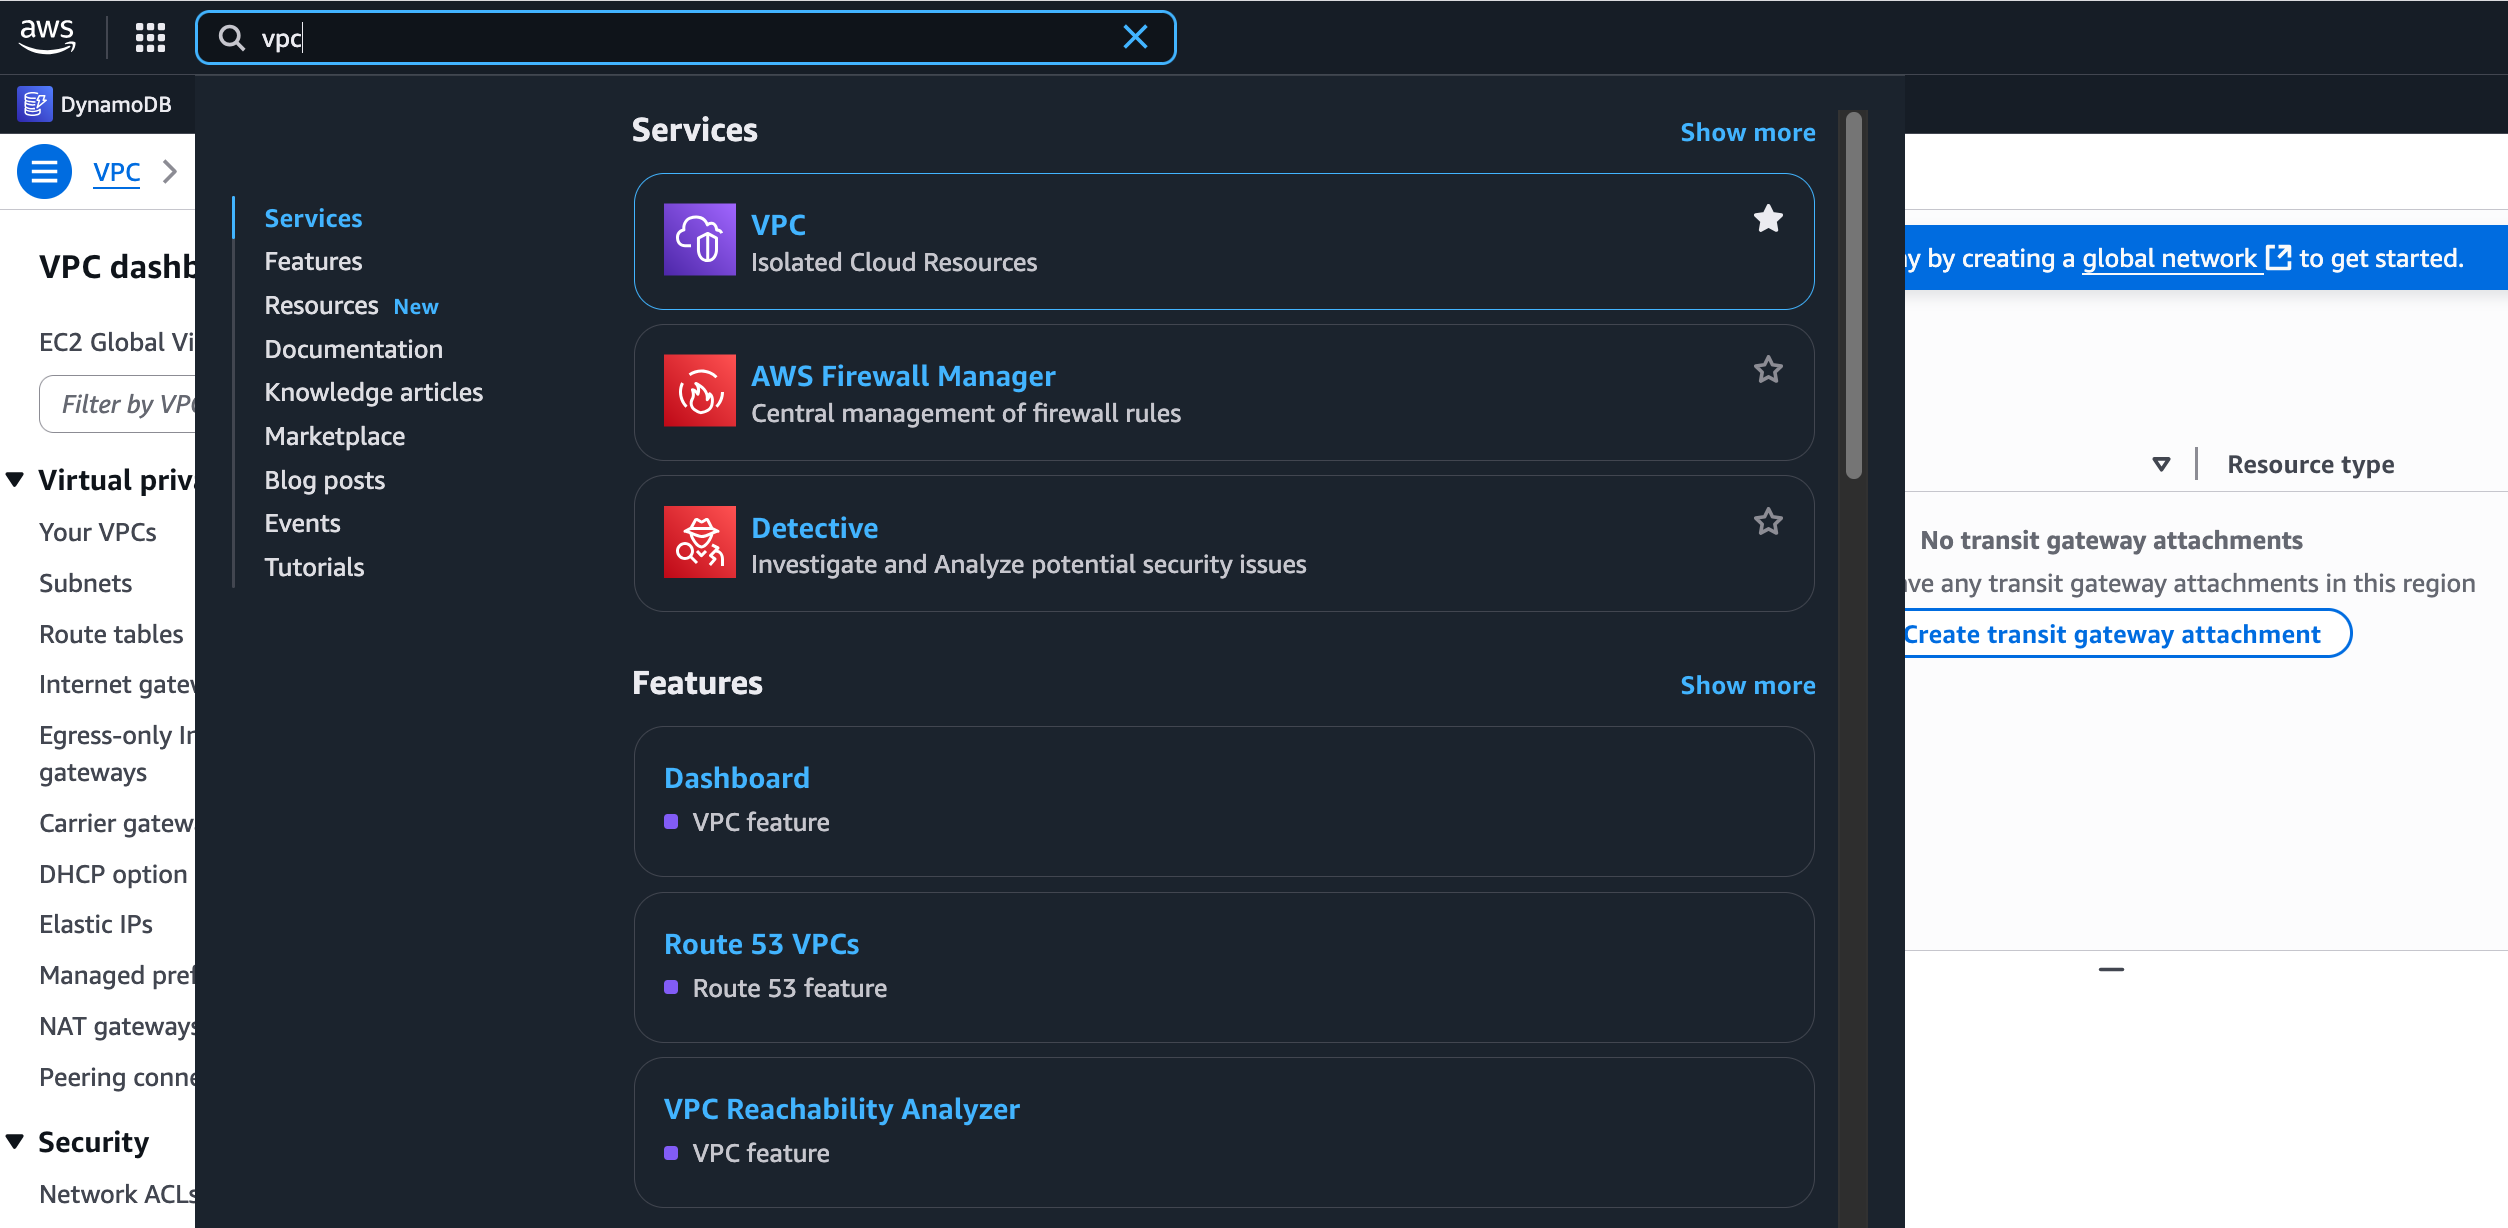
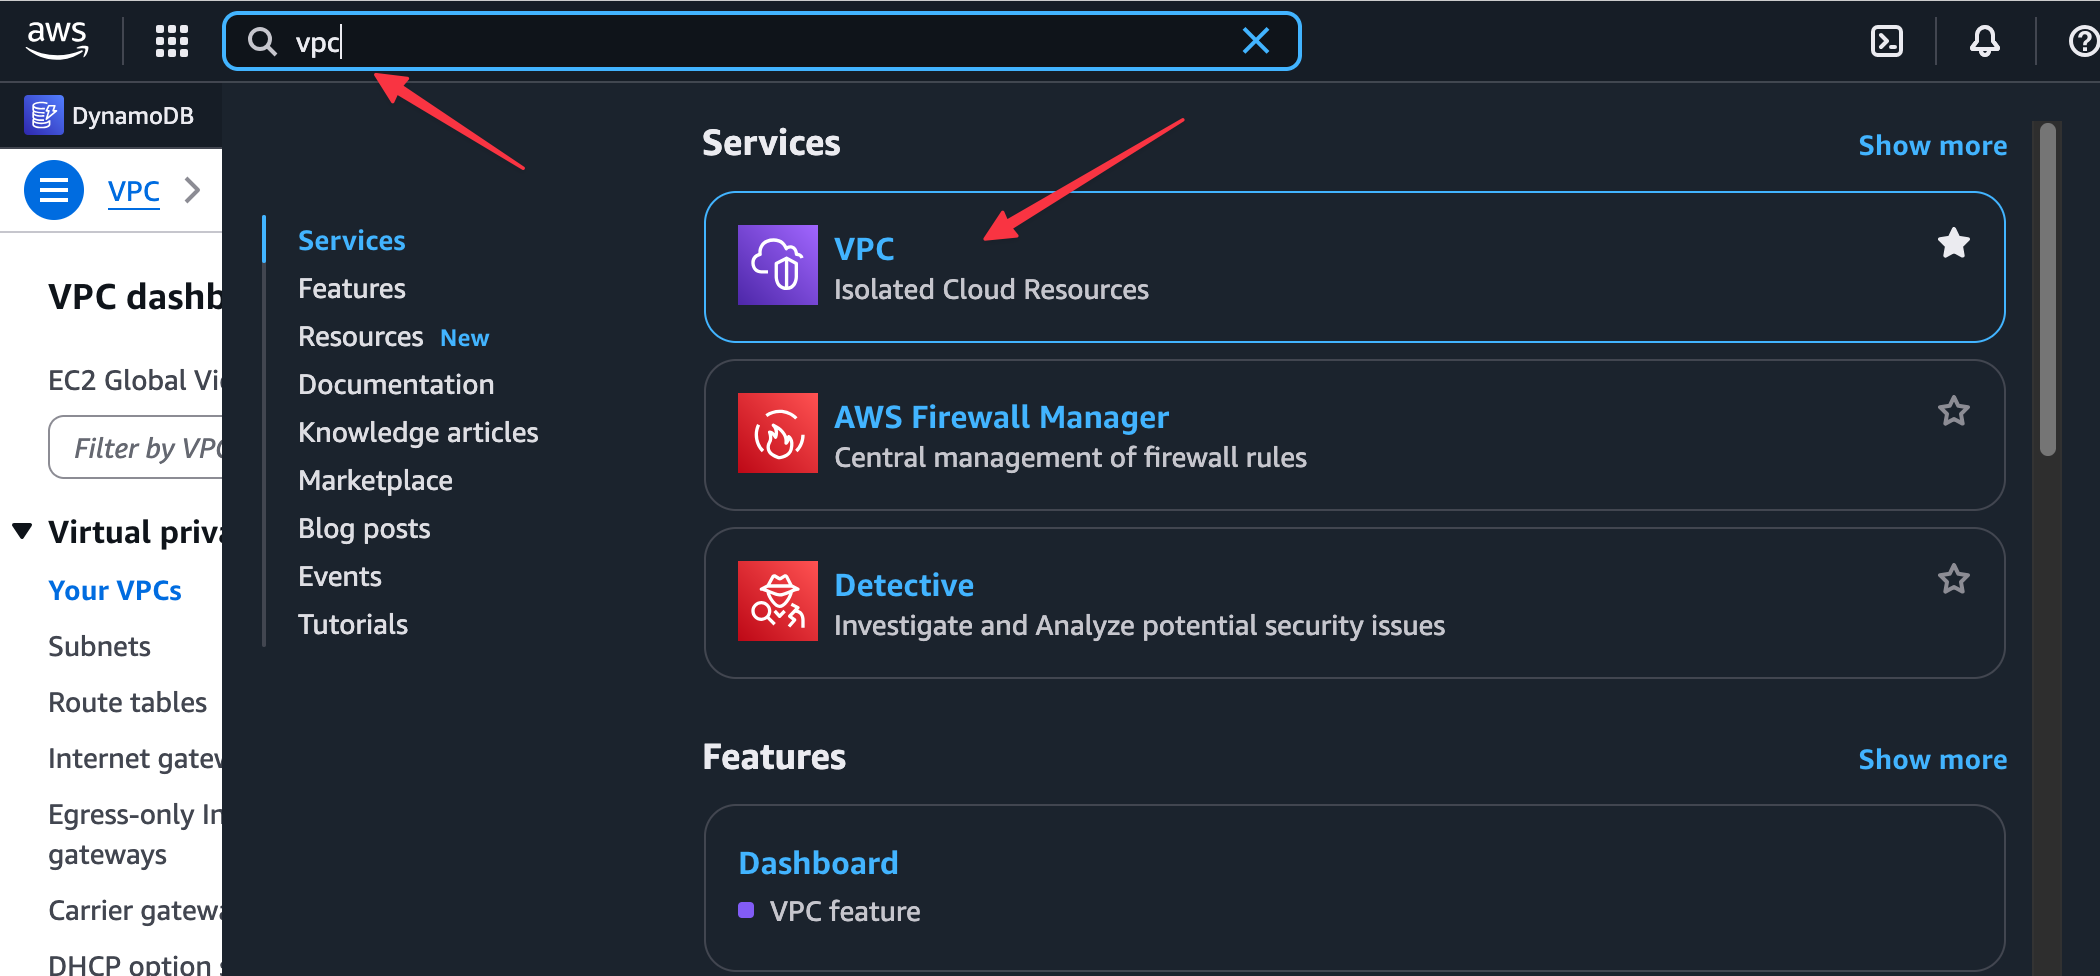
Once you are in your chosen Region, you'll see that AWS offers hundreds of different services. VPC is one of them. In the main search bar, search for VPC to navigate to the VPC service console.
From there, you can create a new VPC. For our lab, go ahead and create a VPC, give it the name lab-vpc, and assign it the CIDR block 10.200.0.0/16.

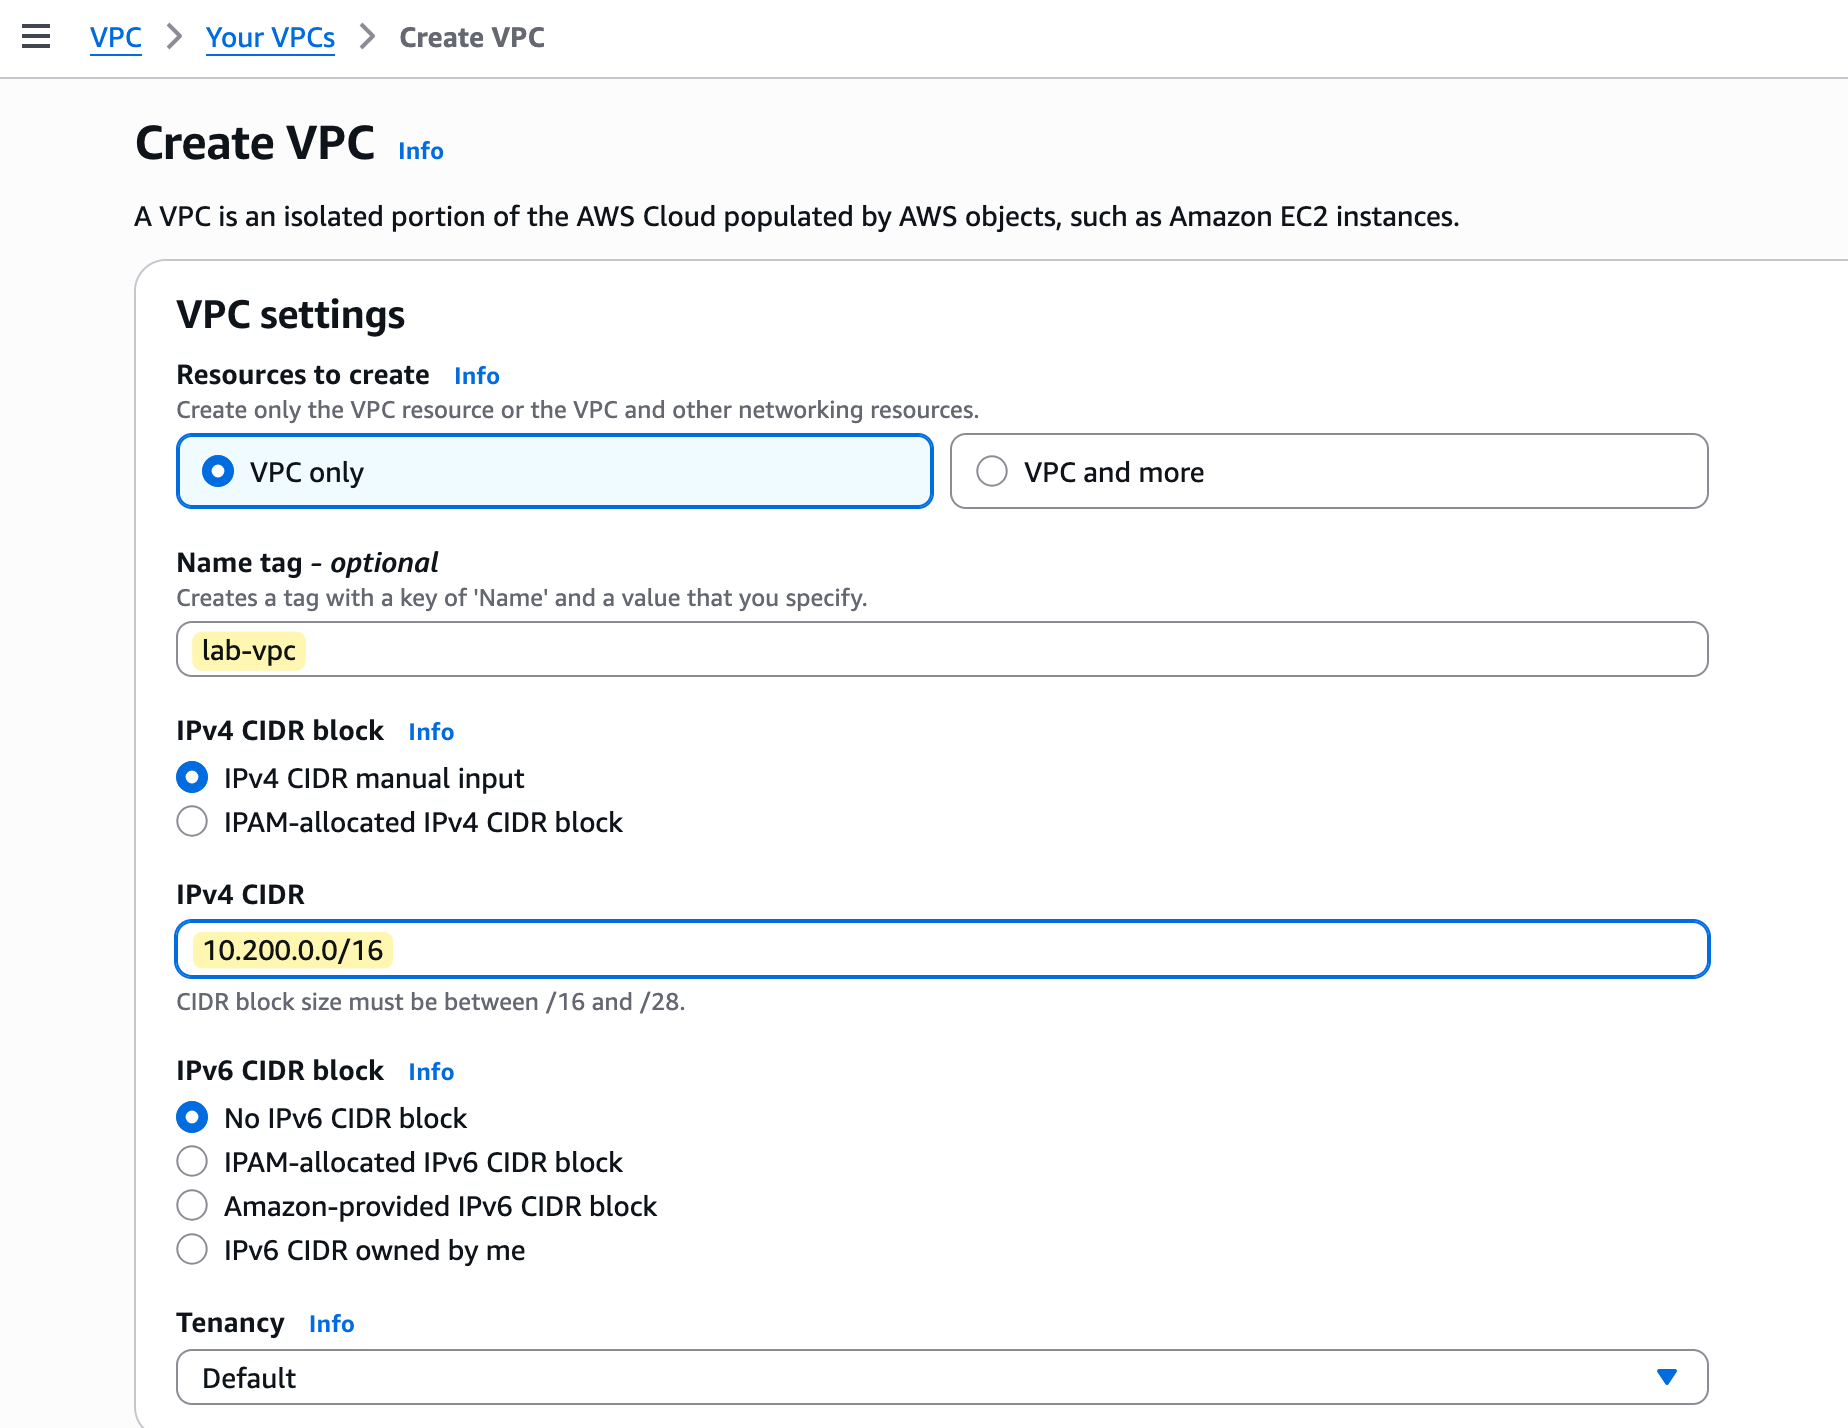
So, we have now created our lab-vpc. This is our private network, which exists only in our chosen region and is available across all of its availability zones. When we eventually launch resources into subnets inside this VPC, they will get a private IP address from the 10.200.0.0/16 range that we assigned.
A /16 CIDR block provides over 65,000 IP addresses. You don't have to assign such a large range if you only plan to run a few services. It's good practice to plan your IP addressing according to your needs so you don't overuse it.
Creating Subnet
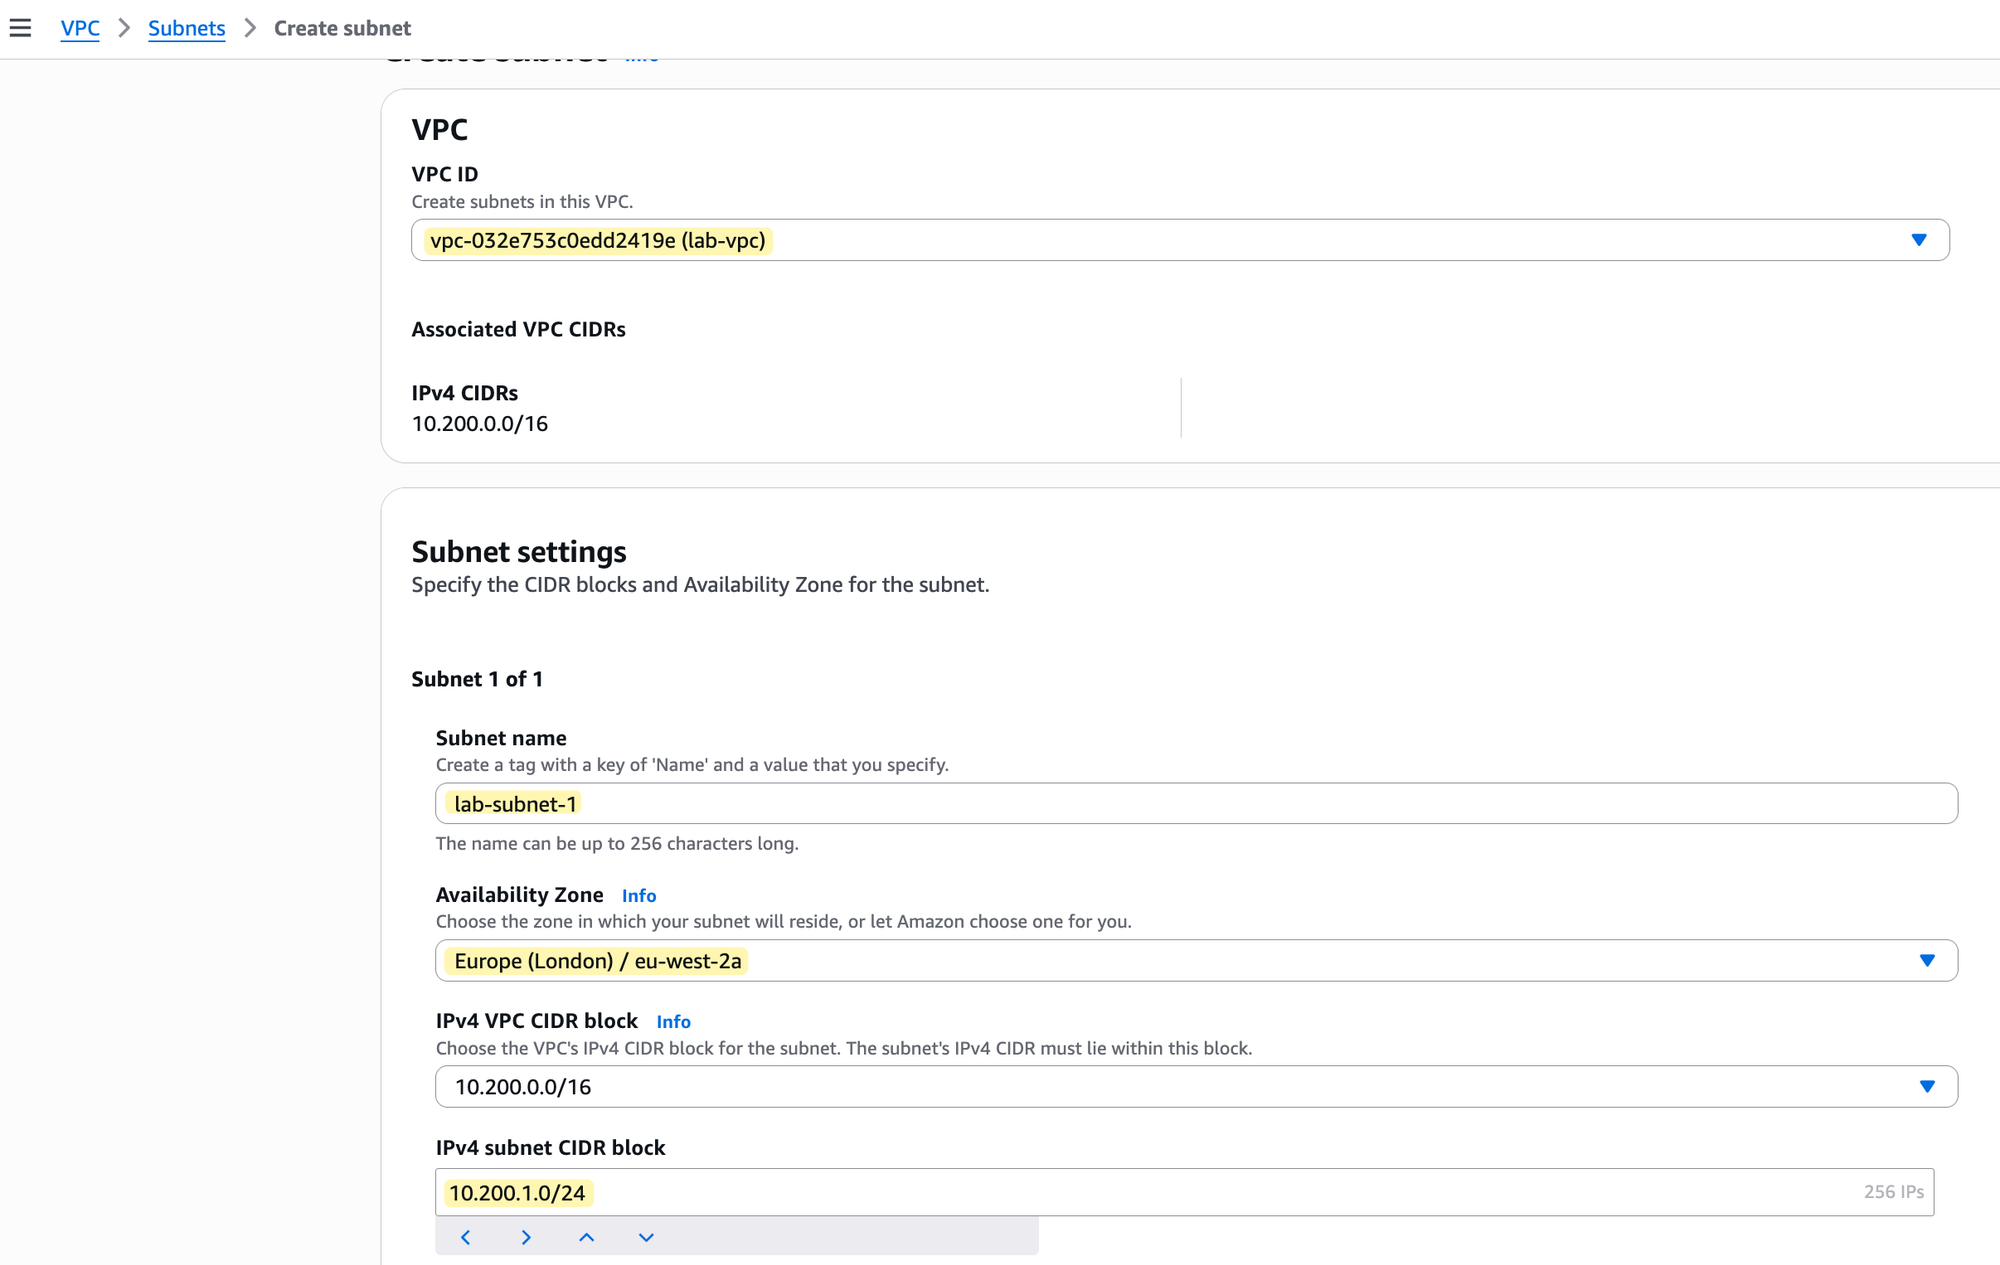
Now that we have our lab-vpc, let's create our first subnet inside it. In the VPC console, navigate to the Subnets section and choose to create a new one. The process is straightforward, but you need to provide a few key pieces of information.
First, you must select the VPC where this subnet will live; in our case, this is the lab-vpc. The console will show you that its CIDR block is 10.200.0.0/16. Next, you need to give your subnet a name, like lab-subnet-1, and choose a specific Availability Zone to place it in, such as eu-west-2a. Finally, you must assign the subnet its own IPv4 CIDR block that is a part of the VPC's larger range. As shown in the image, we will use 10.200.1.0/24 for this subnet.
Route Table
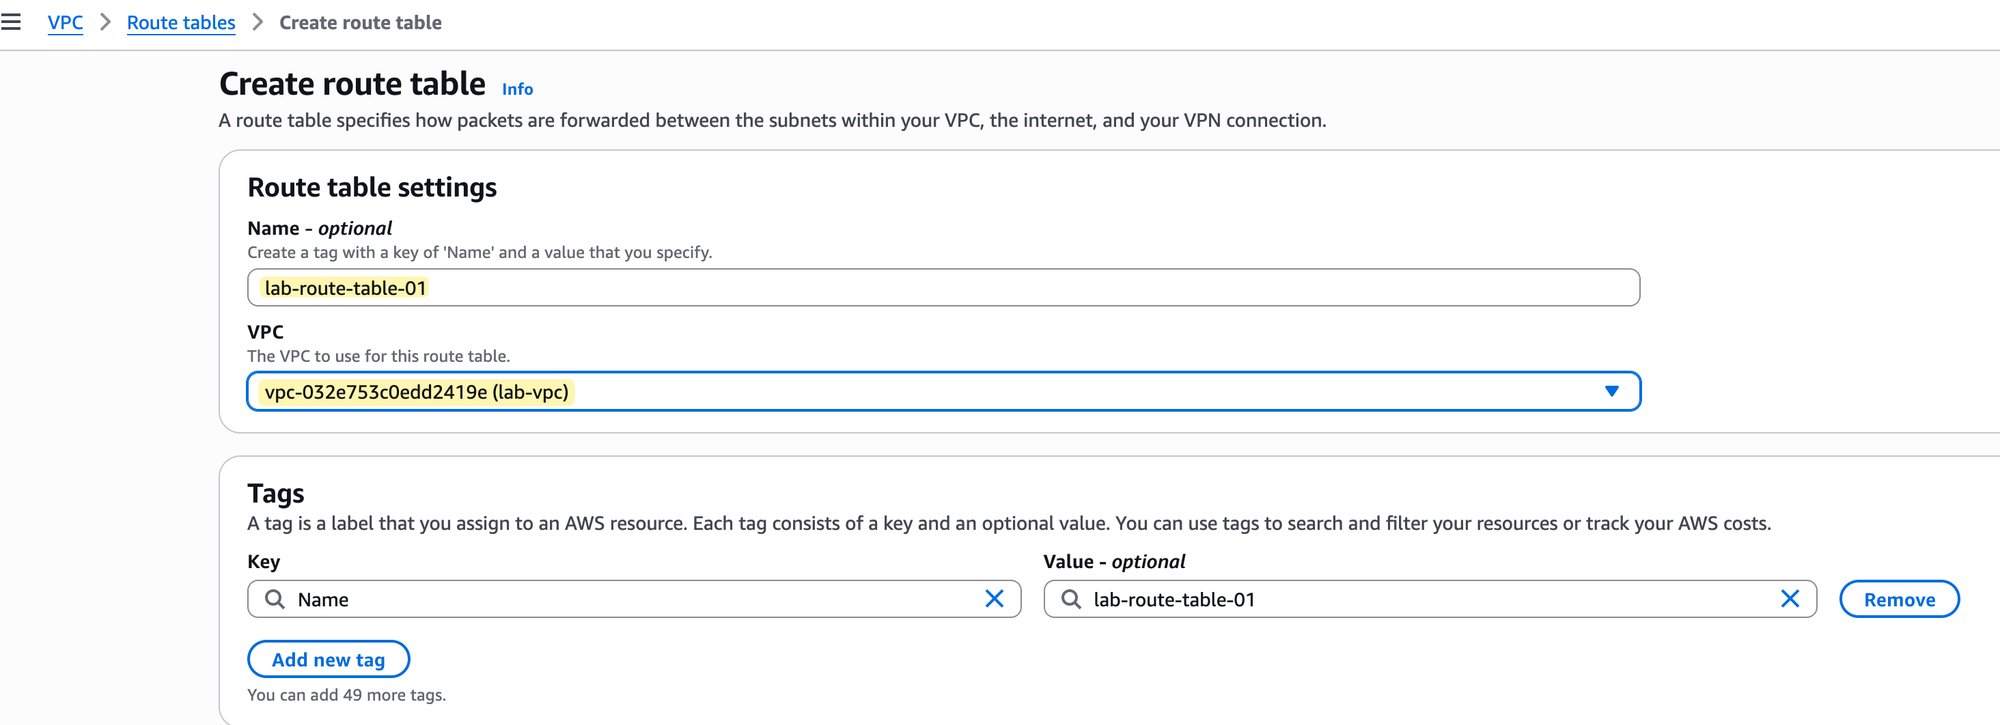
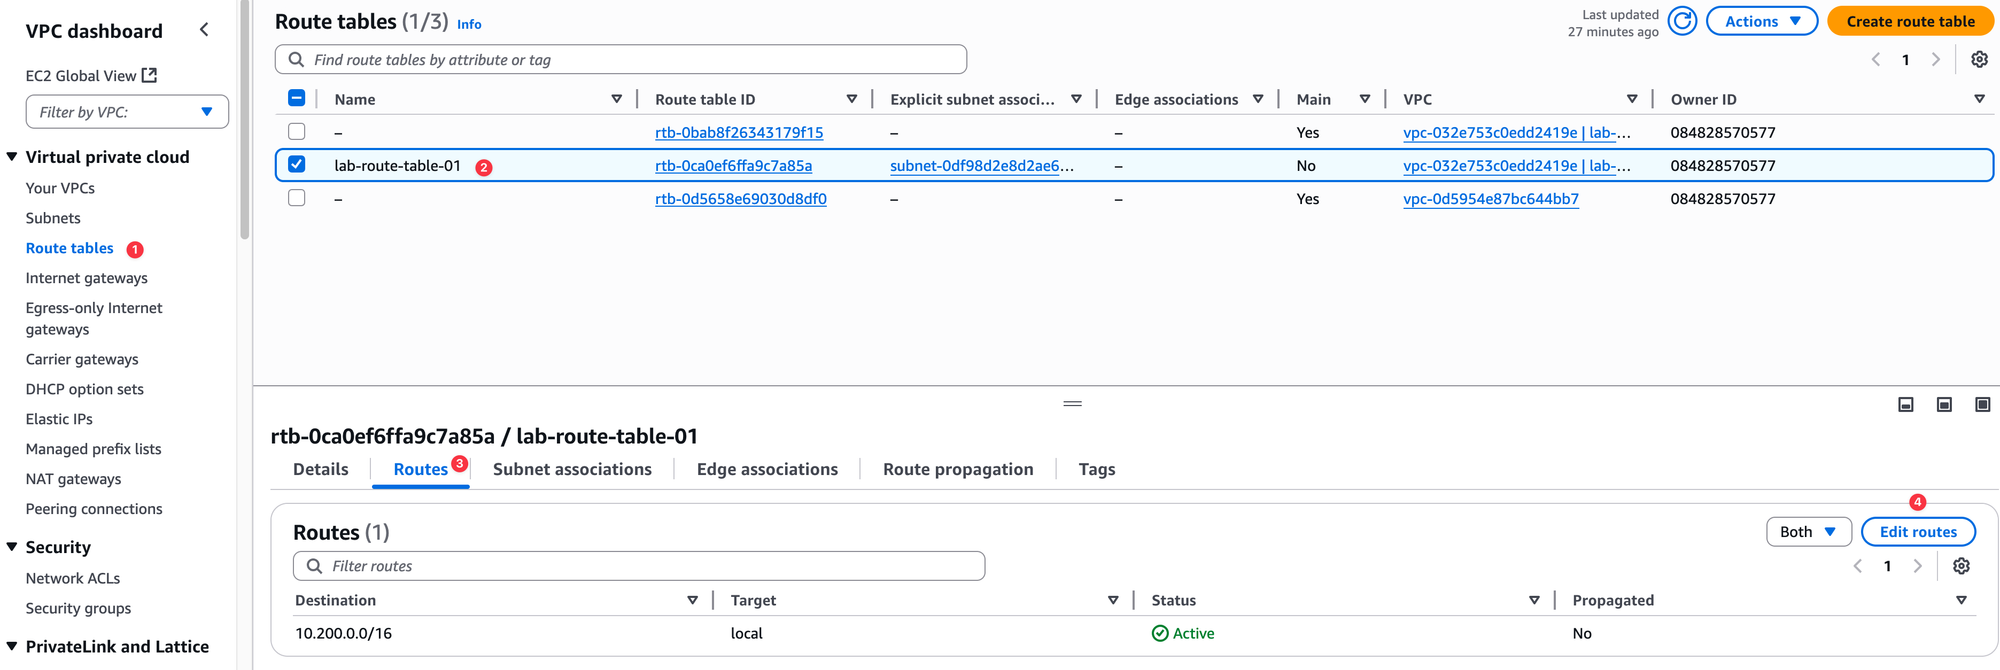
With our subnet created, the next component is a custom route table that will control its traffic.
Go to the Route Tables section of the VPC console and choose to create a new one. As shown in the image, you just need to provide a name, such as lab-route-table-01, and select the VPC it belongs to, which is our lab-vpc.
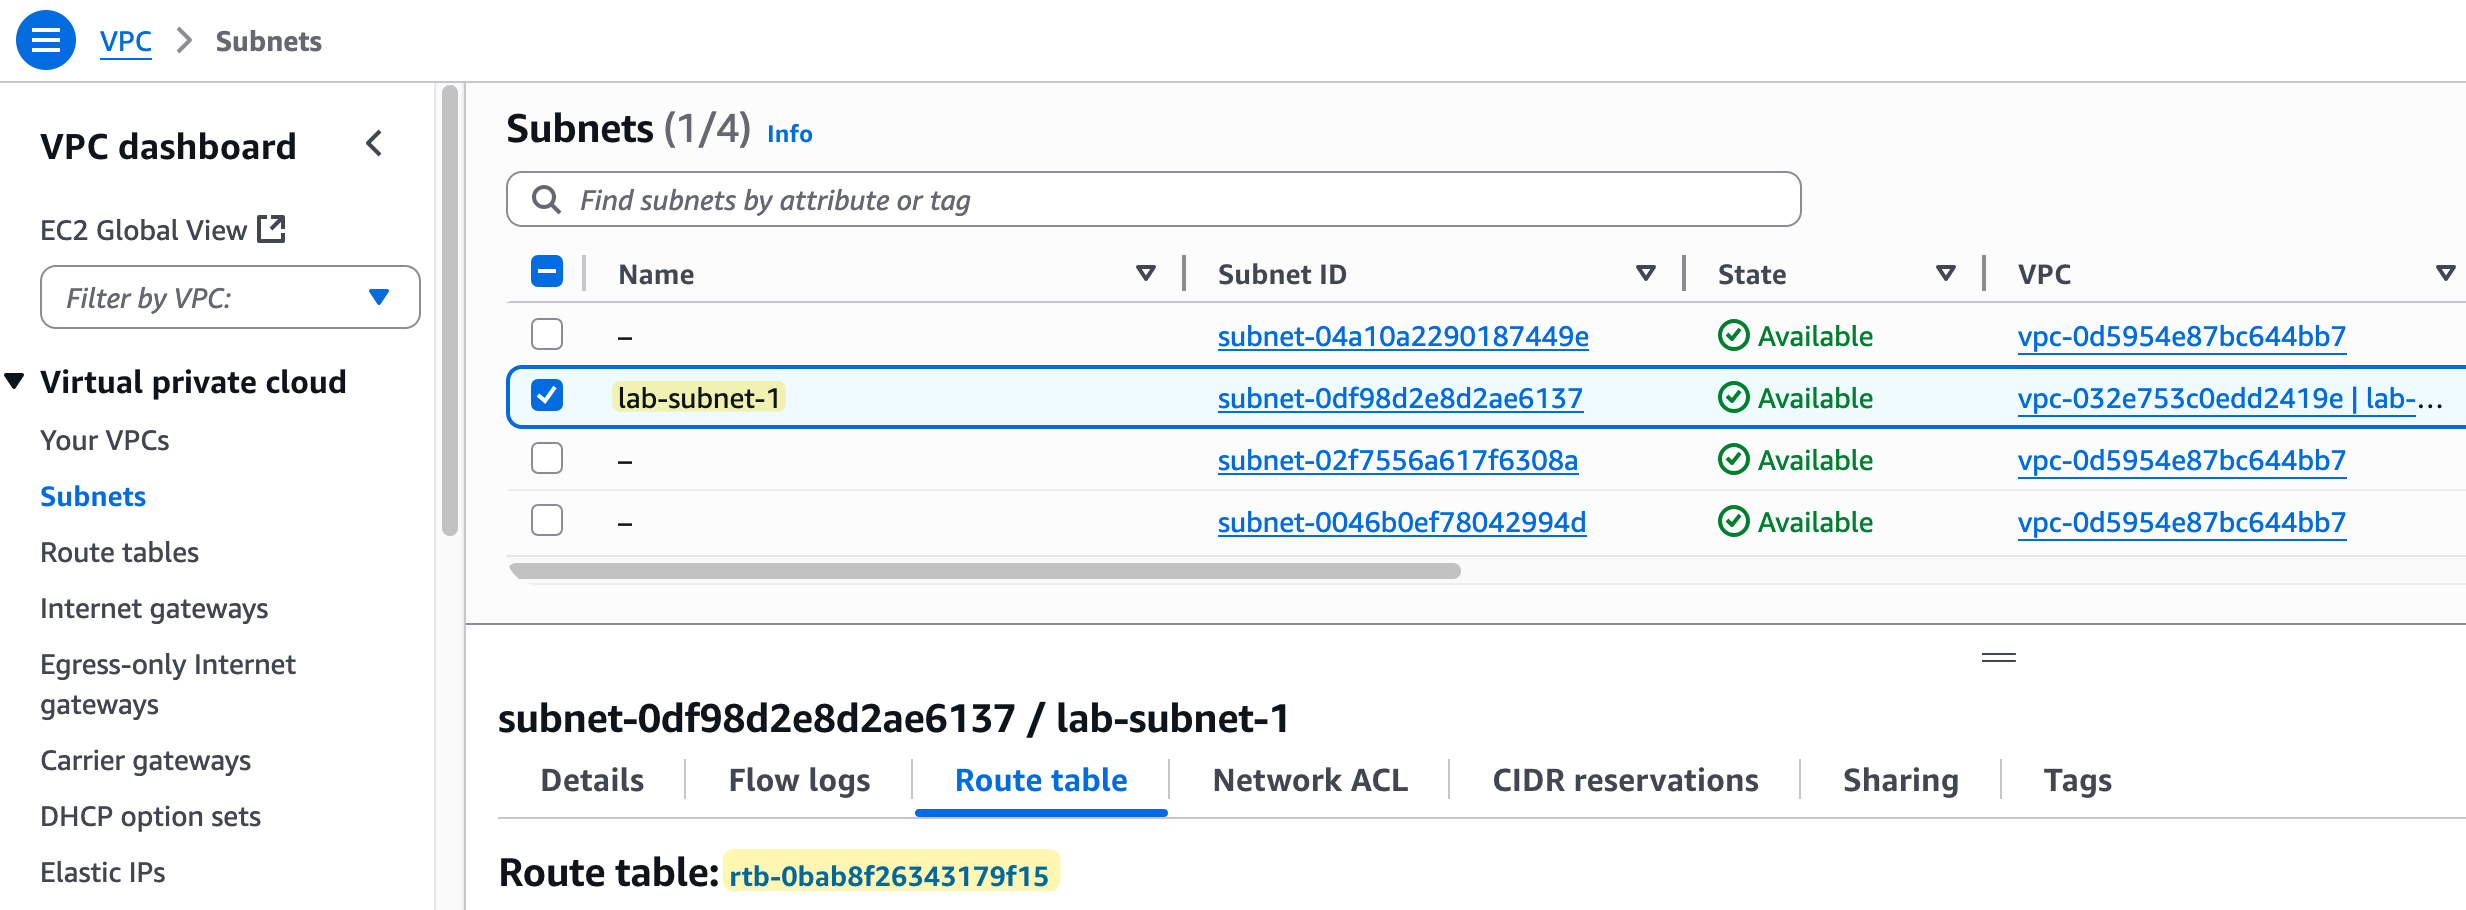
Before we proceed, it's important to understand the main route table. When you create a VPC, AWS automatically creates a route table and designates it as the 'main' one. Any subnet you create will be automatically associated with this main route table if you don't assign a different one.

This means that right now, our lab-subnet-1 is associated with the main route table of our lab-vpc.
It is best practice to leave the main route table in its default state and create custom route tables for your subnets. This gives you more granular control over routing, which is why we created lab-route-table-01.
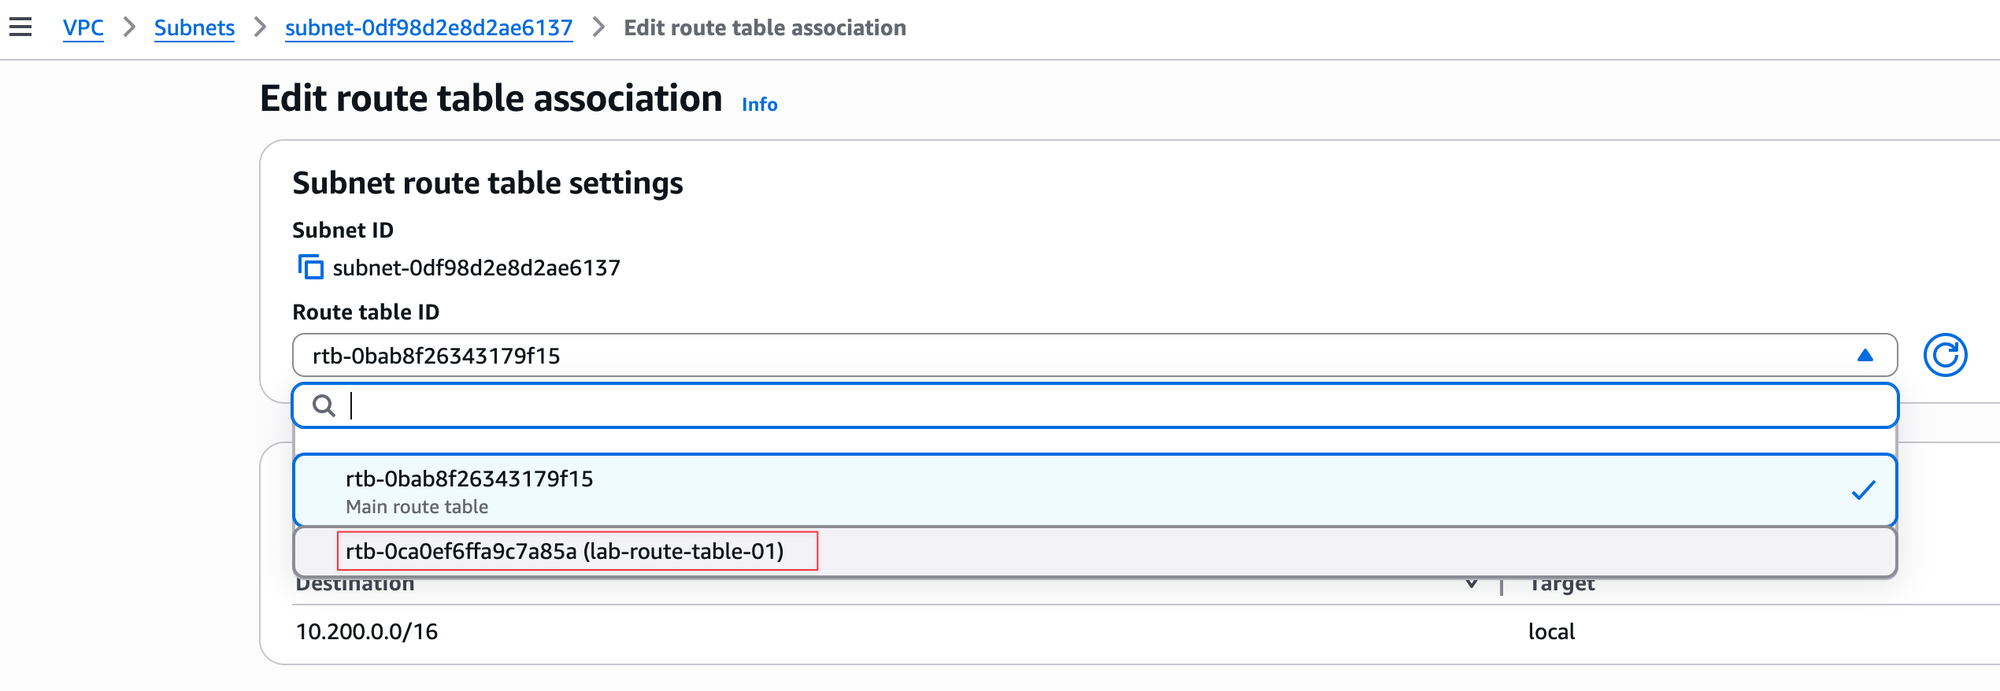
The next step is to associate our custom route table (lab-route-table-01) with our subnet (lab-subnet-1). By default, the subnet is using the main route table, so we need to change that. You can do this by editing the subnet's route table association and selecting the custom route table we created, as shown in the image. Once you save this change, lab-subnet-1 will use the rules in lab-route-table-01 to direct its traffic.
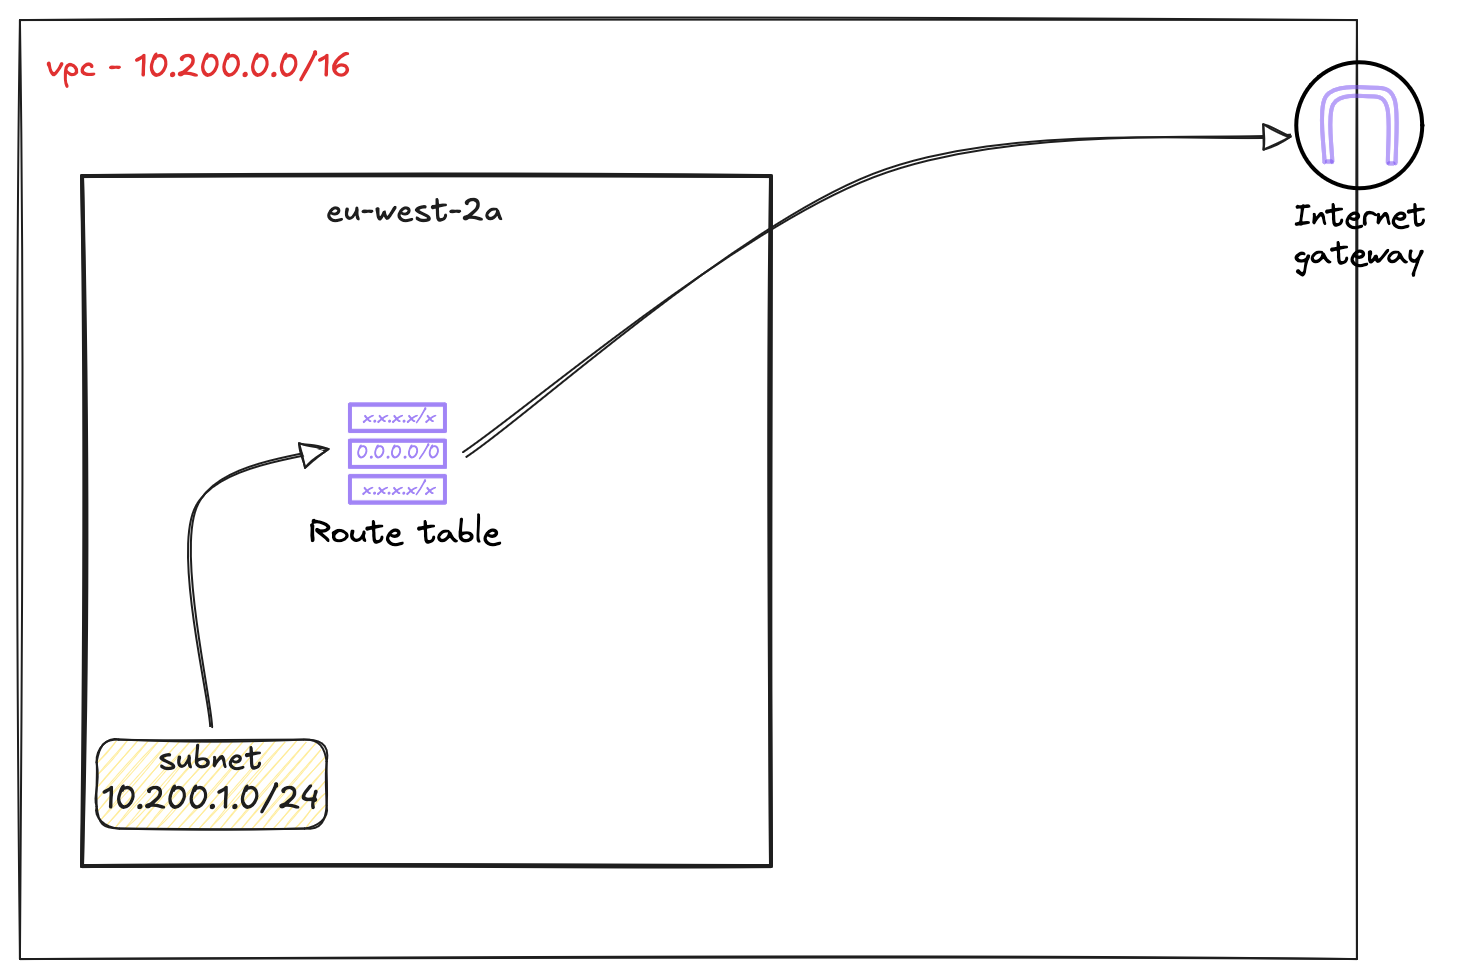
Now, let's look at the route table itself. You will notice it already contains one route. This is the local route.
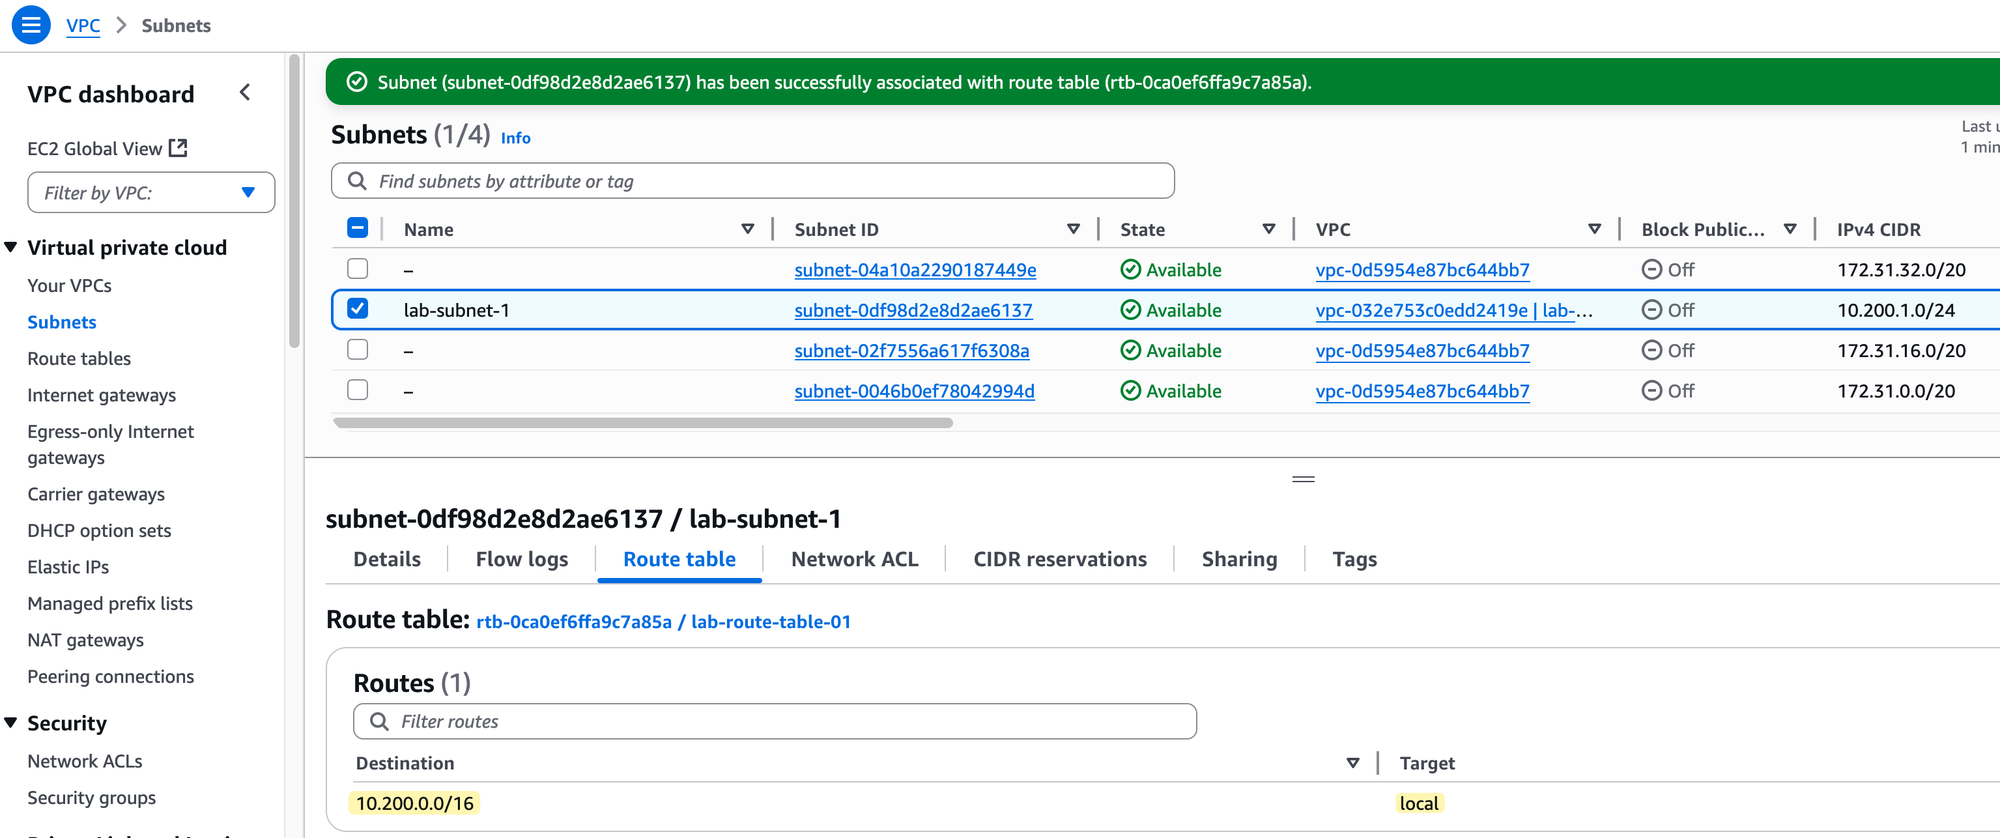
It shows the VPC's CIDR block (10.200.0.0/16) as the destination and has local as the target. This route is automatically added by AWS to every route table in a VPC and it cannot be deleted. Its purpose is to allow all resources within the VPC to communicate with each other using their private IP addresses.
This is another area where AWS networking differs significantly from traditional on‑prem environments. In an on‑prem setup, you might not expect different subnets to communicate with each other by default, routing between them usually requires explicit configuration or firewall rules. But in AWS, all subnets within the same VPC, even if they span across multiple Availability Zones, have IP reachability by default.
You don’t need to do anything to enable communication between subnets in the same VPC. The local route in the route table (automatically added by AWS) manages this for you. Additional entries in the route table are only needed when you want to reach resources outside of the VPC, such as the Internet, another VPC, or an on‑prem network.
Quick Recap
Let's have a quick recap. So far, we have created a VPC, a subnet inside it, and a custom route table. We then associated our subnet with this route table.
The purpose of this is to control traffic flow. If we place a server inside this subnet, any traffic leaving that server will hit the associated route table. The route table then makes a decision on where that traffic should go based on the routes configured within it. This function is very similar to how a route table works on traditional on-premises networking devices.
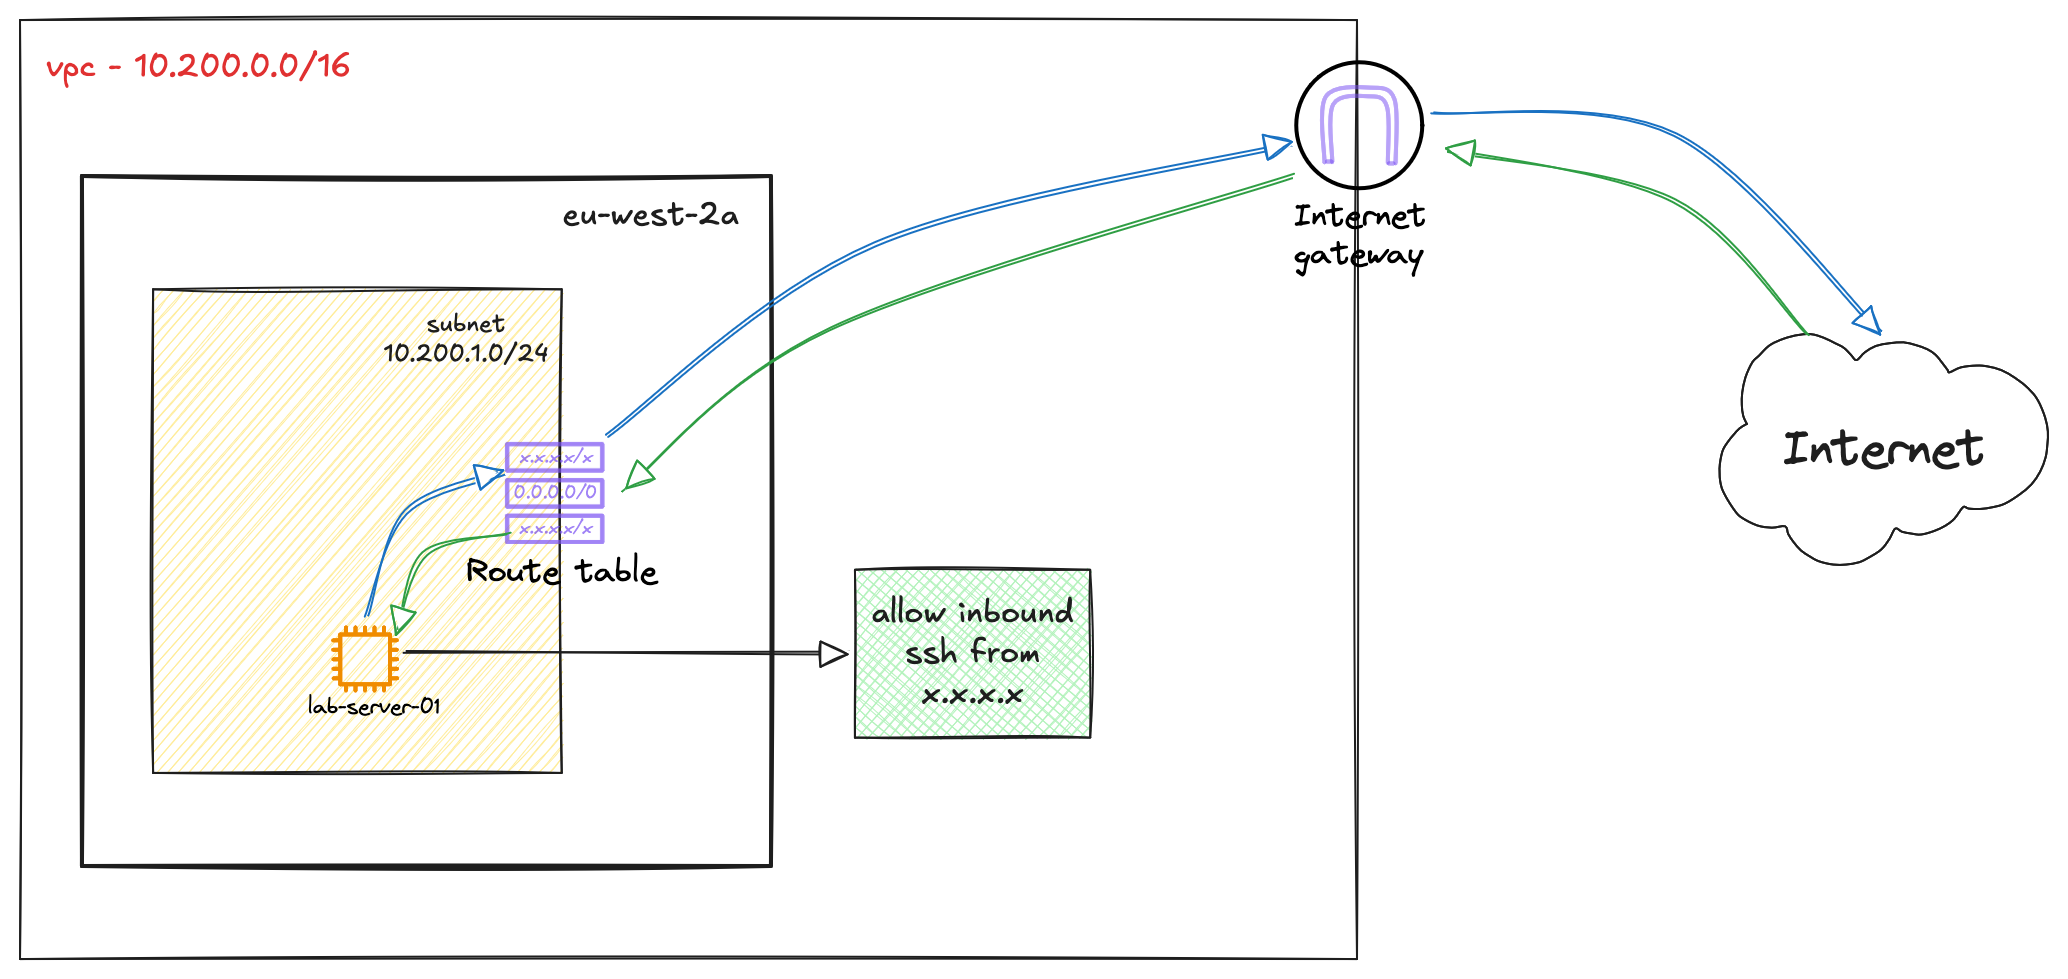
AWS Internet Gateway (IGW)
An Internet Gateway (IGW) is a VPC component that allows communication between resources in your VPC and the Internet. It is horizontally scaled, redundant, and highly available. Think of it as the ISP router for your private network to access the public Internet. Without an IGW, your VPC is isolated from the outside world. If you need a server inside your VPC to be reachable from the Internet or to be able to download updates, you need an IGW.
To set this up, we will first create an Internet Gateway and give it a name, for example, lab-internet-gateway. Creating the IGW is not enough; by itself, it is not associated with any network.
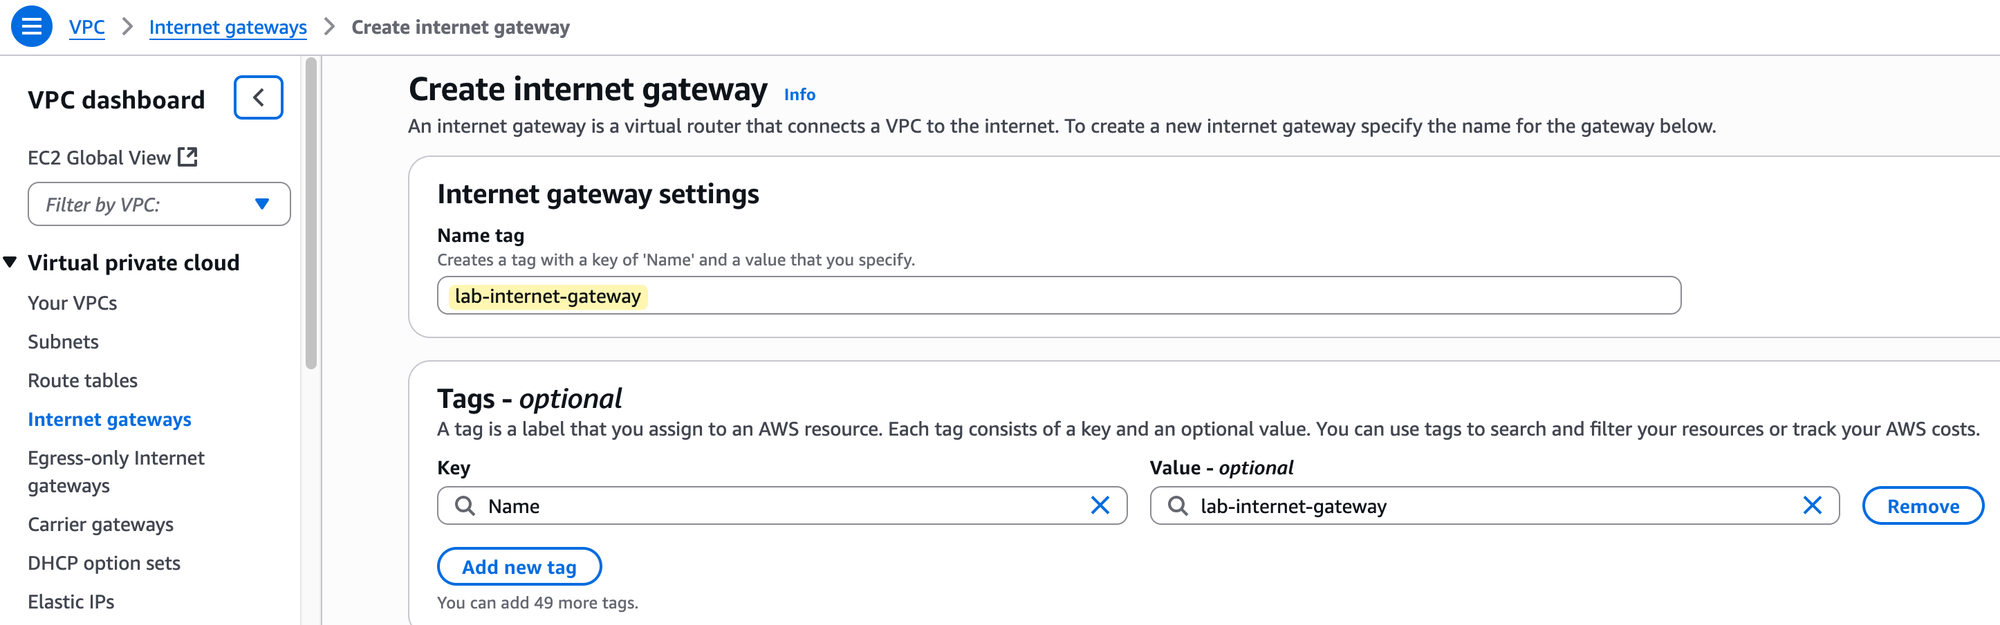
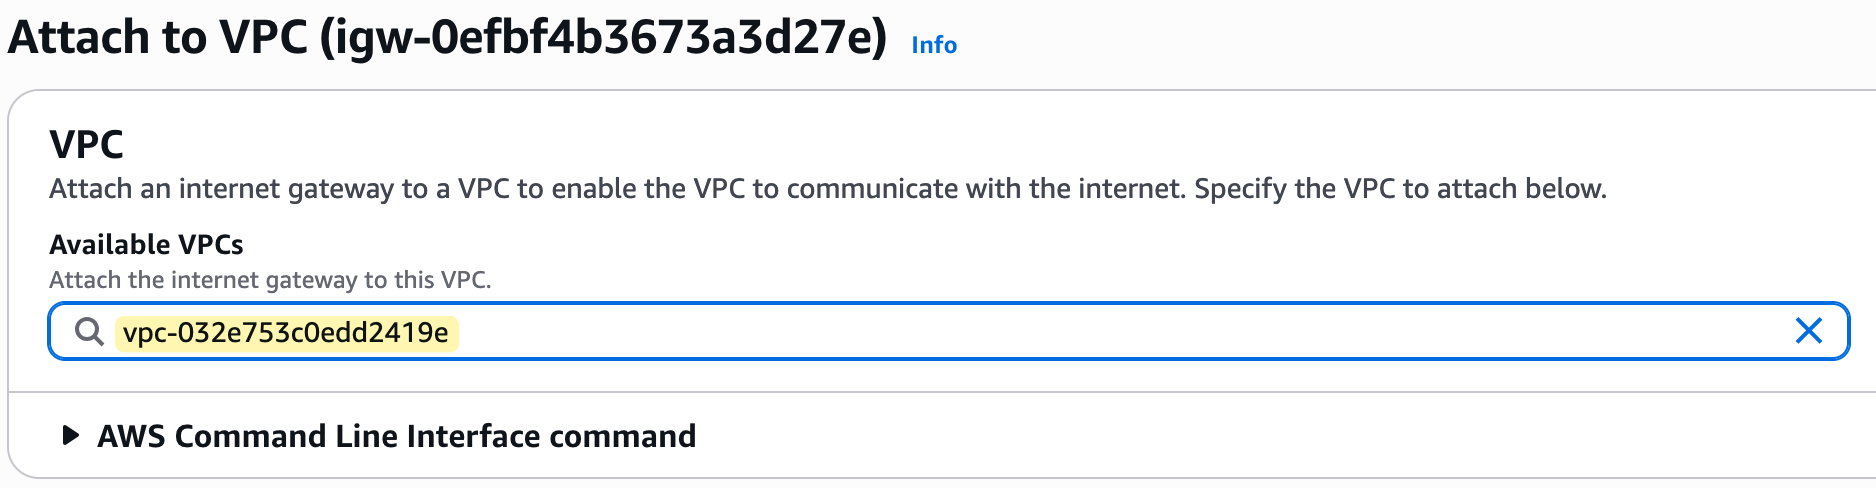
After creation, you must perform a second step, which is to explicitly attach it to your VPC. In our case, we will attach it to our lab-vpc.

Regarding costs, there is no charge for creating or having an Internet Gateway attached to your VPC. However, standard AWS data transfer charges apply for all data that passes through the IGW into and out of your VPC.
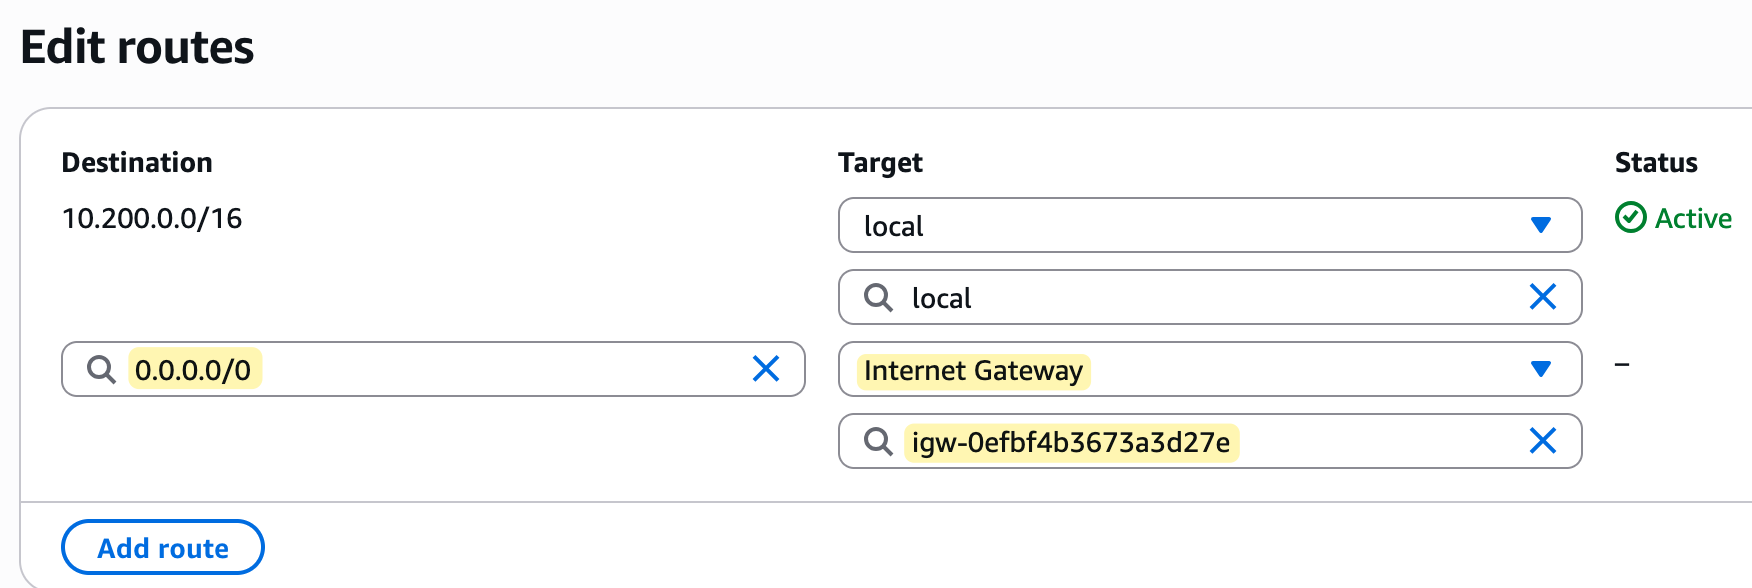
Now that we have created an Internet Gateway and attached it to our lab-vpc, is that enough for a server in our subnet to reach the internet? Think about it for a moment. Remember what we said about the route table? It has a local route by default, but did you see a default route for the Internet? No.
At the moment, our route table, lab-route-table-01, has no idea on where to send internet-bound traffic. Attaching the IGW to the VPC makes Internet access possible, but the subnet's route table must be told how to use it.
So, the final step is to go to our custom route table, edit its routes, and add a new route. As shown in the image, we will add a route with the destination 0.0.0.0/0, which means all traffic not destined for the local VPC.
For the target, we will select the Internet Gateway we created. This tells the route table to send all outbound Internet traffic to the IGW. This is very similar to creating a default route on your on-premise router and setting a next-hop. In this case, the IGW is our next-hop to the Internet.
We are progressing well with our setup. By creating an Internet Gateway and adding a default route to our custom route table, we have now laid the complete foundation for our network.
I hope you can start to see some of the benefits of the cloud here. If this were an on-premise deployment, we would have to think about all sorts of things like physical switches, routers, cabling, having redundant ISP connections, and redundant routers for failover. In AWS, this is much simpler.
Take the Internet Gateway as an example. It is an inherently redundant and highly available construct, so you don't need to worry about creating two IGWs or thinking about failover. AWS handles all of that for you. So, within just a few minutes, we have created a solid foundation to run our applications.
AWS Key Pair
We are getting closer to the final step of launching a server. Our goal in this post is to launch a Linux server inside our new subnet, connect to it securely using SSH from the Internet, and then run some simple ping tests to verify connectivity.
But before we can do that, there is one last component we need to set up, which is a Key Pair. A key pair is a set of security credentials that you use to prove your identity when connecting to a virtual server in AWS. It consists of two parts.
- A public key that AWS stores and places on your server
- A private key that you store on your own computer.
When you try to connect to your Linux server using SSH, the server uses the public key to verify that you are the holder of the matching private key, granting you access without needing a traditional password.
It is absolutely critical that you manage your private key with care. You must keep it in a safe and private location, just as you would a password. When you create a key pair in the AWS console, you are given only one opportunity to download and save your private key. AWS does not keep a copy of it, so if you lose your private key, you will permanently lose the ability to connect to any server that was launched using it. You cannot recover a lost private key.
To create our key pair, we need to navigate to a different part of the AWS console. So far, we have been working exclusively within the VPC service. Now, we need to go to the EC2 service. EC2, which stands for Elastic Compute Cloud, is the AWS service you use to create and manage virtual servers.
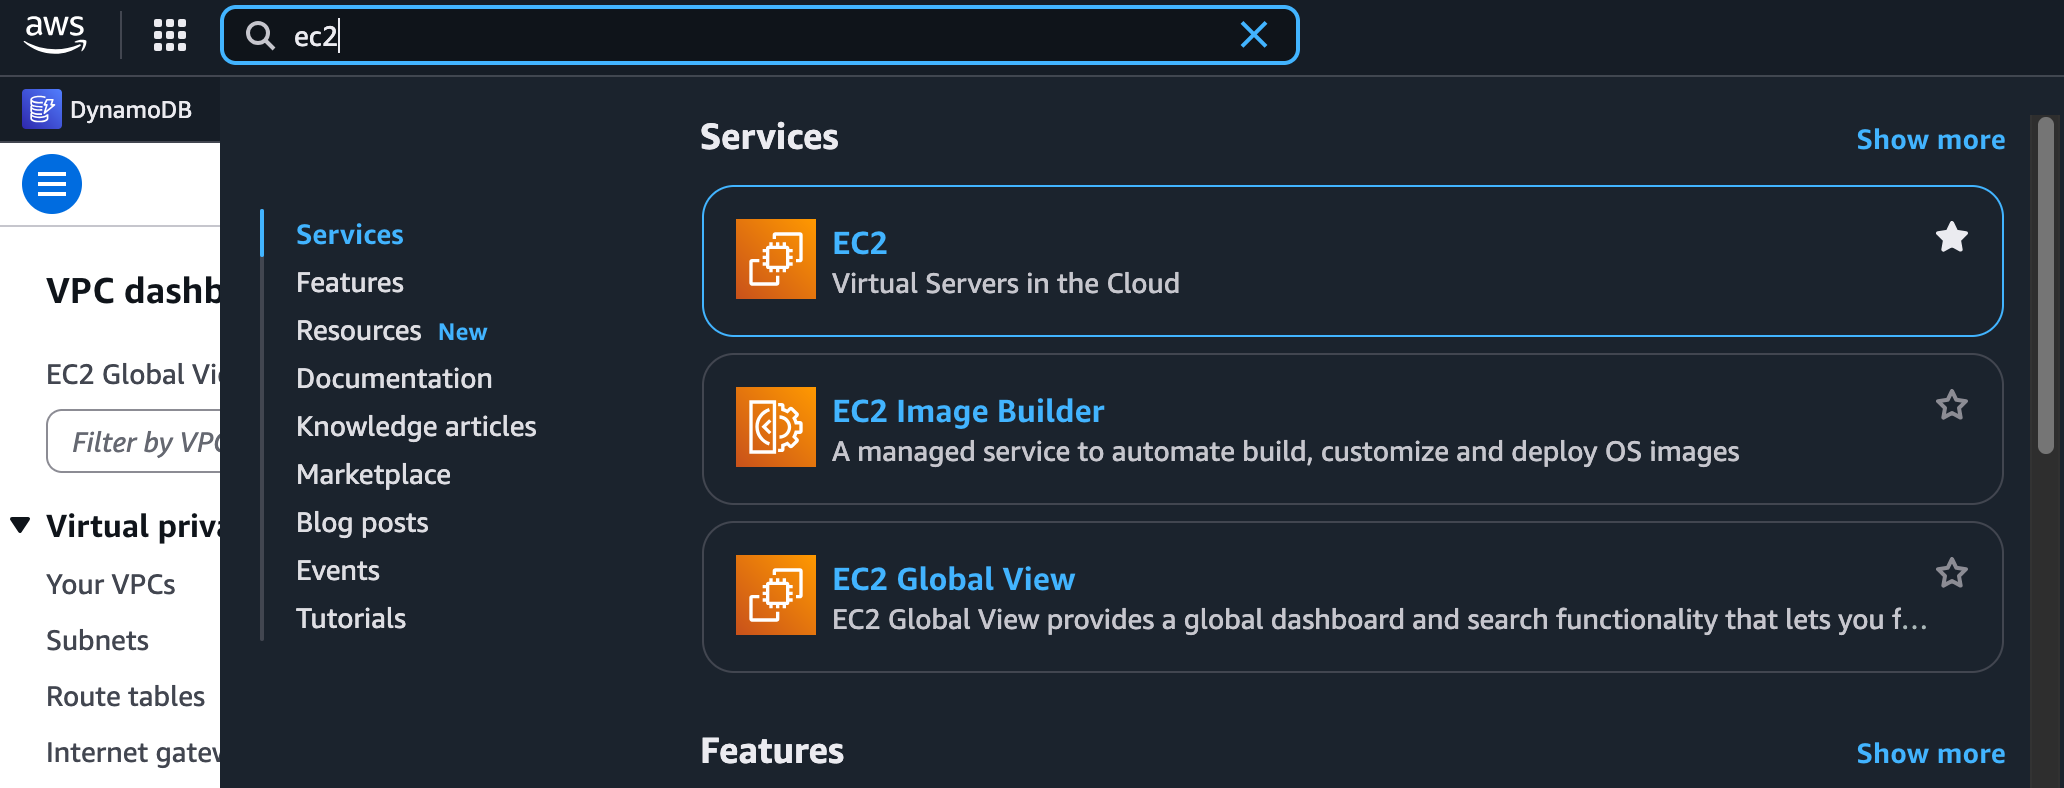
In the top search bar, simply type EC2 and select the service to go to its dashboard. Navigating between different service consoles is a normal part of working in AWS, and you will get used to it quickly as you use the platform more.
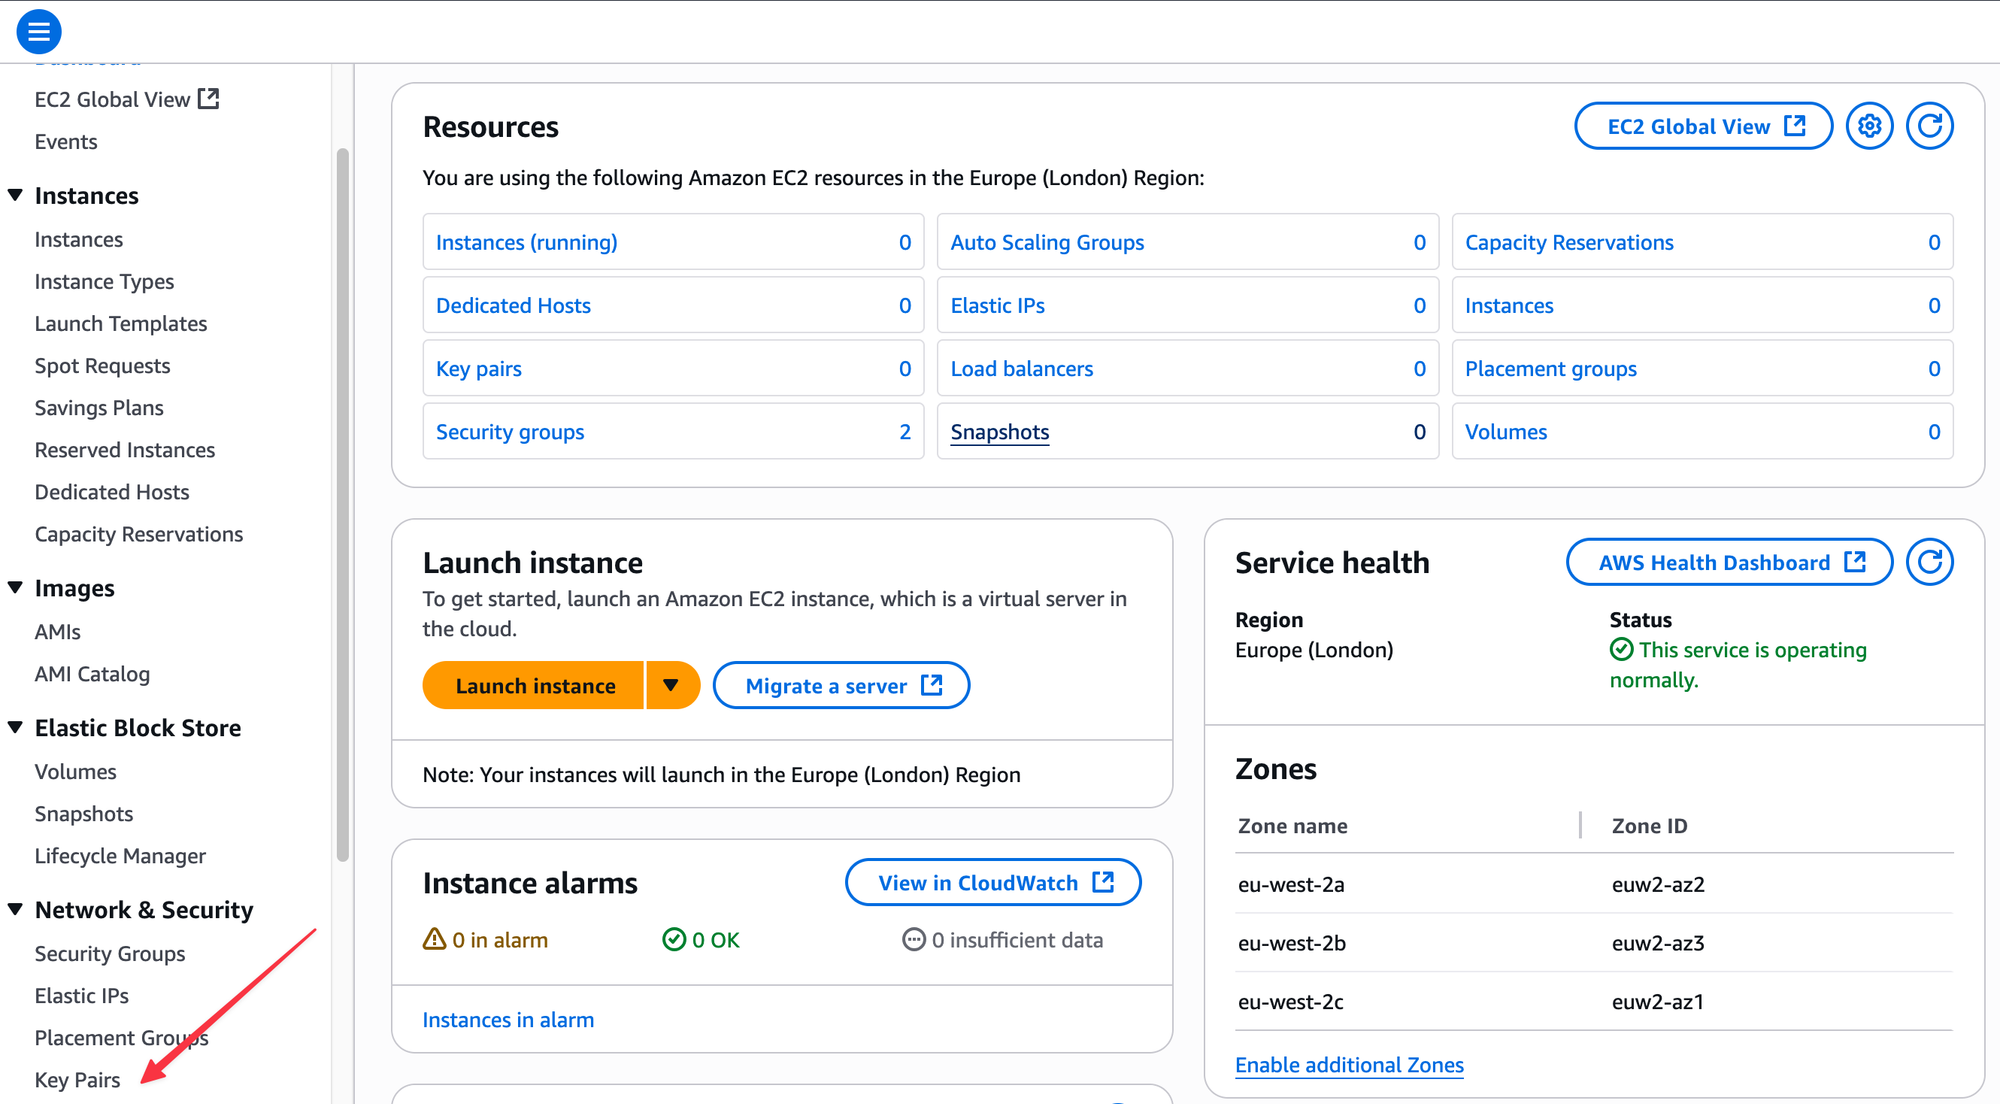
Once you are in the EC2 console, look for Key Pairs in the navigation menu on the left, under the 'Network & Security' section. From there, choose to create a new key pair.
For this example, I am accepting all the default options - RSA for the type and .pem for the file format. I will give it the name lab-key-1.
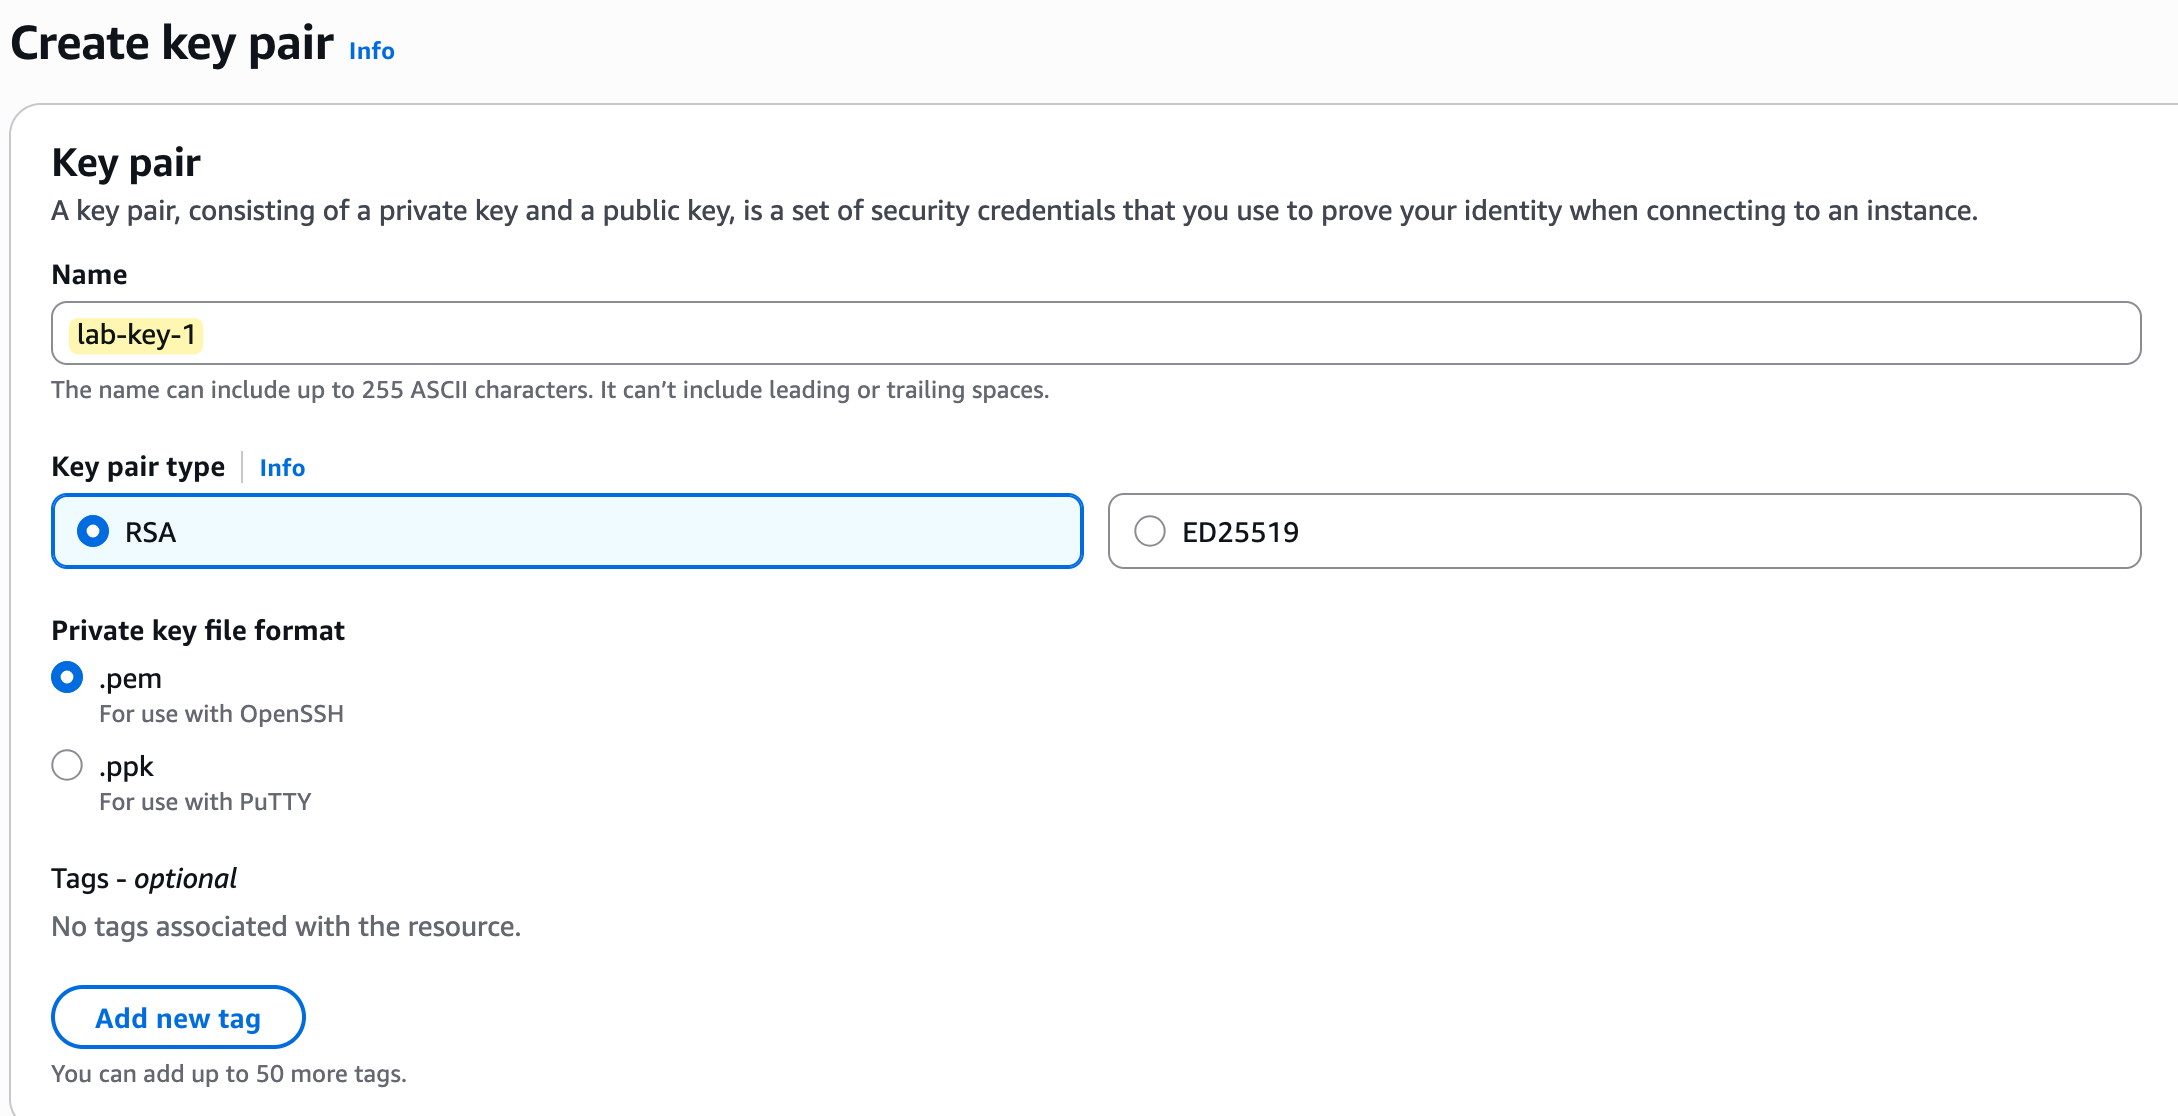
As soon as you click the create button, your browser will automatically download the private key file (lab-key-1.pem). This is the only chance you will have to save this file. Make sure you move it to a secure and permanent folder on your computer where you will not lose it.
Finally, Launching Our EC2 Instance
The time has finally come to launch our server. In the AWS world, a virtual server or Virtual Machine (VM) is called an EC2 instance.
If you are still in the EC2 service console, click on Instances in the left menu, then click the orange Launch instances button. This opens a wizard with several sections that you need to fill out to define your server.
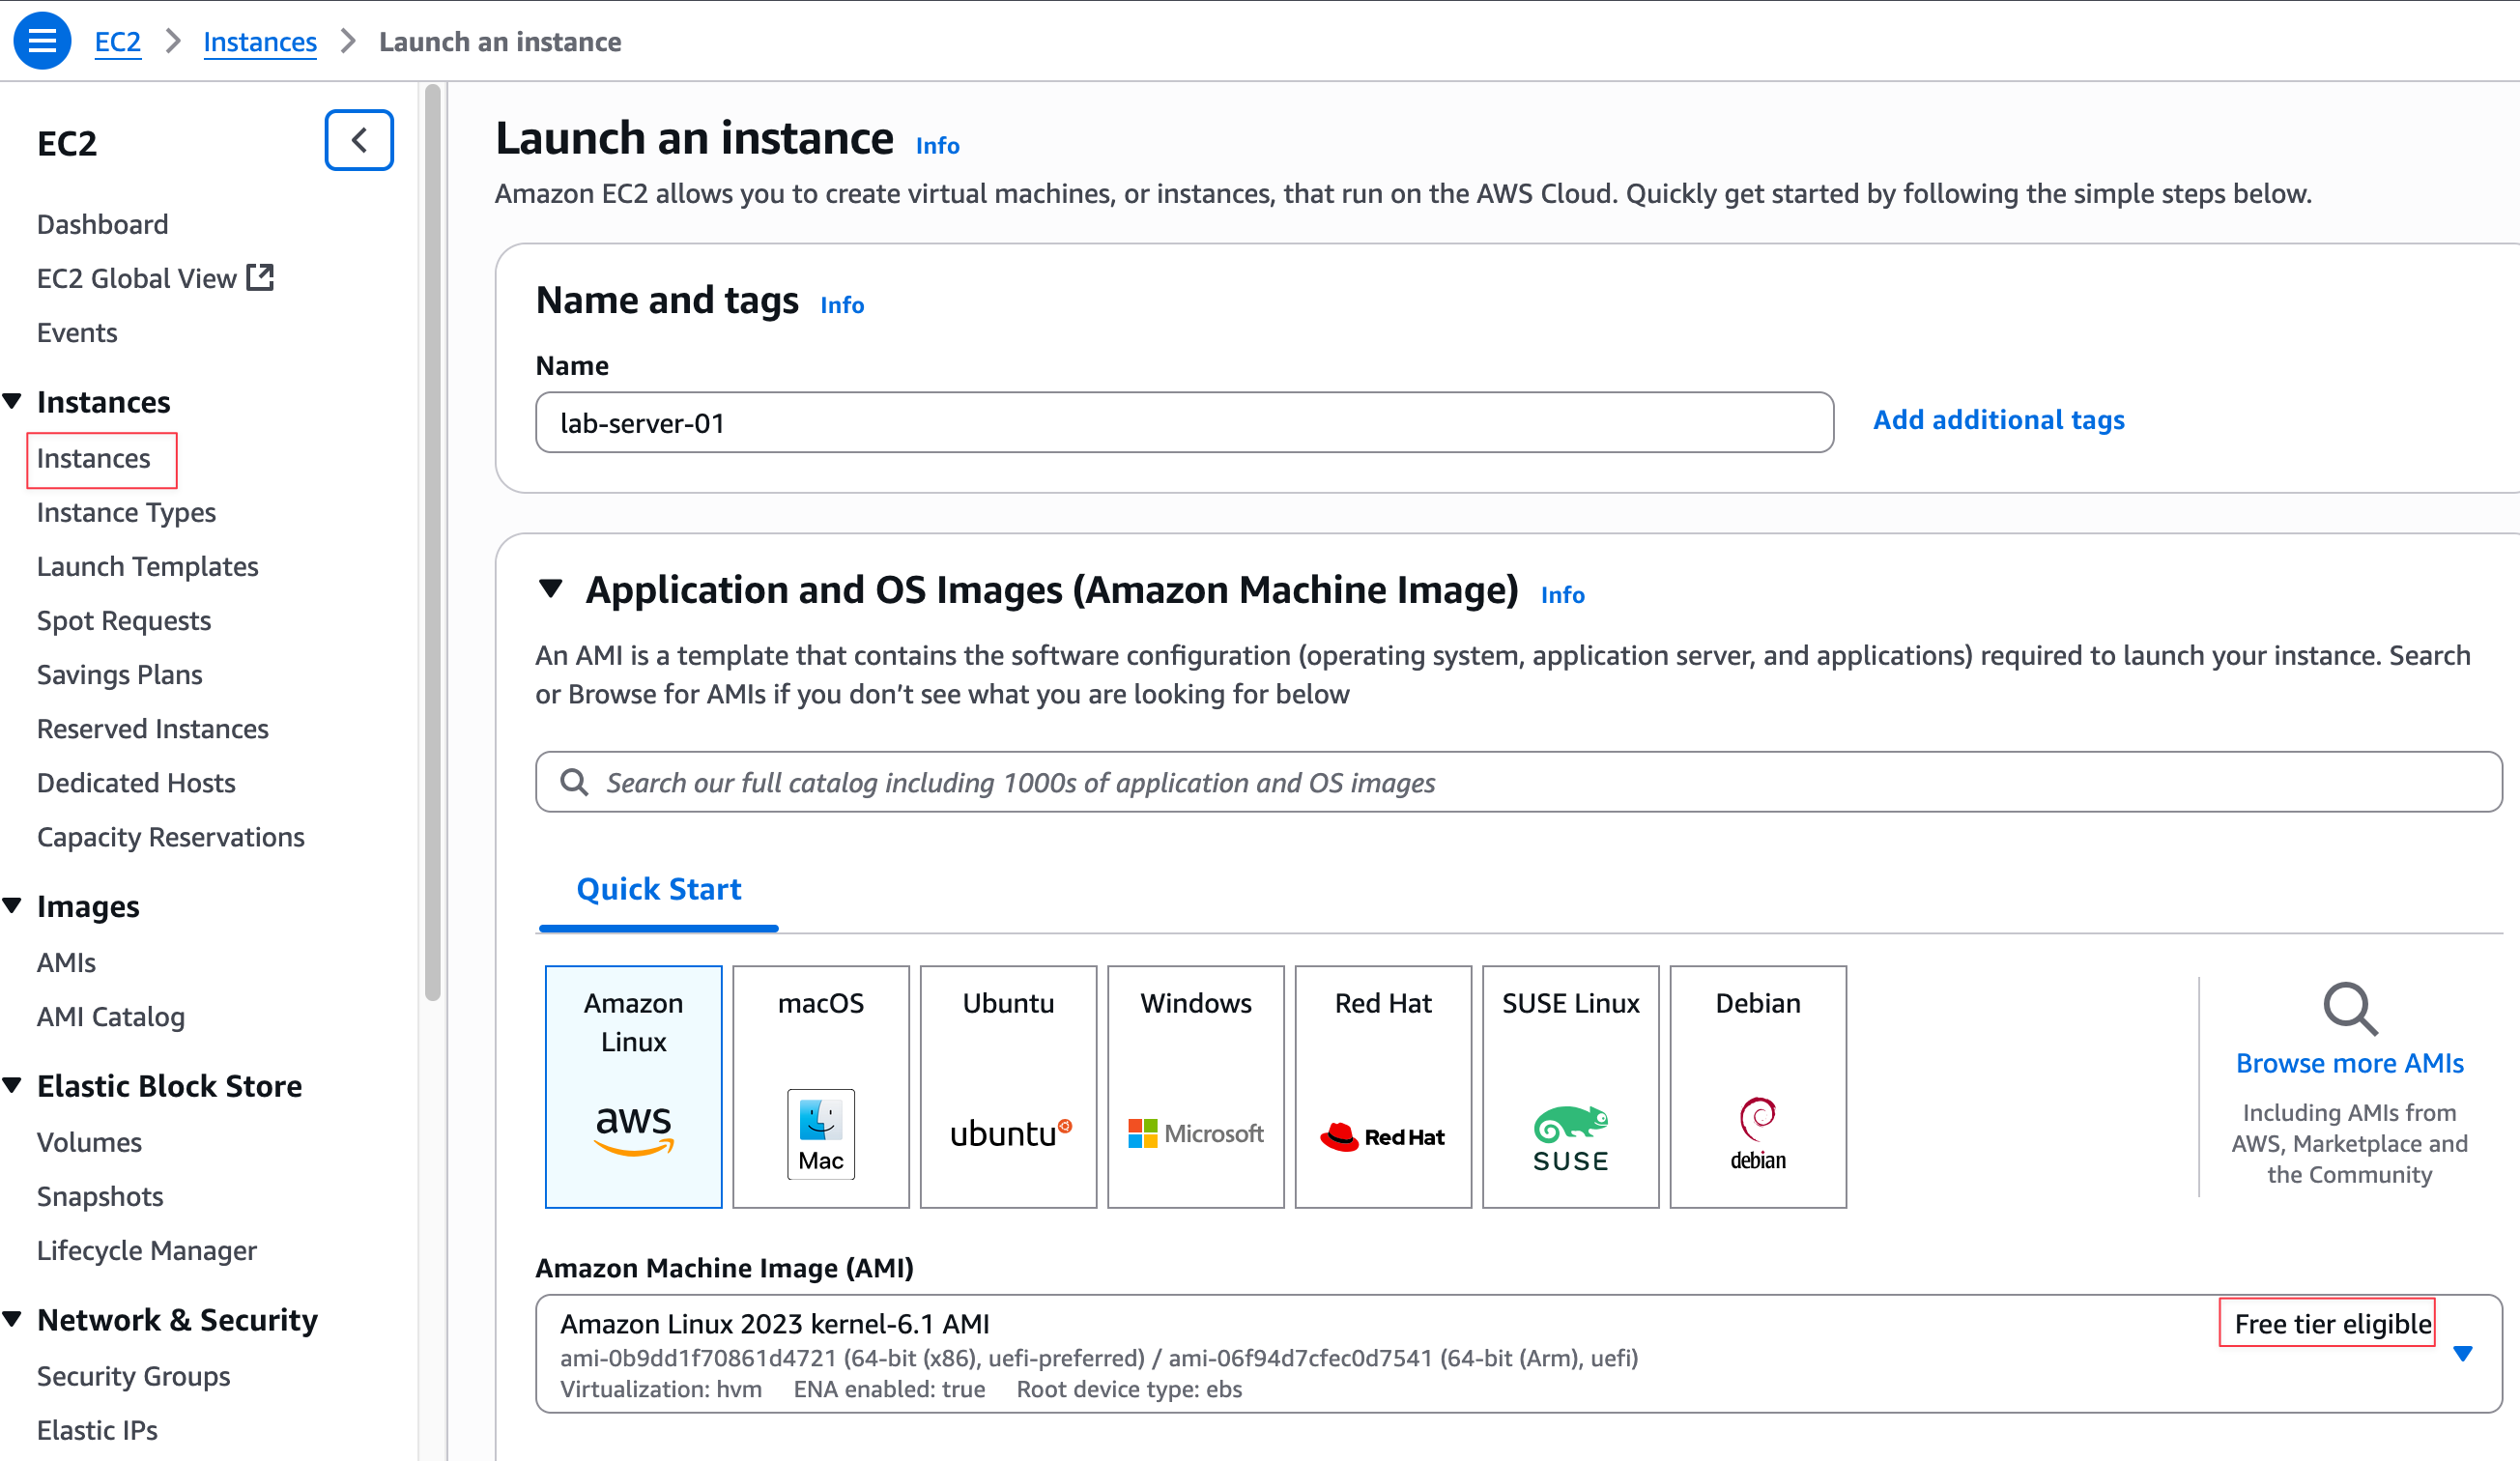
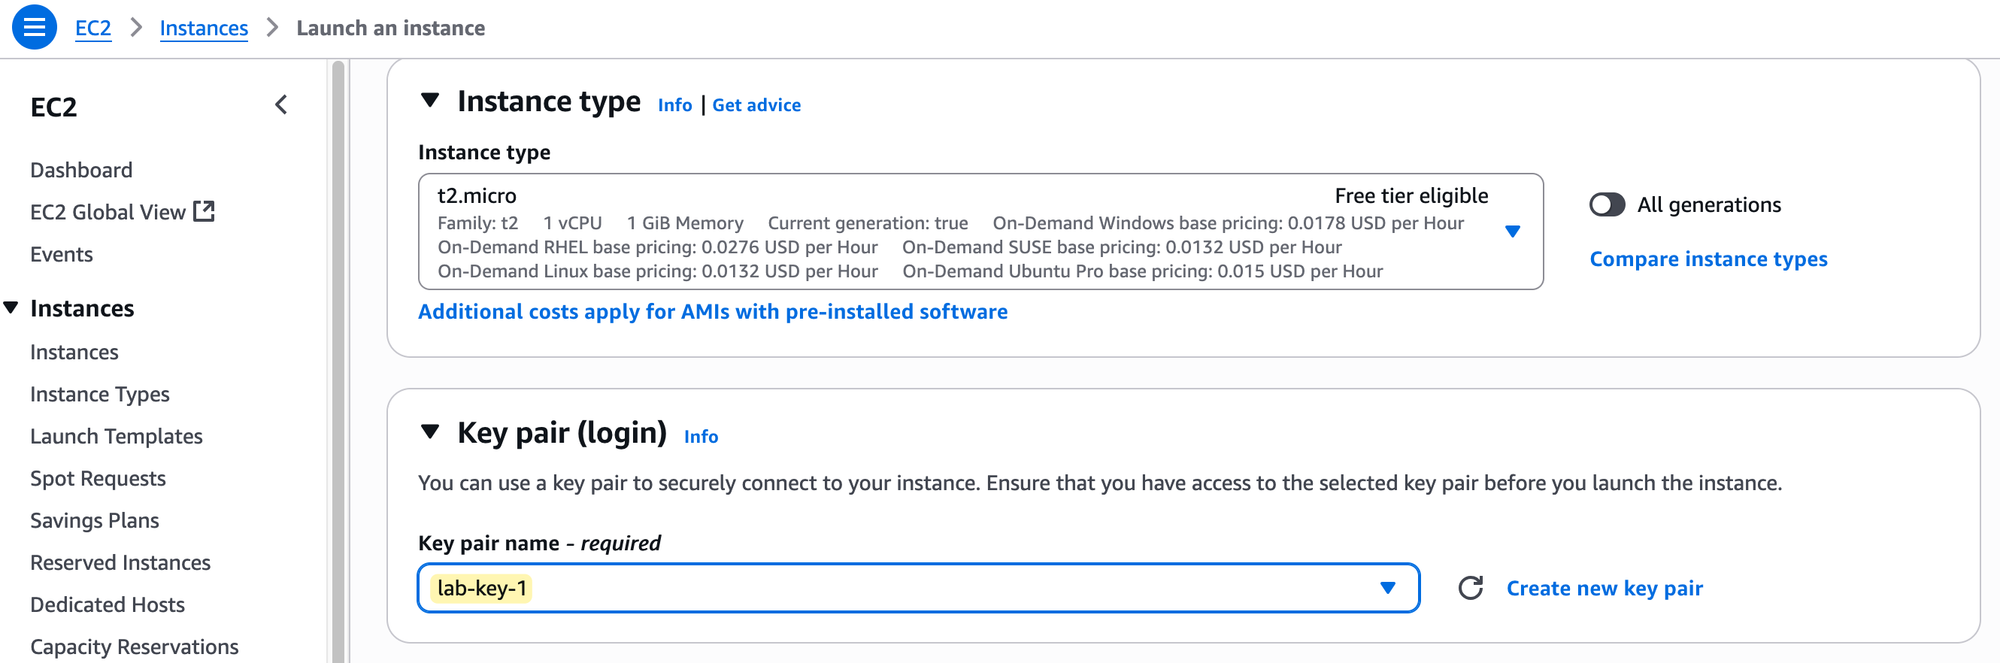
First, give your instance a Name, such as lab-server-01. In the Application and OS Images (Amazon Machine Image) section, you can select the operating system for your server. An Amazon Machine Image (AMI) is a template that contains the software configuration (operating system, application server, and applications) required to launch your instance.
You have the option to choose various operating systems like Ubuntu, Windows, or macOS, but for this guide, I'm going with the default Amazon Linux. The most important thing here is to ensure that whatever you choose is marked as 'Free tier eligible' to avoid unexpected costs.
Next is the Instance type, which defines the virtual hardware for your instance, specifically its CPU and RAM. I'm selecting the t2.micro instance type, which is eligible for the Free Tier. While AWS offers many different instance families with much higher CPU and memory for demanding workloads, the t2.micro is more than enough for our testing.
In the Key pair (login) section, select the lab-key-1 key pair that we created in the previous step. This is how we will securely log in to the server.
Now for the most important part of this lab, the Network settings. You will need to click the 'Edit' button to change these. Here, you must select the VPC and subnet we created earlier.
- VPC - Choose our
lab-vpc. - Subnet - Choose our
lab-subnet-1. - Auto-assign public IP - When enabled, AWS will automatically assign a public IPv4 address to our instance from its pool of addresses. We need this public IP to be able to connect to the instance from the Internet.
You should be aware that AWS now charges for public IPv4 addresses. However, as per their documentation for the Free Tier - "If you are an existing or new AWS Free Tier customer for Amazon EC2, you will get 750 hours public IPv4 address usage per month free when launching any EC2 instance with a public IPv4 address."
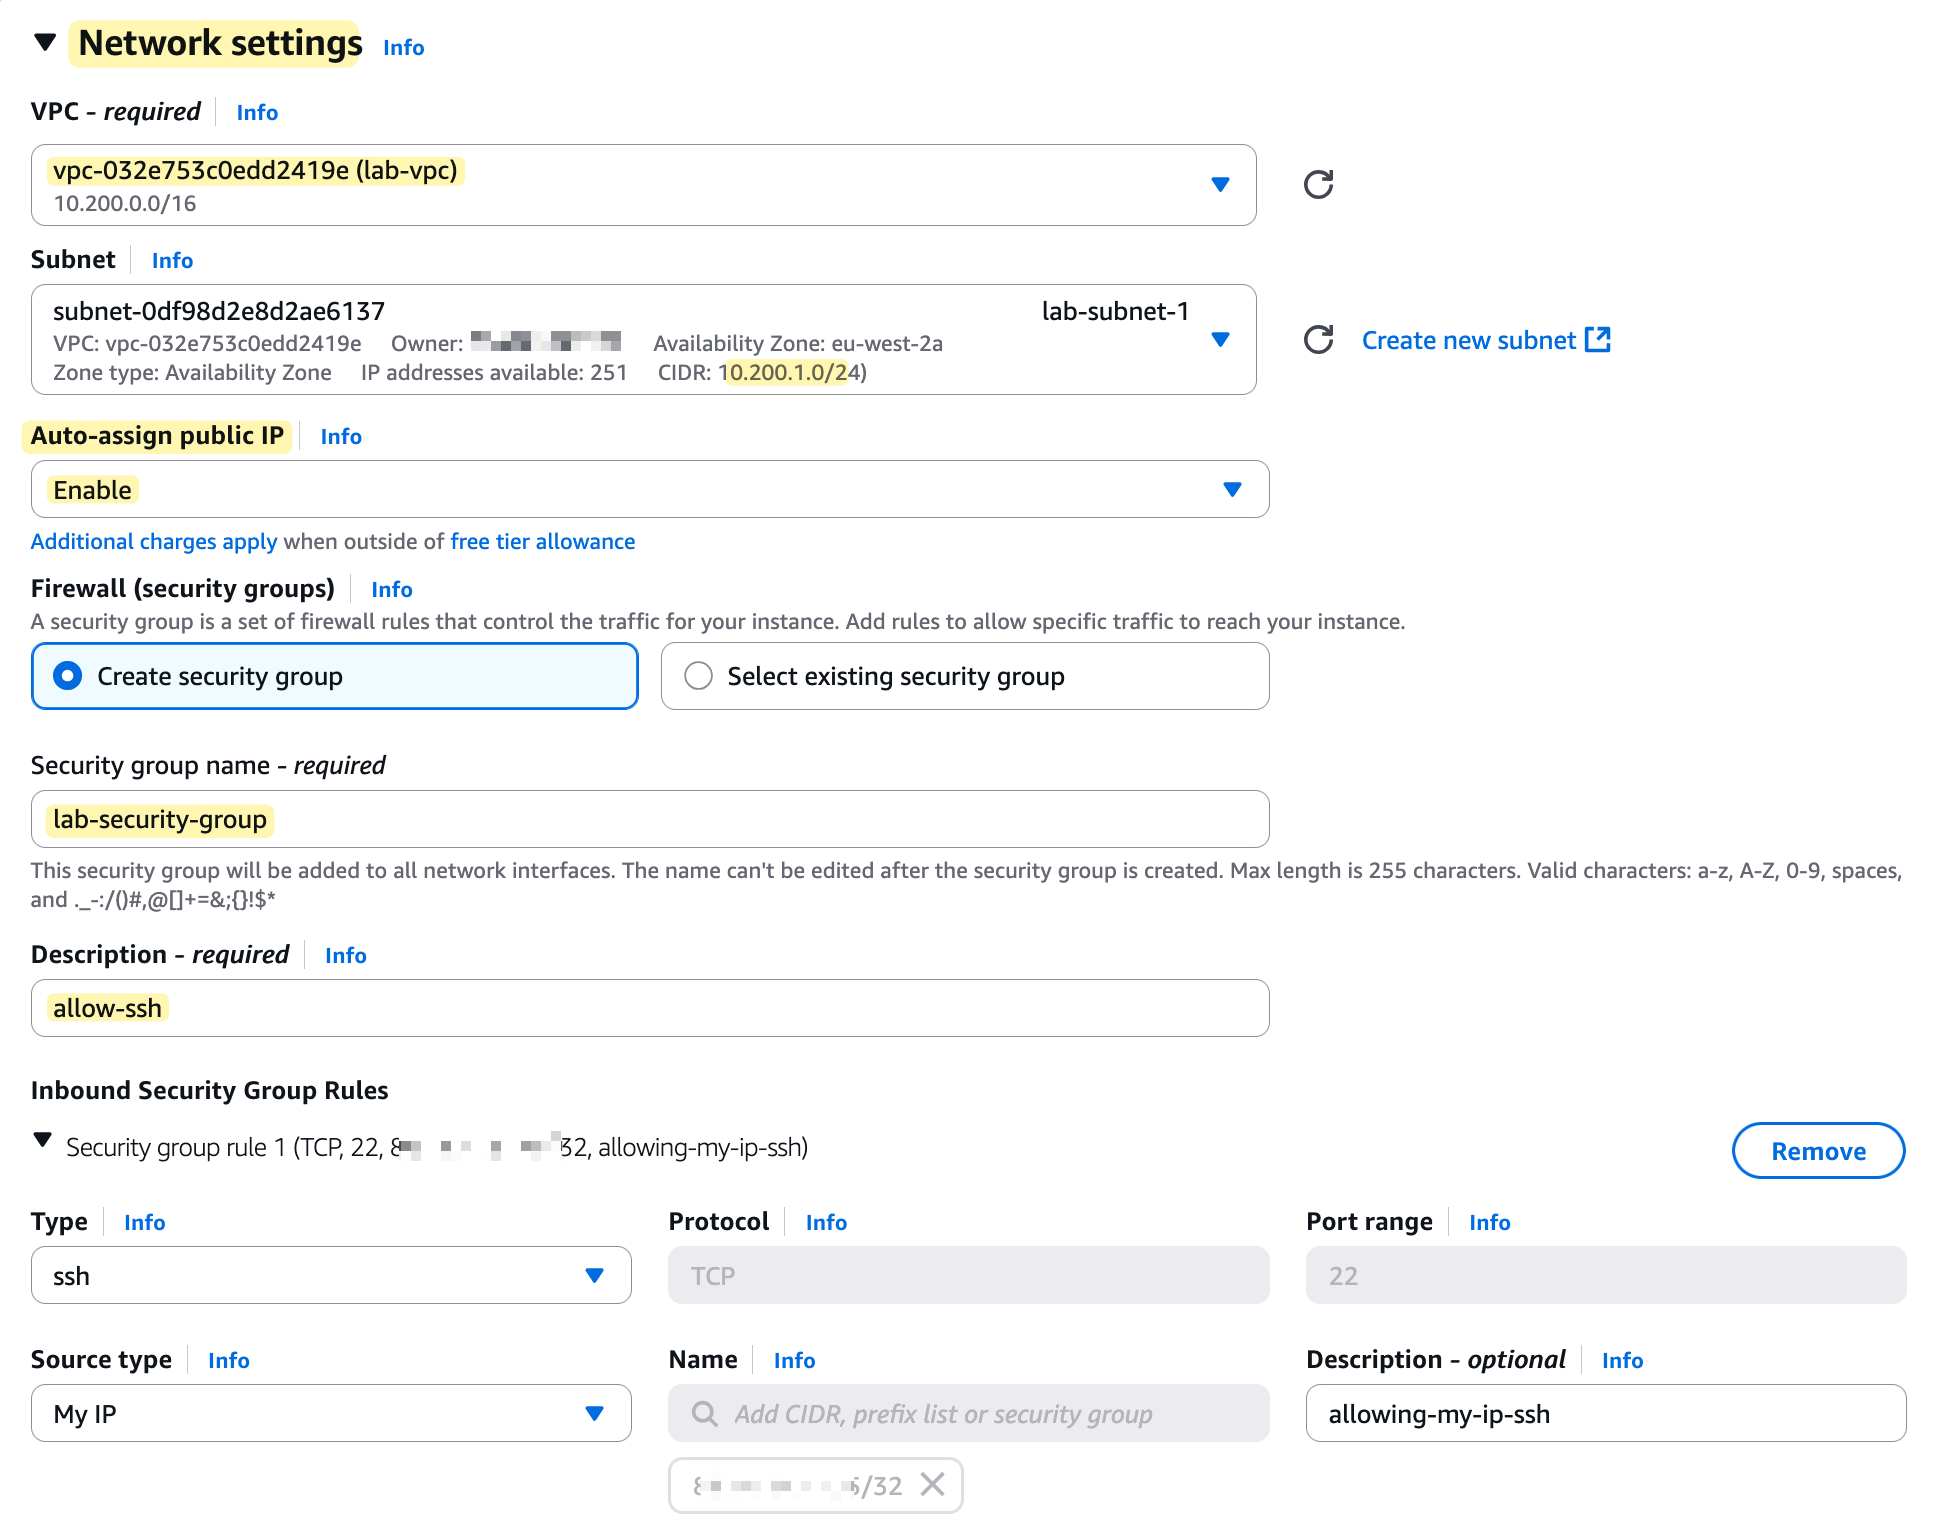
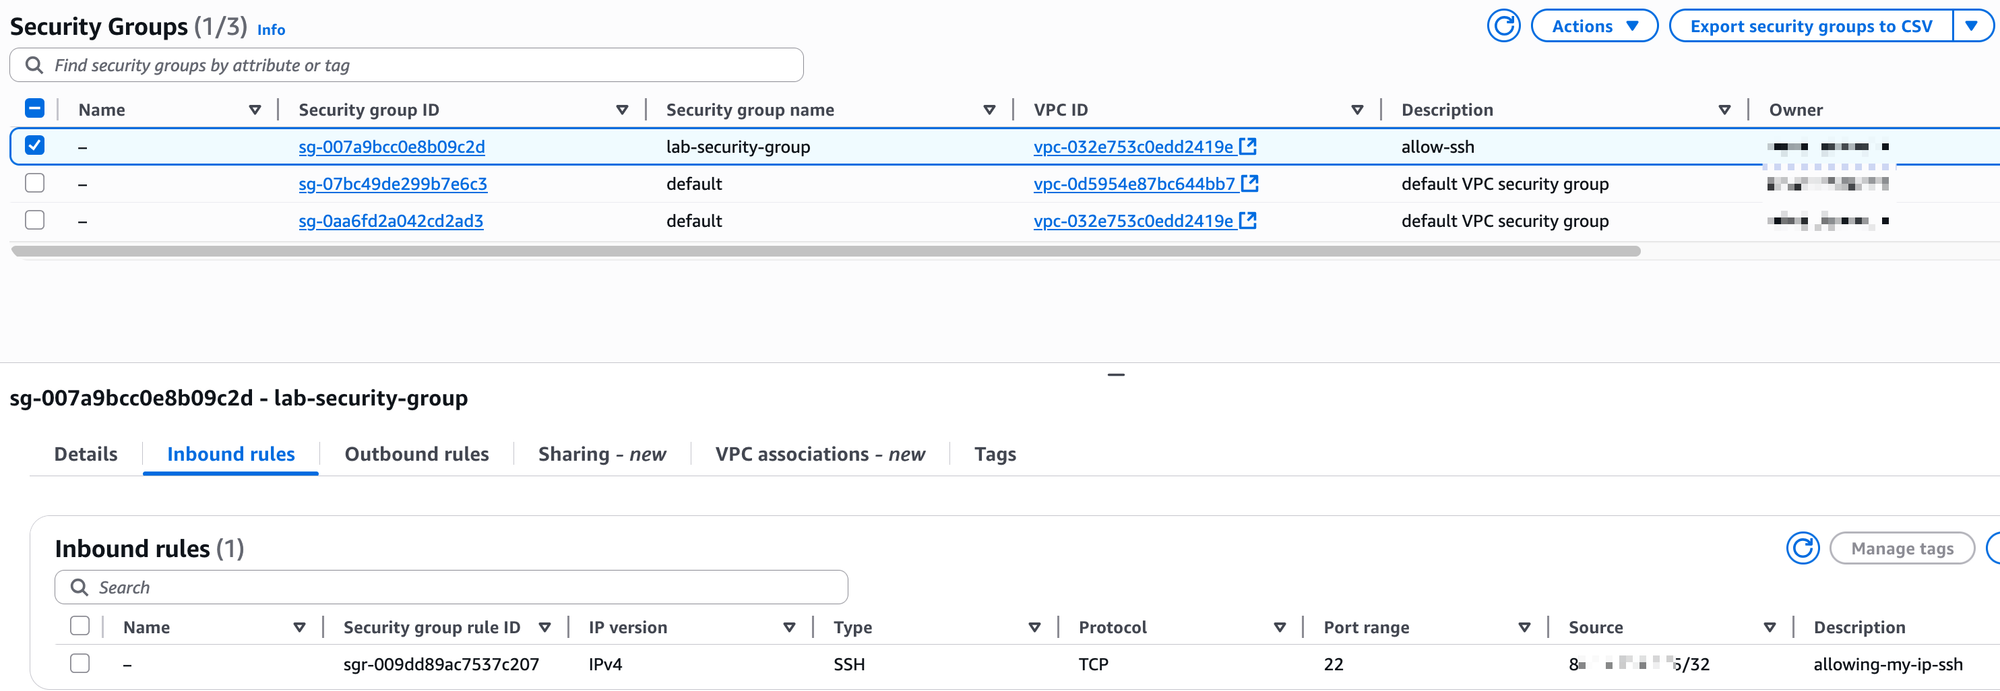
Finally, we need to configure a Security Group. Think of this as a mini-firewall that is attached to the EC2 instance and controls its inbound and outbound traffic. For this section, we will create a new security group and add one inbound rule that allows SSH traffic (on port 22) but only from your current public IP address (masked in the screenshot 😄)
Where Does the Public IP Actually Live?
Before moving on, let's clarify a common misconception about how your instance's public IP address works. The public IP address you see in the console is not actually configured on the network interface of the instance itself. If you were to log in to the server and check its network settings, you would only see its private IP address (e.g., 10.200.1.49).
The mapping between the private and public IP happens within the AWS network at the Internet Gateway (IGW). The IGW performs a 1-to-1 Network Address Translation (NAT), swapping the private IP for the public IP on outbound traffic and doing the reverse for inbound traffic. This is why the instance can communicate with the Internet without its operating system ever being aware of its own public IP address.
Testing and Verification
After you click 'Launch instance', wait a few moments for it to come online. On the EC2 Instances screen, you should see the Instance state change to 'Running' and the Status check pass.
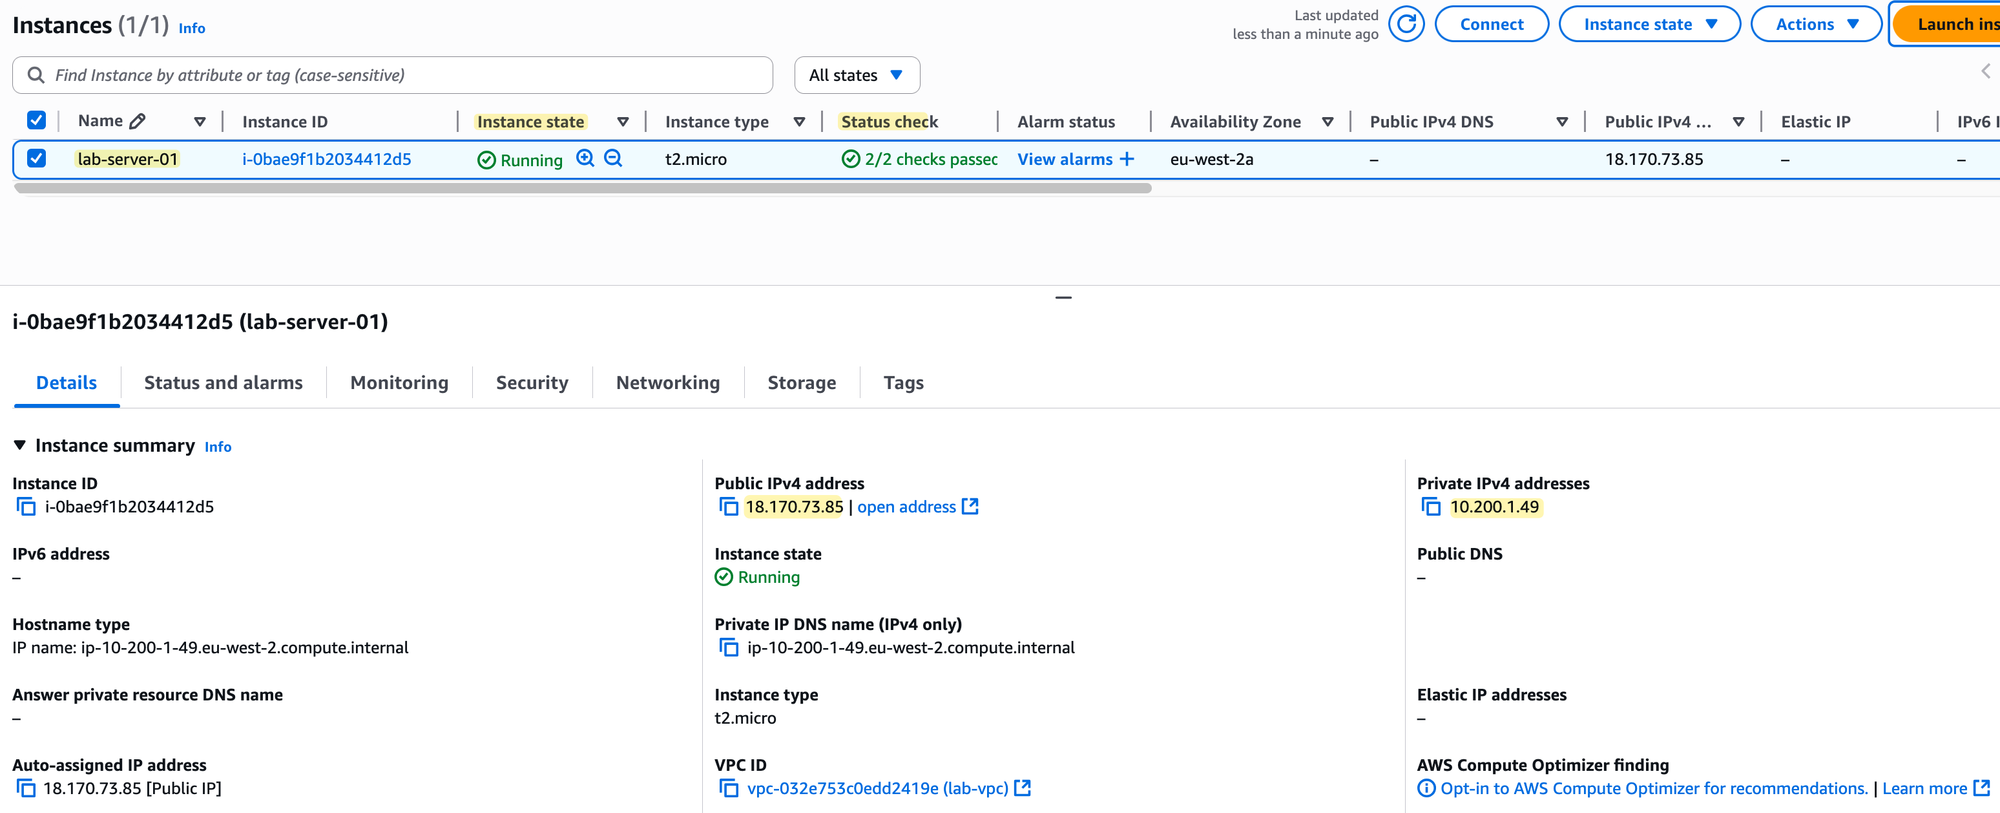
If you click on your instance ID, the details pane will open. You will see that the instance has a Private IPv4 address from our subnet's range (10.200.1.49) and also the Public IPv4 address that was assigned to it. Since we already allowed our home IP address in the security group, we should be able to connect to it now using SSH.
Open a terminal on your computer, navigate to the folder where you saved your key file, and use the following command, replacing the IP address with your instance's public IP.
ssh -i lab-key-1.pem ec2-user@18.170.73.85chmod command. This is a security measure to ensure no one else on your system can read your private key. You can run chmod 400 lab-key-1.pemOnce you are logged into the instance, let's verify our setup. First, check the IP address of the instance. You'll see it has the private IP we expect.
[ec2-user@ip-10-200-1-49 ~]$
[ec2-user@ip-10-200-1-49 ~]$ ip ad
1: lo: <LOOPBACK,UP,LOWER_UP> mtu 65536 qdisc noqueue state UNKNOWN group
    link/loopback 00:00:00:00:00:00 brd 00:00:00:00:00:00
    inet 127.0.0.1/8 scope host lo
       valid_lft forever preferred_lft forever
    inet6 ::1/128 scope host noprefixroute
       valid_lft forever preferred_lft forever
2: enX0: <BROADCAST,MULTICAST,UP,LOWER_UP> mtu 9001 qdisc fq_codel state UP
    link/ether 06:02:6a:3d:05:f3 brd ff:ff:ff:ff:ff:ff
    altname eni-0f26a313c00fee7bb
    altname device-number-0.0
    inet 10.200.1.49/24 metric 512 brd 10.200.1.255 scope global dynamic enX0
       valid_lft 3386sec preferred_lft 3386sec
    inet6 fe80::402:6aff:fe3d:5f3/64 scope link proto kernel_ll
       valid_lft forever preferred_lft forever
Now, let's try to ping a public Google server. This will test if our instance can reach the Internet through our route table and Internet Gateway.
[ec2-user@ip-10-200-1-49 ~]$ ping 8.8.8.8
PING 8.8.8.8 (8.8.8.8) 56(84) bytes of data.
64 bytes from 8.8.8.8: icmp_seq=1 ttl=116 time=0.895 ms
64 bytes from 8.8.8.8: icmp_seq=2 ttl=116 time=0.919 ms
^C
--- 8.8.8.8 ping statistics ---
2 packets transmitted, 2 received, 0% packet loss, time 1077ms
rtt min/avg/max/mdev = 0.895/0.907/0.919/0.012 ms
Success! The ping works, which confirms that all the components we configured, the VPC, subnet, route table, Internet Gateway, and security group, are working together correctly to provide our instance with Internet access.
Remember, we configured a Security Group when launching our instance, but let's look at it more closely. As mentioned, a Security Group acts as a stateful firewall that is attached to an EC2 instance. It lets you control what traffic is allowed to come in and what is allowed to go out.
When we created our instance, we created a security group named lab-security-group and added an inbound rule to allow SSH (port 22) from our specific IP address. This is why we were able to connect to it.
If you were to run an application like a web server on this instance, you would need to add more rules to allow users to access it. For example, to make a website accessible, you would edit your security group and add new inbound rules to allow traffic on port 80 (HTTP) and port 443 (HTTPS). If you wanted to allow access to your website for everyone on the Internet, you would set the 'Source' for these new rules to 0.0.0.0/0, which means 'Anywhere'.
Important - Cleaning Up
Once you are finished with your lab, it is critical that you clean up the resources to ensure you do not incur any unexpected charges.