

Testing individual components is a good start, but what happens when you need to validate how everything works together? In this post, we’ll show you how to run integration tests in Infrahub that verify your schema, data, and Git workflows in a real, running environment.
You’ll learn how to spin up isolated Infrahub instances on the fly using Docker and Testcontainers, automate schema and data loading, and catch issues before they reach production.
OpsMill has partnered with me for this post, and they also support my blog as a sponsor. The post is originally published under https://opsmill.com/blog/integration-testing-infrahub/
You don’t need to be a Python expert to follow along. We’ll walk through everything step by step, with example code and tooling recommendations. You can also follow this guide in video form on the Cisco DevNet YouTube channel:
- Building a Production-Grade Automation Platform With Infrahub – Part 1
- Building a Production-Grade Automation Platform With Infrahub – Part 2
All the sample data and code used here are available on the OpsMill GitHub repo, so you can set up your own test environment and try it yourself.
Quick recap
Previously, we covered how to write smoke and unit tests using the Infrahub pytest plugin. Smoke tests are used to check for syntax errors in your GraphQL queries and Jinja2 templates. Unit tests validate that a given input produces the expected output from your transformation logic. All of this was done using YAML, without writing any Python code.
Before we move on to integration testing, make sure you have the following:
- A local Infrahub instance running
- A clone of the DevNet Git repository
- infrahub-sdk is installed
- Your schema and sample data are loaded into Infrahub
If you just want to get started quickly, here's a fast way to get everything set up.
curl https://infrahub.opsmill.io | docker compose -p infrahub -f - up -d


git clone https://github.com/opsmill/devnet-live-2025.git

python3 -m venv venv
source venv/bin/activate
pip install infrahub-sdk[all]
Pip install infrahub-testcontainers
Pip install pytest-asyncio

export INFRAHUB_USERNAME=admin
export INFRAHUB_PASSWORD=infrahub
export INFRAHUB_ADDRESS=http://localhost:8000

infrahubctl schema load schemas/
infrahubctl object load data
We’re adding two new Python packages, infrahub-testcontainers and pytest-asyncio , that we haven’t used previously. We’ll cover them in the next sections.
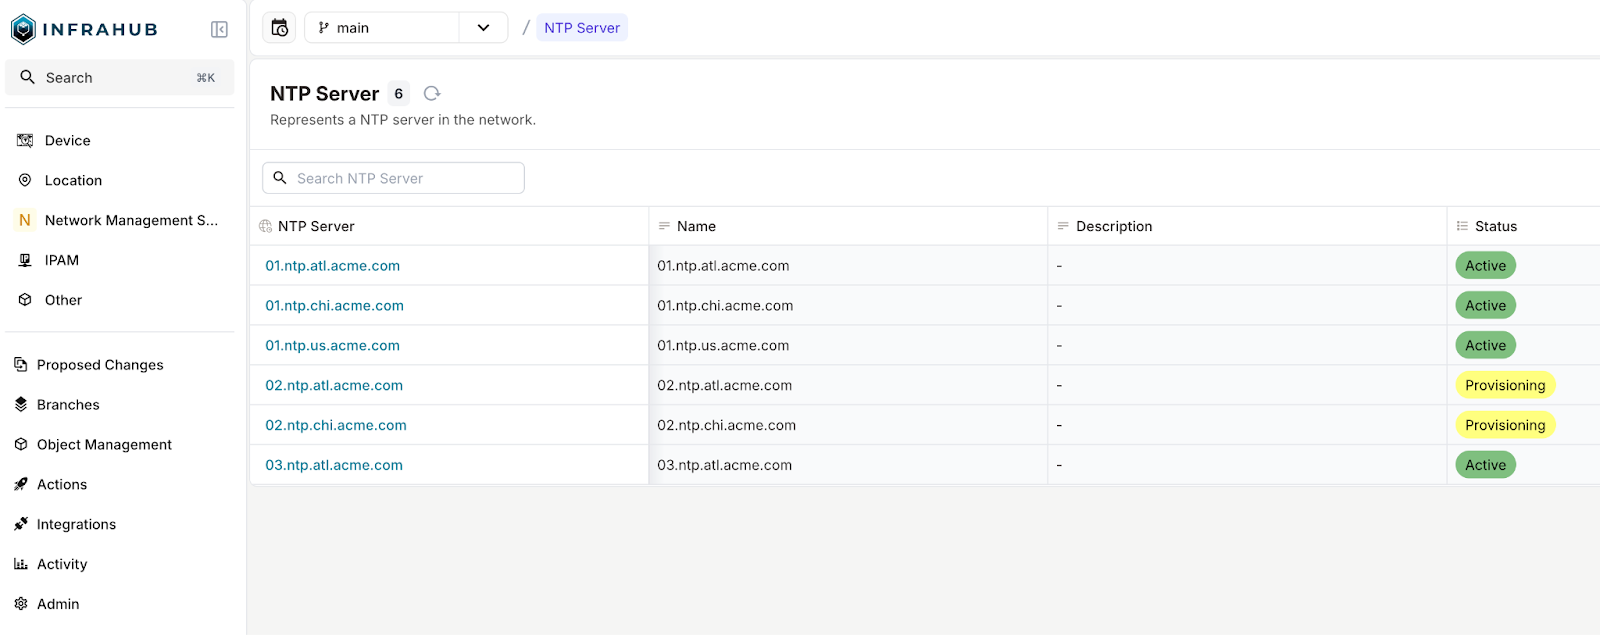
If everything goes well, you should be able to log in to the Infrahub web interface at http://localhost:8000 using admin as the username and infrahub as the password. Once logged in, you should see the schema and the sample data we loaded earlier.
(pic - integration_initial)
What’s an integration test?
An integration test checks if multiple components of a system work together as expected. It validates the behaviour of the full workflow, often using real data, running services, and any external dependencies involved. The goal is to catch issues that might not show up in unit tests, like broken interactions or incorrect assumptions between parts of the system.
In contrast, unit testing focuses on testing individual components or functions in isolation. A unit test verifies that a single piece of code (typically a function or method) works correctly when given specific inputs, without depending on external systems or other parts of the application.
How integration testing works in Infrahub
Integration tests in Infrahub involve verifying that your resources work as expected when interacting with a live instance. Instead of using mock data or static inputs, these tests run against real data loaded into the system. This type of testing helps catch issues that only appear when all parts of the system are working together.
Okay, I said 'live instance' but of course we don't want to test against our production instance, right? Correct. Instead, we'll spin up a fully functional Infrahub instance on the fly just for testing. Yes, it might sound like magic, but it's not. We'll take a closer look at how this works in the next section.
The goal is simple: if we make a change to the schema, for example, we want to be confident that those changes will work with our existing data in a real Infrahub environment. Integration testing helps us validate that everything fits together correctly before it ever reaches production.
Having some basic Python and pytest knowledge will be helpful for this post, especially to follow along with the examples. But even if you're not familiar with either, don't worry, you should still be able to follow the steps and understand how everything fits together.
Using Testcontainers for integration testing
Testcontainers is an open-source library that makes it easy to spin up lightweight, throwaway instances of real services in Docker containers. It provides simple APIs for bootstrapping dependencies like databases, message brokers, web browsers, or just about any service that can run in a container.
With Testcontainers, you can write tests that use the same services you rely on in production without falling back on mocks or other alternatives. This helps make tests more realistic and reliable while keeping your environment isolated and repeatable.
You define your test dependencies as code, and when you run your tests, the required containers are automatically created. Once the tests are complete, the containers are cleaned up. This makes it easy to set up and tear down realistic environments without manual steps.
I hope now you can see where we’re going with this. Since Infrahub is deployed using Docker, we can use the same approach during testing.
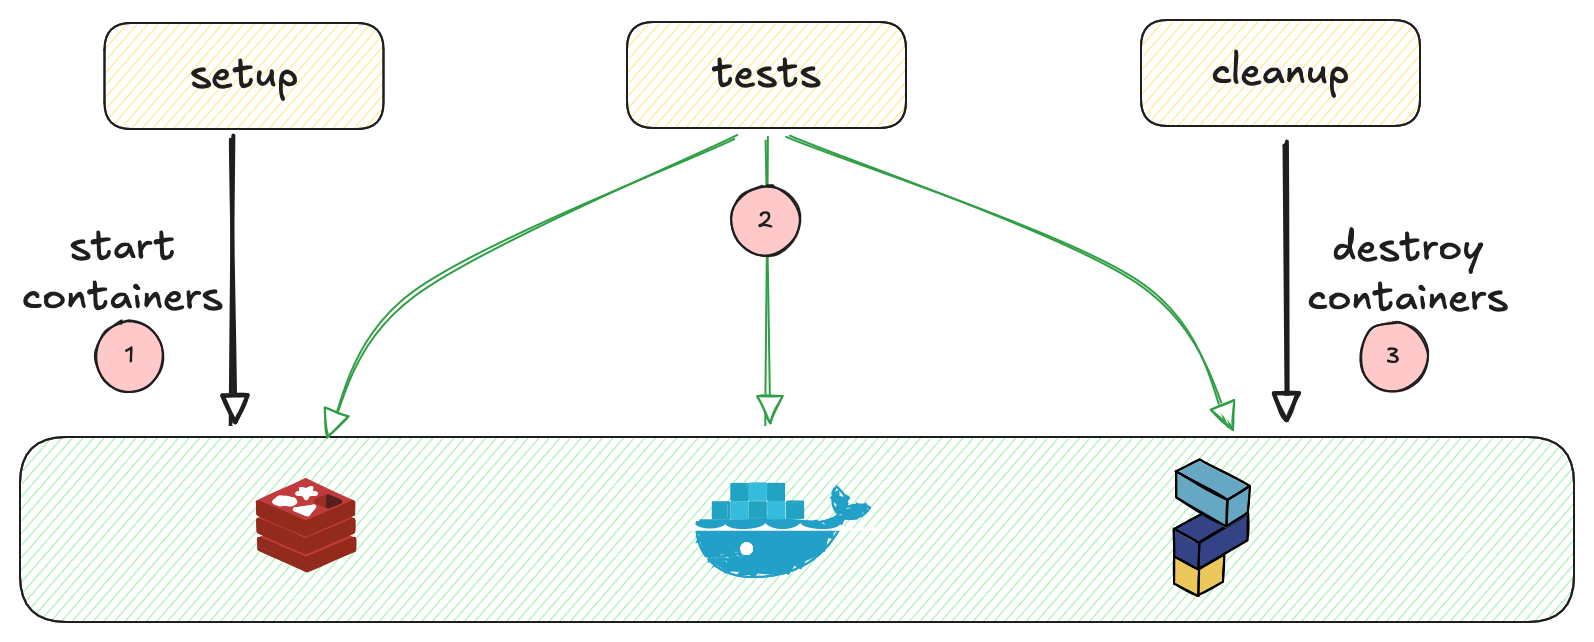
- Testcontainers lets us spin up a test instance of Infrahub as part of our test run
- Once the tests are done, everything is automatically cleaned up.
- No manual setup
- No leftover containers
Infrahub provides a Python library called infrahub-testcontainers, which is built on top of the popular testcontainers Python library. It makes it easier to run a temporary Infrahub instance for testing purposes. You can install it using pip, just like any other Python package. This library handles the setup and teardown of the container automatically, so you can focus on writing your tests instead of managing the environment.
Writing an integration test
Moving on, let's look at how to write integration tests and how everything fits together. As I briefly mentioned earlier, this does require some knowledge of pytest, but don't worry if you're not familiar with it; you should still be able to follow along without much trouble.
We'll start with a quick introduction to pytest and then move on to the actual test implementation.
Quick Pytest overview for integration testing
Pytest is a popular testing framework for Python. It’s simple to use and doesn't require much boilerplate. At its core, pytest works by running functions that start with test_ and using plain assert statements to check if something is true. If the assertion passes, the test passes. If it fails, pytest shows you exactly what went wrong.
Writing the integration tests
If you look at the tests directory, you'll see subdirectories for smoke, unit, and integration tests, along with a conftest.py file. We’ll add our integration test file, test_end2end.py, under the integration directory. We’ll also add some content to conftest.py to help manage test setup.
The conftest.py file is a special file used by pytest. It lets you define reusable fixtures, which are like helper functions that prepare things your tests need, like directory paths or sample data. Pytest automatically picks up this file and makes those fixtures available to any test in the same directory tree.
import json
from pathlib import Path
from typing import Any

import pytest

from infrahub_sdk import InfrahubClientSync, Config
from infrahub_sdk.ctl.repository import get_repository_config
from infrahub_sdk.schema.repository import InfrahubRepositoryConfig
from infrahub_sdk.yaml import SchemaFile

CURRENT_DIR = Path(__file__).parent


@pytest.fixture(scope="session")
def root_dir() -> Path:
   return Path(__file__).parent / ".."


@pytest.fixture(scope="session")
def fixtures_dir() -> Path:
   return CURRENT_DIR / "fixtures"


@pytest.fixture(scope="session")
def schema_dir(root_dir) -> Path:
   return root_dir / "schemas"


@pytest.fixture(scope="session")
def data_dir(root_dir) -> Path:
   return root_dir / "data"
The conftest.py file defines a few fixtures that make it easier to reference key directories throughout the tests. For example, root_dir points to the root of the project, and from there, schema_dir and data_dir point to the folders where schema files and test data are stored. These fixtures are marked with scope="session", meaning they’re created once and shared across all tests during a single test run.
import logging

import pytest

from pathlib import Path

from infrahub_sdk.client import InfrahubClient, InfrahubClientSync
from infrahub_sdk.protocols import CoreGenericRepository
from infrahub_sdk.spec.object import ObjectFile
from infrahub_sdk.testing.docker import TestInfrahubDockerClient
from infrahub_sdk.testing.repository import GitRepo
from infrahub_sdk.yaml import SchemaFile

logger = logging.getLogger(__name__)


class TestServiceCatalog(TestInfrahubDockerClient):

   @pytest.fixture(scope="class")
   def default_branch(self) -> str:
       return "main"

   @pytest.fixture(scope="class")
   def schema_definition(self, schema_dir: Path) -> list[SchemaFile]:
       return SchemaFile.load_from_disk(paths=[schema_dir])

   def test_schema_load(
       self, client_sync: InfrahubClientSync, schema_definition: list[SchemaFile], default_branch: str
   ):
       """
       Load the schema from the schema directory into the infrahub instance.
       """
       logger.info("Starting test: test_schema_load")

       client_sync.schema.load(schemas=[item.content for item in schema_definition])
       client_sync.schema.wait_until_converged(branch=default_branch)

   async def test_data_load(self, client: InfrahubClient, data_dir: Path, default_branch: str):
       """
       Load the data from the data directory into the infrahub instance.
       """
       logger.info("Starting test: test_data_load")

       await client.schema.all()
       object_files = sorted(ObjectFile.load_from_disk(paths=[data_dir]), key=lambda x: x.location)

       for idx, file in enumerate(object_files):
           file.validate_content()
           schema = await client.schema.get(kind=file.spec.kind, branch=default_branch)
           for item in file.spec.data:
               await file.spec.create_node(
                   client=client, position=[idx], schema=schema, data=item, branch=default_branch
               )

       countries = await client.all(kind="LocationCountry")
       assert len(countries) == 3

   async def test_add_repository(
       self, client: InfrahubClient, root_dir: Path, default_branch: str, remote_repos_dir: Path
   ) -> None:
       """
       Add the local directory as a repository in the infrahub instance in order to validate the import of the repository
       and have the generator operational in infrahub.
       """
       repo = GitRepo(name="devnet-live-2025", src_directory=root_dir, dst_directory=remote_repos_dir)
       await repo.add_to_infrahub(client=client)
       in_sync = await repo.wait_for_sync_to_complete(client=client)
       assert in_sync

       repos = await client.all(kind=CoreGenericRepository)
       assert repos
The actual test file defines a test class called TestServiceCatalog, which inherits from TestInfrahubDockerClient. This base class comes from the infrahub-testcontainers library and is responsible for launching a temporary Infrahub Docker container during the test session.
When pytest runs this test class, it automatically starts the container before the tests execute and cleans it afterwards. This gives you a fresh, isolated Infrahub instance for every test run. Inside the class, we have a few tests that demonstrate how to interact with this live instance.
pytest-asyncio is a plugin for pytest that adds support for testing asynchronous code using async and await. It allows you to write async def test functions and handles the event loop setup automatically, so you can test coroutines just like regular functions.
The test_schema_load method loads the schema files into the running test Infrahub container. It uses the synchronous client and waits for the schema to fully load before proceeding. This is the same schema we initially loaded into our original Infrahub instance.
What we’re basically doing here is spinning up a test instance and loading that same schema into it. This becomes especially useful when you make changes to the schema. You can verify that those changes don’t break any existing functionality by testing schema loading in a clean, isolated environment first.
The test_data_load test loads sample objects into the live instance. It also verifies that the expected number of objects (in this case, countries) exists after loading. If you check Infrahub, you’ll see we have three locations. So if we were to make a small mistake in the schema, like renaming a field or changing the structure, the data wouldn’t load correctly, and the test would fail (we will test this shortly). This gives us a quick way to catch issues introduced by schema changes before they reach production.
Finally, test_add_repository adds the local project directory as a Git repository inside Infrahub and checks that it's in sync. Together, these tests validate that the schema and data can be loaded and that the repository setup works as expected in a real Infrahub environment.
If you remember from our previous post, we typically have the Git repo hosted in GitHub or GitLab and then manually add it into Infrahub. But here, we did something very cool. We’re mounting our local Git repo directly into the test Infrahub instance. This means we can skip all the usual steps of setting up a remote repo, pushing changes, and configuring access. It makes testing changes to the repository much faster and more convenient during development.
Running integration tests in Infrahub
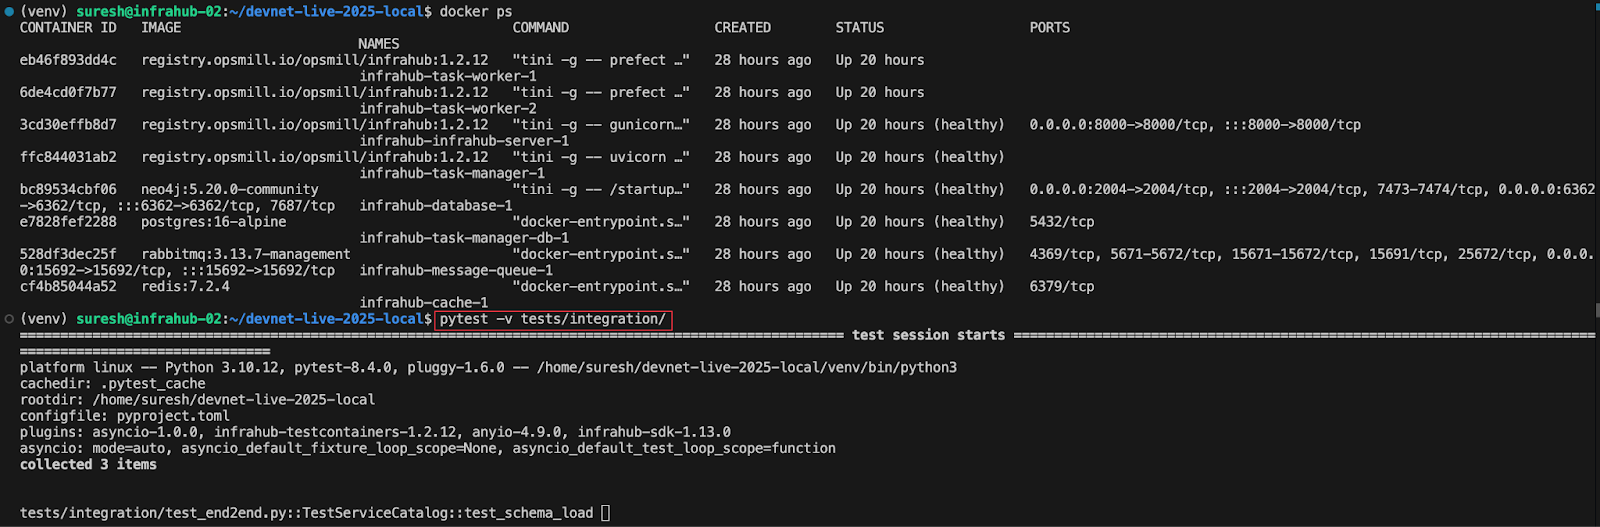
Let’s run the test using the command pytest -v tests/integration. Pytest automatically discovers test files and test functions. Any file that starts with test_ or ends with _test.py, and any class or function that starts with test_, will be picked up and executed.
Before running the command, if we check the running containers, we'll see our production Infrahub instance. But as soon as we run the test, you’ll notice a new set of containers being launched. These are the temporary test containers started by infrahub-testcontainers.
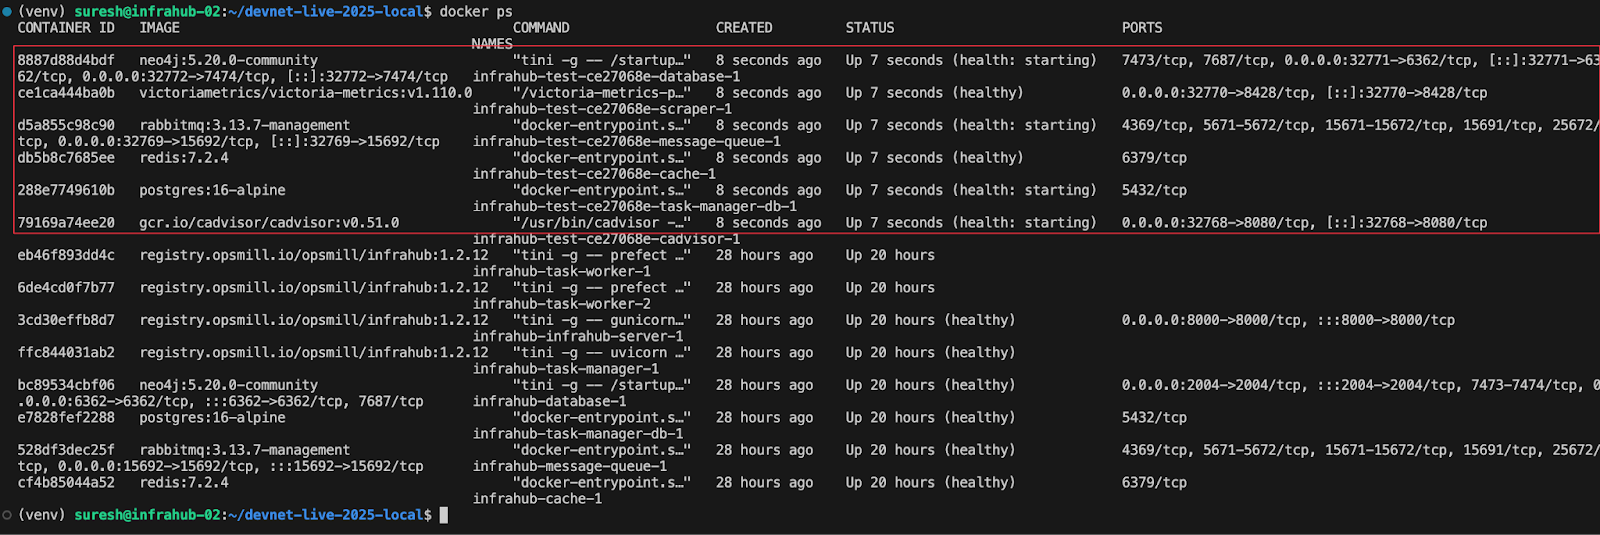
Once the test finishes, these containers are automatically removed, leaving your system clean.

A failing test
To demonstrate a failing test, let’s say we make a small change to the schema. Maybe you or someone on the team thought it would be a good idea to rename one of the attributes. In this case, we’re changing the attribute name from shortname to shortnames.
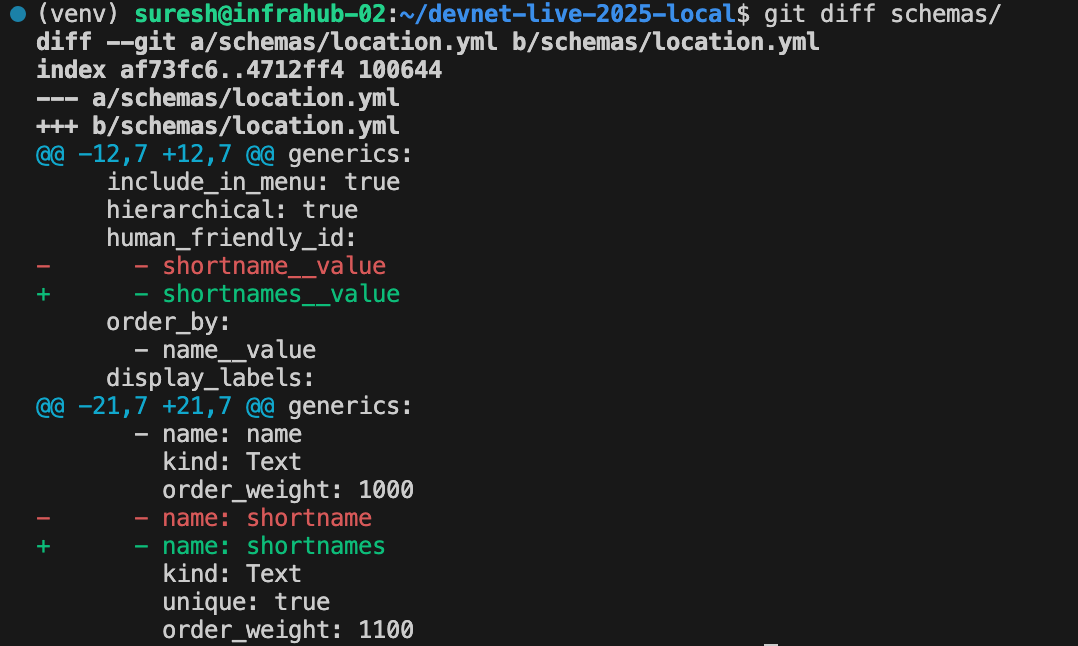
It might look like a simple, harmless update, and we might expect everything to continue working. But because we have a test that loads data, including location objects, and the data still uses the old attribute name shortname, the load will fail. As a result, when the test checks the number of countries, it won’t find any, and the test will fail.

Wrapping up Infrahub integration testing
We looked at how integration tests work in Infrahub and how to spin up a temporary test instance using infrahub-testcontainers. We loaded the schema, added some sample data, and even registered a local Git repo. If you’ve already got smoke and unit tests in place, adding integration tests is a solid next step. It gives you much more confidence in your automation workflow, and Infrahub makes it even easier to get started.
If you have any more questions, hop over to the OpsMill Discord where the team is always ready to respond.