In today's post, we're going to dive into setting up your MikroTik router. I'm working with the MikroTik hAP AX2, but you'll find that these steps are pretty much the same for any MikroTik router. If you're curious about why I chose the hAP AX2 and my first thoughts on it, be sure to check out my previous post here. Now, let's get into the nuts and bolts of getting your MikroTik router up and running smoothly.
 Suresh Vina
 Suresh Vina
Diagram and Basic Info
Alright, let's break down my setup requirements, which are pretty straightforward. I've sketched a simple diagram to help you visualize how things are connected.
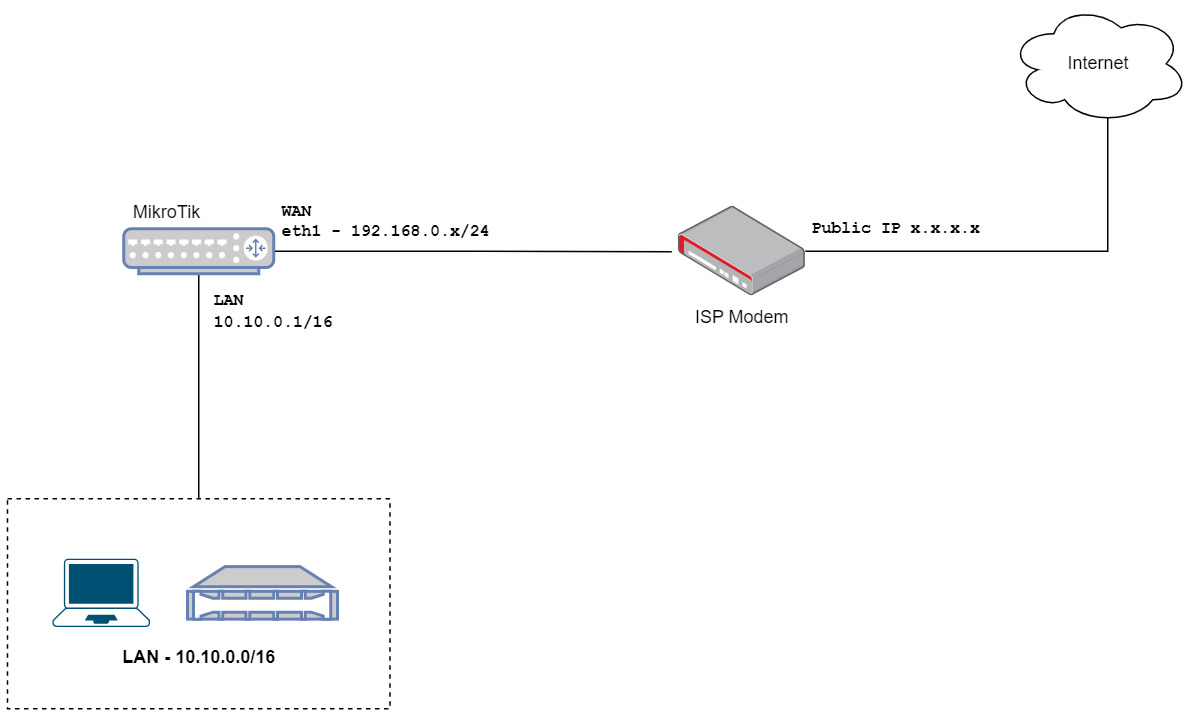
- Connecting to the ISP's Modem/Router - I'm connecting port 1 of the MikroTik hAP AX2 directly to my ISP's modem/router. This setup allows the interface on port 1 to automatically receive an IP address (192.168.0.x/24) from the ISP's modem.
- Configuring the LAN Port and Bridge - Next up, I'm setting up ports 3 through 5 as LAN and putting them into a bridge. What does this do? Well, it essentially turns these ports (3-5) into a switch, making it easier to connect multiple devices in my LAN.
- Why a Private IP on the WAN Port? - You might be wondering why I'm not going for a public IP on the WAN interface. The reason is simple – I didn't want to do that bit yet. So, in this configuration, my MikroTik router connects to the ISP's modem, which in turn connects to the internet. However, if you want your MikroTik to directly receive the public IP, you can easily do this. The setup process remains the same; just switch your ISP's modem to bridge mode.
- Enabling WiFi - I'm enabling WiFi on both the 2.4GHz and 5GHz bands.
- NAT - Finally, NAT configurations
So that's the basic outline of my MikroTik setup. In the following sections, I'll walk you through each step in more detail, so you can easily replicate this setup in your own home or office. Stay tuned.
Initial Access to MikroTik Router
Getting started with your MikroTik router is pretty straightforward, especially with the right tools. Here's how I did it.
- Using WinBox - First things first, I used an application called 'WinBox' for this entire process. You can download WinBox directly from the MikroTik website. Make sure you download and install it before proceeding.
- Connecting to the Router
- For Non-Wireless Routers - If you're using a non-wireless MikroTik router, you'll need to connect the WAN port directly to your laptop. Then, you can access the router using its default IP address, which is usually 192.168.88.1.
- For hAP AX2 (Wireless Router) - Since the hAP AX2 has wireless capabilities, the process is a bit different. The instruction manual suggests connecting to the SSID that the router advertises out of the box. Once connected, you can access the router's interface via the same IP address, 192.168.88.1.
- Logging In - When it comes to logging in, my router came with the username 'admin' and no password. This might vary, as some models require both a username and a password. You'll find these credentials with your new router.
- Choosing Configuration Options - Upon connecting with WinBox, you'll be presented with an option to use the 'Default Configuration'. I decided to start from scratch and not use the default settings. Be aware that once you make this choice, MikroTik removes all existing configurations, including the SSID. This means your connection to the router will drop.
- Reconnecting to the Router - Now, you'll need to physically connect your laptop to one of the router's ports. Once you've done that, open WinBox again and look for your router in the 'neighbor discovery' section.
- Accessing the Router - At this point, you should have access to your router. From here, you can start configuring it to your liking.
DHCP Client on the WAN Interface
Now that we've accessed the MikroTik router using WinBox, the first task is to ensure that our WAN port can receive an IP address from the ISP's modem. To do this, we need to set up a DHCP client for the WAN interface.
I connected the WAN port to my ISP's modem. Then, in the WinBox interface, I navigated to IP > DHCP Client. In this menu, I added a new DHCP client to make sure that my router's WAN port was ready to get an IP address from the modem.

As shown in the screenshot I've shared, you'll want to select the interface that corresponds to your WAN port – in my case, it's 'ether1'. Make sure the 'Add Default Route' option is set to 'yes'.
Also, check the boxes for 'Use Peer DNS' and 'Use Peer NTP'. This will allow your router to use the DNS and NTP provided by your ISP. You can also choose to use your own one if you like.
After setting up the DHCP client, your WAN interface should receive an IP address, as indicated by the 'Status: bound' message.
Bridge
Creating a bridge on your MikroTik router allows you to connect multiple devices to the network through the ports that are part of the bridge, essentially treating them as a single network segment.
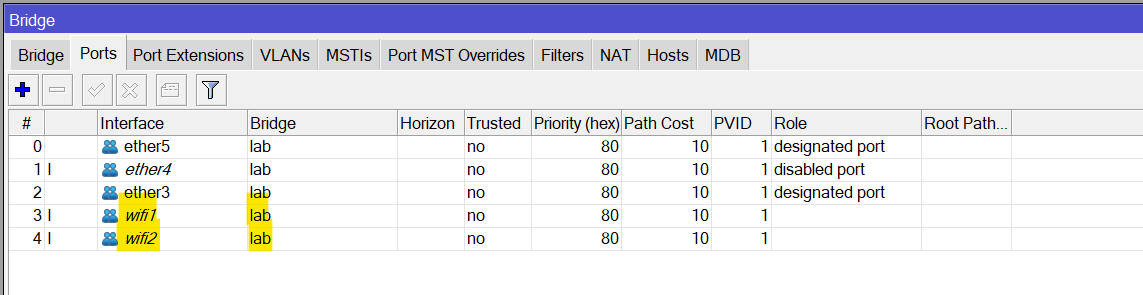
In my case, I needed to create a bridge for my LAN network. To do this, I went to the 'Bridge' menu in WinBox and set up a new bridge. I named my bridge 'lab'. Next, I added the interfaces that I wanted to be part of this bridge – specifically, ports 3 to 5 (I'm saving port 2 for future use)
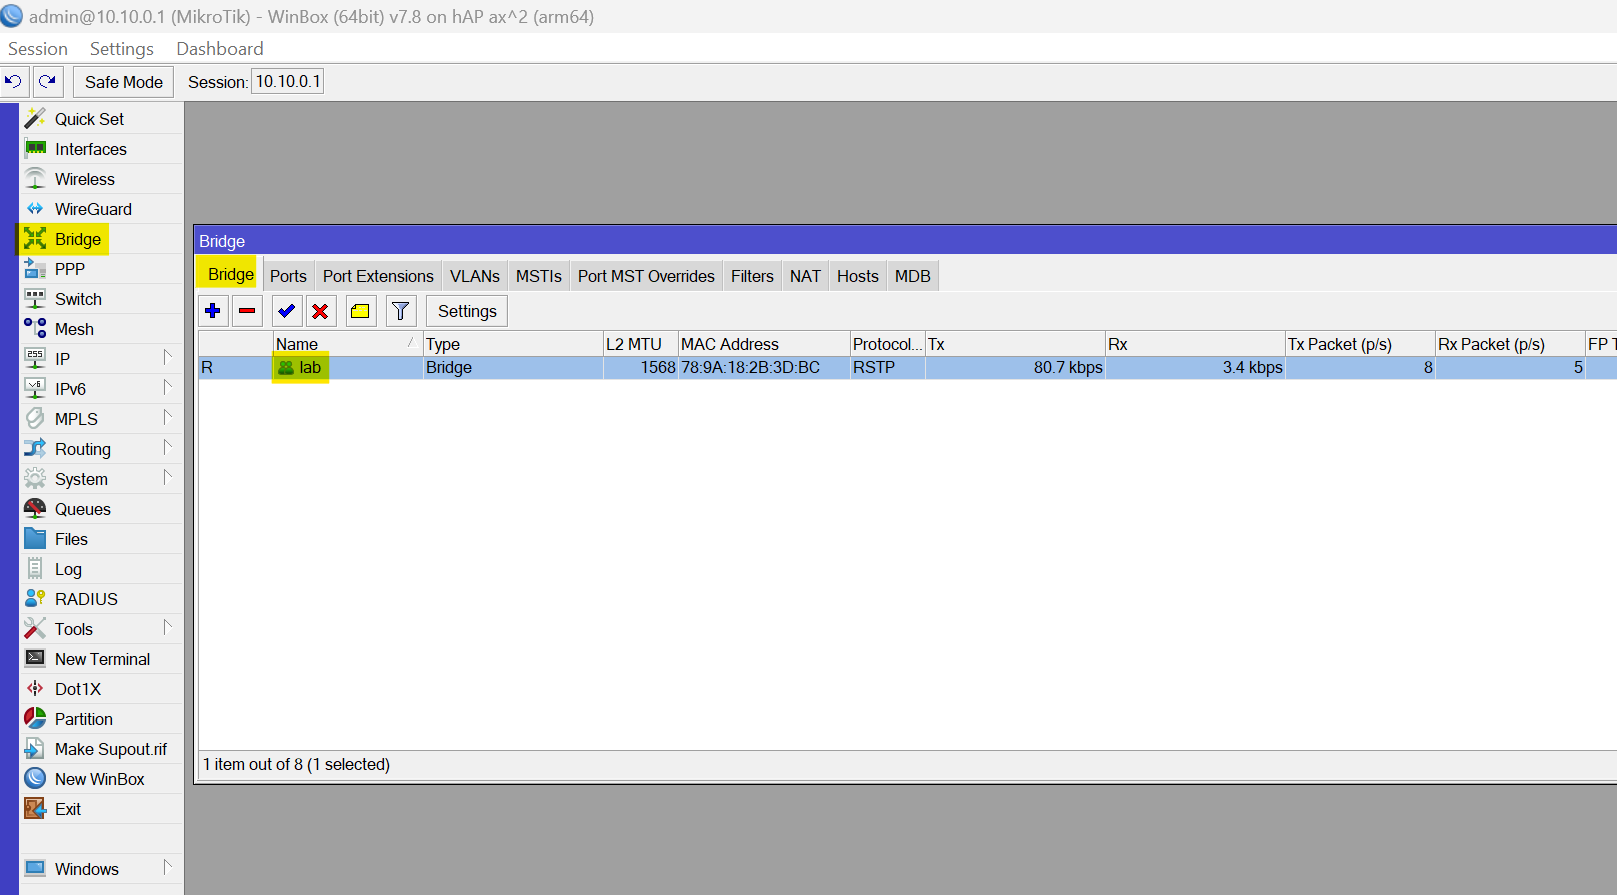
The process in WinBox was pretty intuitive. After creating the bridge, I went to the 'Ports' tab within the 'Bridge' menu to assign the respective interfaces to my new bridge. This effectively means that any device I connect to ports 3, 4, or 5 will be on the same LAN network.
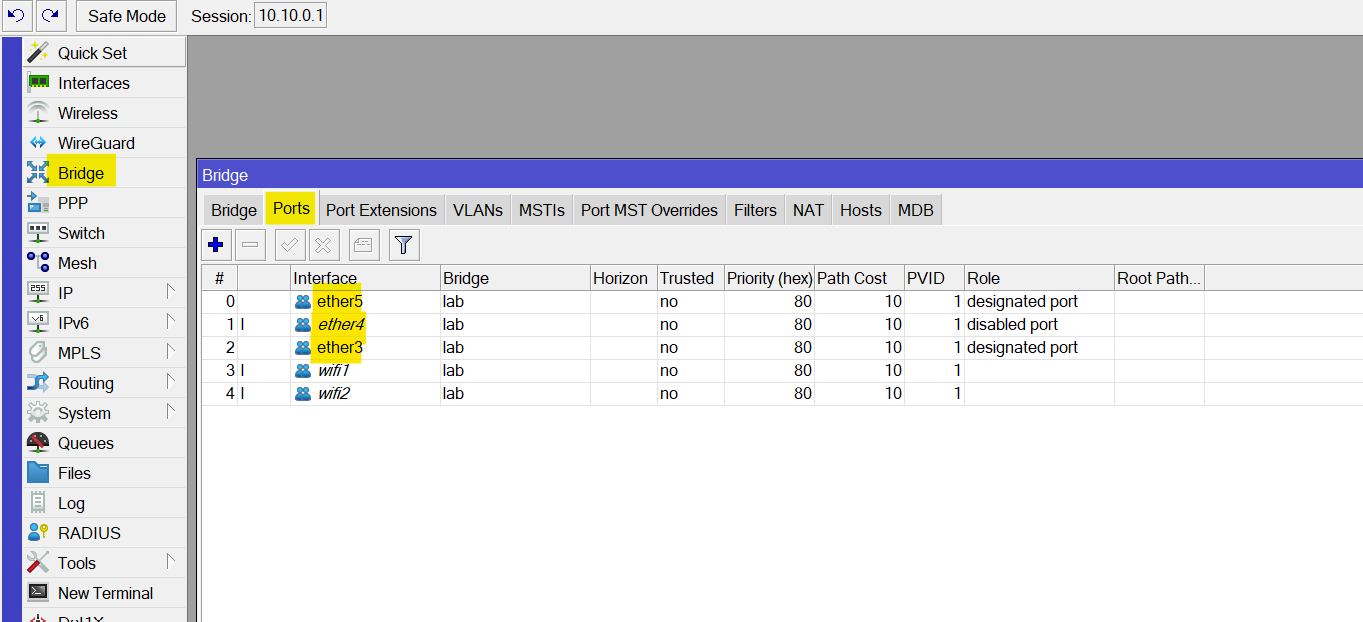
For now, we're skipping the wireless interfaces that you see in the screenshots. Don't worry, we'll get to configuring the WiFi soon.
LAN IP Address
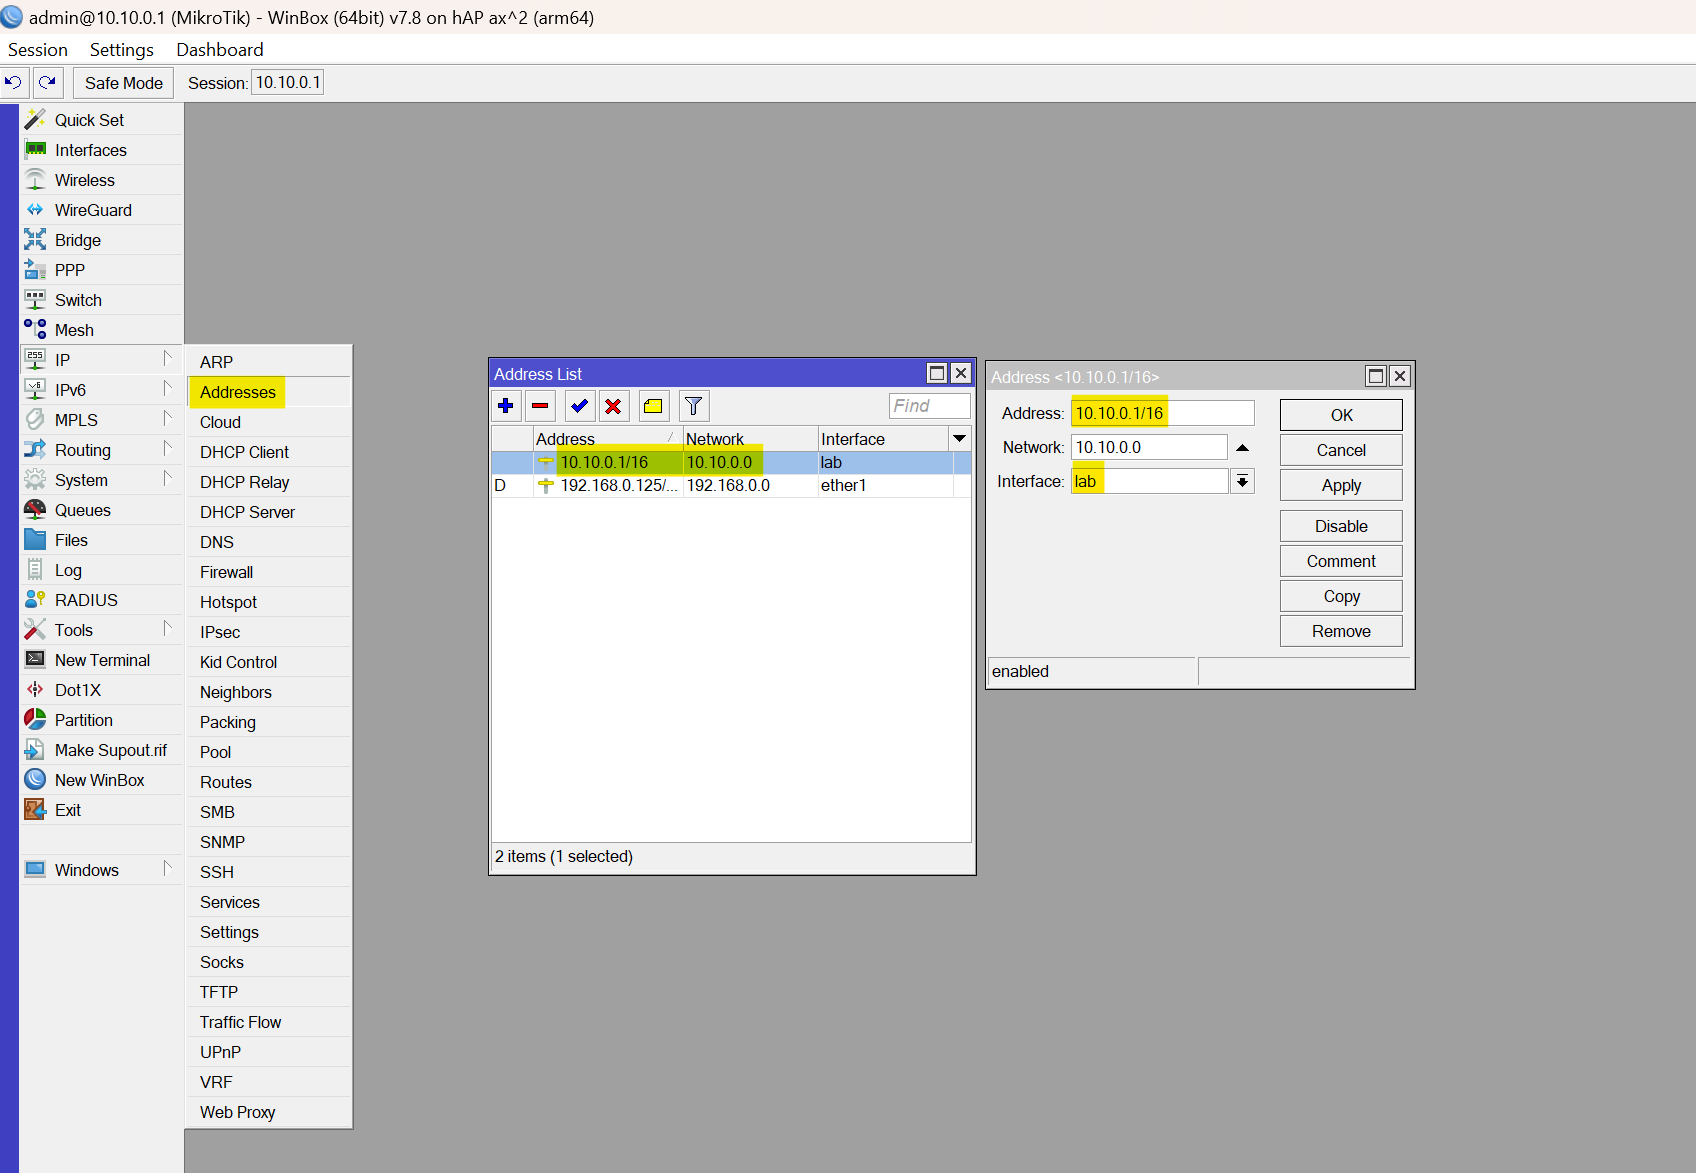
I opted for the 10.10.0.0/16 subnet for my LAN network. In WinBox, navigated to 'IP' then 'Addresses', and assigned this IP range to my 'lab' bridge—not directly to a physical interfaces. This way, any device plugged into the bridged ports gets an IP from this subnet. If you're not using a bridge, you'd assign the IP to a specific physical port instead.
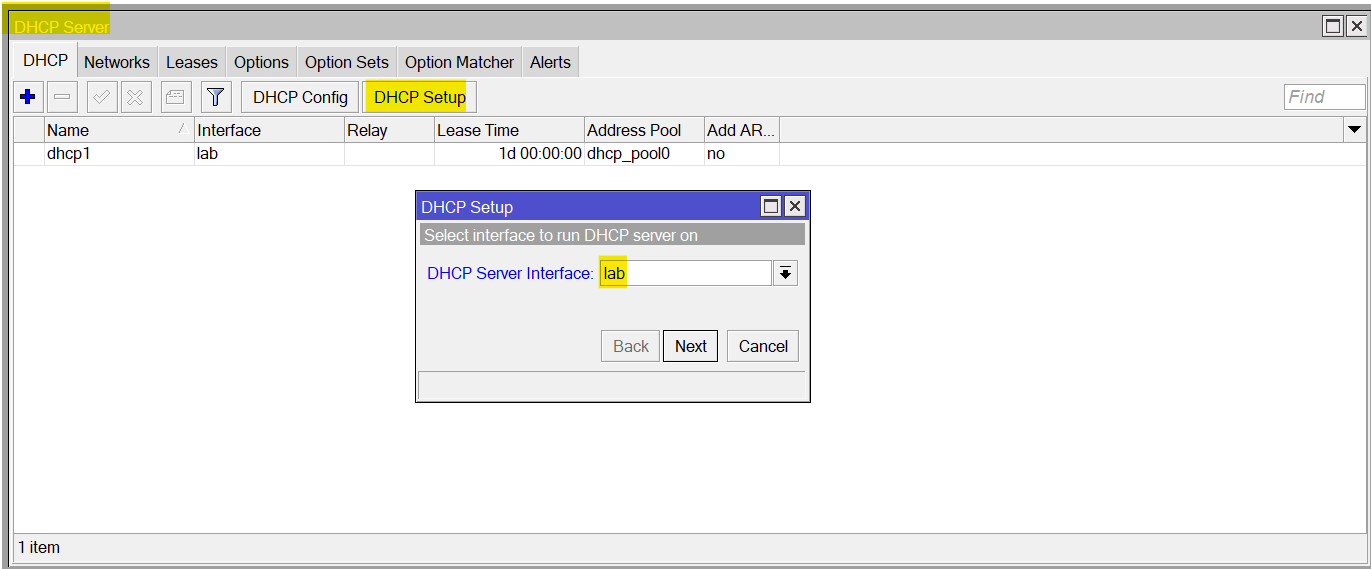
To configure the DHCP server, navigate to IP > DHCP Server and then click on DHCP Setup. This will take you through a series of options such as lease time and the DHCP range. Please make sure to select the Bridge interface as shown below.
MikroTik hAP AX2 WiFi Configuration
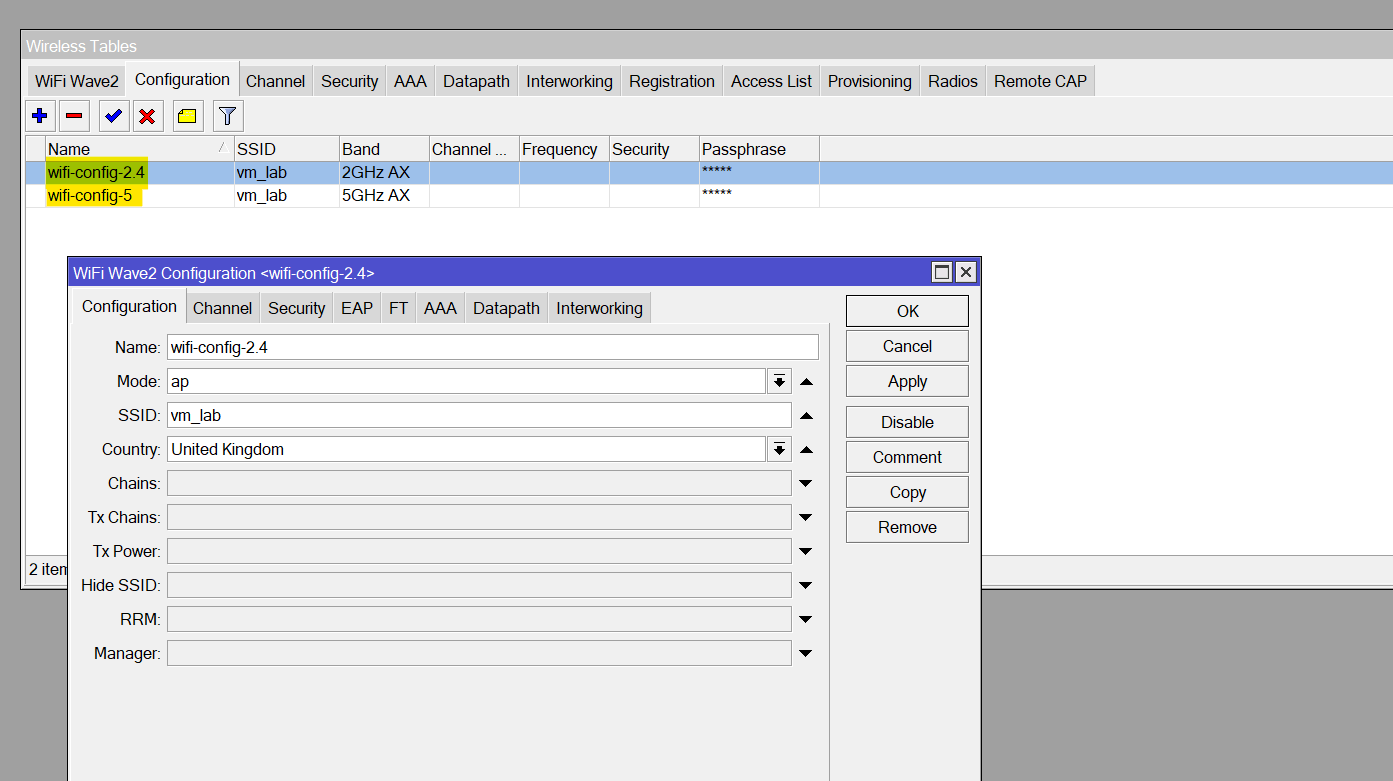
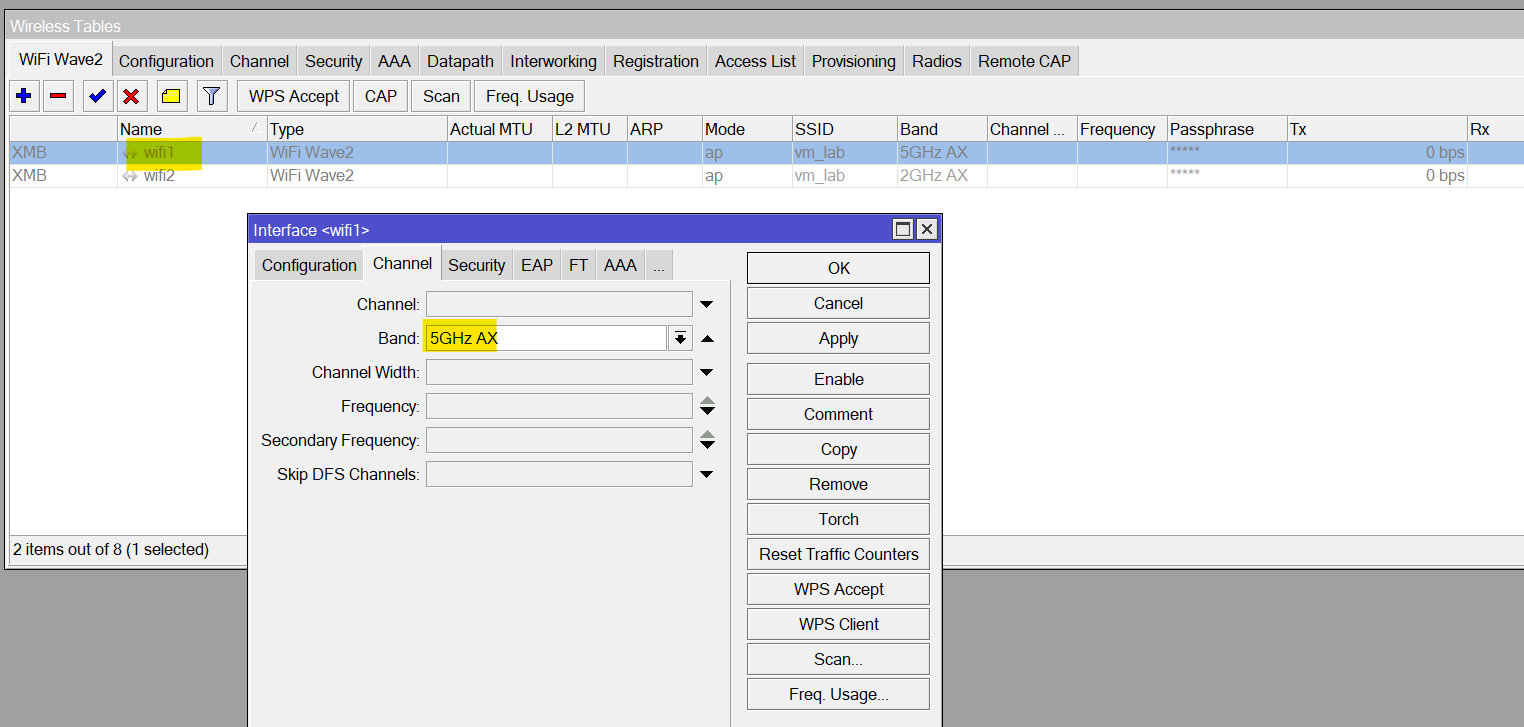
Setting up WiFi on the MikroTik hAP AX2 is straightforward, especially since it supports both 5GHz and 2.4GHz bands. When I hopped into the Wireless section in WinBox, I found two interfaces named 'wifi1' and 'wifi2'. I decided to keep things simple and use the same SSID and password for both bands.
In the Configuration tab, I created two separate configurations, one for the 5GHz band and another for the 2.4GHz band. I then applied these configurations to the corresponding interfaces under the WiFi Wave2 section. I didn't change other settings like Chains, Tx chains, and frequency, as the default settings are optimized for general use.
By applying the same SSID and security settings across both bands, devices can connect to whichever signal is stronger or less congested, without any extra configuration needed from the user.
The final step is to add these two wifi interfaces to the Bridge so, the wireless clients become part of the same LAN network. You can create a new subnet if you want to keep them separate.
NAT Configuration
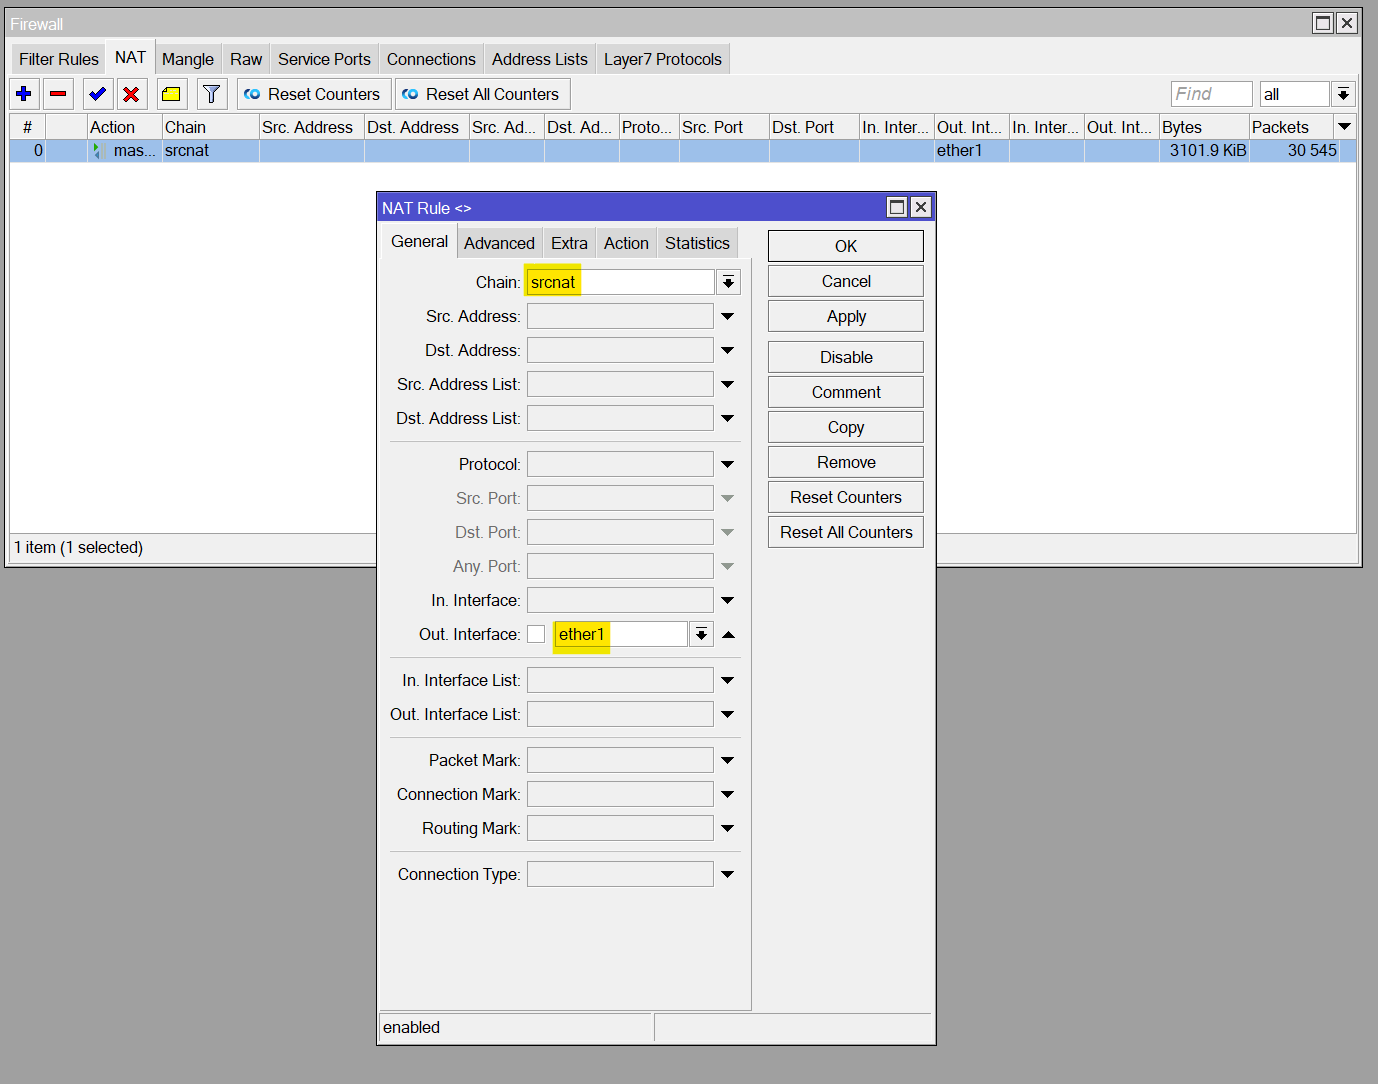
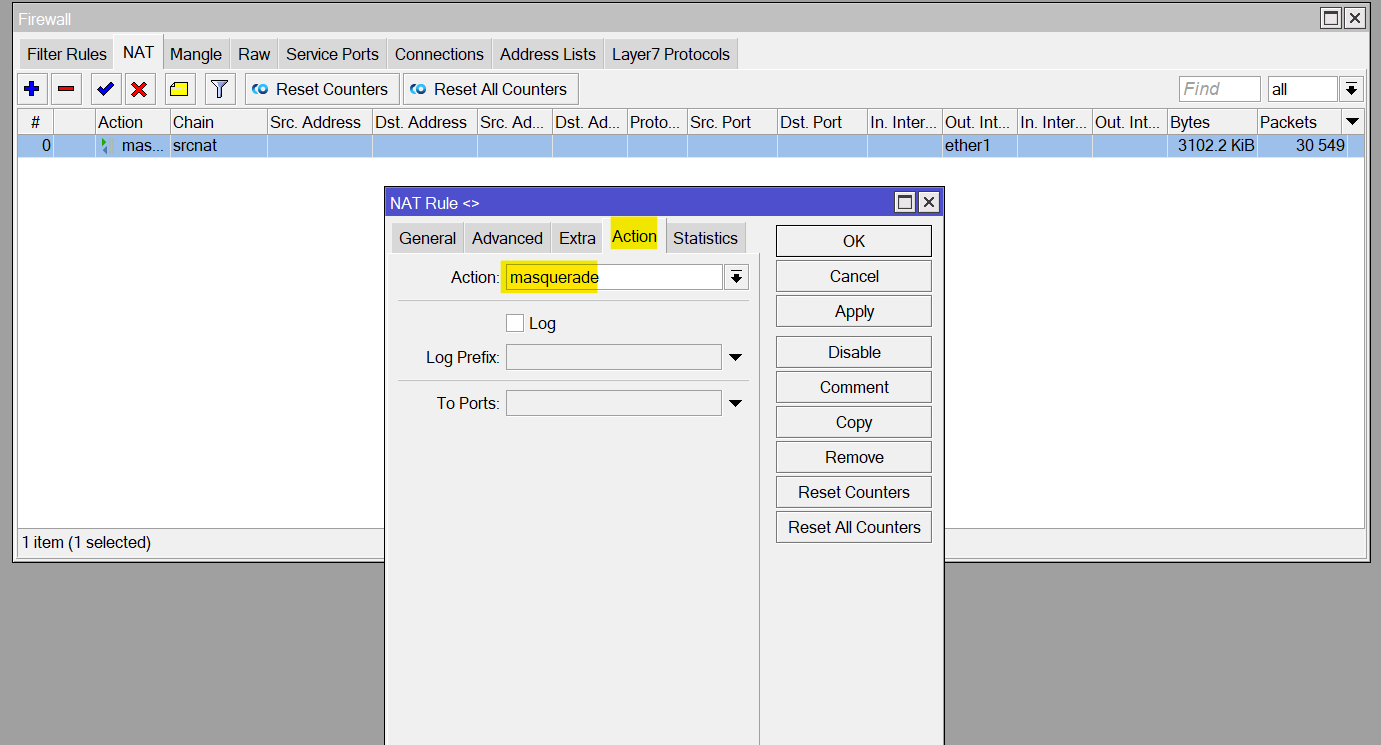
Configuring Network Address Translation (NAT) is essential because it allows all devices on my local network to share the single IP address assigned to my router's WAN interface. By doing this, each device can access the Internet using the same public IP address provided by my ISP.
Navigate to IP > Firewall > NAT and create a Source NAT as shown in the below screenshots. We are telling the router to take any traffic coming from any interface, as it heads out through the eth1 interface to the Internet, to change its source IP to match the IP of the eth1 interface.
Closing Thoughts
That wraps up our guide on setting up a MikroTik hAP AX2 router. We've walked through the initial access, creating a bridge, setting up the LAN IP address, and configuring WiFi and NAT. By following these steps, you should now have a solid foundation for your home or small office network.
I hope you've found this guide straightforward and helpful. Stay tuned for my upcoming posts where I'll dive into more configurations, such as setting up a Wireguard VPN. Until next time, happy networking.