Yes, you read that right. My Network Lab is indeed a text file (YAML file to be more specific). I can share the file with anyone, put it into version control, and never worry about re-creating the lab manually. No more clicking through the GUI and connecting interfaces. How is that even possible? You must be thinking this is clickbait right? Well, I'm talking about using Containerlab to create and manage your network topologies and labs.
My Life Before Containerlab
I started my networking journey with Packet Tracer, then moved on to GNS3. Most of the time, I've used EVE-NG and some Cisco CML. EVE-NG is a great tool, and I still use it for building complex, large topologies with Cisco ISE, multiple firewalls, Active Directory, etc. But when it comes to labbing up pure networking protocols like BGP, OSPF, STP, or even simple IP routing, I needed something very simple that is easy to deploy and manage.
That's when I came across Containerlab which is a Lab-as-a-code tool that helps you set up and manage your network labs easily. Instead of dealing with complex setups and configurations, containerlab simplifies everything for you. Containerlab provides a command-line interface (CLI) that lets you easily start containers, connect them together virtually, and create the network topology you want for your lab.
If you are new to Containerlab, feel free to check out my introductory blog post below.
 Suresh Vina
Quick Recap on Installation and Setup
I covered the installation and adding the Arista cEOS image into Containerlab in the above post, but here is a quick recap.
#installation

bash -c "$(curl -sL https://get.containerlab.dev)"
#adding the arista cEOS image

docker import cEOS-lab-4.28.10.1M.tar ceos:4.27.10.1M
Here is a Simple Example
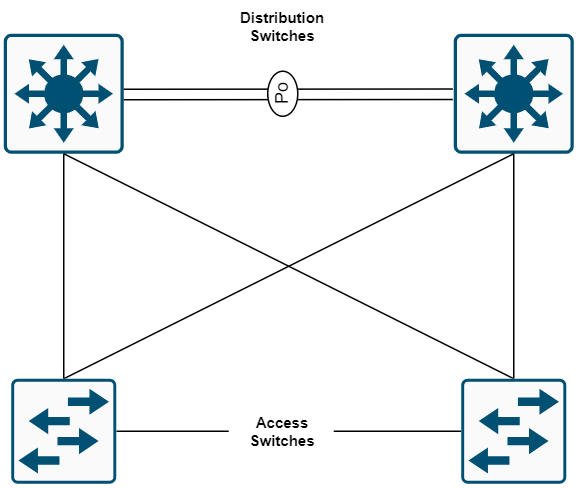
Let's say I want to create the following lab with four nodes to test routing, STP, HSRP, run some automation, or any other network-related task. Typically, I would start by firing up my EVE-NG server, creating a new lab, adding the necessary nodes, and connecting the interfaces. Then, I'd have to start the nodes. If I wanted to do some automation, I'd need to set up the management interface, create user accounts, and enable SSH. This process can take quite a while just to get the prerequisites in place.
If you're just starting out in networking, it's important to learn how to set all of this up. But after doing this a thousand times, I don't want to go through that setup again. I just want to get the lab up and running quickly so I can focus on testing whatever I need to test. This is where Containerlab comes in, offering a simple and efficient way to deploy labs without the repetitive setup process.
If I want to create this lab in Containerlab, all I need is a simple file and a single command sudo containerlab deploy -t topology.yaml. That's it. Your lab will be ready in under a minute (depending on the nodes you are running). The best part is that it's already preconfigured with a default user account, SSH access, and other necessary bits, so you can get it up and running in no time.
---
name: simple_lab

mgmt:
  network: mgmt
  ipv4-subnet: 192.168.100.0/24

topology:
  kinds:
    ceos:
      image: ceos:4.28.10.1M

  nodes:
    aggr-01:
      kind: ceos
      mgmt-ipv4: 192.168.100.100
    aggr-02:
      kind: ceos
      mgmt-ipv4: 192.168.100.101
    access-01:
      kind: ceos
      mgmt-ipv4: 192.168.100.102
    access-02:
      kind: ceos
      mgmt-ipv4: 192.168.100.103
  links:
    - endpoints: ["aggr-01:eth1", "aggr-02:eth1"]
    - endpoints: ["aggr-01:eth2", "aggr-02:eth2"]
    - endpoints: ["aggr-01:eth5", "access-01:eth1"]
    - endpoints: ["aggr-01:eth6", "access-02:eth1"]
    - endpoints: ["aggr-02:eth5", "access-01:eth2"]
    - endpoints: ["aggr-02:eth6", "access-02:eth2"]
What we have in this file is a description of our topology. It includes the nodes we need, the links, and their IP addresses. The benefit of this approach is flexibility. For example, if I want to swap the distribution switches for Cisco or Juniper, I can simply change the image in the topology file. This makes it easy to modify and adapt the lab setup without having to start from scratch.
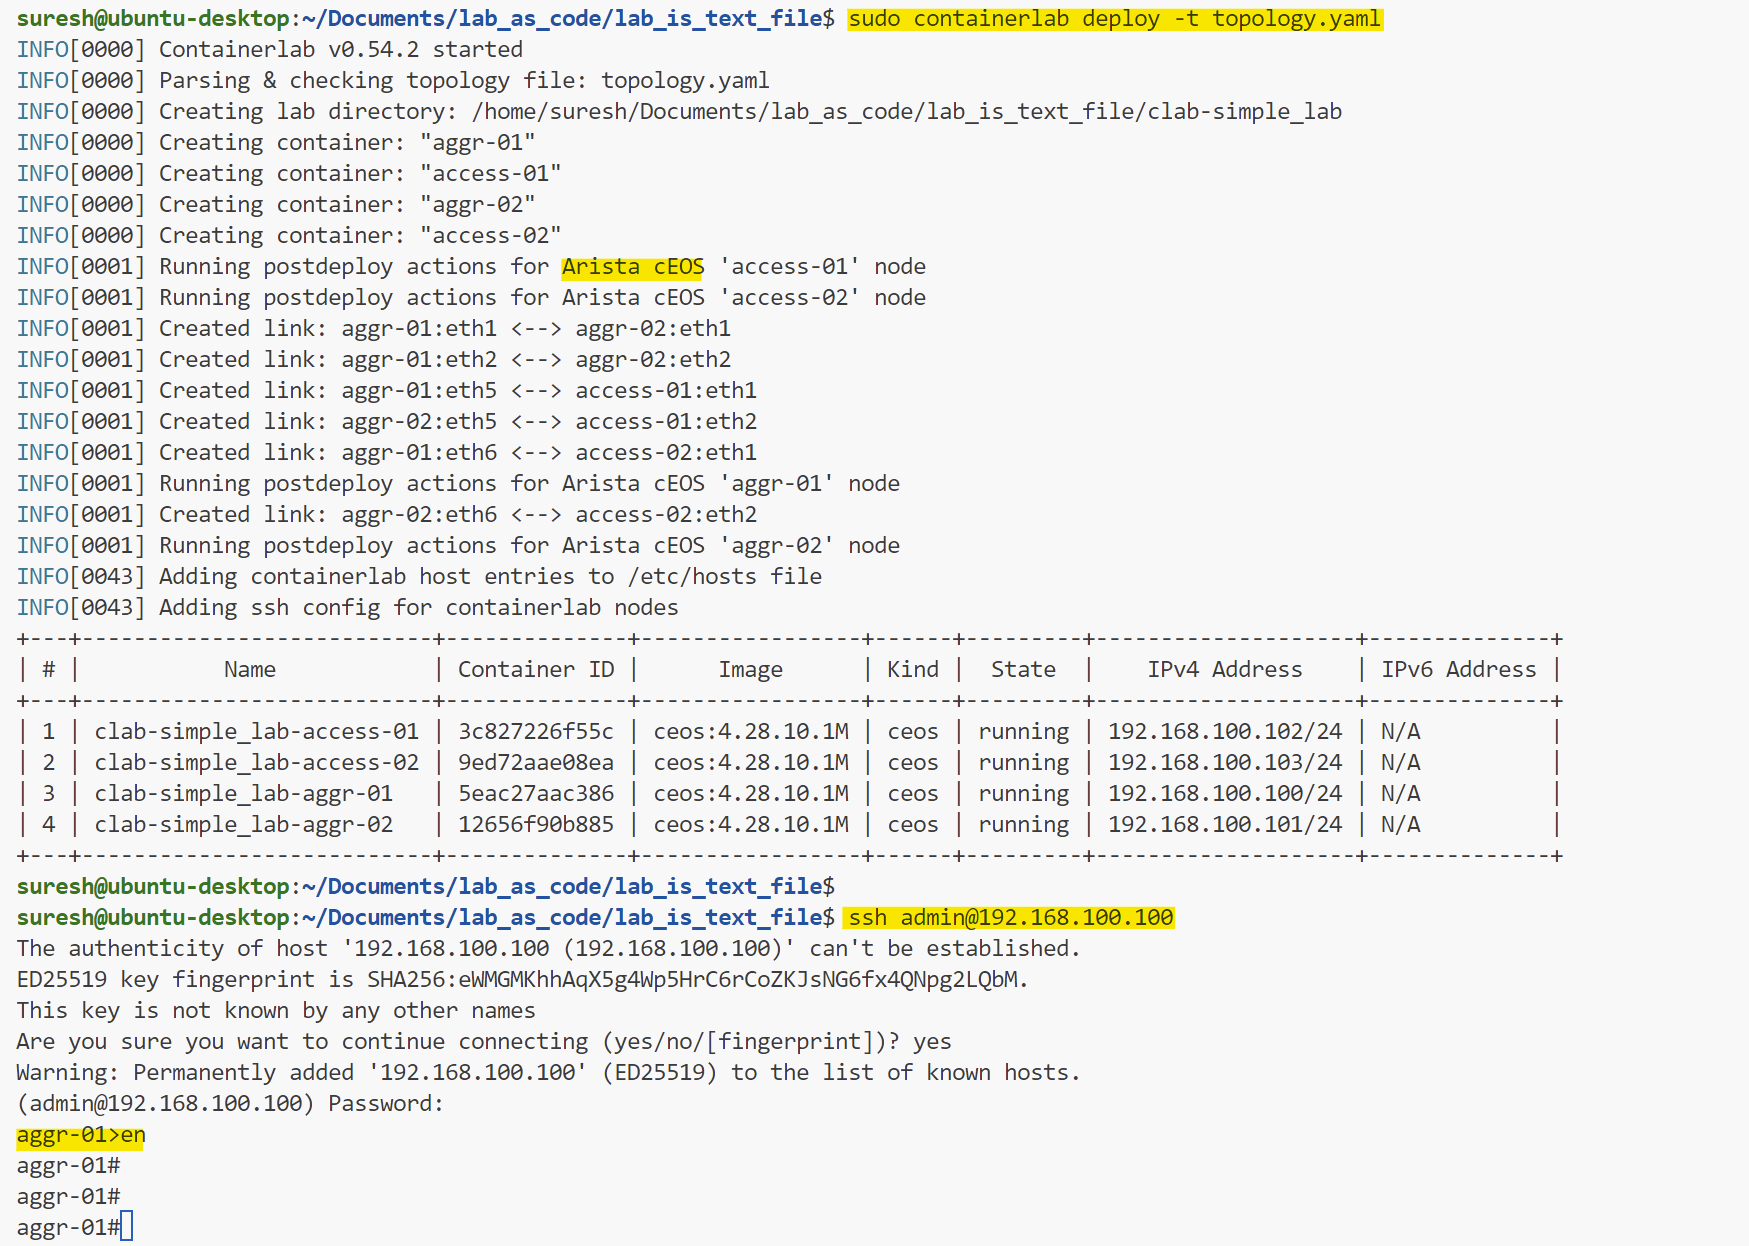
As you can see, it was as simple as that. It took just about a minute, and I can already SSH into the devices. Once I'm done, I can destroy them again with a single command. The resource usage is also low so, you can even run the labs directly on your laptop.
Containerlab can also creates the diagram for you by running a single command as shown below.
suresh@ubuntu-desktop:~sudo containerlab graph -t topology.yaml

INFO[0000] Parsing & checking topology file: topology.yaml
INFO[0000] Serving static files from directory: /etc/containerlab/templates/graph/nextui/static
INFO[0000] Serving topology graph on http://0.0.0.0:50080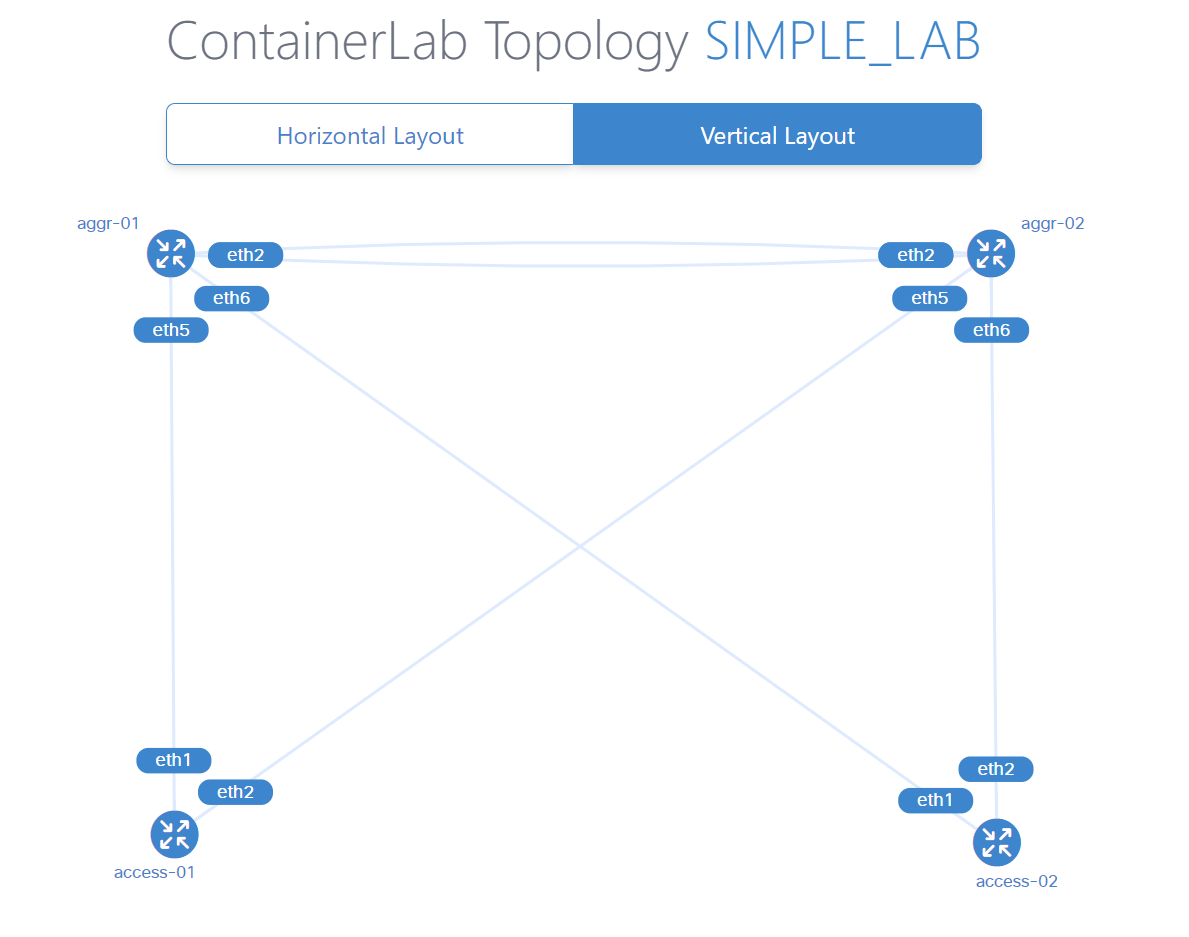
Re-creating the Lab and Sharing
If I ever want to re-create the labs or share them with anyone, all I need is the topology file. Of course, I or whoever is using needs to have Containerlab installed. They also need to have the images, but you get the idea. With the topology file, it's simple to recreate the exact same lab anytime, anywhere.
What's Next?
You can even go another step further by automating the configuration as well. For example, you can use Nornir and Napalm to manage the configurations of the devices. I covered them in-depth in the following blog posts, feel free to check them out below.
Suresh Vina Suresh Vina