I'm sure many of you can relate to the familiar headache that comes with setting up Network Labs. Suppose you just want to test some BGP functionalities, perhaps exploring how to use Route Map with BGP route filtering. Normally, you'd start by setting up a lab environment. This involves selecting a platform like EVE-NG or Cisco CML, adding a bunch of routers, and connecting everything with virtual cables.
Once your setup is physically ready, the real "fun" begins. You start configuring each router, setting interface IPs, adding descriptions, and configuring BGP attributes like neighbours and network statements. If this sounds tedious, that's because it is! I've configured interfaces countless times myself, and it never gets any less painful. Ever typed the wrong IP and then spent hours troubleshooting why you can't ping your peer? If you're nodding in agreement, you're definitely not alone. I know how to configure an interface already, I just don't want to do it for the 1000th time this year.
And just when you think about doing some automation or integrating with 3rd party tools (NMS, NCM etc), you're faced with another set of challenges. Setting up local user accounts, configuring management IPs, creating SSH keys—it feels like falling down a rabbit hole. By the time you're done, you're too exhausted to even remember why you started, to experiment with those damn route maps.
I don't even want to get started with going multi-vendor. Let's say you are done with Cisco and now want to create the same lab for Juniper. You are going to have to do it all over again. So, how do we make this process simpler and less painful? Let's dive into that in this post.
 Suresh Vina
A few things before we start
Before we dive into the details, there are a couple of things I want to highlight.
Firstly, it's important to understand that there's no one-size-fits-all solution here. If you're just starting out in the world of networking, you might find it beneficial to configure interfaces and BGP configurations manually. This guide is best suited for Network Engineers who already have a good understanding of the basics and are looking to automate some of the more tedious tasks.
Secondly, I prefer to manage everything in code. Instead of relying on topology backups and other traditional methods, I prefer to have a bunch of text files at the end of my experiments (Lab-as-a-Code) These files can be easily stored in Git or shared with colleagues. If I ever need to revisit the same lab setup, all I need are these text files. This approach can save a ton of time in the future.
Containerlab, Nornir, Napalm and Jinja2
In this setup, I'm going to use four different tools - Containerlab, Nornir, Napalm, and Jinja2. If you're not entirely familiar with any of these tools, feel free to check out the detailed posts I've written on each of my blogs for a quick refresher.
GitHub link - https://github.com/vsurresh/simple_bgp_lab
Here's how everything comes together.
- Containerlab - We start by defining our network topology in a YAML file, which Containerlab uses to deploy the network as containers. This makes setting up and tearing down labs incredibly easy and efficient.
- Nornir - For inventory management and task executions
- Napalm - We use Napalm for configuration management. It interacts directly with the network devices, pushing configurations and retrieving information when needed.
- Jinja2 - The actual network configurations are dynamically generated using Jinja2 templating. This means we can define templates for configurations like interface IPs and BGP neighbour details, which are then populated with specific values stored in the Nornir hosts file.
It might seem a bit confusing at first glance, but don't worry, once we start using these tools, their benefits and functionalities will become much clearer.
Suresh Vina
Creating a Simple BGP Lab
Alright, let's talk about creating our BGP lab. Suppose we want to set up the BGP topology you see in the diagram, with four routers across four different autonomous systems (AS), each having eBGP peering as shown.
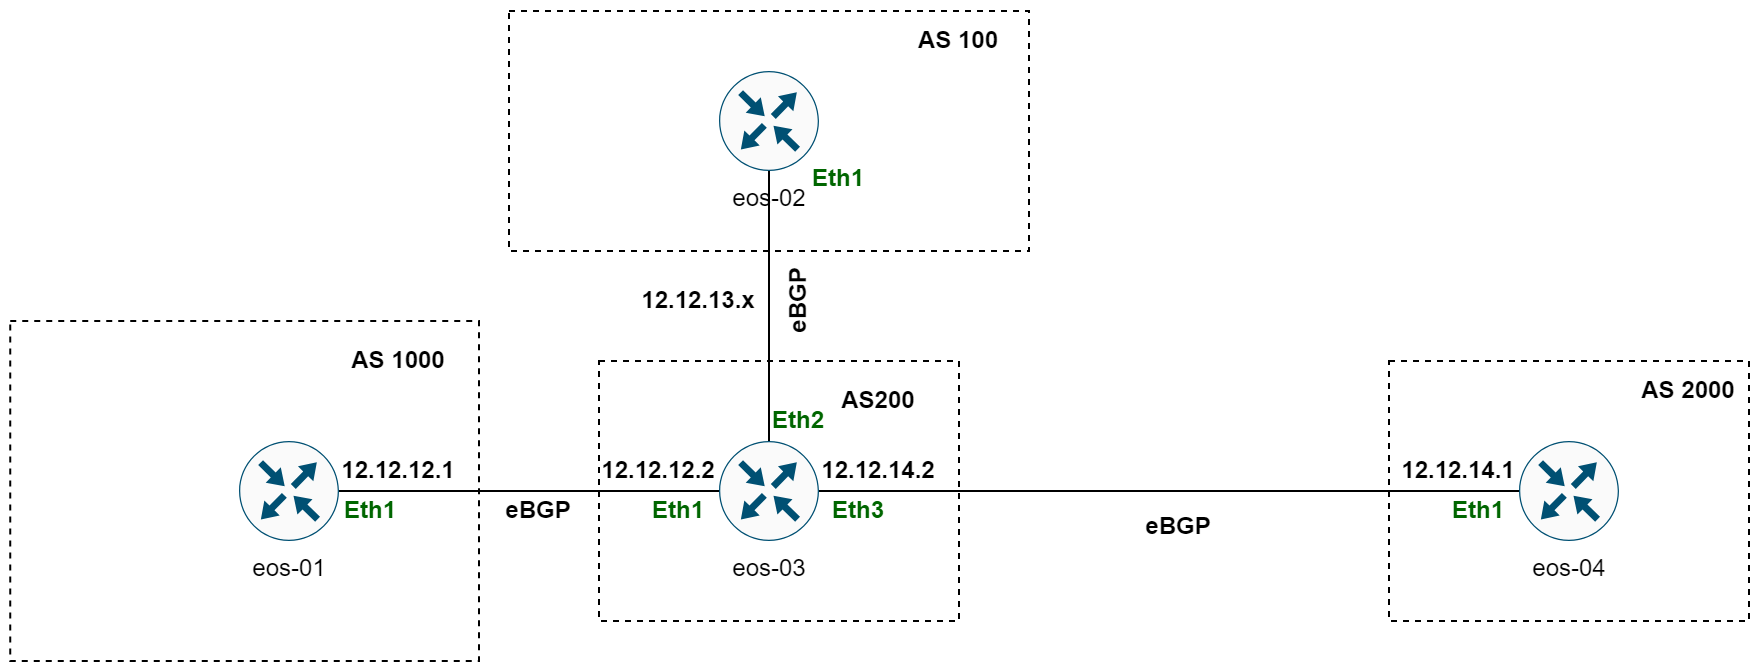
In the past, We could use tools like EVE-NG or CML to manually add nodes and links, but that's exactly what we're trying to avoid. Instead, we're going to take a 'Lab-as-Code' approach, which means defining everything in a structured, code-based format. For deploying this topology in Containerlab, all we need is a YAML file that describes the setup.
I'm also going to use Arista EOS in this example becuase you can download the images from Arista website (require creating an account). If you are coming from Cisco background, don't worry the syntax is almost identical and you should be able to follow along.
Suresh Vina
Directory Structure
Here is the directory structure which holds all the required files and folders.
.
├── clab
│   └── bgp.yaml
└── nornir_files
    ├── config_templates
    │   └── config.j2
    ├── config.yaml
    ├── defaults.yaml
    ├── groups.yaml
    ├── hosts.yaml
    └── render_configs.py
Inside our main project folder, we have organized our files into two primary directories.
clab- This directory is dedicated to Containerlab configurations. It holds ourbgp.yamlfile, which outlines the network topology for Containerlab to spin up our lab environment.nornir_files- This directory contains all the files related to Nornir, our automation framework of choice.- The
nornir_filesdirectory contains the followingconfig_templates- A subdirectory where our Jinja2 templates live. Specifically,config.j2is stored here, which is our template for device configurations.config.yaml- This is the Nornir configuration file that tells Nornir how to initialize and what plugins to use.defaults.yaml- A YAML file specifying default values for our hosts, such as usernames and passwords.groups.yaml- Contains group-specific data that can be inherited by hosts in Nornir.hosts.yaml- This important file holds the details of each network device, like hostnames and roles.
render_configs.py: A Python script that uses Nornir to render and deploy configurations to devices.
Containerlab
Here's a high-level look at what the YAML file for our BGP lab might include.
#bgp.yaml

name: bgp

mgmt:
  network: mgmt
  ipv4-subnet: 192.168.100.0/24

topology:
  kinds:
    ceos:
      image: ceos:4.27.12M
  nodes:
    eos-01:
      kind: ceos
      mgmt-ipv4: 192.168.100.11
    eos-02:
      kind: ceos
      mgmt-ipv4: 192.168.100.12
    eos-03:
      kind: ceos
      mgmt-ipv4: 192.168.100.13
    eos-04:
      kind: ceos
      mgmt-ipv4: 192.168.100.14
  links:
    - endpoints: ["eos-01:eth1", "eos-03:eth1"]
    - endpoints: ["eos-02:eth1", "eos-03:eth2"]
    - endpoints: ["eos-04:eth1", "eos-03:eth3"]
Without getting into the nitty-gritty of the file, what we're doing is defining the management network details, the types of nodes we'll use, and the connections between them. Each node's management IP is also specified. With just a single line of command, we can bring the lab up and running.
sudo containerlab deploy --topo bgp.yaml
If you're curious about the inner workings of Containerlab and want to dive deeper into how it works, make sure to check out my other blog post dedicated to that topic.
Suresh Vina
Nornir
In our lab setup, Nornir plays an important role. It allows us to manage and automate the configurations for our network devices using various plugins.
#config.yaml

---
inventory:
  plugin: SimpleInventory
  options:
    host_file: 'hosts.yaml'
    group_file: 'groups.yaml'
    defaults_file: 'defaults.yaml'

runner:
  plugin: threaded
  options:
    num_workers: 5
#groups.yaml
---
arista:
connection_options:
napalm:
platform: eos
extras:
optional_args:
transport: ssh#defaults.yaml
---
username: admin
password: adminThis hosts.yaml file contains the details of each device in our topology, such as management IP (hostname), the group it belongs to (indicating a specific set of characteristics and configurations like device type), and custom data. Under data, we outline the specifics of interface configurations and BGP settings such as AS numbers and neighbour relationships.
#hosts.yaml

---
eos-01:
  hostname: 192.168.100.11
  groups:
    - arista
  data:
    interfaces:
      - name: eth1
        description: eos-03
        ip: 12.12.12.1 255.255.255.0
    bgp:
      asn: 1000
      neighbours:
        - ip: 12.12.12.2
          asn: 200

eos-02:
  hostname: 192.168.100.12
  groups:
    - arista
  data:
    interfaces:
      - name: eth1
        description: eos-03
        ip: 12.12.13.1 255.255.255.0
    bgp:
      asn: 100
      neighbours:
        - ip: 12.12.13.2
          asn: 200

eos-03:
  hostname: 192.168.100.13
  groups:
    - arista
  data:
    interfaces:
      - name: eth1
        description: eos-01
        ip: 12.12.12.2 255.255.255.0
      - name: eth2
        description: eos-02
        ip: 12.12.13.2 255.255.255.0
      - name: eth3
        description: eos-03
        ip: 12.12.14.2 255.255.255.0
    bgp:
      asn: 200
      neighbours:
        - ip: 12.12.12.1
          asn: 1000
        - ip: 12.12.13.1
          asn: 100
        - ip: 12.12.14.1
          asn: 2000

eos-04:
  hostname: 192.168.100.14
  groups:
    - arista
  data:
    interfaces:
      - name: eth1
        description: eos-03
        ip: 12.12.14.1 255.255.255.0
    bgp:
      asn: 2000
      neighbours:
        - ip: 12.12.14.2
          asn: 200
In short, what we have here is a straightforward, yet powerful structured data format that Nornir uses to render configurations and manage the state of each device. By defining everything here, we can automate repetitive tasks like configuring interfaces and setting up BGP, which, as we discussed before, can be a time-consuming process if done manually.
Remember, this is just a high-level overview. If you’re eager to dig deeper into the nuts and bolts of Nornir, make sure to check out my in-depth post on it.
Suresh Vina
Jinja2
Jinja2 is an incredibly versatile templating language that we use to generate the actual configuration for our devices based on the data we’ve defined in the hosts.yaml file.
#config.j2

ip routing
!
{% for interface in interfaces%}
interface {{ interface.name }}
 no switchport
 description {{ interface.description }}
 ip address {{ interface.ip }}
 no shut
!
{% endfor %}
router bgp {{ bgp.asn }}
{% for neighbour in bgp.neighbours  %}
 neighbor {{ neighbour.ip }} remote-as {{ neighbour.asn }}
{% endfor %}
!
end
ip routingis the command to enable IP routing on the device.- The
{% for interface in interfaces %}loop iterates over each interface defined in theinterfaceslist of thehosts.yamlfile for a device. - Inside the loop, we use
{{ interface.name }},{{ interface.description }}, and{{ interface.ip }}to replace these placeholders with the actual values for each interface. - Once all interfaces are configured, the template moves on to configure BGP.
router bgp {{ bgp.asn }}sets the BGP autonomous system number for the router.- Another loop,
{% for neighbour in bgp.neighbours %}, goes through all the defined BGP neighboursneighbourand sets up the neighbor relationship with theneighbor {{ neighbour.ip }} remote-as {{ neighbour.asn }}command.
What Jinja2 does here is map the variables and loops in the template with the data from the hosts.yaml file. So, for a router like eos-01, it would replace {{ interface.name }} with eth1, {{ interface.description }} with eos-03, and so on. The result is a rendered configuration that's ready to be pushed to the device.
Suresh Vina
Napalm
To push the configurations, we're using Napalm, a powerful Python library that interacts with network devices. While Netmiko could also handle this task, I've opted for Napalm.
To get started with Napalm (with Nornir), we first need to install the nornir_napalm plugin. Additionally, we require the nornir_jinja2 plugin to render our Jinja2 templates.
pip install nornir_napalm
pip install nornir_jinja2
Here is the Nornir script that uses Napalm and Jinja2 plugins. I have two functions (tasks). The first one renders the required configrations and the second task pushes the rendered-configuration to each device.
#render_configs.py

from nornir import InitNornir
from nornir_napalm.plugins.tasks import napalm_configure
from nornir_utils.plugins.functions import print_result
from nornir_jinja2.plugins.tasks import template_file

def render_config(task):
    template = 'config.j2'
    result = task.run(task=template_file, template=template, path='config_templates/', **task.host)
    rendered_config = result[0].result
    task.host['rendered_config'] = rendered_config

def napalm_send_config(task):
    host = task.host
    config = host['rendered_config']
    task.run(task=napalm_configure, configuration=config, dry_run=False)

nr = InitNornir(config_file='config.yaml')
result = nr.run(task=render_config)
result1 = nr.run(task=napalm_send_config)

print_result(result1)
Here is the rendered config for eos-01
render_config*******************************************************************
* eos-01 ** changed : False ****************************************************
vvvv render_config ** changed : False vvvvvvvvvvvvvvvvvvvvvvvvvvvvvvvvvvvvvvvvvv INFO
---- template_file ** changed : False ------------------------------------------ INFO
ip routing
!
interface eth1
 no switchport
 description eos-03
 ip address 12.12.12.1 255.255.255.0
 no shut
!
interface Loopback1
 no switchport
 description test_network
 ip address 100.100.1.1 255.255.255.0
 no shut
!
router bgp 1000
 neighbor 12.12.12.2 remote-as 200
 network 100.100.1.0 mask 255.255.255.0
!
end
^^^^ END render_config ^^^^^^^^^^^^^^^^^^^^^^^^^^^^^^^^^^^^^^^^^^^^^^^^^^^^^^^^^
napalm_send_config**************************************************************
* eos-01 ** changed : True *****************************************************
vvvv napalm_send_config ** changed : False vvvvvvvvvvvvvvvvvvvvvvvvvvvvvvvvvvvvv INFO
---- napalm_configure ** changed : True ---------------------------------------- INFO
@@ -22,12 +22,18 @@
transport ssh default
!
interface Ethernet1
+ description eos-03
+ no switchport
+ ip address 12.12.12.1/24
!
interface Management0
ip address 192.168.100.11/24
!
-no ip routing
+ip routing
!
ip route 0.0.0.0/0 192.168.100.1
!
+router bgp 1000
+ neighbor 12.12.12.2 remote-as 200
+!
end
^^^^ END napalm_send_config ^^^^^^^^^^^^^^^^^^^^^^^^^^^^^^^^^^^^^^^^^^^^^^^^^^^^
* eos-02 ** changed : True *****************************************************
vvvv napalm_send_config ** changed : False vvvvvvvvvvvvvvvvvvvvvvvvvvvvvvvvvvvvv INFO
---- napalm_configure ** changed : True ---------------------------------------- INFO
@@ -22,12 +22,18 @@
transport ssh default
!
interface Ethernet1
+ description eos-03
+ no switchport
+ ip address 12.12.13.1/24
!
interface Management0
ip address 192.168.100.12/24
!
-no ip routing
+ip routing
!
ip route 0.0.0.0/0 192.168.100.1
!
+router bgp 100
+ neighbor 12.12.13.2 remote-as 200
+!
end
^^^^ END napalm_send_config ^^^^^^^^^^^^^^^^^^^^^^^^^^^^^^^^^^^^^^^^^^^^^^^^^^^^
* eos-03 ** changed : True *****************************************************
vvvv napalm_send_config ** changed : False vvvvvvvvvvvvvvvvvvvvvvvvvvvvvvvvvvvvv INFO
---- napalm_configure ** changed : True ---------------------------------------- INFO
@@ -22,16 +22,30 @@
transport ssh default
!
interface Ethernet1
+ description eos-01
+ no switchport
+ ip address 12.12.12.2/24
!
interface Ethernet2
+ description eos-02
+ no switchport
+ ip address 12.12.13.2/24
!
interface Ethernet3
+ description eos-03
+ no switchport
+ ip address 12.12.14.2/24
!
interface Management0
ip address 192.168.100.13/24
!
-no ip routing
+ip routing
!
ip route 0.0.0.0/0 192.168.100.1
!
+router bgp 200
+ neighbor 12.12.12.1 remote-as 1000
+ neighbor 12.12.13.1 remote-as 100
+ neighbor 12.12.14.1 remote-as 2000
+!
end
^^^^ END napalm_send_config ^^^^^^^^^^^^^^^^^^^^^^^^^^^^^^^^^^^^^^^^^^^^^^^^^^^^
* eos-04 ** changed : True *****************************************************
vvvv napalm_send_config ** changed : False vvvvvvvvvvvvvvvvvvvvvvvvvvvvvvvvvvvvv INFO
---- napalm_configure ** changed : True ---------------------------------------- INFO
@@ -22,12 +22,18 @@
transport ssh default
!
interface Ethernet1
+ description eos-03
+ no switchport
+ ip address 12.12.14.1/24
!
interface Management0
ip address 192.168.100.14/24
!
-no ip routing
+ip routing
!
ip route 0.0.0.0/0 192.168.100.1
!
+router bgp 2000
+ neighbor 12.12.14.2 remote-as 200
+!
end
^^^^ END napalm_send_config ^^^^^^^^^^^^^^^^^^^^^^^^^^^^^^^^^^^^^^^^^^^^^^^^^^^^If I log in to the devices, I should be able to ping the peer IP and the BGP session should be established. Let's check it on a couple of devices.
eos-01#ping 12.12.12.2
PING 12.12.12.2 (12.12.12.2) 72(100) bytes of data.
80 bytes from 12.12.12.2: icmp_seq=1 ttl=64 time=0.099 ms
80 bytes from 12.12.12.2: icmp_seq=2 ttl=64 time=0.030 ms
80 bytes from 12.12.12.2: icmp_seq=3 ttl=64 time=0.017 ms
80 bytes from 12.12.12.2: icmp_seq=4 ttl=64 time=0.015 ms
80 bytes from 12.12.12.2: icmp_seq=5 ttl=64 time=0.005 ms
eos-01#show ip bgp summary
BGP summary information for VRF default
Router identifier 12.12.12.1, local AS number 1000
Neighbor Status Codes: m - Under maintenance
Neighbor V AS MsgRcvd MsgSent InQ OutQ Up/Down State PfxRcd PfxAcc
12.12.12.2 4 200 7 7 0 0 00:02:59 Estab 0 0eos-01#show run | sec bgp
router bgp 1000
neighbor 12.12.12.2 remote-as 200eos-04#show ip bgp summary
BGP summary information for VRF default
Router identifier 12.12.14.1, local AS number 2000
Neighbor Status Codes: m - Under maintenance
Neighbor V AS MsgRcvd MsgSent InQ OutQ Up/Down State PfxRcd PfxAcc
12.12.14.2 4 200 8 8 0 0 00:03:28 Estab 0 0Adding More Configurations
Now let's say we want to add a Loopback interface to eos-01 and inject its route into BGP without manually configuring it via CLI.
In the hosts.yaml file, we've added a new interface under the interfaces section for eos-01. We've also added aprefixes section in hosts.yaml for eos-01 to include the new network under the BGP process.
#hosts.yaml

---
eos-01:
  hostname: 192.168.100.11
  groups:
    - arista
  data:
    interfaces:
      - name: eth1
        description: eos-03
        ip: 12.12.12.1 255.255.255.0
      - name: Loopback1 #new lines
        description: test_network
        ip: 100.100.1.1 255.255.255.0
    bgp:
      asn: 1000
      neighbours:
        - ip: 12.12.12.2
          asn: 200
    prefixes: #new lines
      - ip: 100.100.1.0
        mask: 255.255.255.0

<< TRUNCATED >>
Now, let's discuss the changes to the Jinja2 template. we've altered the BGP section to handle the new prefixes structure (network statements) that now includes separate ip and mask fields. (Lines #17 - 21)
#config.j2

ip routing
!
{% for interface in interfaces%}
interface {{ interface.name }}
 no switchport
 description {{ interface.description }}
 ip address {{ interface.ip }}
 no shut
!
{% endfor %}
router bgp {{ bgp.asn }}
{% for neighbour in bgp.neighbours  %}
 neighbor {{ neighbour.ip }} remote-as {{ neighbour.asn }}
{% endfor %}
{% if prefixes %}
{% for prefix in prefixes %}
 network {{ prefix.ip }} mask {{ prefix.mask }}
{% endfor %}
{% endif %}
!
end
With these adjustments, the template now reads the IP and mask separately for each entry under prefixes and uses them to create BGP network statements that will be used to advertise these networks.
By updating the hosts.yaml and Jinja2 template and rerunning the script, we effectively add the Loopback interface configuration and its associated route advertisement to the BGP configuration, all in an automated, repeatable, and error-free manner. Here is the output from Nornir/Napalm when we re-run the script.
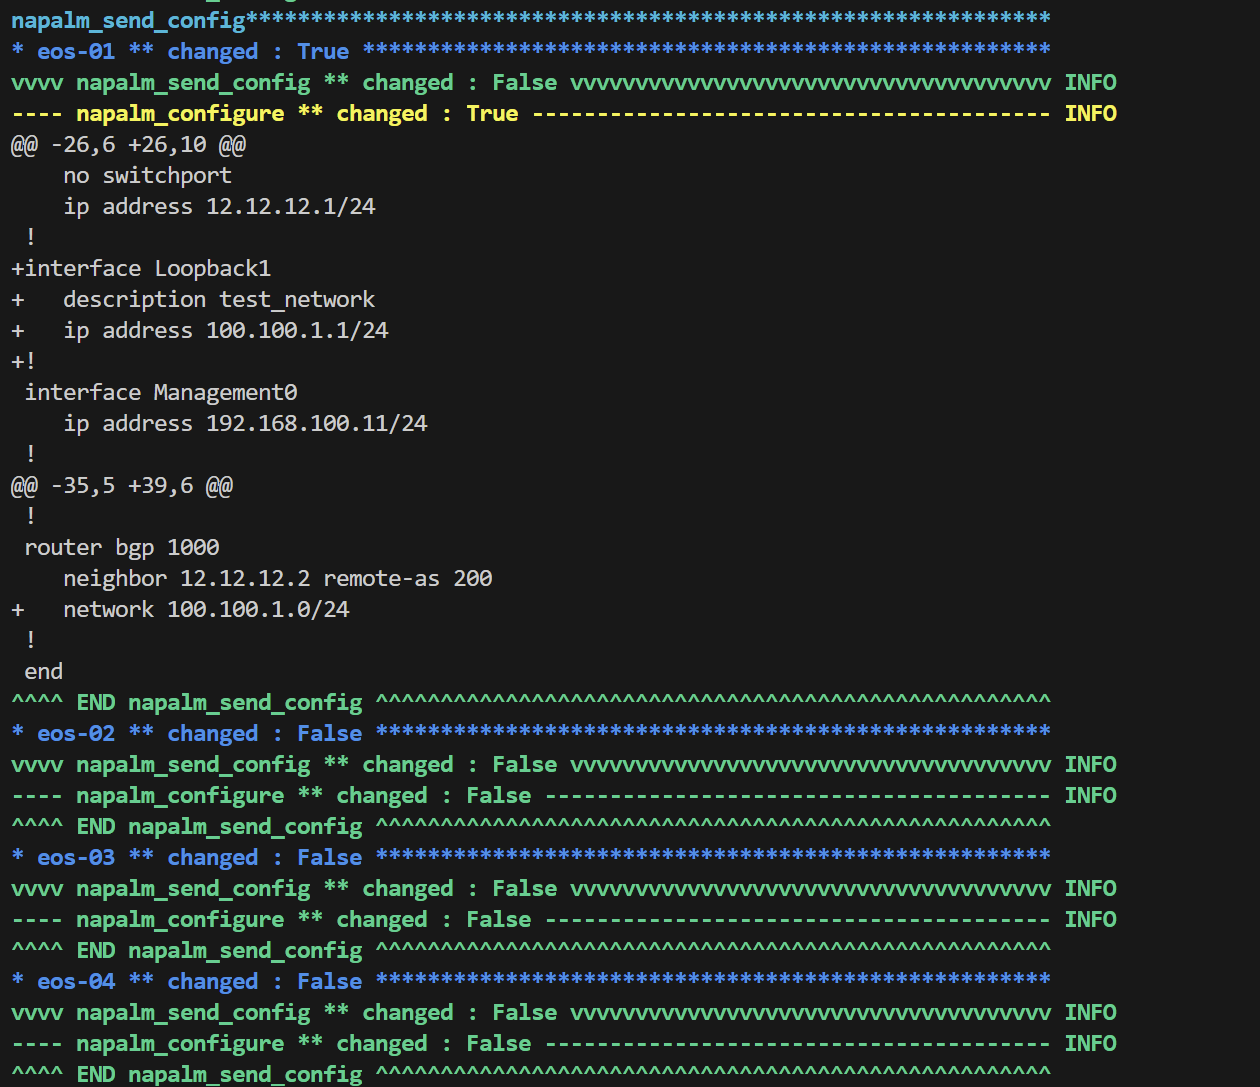
The + sign indicates the config lines being added to the device. We can also see, there are no changes to the other 3 devices. If I go to eos-04, I should be able to see the new prefix in the BGP table that is coming from eos-01
eos-04#show ip bgp
BGP routing table information for VRF default

          Network                Next Hop              Metric  AIGP       LocPref Weight  Path
 * >      100.100.1.0/24         12.12.14.2            0       -          100     0       200 1000 i
Where do we go from here?
Now, let's imagine you've set everything up, dived into some BGP configurations, and things went a bit sideways, we've all been there, haven't we? The beauty of this approach is in the simplicity of starting over. If you mess up, all it takes to get back to square one is to tear down the lab and recreate it, which only takes a few minutes. That's the power of 'Lab-as-a-Code'.
And what if you're looking to switch things up and work with Juniper instead of Arista? No problem at all. All you need to do is update the topology file to swap out the Arista container for a Juniper one, create a new Jinja2 template that speaks Junos, and push out the configurations.
Closing Up
I hope you've found this walk-through straightforward and easy to follow. I avoided diving too deep into every detail to keep things light and to avoid overwhelming you with a massive blog post.
I'd love to hear your thoughts on this. If you've got comments, questions, or feedback, drop them in the comments section. I'm always looking to improve and share knowledge that can make our networking lives a little bit easier. Thanks for reading 🙃
References
https://juliopdx.com/2021/12/10/my-journey-and-experience-with-containerlab/