
Recently, I came across a task of generating configurations for a handful of Cisco switches. The most important thing of the task was to ensure the base config is identical across all of the switches to maintain consistency. For example, all the switches should have identical NTP, SNMP, AAA, banner etc configurations. Of course, the port description, VLANs, and the number of ports will be different on each of the switches.
The usual route I take is to first come up with the base config file and then duplicate that into multiple text files. I will then add the unique values to each configuration file. The problem with that is, if I were to change anything from the base config, I will have to go and change the same value on all of the configurations, with this approach, there is a high chance, I will do a mistake somewhere.
Device Templating with Jinja
After doing a bit of research for finding an alternative method, I came across a templating tool called Jinja. Jinja is an amazing templating engine that can be used with Python, Ansible or any other automation tool that you use.
The idea is two create two files, a template file and a variable file. The template file contains the base configuration and the variable file contains all the elements that go into the template such as interface IP, VLAN, etc.
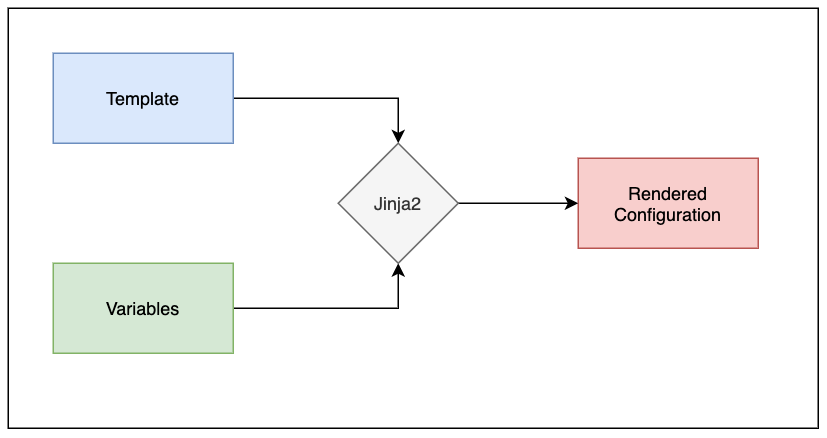
You can use finally use Python or Ansible to merge both files together to get the desired configuration.
Understanding Jinja2?
At its core, Jinja2 works by defining placeholders and variables within a template file. These placeholders are enclosed by double curly brackets {{ }}. Once a template is defined, it can be populated with actual data using a process called rendering. This is achieved in Python by passing a dictionary of variables to the template's render method.
The true power of Jinja2, however, lies in its ability to include advanced features like filters, tags, macros, and conditional statements. These features allow you to create dynamic content that can change depending on the data provided.
The Role of Python
While Jinja2 is a powerful templating engine, it doesn't work in isolation. It needs a host language to drive the template rendering process and provide the data which populates the templates, and that's where Python comes in.
Python, due to its simple syntax and wide variety of libraries, works seamlessly with Jinja2. Python is used to pass data into the Jinja2 templates, and also to control the logic for rendering these templates. This means that Python acts as the 'engine' which drives the Jinja2 'car', enabling you to navigate through the diverse terrains of network configuration tasks.
As for the level of Python knowledge required, the basics should suffice. Familiarity with data types, control structures (like if-else conditions and for loops), and functions would be beneficial. Knowledge of Python's file handling operations would be a plus, as it helps in working with template files.
Jinja2 Delimiters
The default Jinja delimiters are shown below:
{% ... %}- Statements (for loop, if/else conditions){{ ... }}- Variables and expressions{# ... #}- Comments
Jinja2 Value Substitution
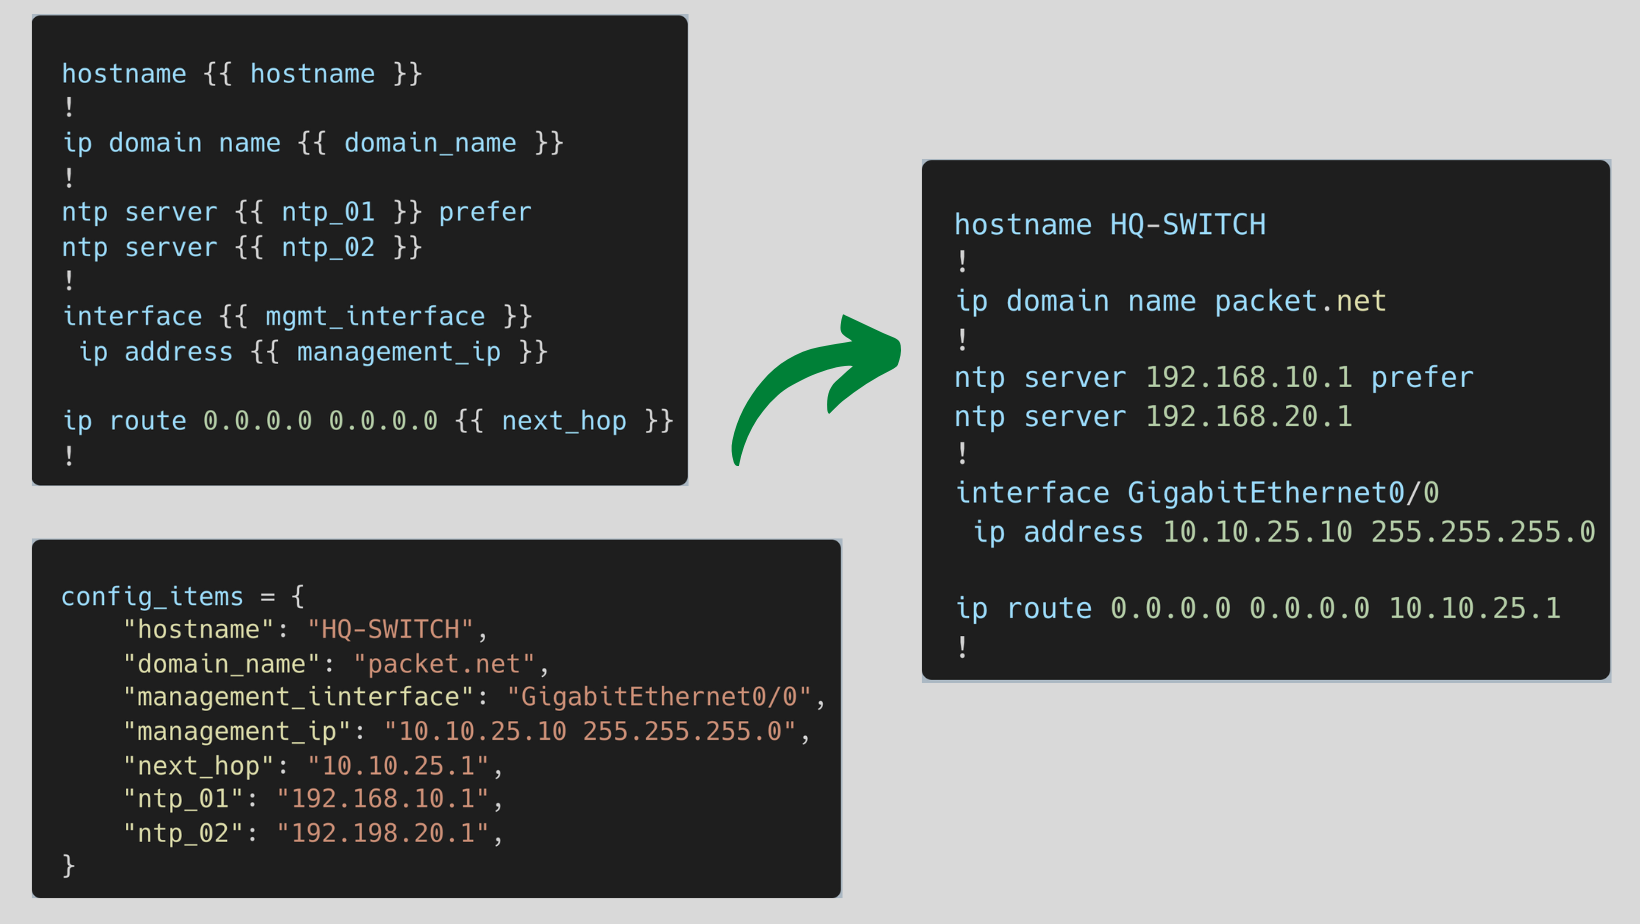
To start with, let's look at Jinja2 value substitution where a template contains variables (double curly braces) which get replaced with values when a template is rendered.
As you can see below, I defined a template and the required variables. Merging them together generates a configuration file that can be pushed to the device.
For loop with Jinja
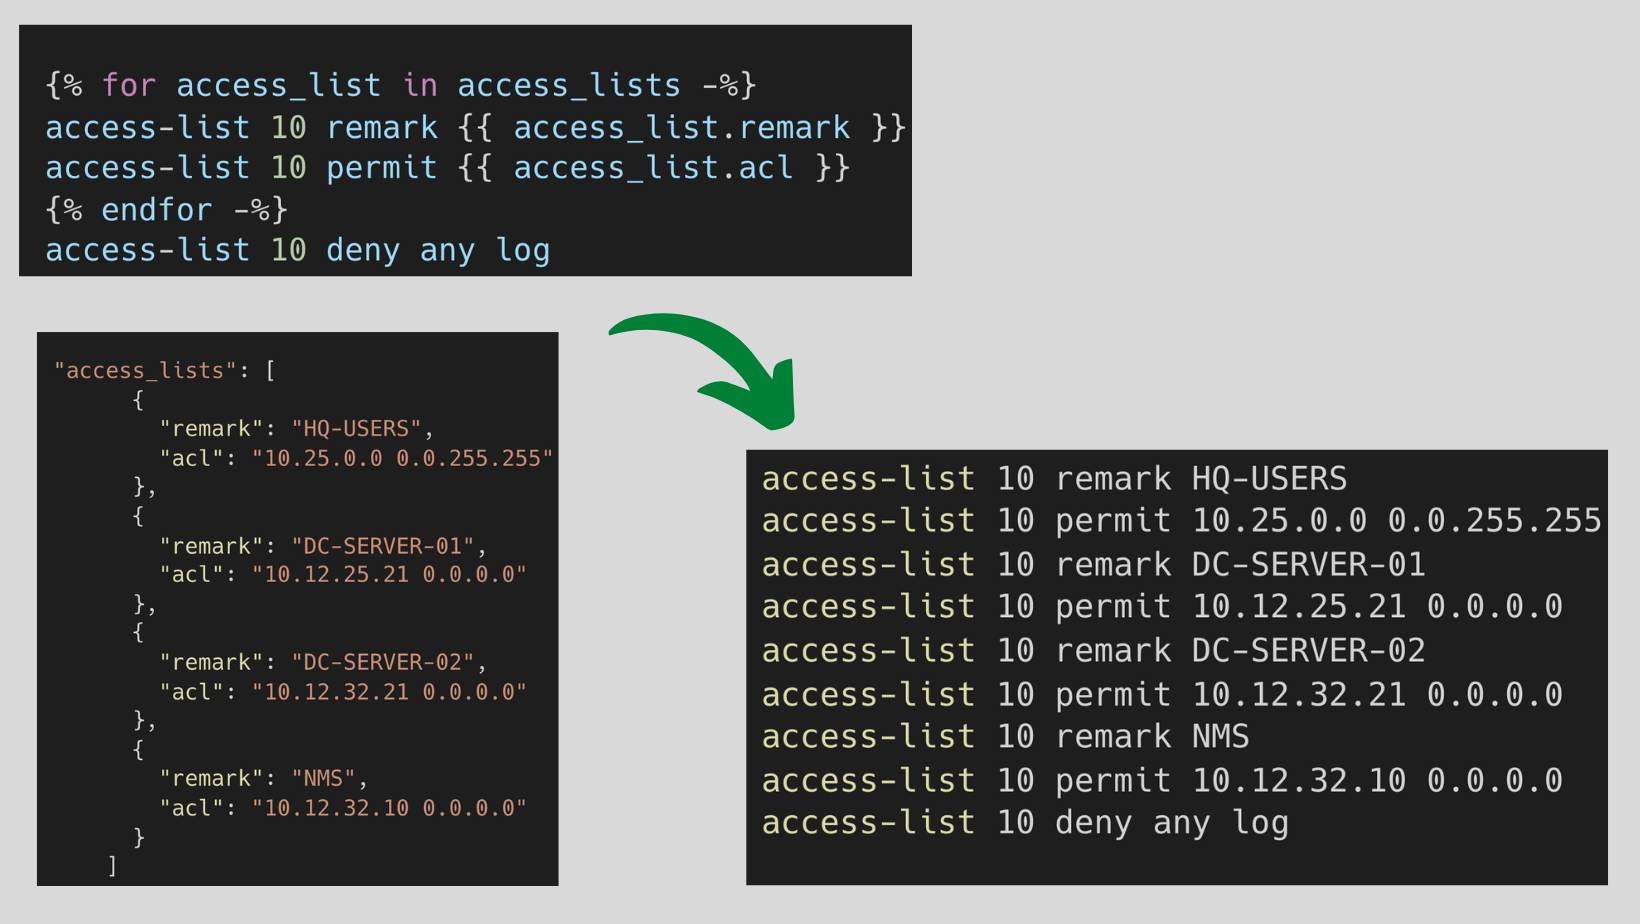
My preference is to keep the template as short as possible. For example, instead of defining each and every line of ACL in the template, I created a for loop and then defined the ACL parameters in the variable file.
As you can see in the below diagram, the Jinja template has a for loop that starts with {% for -%} and ends with {% endfor -%}.
The loop iterates through access_lists variable containing the actual ACEs (Access List Entry) alongside the remarks. When you render the template, the for loop iterates through the entire list and spits out the desired output. If you want to add another entry, all you have to do is add another ACE to the access-lists variable rather than touching the template or rendered configuration file.
If/Else Conditional
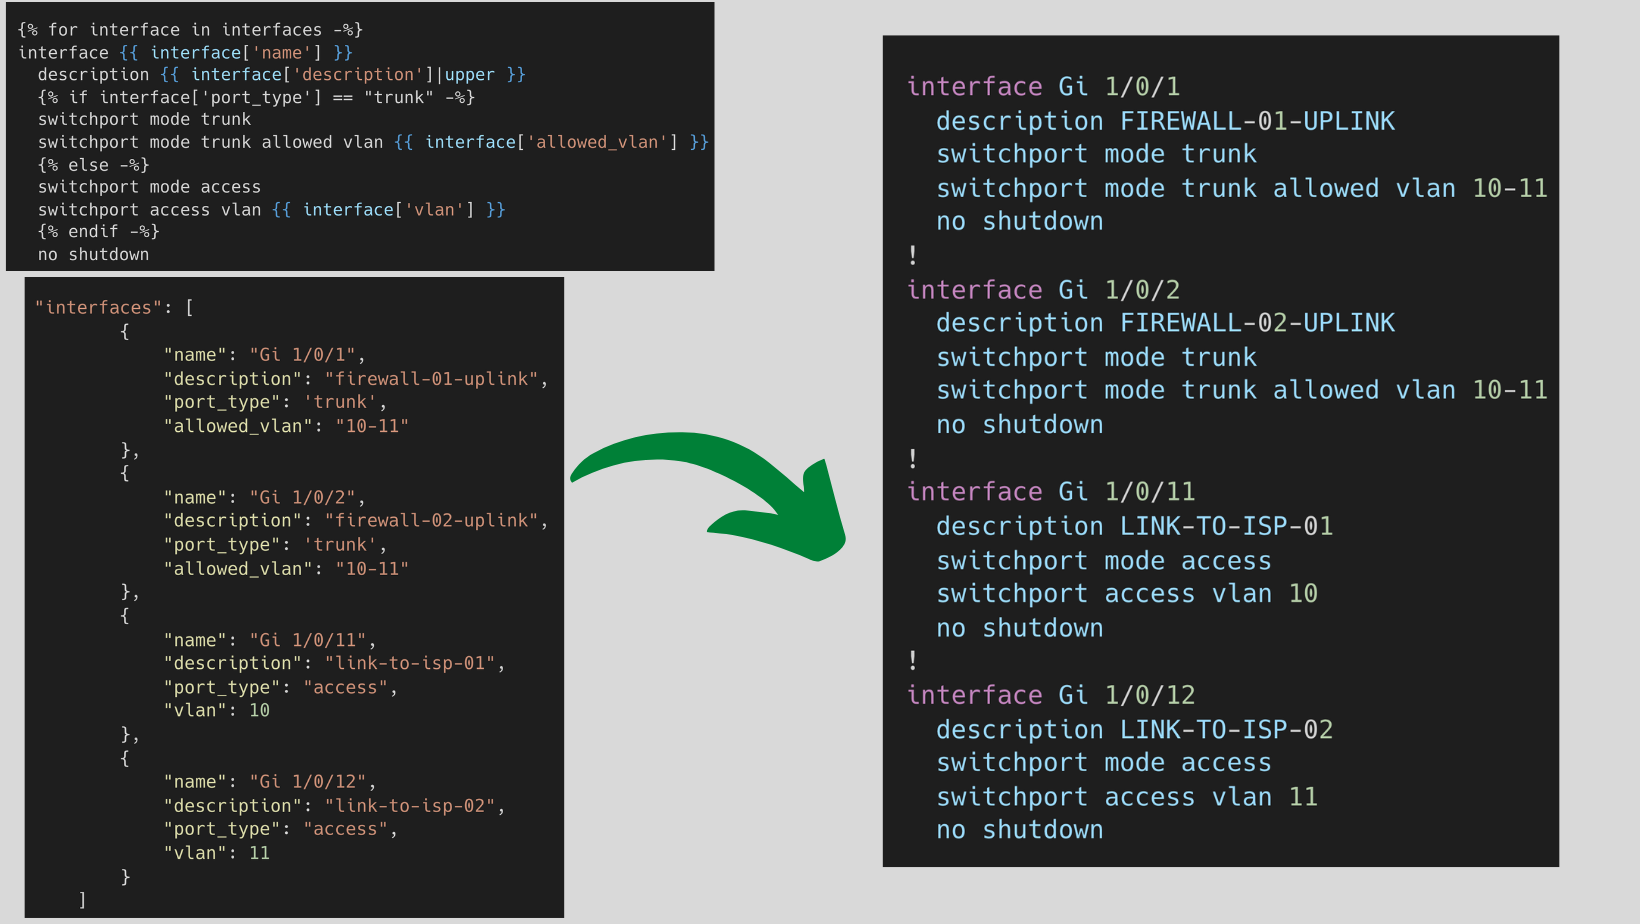
If/Else conditional is very useful when you want to render configuration based on the value in the variable file. For example, an interface can be either an access or trunk port. Instead of creating two different blocks of code within the template, you can easily use the conditional to achieve the same results.
As you can below, each item in the list interfaces is a dictionary that defines an interface. Some of them are access ports and some are trunk ports.
By using conditional, we are instructing Jinja to check the value of the dictionary key port_type and if the value is trunk then use the following two lines (just below the if statement). else, use the two lines below the else statement.
Full configuration Example
Jinja Template
A Jinja template is simply a text file and doesn’t need to have a specific extension. My preference is to always use .j2 extension.
In the following example, I've tried to cover some of the most used config lines such as hostname, ntp, management-ip, ip-route, snmp etc.
hostname {{ hostname }}
!
ip domain name {{ domain_name }}
!
ntp server {{ ntp_01 }} prefer
ntp server {{ ntp_02 }}
!
interface GigabitEthernet0/0
 ip address {{ management_ip }}
 negotiation auto

ip route 0.0.0.0 0.0.0.0 {{ next_hop }}
!
snmp-server community {{ snmp_community }} RO 6
snmp-server trap-source GigabitEthernet0/0
snmp-server location London {{ device_location }}
{% for trap in snmp_traps -%}
snmp-server enable traps {{ trap }}
{%- endfor %}
snmp-server host 10.10.12.15 {{ snmp_community }}
snmp-server host 10.20.12.25 {{ snmp_community }}
!
{% for vlan in vlans -%}
vlan {{ vlan.id }}
 name {{ vlan.name }}
{%- endfor %}
!
{% for interface in interfaces -%}
interface {{ interface['name'] }}
  description {{ interface['description']|upper }}
  {% if interface['port_type'] == "trunk" -%}
  switchport mode trunk
  switchport mode trunk allowed vlan {{ interface['allowed_vlan'] }}
  {%- else %}
  switchport mode access
  switchport access vlan {{ interface['vlan'] }}
  {%- endif %}
  no shutdown
!
{% endfor -%}
{% for access_list in access_lists -%}
access-list 10 remark {{ access_list.remark }}
access-list 10 permit {{ access_list.acl }}
{%- endfor %}
access-list 10 deny any log
!
line con 0
 exec-timeout 5 0
 logging synchronous
line vty 0 4
 transport input ssh
 access-class 10 in
line vty 5 15
 transport input ssh
access-class 10 inVariables and Python Script
For simplicity, I've added the variables and the Python script into one single file. You can, of course, add the variables into a separate file and then import it into the script if required.
import csv
from jinja2 import Template

template_file = "template.j2"

config_items = {
    "hostname": "HQ-SWITCH-01",
    "domain_name": "packet.net",
    "management_ip": "10.10.25.10 255.255.255.0",
    "next_hop": "10.10.25.1",
    "ntp_01": "192.168.10.1",
    "ntp_02": "192.168.20.1",
    "snmp_community": "s3creT",
    "device_location": "london-hq",
    "snmp_traps": ["license", "cpu threshold", "envmon", "errdisable"],
    "vlans": [
      {
        "name": "isp-01",
        "id": 10
      },
      {
        "name": "isp-02",
        "id": 11
      }
    ],
    "access_lists": [
      {
        "remark": "HQ-USERS",
        "acl": "10.25.0.0 0.0.255.255"
      },
      {
        "remark": "DC-SERVER-01",
        "acl": "10.12.25.21 0.0.0.0"
      },
      {
        "remark": "DC-SERVER-02",
        "acl": "10.12.32.21 0.0.0.0"
      },
      {
        "remark": "NMS",
        "acl": "10.12.32.10 0.0.0.0"
      }
    ],
    "interfaces": [
        {
            "name": "Gi 1/0/1",
            "description": "firewall-01-uplink",
            "port_type": 'trunk',
            "allowed_vlan": "10-11"

        },
        {
            "name": "Gi 1/0/2",
            "description": "firewall-02-uplink",
            "port_type": 'trunk',
            "allowed_vlan": "10-11"

        },
        {
            "name": "Gi 1/0/11",
            "description": "link-to-isp-01",
            "port_type": "access",
            "vlan": 10
        },
        {
            "name": "Gi 1/0/12",
            "description": "link-to-isp-02",
            "port_type": "access",
            "vlan": 11
        }
    ]
  }

with open(template_file) as f:
    cisco_template = Template(f.read(), keep_trailing_newline=True)

cisco_config = cisco_template.render(config_items)
print(cisco_config)Rendered Configuration
The output of the above script generates the desired configuration that is shown below.
hostname HQ-SWITCH-01
!
ip domain name packet.net
!
ntp server 192.168.10.1 prefer
ntp server 192.168.20.1
!
interface GigabitEthernet0/0
 ip address 10.10.25.10 255.255.255.0
 negotiation auto

ip route 0.0.0.0 0.0.0.0 10.10.25.1
!
snmp-server community s3creT RO 6
snmp-server trap-source GigabitEthernet0/0
snmp-server location London london-hq
snmp-server enable traps license
snmp-server enable traps cpu threshold
snmp-server enable traps envmon
snmp-server enable traps errdisable
snmp-server host 10.10.12.15 s3creT
snmp-server host 10.20.12.25 s3creT
!
vlan 10
 name isp-01
vlan 11
 name isp-02
!
interface Gi 1/0/1
  description FIREWALL-01-UPLINK
  switchport mode trunk
  switchport mode trunk allowed vlan 10-11
  no shutdown
!
interface Gi 1/0/2
  description FIREWALL-02-UPLINK
  switchport mode trunk
  switchport mode trunk allowed vlan 10-11
  no shutdown
!
interface Gi 1/0/11
  description LINK-TO-ISP-01
  switchport mode access
  switchport access vlan 10
  no shutdown
!
interface Gi 1/0/12
  description LINK-TO-ISP-02
  switchport mode access
  switchport access vlan 11
  no shutdown
!
access-list 10 remark HQ-USERS
access-list 10 permit 10.25.0.0 0.0.255.255
access-list 10 remark DC-SERVER-01
access-list 10 permit 10.12.25.21 0.0.0.0
access-list 10 remark DC-SERVER-02
access-list 10 permit 10.12.32.21 0.0.0.0
access-list 10 remark NMS
access-list 10 permit 10.12.32.10 0.0.0.0
access-list 10 deny any log
!
line con 0
 exec-timeout 5 0
 logging synchronous
line vty 0 4
 transport input ssh
 access-class 10 in
line vty 5 15
 transport input ssh
 access-class 10 in
References
Thank you for reading, as always your comments and feedbacks are always welcome.