In this post, we're diving into automating NetBox with Ansible. We'll explore how to leverage Ansible's modules to fully automate setting up NetBox. I'll guide you through a simple scenario where we configure a single site, including two racks and several devices, and even detail setting up cabling through a patch panel using Ansible. This approach simplifies the whole process, and I'll make sure it's straightforward for you to follow and apply.
You can clone my repo from GitHub to follow along. I've included everything you see here in the repo, making it easy for you to get hands-on experience.
What we will cover?
- Why do we need Ansible?
- Prerequisites
- Diagram
- Basic Ansible Playbook
- Creating Sites, Racks, Devices and Cables
But why do I need Ansible though?
You might be thinking, "Why do I need Ansible? Can't I just set up and use NetBox manually?" Sure, you could if that's what works best for you and your team. But here are my reasons for choosing Ansible (or any other automation tool) over manual configuration:
Firstly, I'm not a fan of clicking through the GUI. It might seem quicker at first, but repeating the same tasks over and over can be dull and lead to mistakes. Imagine you're adding circuits to NetBox for many branch sites. It's much simpler to list them all in a YAML file and have Ansible create them, rather than doing it by hand.
Another big plus is being able to track all our changes with git. This way, we can see exactly what changes were made, even years down the line.
And if our NetBox instance ever dies, all I need to do is set up a new one and run my playbook. For me, the benefits outweigh the drawbacks, so I much prefer to handle things through code.
Prerequisites
Before we dive into the details, let's cover some prerequisites. This blog post assumes you're already familiar with NetBox and Ansible. If you've never used NetBox before, don't worry, it's super easy to get the hang of. Honestly, spend about 10 minutes on it, and you'll grasp the basics.
If you're new to Ansible or just need a quick refresher, check out my introduction to Ansible here. It'll give you a solid foundation to follow along with this guide.
Don't have NetBox installed yet? No problem. It's straightforward to set up using Docker. I've written a detailed guide on how to get NetBox up and running with Docker if you're interested.
 Suresh Vina
Diagram
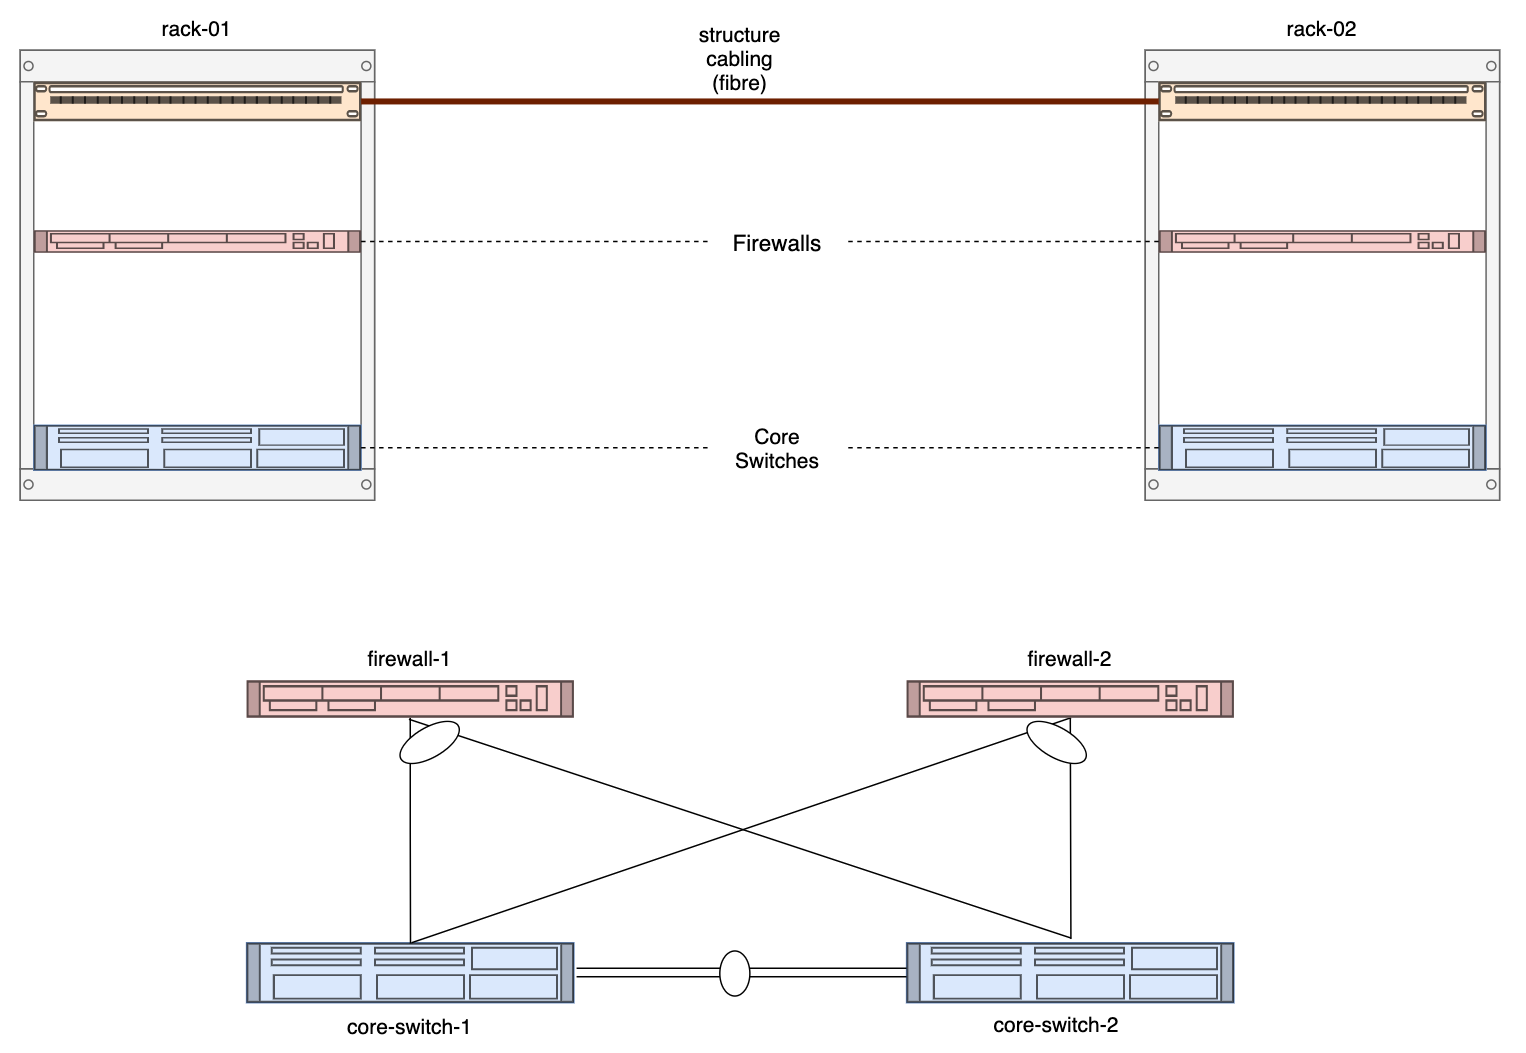
In our project, we're going to add all the components you see in the diagram into NetBox. This includes two racks, two core switches, two firewalls, and two patch panels. Plus, we can't forget about the cabling that connects all these pieces.
Take a closer look at the diagram. For instance, you'll notice that core-switch-1 is connected to both firewall-1 and firewall-2. Since one connection is within the same rack, we can connect them directly. However, the other connection needs to be routed through the patch panel. We'll also take this into account so that we can accurately track these connections via the patch panel in our diagram.
Basic Ansible Playbook
Alright, it's time to create a basic playbook to see if everything is set up correctly. You'll need to kick things off by grabbing your API key from NetBox. You can find it under Admin > API Tokens in NetBox.
Then, you need to install the NetBox collection from Ansible Galaxy. In your terminal, type ansible-galaxy collection install netbox.netbox to download and install it.
With that done, it's time to create your first test playbook. We'll begin by adding a manufacturer to NetBox. Here's a simple playbook to do just that. (Change your NetBox IP/Port and Token accordingly)
---
- name: "Basic Playbook"
  connection: local
  hosts: localhost
  gather_facts: False

  tasks:
    - name: Create Manufacturer
      netbox.netbox.netbox_manufacturer:
        netbox_url: http://10.10.10.10:8000
        netbox_token: API_TOKEN
        data:
          name: Juniper
        state: present
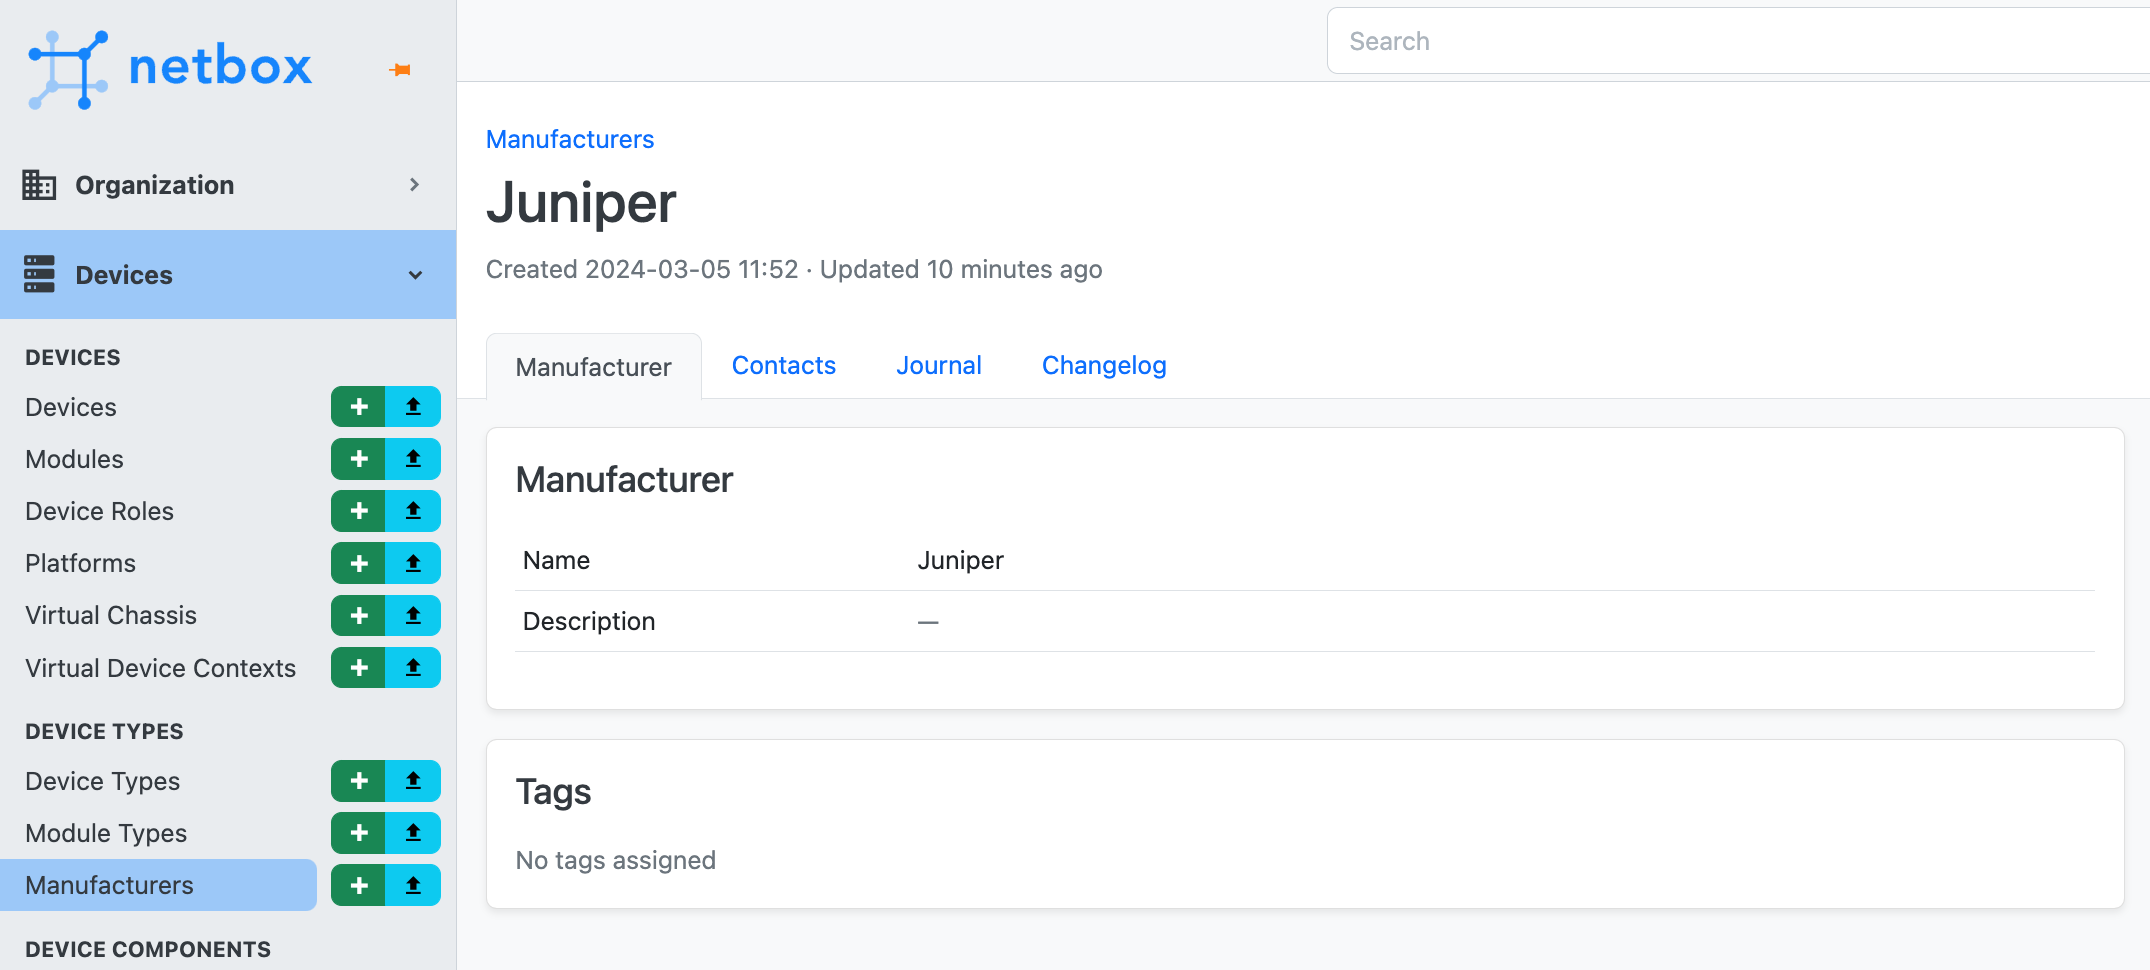
Make sure that your playbook runs smoothly and creates the 'Juniper' manufacturer before moving on. If you have any issues, just drop your questions in the comments below, and I'll do my best to help you out.
This is one of the issues I had and how I fixed it.
An exception occurred during task execution. To see the full traceback, use -vvv. The error was: ModuleNotFoundError: No module named 'pynetbox'
fatal: [localhost]: FAILED! => {"changed": false, "msg": "Failed to import the required Python library (pynetbox) on SURESH's Python /opt/homebrew/opt/python@3.9/bin/python3.9. Please read the module documentation and install it in the appropriate location. If the required library is installed, but Ansible is using the wrong Python interpreter, please consult the documentation on ansible_python_interpreter"}
/opt/homebrew/opt/python@3.9/bin/python3.9 -m pip install pynetboxFull Ansible Configuration
Now that our test playbook is working as expected, it's time to dive in and set up everything we have in the diagram. Feel free to clone the code from my GitHub Repo - https://github.com/vsurresh/netbox_ansible
Environment Variables
Moving forward, I'll store the NetBox URL and API token as environment variables. This is one of the ways to keep sensitive information out of your playbooks. Here’s how you can set them (Mac or Linux)
export NETBOX_URL=http://10.10.10.10:8000
export NETBOX_TOKEN=my_token
In the playbook, instead of writing the URL and token directly, we'll pull them from the environment variables like this.
---
- name: "Basic Playbook"
  connection: local
  hosts: localhost
  gather_facts: False

  tasks:
    - name: Create Manufacturer
      netbox.netbox.netbox_manufacturer:
        netbox_url: "{{ lookup('env', 'NETBOX_URL') }}"
        netbox_token: "{{ lookup('env', 'NETBOX_TOKEN') }}"
        data:
          name: Juniper
        state: present
Here, we're telling Ansible to get the URL and token from the environment variables we just set. It's a neat and secure way to manage your credentials.
Directory Structure
➜  netbox_ansible git:(main) tree
.
├── README.md
├── basic.yml
├── connection.yml
├── devices.yml
├── organization.yml
└── vars
    ├── connections_vars.yml
    ├── devices_vars.yml
    └── organization_vars.yml

1 directory, 8 files
Here is my directory structure, I decided to keep the playbook variables separate for clarity and ease of management. All the variables are stored in the vars directory. This way, I can just reference them in the playbooks without cluttering them. Each playbook corresponds to a different section in NetBox, like devices.yml for Devices and organization.yml for Organizations.
Organization Section
Let's start with the Organization part of our NetBox setup, we're focusing on creating sites and racks. As mentioned before, I've separated our variables into an organization_vars.yml file to keep the playbook tidy.
#organization_vars.yml
---
sites:
  - DC_01

racks:
  - name: R_01
    site: DC_01
    width: 19
    height: 42
  - name: L_01
    site: DC_01
    width: 19
    height: 42
#organization.yml
---
- name: "Organization Tab"
connection: local
hosts: localhost
gather_facts: False
vars_files:
- vars/organization_vars.yml
tasks:
- name: Create Site
netbox.netbox.netbox_site:
netbox_url: "{{ lookup('env', 'NETBOX_URL') }}"
netbox_token: "{{ lookup('env', 'NETBOX_TOKEN') }}"
data:
name: "{{ item }}"
state: present
loop: "{{ sites }}"
- name: Create Rack
netbox.netbox.netbox_rack:
netbox_url: "{{ lookup('env', 'NETBOX_URL') }}"
netbox_token: "{{ lookup('env', 'NETBOX_TOKEN') }}"
data:
site: "{{ item.site }}"
name: "{{ item.name }}"
width: "{{ item.width }}"
u_height: "{{ item.height }}"
state: present
loop: "{{ racks }}"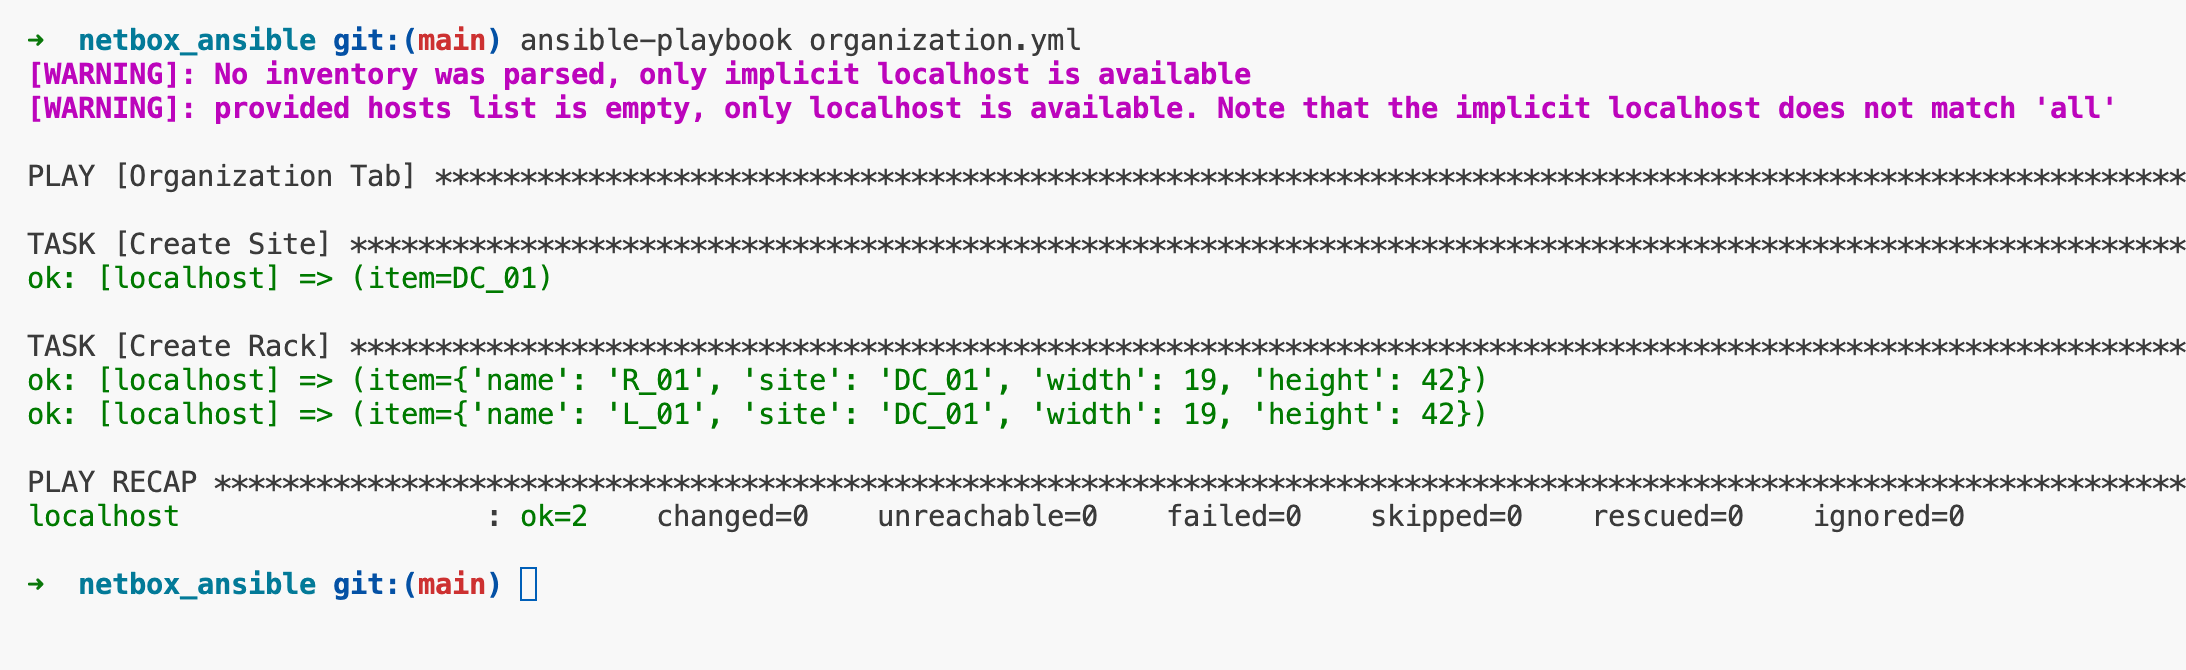
In the variable file, we define a list of sites and racks. Each rack has a name, is assigned to a site, and has specified dimensions (width and height).
The playbook has two main tasks, creating sites and creating racks. We loop through our list of sites and racks using the loop keyword to create each one in NetBox.
- For sites, we just need the name.
- For racks, we specify the site they belong to, their name, width, and height.
This data structure allows us to add multiple sites and racks efficiently. We can update the organization_vars.yml file as needed, and our playbook will handle the rest. If I need to add a new site, all I have to do is update the vars file with the name of the new site.
Devices Section
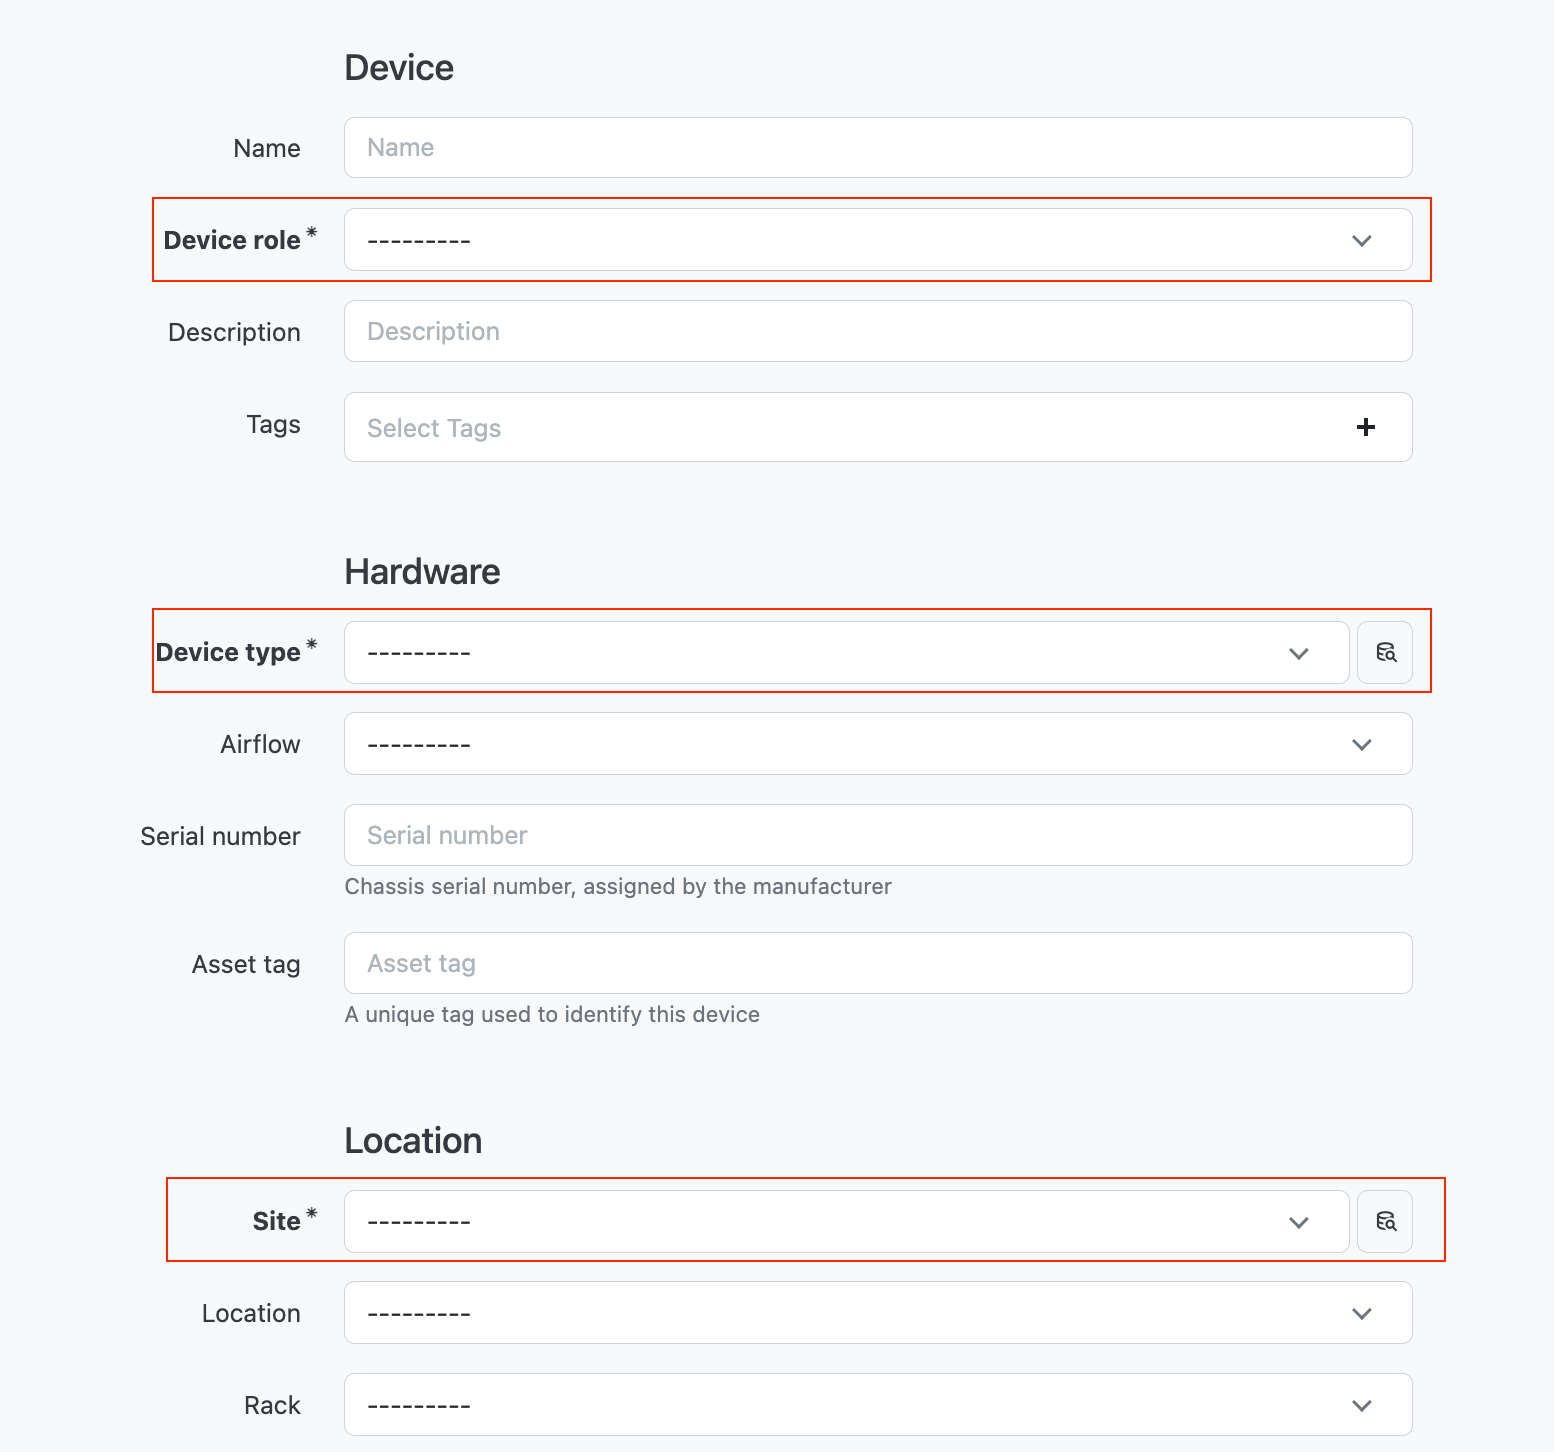
Next, let's walk through setting up the Devices section in NetBox using Ansible. In NetBox, when you go to add a new device through the GUI, you'll find that it requires you to fill in several fields. The mandatory ones are device_role, device_type, and site. But to create a device_type, you need a Manufacturer first. This dependency means you need to create them in a specific order because Ansible is procedural, it follows the steps in sequence.
# vars/devices_vars.yml
---
manufacturer:
  - Cisco
  - Palo Alto
  - FS

device_roles:
  - name: Firewall
    colour: f44336
  - name: Core
    colour: 9c27b0
  - name: Distribution
    colour: 00ffff
  - name: Access
    colour: cddc39
  - name: Patch_Panel
    colour: 795548

device_types:
  - model: Nexus7700 C7706
    manufacturer: Cisco
    height: 2
    full_depth: true
  - model: PA-3410
    manufacturer: Palo Alto
    height: 1
    full_depth: false
  - model: Patch-12-LC
    manufacturer: FS
    height: 1
    full_depth: false

devices:
  - name: patch_panel_dc_a1
    site: DC_01
    type: Patch-12-LC
    role: Patch_Panel
    rack: R_01
    face: front
    position: 42
    rear_ports:
        name: dc_a1_rear_01
        type: lc
        positions: 8
    front_ports:
      - name: dc_a1_front_01
        type: lc
        rear_port: dc_a1_rear_01
        rear_position: 1
      - name: dc_a1_front_02
        type: lc
        rear_port: dc_a1_rear_01
        rear_position: 2
      - name: dc_a1_front_03
        type: lc
        rear_port: dc_a1_rear_01
        rear_position: 3
      - name: dc_a1_front_04
        type: lc
        rear_port: dc_a1_rear_01
        rear_position: 4
  - name: patch_panel_dc_b1
    site: DC_01
    type: Patch-12-LC
    role: Patch_Panel
    rack: L_01
    face: front
    position: 42
    rear_ports:
        name: dc_b1_rear_01
        type: lc
        positions: 8
    front_ports:
      - name: dc_b1_front_01
        type: lc
        rear_port: dc_b1_rear_01
        rear_position: 1
      - name: dc_b1_front_02
        type: lc
        rear_port: dc_b1_rear_01
        rear_position: 2
      - name: dc_b1_front_03
        type: lc
        rear_port: dc_b1_rear_01
        rear_position: 3
      - name: dc_b1_front_04
        type: lc
        rear_port: dc_b1_rear_01
        rear_position: 4
  - name: DC-Core-01
    site: DC_01
    type: Nexus7700 C7706
    role: Core
    rack: R_01
    face: front
    position: 10
    interfaces:
      - name: Eth1/1
        type: SFP+ (10GE)
      - name: Eth1/2
        type: SFP+ (10GE)
      - name: Eth1/10
        type: SFP+ (10GE)
      - name: Eth1/11
        type: SFP+ (10GE)
  - name: DC-Core-02
    site: DC_01
    type: Nexus7700 C7706
    role: Core
    rack: L_01
    face: front
    position: 10
    interfaces:
      - name: Eth1/1
        type: SFP+ (10GE)
      - name: Eth1/2
        type: SFP+ (10GE)
      - name: Eth1/10
        type: SFP+ (10GE)
      - name: Eth1/11
        type: SFP+ (10GE)
  - name: DC-FW-01
    site: DC_01
    type: PA-3410
    role: Firewall
    rack: R_01
    face: front
    position: 15
    interfaces:
    - name: Ethernet1/1
      type: SFP+ (10GE)
    - name: Ethernet1/2
      type: SFP+ (10GE)
  - name: DC-FW-02
    site: DC_01
    type: PA-3410
    role: Firewall
    rack: L_01
    face: front
    position: 15
    interfaces:
    - name: Ethernet1/1
      type: SFP+ (10GE)
    - name: Ethernet1/2
      type: SFP+ (10GE)
#devices.yml
---
- name: "Devices Tab"
connection: local
hosts: localhost
gather_facts: False
vars_files:
- vars/devices_vars.yml
- vars/organization_vars.yml
tasks:
- name: Create Manufacturer
netbox.netbox.netbox_manufacturer:
netbox_url: "{{ lookup('env', 'NETBOX_URL') }}"
netbox_token: "{{ lookup('env', 'NETBOX_TOKEN') }}"
data:
name: "{{ item }}"
state: present
loop: "{{ manufacturer }}"
- name: Create Device Role
netbox.netbox.netbox_device_role:
netbox_url: "{{ lookup('env', 'NETBOX_URL') }}"
netbox_token: "{{ lookup('env', 'NETBOX_TOKEN') }}"
data:
name: "{{ item.name }}"
color: "{{ item.colour }}"
vm_role: false
state: present
loop: "{{ device_roles }}"
- name: Create Device Type
netbox.netbox.netbox_device_type:
netbox_url: "{{ lookup('env', 'NETBOX_URL') }}"
netbox_token: "{{ lookup('env', 'NETBOX_TOKEN') }}"
data:
model: "{{ item.model }}"
manufacturer: "{{ item.manufacturer }}"
u_height: "{{ item.height }}"
is_full_depth: "{{ item.full_depth }}"
state: present
loop: "{{ device_types }}"
- name: Create Device
netbox.netbox.netbox_device:
netbox_url: "{{ lookup('env', 'NETBOX_URL') }}"
netbox_token: "{{ lookup('env', 'NETBOX_TOKEN') }}"
data:
name: "{{ item.name }}"
site: "{{ item.site }}"
device_type: "{{ item.type }}"
device_role: "{{ item.role }}"
rack: "{{ item.rack }}"
face: "{{ item.face }}"
position: "{{ item.position }}"
state: present
loop: "{{ devices }}"
- name: Create Interface
netbox.netbox.netbox_device_interface:
netbox_url: "{{ lookup('env', 'NETBOX_URL') }}"
netbox_token: "{{ lookup('env', 'NETBOX_TOKEN') }}"
data:
device: "{{ item.0.name }}"
name: "{{ item.1.name }}"
type: "{{ item.1.type }}"
state: present
loop: "{{ devices | subelements('interfaces', 'skip_missing=True') }}"
tags: interface
- name: Create Rear Ports
netbox.netbox.netbox_rear_port:
netbox_url: "{{ lookup('env', 'NETBOX_URL') }}"
netbox_token: "{{ lookup('env', 'NETBOX_TOKEN') }}"
data:
name: "{{ item.rear_ports.name }}"
device: "{{ item.name }}"
type: "{{ item.rear_ports.type }}"
positions: "{{ item.rear_ports.positions }}"
state: present
loop: "{{ devices }}"
when: "'rear_ports' in item"
tags: rear
- name: Create Front Ports
netbox.netbox.netbox_front_port:
netbox_url: "{{ lookup('env', 'NETBOX_URL') }}"
netbox_token: "{{ lookup('env', 'NETBOX_TOKEN') }}"
data:
name: "{{ item.1.name }}"
device: "{{ item.0.name }}"
type: "{{ item.1.type }}"
rear_port: "{{ item.1.rear_port }}"
rear_port_position: "{{ item.1.rear_position }}"
state: present
loop: "{{ devices | subelements('front_ports', 'skip_missing=True') }}"
tags: frontThe example below shows how to set up these resources, along with interfaces, front, and rear ports. The variables for each resource are stored in their respective YAML files in the vars directory, which helps keep your playbooks clean and focused. Let's go over the logic behind the structure of the devices.yml playbook.
- Variables Files - We include variable files using
vars_files. This means all the data about devices, roles, manufacturers, etc., are kept separate from the playbook logic. - Loop - The
loopkeyword in Ansible is used to iterate over a list. In our tasks, we're usingloopto create multiple items like manufacturers, device roles, and device types based on the lists defined in our variables files. - Order and Dependency - The order of tasks in the playbook respects the dependencies between objects in NetBox. For instance, we can't create a device without having a manufacturer and device type already defined.
- Tags - we're using
tagsto categorize tasks. This allows us to run specific parts of our playbook by calling only the tasks associated with a tag, which is helpful for managing and updating specific elements without touching the whole setup. - Conditional Execution - The
whencondition is used for the rear ports. This means the task will only run if the condition is met, avoiding errors when certain data points are not present.
A quick note on subelements
In Ansible, the subelements filter is a powerful tool for dealing with lists of dictionaries that contain nested lists. It's used when you want to iterate over a nested list within each item of a parent list.
loop: "{{ devices | subelements('front_ports', 'skip_missing=True') }}"This line tells Ansible to,
- Take the list of
devices(each device being a dictionary of properties from ourdevices_vars.ymlfile). - For each device, look inside it for a list named
front_ports. - Loop over each item in the
front_portslist for every device.
The skip_missing=True part is particularly useful. It tells Ansible to skip over any devices that do not have a front_ports list defined, instead of throwing an error. This makes your playbook more flexible and resilient to variations in our data structure.
In practice, this means if some devices in our devices list don't need to have any front_ports defined, the playbook won't fail when it encounters them. It'll just move on to the next device that does have front_ports to work on.
Suresh Vina
Connection Section
In this section, we’re focusing on cabling. Cables are crucial for connecting our devices, and we need to ensure everything is hooked up correctly in NetBox. This involves specifying what cable goes from point A to point B, its type, colour, and length. We've put all these details into our connection_vars.yml file.
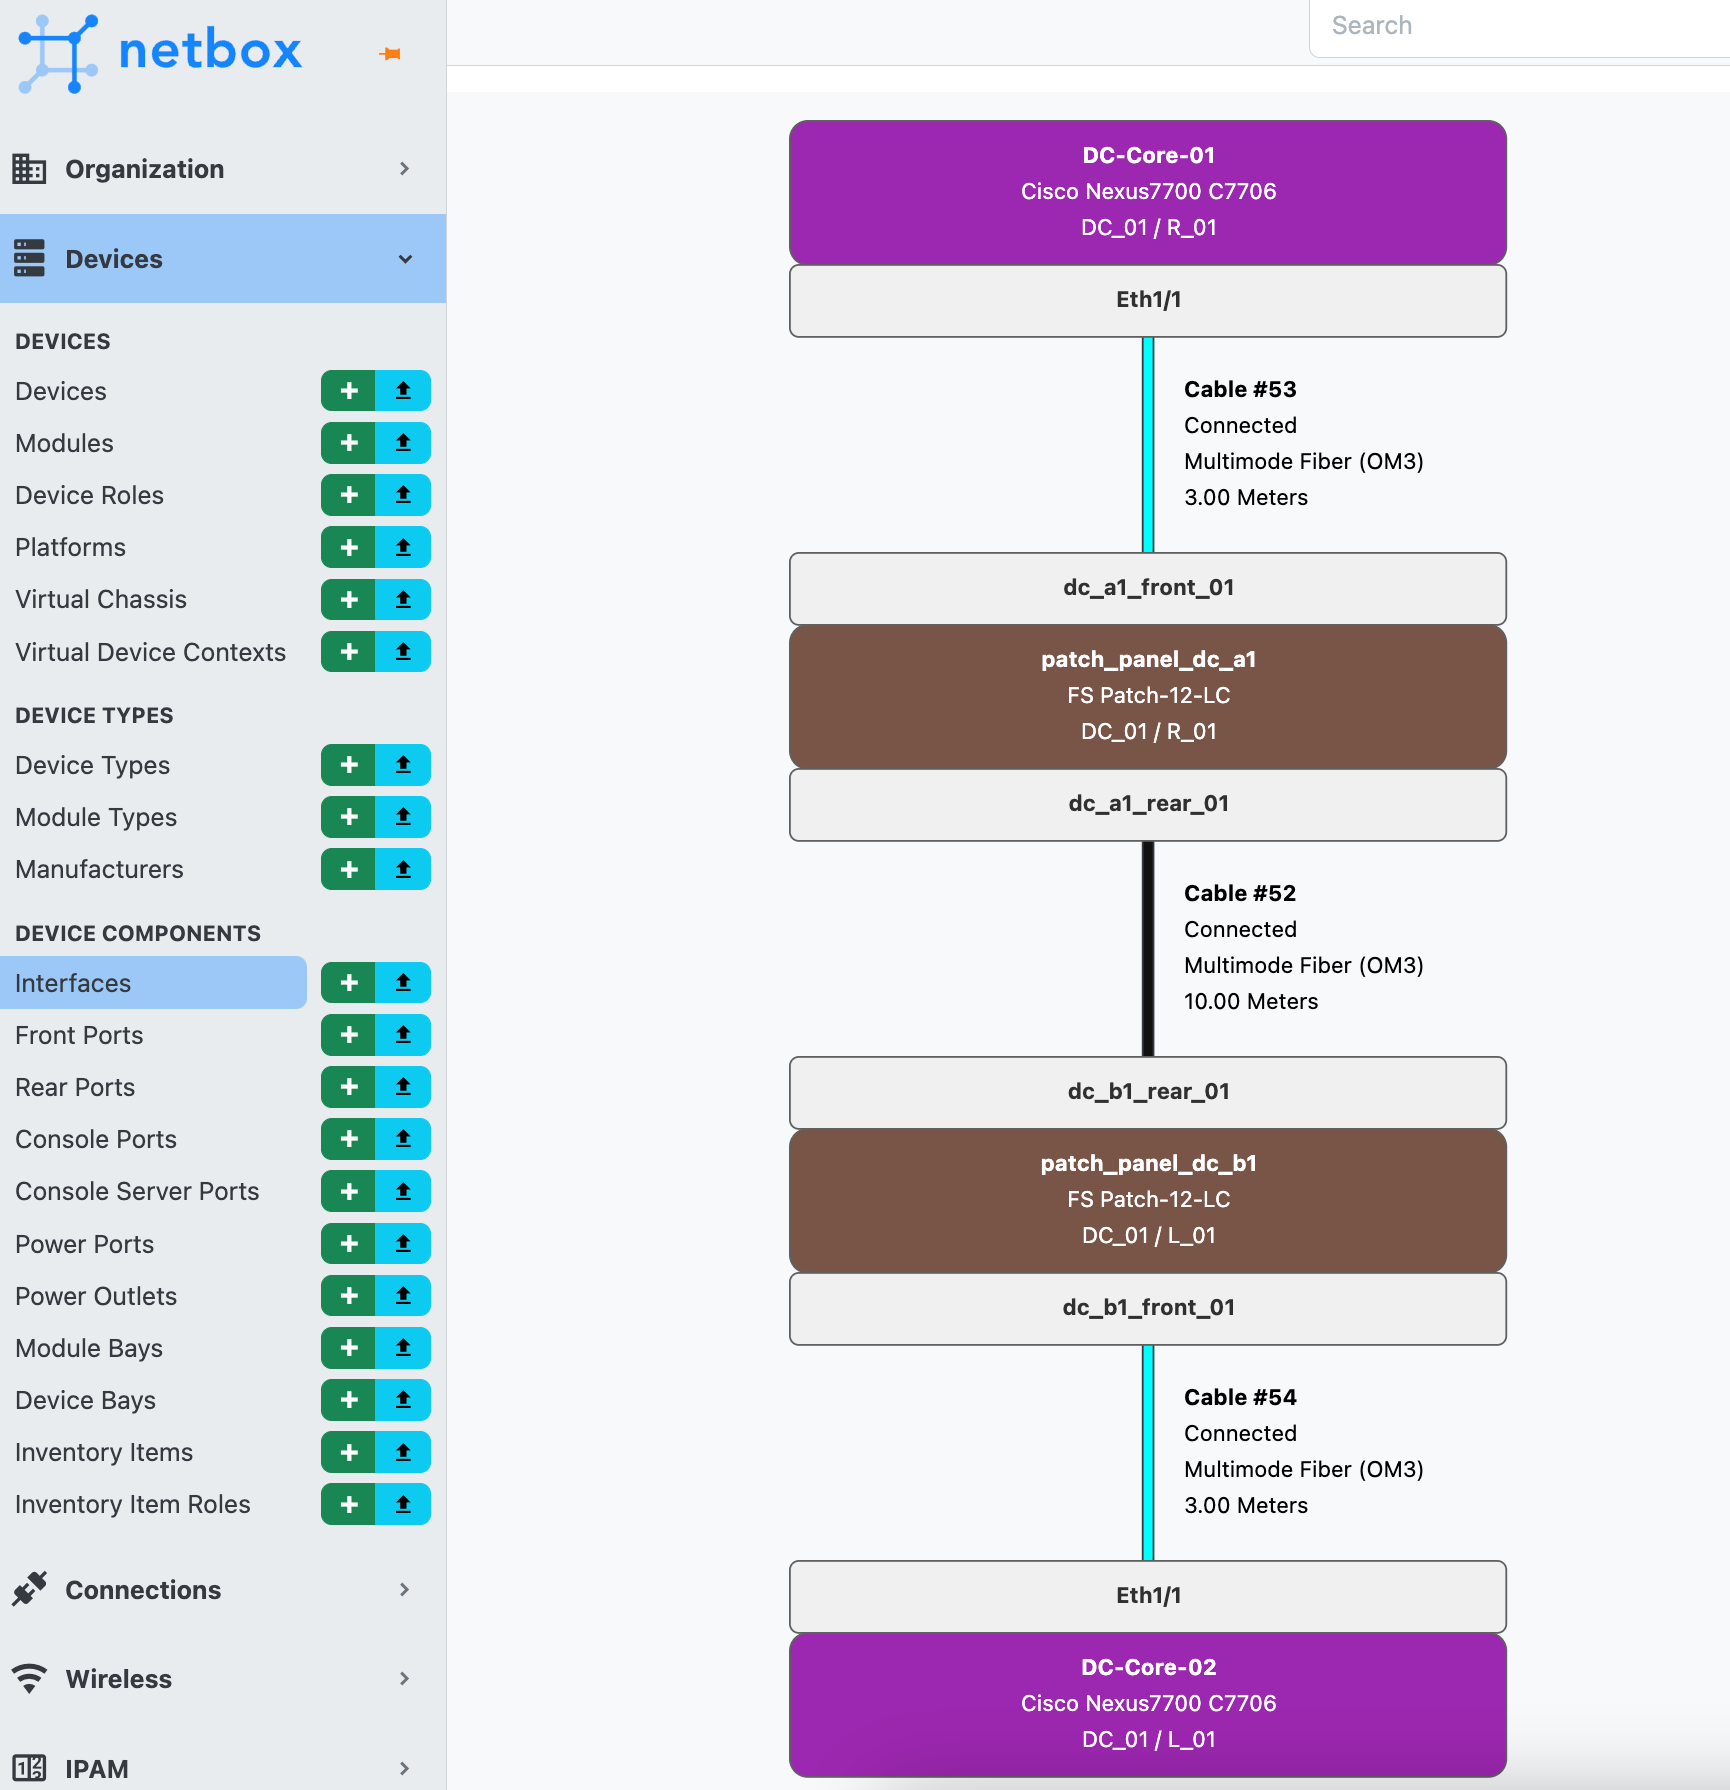
For each cable running from point A to point B, I have a unique item in the YAML file. Each item describes a single cable that connects two devices, a device to a patch panel, or even two rear ports of a patch panel. This approach ensures that every connection in our setup is accounted for and easily traceable.
#connection_vars.yml
---
connections:
  - name: DC-A1 to DC-B1
    cable_type: mmf-om3
    color: 111111
    length: 10
    term_a:
      device: patch_panel_dc_a1
      interface: dc_a1_rear_01
      type: dcim.rearport
    term_b:
      device: patch_panel_dc_b1
      interface: dc_b1_rear_01
      type: dcim.rearport
  - name: CORE-01 TO CORE-02 (Link-1, Leg-A)
    cable_type: mmf-om3
    color: 00ffff
    length: 3
    term_a:
      device: DC-Core-01
      interface: Eth1/1
      type: dcim.interface
    term_b:
      device: patch_panel_dc_a1
      interface: dc_a1_front_01
      type: dcim.frontport
  - name: CORE-01 TO CORE-02 (Link-1, Leg-B)
    cable_type: mmf-om3
    color: 00ffff
    length: 3
    term_a:
      device: DC-Core-02
      interface: Eth1/1
      type: dcim.interface
    term_b:
      device: patch_panel_dc_b1
      interface: dc_b1_front_01
      type: dcim.frontport
  - name: CORE-01 TO CORE-02 (Link-2, Leg-A)
    cable_type: mmf-om3
    color: 00ffff
    length: 3
    term_a:
      device: DC-Core-01
      interface: Eth1/2
      type: dcim.interface
    term_b:
      device: patch_panel_dc_a1
      interface: dc_a1_front_02
      type: dcim.frontport
  - name: CORE-01 TO CORE-02 (Link-2, Leg-B)
    cable_type: mmf-om3
    color: 00ffff
    length: 3
    term_a:
      device: DC-Core-02
      interface: Eth1/2
      type: dcim.interface
    term_b:
      device: patch_panel_dc_b1
      interface: dc_b1_front_02
      type: dcim.frontport
  - name: CORE-01 TO FW-01
    cable_type: mmf-om3
    color: 00ffff
    length: 3
    term_a:
      device: DC-Core-01
      interface: Eth1/10
      type: dcim.interface
    term_b:
      device: DC-FW-01
      interface: Ethernet1/1
      type: dcim.interface
  - name: CORE-02 TO FW-02
    cable_type: mmf-om3
    color: 00ffff
    length: 3
    term_a:
      device: DC-Core-02
      interface: Eth1/11
      type: dcim.interface
    term_b:
      device: DC-FW-02
      interface: Ethernet1/2
      type: dcim.interface
  - name: CORE-01 TO FW-02 (Leg-A)
    cable_type: mmf-om3
    color: 00ffff
    length: 3
    term_a:
      device: DC-Core-01
      interface: Eth1/11
      type: dcim.interface
    term_b:
      device: patch_panel_dc_a1
      interface: dc_a1_front_04
      type: dcim.frontport
  - name: CORE-01 TO FW-02 (Leg-B)
    cable_type: mmf-om3
    color: 00ffff
    length: 3
    term_a:
      device: DC-FW-02
      interface: Ethernet1/1
      type: dcim.interface
    term_b:
      device: patch_panel_dc_b1
      interface: dc_b1_front_04
      type: dcim.frontport
  - name: CORE-02 TO FW-01 (Leg-A)
    cable_type: mmf-om3
    color: 00ffff
    length: 3
    term_a:
      device: DC-Core-02
      interface: Eth1/10
      type: dcim.interface
    term_b:
      device: patch_panel_dc_b1
      interface: dc_b1_front_03
      type: dcim.frontport
  - name: CORE-02 TO FW-01 (Leg-B)
    cable_type: mmf-om3
    color: 00ffff
    length: 3
    term_a:
      device: DC-FW-01
      interface: Ethernet1/2
      type: dcim.interface
    term_b:
      device: patch_panel_dc_a1
      interface: dc_a1_front_03
      type: dcim.frontport
Here's a high-level view of what our connection_vars.yml contains.
- A list of connections, each with a name, cable type, colour, and length.
- Details on both ends of the cable (
term_aandterm_b), including which device and interface they're connected to, and what type of termination point it is (like a rear or front port).
We then have a playbook named connection.yml, which refers to these variables. In the playbook, we loop through each connection and instruct NetBox to create a cable with the attributes we defined.
#connection.yml
---
- name: "Devices Tab"
  connection: local
  hosts: localhost
  gather_facts: False
  vars_files:
    - vars/connections_vars.yml

  tasks:
    - name: Create cables
      netbox.netbox.netbox_cable:
        netbox_url: "{{ lookup('env', 'NETBOX_URL') }}"
        netbox_token: "{{ lookup('env', 'NETBOX_TOKEN') }}"
        data:
          description: "{{ item.name }}"
          type: "{{ item.cable_type }}"
          color: "{{ item.color }}"
          length: "{{ item.length }}"
          length_unit: m
          termination_a_type: "{{ item.term_a.type }}"
          termination_a:
            device: "{{ item.term_a.device }}"
            name: "{{ item.term_a.interface }}"
          termination_b_type: "{{ item.term_b.type }}"
          termination_b:
            device: "{{ item.term_b.device }}"
            name: "{{ item.term_b.interface }}"
        state: present
      loop: "{{ connections }}"
Closing Thoughts
In wrapping up, I'd say the trickiest part is getting the variables organized. Once you've got that nailed down, the rest falls into place nicely. Automation with Ansible and NetBox can really simplify how we manage our network inventory.
References
https://docs.ansible.com/ansible/latest/collections/netbox/netbox/index.html