Welcome back to part 5 of the Nornir series. If you're new to Nornir or need a quick refresher, be sure to check out the previous posts. In this part, we'll explore how to use the nornir_jinja2 plugin to dynamically generate device configurations.
What We Will Cover?
- Nornir Jinja2 plugin
- Generating device configurations dynamically
- Separating the 'data' variables
- Nornir 'load_yaml' plugin
 Suresh Vina
What Is the nornir_jinja2 Plugin and How to Install It?
The nornir_jinja2 plugin is a useful tool that integrates the Jinja2 templating engine into Nornir, allowing you to create dynamic configurations for your network devices. By using this plugin, you can quickly generate device configurations based on templates and variables defined in the inventory file (or any external file)
Make sure that you have a Python environment set up, ideally within a virtual environment, and that Nornir is already installed. To install the nornir_jinja2 plugin, you can use pip
pip install nornir_jinja2Nornir Inventory Setup
Since we covered the Nornir basics extensively in the previous parts, I won't spend much time on this. Here is the directory structure and the files we will be using.
.
├── config.yaml
├── defaults.yaml
├── groups.yaml
├── hosts.yaml
├── jinja2_example.py
└── templates
    └── config.j2
#config.yaml
---
inventory:
plugin: SimpleInventory
options:
host_file: 'hosts.yaml'
group_file: 'groups.yaml'
defaults_file: 'defaults.yaml'
runner:
plugin: threaded
options:
num_workers: 3---
r1:
hostname: 192.168.100.206
groups:
- arista
data:
interfaces:
- name: eth1
description: PATH-1
ip: 11.12.12.2 255.255.255.0
- name: eth2
description: PATH-2
ip: 11.12.13.2 255.255.255.0
r2:
hostname: 192.168.100.207
groups:
- arista
data:
interfaces:
- name: eth1
description: PATH-1
ip: 12.12.12.2 255.255.255.0
- name: eth2
description: PATH-2
ip: 12.12.13.2 255.255.255.0
r3:
hostname: 192.168.100.208
groups:
- arista
data:
interfaces:
- name: eth1
description: PATH-1
ip: 13.12.12.2 255.255.255.0
- name: eth2
description: PATH-2
ip: 13.12.13.2 255.255.255.0#groups.yaml
---
arista:
platform: arista_eos#defaults.yaml
---
username: admin
password: admin
Jinja2 Template
Our goal here is to generate the interface configurations dynamically using a Jinja2 template. As seen in the hosts.yaml file, each device has two interfaces defined. We will use the following config.j2 Jinja2 template to generate the appropriate configurations.
#templates/config.j2

!
{% for interface in interfaces%}
interface {{ interface.name }}
 no switchport
 description {{ interface.description }}
 ip address {{ interface.ip }}
 no shut
!
{% endfor %}
{% for ... %}Loop - This syntax begins a loop that iterates over each item in theinterfaceslist defined for each host. Each iteration gives us an individualinterfaceobject that we can work with inside the loop.{{ ... }}Variable Substitution - This is where the template inserts values from the data dynamically. For example,{{ interface.name }}will be replaced with the actual name of each interface.{% endfor %} -Marks the end of the loop.
The loop ensures that all interfaces for a device are processed, with each one generating a complete configuration block based on the template.
Nornir Script
So, we have variables defined in the Nornir inventory, and the Jinja2 template is ready. But how do we generate the configurations? Let's look at this simple Nornir script that does it for us.
from nornir import InitNornir
from nornir_jinja2.plugins.tasks import template_file
from nornir_utils.plugins.functions import print_result

def render_config(task):
    task.run(task=template_file, template='config.j2', path='templates/', **task.host)

nr = InitNornir(config_file='config.yaml')

result = nr.run(task=render_config)
print_result(result)- Initialize Nornir - We start by initializing Nornir with the
config.yamlfile. - Define the Task Function
render_configis a function that runs thetemplate_filetask, which uses thenornir_jinja2plugin.- The
templateargument specifies the name of the Jinja2 template file (config.j2), andpathpoints to the directory containing the template file (templates/). - The function passes all the host's attributes as keyword arguments (
**task.host) for substitution in the template.
- Run the Task
- The
nr.run(task=render_config)command runs therender_configfunction for each host in the inventory. print_result(result)outputs the generated configuration to the terminal for inspection.
- The
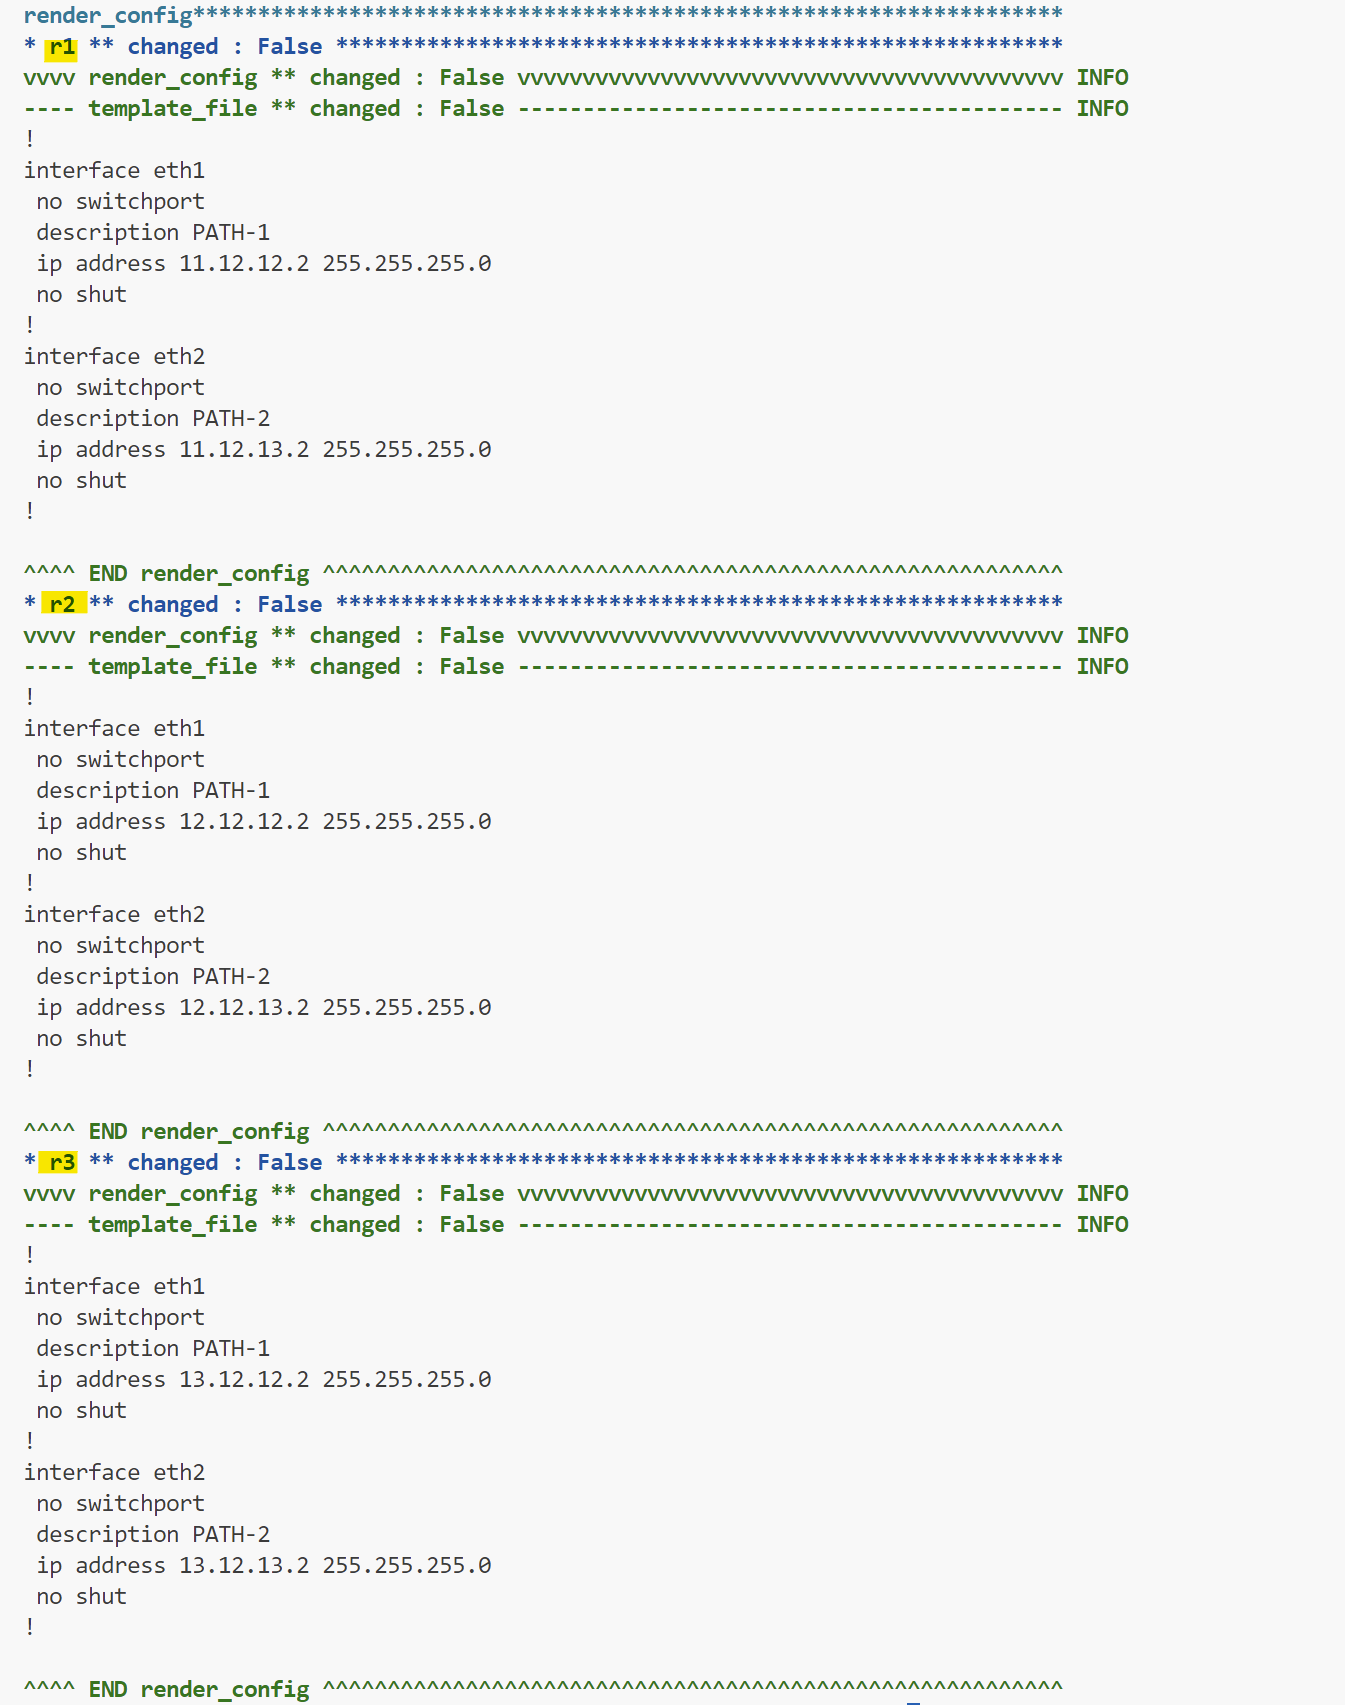
In this way, the nornir_jinja2 plugin simplifies dynamic configuration generation by using host data and a Jinja2 template.
But, how does it work?
Okay, so we know it works, but how does it work? How does the Jinja2 template know where to get the variables it uses? The answer lies in the data section of hosts.yaml. Whatever data is defined there is available to the host object as a dictionary. For example, if you run this command task.host.keys(), you'll see all the available keys as dictionary keys.
task.host.keys()

#output
dict_keys(['interfaces'])
To access a specific key, such as interfaces, you can use task.host['interfaces'] and this will return the list of interface attributes like this.
[{'name': 'eth1', 'description': 'PATH-1', 'ip': '11.12.12.2 255.255.255.0'}, {'name': 'eth2', 'description': 'PATH-2', 'ip': '11.12.13.2 255.255.255.0'}]Since the Jinja2 template receives all this data via task.host, it can use the data directly in template variables.
Suresh Vina
Separating Variables from Host Data
Having all your variables defined under the 'data' section works well, but as you add more and more configurations, the host file will become large and cluttered. I prefer to keep the host file as simple as possible. In this section, let's explore how to keep variables separate in a YAML file.
You can achieve this in multiple ways. For example, you can have a separate file for each device, or you can consolidate everything into a single file. We'll explore both options. First, I'll remove the data section from the hosts.yaml file to clean it up.
---
r1:
  hostname: 192.168.100.206
  groups:
    - arista

r2:
  hostname: 192.168.100.207
  groups:
    - arista

r3:
  hostname: 192.168.100.208
  groups:
    - arista
Variables in a single file
In this first example, we want to keep the hosts.yaml file clean by moving the device variables to a separate YAML file. The key plugins we'll use are load_yaml to read the data and template_file to apply the Jinja2 template.
First, we define our variables in a vars/vars.yaml file. This file contains configuration data for each device, including interface details. For example, for the r1 device, there are two interfaces with their respective names, descriptions, and IP addresses.
---
r1:
  interfaces:
    - name: eth1
      description: PATH-1
      ip: 11.12.12.2 255.255.255.0
    - name: eth2
      description: PATH-2
      ip: 11.12.13.2 255.255.255.0

r2:
  interfaces:
    - name: eth1
      description: PATH-1
      ip: 12.12.12.2 255.255.255.0
    - name: eth2
      description: PATH-2
      ip: 12.12.13.2 255.255.255.0

r3:
  interfaces:
    - name: eth1
      description: PATH-1
      ip: 13.12.12.2 255.255.255.0
    - name: eth2
      description: PATH-2
      ip: 13.12.13.2 255.255.255.0
The main script begins with initializing Nornir using InitNornir, loading configurations from config.yaml. In the function render_config, we use task.run to execute load_yaml with the file path "vars/vars.yaml". This command reads the content of the YAML file into a Python dictionary and stores it in read_vars.result.
from nornir import InitNornir
from nornir_jinja2.plugins.tasks import template_file
from nornir_utils.plugins.functions import print_result
from nornir_utils.plugins.tasks.data import load_yaml

nr = InitNornir(config_file='config.yaml')

def render_config(task):
    read_vars = task.run(
        task=load_yaml,
        file=f"vars/vars.yaml"
    )
    vars = read_vars.result
    task.host.data.update(vars[task.host.name])

    task.run(
        task=template_file,
        template='config.j2',
        path='templates/',
        **task.host
    )

result = nr.run(task=render_config)
print_result(result)
To pass this data to each host, we update the host object with the variables specific to that host. By accessing the key with the hostname, we assign the corresponding configuration from the YAML file to task.host.data.
After loading the data, we use template_file to generate the configuration files dynamically. The task uses the specified Jinja2 template file (config.j2) and the path='templates/' to locate the template. All the variables in task.host are passed as keyword arguments for the template, allowing it to substitute values correctly.
Finally, we run the render_config task across all hosts using nr.run, and print_result displays the generated configurations.
Suresh Vina
Variables in separate files
In this final example, we're organizing variables for each device into individual files that correspond to the device's hostname. For example, we've created three separate YAML files named r1.yaml, r2.yaml, and r3.yaml inside the vars/ directory. Each file contains the interface configuration specific to the host, such as r1.yaml
.
├── config.yaml
├── defaults.yaml
├── external_vars.py
├── groups.yaml
├── hosts.yaml
├── templates
│   └── config.j2
└── vars
    ├── r1.yaml
    ├── r2.yaml
    └── r3.yaml
#r1.yaml
---
interfaces:
- name: eth1
description: PATH-1
ip: 11.12.12.2 255.255.255.0
- name: eth2
description: PATH-2
ip: 11.12.13.2 255.255.255.0#r2.yaml
---
interfaces:
- name: eth1
description: PATH-1
ip: 12.12.12.2 255.255.255.0
- name: eth2
description: PATH-2
ip: 12.12.13.2 255.255.255.0#r3.yaml
---
interfaces:
- name: eth1
description: PATH-1
ip: 13.12.12.2 255.255.255.0
- name: eth2
description: PATH-2
ip: 13.12.13.2 255.255.255.0In the Nornir script, we first initialize Nornir using InitNornir with the main configuration file config.yaml. The render_config function then uses task.run to call the load_yaml plugin with file=f"vars/{task.host.name}.yaml". This reads the variables from the host-specific file based on the hostname and loads them into a Python dictionary stored in read_vars.result.
from nornir import InitNornir
from nornir_jinja2.plugins.tasks import template_file
from nornir_utils.plugins.functions import print_result
from nornir_utils.plugins.tasks.data import load_yaml

nr = InitNornir(config_file='config.yaml')

def render_config(task):
    read_vars = task.run(
        task=load_yaml,
        file=f"vars/{task.host.name}.yaml"
    )
    vars = read_vars.result
    task.host.data.update(vars)

    task.run(
        task=template_file,
        template='config.j2',
        path='templates/',
        **task.host
    )

result = nr.run(task=render_config)
print_result(result)
The key difference here is that each file is unique to a specific host, and the variables are directly mapped from vars/{task.host.name}.yaml. By using task.host.name, we ensure that each host reads only its own specific data file. The task.host.data.update(vars) command updates the host object with the data loaded from the file.
Once the variables are loaded into the host object, we pass them to the template_file task for rendering the configuration based on the config.j2 Jinja2 template. The template_file task accesses the variables via the task.host object and generates the configuration dynamically.
If you want, you can also separate the tasks (reading from YAML and rendering the configs) into their own function like the following. The end result is the same but I hope you get the point.
from nornir import InitNornir
from nornir_jinja2.plugins.tasks import template_file
from nornir_utils.plugins.functions import print_result
from nornir_utils.plugins.tasks.data import load_yaml

nr = InitNornir(config_file='config.yaml')

def read_vars(task):
    read_vars = task.run(
        task=load_yaml,
        file=f"vars/{task.host.name}.yaml"
    )
    vars = read_vars.result
    task.host.data.update(vars)

def render_config(task):
    task.run(
        task=template_file,
        template='config.j2',
        path='templates/',
        **task.host
    )
nr.run(task=read_vars)
result = nr.run(task=render_config)
print_result(result)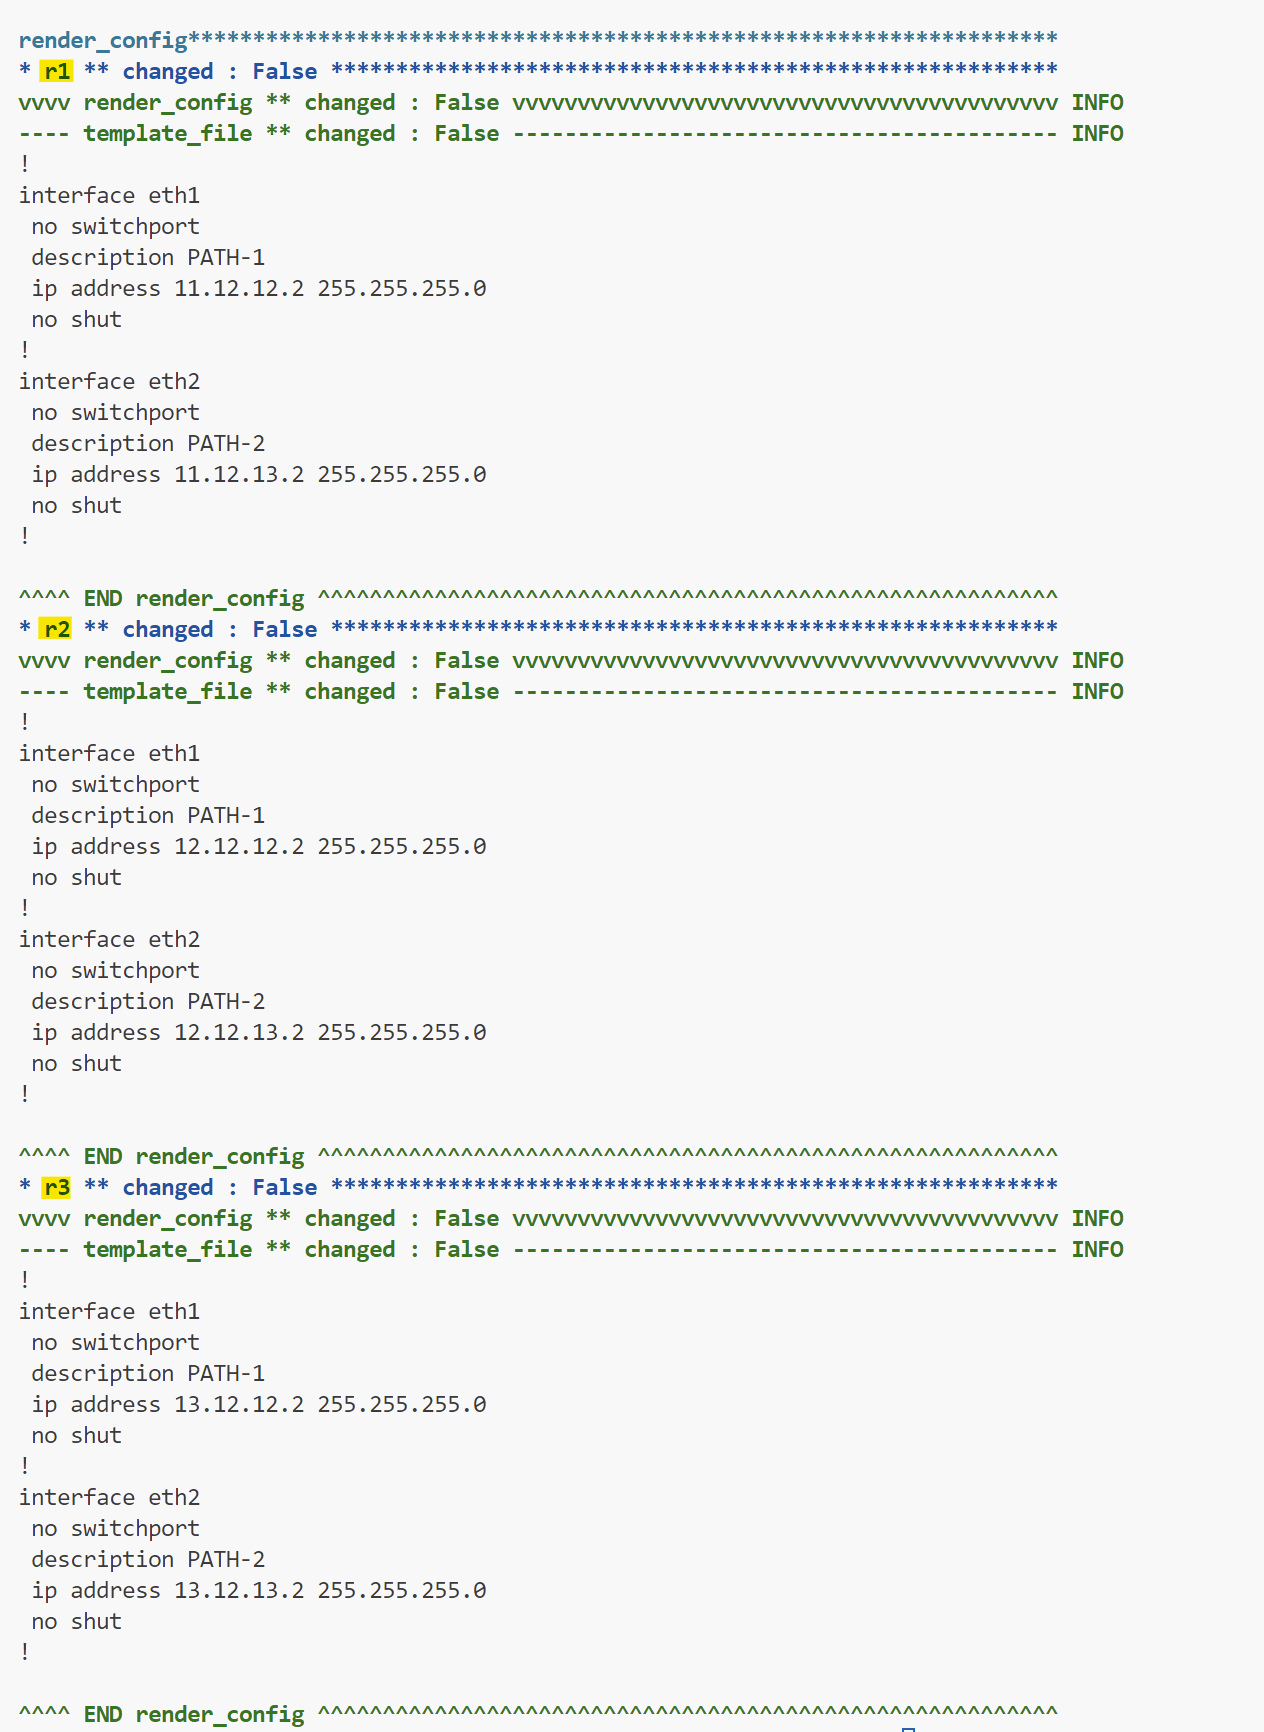
In the upcoming posts, we will see how can we push these generated configurations to the devices using Nornir.