

High Availability is one of the most crucial parts of network operation. In terms of routers and switches, we have a variety of options to choose from such as Switch-Stack, vPC, VSS, HSRP etc.
When it comes to firewalls, we only have very limited options because of the stateful nature of the firewall appliances. Most of us would usually go with an Active/Passive firewall design where the active firewall processes the traffic and the standby firewall just sits there and waits to take over in the event of a failure. You can also choose an Active/Active design if that suits your environment.
In this blog post, we will learn how to configure Active/Passive High Availability in the Palo Alto firewalls.
 Suresh Vina
Configuration
Step 1 - Choosing the control and data links (HA1 & HA2)
Firewalls in an HA pair use HA1 and HA2 links to synchronize data and state information.
- If you have specific physical firewalls such as PA-850, PA-3200, PA-5200 or any other suitable ones, you can then use the dedicated HA ports for data and state synchronization.
- For firewalls without dedicated HA ports such as VM-Series or PA-220, it is recommended to use the management port for the HA1 and use the dataplane interfaces for HA2 and backup links (shown in this example)

Control Link
The HA1 control link is used to exchange hello messages, heartbeats, user-id information and state information. The control link is also used to synchronize configuration changes with its HA peer firewall.
Data Link
The HA2 Data Link is used to synchronize sessions, forwarding tables, ARP tables and IPSec information with its peer firewall.
Backup Links
Backup links are used to provide redundancy for the HA1 and HA2 links. If the firewall doesn't have dedicated backup links, you can use in-band data ports instead.
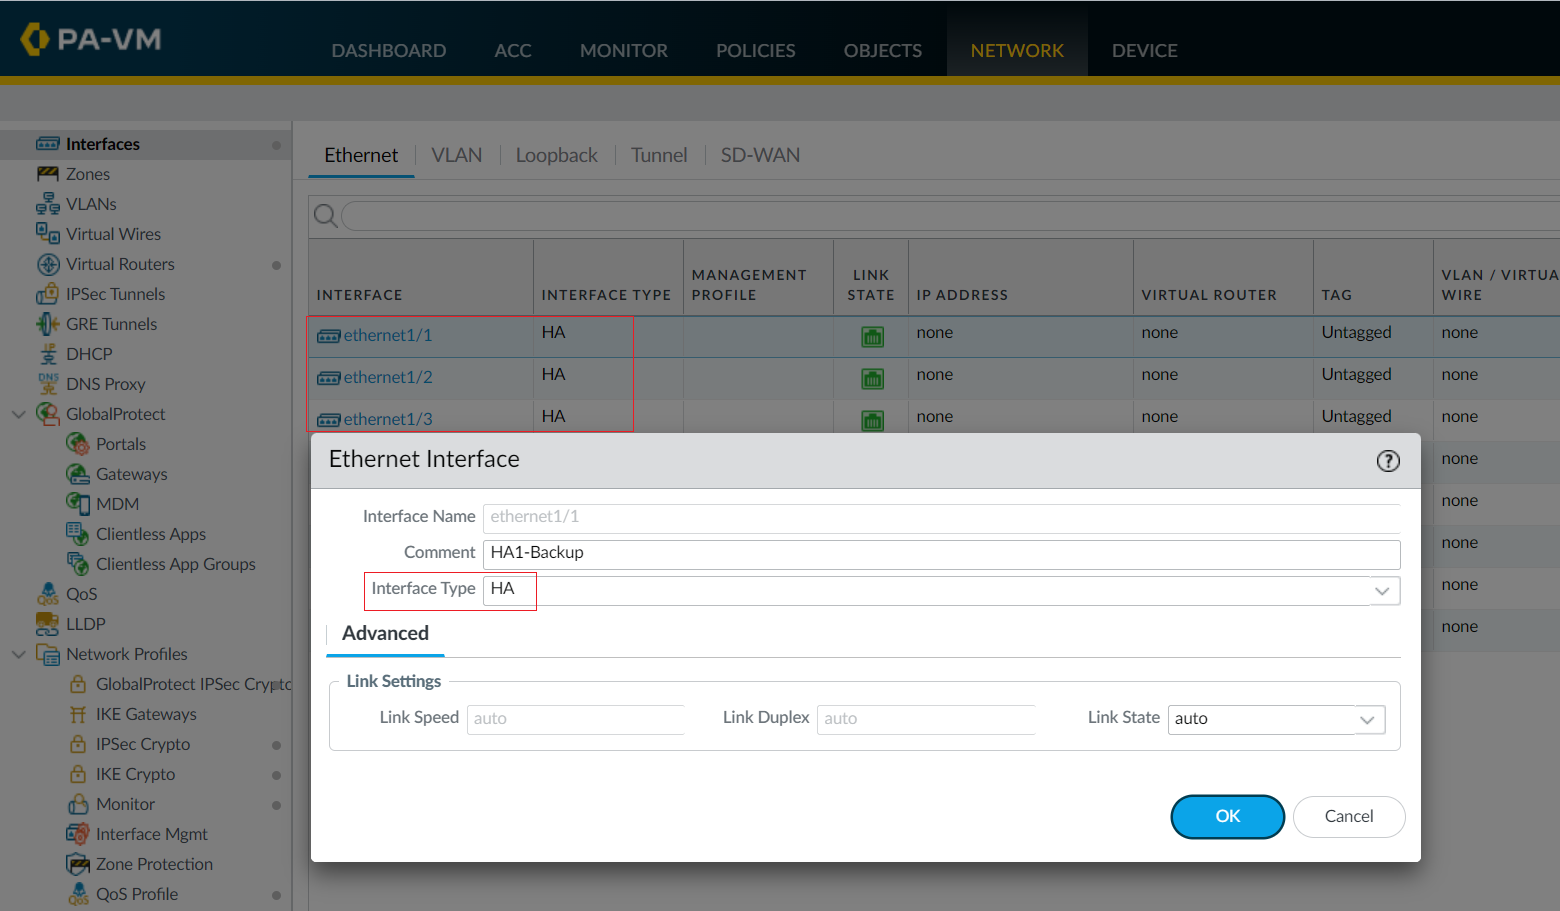
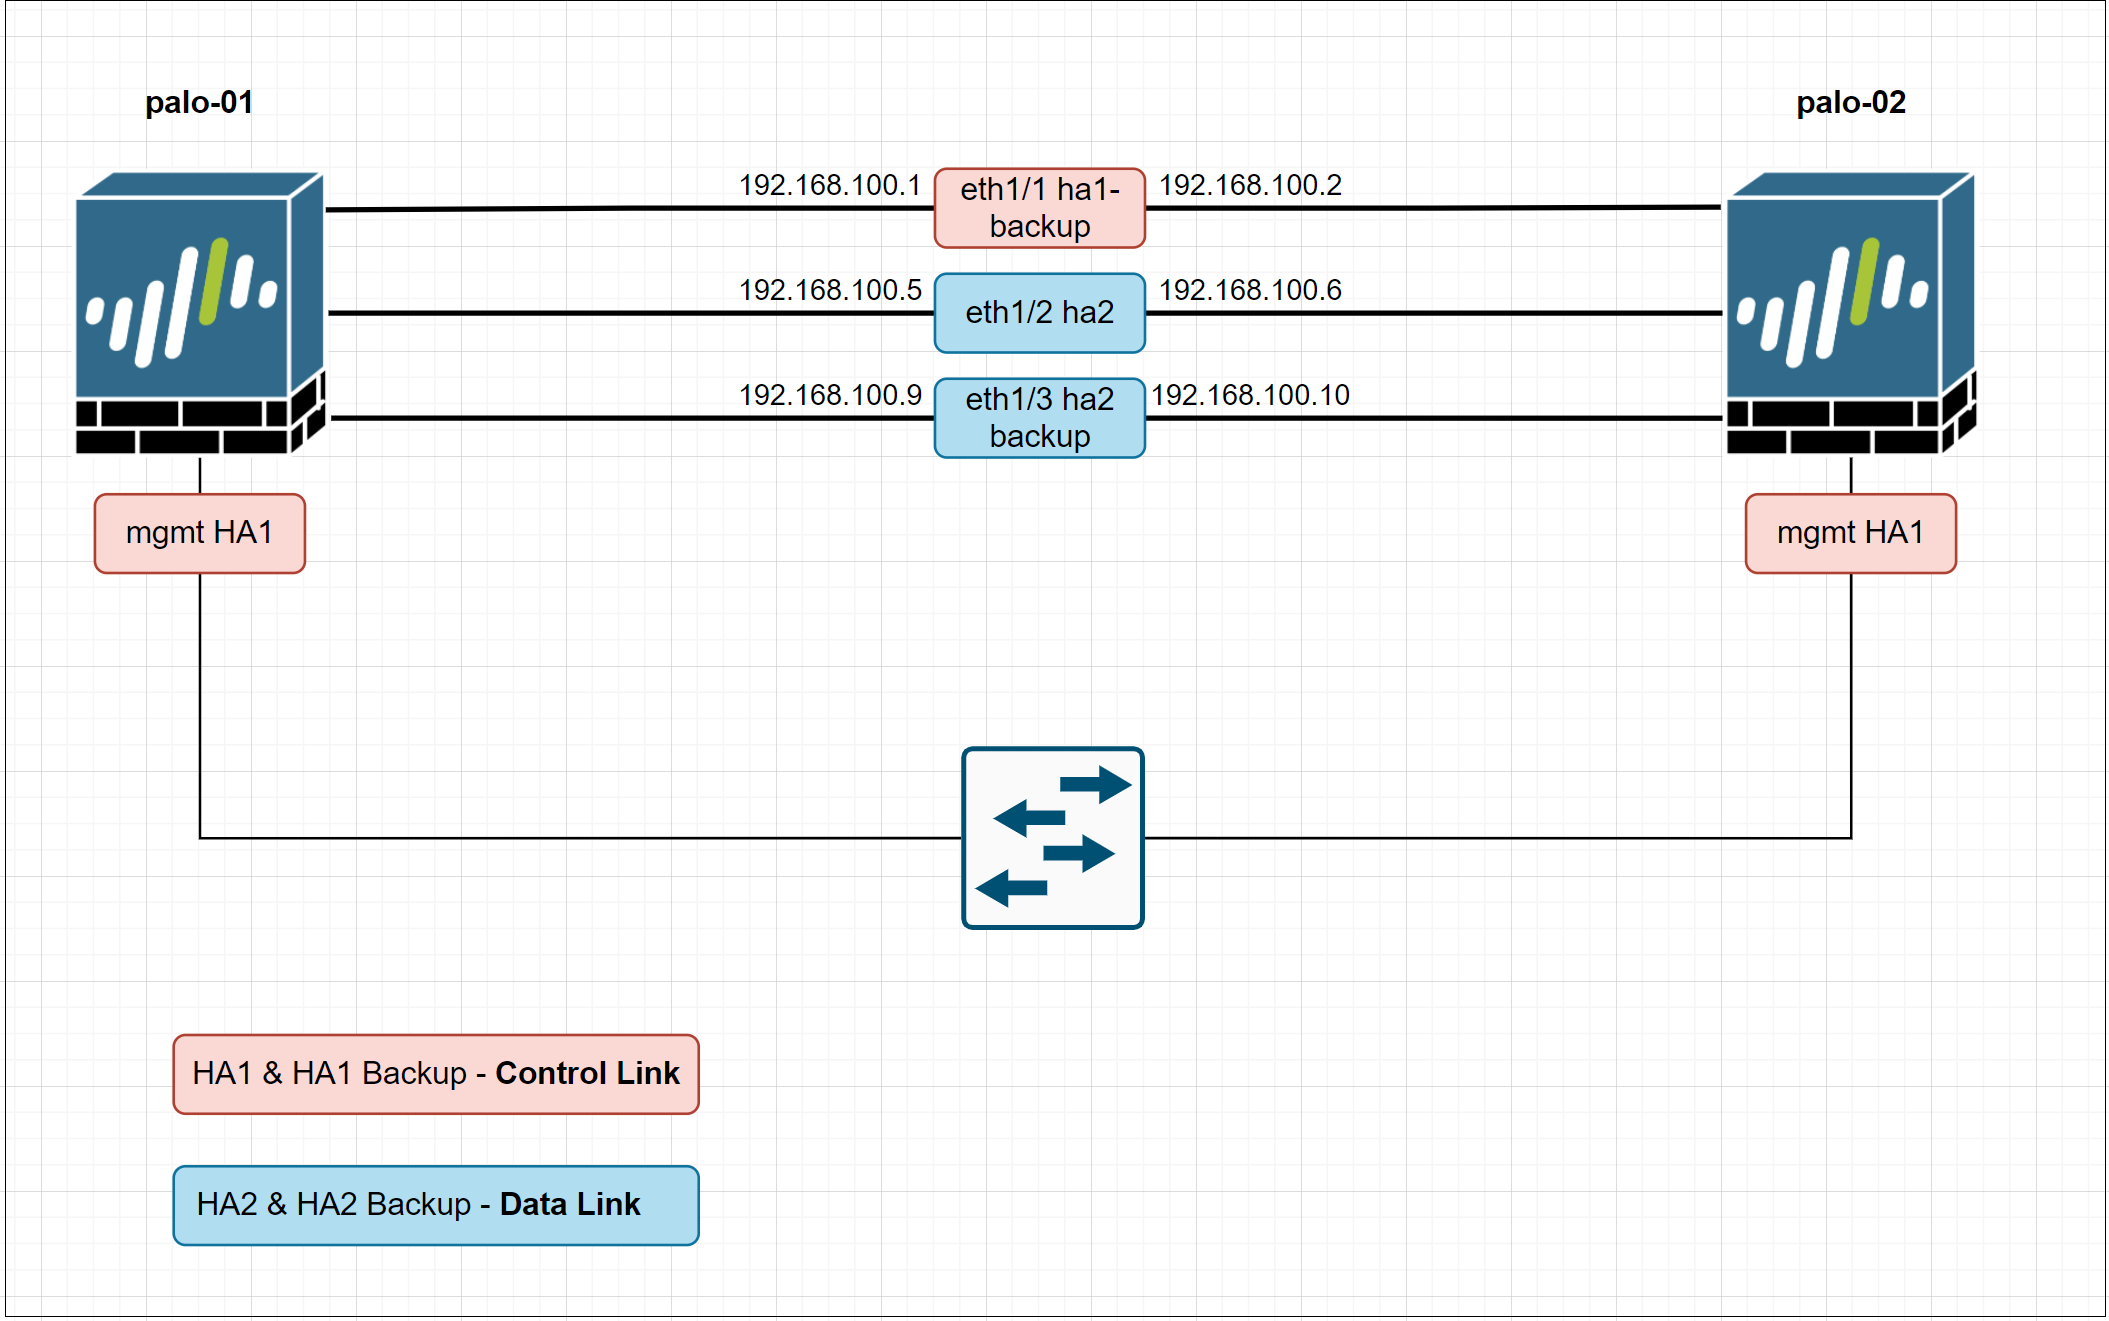
In this example, I'm going to use the following ports as the HA links
- HA1 - Management interface
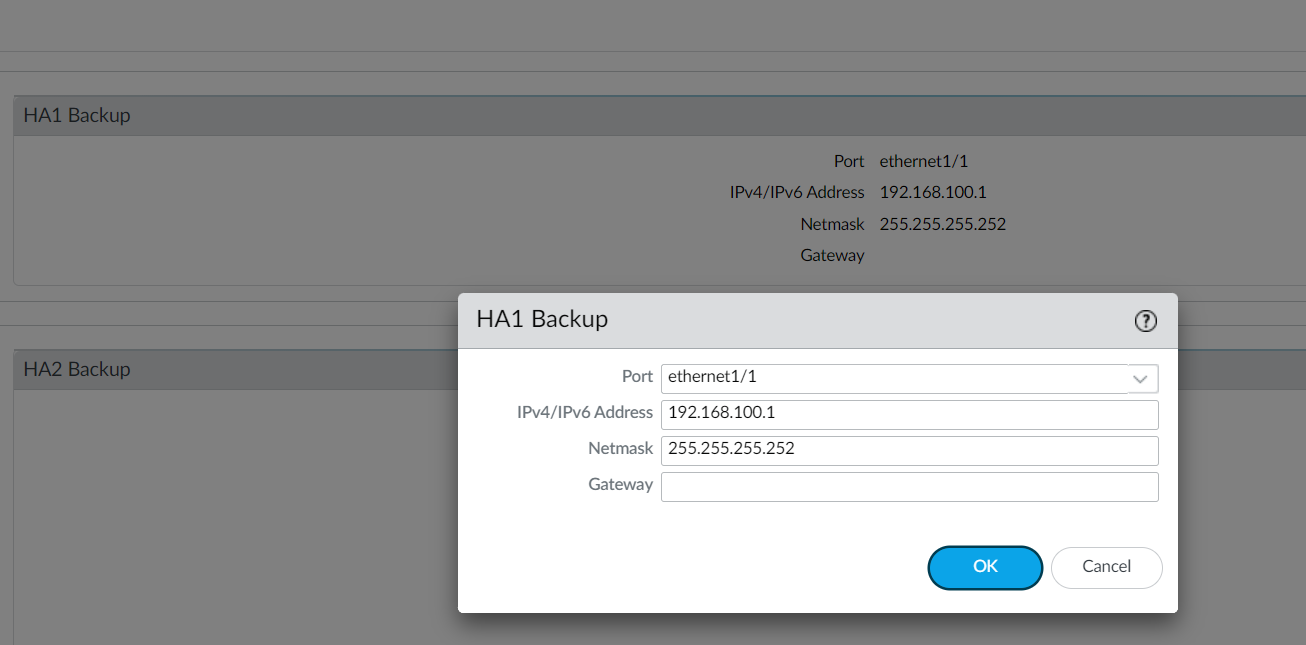
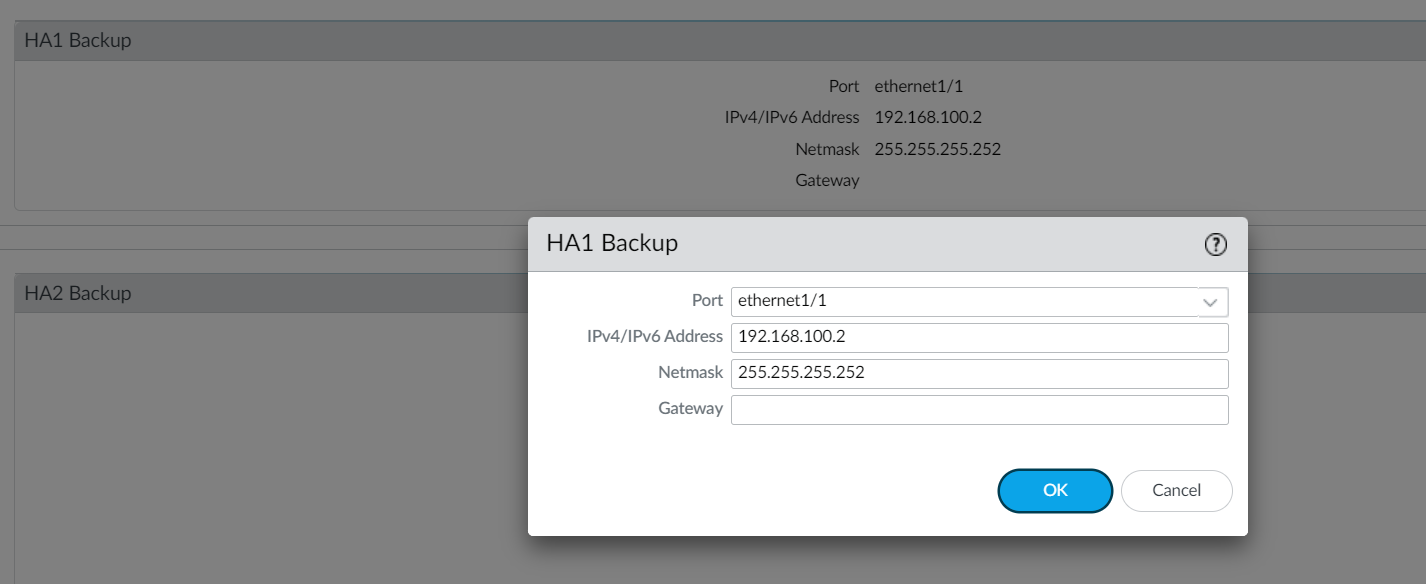
- HA1 Backup - Eth1/1
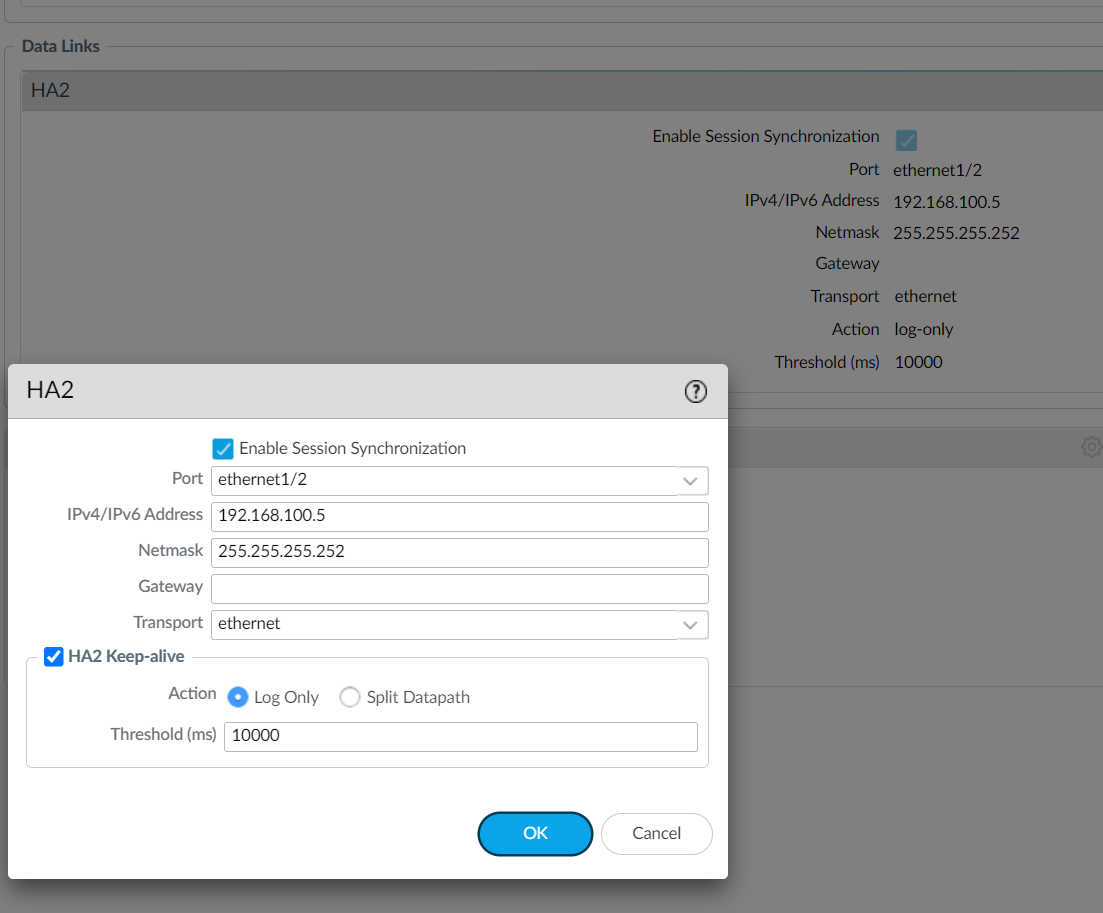
- HA2 - Eth1/2
- HA2 Backup - Eth1/3
Since we don't have dedicated HA ports, we need to set up (convert) the data ports to function as HA ports. Navigate to Network > Interfaces > Ethernet and set the Interface Type to HA on the appropriate interfaces (Eth1/1, Eth1/2 and Eth1/3 in this example)
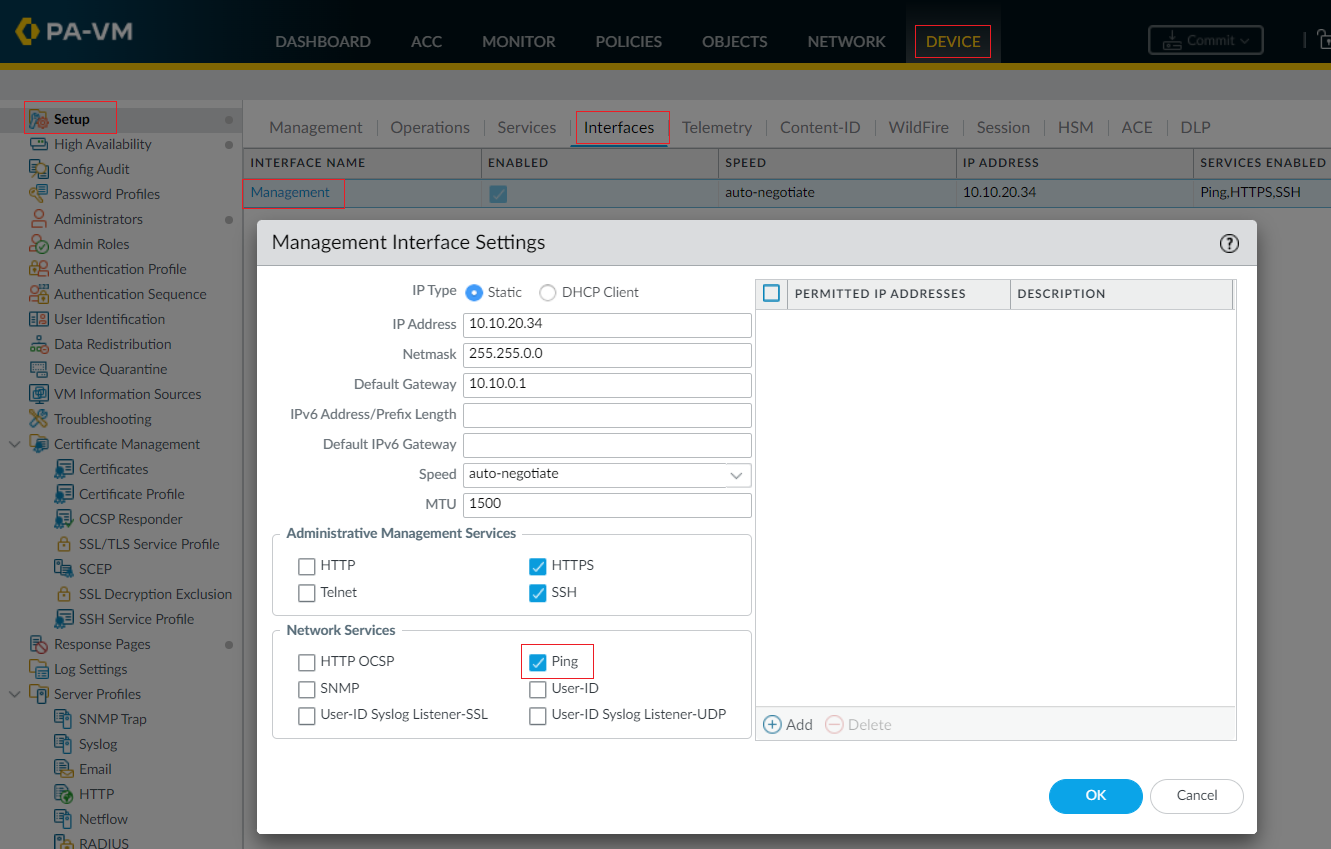
Step 2 - Enable Ping
Enabling ping allows the management port to exchange heartbeat backup information. (If you are using the Heartbeat backup option, more on this later)
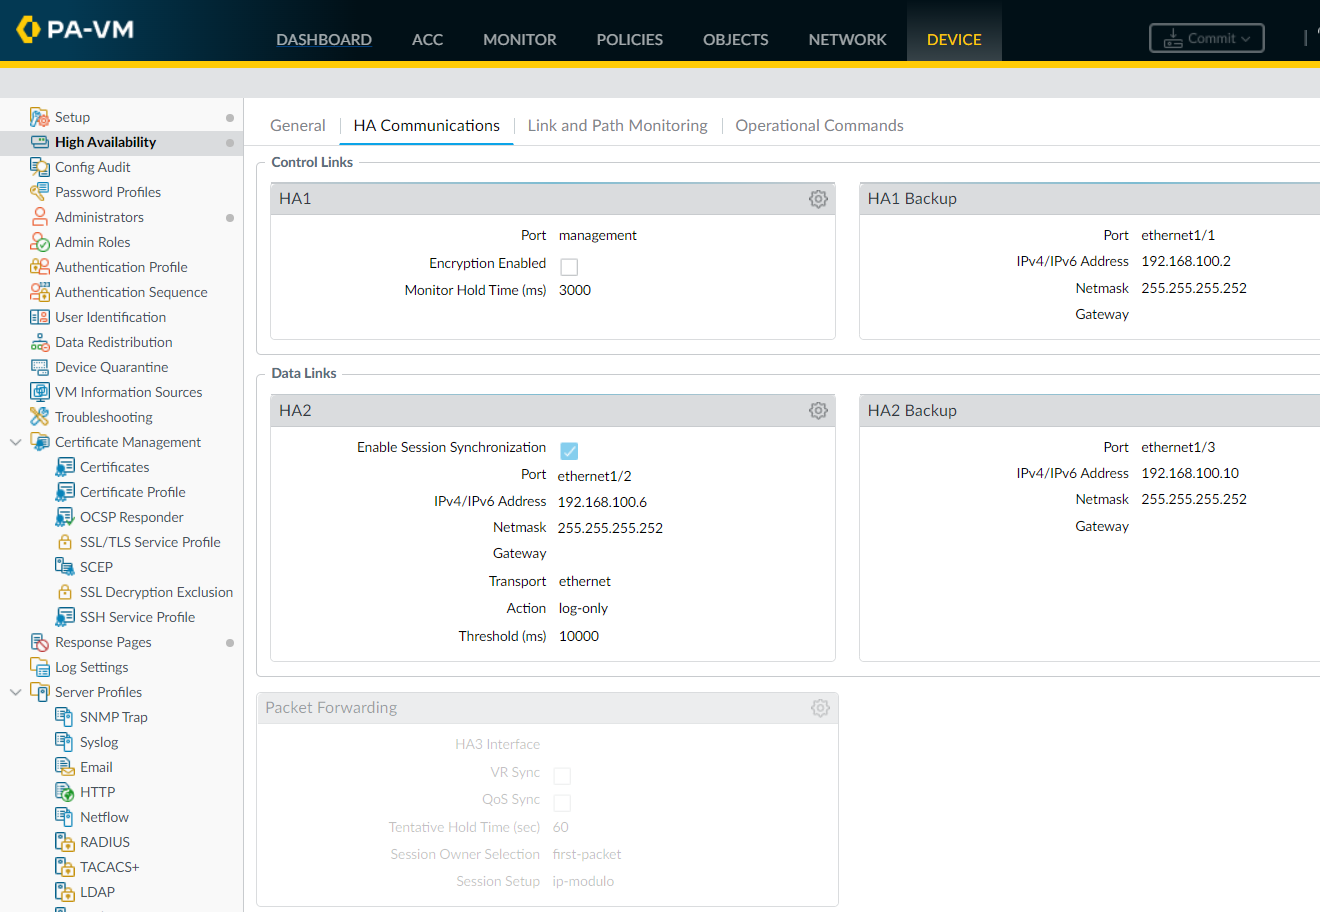
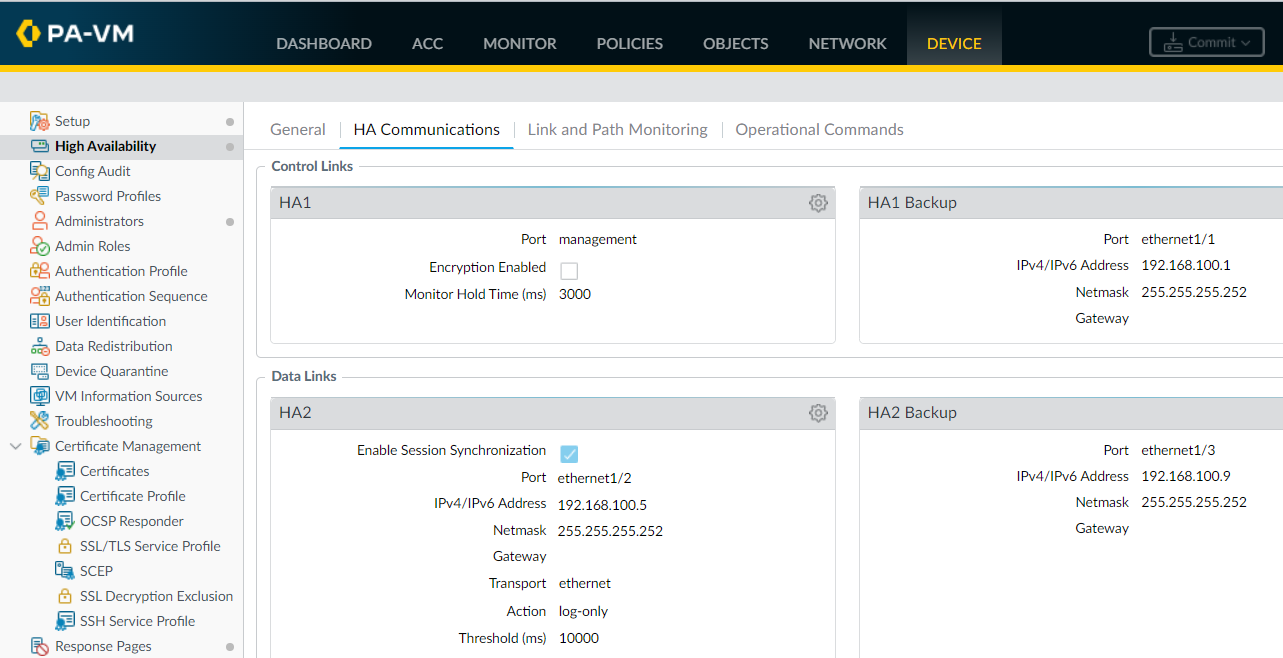
Step 3 - Configure the HA1 Control Link
Navigate to Device > High Availability > HA Communications and edit the HA1 section.
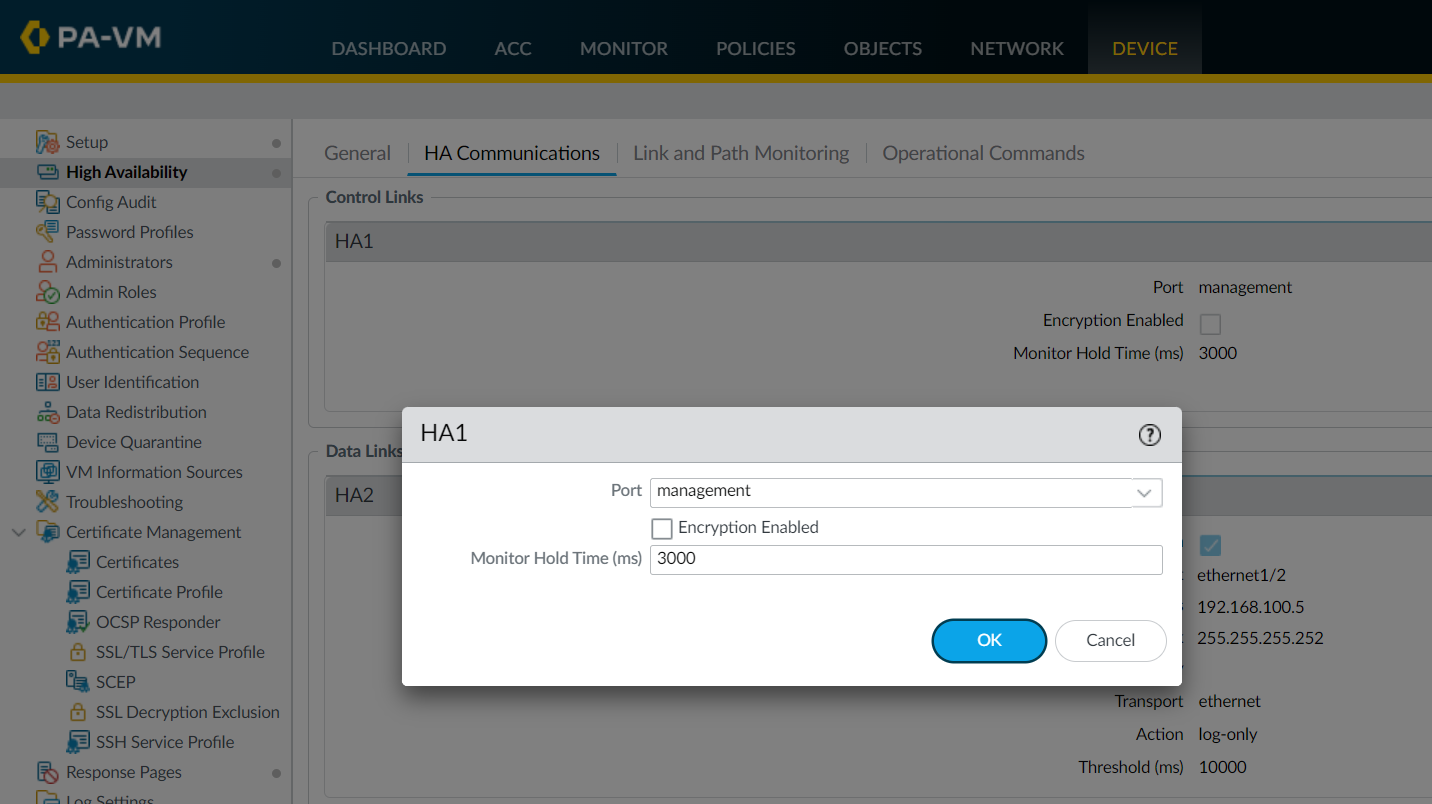
Since we are using the management ports as the HA1 control link, the IP address is pre-populated for us.
If you are using a data port as the HA1 link, then you will need to configure the IP address and mask. You also need the gateway IP if the HA1 interfaces are on different subnets.
Step 4 - Configure the HA1 Backup link
Navigate to Device > High Availability > HA Communications and edit the HA1 Backup section by configuring the IP address and mask.
Step 5 -Configure the HA2 link
Navigate to Device > High Availability > HA Communications and edit the HA2 section by configuring the IP address and mask.
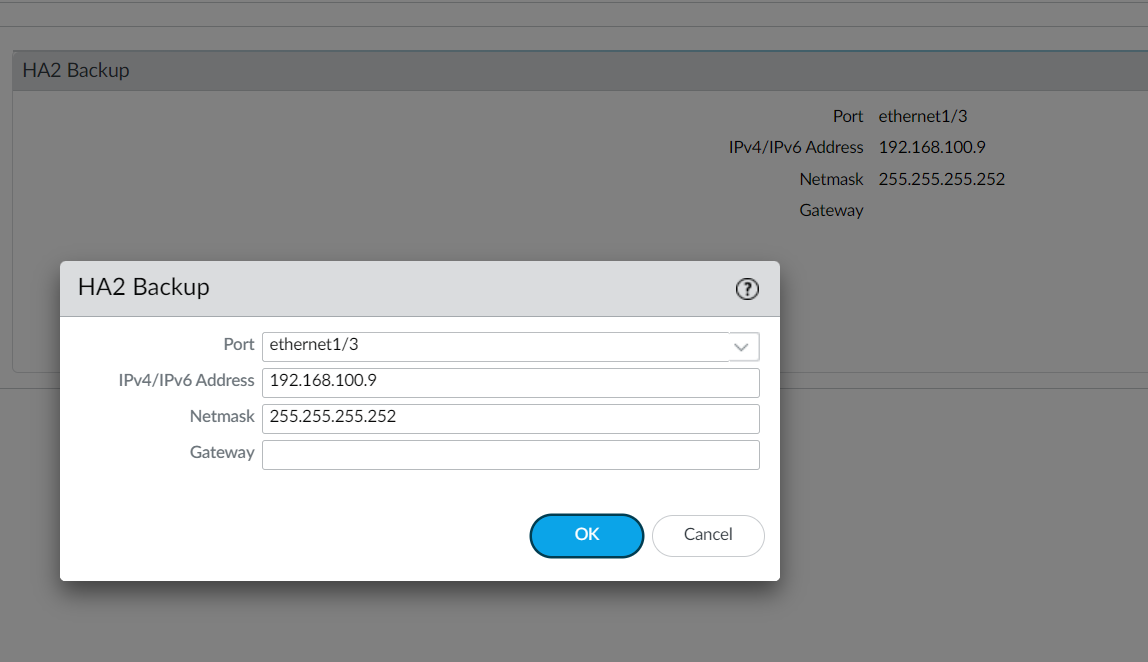
Step 6 - Configure the HA2 Backup link
Navigate to Device > High Availability > HA Communications and edit the HA2 Backup section by configuring the IP address and mask.
HA links configuration summary
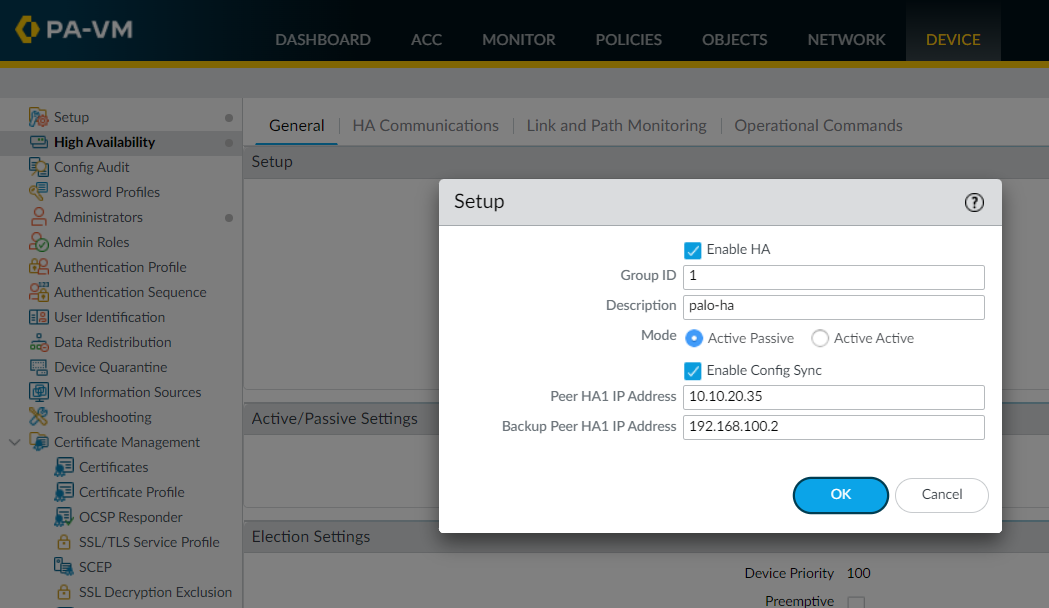
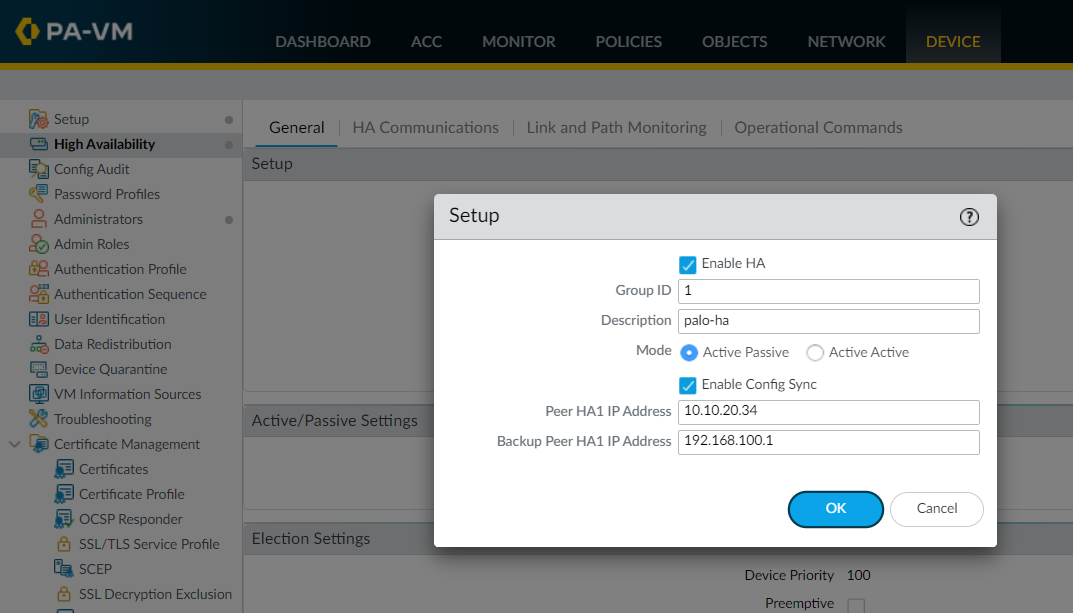
Step 7 - Enable HA
The final step is to Enable HA, choose the HA mode (Active/Passive in this case) and the group ID which uniquely identifies each HA pair in the network. You also need to specify the IP address assigned to the control link/control link backup of the peer firewall.
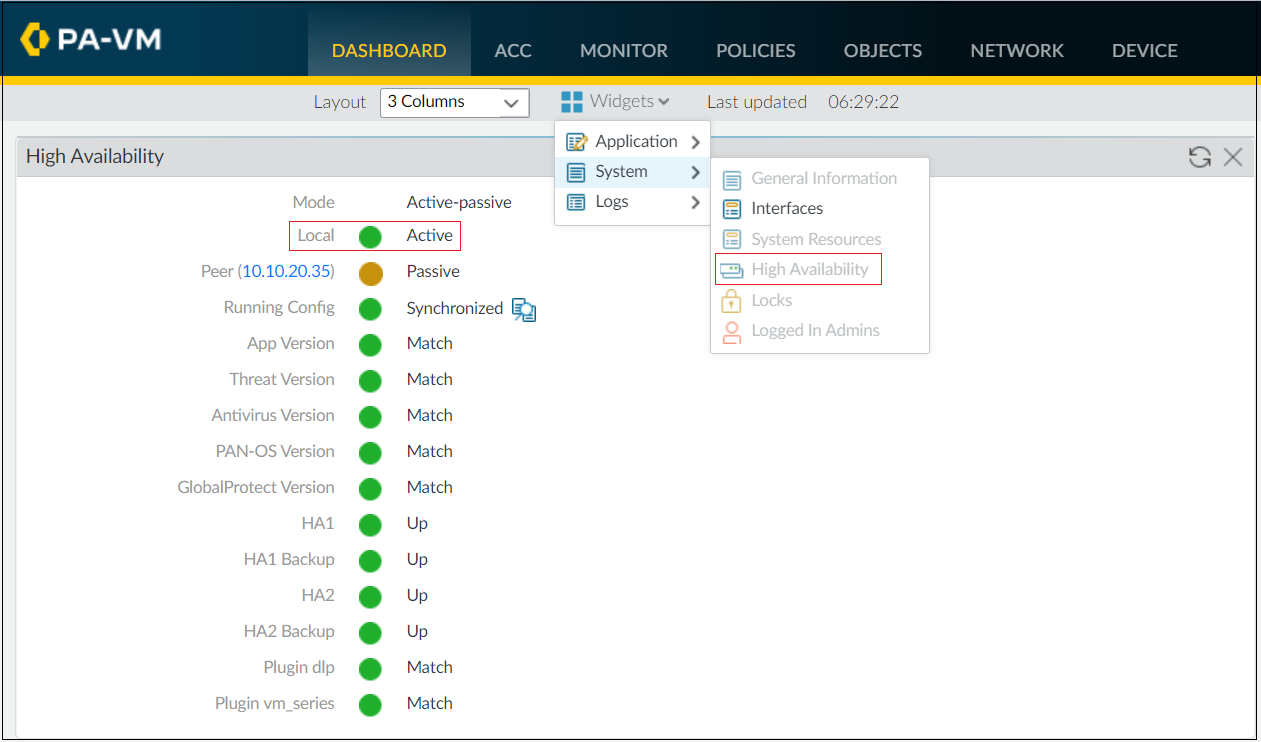
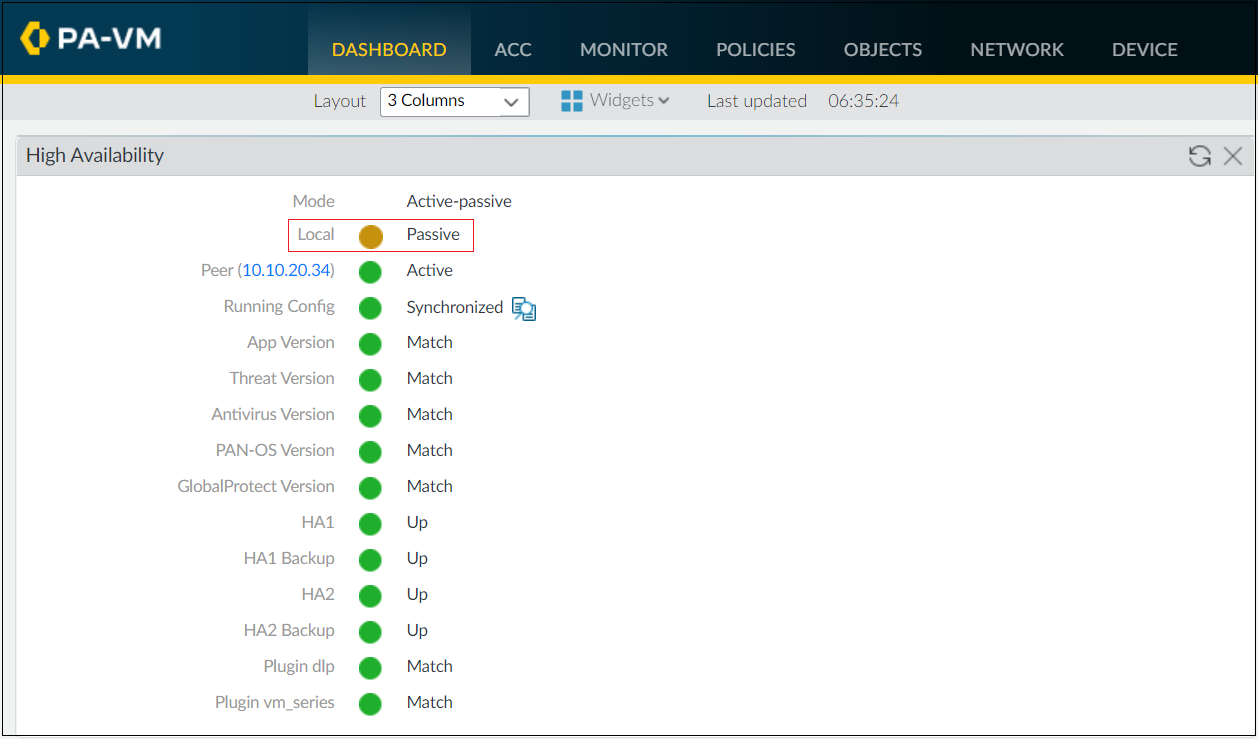
Verification
Now that we have completed the configurations, it's time to verify that the firewalls are indeed in Active/Passive HA. This can be easily checked by adding the High Availability widget to the dashboard.
Navigate to Dashboard > Widgets > System and select the High Availability widget.
You can also use the show high-availability CLI commands to retrieve information regarding state and statistics.
admin@palo-01(active)> show high-availability state

Group 1: palo-ha
  Mode: Active-Passive
  Local Information:
    Version: 1
    Mode: Active-Passive
    State: active (last 5 hours)
    Device Information:
      Management IPv4 Address: 10.10.20.34/16
      Management IPv6 Address:
      Jumbo-Frames disabled; MTU 1500
    HA1 Control Links Joint Configuration:
      Encryption Enabled: no
    Election Option Information:
      Priority: 100
      Preemptive: no
    Version Compatibility:
      Software Version: Match
      Application Content Compatibility: Match
      IOT Content Compatibility: Match
      Anti-Virus Compatibility: Match
      Threat Content Compatibility: Match
      VPN Client Software Compatibility: Match
      Global Protect Client Software Compatibility: Match
      VM License Type: Match
      Plugin Information:
        VMS: Match
        DLP: Match
    State Synchronization: Complete; type: ethernet
  Peer Information:
    Connection status: up
    Version: 1
    Mode: Active-Passive
    State: passive (last 3 hours)
    Last non-functional state reason: Version mismatches with peer for VMS
    Device Information:
      Management IPv4 Address: 10.10.20.35/16
      Management IPv6 Address:
      Jumbo-Frames disabled; MTU 1500
      Connection up; Primary HA1 link
      Connection up
      Keep-alive config log-only; status up; Primary HA2 Link
        Monitor Hold inactive; Allow settling after failure
      Keep-alive status up
    Election Option Information:
      Priority: 100
      Preemptive: no
  Configuration Synchronization:
    Enabled: yes
    Running Configuration: synchronized
Preemption
This setting is only required if you wish to make sure that a specific firewall is the preferred active firewall.
Set the numerical value in Device Priority. Make sure to set a lower numerical value on the firewall that you want to assign a higher priority, the default value is 100. I'm going to assign a value of 80 to the primary firewall.
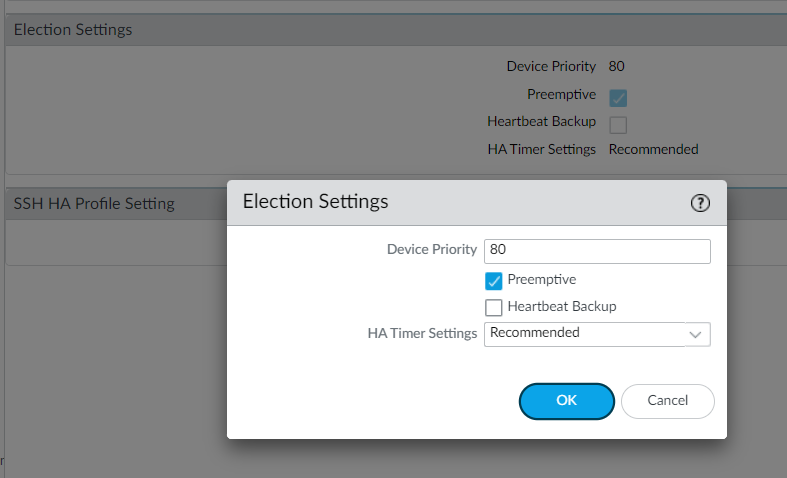
Heartbeat Backup
You need to enable heartbeat backup if your control link uses a dedicated HA port or an in-band port.
However, if you using the management port as the control link then the official Palo Alto documentation says (link in the reference section) that,
You do not need to enable heartbeat backup if you are using the management port for the control link
Since we are using the Management link as the control link, I'm not enabling Heartbeat backup in the election settings.
To test, preemption, I'm going to reboot the current active firewall (primary). When the current active goes down, then the secondary firewall will take the active role and start to forward the traffic. When the primary firewall comes up, it will resume the active role as it has a higher priority (lower numerical value of 80).
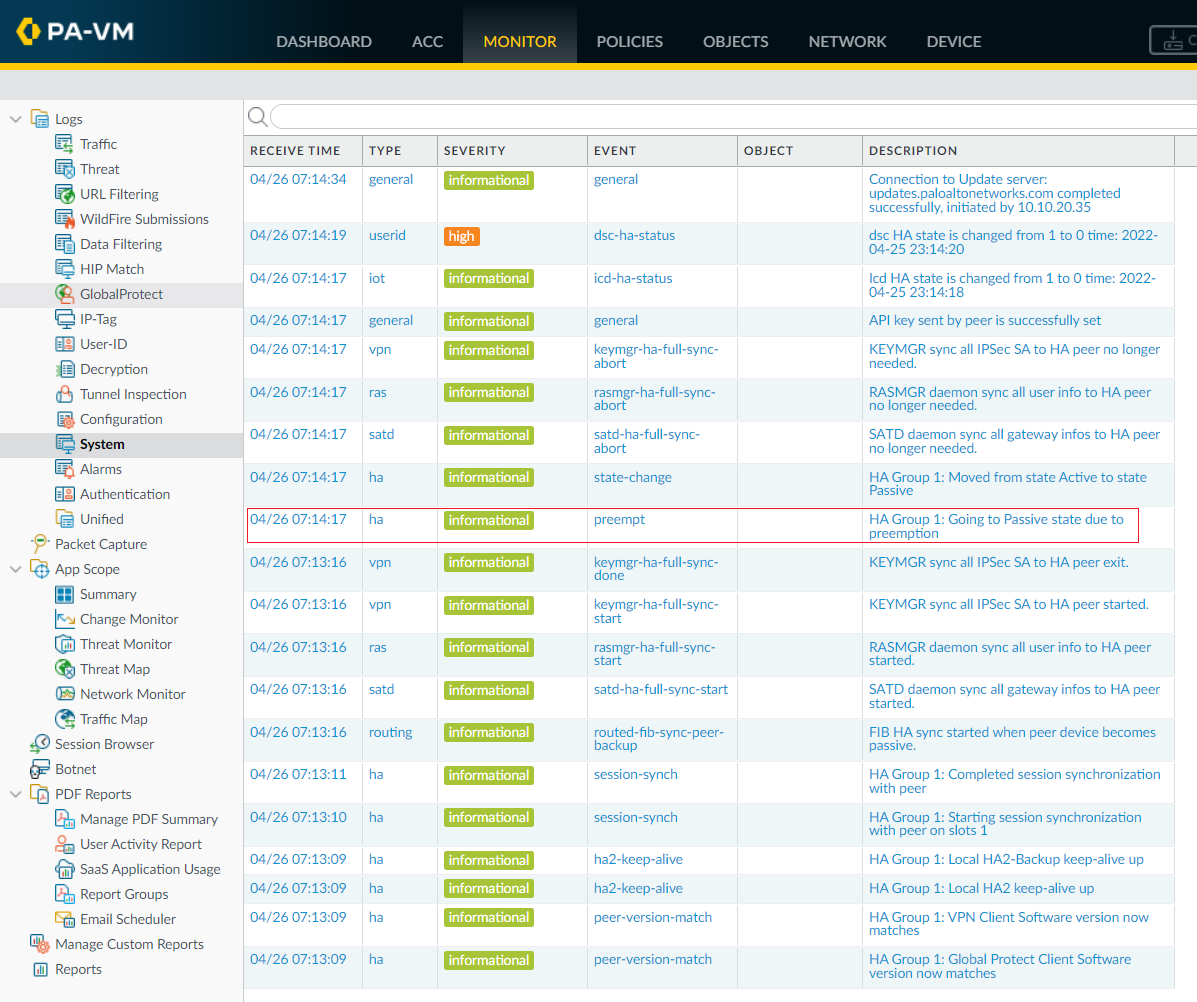
As you can see above, the secondary firewall moved back to the passive role once the primary device comes up.
Closing up and my thoughts
The configuration steps are very straightforward if you don't require some fancy features such as control link encryption or aggressive failover. Please let me know in the comments if come across any issues or have any concerns.


