
In this blog post, we will cover how to configure Palo Alto Global Protect VPN. We'll go through setting up the portal, gateway, certificates, authentication profile, IP pools, split-tunnel, security policy, NAT policy and other necessary components. This is aimed at those who already have a basic understanding of Palo Alto firewalls, including interfaces, zones, and policies. We're just focusing on the Global Protect aspects here.
If you want to see the video version of this blog, please check out the video below.

Scenario
In this example, we have a Palo Alto firewall with a simple setup - one interface connects to the internal network (LAN), and another connects to the Internet (WAN). We're focusing on a remote user, someone working from the comfort of their home, who needs to connect to a server sitting at 192.168.10.10 in the LAN.

In a typical environment, the WAN interface on your firewall would typically have a public IP. But since we're running this setup in a lab for testing, we're using a private IP 10.10.20.36. Just play along and think of it as a public IP for the sake of this example, alright?
 Suresh Vina
 Suresh Vina
Portal vs Gateway
If you are coming from a different firewall vendor, the terms portal and gateway can be confusing. Essentially, the portal provides the management functions for your Global Protect infrastructure. The gateways provide security enforcement for traffic from the Global Protect app. For example, if you have offices across the globe, you can have the portal in a central place and gateways spread across the world. When the users connect, the Global Protect app gets the configuration and gateway information from the portal but the actual VPN terminates in the gateway. In most scenarios, the portal and gateway exist in the same firewall.
To give you a practical example of the portal and gateway setup, let's say your company has offices in the USA, Europe, and Asia. You might decide to place your portal at headquarters or your main data center, which could be in the USA. Then, you'd set up gateways at each of your office locations across the USA, Europe, and Asia.
When someone uses the Global Protect app, it first transparently connects to the portal. This is where the app gets all the necessary configurations and a list of available gateways. After that, the app will choose to connect to the closest gateway or one that's been set as a priority, which could mean faster and more reliable VPN connections for your users, no matter where they are.
Pre-Configurations
1 - SSL/TLS Service Profile
In the context of GlobalProtect, this profile is used to specify the Global Protect portal/gateway's server certificate. We can use the same SSL/TLS profile for both portal/gateway.
The pre-requisite to creating an SSL/TLS profile is to either generate or import the portal/gateway server certificate and its chain. For this example, we will generate a self-signed certificate on the firewall.
- To import a certificate generated externally, navigate to Device>Certificate Management>Certificates and click 'import' at the bottom.
- To generate a certificate on the firewall, navigate to Device>Certificate Management>Certificates and click 'generate' at the bottom.
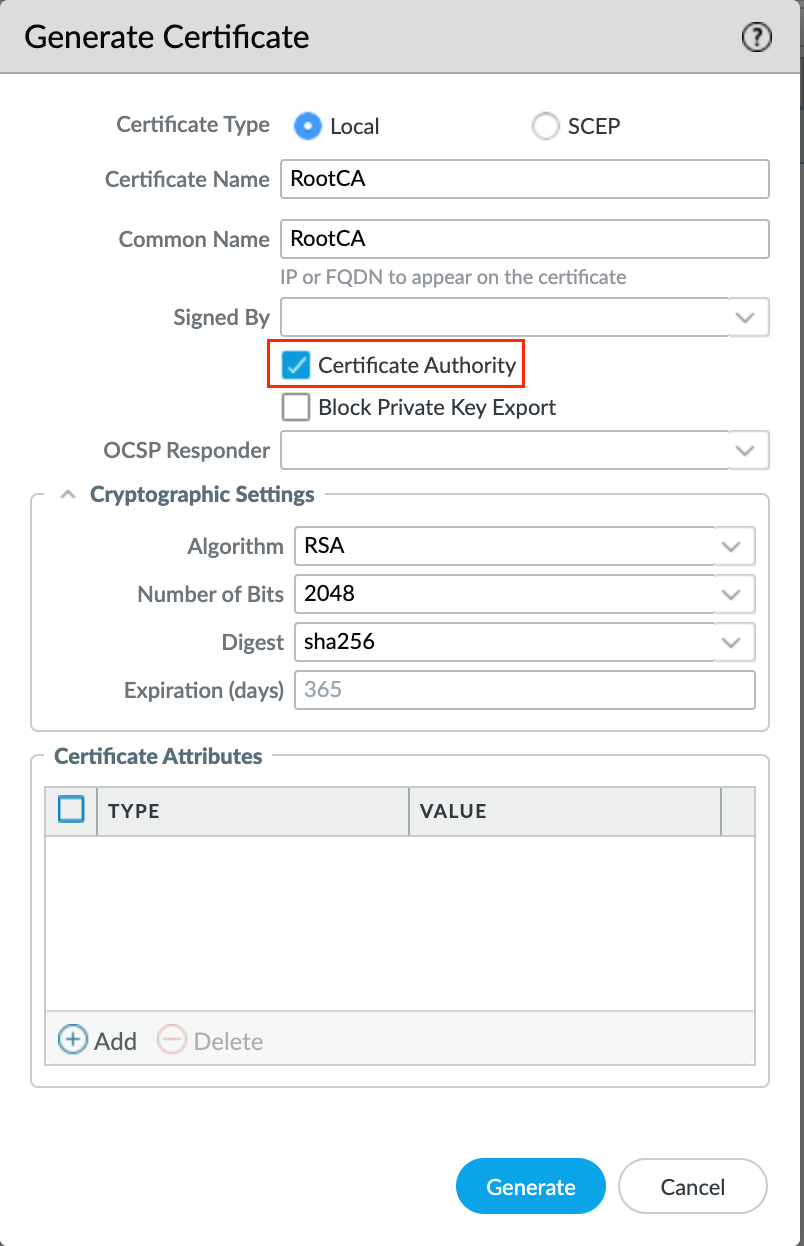
Since the server certificate needs to be generated on the firewall for this exmaple, first we need to generate a root certificate with a common name of any unique value (other than IP or FQDN of portal/gateway). Then, generate a server certificate signed by the root certificate we just created.
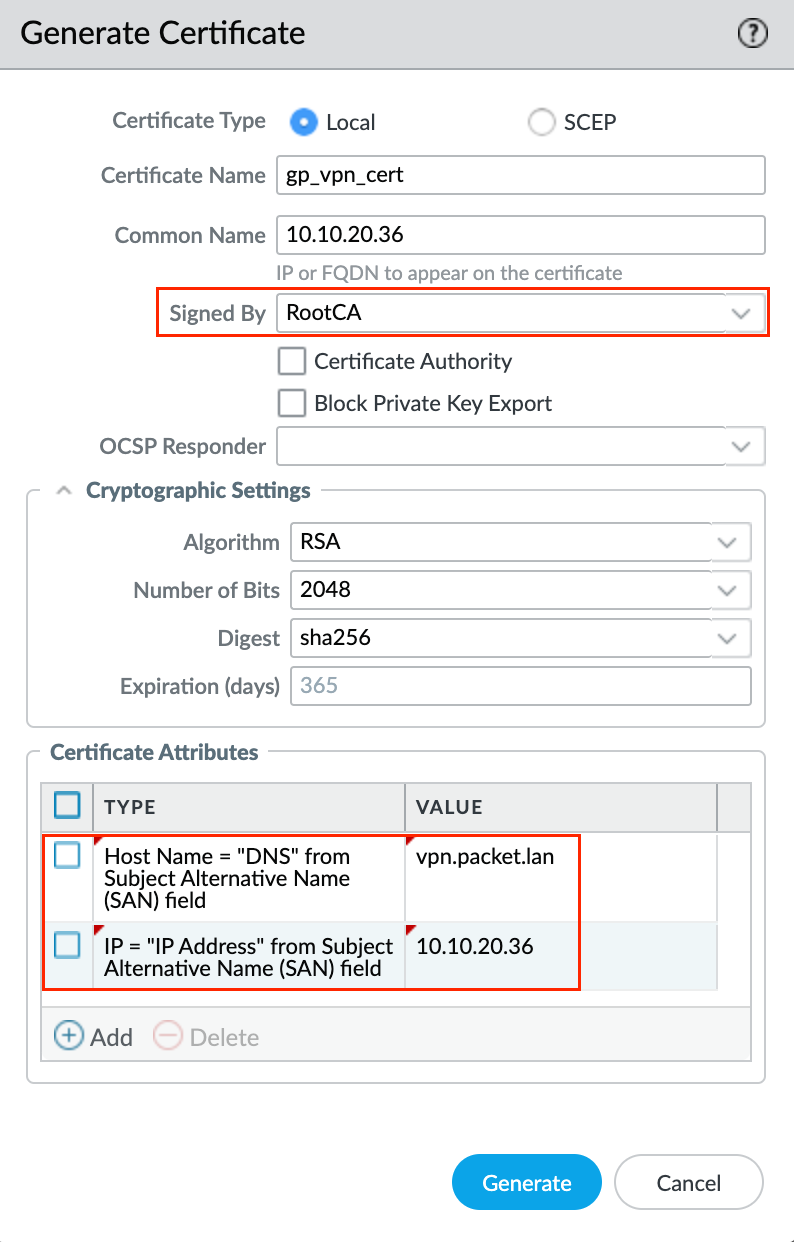
The server certificate's common name must match the portal/gateway's IP or FQDN if the subject alternative name (SAN) does not exist in this certificate. SAN can be created under the optional 'certificate attributes' of type 'hostname' or 'IP'. If SAN exists with at least one entry, then the IP or FQDN being used for portal/gateway must be present in that SAN list. The server certificate also should not be a CA.
As a good practice, it is better to use FQDN instead of IP but for this example, I'm just using the IP. The first screenshot shows generating a root certificate and the second one shows generating a server certificate.

The final step is to create an SSL/TLS Service Profile by navigating to Device > Certificate Management > SSL/TLS Service Profile. Make sure to choose the server certificate we created in the previous step as the Certificate
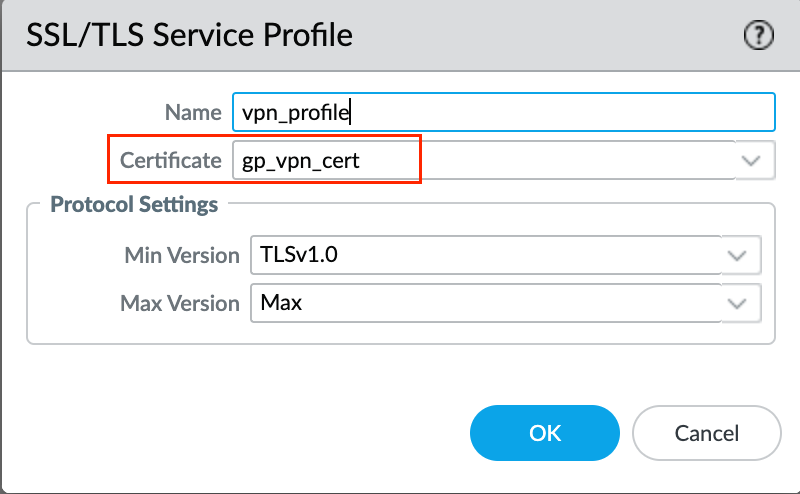
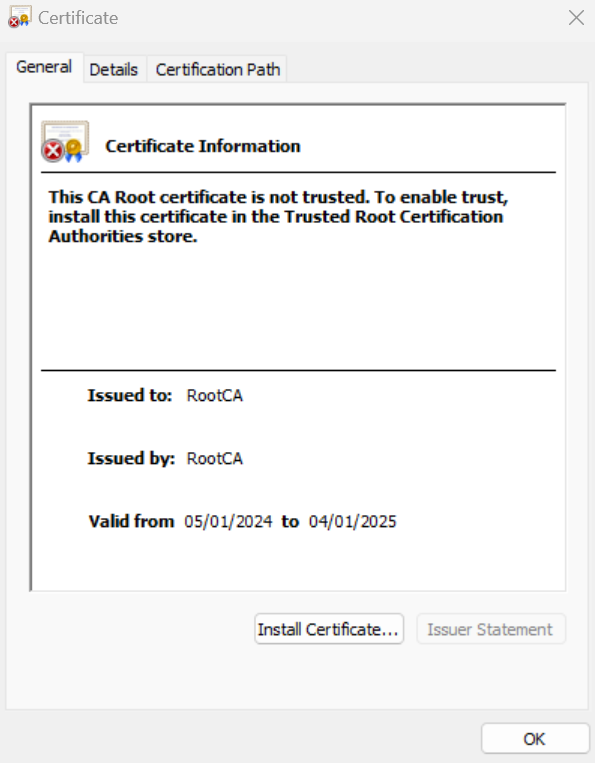
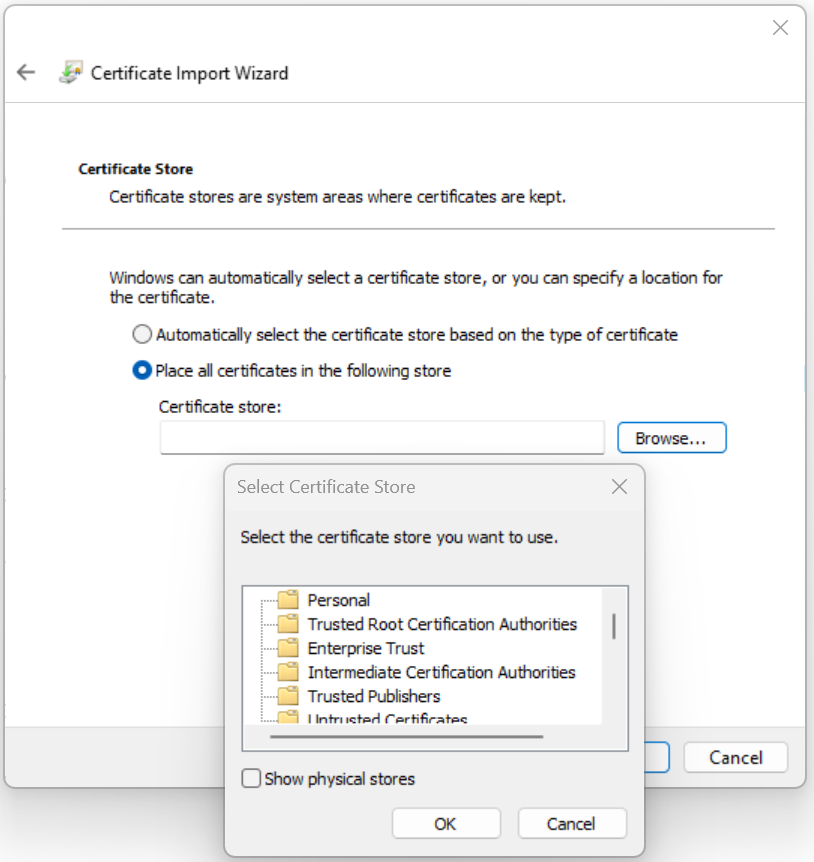
Since we are using a self-signed certificate, the client device may not trust this certificate and show an error when trying to connect Could not verify the server certificate of the gateway. If the issue persists, contact your administrator. If this happens to you, make sure to export the Root CA you just created from the firewall into the client device.
2 - Authentication Profile
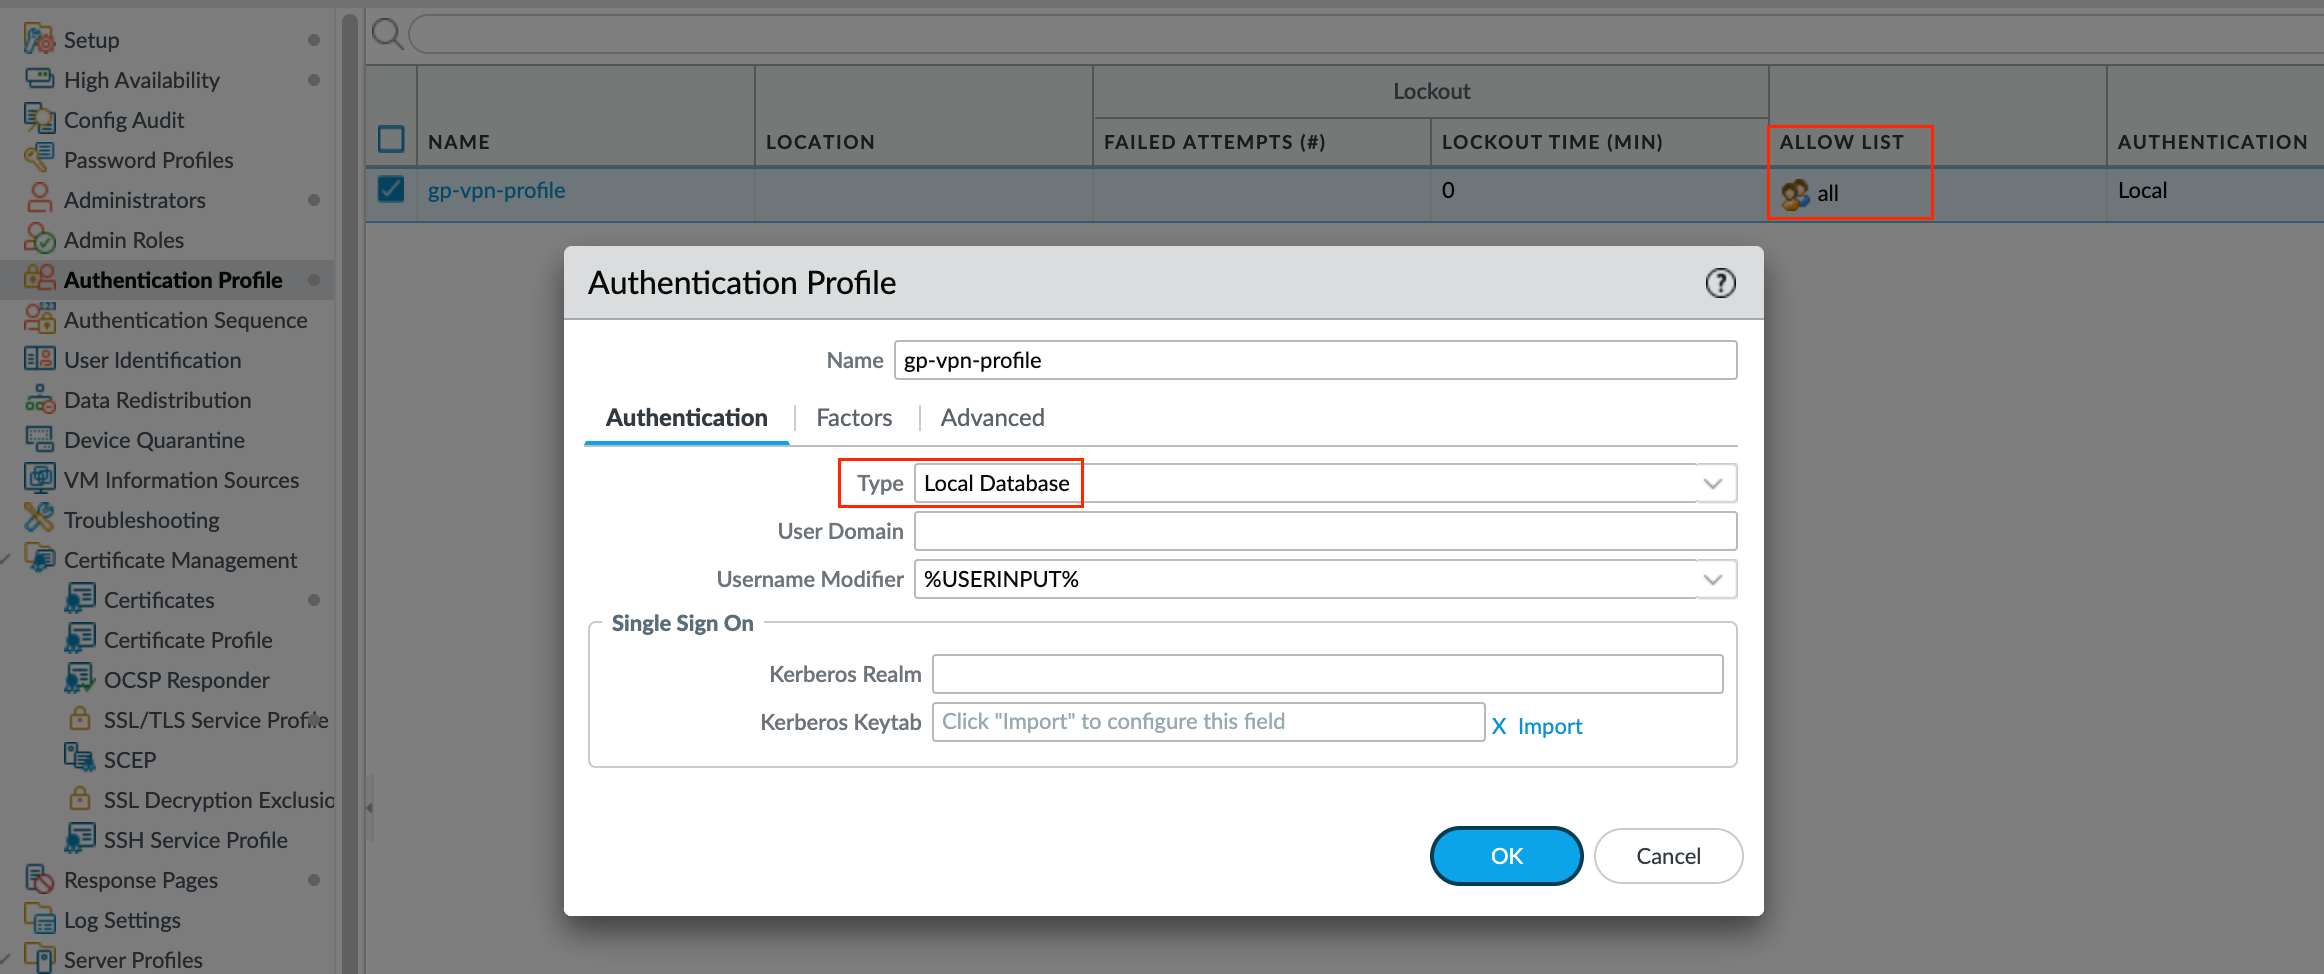
An authentication profile defines the authentication service that validates the login credentials of end users who access GlobalProtect. The service can be Local Authentication that the firewall provides or External Authentication Services such as Active Directory. For the sake of simplicity, let's use a local user database. Navigate to Device > Local User Database > Users and create a new test user.
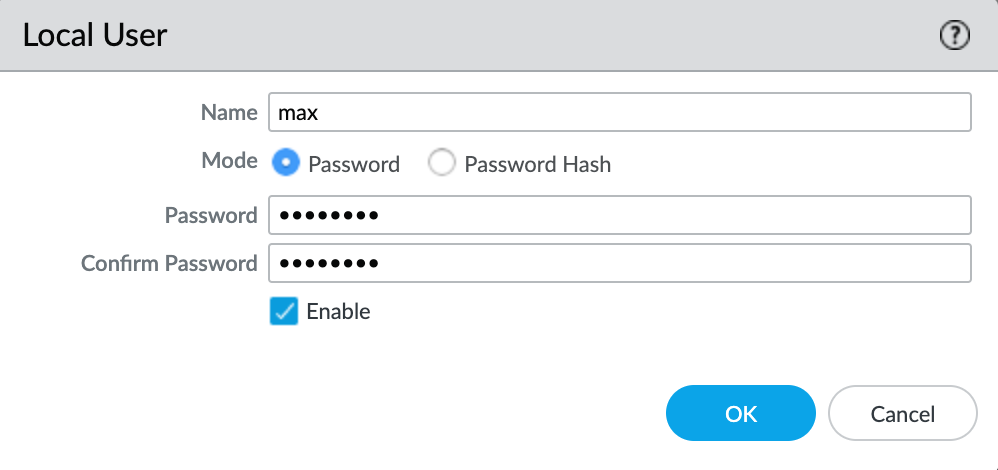
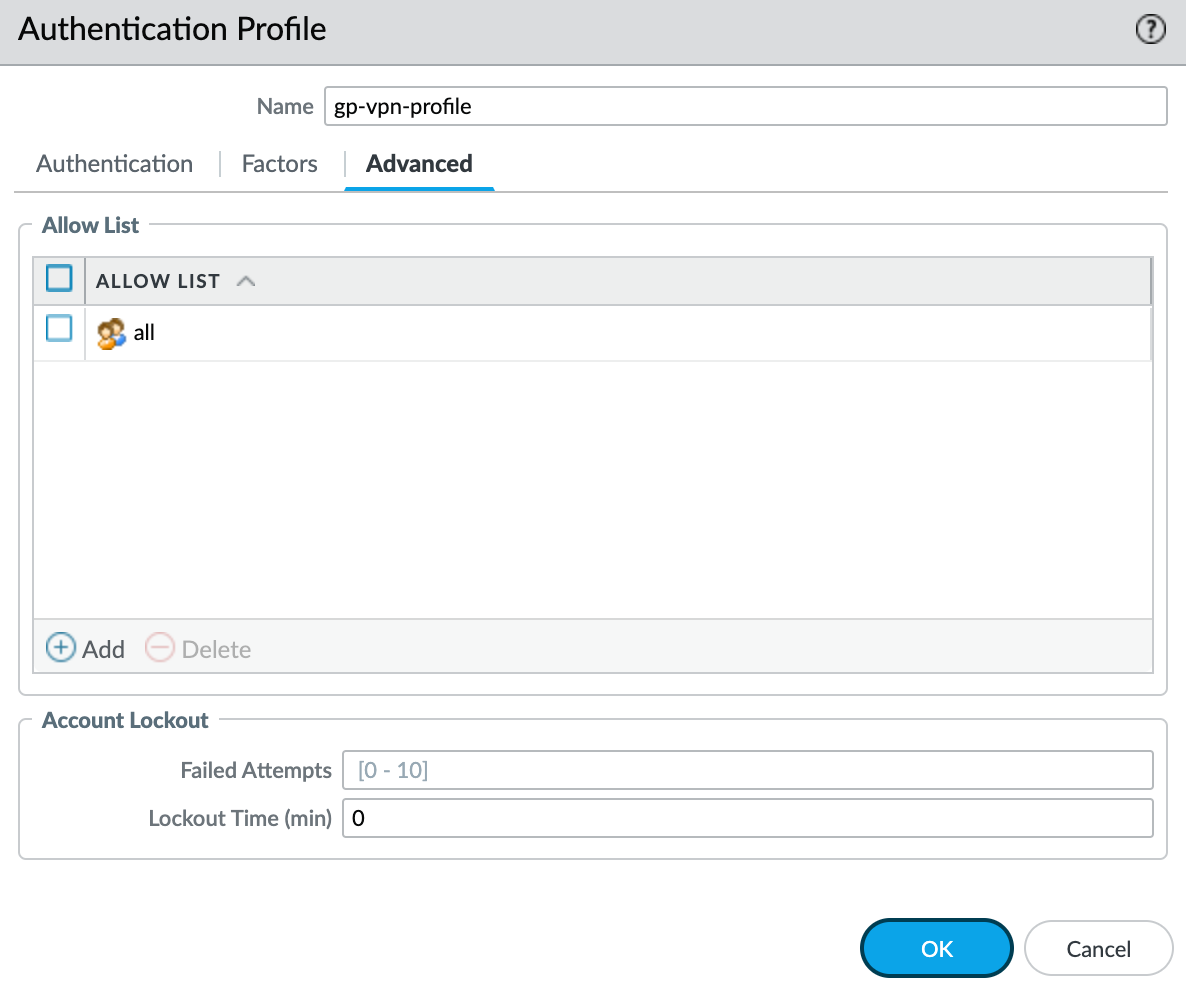
Once you created a user, navigate to Device > Authentication Profile and create a new Authentication Profile as shown below. We will attach this profile later in the portal/gateway configuration.
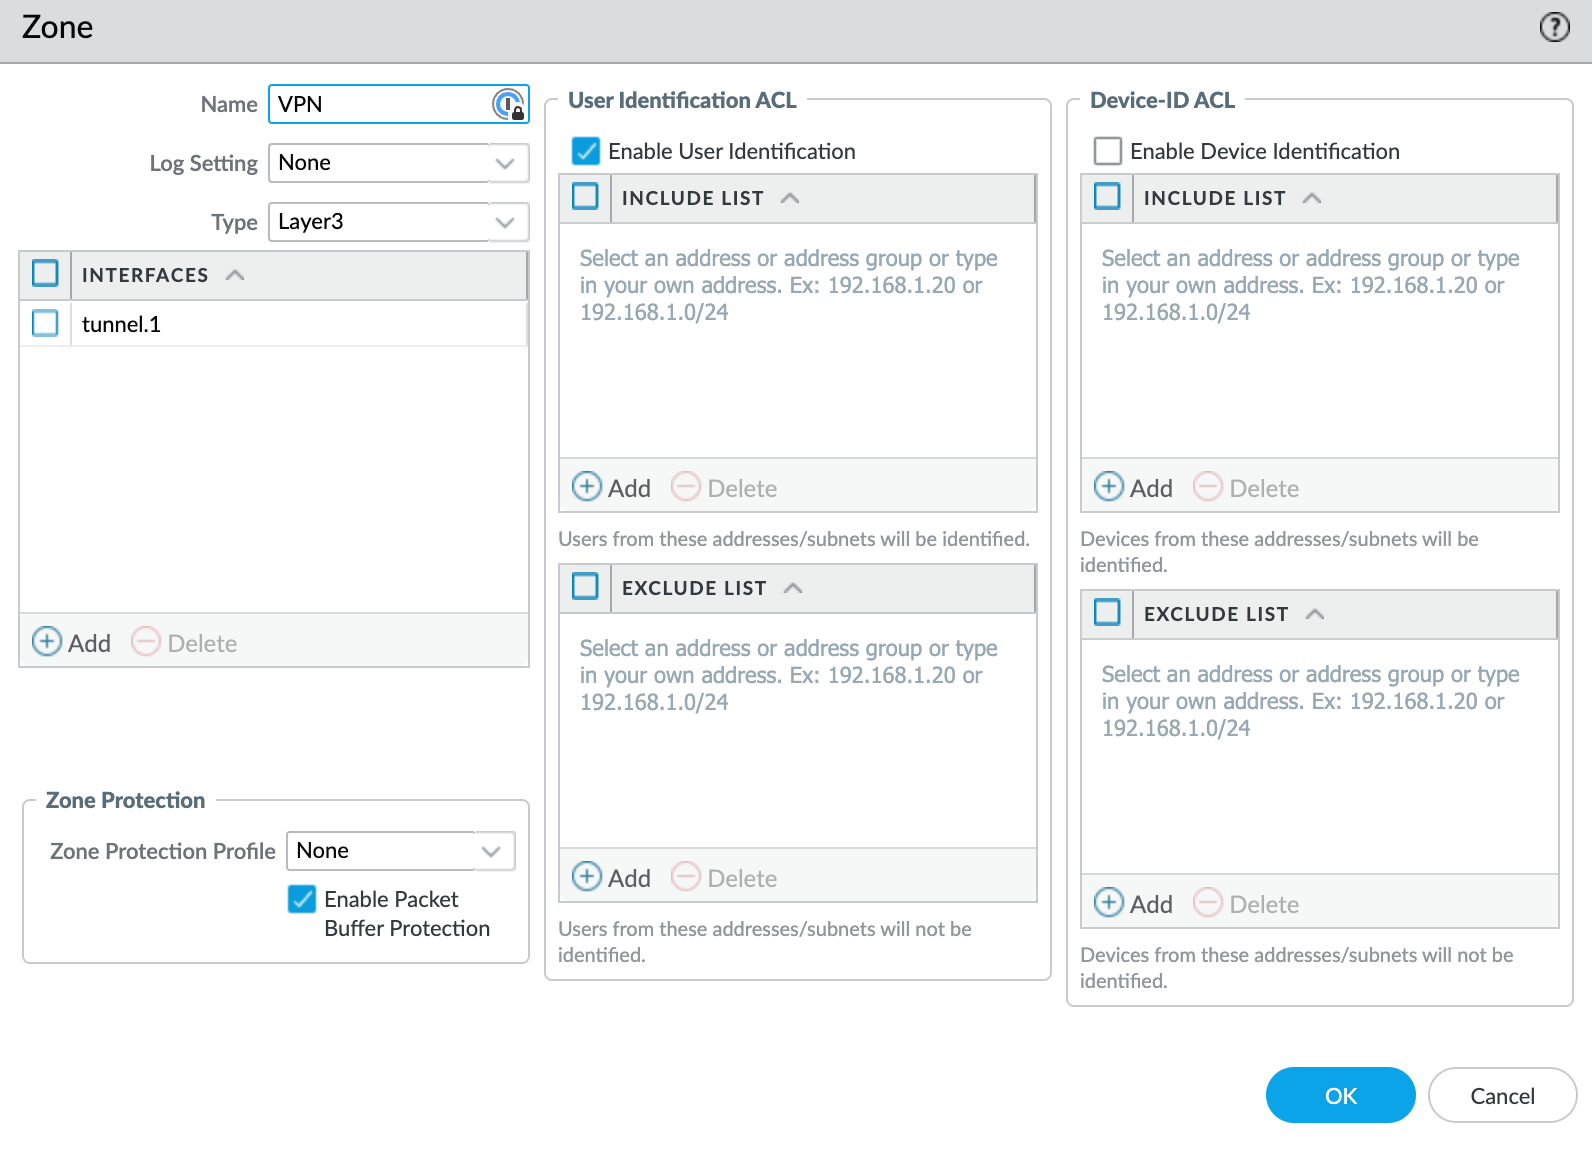
3 - Zone and Tunnel Interface
For the Global Protect VPN, you need to set up a tunnel interface and a new zone. While you could use an existing zone, it's better to create a new one. This helps you manage your VPN traffic separately with its own security/NAT rules.
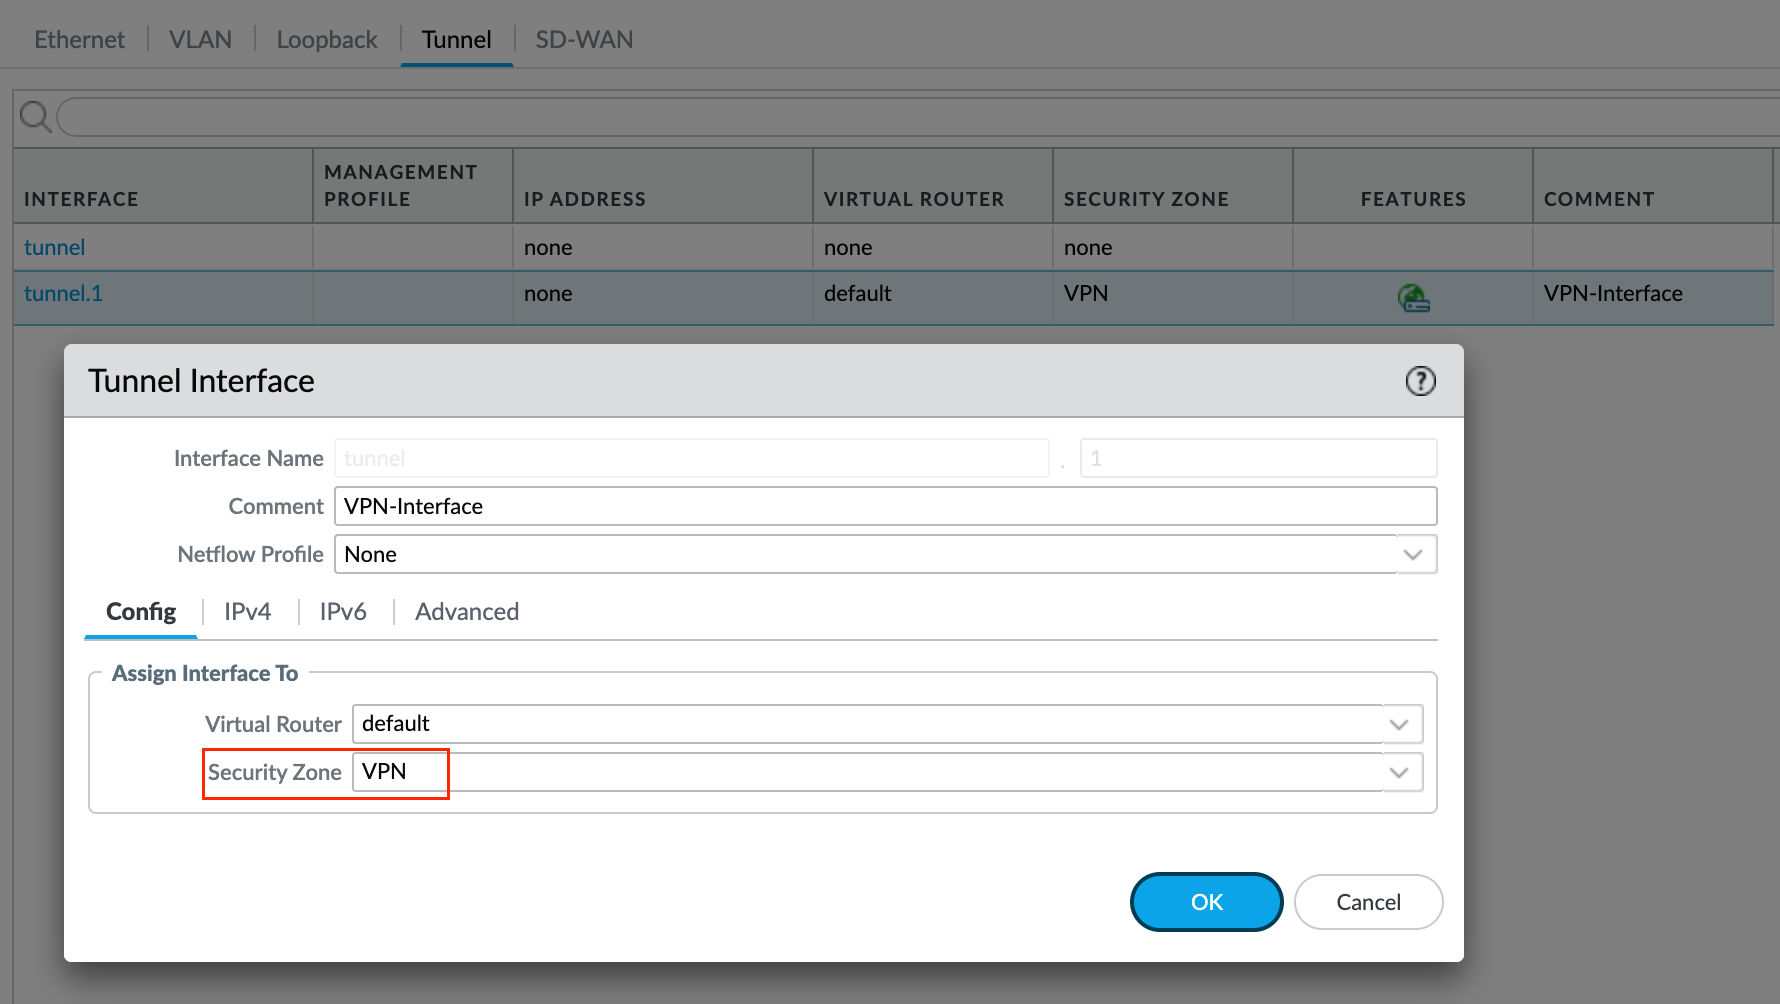
Next, you will also need to create the tunnel interface. This will be used specifically for the VPN as we move through the setup process. You don't need an IP address in the tunnel interface.
4 - Security and NAT Policies
For the security policy, I'm just allowing any traffic from the VPN zone to both LAN and WAN zones.

If you are not using split-tunnelling then you will need to have a NAT policy to translate the source IP of the VPN traffic to the IP address of the WAN interface.
 Suresh Vina
Global Protect Gateway
Though it doesn't matter the order if you have a single portal and gateway in the same firewall, it is recommended that you configure the gateways before configuring the portal. That VPN access is provided through an IPsec or SSL tunnel between the endpoint and the tunnel interface on the firewall hosting the gateway.
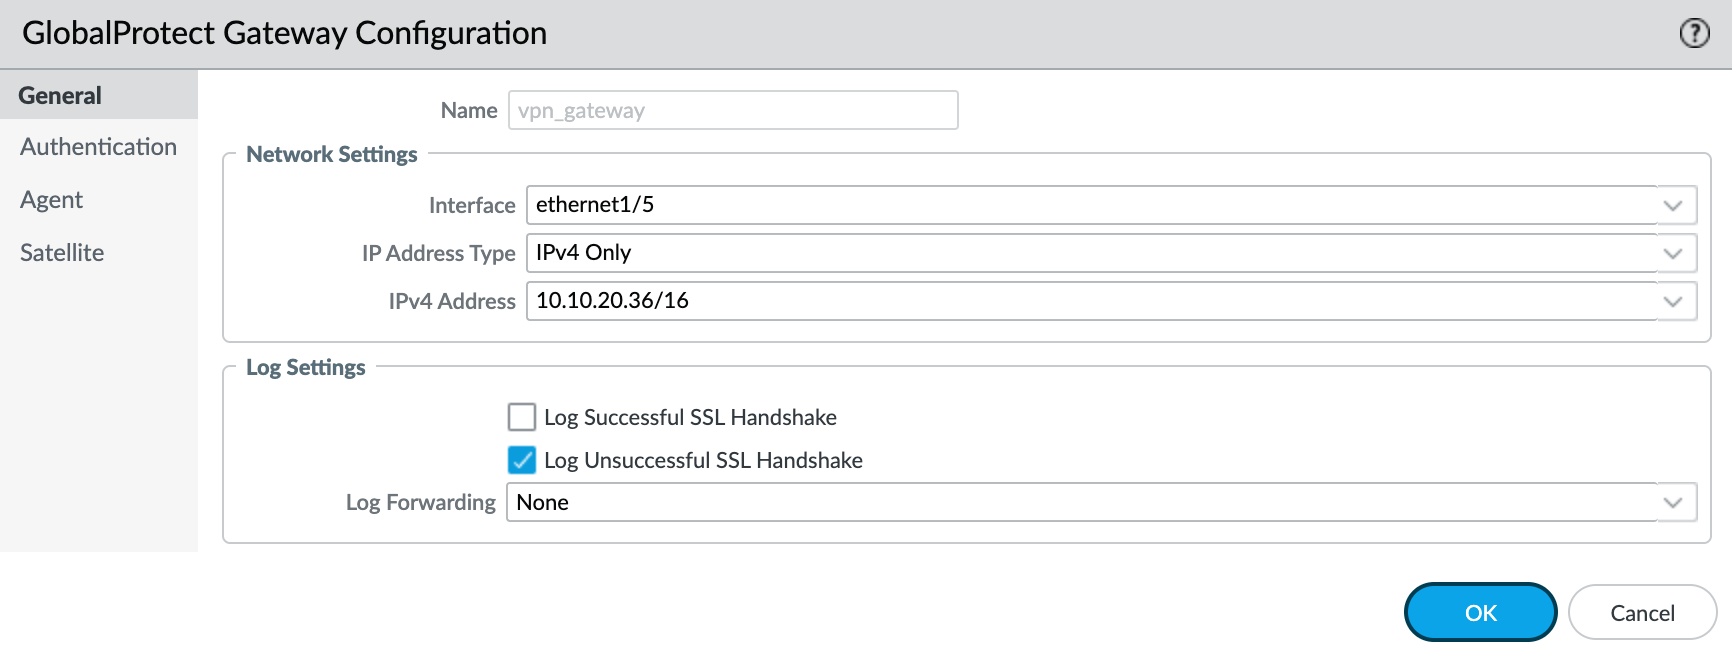
1 - General
Navigate to Network > GlobalProtect > Gateway and create a new gateway and specify the network information that enables endpoints to connect to the gateway. Here we are using the WAN interface that has the IP 10.10.20.36. In your setup, it could be a public IP.
2 - Authentication
In the authentication tab, we can specify how the gateway authenticates users by navigating to Network > GlobalProtect Gateways <gateway-config > Authentication
To secure communication between the gateway and the GlobalProtect app, select the SSL/TLS Service Profile we created earlier for the gateway. To authenticate users with a local user database, use the Authentication Profile we created earlier.
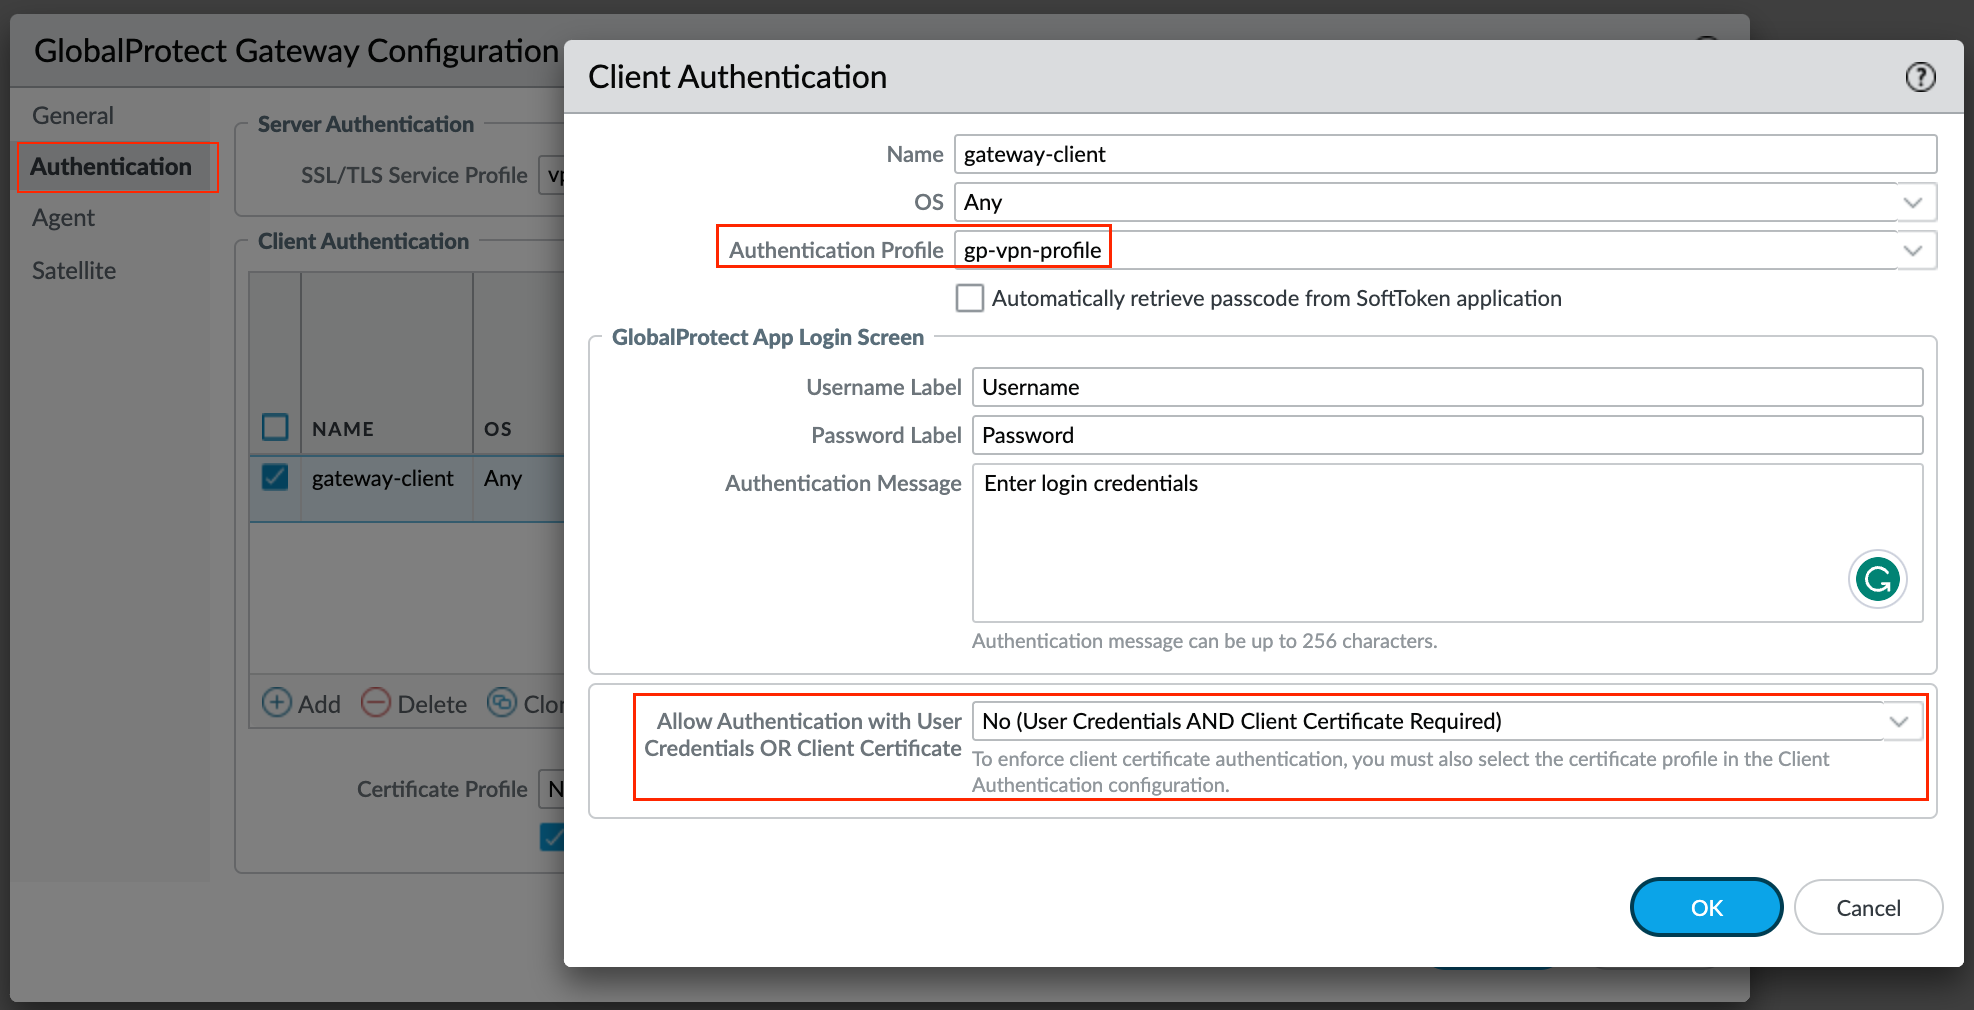
By default, the configuration applies to any operating system but you have the option to create different authentication settings for different OS.
To require users to authenticate to the gateway using both user credentials AND a client certificate set the Allow Authentication with User Credentials OR Client Certificate option to No (User Credentials AND Client Certificate Required) which is the default.
When you set this option to Yes, the gateway first checks the endpoint for a client certificate. If the endpoint does not have a client certificate or you do not configure a certificate profile for your client authentication configuration, the endpoint user can then authenticate to the gateway using their user credentials.
2 - Agent
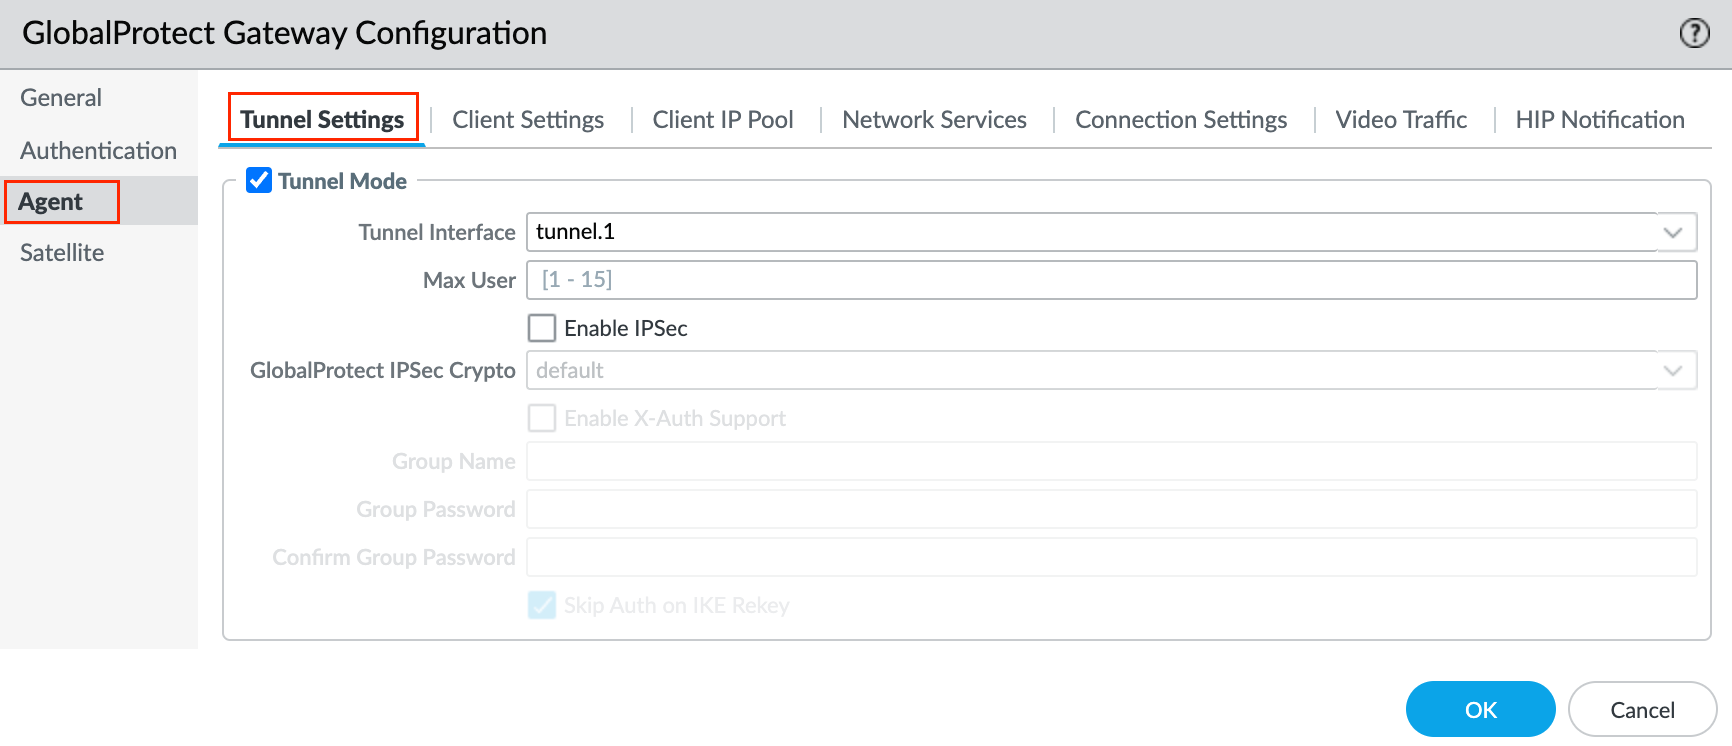
Tunnel parameters are required for an external gateway. To force the use of SSL-VPN tunnel mode, disable the Enable IPSec option. By default, SSL-VPN is used only if the endpoint fails to establish an IPSec tunnel. I prefer to use SSL whenever possible.
Navigate to Agent > Tunnel Settings within the Gateway Configuration, enable Tunnel Mode, select the tunnel interface we created earlier and uncheck the Enable IPSec option.
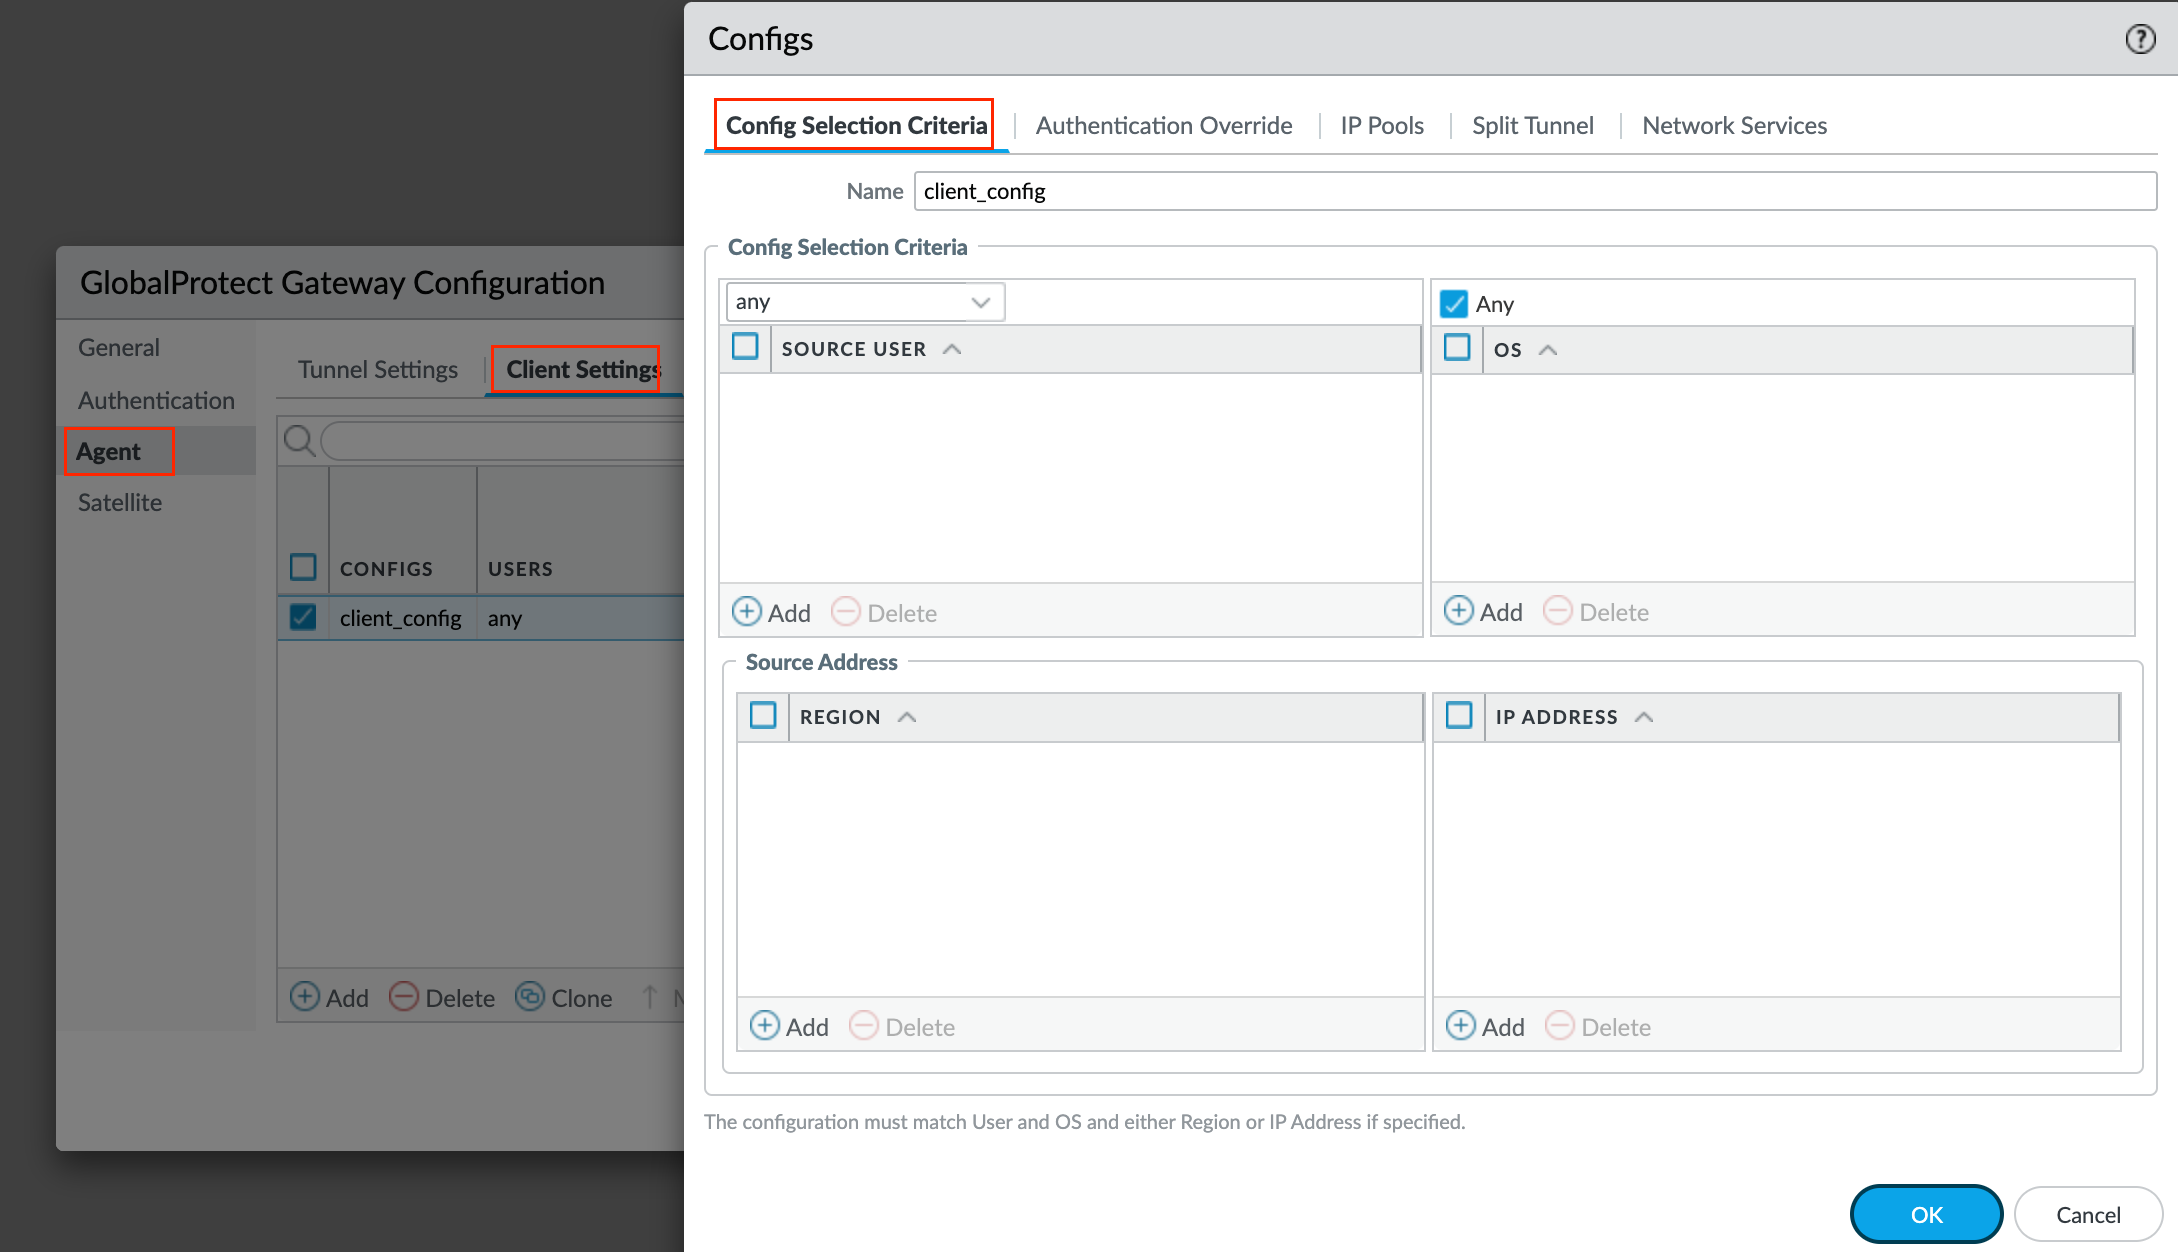
Next, the gateway uses the selection criteria to determine which configuration to deliver to the GlobalProtect apps that connect. If you have multiple configurations, you must make sure to order them correctly. As soon as the gateway finds a match (based on the Source User, OS, and Source Address), it delivers the associated configuration to the user. Therefore, more specific configurations must precede more general ones. Navigate to Agent > Client Settings and create a new config.
For the Authentication Override tab, you can just leave the options at their defaults. You can use authentication override to enable the gateway to generate and accept secure, encrypted cookies for user authentication. This allows the user to provide login credentials only once during the specified period of time (for example, every 24 hours). By default, gateways authenticate users with an authentication profile. When authentication override is enabled, GlobalProtect caches the result of a successful login and uses the cookie to authenticate the user instead of prompting the user for credentials.

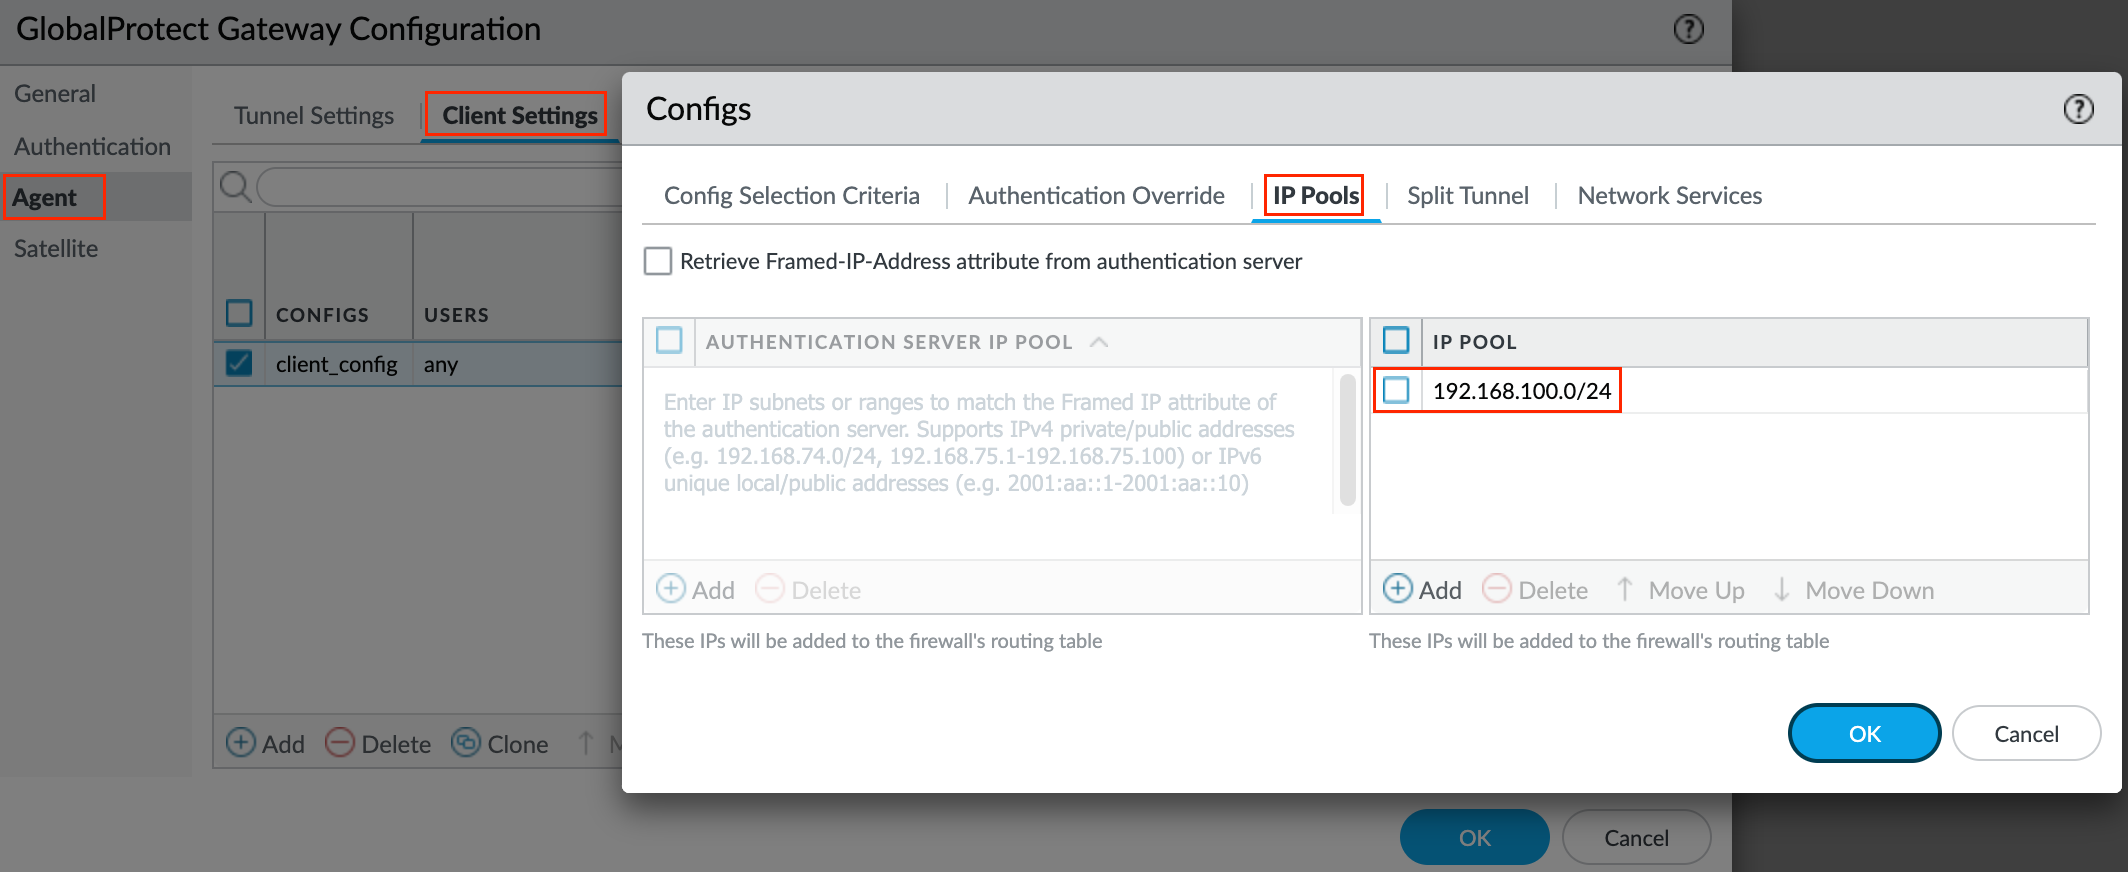
Next tab, IP Pools - Configure client-level IP pools used to assign IP addresses to the endpoints that connect to the gateway.
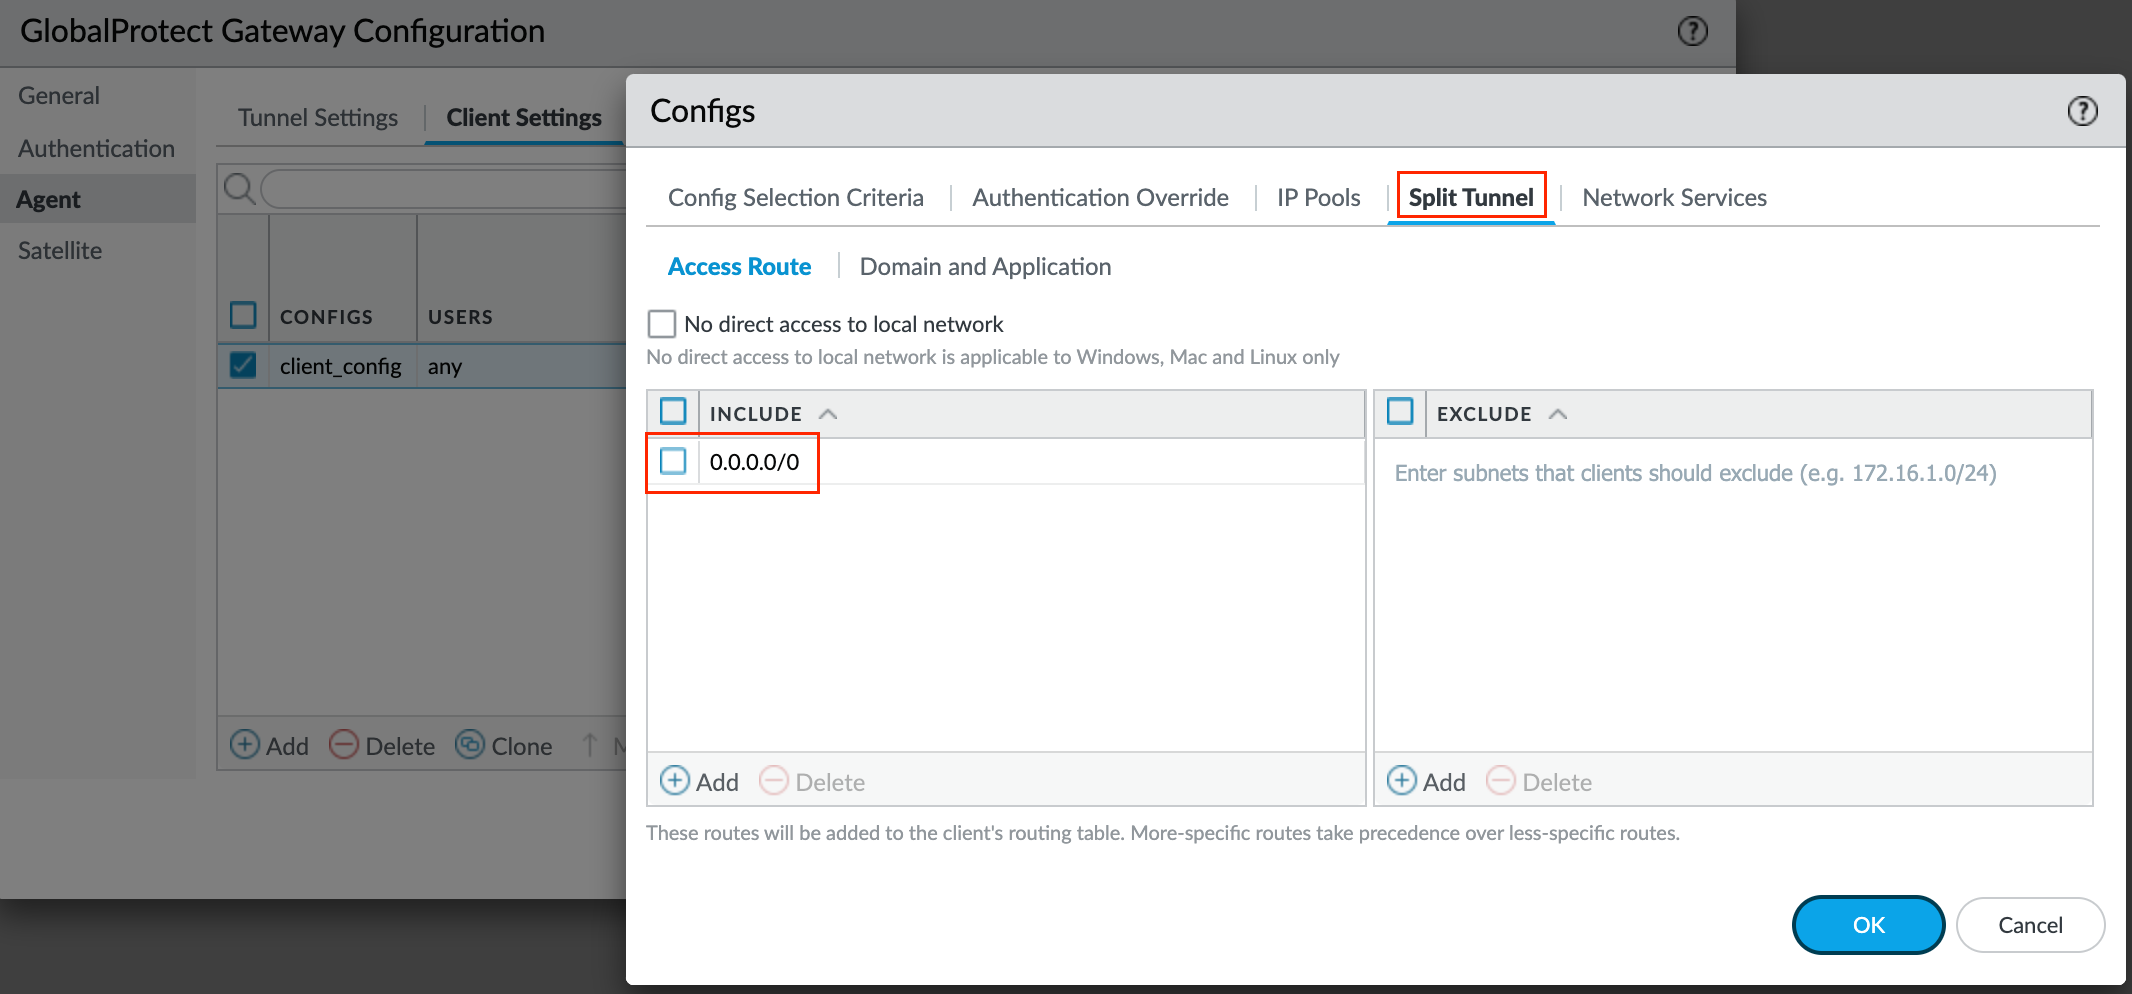
Next, Split Tunnel - If you do not include or exclude routes, every request is routed through the VPN tunnel. You can include or exclude specific destination IP subnet traffic from being sent over the VPN tunnel. The routes that you send through the VPN tunnel can be defined either as the routes you include in the tunnel, or as routes that you exclude from the tunnel, or both.
For example, you can set up a split tunnel to allow remote users to access the Internet without going through the VPN tunnel by including the RFC1918 addresses. More specific routes take precedence over less-specific routes.
For the sake of simplicity, I've included a default route meaning everything has to go through the VPN tunnel.
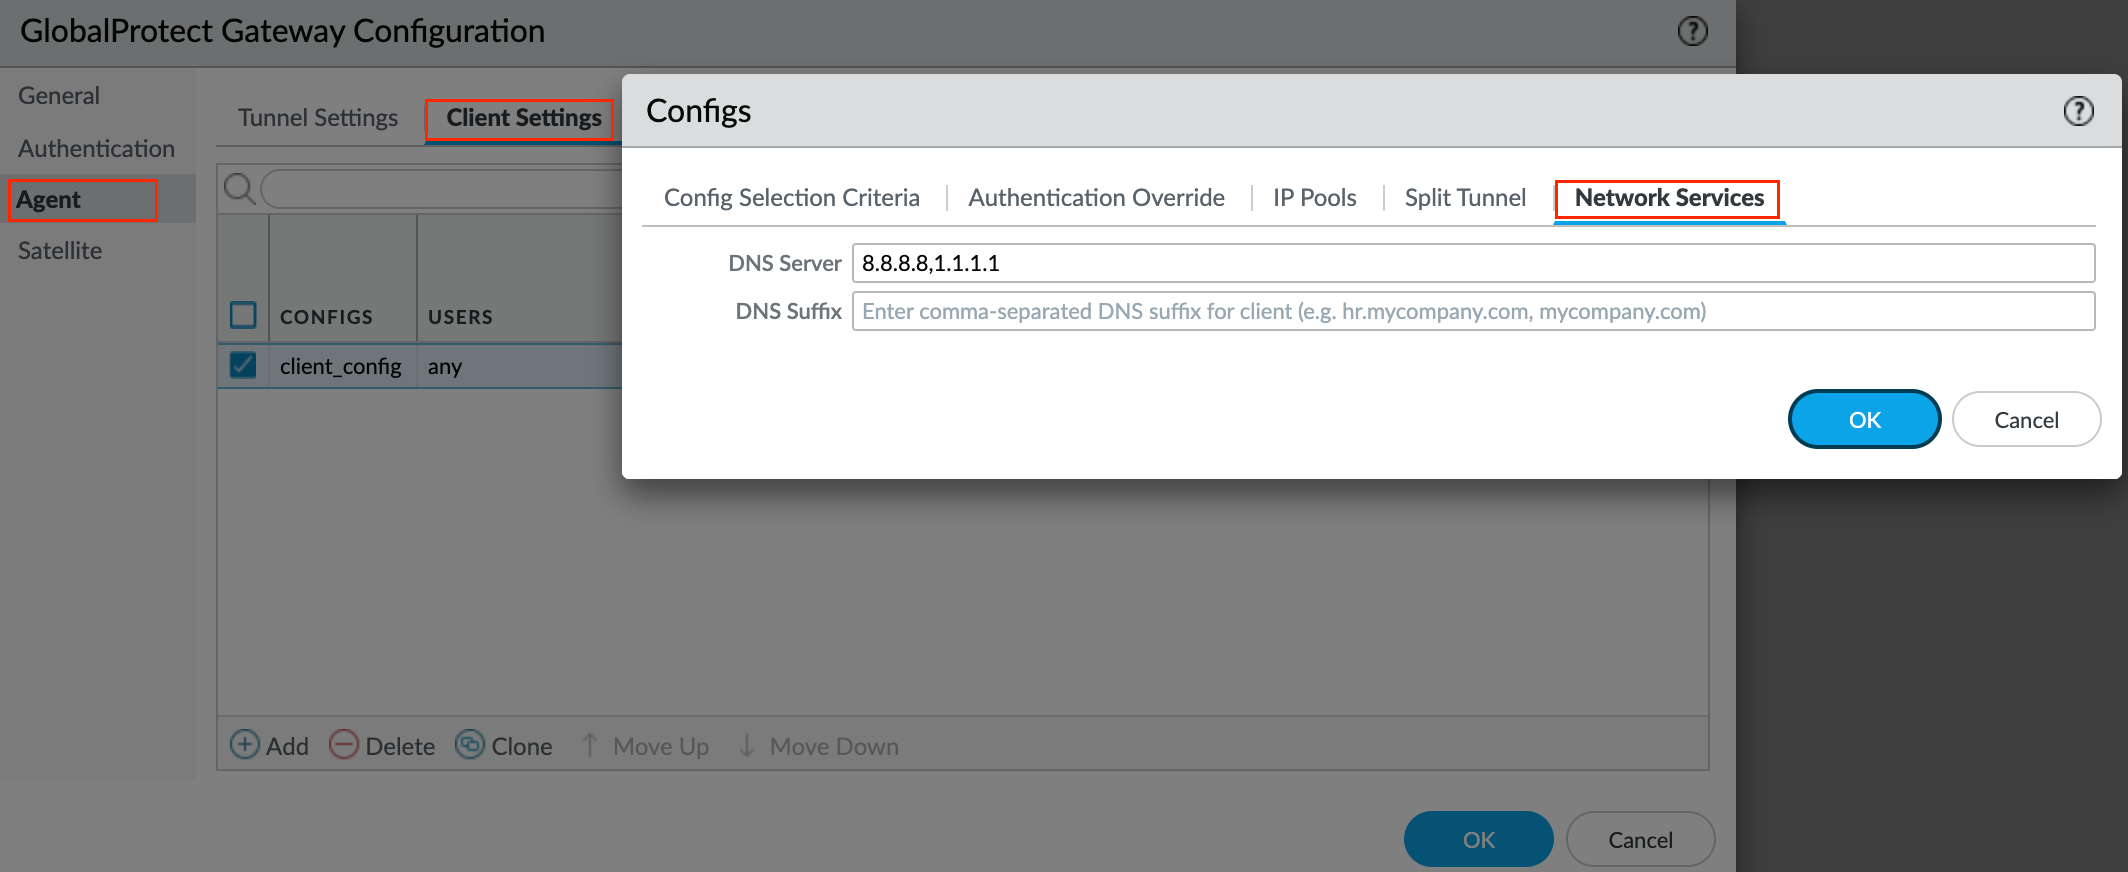
Next up, DNS Settings - Specify the IP address of the DNS Server to which the GlobalProtect app with this client settings configuration sends DNS queries. You can add up to 10 DNS servers by separating each IP address with a comma.
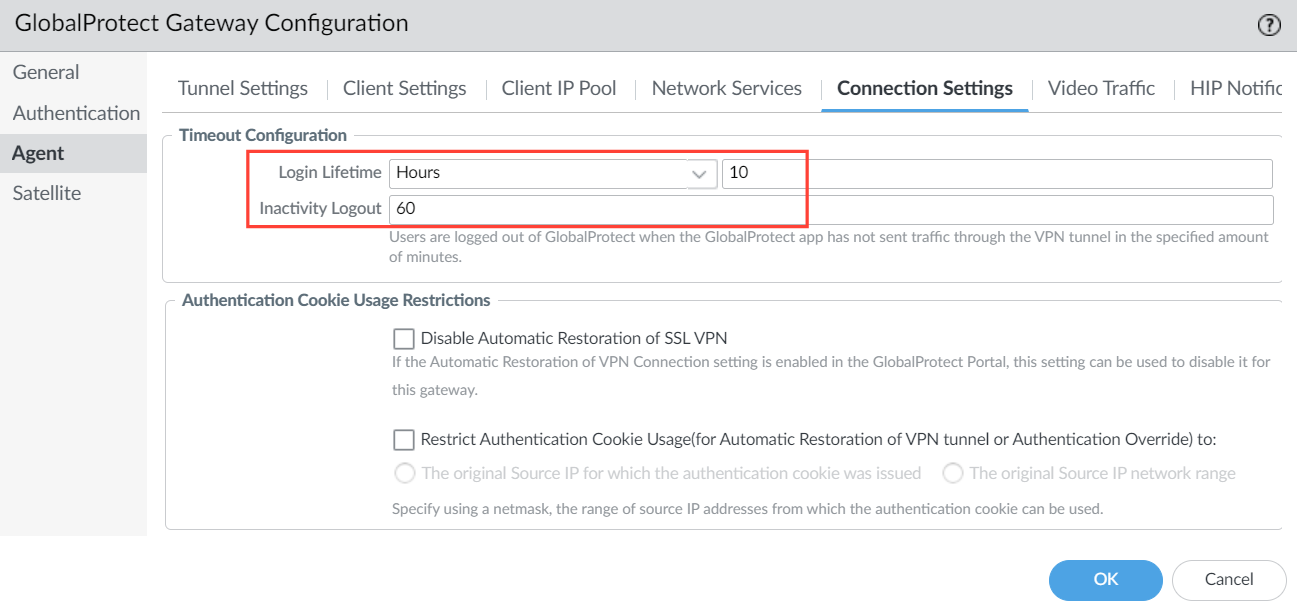
Connection Settings - Under Agent > Connection Settings, you can define the maximum Login Lifetime for a single gateway login session (default is 30 days). You can modify the Inactivity Logout period to specify the amount of time after which an inactive session is automatically logged out (default is 3 hours). Users are logged out of GlobalProtect if the GlobalProtect app has not routed traffic through the VPN tunnel within the configured time period. For this example, I set it to 60 minutes.
That's all for the Gateway settings, let's move on to the Portal configurations.
Suresh Vina Suresh Vina
Portal Configurations
The GlobalProtect portal provides the management functions for your GlobalProtect VPN. Every endpoint that participates in the GlobalProtect network receives configuration information from the portal such as available gateways and any client certificates that may be required to connect to the gateways. The portal also controls the behaviour and distribution of the GlobalProtect app software to both macOS and Windows endpoints.
Navigate to Network > GlobalProtect > Portals > Add and create a new Portal.
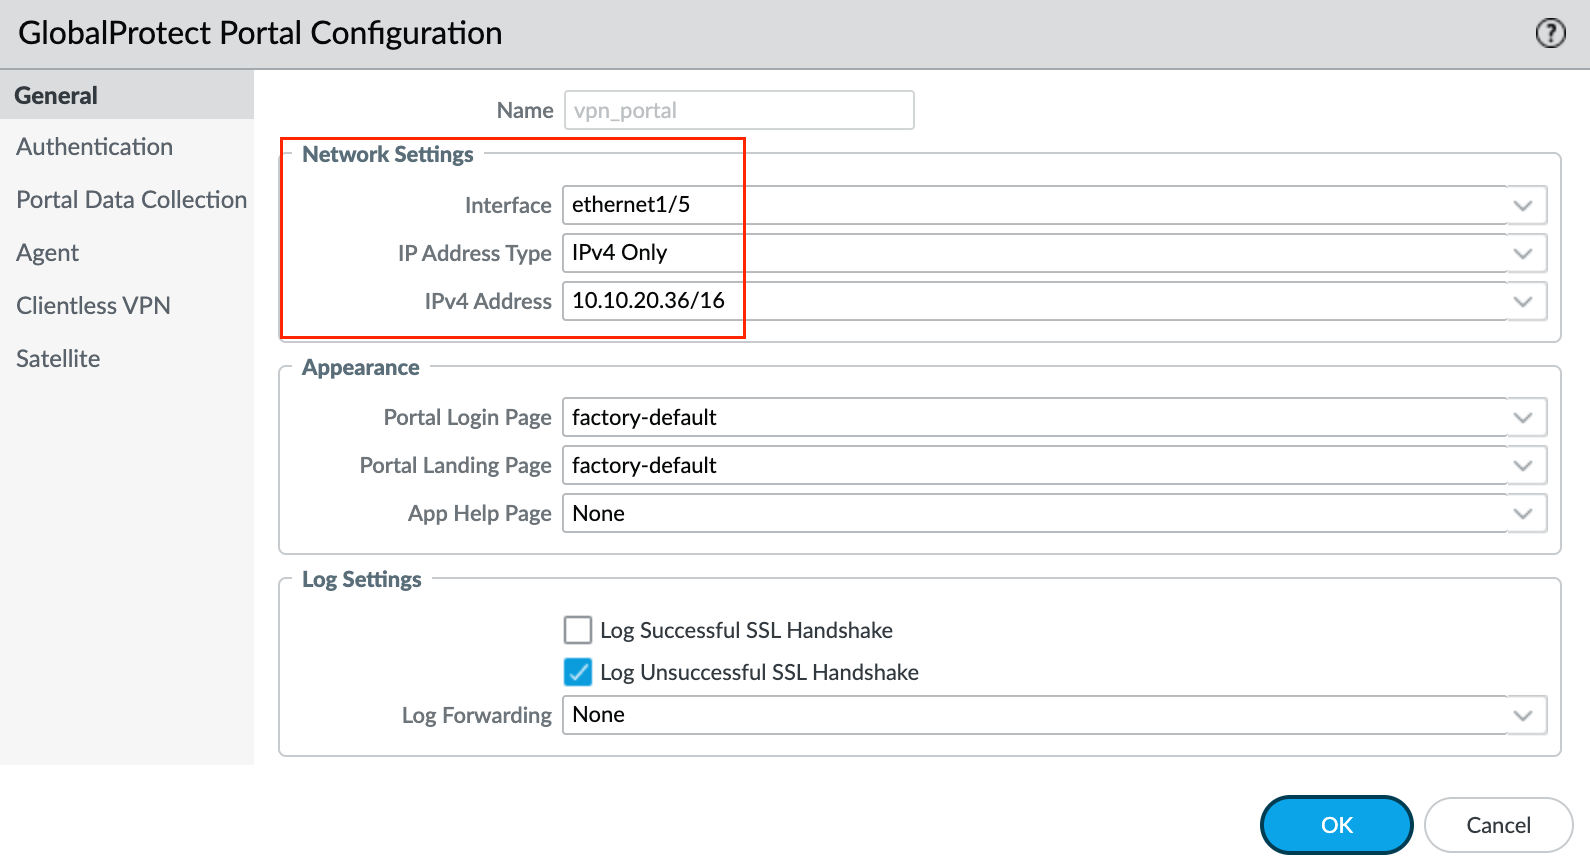
1 - General
First, specify network settings to enable the Global Protect app to communicate with the portal.
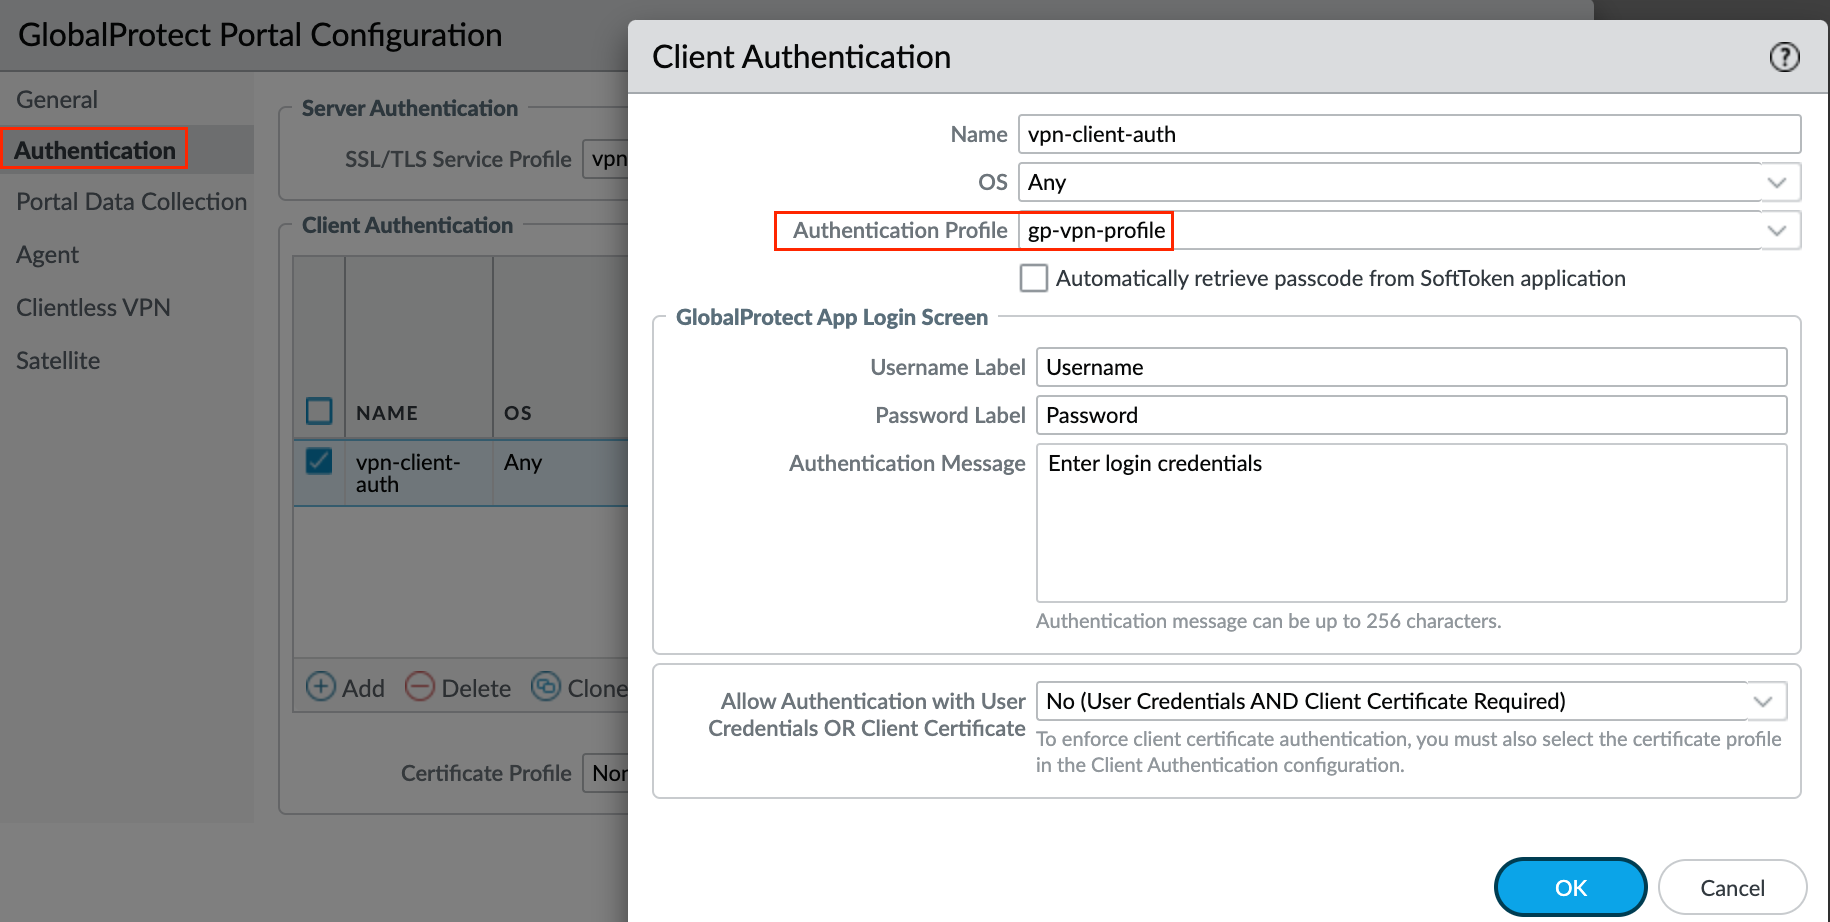
2 - Authentication
Next, specify how the portal authenticates users. This is similar to how we configured the authentication for the gateways.
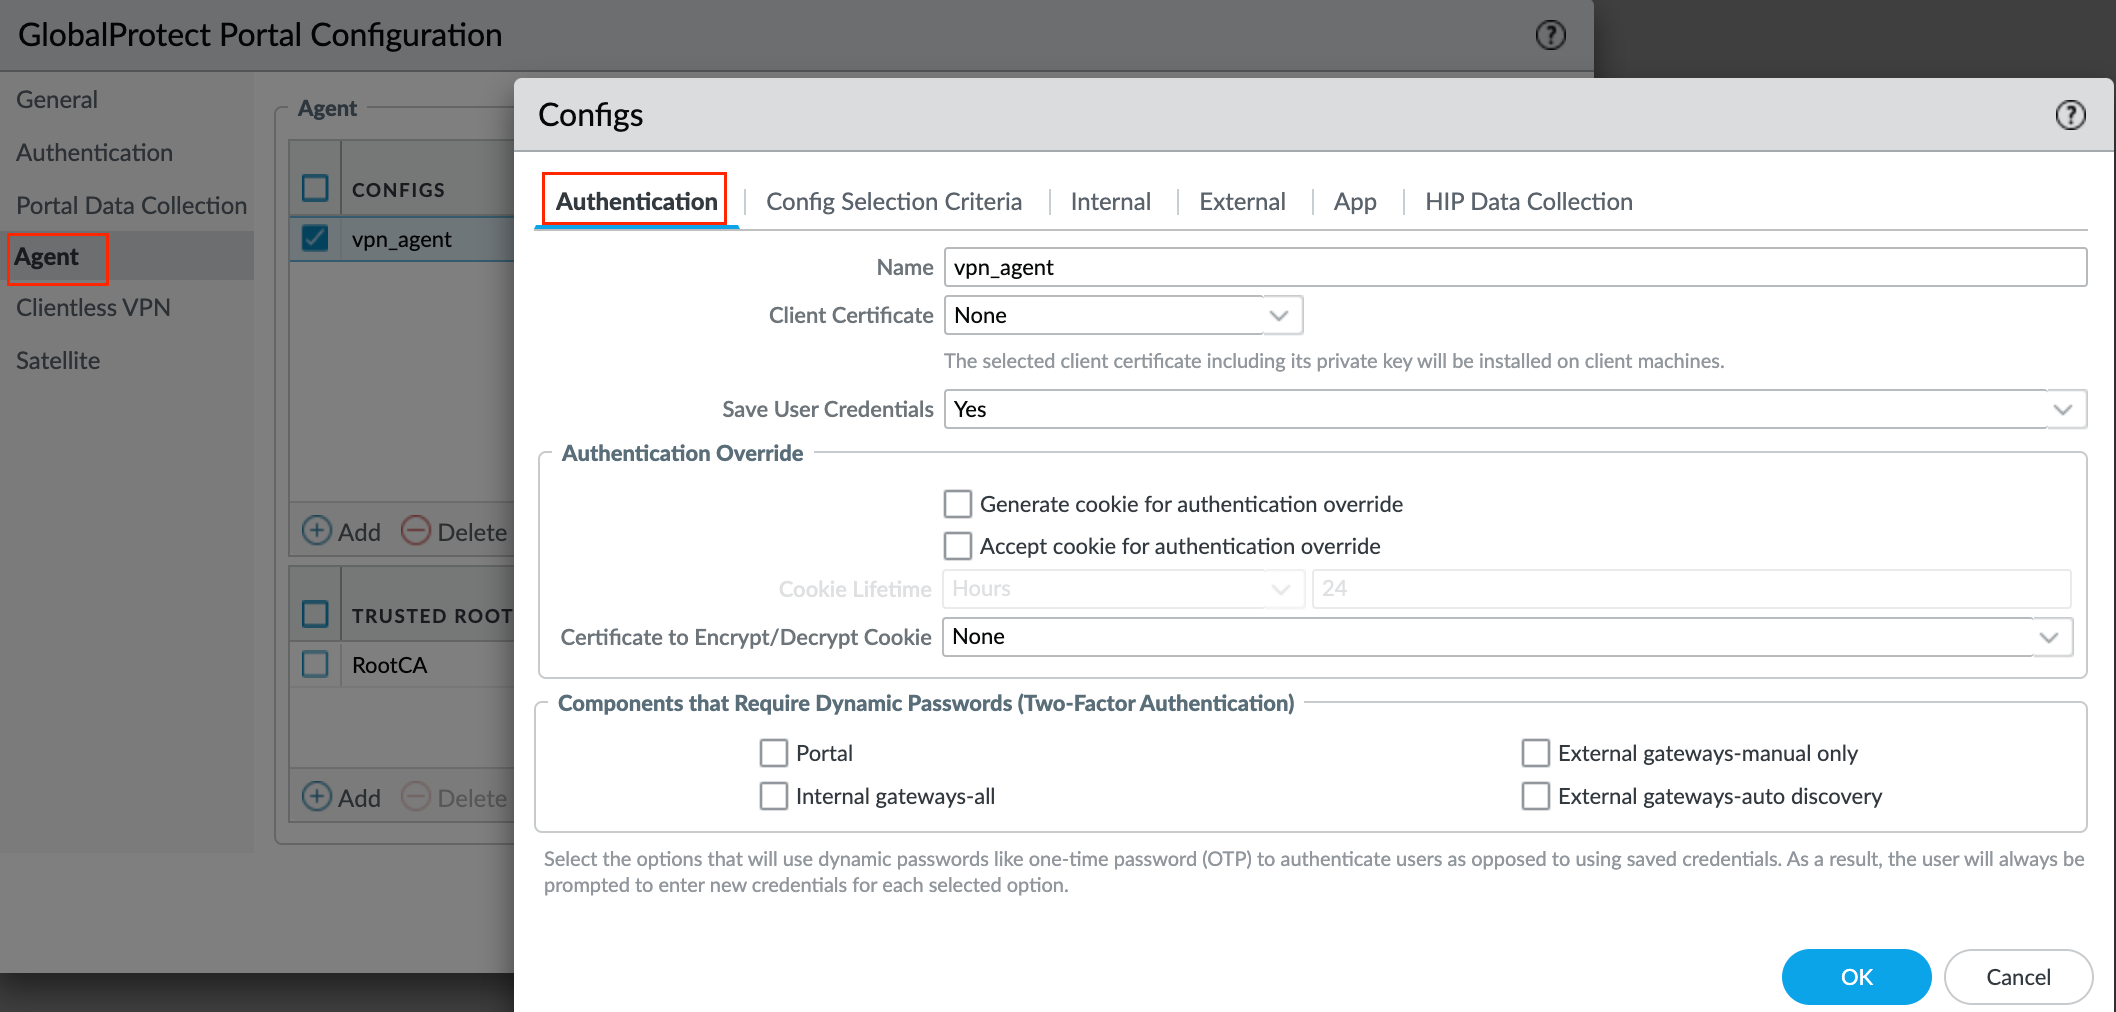
3 - Agent
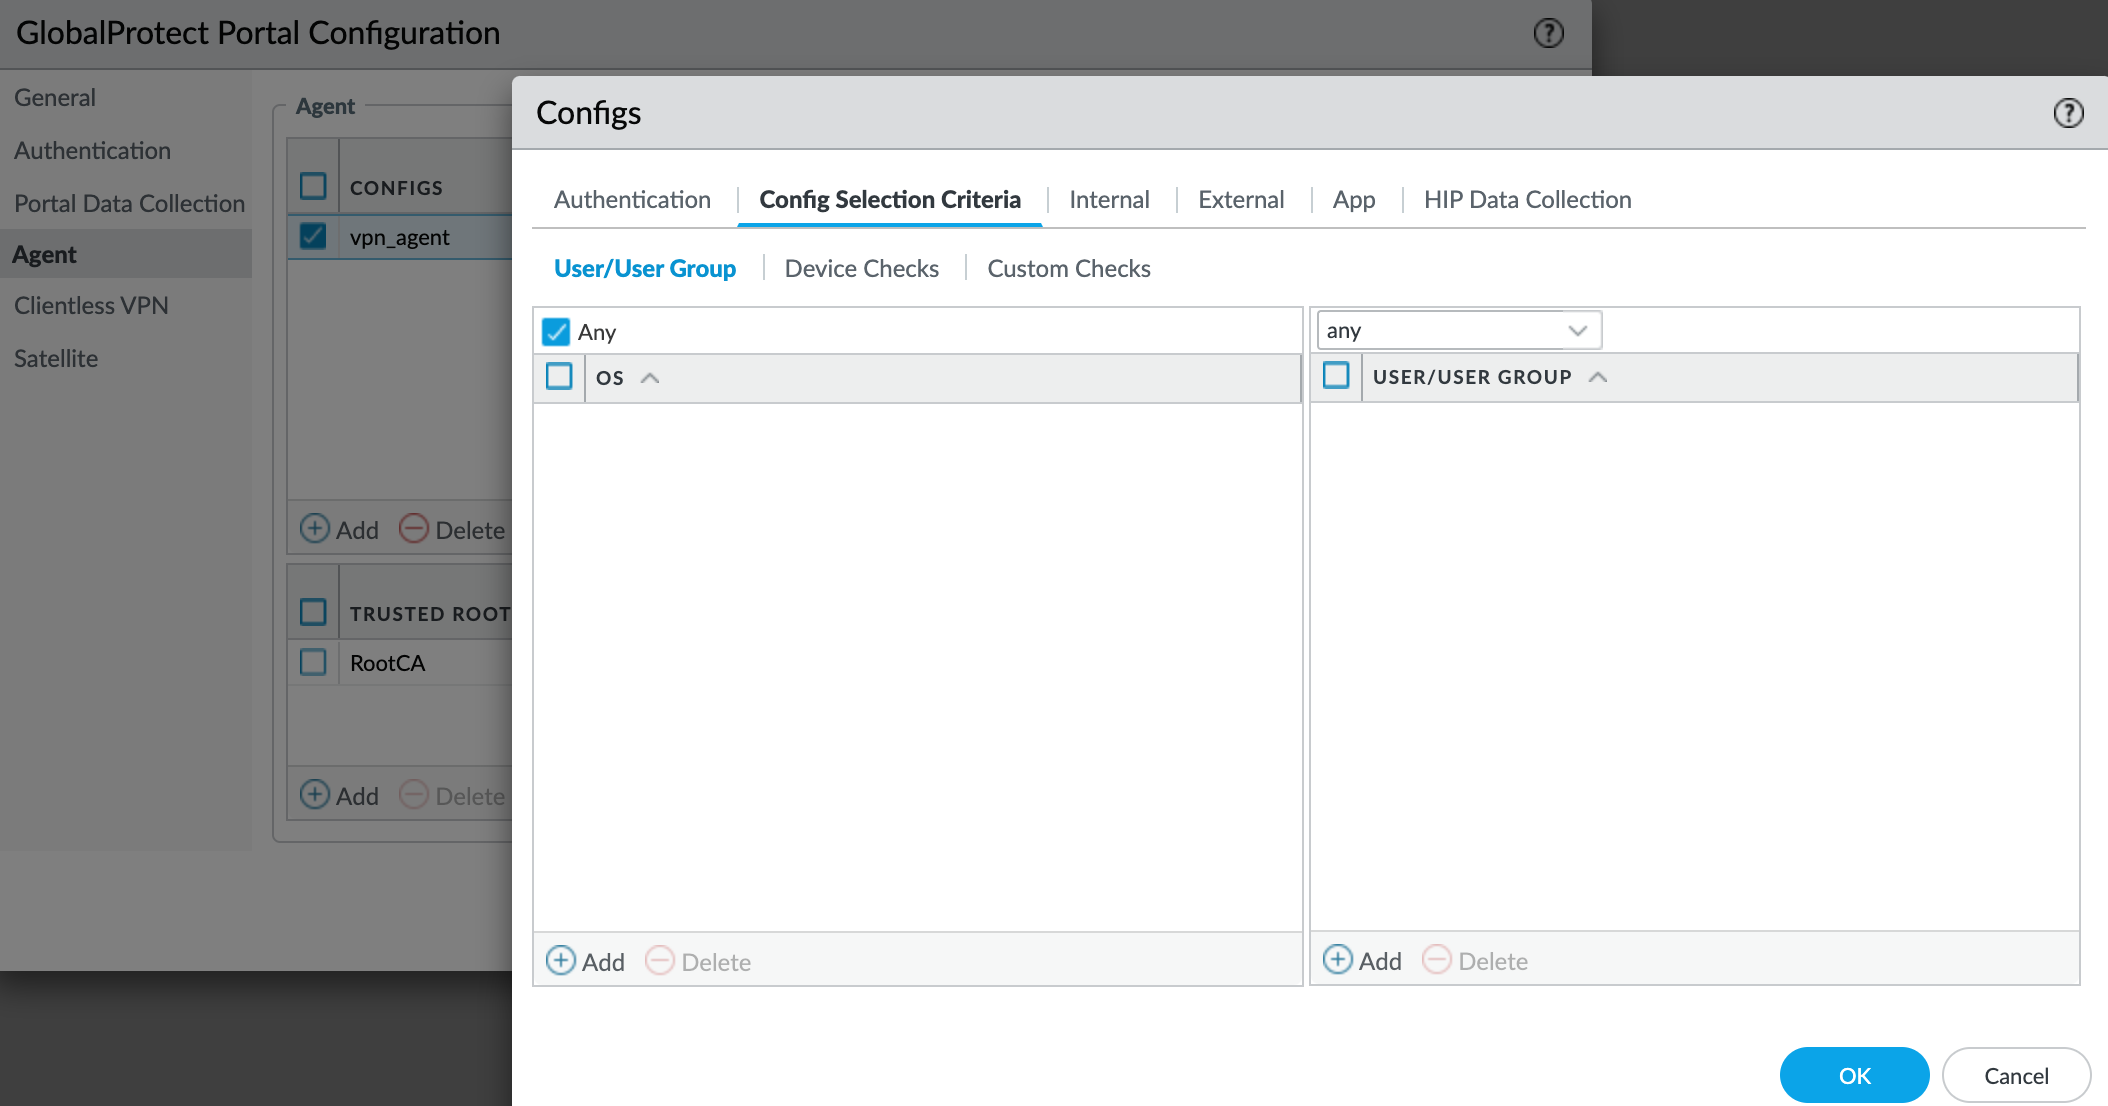
After a Global Protect user connects to the portal and is authenticated by the GlobalProtect portal, the portal sends the agent configuration to the app, based on the settings you define. If you have different roles for users or groups that need specific configurations, you can create a separate agent configuration for each user type or user group. The portal uses the OS of the endpoint and the username or group name to determine which agent configuration to deploy. The portal starts to search for a match at the top of the list. When it finds a match, the portal sends the configuration to the app.
Trusted Root CA - In the Trusted Root CA field, Add and select the CA certificate that was used to issue the gateway and/or portal server certificates. If you tick the box Install in Local Root Certificate Store. The portal automatically sends the certificate when the user logs in to the portal and installs it in the endpoint's local store.

Authentication - Specify whether to Save User Credentials. Select Yes to save the username and password (default)
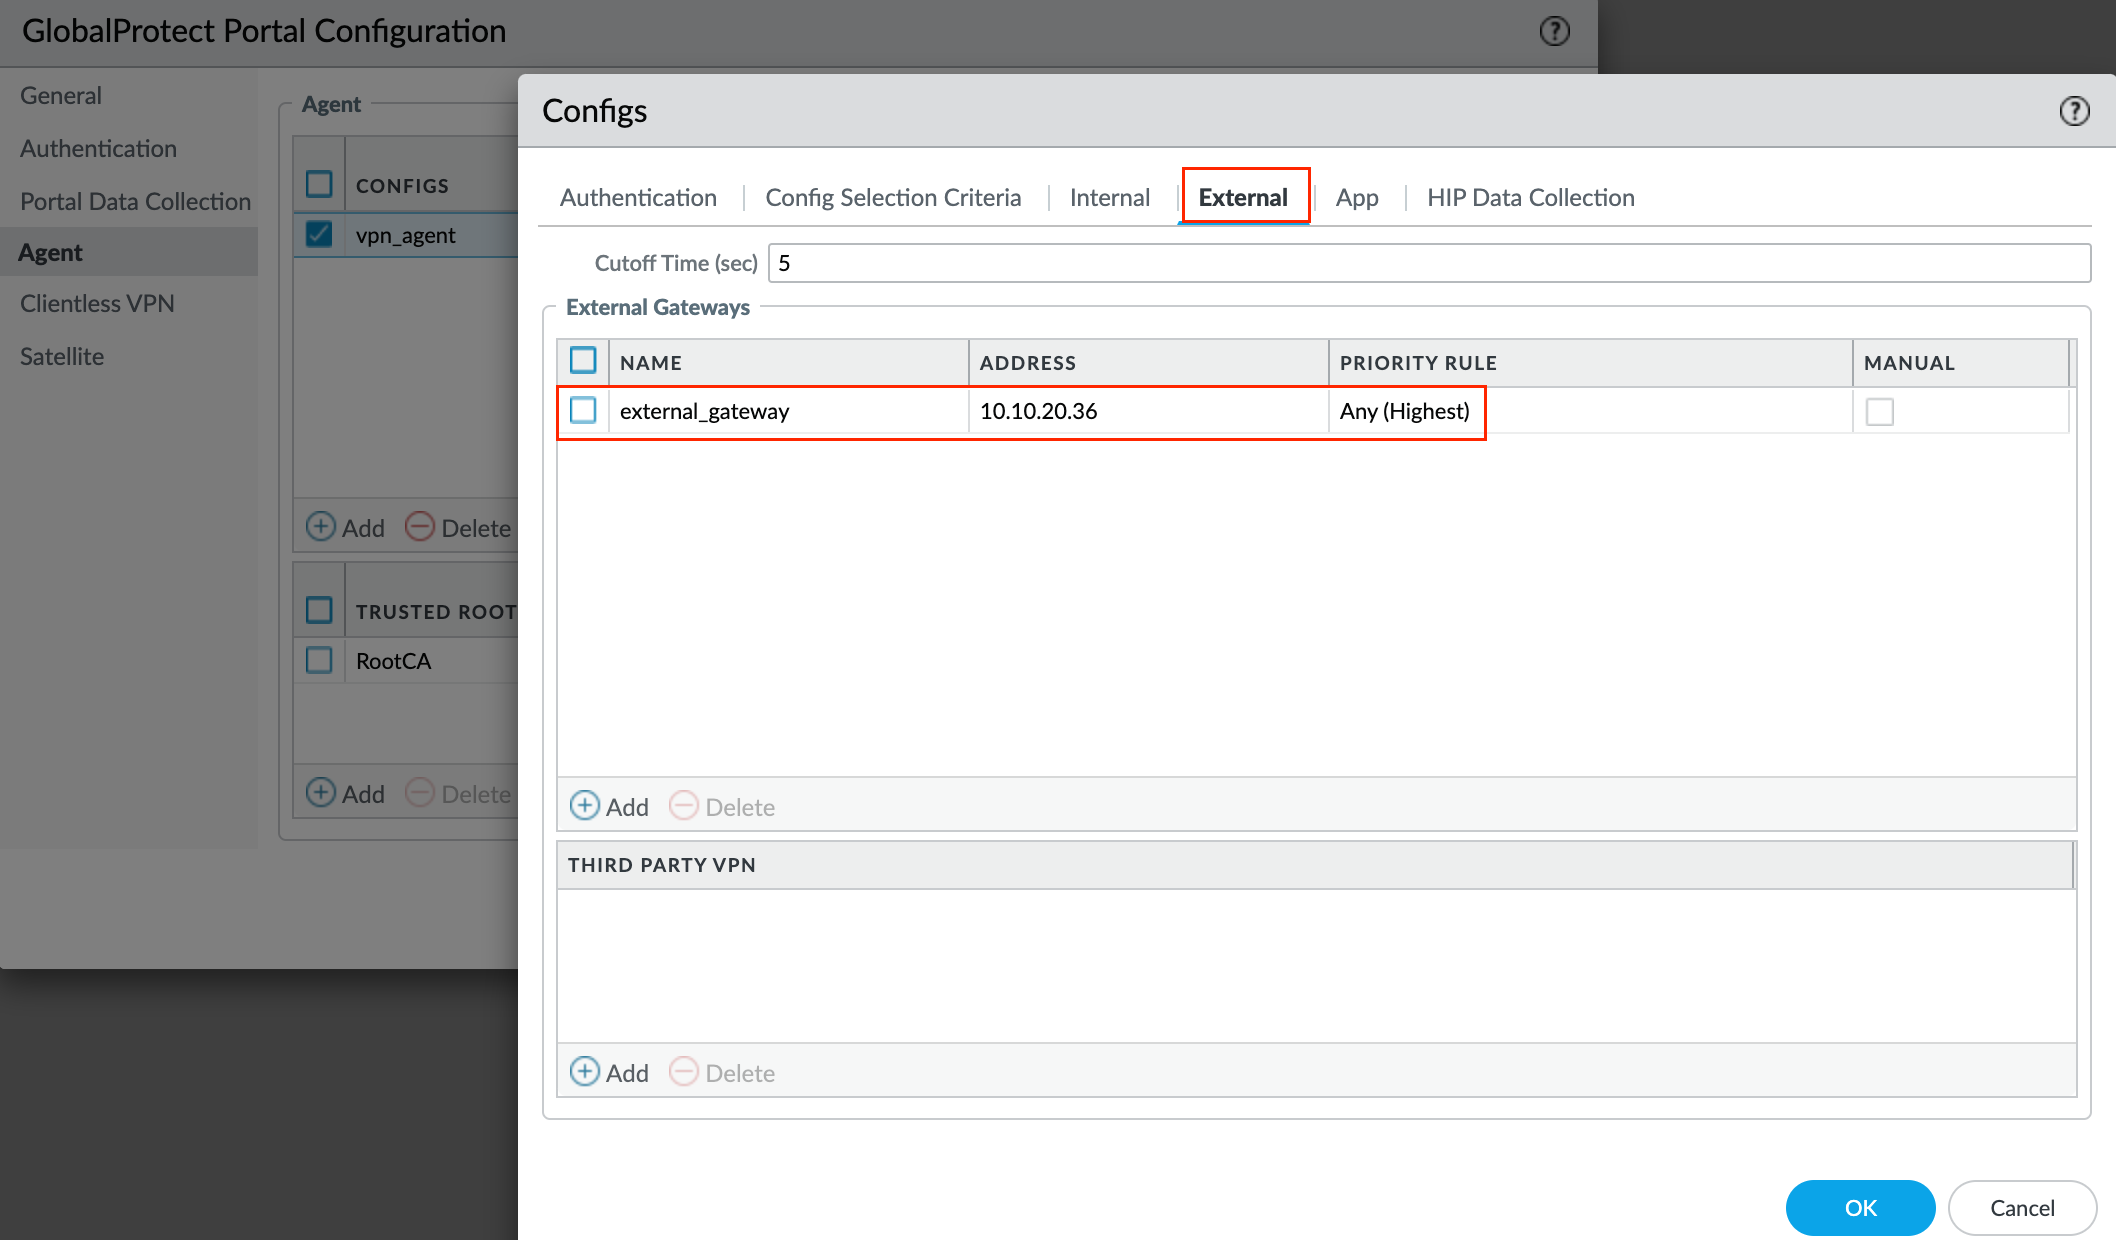
External - Specify the external gateways to which users with this configuration can connect. We need to add the Gateway we created earlier under the Gateway section.
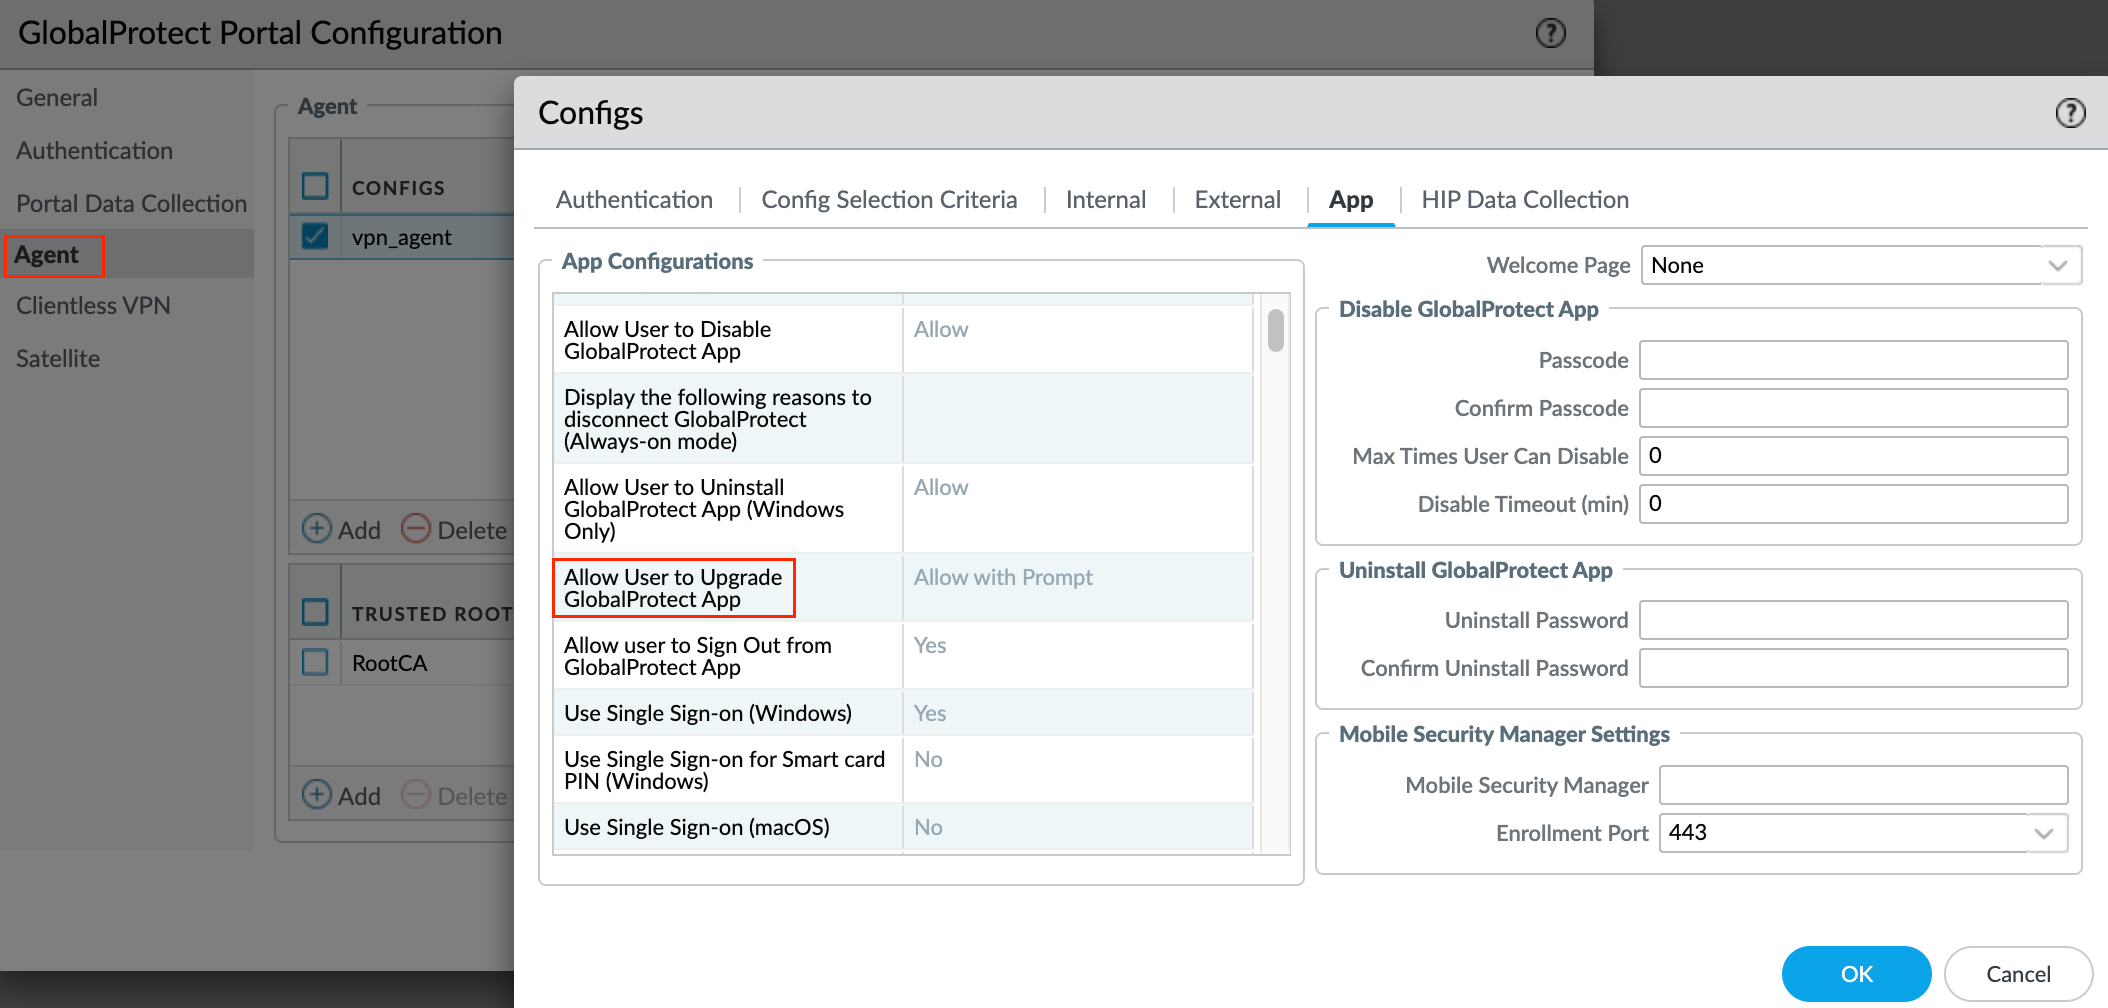
App - You can customize the Global Protect app behavior for users with this configuration but I'm going to leave everything at their default values. Here you can define a lot of things. For example, whether the Global Protect app upgrades automatically or prompts users to upgrade manually as shown below.
 Suresh Vina
Testing and Verification
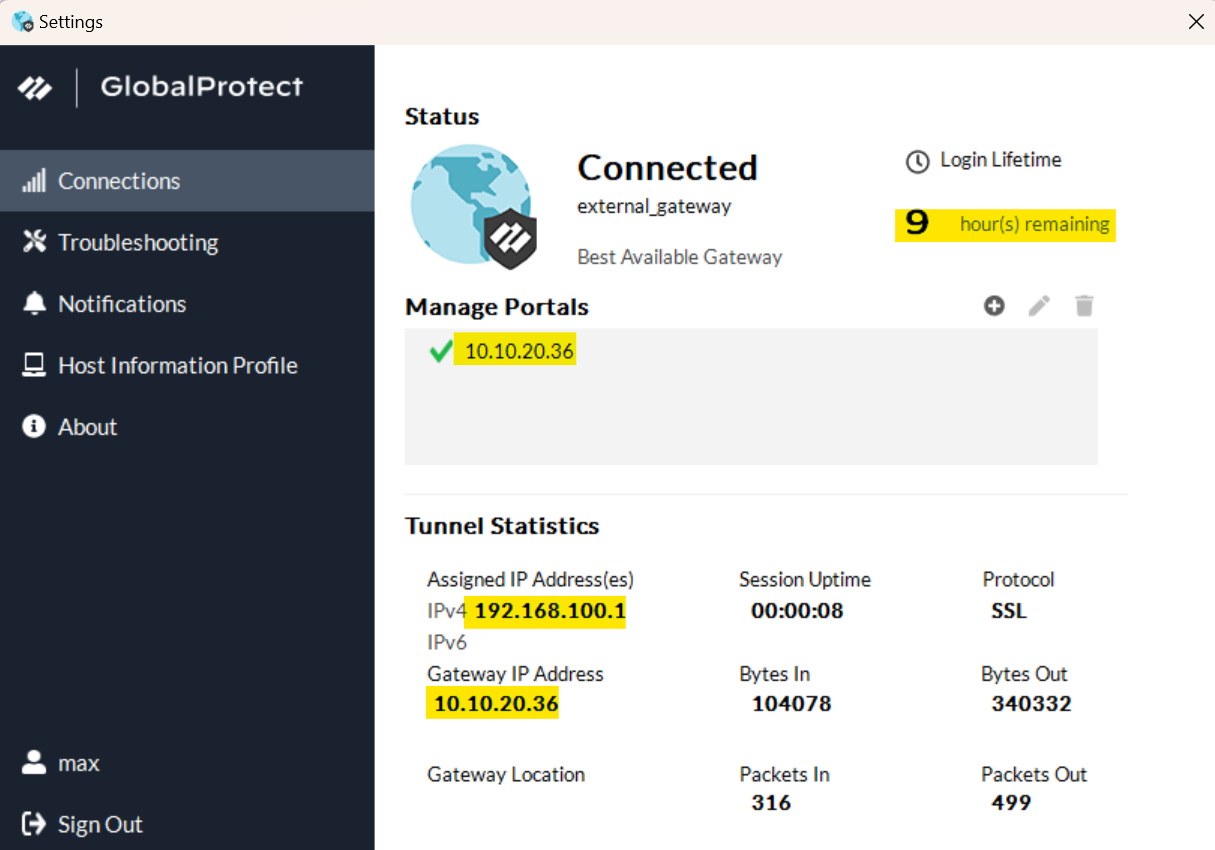
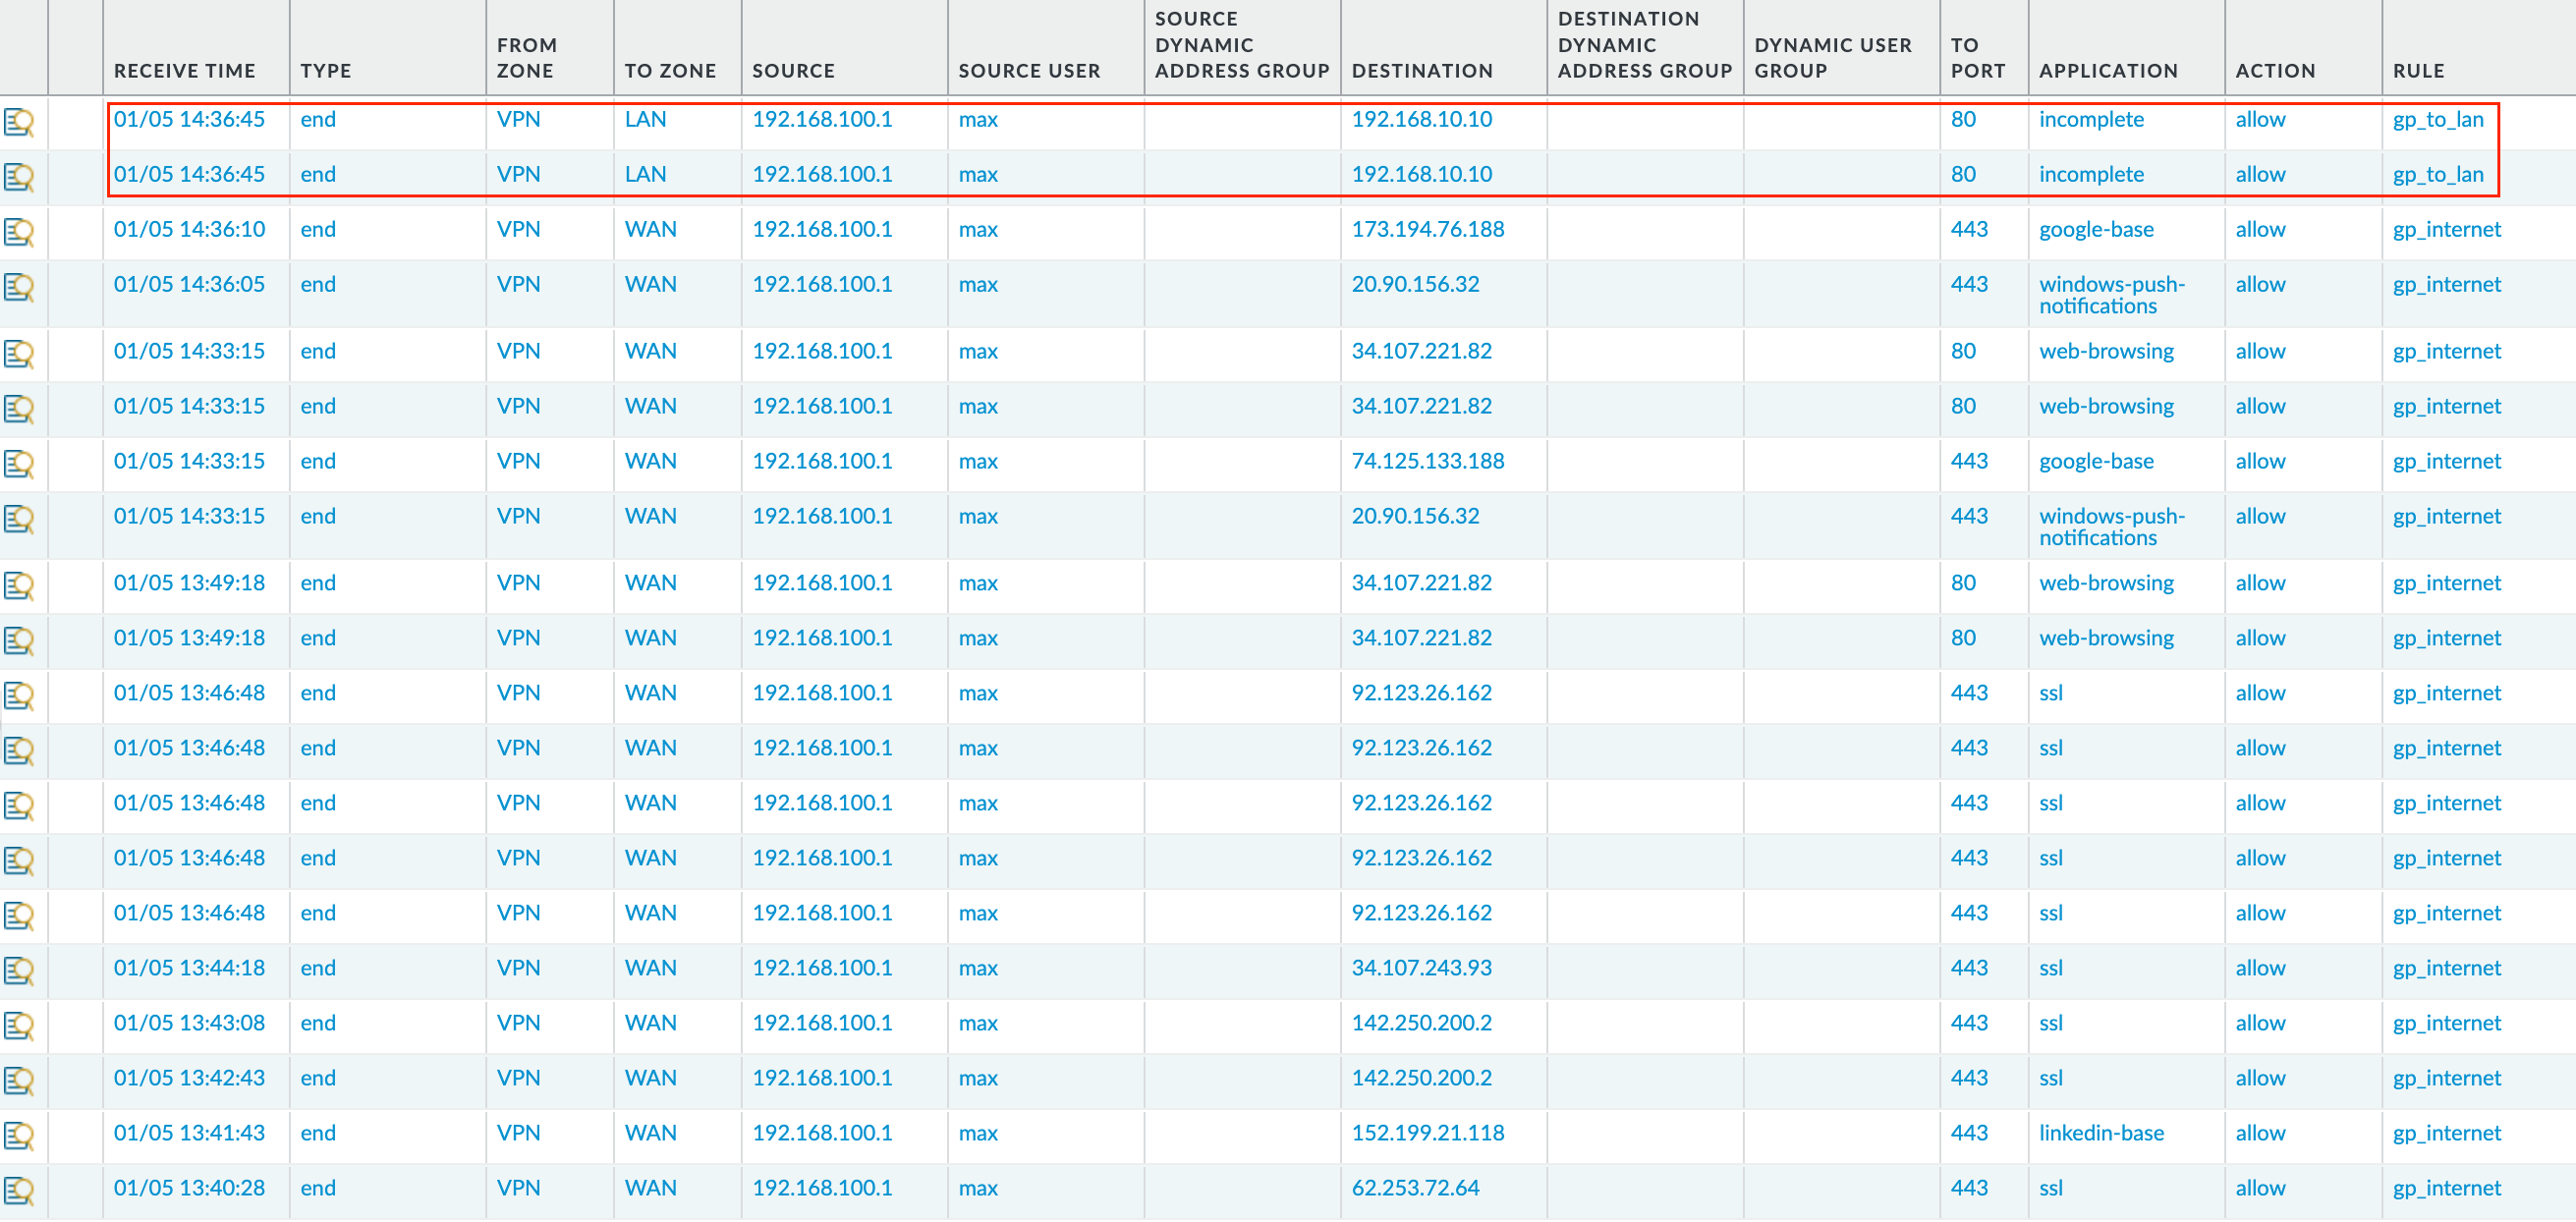
Let me try and connect to the VPN and access one of the web-server 192.168.10.10 that sits in the LAN zone of the firewall. As mentioned before, if you get any certificate issues while trying to connect, just export the root certificate from the firewall and import it into the client device.
Here are the logs for both accessing the web-server and the Internet
What GlobalProtect Licenses Do You Need?
If you want to use GlobalProtect to provide a secure remote access VPN via single or multiple internal/external gateways, you do not need any GlobalProtect licenses. However, to use some of the more advanced features such as HIP checks and associated content updates, support for the GlobalProtect mobile app, or IPv6 support you must purchase an annual GlobalProtect Gateway license. This license must be installed on each firewall running a gateway(s) that:


