WireGuard is a modern VPN protocol that is fast, lightweight, and much simpler to set up compared to other options like OpenVPN. It runs in the Linux kernel, uses modern cryptography, and the configuration is just a few lines, which makes it a great choice for personal use.
The problem is, even though WireGuard itself is simple, managing peers can get tedious. You have to generate key pairs, edit config files, hand out configs to each device, and keep track of who has access to what. If you have a few family members or friends who want to use your VPN, this quickly becomes a hassle.
This is where wg-easy can help. It is a simple open-source web UI that sits on top of WireGuard and takes care of all the boring bits for you. You can add or remove clients with a single click, generate QR codes for mobile devices, and see who is connected, all from a clean web interface.
In this post, I will walk you through how to set up wg-easy so you can have your own self-hosted VPN running in just a few minutes.
Lab Topology
Before we get into the setup, let me quickly explain the topology we will use in this post. wg-easy runs as a Docker container, so ideally, you want a Linux machine to run it on. This can be a small VM, a Raspberry Pi, a mini PC, or even a cloud VPS. Anything that can run Docker will do the job.
At the edge of your network, you most likely have a router with a public IP address from your ISP. For wg-easy to work, you need to port forward the WireGuard port (UDP 51820 by default) from your router to the Linux machine running wg-easy. Port forwarding simply means telling your router, 'if any traffic comes in on this specific port, send it to this internal device.' Without this, your VPN clients on the Internet would not know how to reach your wg-easy server sitting behind the router.
If you have a router that supports WireGuard natively, like MikroTik, OPNsense, or pfSense, you can technically set up WireGuard directly on the router itself and skip wg-easy altogether. That works fine, but you lose the nice web UI and have to manage peers manually through the router's CLI or GUI. You can still go with wg-easy even if your router supports WireGuard, just keep in mind that you will need port forwarding either way.
In my setup, I am running wg-easy on a Linux VM, and my router forwards UDP 15555 to that VM. Clients like my phone, laptop, or any remote device connect to my public IP, hit the router, get forwarded to the VM, and from there they have access to my home network.
Docker Compose File
Docker Compose is a tool that lets you define and run multi-container Docker applications using a simple YAML file. Instead of running long docker run commands with a bunch of flags, you describe everything in a docker-compose.yml file and bring it up with a single command.
wg-easy provides a sample Docker Compose file on their GitHub page, but I have modified it slightly to use a custom HTTP port and a custom WireGuard port. Everything else is left at the defaults.
volumes:
  etc_wireguard:

services:
  wg-easy:
    environment:
      - PORT=8082
      - WG_PORT=15555
    image: ghcr.io/wg-easy/wg-easy:15
    container_name: wg-easy
    networks:
      wg:
        ipv4_address: 10.42.42.42
        ipv6_address: fdcc:ad94:bacf:61a3::2a
    volumes:
      - etc_wireguard:/etc/wireguard
      - /lib/modules:/lib/modules:ro
    ports:
      - "15555:15555/udp"
      - "8082:8082/tcp"
    restart: unless-stopped
    cap_add:
      - NET_ADMIN
      - SYS_MODULE
    sysctls:
      - net.ipv4.ip_forward=1
      - net.ipv4.conf.all.src_valid_mark=1
      - net.ipv6.conf.all.disable_ipv6=0
      - net.ipv6.conf.all.forwarding=1
      - net.ipv6.conf.default.forwarding=1

networks:
  wg:
    driver: bridge
    enable_ipv6: true
    ipam:
      driver: default
      config:
        - subnet: 10.42.42.0/24
        - subnet: fdcc:ad94:bacf:61a3::/64
The two ports to pay attention to are PORT=8082, which is the HTTP port used to access the web UI, and WG_PORT=15555, which is the UDP port WireGuard listens on for VPN connections. These same ports are also exposed under the ports section, so Docker maps them from the host to the container. This is the port you need to forward on your router (UDP 15555 in my case) so external clients can reach the VPN.
One thing to mention here. I already have Caddy running as a reverse proxy in front of wg-easy, so I can access the web UI over HTTPS with a proper domain name. That is why I have not enabled any TLS settings in the Compose file itself.
If you do not have a reverse proxy in front of wg-easy and just want to access the web UI directly over HTTP, you need to add the following to the environment section, otherwise wg-easy will refuse to load the UI over plain HTTP.
environment:
    - INSECURE=true
Bring Up the Container
Once the docker-compose.yml file is ready, simply run docker compose up -d from the same directory. Within a few seconds, Docker will pull the wg-easy image and start the container in the background. That is it, and now you should be able to access the wg-easy web UI by browsing to http://<your-server-ip>:8082 or the domain name used with your reverse proxy.
Initial Setup
When you open the web UI for the first time, wg-easy will walk you through a quick initial setup. This is a one-time process where you configure the basics before you can start adding clients.
First, you will be asked to create an admin account with a username and password. This is what you will use to log in to the web UI from now on, so pick something strong and keep it safe.
Next, wg-easy will ask for the public hostname or IP address of your server. This is the address your VPN clients will connect to from the internet, so it should be your public IP or a domain name that points to it. If your ISP gives you a dynamic IP, I would recommend setting up a dynamic DNS service like DuckDNS or No-IP and using that hostname here instead.
You will also be asked to confirm the WireGuard port, which in my case is 15555. Make sure this matches the port you set in the Docker Compose file and the one you forwarded on your router. Once you finish the setup, you will land on the main dashboard where you can start adding clients.
Adding a Client
Adding a client in wg-easy is as simple as clicking the 'New Client' button on the dashboard. You give the client a name, something like phone, laptop, or mum-laptop, and wg-easy takes care of the rest. It generates the key pair, assigns an IP address from the VPN subnet, and creates a ready-to-use config file for that client.
Once the client is created, you have two options to get the config onto the device. For mobile devices, the easiest way is to scan the QR code directly from the WireGuard app. For laptops or desktops, you can download the .conf file and import it into the WireGuard client.
wg-easy also lets you configure global settings that apply to all clients by default. For example, you can set a global DNS server (like 1.1.1.1 or your internal DNS), allowed IPs, MTU, persistent keepalive, and so on. Any new client you create will inherit these settings, which saves you from configuring the same thing over and over.
If you need to override these for a specific client, you can do that too. Each client has its own settings page where you can set a custom DNS server, custom allowed IPs, or any other parameter just for that client. This is useful when, for example, you want most clients to tunnel all traffic through the VPN but have one client that only routes traffic to your home network.
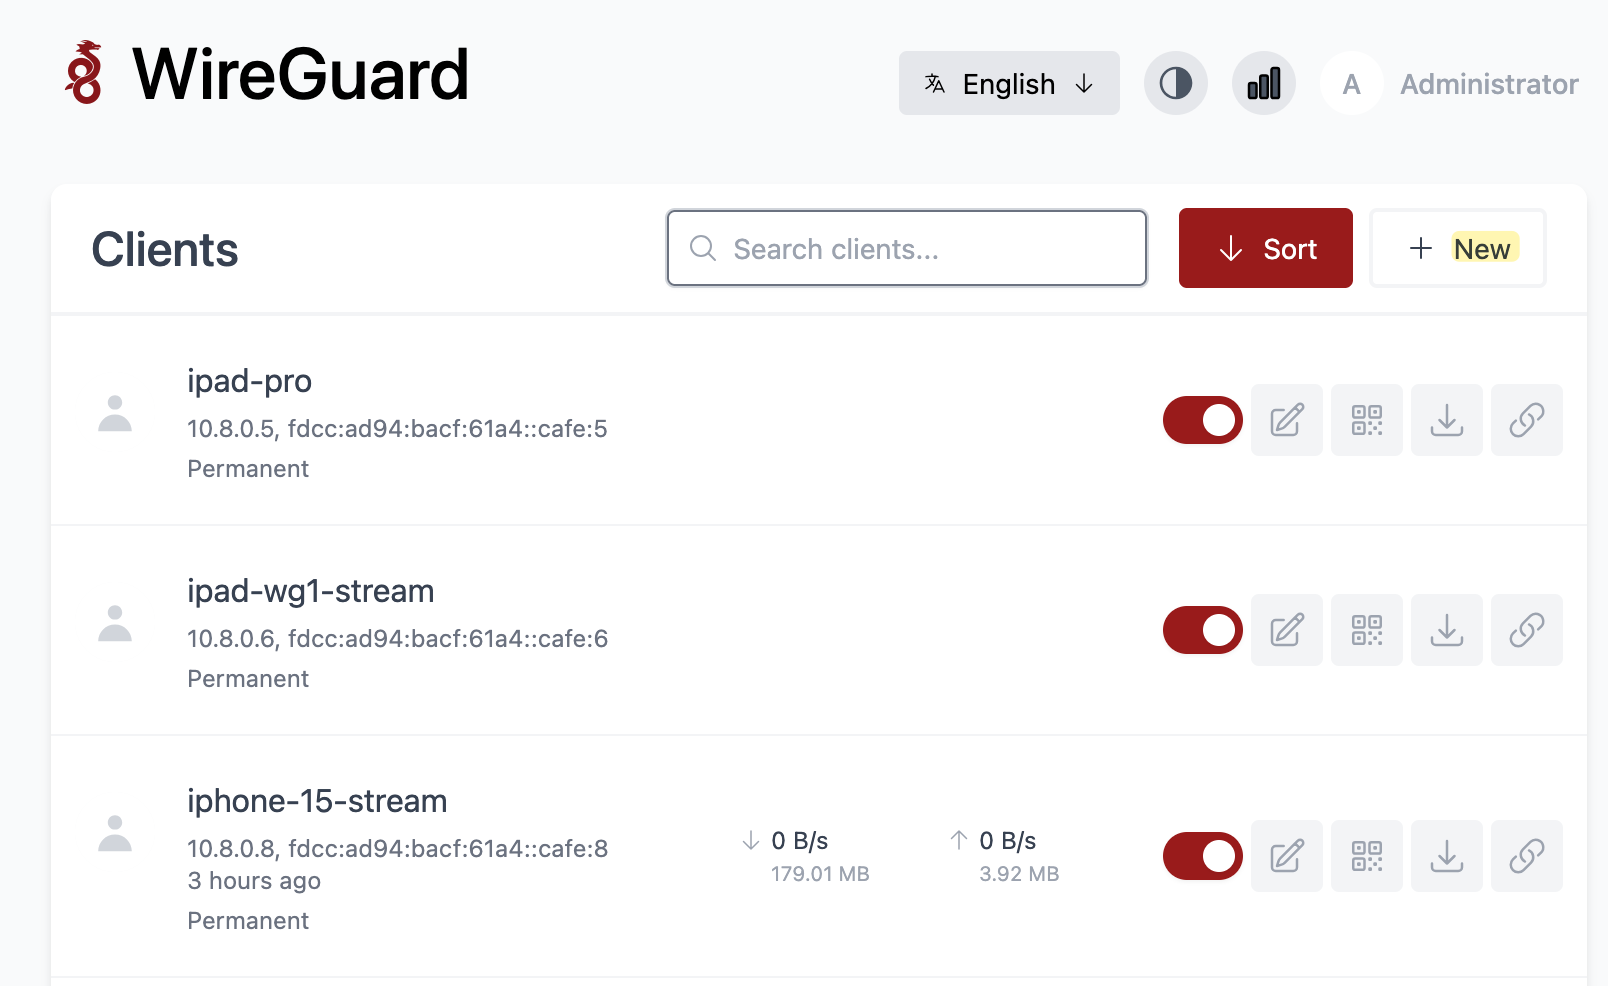
Monitoring Clients
Once you have clients connected, the dashboard gives you a quick overview of each one. You can see the assigned IP addresses, when the client was last connected, and the total data transferred. When a client is actively connected, you also get a live B/s rate.
The 'last connected' timestamp is useful for spotting unused clients you can clean up. On the right side, the toggle lets you enable or disable a client without deleting it, and the other buttons let you edit settings, show the QR code, or download the config file.
NAT and Traffic Flow
One thing worth understanding is how your traffic actually flows once you are connected to the VPN. Let's say wg-easy assigns you the IP 10.8.0.5 when you connect from your phone over mobile data. From your phone's point of view, it now has a new interface with that IP, and any traffic you send through the VPN is sourced from 10.8.0.5.
This traffic is encrypted and sent to the public IP of your router on UDP 15555. The router forwards it to the Linux host running wg-easy, where the container decrypts the packet. At this point, the inner packet still has the source IP 10.8.0.5.
When that packet leaves the wg-easy host and goes out to your home network or the Internet, wg-easy performs a source NAT (masquerade) and rewrites the source IP from 10.8.0.5 to the IP of the host running the container. So if your Linux host has the IP 192.168.1.50 on your home network, any device you reach internally will see the traffic coming from 192.168.1.50, not 10.8.0.5. This NAT behaviour is enabled by default in wg-easy and works well for most use cases.
The same applies when the traffic goes out to the Internet. The packet leaves your home router with your public IP as the source, just like any other traffic from your home network. This is why, when you connect to the VPN and check your public IP, you will see your home's public IP instead of your mobile carrier's IP.