If you have used Nornir before, you already know that the most common way to define your inventory is through YAML files. You list your hosts, groups, and defaults in separate files, and Nornir reads them at runtime. This works fine for small labs or quick scripts, but as your network grows, maintaining those files by hand becomes a problem. Every time you add a device, change an IP, or update a site, you have to remember to update your inventory files as well. It is easy to get out of sync.
This is where a source of truth tool like NetBox can help. NetBox is an open source network source of truth. It is a place to document your devices, IP addresses, sites, roles and pretty much anything about your network. Instead of maintaining a separate YAML inventory alongside NetBox, you can pull your inventory directly from NetBox at runtime. That way, Nornir always works with up to date data, and you only have to manage one source of truth.
In this post, we will cover how to use NetBox as a dynamic inventory source for Nornir using the nornir_netbox plugin. If you are new to Nornir, we have a dedicated series covering it from the basics, check it out here.

Overview
To connect Nornir with NetBox, we will use a plugin called nornir_netbox. The plugin queries NetBox using its API and maps the data to a Nornir inventory object, giving you hosts, groups, and data just like you would have with the default YAML-based approach.
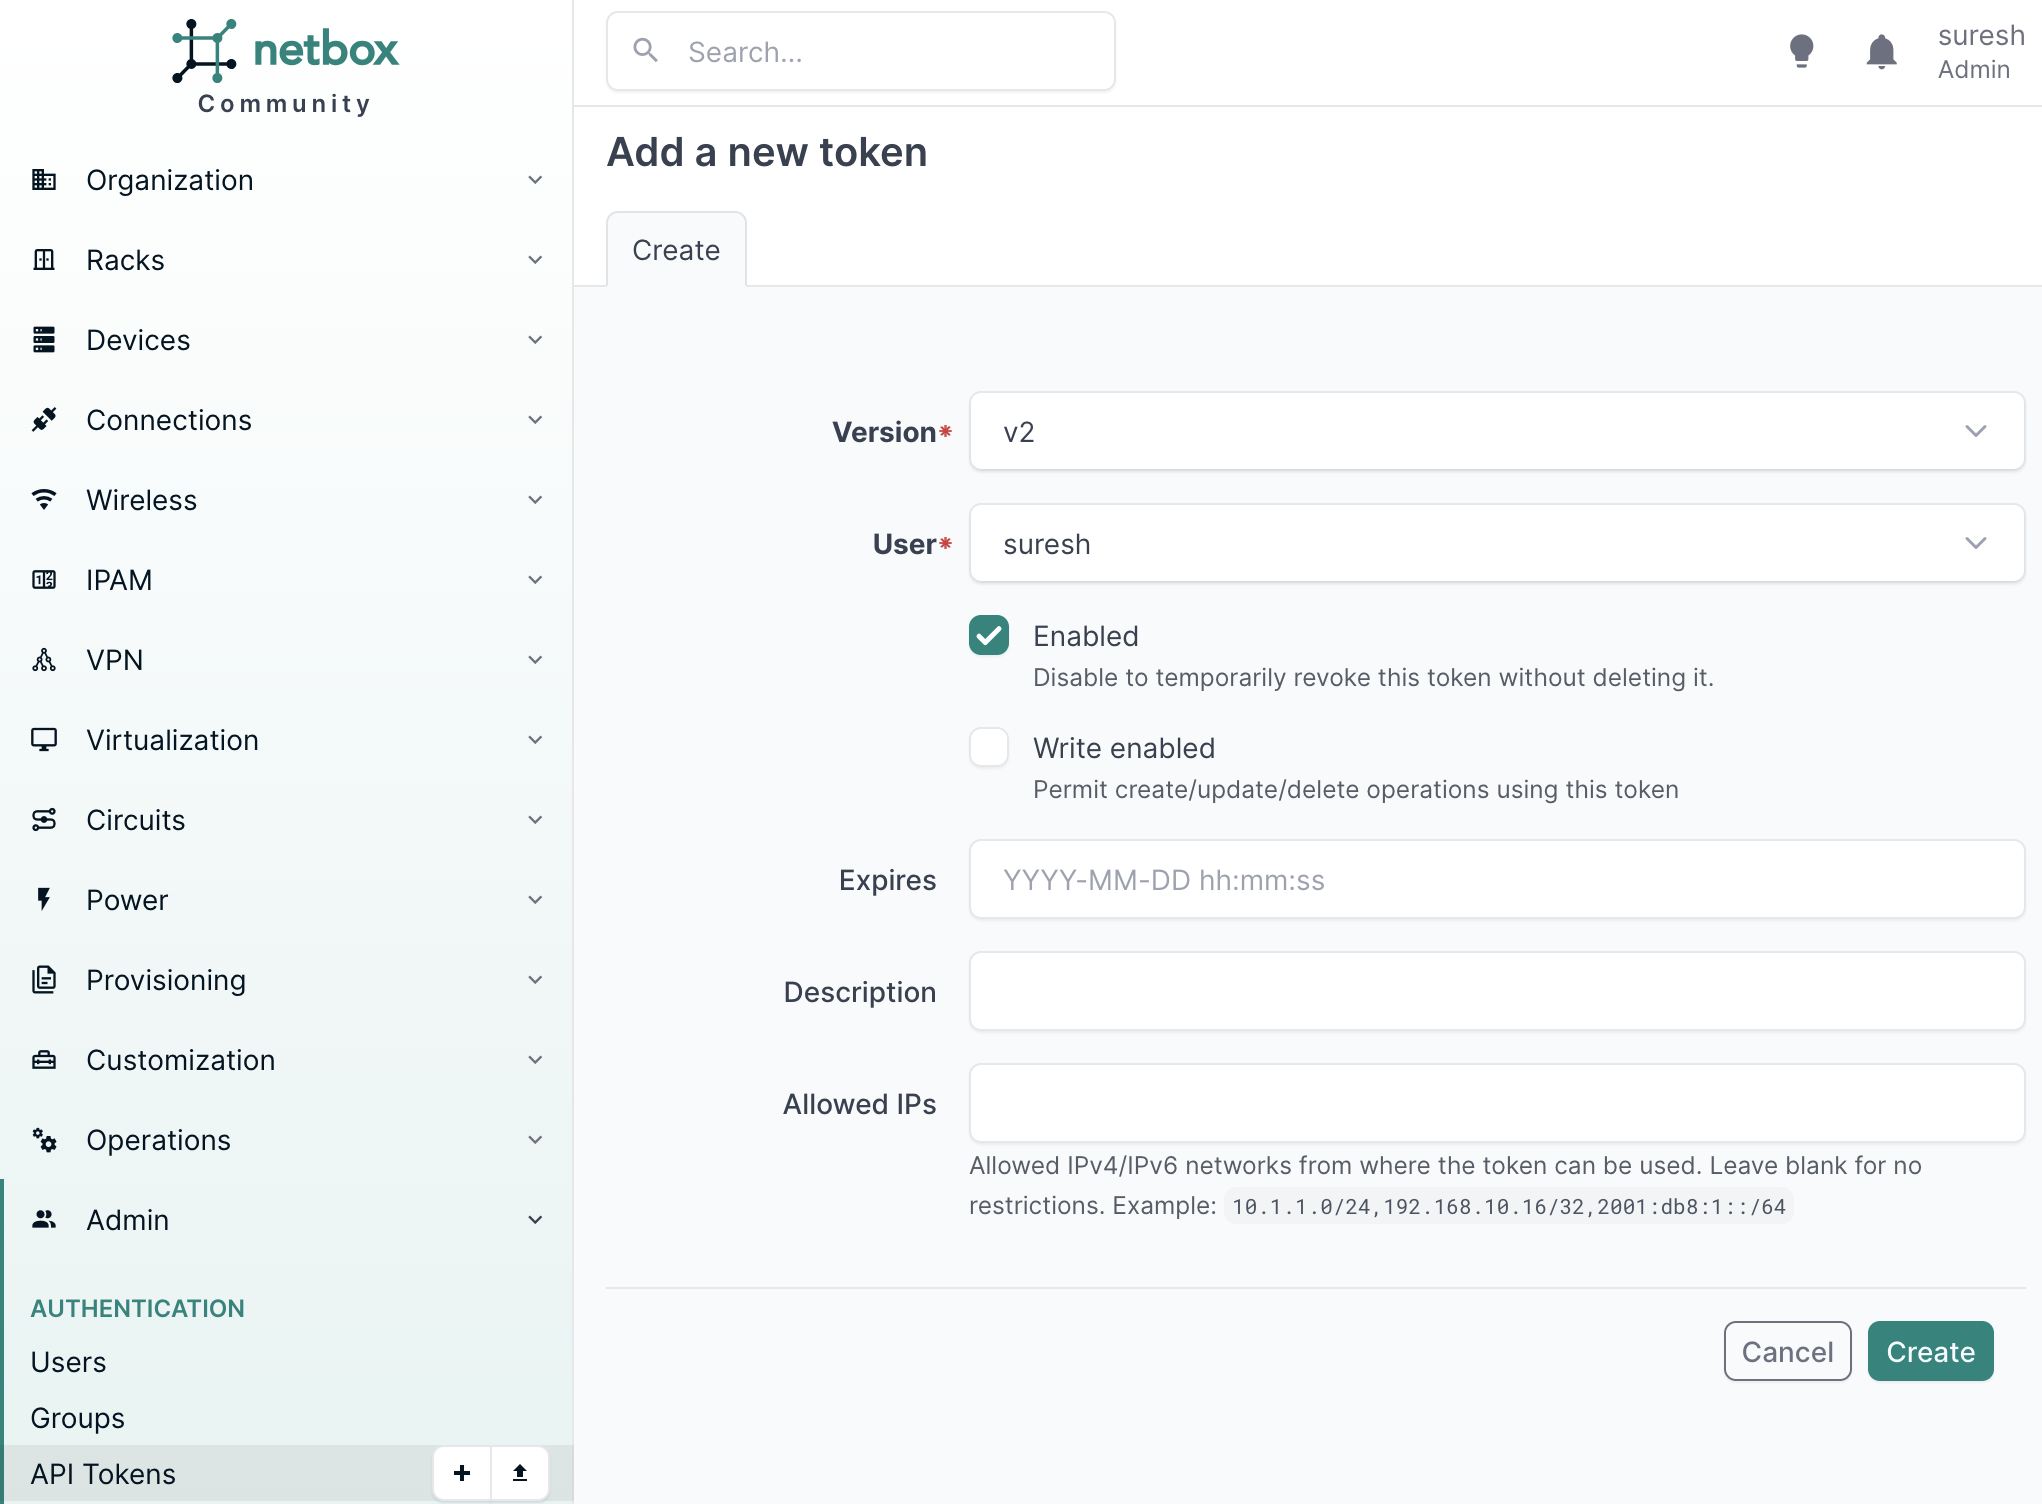
Before we get started, you will need a NetBox API token. You can create one by going to Admin > API Tokens in the left sidebar. You do not need write access enabled since we are only reading data from NetBox.
Setting Up Nornir with NetBox Inventory
Before we start, install the required packages. You can use pip or uv depending on your setup.
pip install nornir
pip install nornir_netbox

uv add nornir
uv add nornir_netbox
Then, create a config.yml file. This is the standard Nornir configuration file where we define the runner. We are using the threaded runner with 5 workers, which means Nornir will run tasks against 5 devices at a time.
#config.yml
---
runner:
  plugin: threaded
  options:
    num_workers: 5
Next, create a main.py file. Here we initialize Nornir using InitNornir, but instead of pointing it to a YAML inventory, we tell it to use the NetBoxInventory2 plugin. We pass in the NetBox URL and the API token, which we are reading from an environment variable rather than hardcoding it in the script.
#main.py
from nornir import InitNornir
import os
nr = InitNornir(
config_file="config.yml",
inventory={
"plugin": "NetBoxInventory2",
"options": {
"nb_url": "https://netbox-lab.local.packetswitch.dev",
"nb_token": os.getenv("NETBOX_TOKEN")
}
}
)
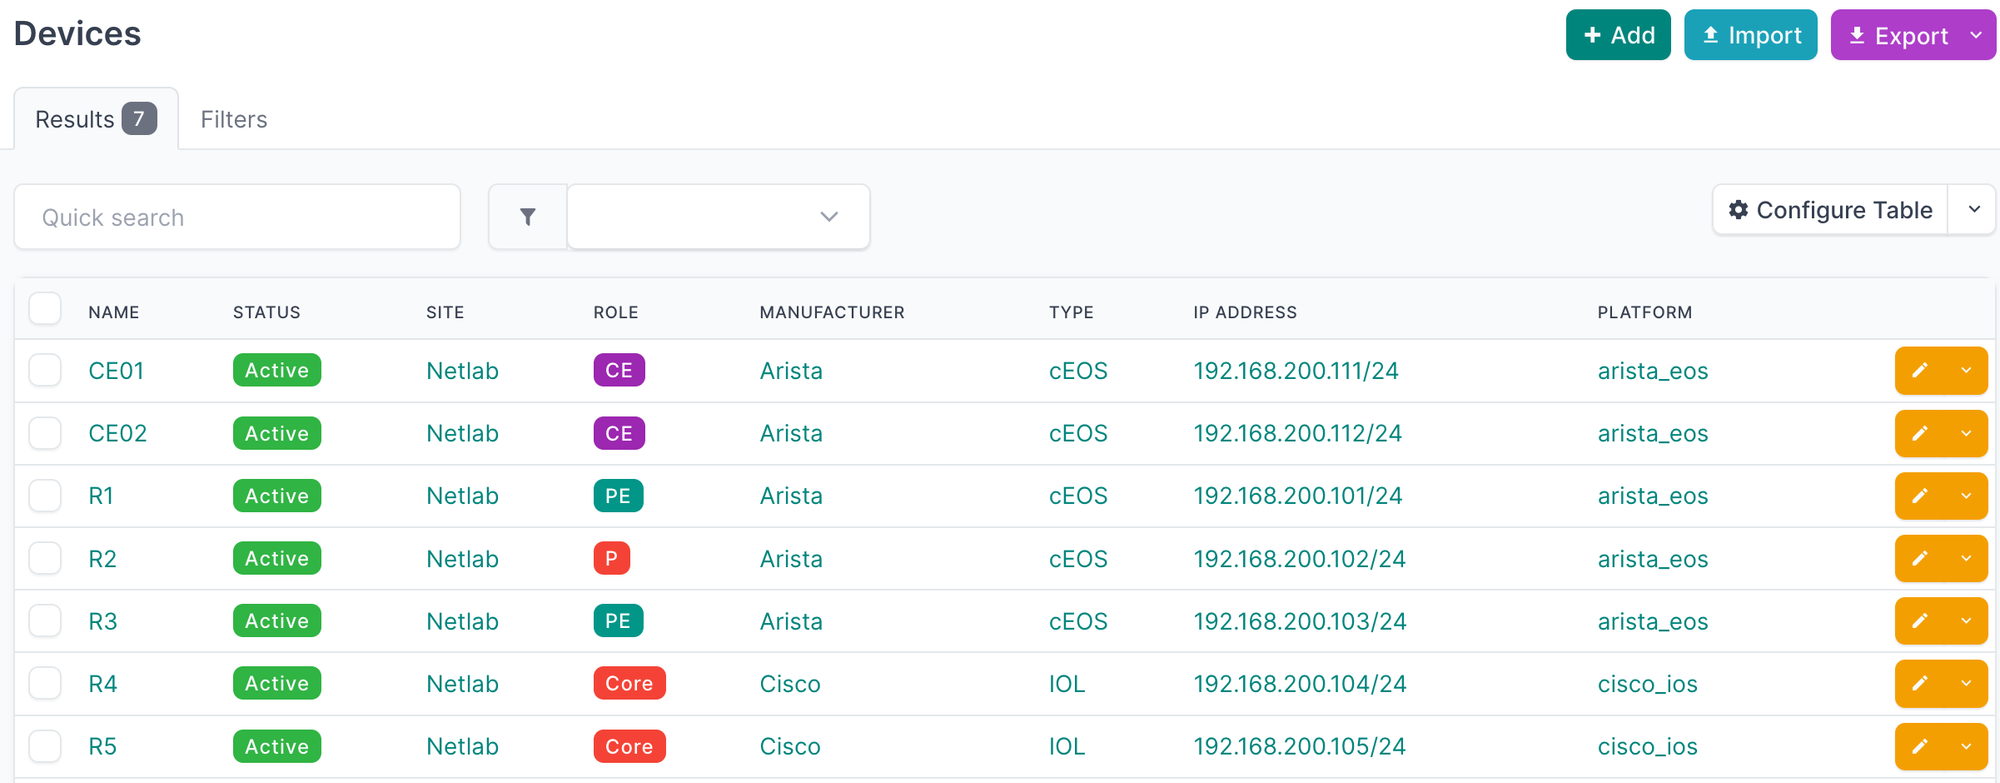
print(nr.inventory.hosts)Run the script and you should see a dictionary of hosts printed to the terminal. If everything is configured correctly, the output will list all the devices pulled from your NetBox instance.
python3 main.py

{'CE01': Host: CE01, 'CE02': Host: CE02, 'R1': Host: R1, 'R2': Host: R2, 'R3': Host: R3, 'R4': Host: R4, 'R5': Host: R5}
ssl_verify: false under the options in your inventory configuration.You can also move the inventory configuration directly into your config.yml file instead of passing it in InitNornir.
---
inventory:
  plugin: NetBoxInventory2
  options:
    nb_url: "https://netbox-lab.local.packetswitch.dev"
    nb_token: "TOKEN"

runner:
  plugin: threaded
  options:
    num_workers: 5
nr = InitNornir(config_file="config.yml")
print(nr.inventory.hosts)Working with Groups
If you print the groups from the inventory, you will see something like this.
print(nr.inventory.groups){'site__netlab': Group: site__netlab, 'platform__arista_eos': Group: platform__arista_eos,
'device_role__ce': Group: device_role__ce, 'manufacturer__arista': Group: manufacturer__arista,
'device_type__ceos': Group: device_type__ceos, 'device_role__pe': Group: device_role__pe,
'device_role__p': Group: device_role__p, 'platform__cisco_ios': Group: platform__cisco_ios,
'device_role__core': Group: device_role__core, 'manufacturer__cisco': Group: manufacturer__cisco,
'device_type__iol': Group: device_type__iol}The plugin automatically creates groups based on specific attributes it pulls from NetBox. Those attributes are site, platform, device_role, device_type, and manufacturer. For each device, it takes the slug of those attributes and creates a group name in the format attribute__slug. For example, a device assigned to a site with the slug netlab will be added to a group called site__netlab. A device with the platform slug arista_eos will be added to platform__arista_eos, and so on.
This is useful because you can create a groups.yml file and add data to these groups, just like you would with the default SimpleInventory plugin. For example, if you want to set a specific username and password for all Arista devices, you can add that under the manufacturer__arista group and every Arista device in your inventory will inherit those values automatically.
Using Groups to Assign Data
To test this create a groups.yml file and add any data you want to assign to a group. In this example, we are setting a username for all devices in the site__netlab group.
#groups.yml
---
site__netlab:
  username: suresh
Then pass the group_file option in your inventory configuration pointing to that file.
nr = InitNornir(
    config_file="config.yml",
    inventory={
        "plugin": "NetBoxInventory2",
        "options": {
            "nb_url": "https://netbox-lab.local.packetswitch.dev",
            "nb_token": os.getenv("NETBOX_TOKEN"),
            "group_file": "groups.yml",
        }
    }
)
Now if you print the username for any device in that site, you should see it picked up from the groups file.
print(nr.inventory.hosts['R1'].username)

#output
suresh
Similarly, you can create a defaults.yml file for any data you want applied to all devices in the inventory regardless of their group.
#defaults.yml
---
password: "super_secret_password"
Then pass the defaults_file option alongside the group_file in your inventory configuration.
nr = InitNornir(
    config_file="config.yml",
    inventory={
        "plugin": "NetBoxInventory2",
        "options": {
            "nb_url": "https://netbox-lab.local.packetswitch.dev",
            "nb_token": os.getenv("NETBOX_TOKEN"),
            "group_file": "groups.yml",
            "defaults_file": "defaults.yml",
        }
    }
)
Any value defined in defaults.yml will be inherited by every host in the inventory.
print(nr.inventory.hosts['R1'].password)

#output
super_secret_password
Running Tasks with Nornir Netmiko
In this section, we will put everything together and run an actual task against our devices using the nornir_netmiko plugin. As we covered earlier, instead of a static YAML inventory, our devices are coming from NetBox, and we will use Netmiko to SSH into them and run a command. First, install the required packages.
uv add nornir_utils
uv add nornir_netmiko
To run tasks against devices, Netmiko needs the hostname or IP address, the platform, and credentials. The hostname is automatically set from the primary IP defined in NetBox, so nr.inventory.hosts['R1'].hostname will give you the IP address directly. The platform is also pulled from NetBox, and the credentials come from our groups.yml and defaults.yml files.
print(nr.inventory.hosts['R1'].hostname)
print(nr.inventory.hosts['R1'].platform)

#output
192.168.200.101
arista_eos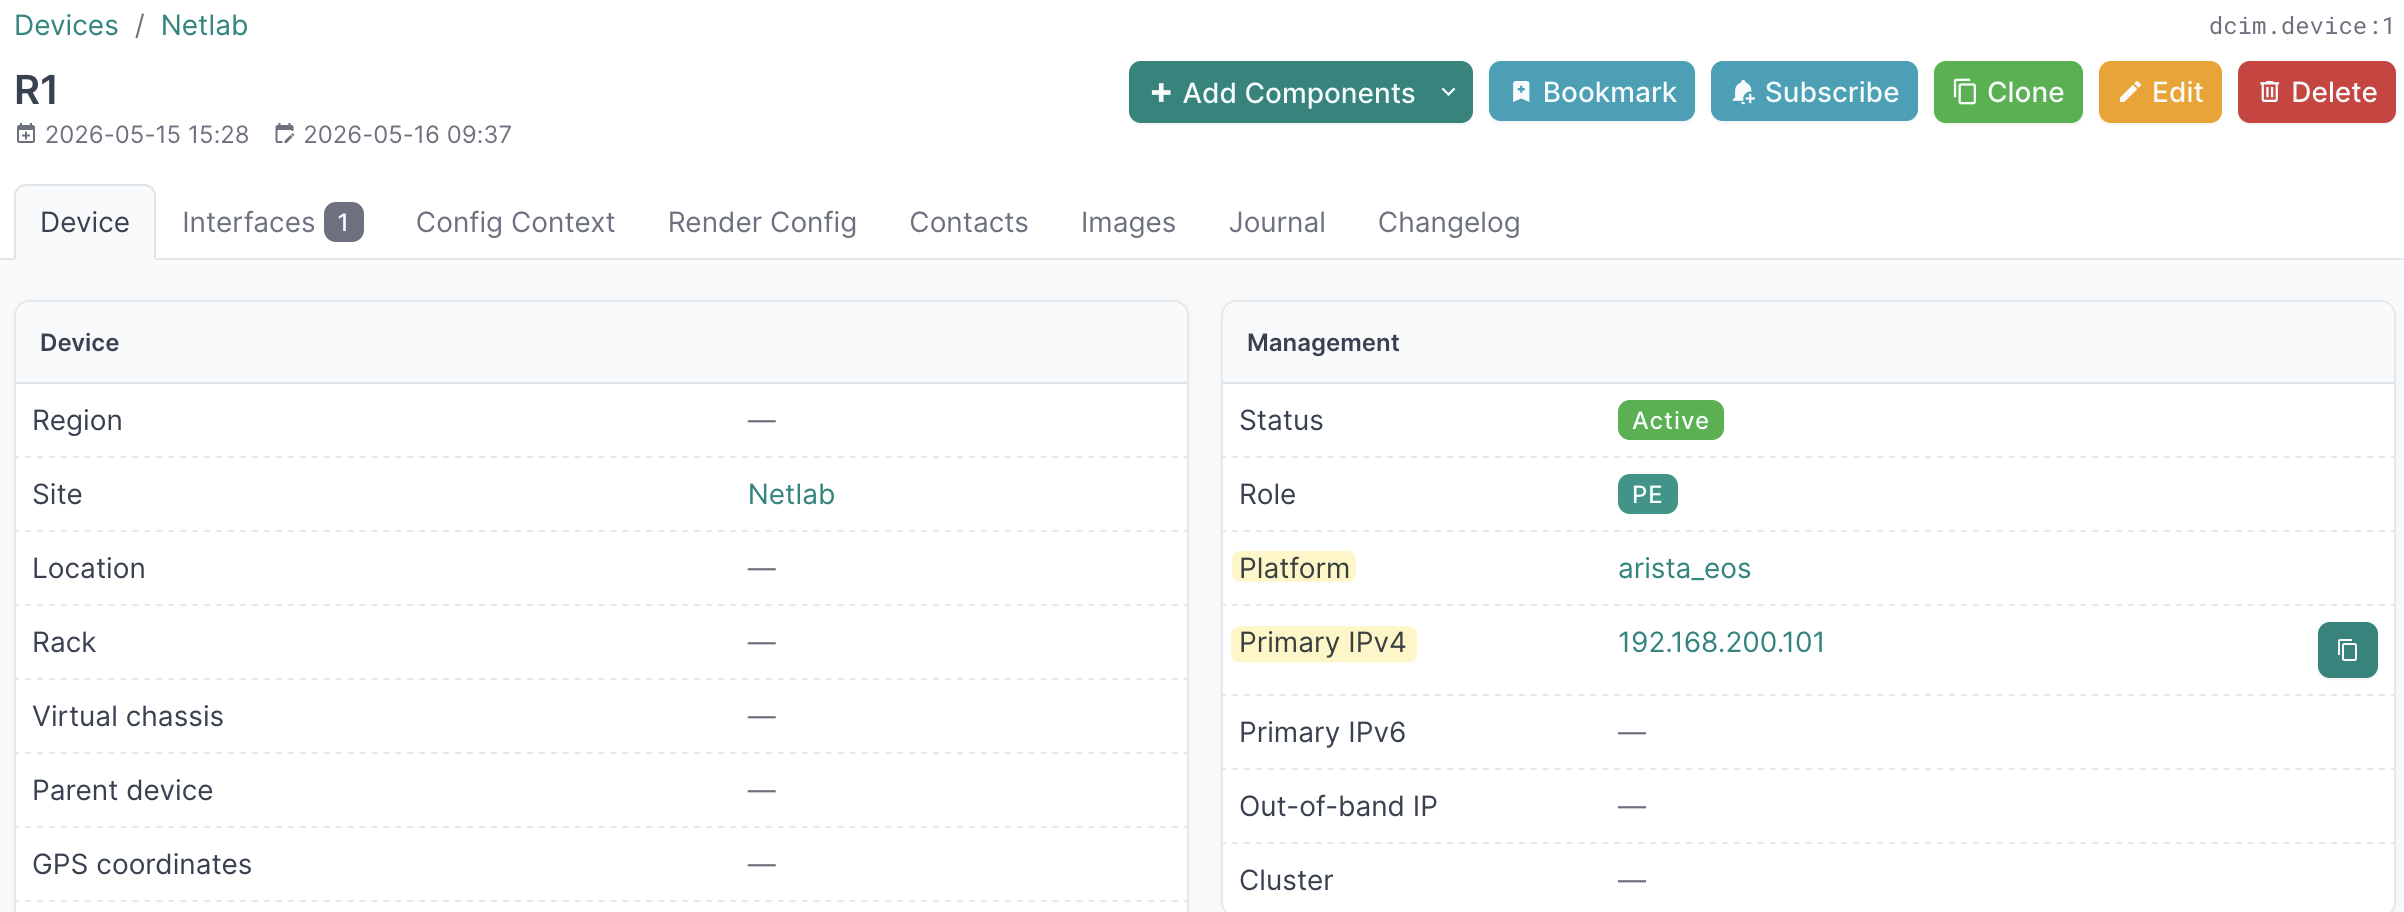
Here in total we have 7 devices in NetBox across two platforms, Arista cEOS and Cisco IOL.
The script itself is straightforward. We initialize Nornir the same way as before, run the netmiko_send_command task with the command we want to run, and then use print_result to display the output.
#show_bgp.py
from nornir import InitNornir
from nornir_netmiko.tasks import netmiko_send_command
from nornir_utils.plugins.functions import print_result
import os

nr = InitNornir(
    config_file="config.yml",
    inventory={
        "plugin": "NetBoxInventory2",
        "options": {
            "nb_url": "https://netbox-lab.local.packetswitch.dev",
            "nb_token": os.getenv("NETBOX_TOKEN"),
            "group_file": "groups.yml",
            "defaults_file": "defaults.yml",
        }
    }
)

results = nr.run(task=netmiko_send_command, command_string='show ip bgp summary')
print_result(results)
netmiko_send_command************************************************************
* CE01 ** changed : False ******************************************************
vvvv netmiko_send_command ** changed : False vvvvvvvvvvvvvvvvvvvvvvvvvvvvvvvvvvv INFO
BGP summary information for VRF default
Router identifier 10.0.0.11, local AS number 100
Neighbor Status Codes: m - Under maintenance
Description Neighbor V AS MsgRcvd MsgSent InQ OutQ Up/Down State PfxRcd PfxAcc PfxAdv
R1 10.1.0.2 4 200 16 16 0 0 00:10:00 Estab 1 1 1
^^^^ END netmiko_send_command ^^^^^^^^^^^^^^^^^^^^^^^^^^^^^^^^^^^^^^^^^^^^^^^^^^
* CE02 ** changed : False ******************************************************
vvvv netmiko_send_command ** changed : False vvvvvvvvvvvvvvvvvvvvvvvvvvvvvvvvvvv INFO
BGP summary information for VRF default
Router identifier 10.0.0.12, local AS number 300
Neighbor Status Codes: m - Under maintenance
Description Neighbor V AS MsgRcvd MsgSent InQ OutQ Up/Down State PfxRcd PfxAcc PfxAdv
R3 10.1.0.6 4 200 17 16 0 0 00:10:00 Estab 1 1 1
^^^^ END netmiko_send_command ^^^^^^^^^^^^^^^^^^^^^^^^^^^^^^^^^^^^^^^^^^^^^^^^^^
* R1 ** changed : False ********************************************************
vvvv netmiko_send_command ** changed : False vvvvvvvvvvvvvvvvvvvvvvvvvvvvvvvvvvv INFO
BGP summary information for VRF default
Router identifier 10.0.0.1, local AS number 200
Neighbor Status Codes: m - Under maintenance
Description Neighbor V AS MsgRcvd MsgSent InQ OutQ Up/Down State PfxRcd PfxAcc PfxAdv
R4 10.0.0.4 4 200 16 16 0 0 00:09:59 Estab 1 1 1
R5 10.0.0.5 4 200 16 16 0 0 00:09:59 Estab 1 1 1
CE01 10.1.0.1 4 100 17 16 0 0 00:10:00 Estab 1 1 1
^^^^ END netmiko_send_command ^^^^^^^^^^^^^^^^^^^^^^^^^^^^^^^^^^^^^^^^^^^^^^^^^^
* R2 ** changed : False ********************************************************
vvvv netmiko_send_command ** changed : False vvvvvvvvvvvvvvvvvvvvvvvvvvvvvvvvvvv INFO
BGP summary information for VRF default
Router identifier 10.0.0.2, local AS number 200
Neighbor Status Codes: m - Under maintenance
Description Neighbor V AS MsgRcvd MsgSent InQ OutQ Up/Down State PfxRcd PfxAcc PfxAdv
R4 10.0.0.4 4 200 19 17 0 0 00:09:58 Estab 2 2 0
R5 10.0.0.5 4 200 18 18 0 0 00:09:58 Estab 2 2 0
^^^^ END netmiko_send_command ^^^^^^^^^^^^^^^^^^^^^^^^^^^^^^^^^^^^^^^^^^^^^^^^^^
* R3 ** changed : False ********************************************************
vvvv netmiko_send_command ** changed : False vvvvvvvvvvvvvvvvvvvvvvvvvvvvvvvvvvv INFO
BGP summary information for VRF default
Router identifier 10.0.0.3, local AS number 200
Neighbor Status Codes: m - Under maintenance
Description Neighbor V AS MsgRcvd MsgSent InQ OutQ Up/Down State PfxRcd PfxAcc PfxAdv
R4 10.0.0.4 4 200 16 16 0 0 00:09:54 Estab 1 1 1
R5 10.0.0.5 4 200 16 15 0 0 00:09:54 Estab 1 1 1
CE02 10.1.0.5 4 300 16 17 0 0 00:10:00 Estab 1 1 1
^^^^ END netmiko_send_command ^^^^^^^^^^^^^^^^^^^^^^^^^^^^^^^^^^^^^^^^^^^^^^^^^^
* R4 ** changed : False ********************************************************
vvvv netmiko_send_command ** changed : False vvvvvvvvvvvvvvvvvvvvvvvvvvvvvvvvvvv INFO
BGP router identifier 10.0.0.4, local AS number 200
BGP table version is 3, main routing table version 3
2 network entries using 496 bytes of memory
2 path entries using 272 bytes of memory
2/2 BGP path/bestpath attribute entries using 592 bytes of memory
2 BGP AS-PATH entries using 48 bytes of memory
0 BGP route-map cache entries using 0 bytes of memory
0 BGP filter-list cache entries using 0 bytes of memory
BGP using 1408 total bytes of memory
BGP activity 2/0 prefixes, 2/0 paths, scan interval 5 secs
2 networks peaked at 11:43:45 May 16 2026 UTC (00:09:54.919 ago)
Neighbor V AS MsgRcvd MsgSent TblVer InQ OutQ Up/Down State/PfxRcd
10.0.0.1 4 200 16 16 3 0 0 00:10:00 1
10.0.0.2 4 200 14 17 3 0 0 00:09:59 0
10.0.0.3 4 200 16 16 3 0 0 00:09:55 1
10.0.0.5 4 200 16 16 3 0 0 00:09:49 0
^^^^ END netmiko_send_command ^^^^^^^^^^^^^^^^^^^^^^^^^^^^^^^^^^^^^^^^^^^^^^^^^^
* R5 ** changed : False ********************************************************
vvvv netmiko_send_command ** changed : False vvvvvvvvvvvvvvvvvvvvvvvvvvvvvvvvvvv INFO
BGP router identifier 10.0.0.5, local AS number 200
BGP table version is 3, main routing table version 3
2 network entries using 496 bytes of memory
2 path entries using 272 bytes of memory
2/2 BGP path/bestpath attribute entries using 592 bytes of memory
2 BGP AS-PATH entries using 48 bytes of memory
0 BGP route-map cache entries using 0 bytes of memory
0 BGP filter-list cache entries using 0 bytes of memory
BGP using 1408 total bytes of memory
BGP activity 2/0 prefixes, 2/0 paths, scan interval 5 secs
2 networks peaked at 11:43:44 May 16 2026 UTC (00:09:55.931 ago)
Neighbor V AS MsgRcvd MsgSent TblVer InQ OutQ Up/Down State/PfxRcd
10.0.0.1 4 200 16 16 3 0 0 00:10:00 1
10.0.0.2 4 200 15 16 3 0 0 00:09:59 0
10.0.0.3 4 200 15 16 3 0 0 00:09:55 1
10.0.0.4 4 200 16 16 3 0 0 00:09:49 0
^^^^ END netmiko_send_command ^^^^^^^^^^^^^^^^^^^^^^^^^^^^^^^^^^^^^^^^^^^^^^^^^^Nornir Inventory Filtering
By default, Nornir runs tasks against all devices in the inventory. But there are times when you only want to target a specific subset, for example, only devices with a certain role or from a specific site. You can do this using the F filter.
Let's say we only want to run our task against devices with the role core. Since the plugin automatically creates groups based on NetBox attributes, we can filter by the group name that was created for that role.
from nornir import InitNornir
from nornir_netmiko.tasks import netmiko_send_command
from nornir_utils.plugins.functions import print_result
from nornir.core.filter import F
import os

nr = InitNornir(
    config_file="config.yml",
    inventory={
        "plugin": "NetBoxInventory2",
        "options": {
            "nb_url": "https://netbox-lab.local.packetswitch.dev",
            "nb_token": os.getenv("NETBOX_TOKEN"),
            "group_file": "groups.yml",
            "defaults_file": "defaults.yml",
        }
    }
)

nr = nr.filter(F(groups__contains="device_role__core"))
results = nr.run(task=netmiko_send_command, command_string='show ip bgp summary')
print_result(results)
This will limit the inventory to only the devices that belong to the device_role__core group, which in our case are R4 and R5.
Accessing Host Data in Tasks
Every host in the Nornir inventory carries a data dictionary that contains all the information pulled from NetBox. Things like the device role, platform, site, primary IP, status, and any custom fields you have defined. Inside a task function, you can access this data using task.host.data, which is useful when you want your task to behave differently depending on the device it is running against, without hardcoding anything in your script.
from nornir import InitNornir
import os

nr = InitNornir(
    config_file="config.yml",
    inventory={
        "plugin": "NetBoxInventory2",
        "options": {
            "nb_url": "https://netbox-lab.local.packetswitch.dev",
            "nb_token": os.getenv("NETBOX_TOKEN"),
            "group_file": "groups.yml",
            "defaults_file": "defaults.yml",
        }
    }
)

print(nr.inventory.hosts['R1'].data)
{
"id": 1,
"url": "https://netbox-lab.local.packetswitch.dev/api/dcim/devices/1/",
"display_url": "https://netbox-lab.local.packetswitch.dev/dcim/devices/1/",
"display": "R1",
"name": "R1",
"device_type": {
"id": 1,
"url": "https://netbox-lab.local.packetswitch.dev/api/dcim/device-types/1/",
"display": "cEOS",
"manufacturer": {
"id": 2,
"url": "https://netbox-lab.local.packetswitch.dev/api/dcim/manufacturers/2/",
"display": "Arista",
"name": "Arista",
"slug": "arista",
"description": ""
},
"model": "cEOS",
"slug": "ceos",
"description": "",
"device_count": 5
},
"role": {
"id": 3,
"url": "https://netbox-lab.local.packetswitch.dev/api/dcim/device-roles/3/",
"display": "PE",
"name": "PE",
"slug": "pe",
"description": "",
"device_count": 0,
"virtualmachine_count": 0,
"_depth": 0
},
"tenant": null,
"platform": {
"id": 3,
"url": "https://netbox-lab.local.packetswitch.dev/api/dcim/platforms/3/",
"display": "arista_eos",
"name": "arista_eos",
"slug": "arista_eos",
"description": "",
"device_count": 0,
"virtualmachine_count": 0,
"_depth": 0
},
"serial": "",
"asset_tag": null,
"site": {
"id": 1,
"url": "https://netbox-lab.local.packetswitch.dev/api/dcim/sites/1/",
"display": "Netlab",
"name": "Netlab",
"slug": "netlab",
"description": ""
},
"location": null,
"rack": null,
"position": null,
"face": null,
"latitude": null,
"longitude": null,
"parent_device": null,
"status": {
"value": "active",
"label": "Active"
},
"airflow": null,
"primary_ip": {
"id": 2,
"url": "https://netbox-lab.local.packetswitch.dev/api/ipam/ip-addresses/2/",
"display": "192.168.200.101/24",
"family": {
"value": 4,
"label": "IPv4"
},
"address": "192.168.200.101/24",
"nat_inside": null,
"nat_outside": [],
"description": "R1 Management IP"
},
"primary_ip4": {
"id": 2,
"url": "https://netbox-lab.local.packetswitch.dev/api/ipam/ip-addresses/2/",
"display": "192.168.200.101/24",
"family": {
"value": 4,
"label": "IPv4"
},
"address": "192.168.200.101/24",
"nat_inside": null,
"nat_outside": [],
"description": "R1 Management IP"
},
"primary_ip6": null,
"oob_ip": null,
"cluster": null,
"virtual_chassis": null,
"vc_position": null,
"vc_priority": null,
"description": "",
"owner": null,
"comments": "",
"config_template": null,
"config_context": {},
"local_context_data": null,
"tags": [],
"custom_fields": {},
"created": "2026-05-15T15:28:37.342312Z",
"last_updated": "2026-05-16T09:37:22.959176Z",
"console_port_count": 0,
"console_server_port_count": 0,
"power_port_count": 0,
"power_outlet_count": 0,
"interface_count": 1,
"front_port_count": 0,
"rear_port_count": 0,
"device_bay_count": 0,
"module_bay_count": 0,
"inventory_item_count": 0
}Next, we are taking things a step further. Instead of hardcoding a command in the script, we are defining the command in the groups.yml and defaults.yml files so each group runs a different command based on its role.
In groups.yml, we already set a username for all devices in the site__netlab group. We also define a command under the data key for device_role__core and device_role__pe, so each role will run a different command.
#groups.yml
---
site__netlab:
  username: admin

device_role__core:
  data:
    command: "show ip bgp summary"

device_role__pe:
  data:
    command: "show ip ospf neighbor"
In defaults.yml, we set a fallback command under data, so any device that does not belong to a role with a specific command will fall back to show interface status.
#defaults.yml
---
password: "admin"
data:
  command: "show interface status"
In the script we define a send_command function that reads the command from task.host["command"] and passes it to netmiko_send_command. Because the command is coming from the host data, each device will automatically run the right command for its role without any extra logic in the script.
from nornir import InitNornir
from nornir_netmiko.tasks import netmiko_send_command
from nornir_utils.plugins.functions import print_result
from nornir.core.filter import F
import os

nr = InitNornir(
    config_file="config.yml",
    inventory={
        "plugin": "NetBoxInventory2",
        "options": {
            "nb_url": "https://netbox-lab.local.packetswitch.dev",
            "nb_token": os.getenv("NETBOX_TOKEN"),
            "group_file": "groups.yml",
            "defaults_file": "defaults.yml",
        }
    }
)

def send_command(task):
    command = task.host["command"]
    task.run(task=netmiko_send_command, command_string=command)

results = nr.run(task=send_command)
print_result(results)
We created a wrapper function send_command here because we need to read the command from task.host["command"] before passing it to netmiko_send_command. Earlier when we ran nr.run(task=netmiko_send_command, command_string='show ip bgp summary'), the command was hardcoded directly in the call. This time, the command is different for each device depending on its role, so we need a function that runs first, reads the right command for that host, and then calls netmiko_send_command with it.
send_command********************************************************************
* CE01 ** changed : False ******************************************************
vvvv send_command ** changed : False vvvvvvvvvvvvvvvvvvvvvvvvvvvvvvvvvvvvvvvvvvv INFO
---- netmiko_send_command ** changed : False ----------------------------------- INFO
Port       Name                  Status       Vlan     Duplex Speed  Type            Flags Encapsulation
Et1        CE01 -> stub [stub]   connected    routed   full   1G     EbraTestPhyPort
Et2        CE01 -> R1 [external] connected    routed   full   1G     EbraTestPhyPort
Ma0                              connected    routed   a-full a-1G   10/100/1000

^^^^ END send_command ^^^^^^^^^^^^^^^^^^^^^^^^^^^^^^^^^^^^^^^^^^^^^^^^^^^^^^^^^^
* CE02 ** changed : False ******************************************************
vvvv send_command ** changed : False vvvvvvvvvvvvvvvvvvvvvvvvvvvvvvvvvvvvvvvvvvv INFO
---- netmiko_send_command ** changed : False ----------------------------------- INFO
Port       Name                  Status       Vlan     Duplex Speed  Type            Flags Encapsulation
Et1        CE02 -> stub [stub]   connected    routed   full   1G     EbraTestPhyPort
Et2        CE02 -> R3 [external] connected    routed   full   1G     EbraTestPhyPort
Ma0                              connected    routed   a-full a-1G   10/100/1000

^^^^ END send_command ^^^^^^^^^^^^^^^^^^^^^^^^^^^^^^^^^^^^^^^^^^^^^^^^^^^^^^^^^^
* R1 ** changed : False ********************************************************
vvvv send_command ** changed : False vvvvvvvvvvvvvvvvvvvvvvvvvvvvvvvvvvvvvvvvvvv INFO
---- netmiko_send_command ** changed : False ----------------------------------- INFO
Neighbor ID     Instance VRF      Pri State                  Dead Time   Address         Interface
10.0.0.2        1        default  0   FULL                   00:00:33    10.1.0.10       Ethernet2
10.0.0.4        1        default  1   FULL                   00:00:35    10.1.0.22       Ethernet3
^^^^ END send_command ^^^^^^^^^^^^^^^^^^^^^^^^^^^^^^^^^^^^^^^^^^^^^^^^^^^^^^^^^^
* R2 ** changed : False ********************************************************
vvvv send_command ** changed : False vvvvvvvvvvvvvvvvvvvvvvvvvvvvvvvvvvvvvvvvvvv INFO
---- netmiko_send_command ** changed : False ----------------------------------- INFO
Port       Name     Status       Vlan     Duplex Speed  Type            Flags Encapsulation
Et1        R2 -> R1 connected    routed   full   1G     EbraTestPhyPort
Et2        R2 -> R3 connected    routed   full   1G     EbraTestPhyPort
Et3        R2 -> R4 connected    routed   full   1G     EbraTestPhyPort
Et4        R2 -> R5 connected    routed   full   1G     EbraTestPhyPort
Ma0                 connected    routed   a-full a-1G   10/100/1000

^^^^ END send_command ^^^^^^^^^^^^^^^^^^^^^^^^^^^^^^^^^^^^^^^^^^^^^^^^^^^^^^^^^^
* R3 ** changed : False ********************************************************
vvvv send_command ** changed : False vvvvvvvvvvvvvvvvvvvvvvvvvvvvvvvvvvvvvvvvvvv INFO
---- netmiko_send_command ** changed : False ----------------------------------- INFO
Neighbor ID     Instance VRF      Pri State                  Dead Time   Address         Interface
10.0.0.2        1        default  0   FULL                   00:00:37    10.1.0.13       Ethernet2
10.0.0.5        1        default  1   FULL                   00:00:30    10.1.0.26       Ethernet3
^^^^ END send_command ^^^^^^^^^^^^^^^^^^^^^^^^^^^^^^^^^^^^^^^^^^^^^^^^^^^^^^^^^^
* R4 ** changed : False ********************************************************
vvvv send_command ** changed : False vvvvvvvvvvvvvvvvvvvvvvvvvvvvvvvvvvvvvvvvvvv INFO
---- netmiko_send_command ** changed : False ----------------------------------- INFO
BGP router identifier 10.0.0.4, local AS number 200
BGP table version is 3, main routing table version 3
2 network entries using 496 bytes of memory
2 path entries using 272 bytes of memory
2/2 BGP path/bestpath attribute entries using 592 bytes of memory
2 BGP AS-PATH entries using 48 bytes of memory
0 BGP route-map cache entries using 0 bytes of memory
0 BGP filter-list cache entries using 0 bytes of memory
BGP using 1408 total bytes of memory
BGP activity 2/0 prefixes, 2/0 paths, scan interval 5 secs
2 networks peaked at 11:43:45 May 16 2026 UTC (00:34:39.083 ago)

Neighbor        V           AS MsgRcvd MsgSent   TblVer  InQ OutQ Up/Down  State/PfxRcd
10.0.0.1        4          200      45      43        3    0    0 00:34:44        1
10.0.0.2        4          200      44      44        3    0    0 00:34:43        0
10.0.0.3        4          200      45      44        3    0    0 00:34:39        1
10.0.0.5        4          200      43      43        3    0    0 00:34:33        0
^^^^ END send_command ^^^^^^^^^^^^^^^^^^^^^^^^^^^^^^^^^^^^^^^^^^^^^^^^^^^^^^^^^^
* R5 ** changed : False ********************************************************
vvvv send_command ** changed : False vvvvvvvvvvvvvvvvvvvvvvvvvvvvvvvvvvvvvvvvvvv INFO
---- netmiko_send_command ** changed : False ----------------------------------- INFO
BGP router identifier 10.0.0.5, local AS number 200
BGP table version is 3, main routing table version 3
2 network entries using 496 bytes of memory
2 path entries using 272 bytes of memory
2/2 BGP path/bestpath attribute entries using 592 bytes of memory
2 BGP AS-PATH entries using 48 bytes of memory
0 BGP route-map cache entries using 0 bytes of memory
0 BGP filter-list cache entries using 0 bytes of memory
BGP using 1408 total bytes of memory
BGP activity 2/0 prefixes, 2/0 paths, scan interval 5 secs
2 networks peaked at 11:43:44 May 16 2026 UTC (00:34:40.106 ago)

Neighbor        V           AS MsgRcvd MsgSent   TblVer  InQ OutQ Up/Down  State/PfxRcd
10.0.0.1        4          200      45      44        3    0    0 00:34:44        1
10.0.0.2        4          200      43      44        3    0    0 00:34:43        0
10.0.0.3        4          200      45      44        3    0    0 00:34:39        1
10.0.0.4        4          200      43      43        3    0    0 00:34:33        0
^^^^ END send_command ^^^^^^^^^^^^^^^^^^^^^^^^^^^^^^^^^^^^^^^^^^^^^^^^^^^^^^^^^^
As you can see in the output, each device ran a different command depending on its role.
- CE01, CE02 and R2, which do not belong to either the
coreorperole group, fell back to the default commandshow interface status. - R1 and R3, which are PE routers, ran
show ip ospf neighbor. - R4 and R5, which are core routers, ran
show ip bgp summary.
All of this happened automatically without any conditional logic in the script itself. The command was simply read from the host data, which was set in the groups and defaults files.
Using NetBox Custom Fields
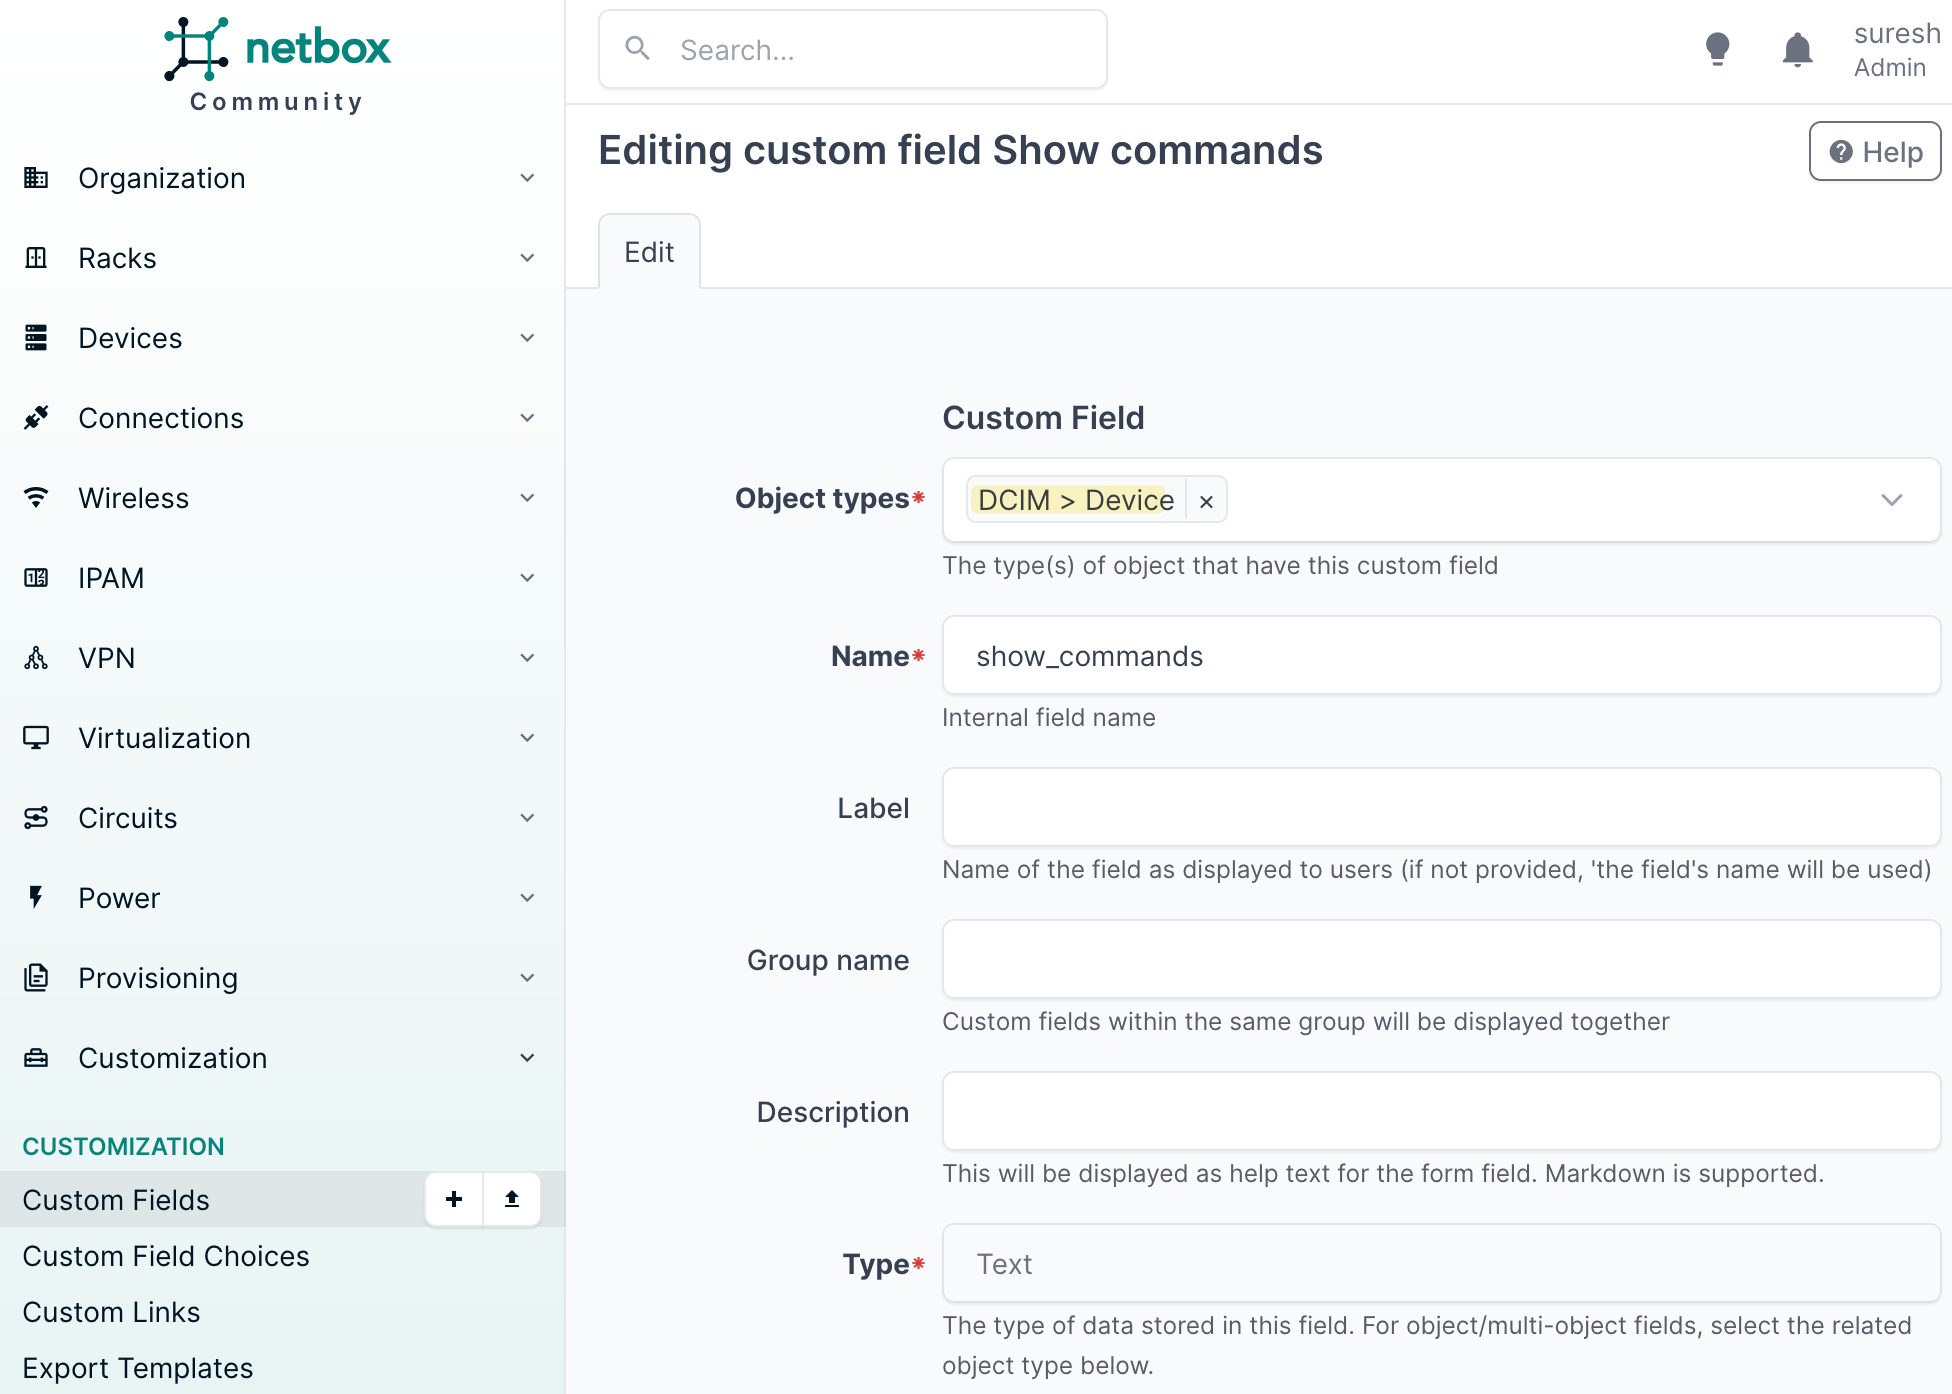
Custom fields in NetBox allow you to add extra attributes to objects like devices, sites, or roles beyond what NetBox provides out of the box. For example, if you want to store a specific command to run against a device, you can create a custom field called show_commands and set a value for each device directly in NetBox.
To create a custom field in NetBox, go to Customization > Custom Fields in the left sidebar and click the add button. Set the object type to DCIM > Device so the field applies to devices. Give it a name, in our case show_commands, and set the type to Text.
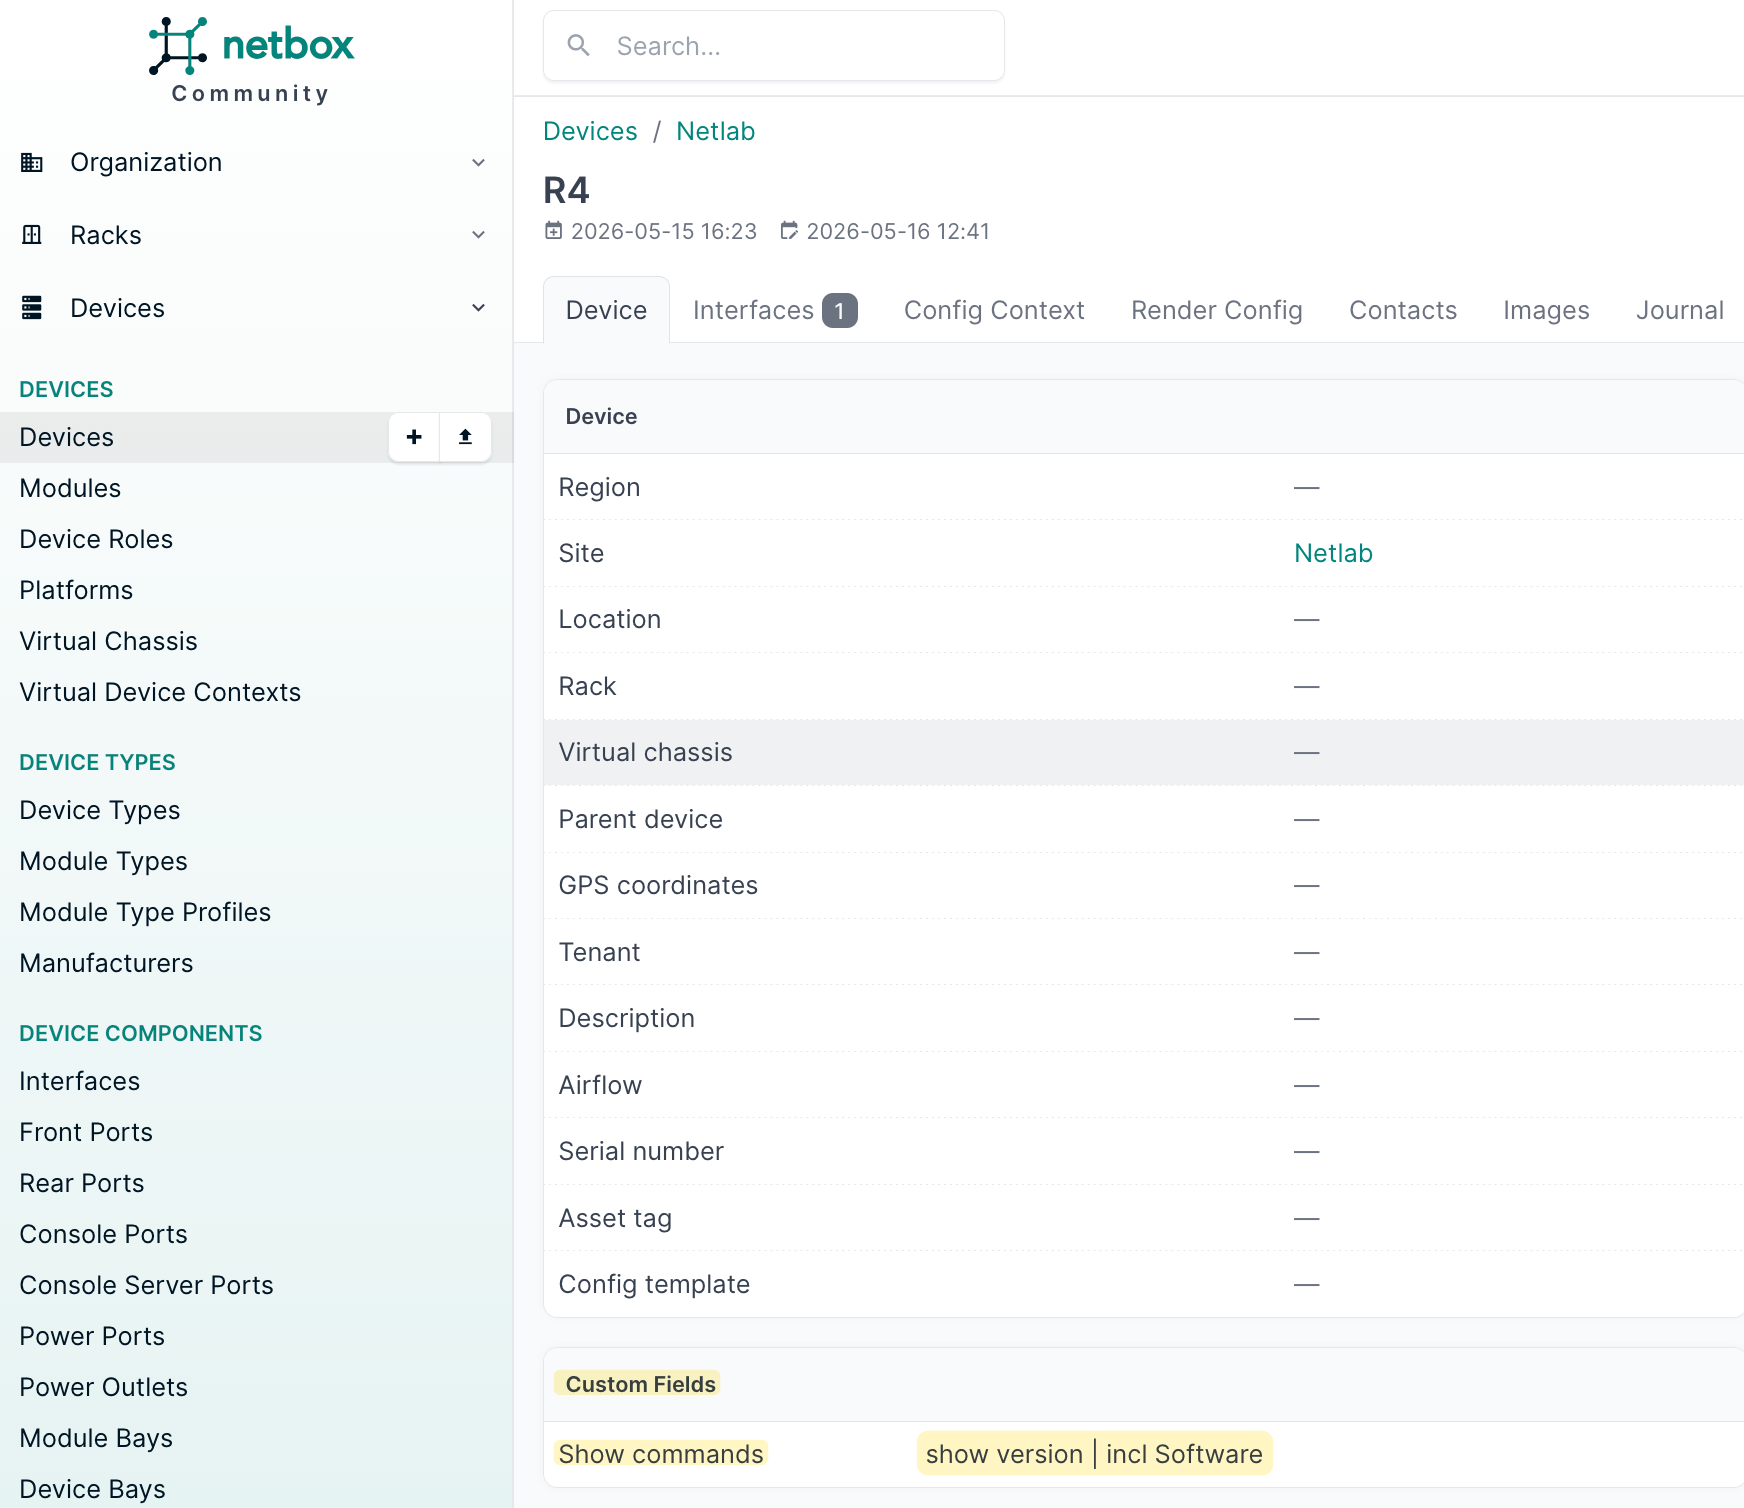
Once saved, the field will appear on every device page under the Custom Fields section where you can set a value for each device individually.
To make custom fields available in your Nornir inventory, you need to add flatten_custom_fields: True to your inventory options.
nr = InitNornir(
    config_file="config.yml",
    inventory={
        "plugin": "NetBoxInventory2",
        "options": {
            "nb_url": "https://netbox-lab.local.packetswitch.dev",
            "nb_token": os.getenv("NETBOX_TOKEN"),
            "group_file": "groups.yml",
            "defaults_file": "defaults.yml",
            "flatten_custom_fields": True
        }
    }
)
Once enabled, the custom field will appear directly in task.host.data, so you can access it in your tasks just like any other field. I went ahead and added the show_commands custom field to both R4 and R5 in NetBox with the command I want to run against each device.
Since we only added the custom field to R4 and R5, we filter the inventory down to just the device_role__core group before running the task. The send_command function reads the show_commands value from each host's data and passes it to netmiko_send_command. Because flatten_custom_fields is set to True, the custom field is available directly via task.host.data.get("show_commands") without having to dig into a nested dictionary.
from nornir import InitNornir
from nornir_netmiko.tasks import netmiko_send_command
from nornir_utils.plugins.functions import print_result
from nornir.core.filter import F
import os

nr = InitNornir(
    config_file="config.yml",
    inventory={
        "plugin": "NetBoxInventory2",
        "options": {
            "nb_url": "https://netbox-lab.local.packetswitch.dev",
            "nb_token": os.getenv("NETBOX_TOKEN"),
            "group_file": "groups.yml",
            "defaults_file": "defaults.yml",
            "flatten_custom_fields": True
        }
    }
)

def send_command(task):
    command = task.host.data.get("show_commands")
    task.run(task=netmiko_send_command, command_string=command)

nr = nr.filter(F(groups__contains="device_role__core"))
results = nr.run(task=send_command)
print_result(results)
send_command********************************************************************
* R4 ** changed : False ********************************************************
vvvv send_command ** changed : False vvvvvvvvvvvvvvvvvvvvvvvvvvvvvvvvvvvvvvvvvvv INFO
---- netmiko_send_command ** changed : False ----------------------------------- INFO
Cisco IOS Software [Dublin], Linux Software (X86_64BI_LINUX-ADVENTERPRISEK9-M), Version 17.12.1, RELEASE SOFTWARE (fc5)
^^^^ END send_command ^^^^^^^^^^^^^^^^^^^^^^^^^^^^^^^^^^^^^^^^^^^^^^^^^^^^^^^^^^
* R5 ** changed : False ********************************************************
vvvv send_command ** changed : False vvvvvvvvvvvvvvvvvvvvvvvvvvvvvvvvvvvvvvvvvvv INFO
---- netmiko_send_command ** changed : False ----------------------------------- INFO
Cisco IOS Software [Dublin], Linux Software (X86_64BI_LINUX-ADVENTERPRISEK9-M), Version 17.12.1, RELEASE SOFTWARE (fc5)
^^^^ END send_command ^^^^^^^^^^^^^^^^^^^^^^^^^^^^^^^^^^^^^^^^^^^^^^^^^^^^^^^^^^A Note on Custom Fields and Related Objects
When I first tried this, I added the custom field to the device role in NetBox instead of the device itself. The idea made sense, since R4 and R5 are both part of the core role, setting it at the role level would mean we only have to define it once. However, it did not work. The custom field was not showing up in the host data at all.
print(nr.inventory.hosts['R4'].data['role'])

#output
{
    "id": 1,
    "url": "https://netbox-lab.local.packetswitch.dev/api/dcim/device-roles/1/",
    "display": "Core",
    "name": "Core",
    "slug": "core",
    "description": "",
    "device_count": 0,
    "virtualmachine_count": 0,
    "_depth": 0
}
The reason could be that when the plugin pulls device data from NetBox, related objects like role, site, and platform are only returned as a basic summary containing fields like name, slug, and ID, and their custom fields are not included. But this is just my assumption. If you find a way to make it work at the role level, drop a comment below, I would love to know.
Merging Local Inventory to the NetBox Inventory
There might be situations where you have devices that are not in NetBox, but you still want to include them in your Nornir inventory. For example, a firewall or a legacy host that you manage separately. In that case, you can define those devices in a local hosts.yml file and merge them into the NetBox inventory after it is initialized.
#hosts.yml
---
FW01:
  hostname: 192.168.201.101
  groups:
    - firewall
FW02:
  hostname: 192.168.201.102
  groups:
    - firewall
#groups.yml
---
site__netlab:
username: admin
device_role__core:
data:
command: "show ip bgp summary"
device_role__pe:
data:
command: "show ip ospf neighbor"
firewall: {}We use SimpleInventory to load the local YAML files and then merge the hosts and groups into the existing NetBox inventory using .update().
from nornir import InitNornir
from nornir.plugins.inventory.simple import SimpleInventory
import os

nr = InitNornir(
    config_file="config.yml",
    inventory={
        "plugin": "NetBoxInventory2",
        "options": {
            "nb_url": "https://netbox-lab.local.packetswitch.dev",
            "nb_token": os.getenv("NETBOX_TOKEN"),
            "group_file": "groups.yml",
            "defaults_file": "defaults.yml",
            "flatten_custom_fields": True
        }
    }
)

local_inv = SimpleInventory(
    host_file="hosts.yml",
    group_file="groups.yml",
    defaults_file="defaults.yml"
).load()

nr.inventory.hosts.update(local_inv.hosts)
nr.inventory.groups.update(local_inv.groups)

print(nr.inventory.hosts)
After the merge, nr.inventory.hosts will contain both the devices pulled from NetBox and the ones defined locally, and you can run tasks against all of them as usual.
{'CE01': Host: CE01, 'CE02': Host: CE02, 'R1': Host: R1, 'R2': Host: R2, 'R3': Host: R3, 'R4': Host: R4, 'R5': Host: R5, 'FW01': Host: FW01, 'FW02': Host: FW02}This is a simple task that just prints the name of the device it is running against. We filter the inventory down to the firewall group first using F(groups__contains="firewall") so the task only runs against FW01 and FW02, and not against any of the NetBox devices.
def check_host(task):
    print(f"Running against: {task.host.name}\n")

nr_fw = nr.filter(F(groups__contains="firewall"))
results = nr_fw.run(task=check_host)

#output
Running against: FW01
Running against: FW02
This is just to confirm that the local devices are in the inventory and that filtering works as expected against them.
Closing Up
That is it for this post. We covered how to use NetBox as a dynamic inventory source for Nornir using the nornir_netbox plugin, how groups are automatically created from device attributes, and how to use custom fields to pass data into your tasks. The goal was to show that you do not need to maintain a separate inventory file when you already have NetBox as your source of truth.