If you're a Network Engineer keen to dive into the world of Network Automation, Ansible is an excellent starting point. Unlike other automation tools, Ansible stands out for its simplicity and user-friendliness. It's much easier to learn and use, making it perfect for those who are new to Network Automation.
In this blog post, we'll walk you through the basics of setting up Ansible and run through a few simple examples to give you a clear idea of how it works. Whether you're automating tasks for Cisco, Juniper, or other network devices, you'll see how Ansible can make your life easier and your work more efficient.
Ansible Quick Overview
Ansible is an open-source automation tool that's incredibly versatile yet easy to use. It automates tasks such as configuration management, application deployment, and even orchestrating complex workflows across multiple systems. What makes Ansible particularly appealing is its use of YAML (Yet Another Markup Language) for writing playbooks. These playbooks are simple to understand and write, making Ansible accessible to everyone. One of the biggest perks of Ansible is that it doesn't require any special coding skills. If you can write basic commands, you can write an Ansible playbook.
When it comes to installing Ansible on your system, whether it's Windows, Mac, or Linux, the Ansible documentation provides a comprehensive and easy-to-follow guide. They've covered everything you need to know about installing Ansible on various operating systems. To get started, simply head over to their installation guide at Ansible Installation Guide.
For Ubuntu Linux, you can install Ansible with the apt command and then install the Cisco IOS collection using ansible-galaxy command.
sudo apt install ansible

ansible-galaxy collection install cisco.iosSetting Up Your Ansible Environment
When working with Ansible for network automation, organizing your directory structure and understanding the purpose of each file and directory is crucial. Let me take you through my setup, for the sake of simplicity, I'm using a single Cisco C9300 running IOS-XE. Here’s a glimpse of the directory structure.
➜  ansible-network-101 tree
.
├── ansible.cfg
├── inventory
│   ├── group_vars
│   │   └── switches.yml
│   ├── host_vars
│   └── hostfile.ini
└── playbook.yml

3 directories, 4 files
ansible.cfg
This is the Ansible configuration file. It contains settings that apply globally to Ansible in the current directory. In our case, the contents are.
#ansible.cfg
[defaults]
host_key_checking = False
inventory = inventory/hostfile.ini
host_key_checking = Falsedisables SSH key host checking.inventory = inventory/hostfile.inispecifies the location of our inventory file, which contains information about the hosts.
Inventory
#hostfile.ini
[switches]
switch_01 ansible_host=10.10.1.50
This directory holds information about your network devices. hostfile.ini is the inventory file where you list all your network devices. For simplicity, we're working with a single Cisco device. The term [switches] in the hostfile.ini inventory file represents a group of hosts, in this case, network switches. This notation is part of Ansible’s inventory file syntax, where hosts (devices or servers) are organized into groups for easier management.
[switches]- This is a group name enclosed in square brackets. You can define any name for your group based on your own needs. In our setup, this group is meant to represent network switches.switch_01 ansible_host=10.10.1.50 -Within this group, we define individual hosts.switch_01is the alias we give to our network switch, making it more readable and easier to reference in playbooks.ansible_host=10.10.1.50specifies the IP address ofswitch_01.
Group Vars and Host Vars
group_vars and host_vars - These directories store variables specific to groups and individual hosts, respectively. switches.yml under group_vars contains group-specific variables.
It's important that the group name in the inventory file ([switches] in this case) matches the name used in the group_vars directory. This is how Ansible knows which variables in the group_vars/switches.yml file apply to the hosts in the [switches] group. By matching these names, Ansible can automatically apply all the settings and variables defined in switches.yml to switch_01
#switches.yml
---
ansible_connection: ansible.netcommon.network_cli
ansible_network_os: cisco.ios.ios
ansible_become: yes
ansible_become_method: enable
ansible_user: admin
ansible_password: cisco123
ansible_become_password: cisco123These variables define how Ansible will connect to the devices in the switches group, including the connection type, network OS, and credentials.
- ansible_connection - Ansible uses the ansible-connection setting to determine how to connect to a remote device. When working with network devices, we need to set this to an appropriate network connection option, so Ansible treats the remote node as a network device with a limited execution environment.
- ansible_network_os - Informs Ansible which Network platform these hosts correspond to. This is required when using the
ansible.netcommon.*connection options. - ansible_become - Cisco uses the concept of enable mode which is the highest privilege level available. You need to be in the enable mode to configure almost all the configuration items.
- ansible_become_method - This informs Ansible to go into privilege mode (enable) before executing the task

3. playbook.yml
Finally, playbook.yml is where you define the tasks you want Ansible to execute on your network devices. A playbook can contain multiple tasks, each automating a specific part of your network operations.
By setting up your environment in this manner, you ensure that each component of your Ansible setup is neatly organized and easy to manage. This structure is not only efficient but also scalable, making it easier to expand as you add more devices or functionalities to your network automation tasks.
Simple Ansible Example to Run Show Commands
Let's start with a basic example of using Ansible to log in to a switch, run a show command, and print out the output.
---
- name: "Ansible 101"
  hosts: switches
  gather_facts: no

  tasks:
    - name: Show Version
      cisco.ios.ios_command:
        commands: show version
      register: output  # This stores the output in a variable named 'output'

    - name: Print output
      debug:
        msg: "{{ output.stdout_lines }}"  # This prints the output
In our playbook, named "Ansible 101", we specify hosts: switches, telling Ansible to apply the tasks to all hosts in the switches group, as defined in our inventory. We set gather_facts: no because we don't need to collect system facts about the devices.
The playbook contains two tasks. The first task is named "Show Version". Here, we use the cisco.ios.ios_command module, a part of Ansible's collection of modules. We pass the command show version to this module. This command is then executed on the switch. We use register: output to store the result of this command in a variable named output. This is a common practice in Ansible to capture command output for further processing.
The second task, "Print output", uses the debug module to display the output stored in the output variable. Specifically, we print output.stdout_lines, which is the standard output of the show command we executed, formatted as a list of lines. To run the playbook, use the command ansible-playbook playbook.yml in your terminal, where playbook.yml is the name of your Ansible playbook file.
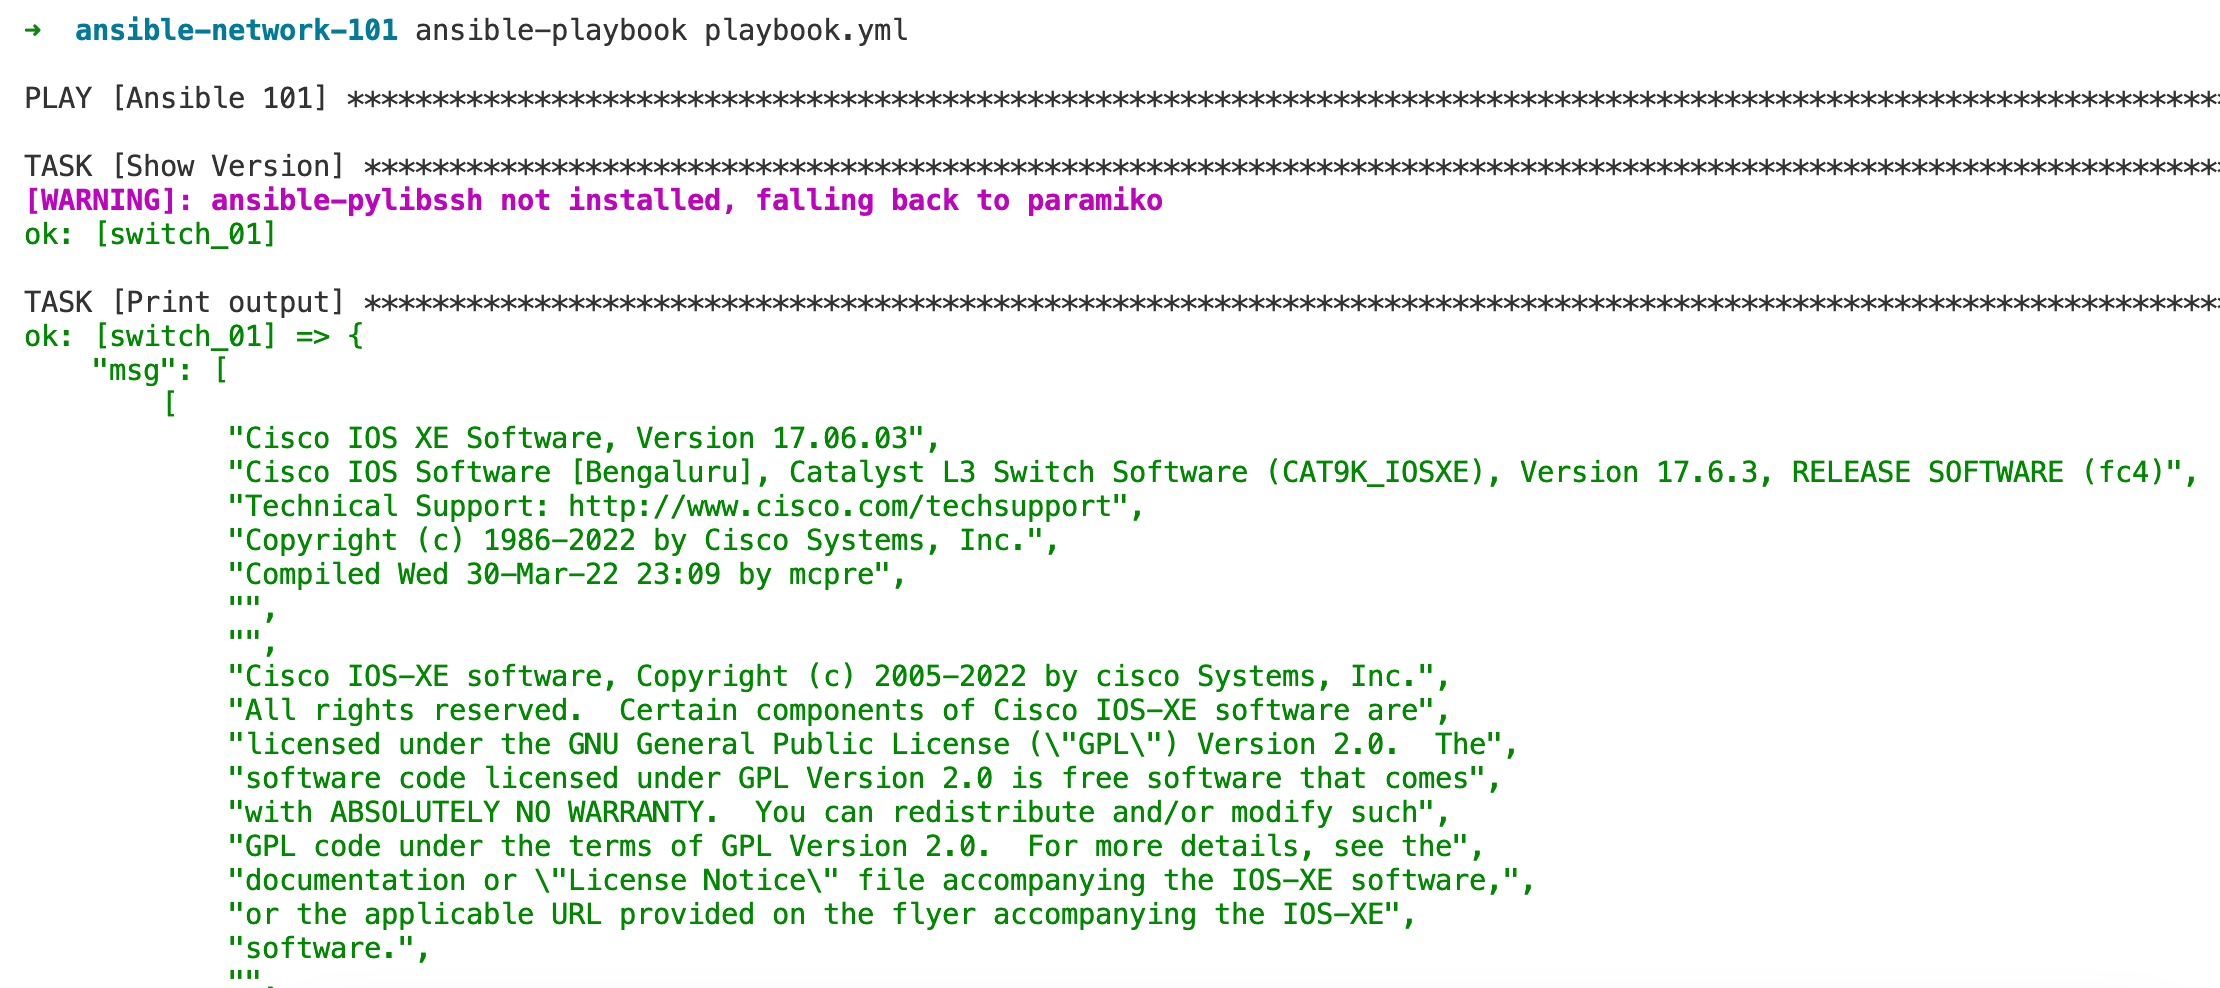
This way, when the playbook runs, it will connect to the switch, execute the show version command, and then display the results in a readable format in your Ansible console. This simple playbook demonstrates the fundamental operation of Ansible in network automation – sending commands to network devices and handling their outputs.
If you want to automate more switches, simply add their details to the hostfile.ini file, and Ansible will include them in your automation tasks.
[switches]
switch_01 ansible_host=10.10.1.50
switch_02 ansible_host=10.10.1.51
Make a Configuration Change
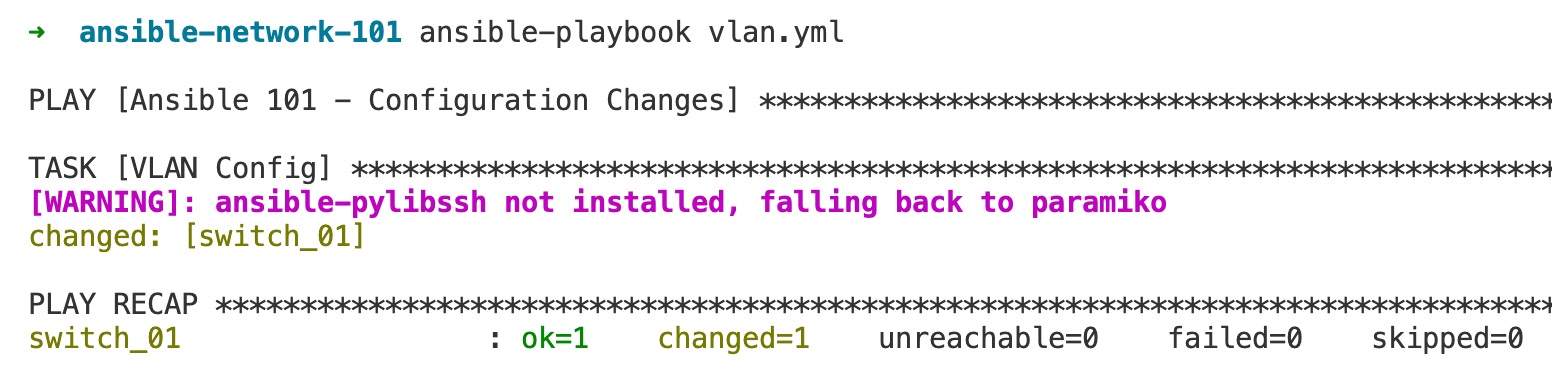
In this next example, we'll demonstrate making a configuration change on a switch by creating two VLANs.
---
- name: "Ansible 101 - Configuration Changes"
  hosts: switches
  gather_facts: no

  tasks:
    - name: VLAN Config
      cisco.ios.ios_vlans:
        config:
          - name: server_vlan
            vlan_id: 30
          - name: user_vlan
            vlan_id: 31
The task named "VLAN Config" uses the cisco.ios.ios_vlans module. This module is used for managing VLAN configurations on Cisco IOS devices. The config section lists the VLANs we want to set up. In this task, we're creating two VLANs. One named server_vlan with VLAN 30, and another named user_vlan with VLAN 31.
Running this playbook will tell Ansible to log in to each switch defined in the switches group of the inventory and apply the VLAN configurations accordingly. If the VLANs do not already exist, Ansible will create them with the specified names and IDs. If the VLANs already exist, Ansible will ensure their configurations match what's defined in the playbook.
c9300# show vlan

VLAN Name                             Status    Ports
---- -------------------------------- --------- -------------------------------
1    default                          active    Te1/0/1, Te1/0/2
30   server_vlan                      active
31   user_vlan                        active
In the Ansible output , there are a couple of key terms that reflect the state of your playbook run.
- ok=1 - refers to the number of tasks that have been executed successfully on a host.
- changed=1 - This shows that one task has made changes to the system. Whenever Ansible makes a change to the system that aligns it with the desired state specified in the playbook, it's counted as a change.
You might be curious about how to know which Ansible module to use for specific configuration tasks, like cisco.ios.ios_vlans in this example. For this, I refer to the Ansible Cisco documentation, which is an excellent resource for understanding the various modules available for Cisco devices. You can find detailed information and examples for each module, which is incredibly helpful for planning your automation tasks. Check out the Ansible Cisco documentation here at Ansible Cisco Documentation.
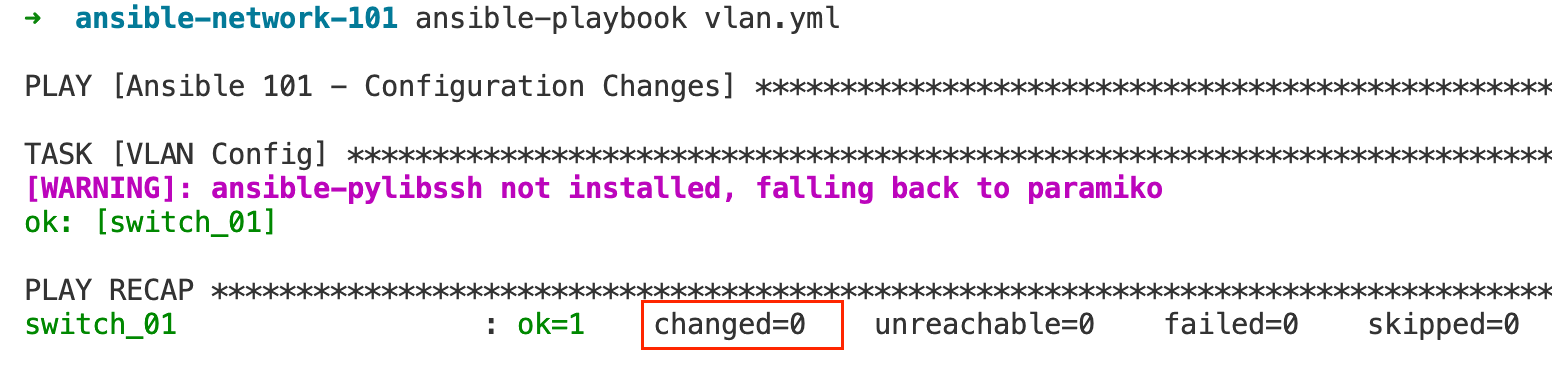
Idempotency
Idempotency is a key concept in configuration management and automation, which Ansible implements very well. It refers to the ability of a system to detect the current state and only apply changes if they are needed to reach the desired state. If the system is already in the desired state, running the automation script again will not cause any changes. This ensures that you can run the same playbook multiple times without worrying about causing unintended changes or disruptions to your system.
In the context of our Ansible playbook, idempotency means that when you run the playbook once, it will create the VLANs because they do not exist. If you run the playbook again, Ansible checks the current state of the switch and sees that the VLANs already exist and match the desired configuration. Since no change is needed, it will report changed=0. This feature of Ansible is powerful because it allows you to maintain consistency across your network infrastructure and makes your automation tasks safe to run repeatedly, which is incredibly useful for both routine management and troubleshooting.
Desired State
Another key thing to remember is that Ansible operates on a declarative model, which means as users, we define the desired state of our system with our Ansible playbooks.
It's a way of telling Ansible "what" the end result should be, rather than "how" to get there. For instance, in our VLAN configuration example, we specified that our desired state includes two VLANs on the switch. Ansible then takes on the responsibility of ensuring these VLANs exist with the correct settings. It abstracts away the complexity of the underlying commands and processes needed to achieve this state. This means we don't need to provide the exact CLI commands for the VLAN creation; Ansible understands our intent and executes the necessary steps in the background. This approach simplifies the automation process, reduces the likelihood of human error, and ensures our infrastructure is configured consistently every time the playbook is run.
Ansible Cisco Interface Configurations
In this example, let's look at how to assign the VLAN to an interface. The first task, "VLAN Config," remains the same as before. The second task, "Port Configuration," is where we introduce the port configuration. This task uses the cisco.ios.ios_l2_interfaces module, which is designed for managing Layer 2 interface configurations on Cisco IOS devices. Here, we're configuring the interface Te1/0/1 to operate in access mode and assigning it to VLAN 30.
---
- name: "Ansible 101 - Configuration Changes"
  hosts: switches
  gather_facts: no

  tasks:
    - name: VLAN Config
      cisco.ios.ios_vlans:
        config:
          - name: server_vlan
            vlan_id: 30
          - name: user_vlan
            vlan_id: 31

    - name: Port Configuration
      cisco.ios.ios_l2_interfaces:
        config:
          - name: Te1/0/1
            mode: access
            access:
              vlan: 30
Running this playbook will apply both the VLAN and interface configurations to the switch. If the VLANs and interface configurations are already in the desired state, Ansible's idempotency ensures that no unnecessary changes are made. If any configuration is not as specified in the playbook, Ansible will make the necessary changes.
Additional Configurations
For additional configurations like creating ACLs or assigning IP addresses to interfaces, Ansible offers a variety of modules suited for these tasks, as highlighted in the screenshot from the documentation. Each module is designed for a specific type of configuration on Cisco IOS devices.
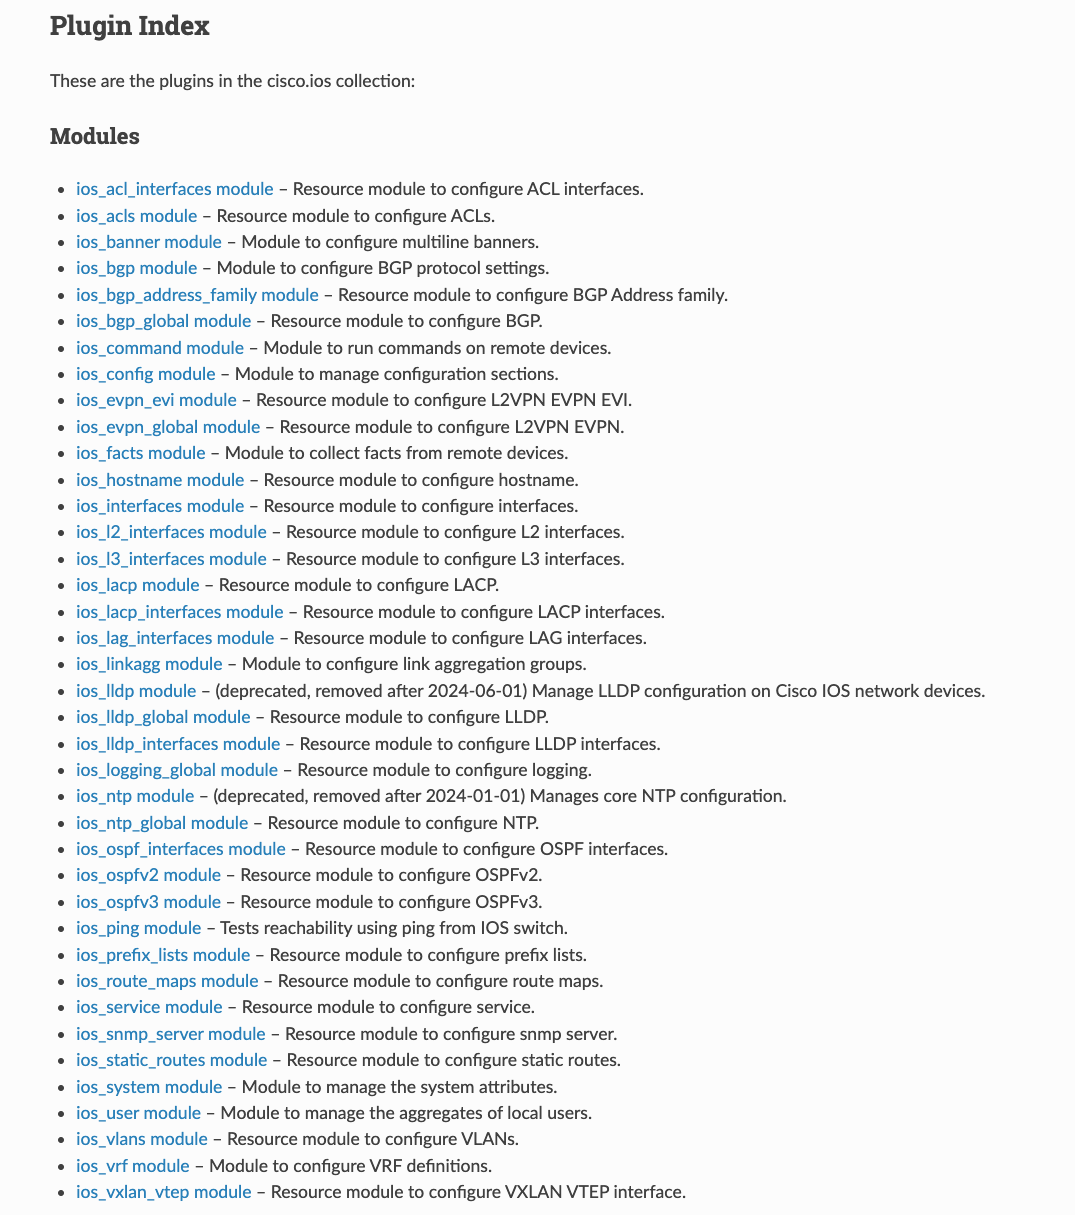
For example, if you want to configure ACLs, you would use the ios_acls module, when assigning an IP address to an interface, you'd likely use the ios_l3_interfaces module, which manages L3 interface configurations.
The process of using these modules is consistent with what we've covered previously. You would write a task within your playbook, call the appropriate module, and pass the necessary parameters that define your desired state. The documentation for each module will provide you with the information on required and optional parameters, as well as examples to help you construct your playbook.
Going through the Ansible documentation is essential to understand the capabilities and usage of each module. As shown, there is a wide array of modules available, each designed to manage a different aspect of your Cisco network device configurations.
Closing Up
I hope this introduction to Ansible for Network Automation has been clear and helpful. As with any tool, the more you use Ansible in your daily work, the more intuitive it becomes. We've only scratched the surface here; there's a lot more to explore, such as encrypting sensitive information, using loops, organizing variables in separate files for better structure, and leveraging Jinja2 templates for dynamic config generation.
In the upcoming blog posts, I'll cover these advanced topics. I'm interested in hearing what you, the readers, are keen to learn about. Do drop your suggestions in the comments section regarding what you'd like to see covered next. Your feedback will guide the content of future posts, ensuring they are as useful and relevant to your needs as possible.
Here is part two of the Ansible for Network Automation Series.