Welcome to part two of our journey into Ansible for Network Automation. In this part, we're focusing on managing multiple devices, using variables and loops in our playbooks. We'll also be looking at Ansible Vault for handling sensitive information. If you're just starting with Ansible, I suggest reading the first part of our series below to get up to speed.
What We Will Cover?
So far in our journey with Ansible, we've covered the essentials such as how to install Ansible, understand its file and directory structure, and target a single device for automation tasks.
In this part of the series, we're taking a step further. Here's what we'll be focusing on.
- Hiding Sensitive Information with Ansible Vault - We'll explore how Ansible Vault can be used to securely store and manage sensitive data like passwords or secrets.
- Using Loops and Managing Multiple Devices - We'll dive into how to use loops in Ansible. We will also look at managing multiple devices with a single playbook.
- Using Variables in Ansible - Variables add a lot of flexibility to your playbooks. We'll see how to use them to make your playbooks more adaptable and easier to maintain.
Ansible Vault
Ansible Vault is a feature of Ansible that allows you to keep sensitive data such as passwords or keys secure. When you store your sensitive data in plaintext, anyone with access to your files can read that information. Vault encrypts this data, so it remains safe even if someone gains unauthorized access to your source files.
Here are some useful commands and syntaxes for Ansible Vault.
ansible-vault create <file_name>
ansible-vault edit <file_name>
ansible-vault encrypt <file_name>
ansible-vault decrypt <file_name>
ansible-vault rekey <file_name>
ansible-vault view <file_name>
ansible-vault create <file_name>- This command is used when you want to create a new encrypted file from scratch. When you run it, Ansible Vault will prompt you to set a password, and then it will open up your default text editor for you to enter the sensitive data that you want to encrypt.ansible-vault edit <file_name>- Use this when you need to make changes to an already encrypted file.ansible-vault encrypt <file_name>- If you have an existing file with sensitive data in plaintext, this command will encrypt it for you.ansible-vault decrypt <file_name>- When you need to turn the encrypted file back into plaintext.ansible-vault rekey <file_name>- Security best practices sometimes require you to change your passwords regularly. This command allows you to change the password used to encrypt a file. Ansible will ask for the old password and then for a new one, effectively "rekeying" the encrypted file.ansible-vault view <file_name>- There might be times when you just want to view the contents of an encrypted file without editing it. This command lets you do that. After entering the correct password, Ansible Vault will display the file's contents in your terminal window.
We're going to make some adjustments to our directory structure for better organization and security. Up to now, we've had our switches.yml file directly under the group_vars directory. We're refining this by creating a new directory named switches within group_vars. Then, we'll move the switches.yml file into this new directory. Here is our new directory structure.
├── ansible.cfg
├── interface.yml
├── inventory
│   ├── group_vars
│   │   └── switches
│   │       ├── my_vault
│   │       └── switches.yml
│   ├── hostfile.ini
│   └── host_vars
├── playbook.yml
Next, we're introducing a new file called my_vault. This is where we'll securely store sensitive information. To create this vault, we'll use the command ansible-vault create my_vault. This command does two things: it creates a new file called my_vault, and it encrypts this file so that the contents are secure. Inside my_vault, we'll add the following content.
---
vault_ansible_password: cisco123
This is the sensitive data we want to protect. The vault_ prefix isn't required, but it's a naming convention that makes it clear this variable is secure.
Now, let's talk about how we use this vault file. In our switches.yml, which is now inside the switches directory, we reference the password stored in my_vault. Instead of writing the passwords in plaintext, we use the variables we've defined in the vault as shown below.
# switches.yml
---
ansible_connection: ansible.netcommon.network_cli
ansible_network_os: cisco.ios.ios
ansible_become: yes
ansible_become_method: enable
ansible_user: admin
ansible_password: "{{ vault_ansible_password }}"
ansible_become_password: "{{ vault_ansible_password }}"
By referencing {{ vault_ansible_password }}, we're telling Ansible to look up the vault_ansible_password variable from the vault file for the actual password. This way, the sensitive data remains encrypted, and our switches.yml file can be safely committed to version control or shared with team members without exposing any passwords.
From now on, whenever you run your Ansible playbook, you'll need to pass the --ask-vault-pass parameter. This is because your playbook references variables that are encrypted with Ansible Vault. When you use --ask-vault-pass, Ansible will prompt you to enter the vault password before the playbook can execute. This ensures that the playbook has the necessary permissions to decrypt the my_vault file and use the sensitive information it contains during the run.
Using Loops
In the first part of our series, we went through configuring a single interface by assigning a VLAN to it. That example was straightforward but only catered to one interface. Here's a quick reminder of that snippet which configures one interface.
---
- name: "Ansible 101 - Configuration Changes"
  hosts: switches
  gather_facts: no

  tasks:
    - name: VLAN Config
      cisco.ios.ios_vlans:
        config:
          - name: server_vlan
            vlan_id: 30
          - name: user_vlan
            vlan_id: 31

    - name: Port Configuration
      cisco.ios.ios_l2_interfaces:
        config:
          - name: Gi1/0
            mode: access
            access:
              vlan: 30
Now, let's say you need to configure multiple interfaces in a similar fashion. It's not efficient or scalable to copy and paste this task for each interface, as that would lead to a lot of repetition. This is the perfect scenario to introduce loops.
Loops allow you to repeat a task for a list of items. In Ansible, you use the loop keyword to iterate over each item and apply the same task. Here's how the syntax changes when you're configuring multiple interfaces.
---
- name: "Ansible 101 - Configuration Changes"
  hosts: switches
  gather_facts: no

  tasks:
    - name: VLAN Config
      cisco.ios.ios_vlans:
        config:
          - name: server_vlan
            vlan_id: 30
          - name: user_vlan
            vlan_id: 31

    - name: Port Configuration
      cisco.ios.ios_l2_interfaces:
        config:
          - name: "{{ item }}"
            mode: access
            access:
              vlan: 30
      loop:
        - Gi1/0
        - Gi1/1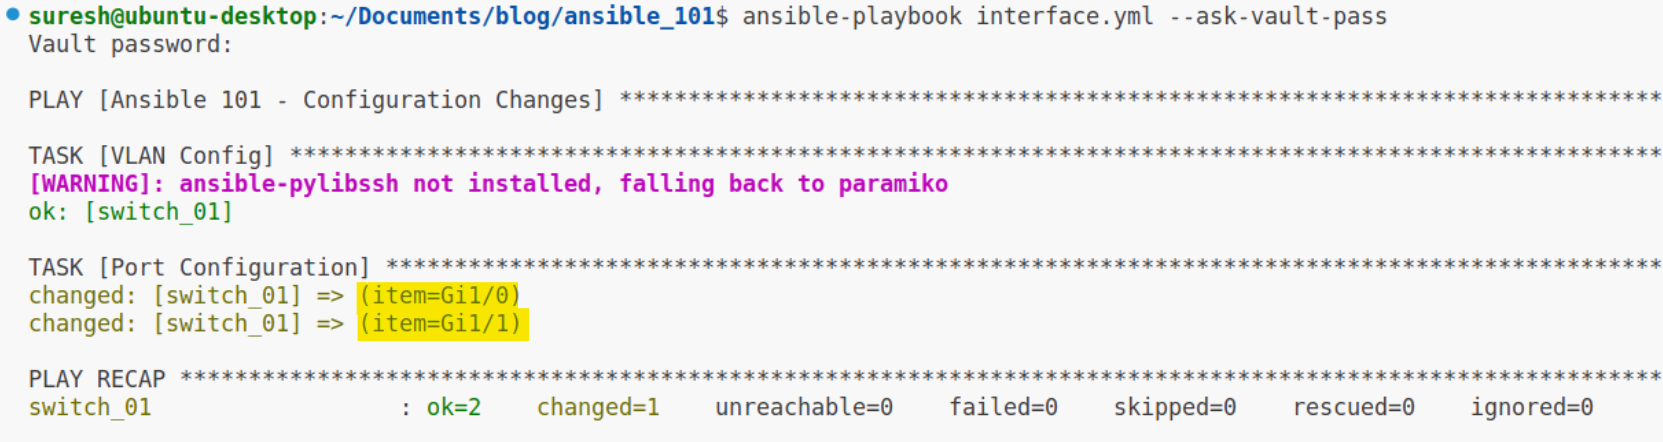
In this example, the loop keyword is followed by a list of interface names. The task will run once for each item in the list, substituting {{ item }} with the current item from the list. So, the task first runs for Gi1/0, setting it to access mode and assigning it to VLAN 30. Then the task runs again for Gi1/1 with the same configuration. This way, you can scale your configurations to as many interfaces as you need by simply adding them to the loop list. It's a clean and efficient solution to apply repetitive tasks across multiple items.
Managing Multiple Devices
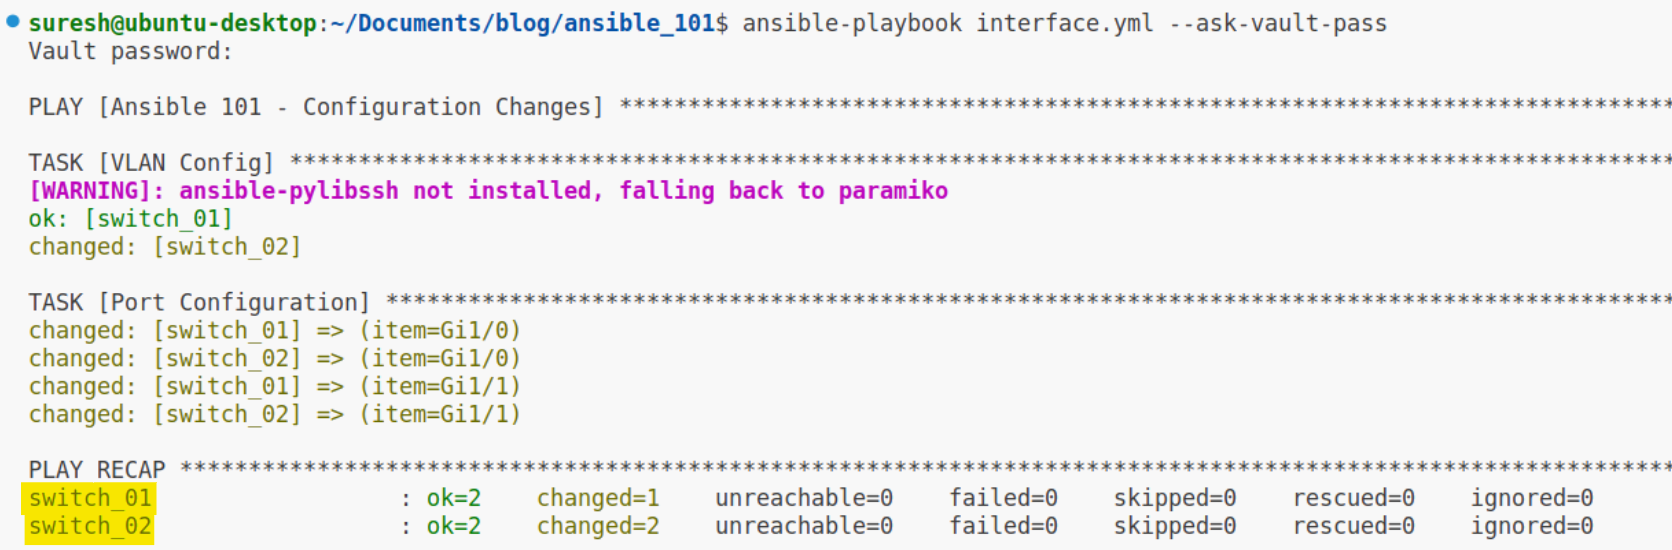
Managing multiple devices with Ansible is a straightforward process that involves defining all the devices you want to manage within your inventory file. In our case, the inventory file is named hostfile.ini, and it’s organized by groups for better management.
To add a new switch to our automation tasks, simply include it in the switches group within the hostfile.ini. Here’s how you would add another switch, switch_02, to the existing list.
[switches]
switch_01 ansible_host=10.10.1.50
switch_02 ansible_host=10.10.1.51
By listing switch_02 under the same group as switch_01, you're telling Ansible that switch_02 should receive the same automation tasks as switch_01.
Now, if you run the same playbook we used in the previous example, Ansible will perform the tasks on both switch_01 and switch_02. It does this by iterating through the hosts listed under the switches group in your inventory and applying the configurations you've defined. This means that with just one command, you can deploy changes across all the devices listed in the group, which is incredibly efficient and time-saving.
Using Variables
Using variables effectively is key to making Ansible playbooks reusable and flexible. Variables can be defined in different places within Ansible, two of which are group_vars and host_vars. We've already used group_vars to define variables that apply to an entire group of hosts, such as usernames and passwords.
To tailor configurations for individual hosts, we use host_vars. This is especially useful when you want specific settings for each host, like unique hostnames in our case. Since we're managing multiple switches with a single playbook, we can't hardcode host-specific details like hostnames in the playbook itself. Each switch needs a distinct hostname, and host_vars allow us to achieve this granularity.
- Inside the
host_varsdirectory, create two files namedswitch_01.ymlandswitch_02.yml. The names of these files must match the aliases we've used in thehostfile.ini. - Within each file, we'll define properties that belong exclusively to that host. In
switch_01.yml, we'll set the hostname tobranch_sw_01, and inswitch_02.yml, tobranch_sw_02like this.
---
hostname: branch_sw_01
---
hostname: branch_sw_02In our playbook, we refer to the hostname with the variable {{ hostname }}. Ansible will automatically substitute this variable with the value defined in the corresponding host_vars file for each host. The relevant part of the playbook looks like this.
- name: Hostnames
  cisco.ios.ios_hostname:
    config:
      hostname: "{{ hostname }}"
When the playbook runs, it will apply the VLAN and port configurations to all switches in the switches group, as before. Additionally, it will now also configure the hostname of each switch based on the variables defined in their respective host_vars file.
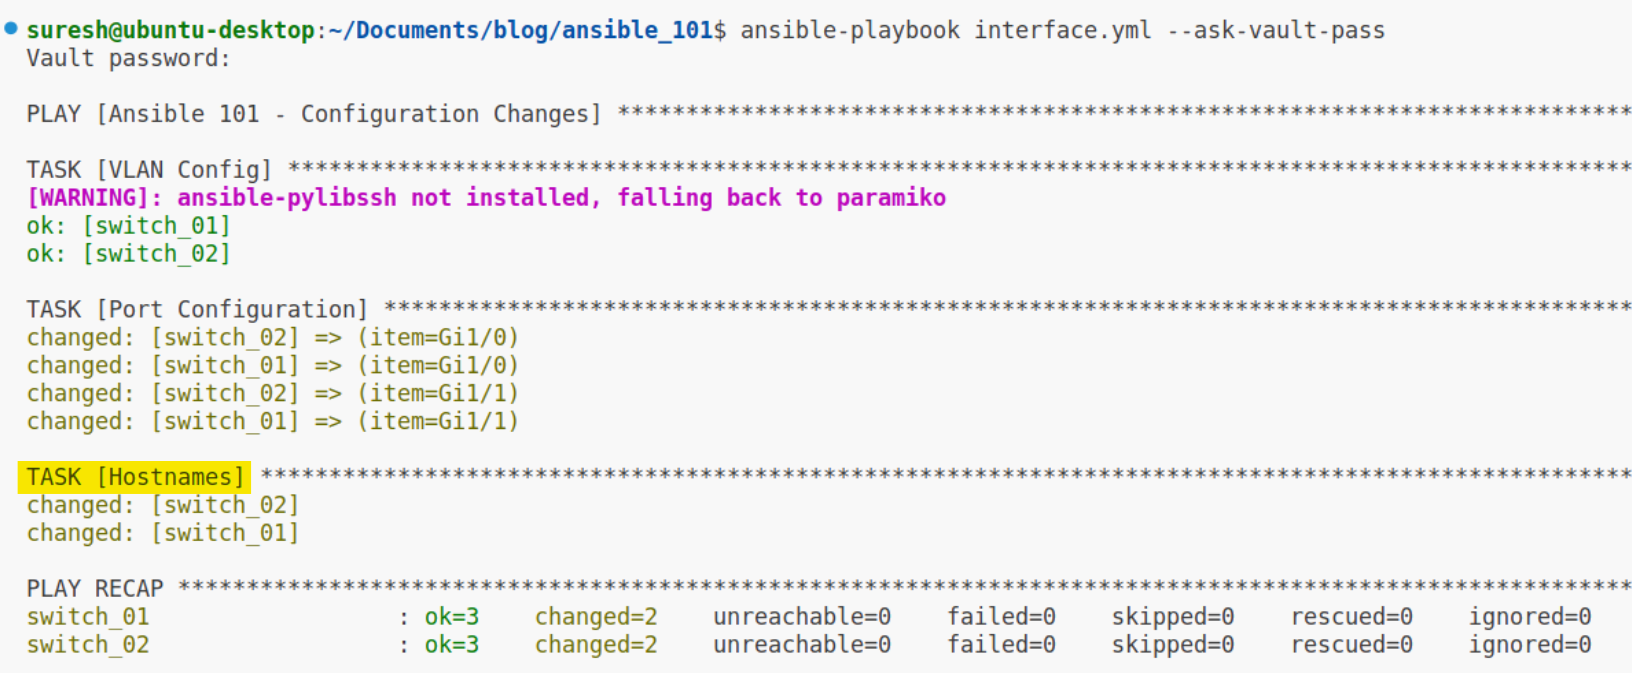
This way, the playbook remains generic and can be applied to many different hosts, while the host_vars directory holds the host-specific details that ensure each switch is configured with its correct hostname. This method provides a scalable and manageable approach to handling multiple, distinct configurations across your network devices.
A Few Things to Remember
Certain configurations such as DNS servers, NTP servers, and TACACS+ servers are typically common across all devices in a network. For these shared settings, the group_vars directory is the perfect place to define them. By adding these common configurations to group_vars, you ensure that every device in the group automatically inherits these settings, making your playbook more efficient and easier to manage.