I run a lot of applications and services in my homelab, and they usually look something like http://10.10.10.10:8000, http://10.10.10.11:8006, and so on. It works, but it comes with a few annoyances. Browsers constantly complain you about insecure connections, and remembering which IP and port maps to which service gets old fast.
The ideal setup is something like https://netbox-lab.yourdomain.com - a proper domain name with a valid SSL certificate and no port numbers to remember. In this post, I'll show you how to get there using Caddy, Cloudflare, and Let's Encrypt with very minimal effort.
Overview
To make this work, we need the following.
- A Cloudflare account with a domain (You don't necessarily need Cloudflare. Other DNS providers should work the same way, but this post uses Cloudflare as the example.)
- An LXC or VM to run Caddy
- A Cloudflare API token with DNS edit permissions
- Let's Encrypt Certificates are automatically managed by Caddy
Cloudflare Setup
I already have a domain that I use in my homelab, so I name my services like app.yourdomain.com. I purchased this domain through Cloudflare and manage it there.
To generate an API token, go to your Cloudflare dashboard, head to My Profile > API Tokens, and click Create Token. You can use the Edit zone DNS template and select the domain you want to use. Copy the token and keep it safe, we will need it later.
Caddy Download and Setup
I'm using an LXC container on Proxmox here, but any Linux VM will work fine.
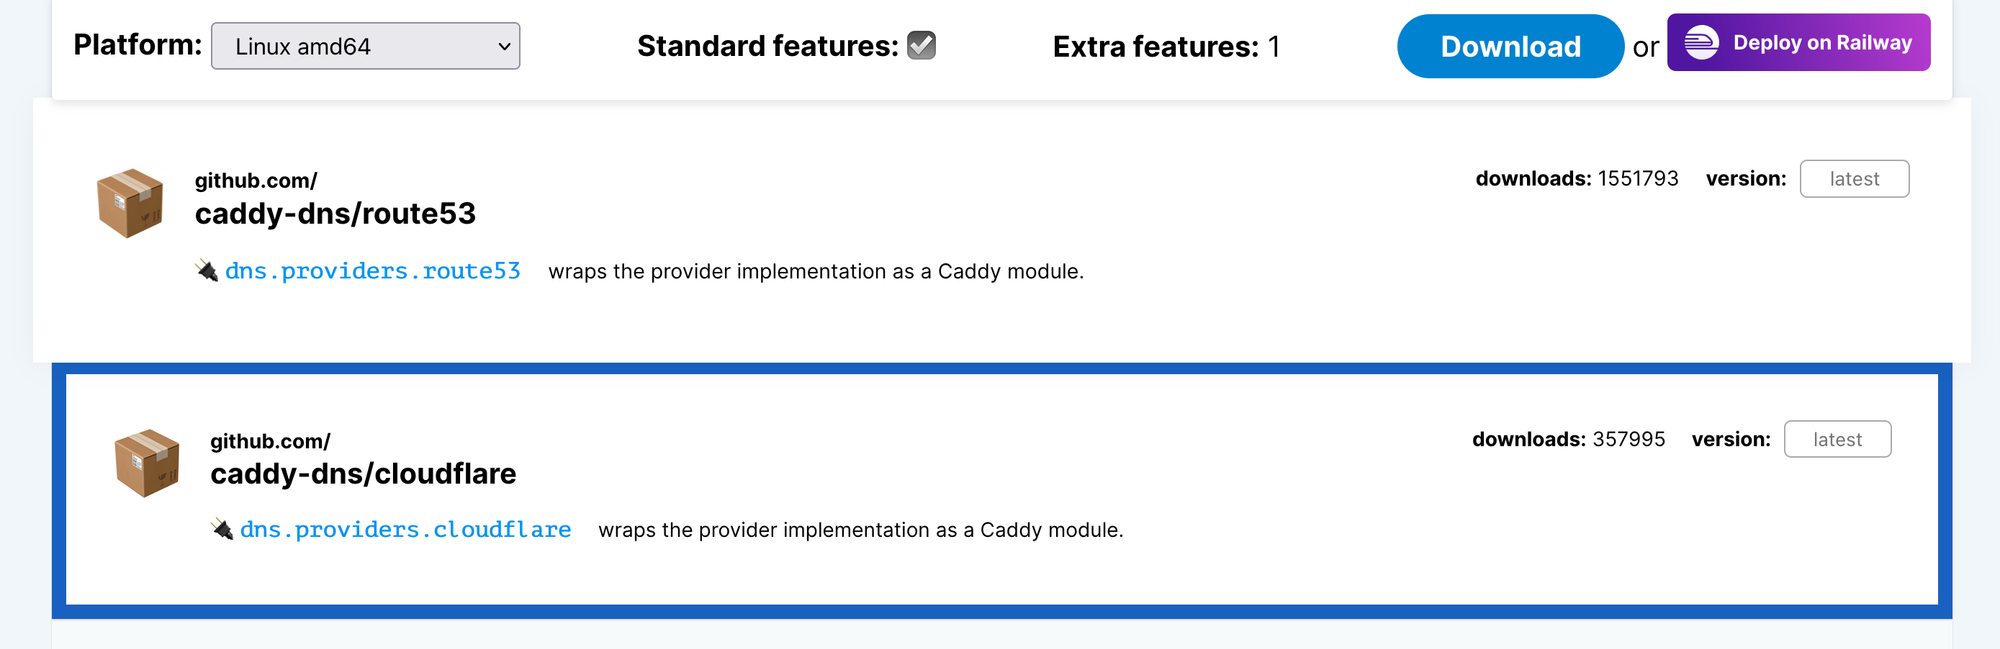
Go to caddyserver.com/download, select Linux amd64, add the caddy-dns/cloudflare plugin, and download the binary. The reason we need the Cloudflare plugin is that Caddy uses it to complete the DNS-01 challenge with Let's Encrypt, which means you don't need to open any ports to the Internet for SSL to work.
Once downloaded, move the binary to /usr/local/bin/caddy and make it executable. You can verify the install by running caddy version.
mv caddy_linux_amd64_custom /usr/local/bin/caddy
chmod +x /usr/local/bin/caddy

caddy version
v2.11.3 h1:/vFbdjcs2DtzcWTIxHybf5R5TspYFFThlZffChyBFHg=
Caddyfile
The Caddyfile is where you define your services and how Caddy should handle them. Create the directory and the file as follows.
mkdir -p /etc/caddy
nano /etc/caddy/Caddyfile
At the top of the file, you set a global block with your email address and tell Caddy to use Cloudflare for the DNS challenge. The acme_dns cloudflare line is what tells Caddy to use the Cloudflare plugin we downloaded earlier, and it pulls the API token from an environment variable we will set in the systemd service.
{
  email suresh@yourdomain.com
  acme_dns cloudflare {env.CF_API_TOKEN}
}

memos.yourdomain.com {
  reverse_proxy 10.10.0.252:5230
}
Below the global block, you add a block for each service you want to proxy. Each block is just the domain name followed by the backend IP and port. That's it. Caddy manages everything else, including requesting and renewing the SSL certificate automatically.
systemd service
To keep Caddy running in the background and have it start automatically on boot, we set it up as a systemd service. Create the service file and paste in the config.
nano /etc/systemd/system/caddy.service[Unit]
Description=Caddy
Documentation=https://caddyserver.com/docs/
After=network.target network-online.target
Requires=network-online.target
[Service]
Type=notify
User=root
Group=root
ExecStart=/usr/local/bin/caddy run --environ --config /etc/caddy/Caddyfile
ExecReload=/usr/local/bin/caddy reload --config /etc/caddy/Caddyfile --force
TimeoutStopSec=5s
LimitNOFILE=1048576
LimitNPROC=512
PrivateTmp=true
ProtectSystem=full
AmbientCapabilities=CAP_NET_BIND_SERVICE
Environment=CF_API_TOKEN=YOUR_API_KEY
[Install]
WantedBy=multi-user.targetThe important part here is the Environment=CF_API_TOKEN=your_token_here line. This is where you paste the Cloudflare API token you generated earlier. Caddy reads this when it starts up and uses it to authenticate with Cloudflare when requesting certificates.
Once the file is saved, reload systemd, enable the service, and start it. You can check that everything is running with systemctl status caddy.
systemctl daemon-reload
systemctl enable caddy
systemctl start caddy
systemctl status caddy
* caddy.service - Caddy
Loaded: loaded (/etc/systemd/system/caddy.service; enabled; preset: enabled)
Active: active (running) since Sun 2026-05-17 09:23:49 UTC; 4s ago
Docs: https://caddyserver.com/docs/
Main PID: 572 (caddy)
Tasks: 38 (limit: 38071)
Memory: 18.7M (peak: 18.9M)
CPU: 134ms
CGroup: /system.slice/caddy.service
`-572 /usr/local/bin/caddy run --environ --config /etc/caddy/CaddyfileAdding Services
Once Caddy is running, adding a new service is as easy as adding a couple of lines. Open the Caddyfile and add a new block for each service you want to expose. The format is simple, the domain name on the first line, followed by the backend IP and port inside the block.
nano /etc/caddy/Caddyfile {
email suresh@ourdomain.com
acme_dns cloudflare {env.CF_API_TOKEN}
}
memos.yourdomain.com {
reverse_proxy 10.10.0.252:5230
}
netbox-lab.yourdomain.com {
reverse_proxy 10.10.0.182:8080
}
homeassistant-01.yourdomain.com {
reverse_proxy 10.10.0.176:8123
}Caddy will automatically request a certificate from Let's Encrypt for each domain the first time it sees a request for it. After saving the file, reload Caddy with systemctl reload caddy. You don't need to restart the service, a reload is enough and it won't interrupt anything that's already running.
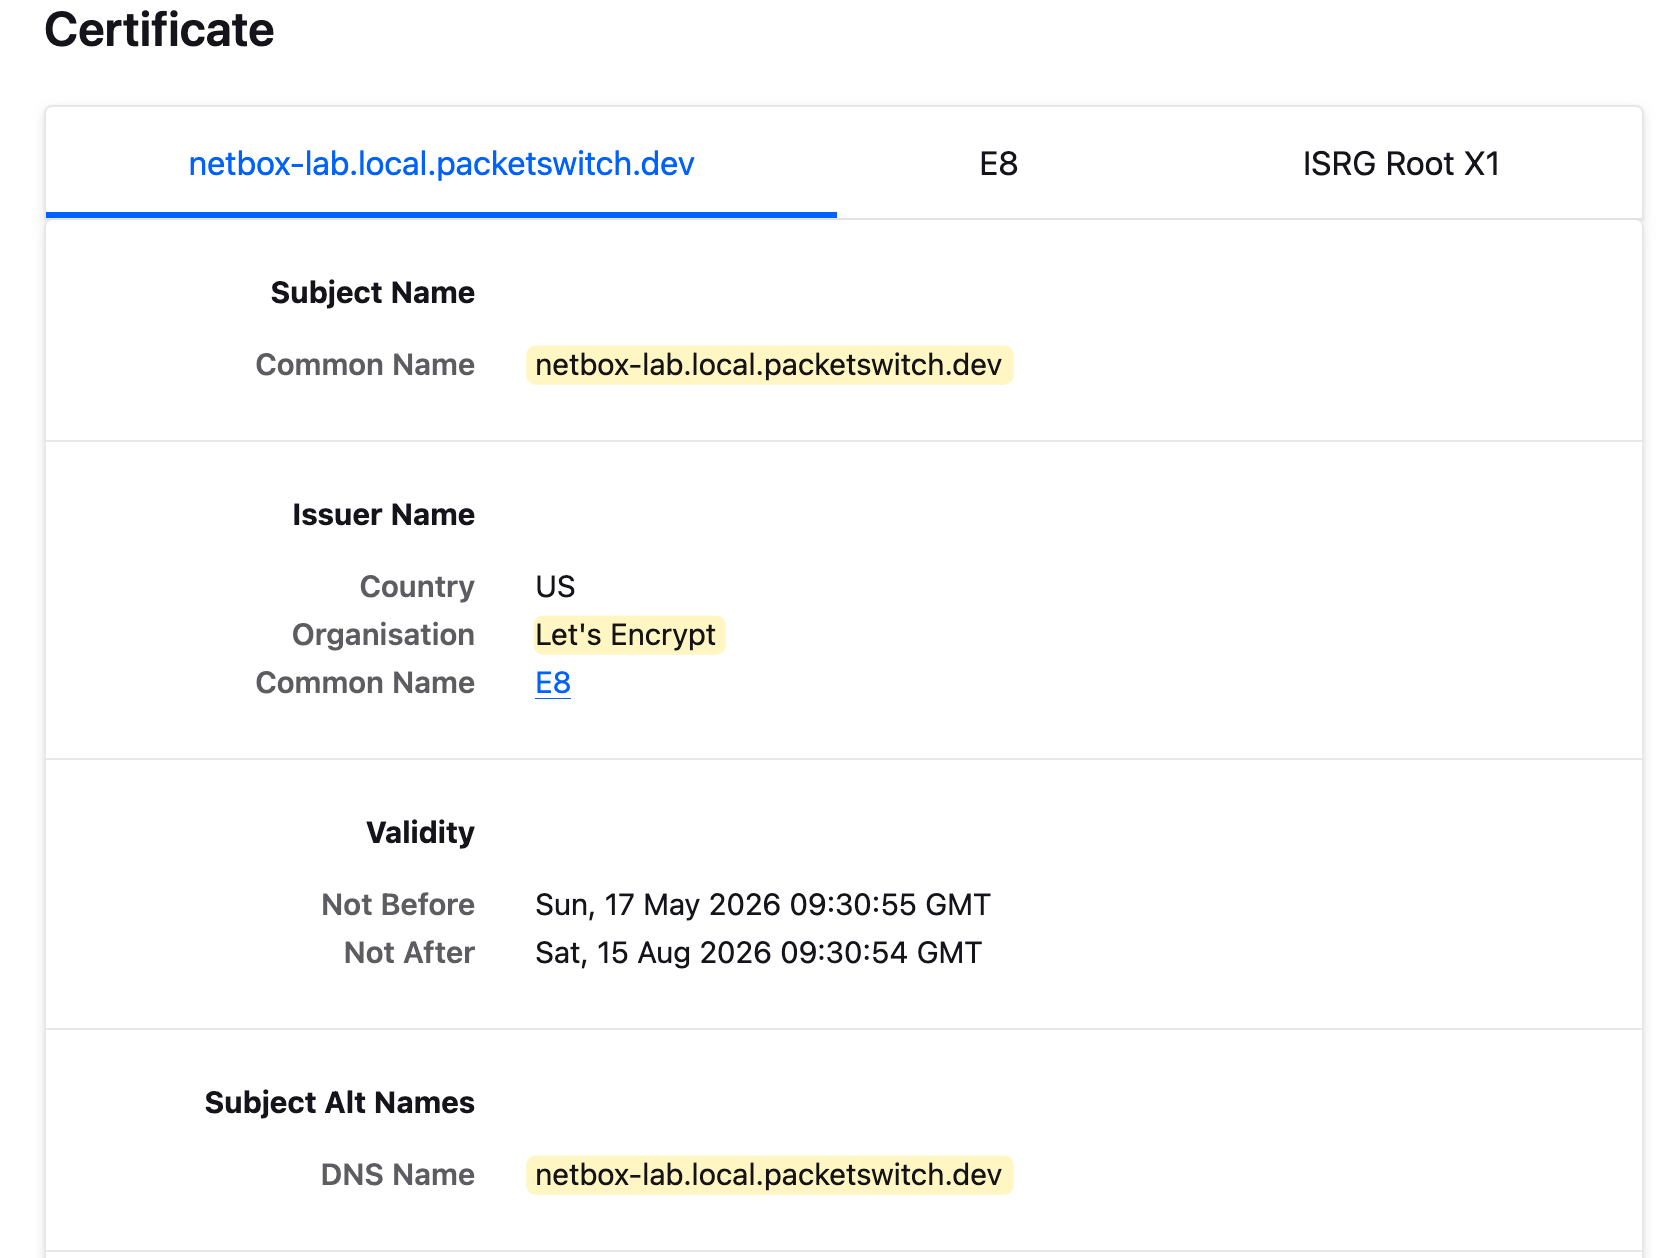
Let's Encrypt is a free, open, and automated certificate authority. It issues SSL certificates that are trusted by all major browsers and operating systems, which means you don't have to pay for a certificate or manually install anything on your devices. The certificates are valid for 90 days, but Caddy manages the renewal automatically, so you never have to think about it.
Some services in your homelab, like Unifi, run their own self-signed certificate on the backend. When Caddy tries to proxy traffic to them over HTTPS, it will fail because it can't verify that certificate. To get around this, you can add tls_insecure_skip_verify inside a transport block, which tells Caddy to skip the backend certificate verification.
unifi.yourdomain.com {
  reverse_proxy 10.10.0.55:8443 {
    transport http {
        tls_insecure_skip_verify
    }
  }
}
Internal DNS
Also worth mentioning, since this is all internal, you don't need to touch Cloudflare DNS for the actual resolution. Instead, create the A records on your internal DNS server pointing each subdomain to the IP address of your Caddy server. Cloudflare is only used here for the DNS-01 challenge to issue the certificate, not for resolving your internal domains.
You can also create a single wildcard A record like *.local.yourdomain.com pointing to the IP of your Caddy server on your internal DNS. This way, you don't have to add a new DNS record every time you add a service. Any subdomain you define in the Caddyfile will automatically resolve to Caddy without any extra DNS work.
I use AdGuard Home as my internal DNS server. You can create a DNS rewrite under Filters > DNS Rewrites and add a wildcard entry like *.local.yourdomain.com pointing to the IP of your Caddy server.
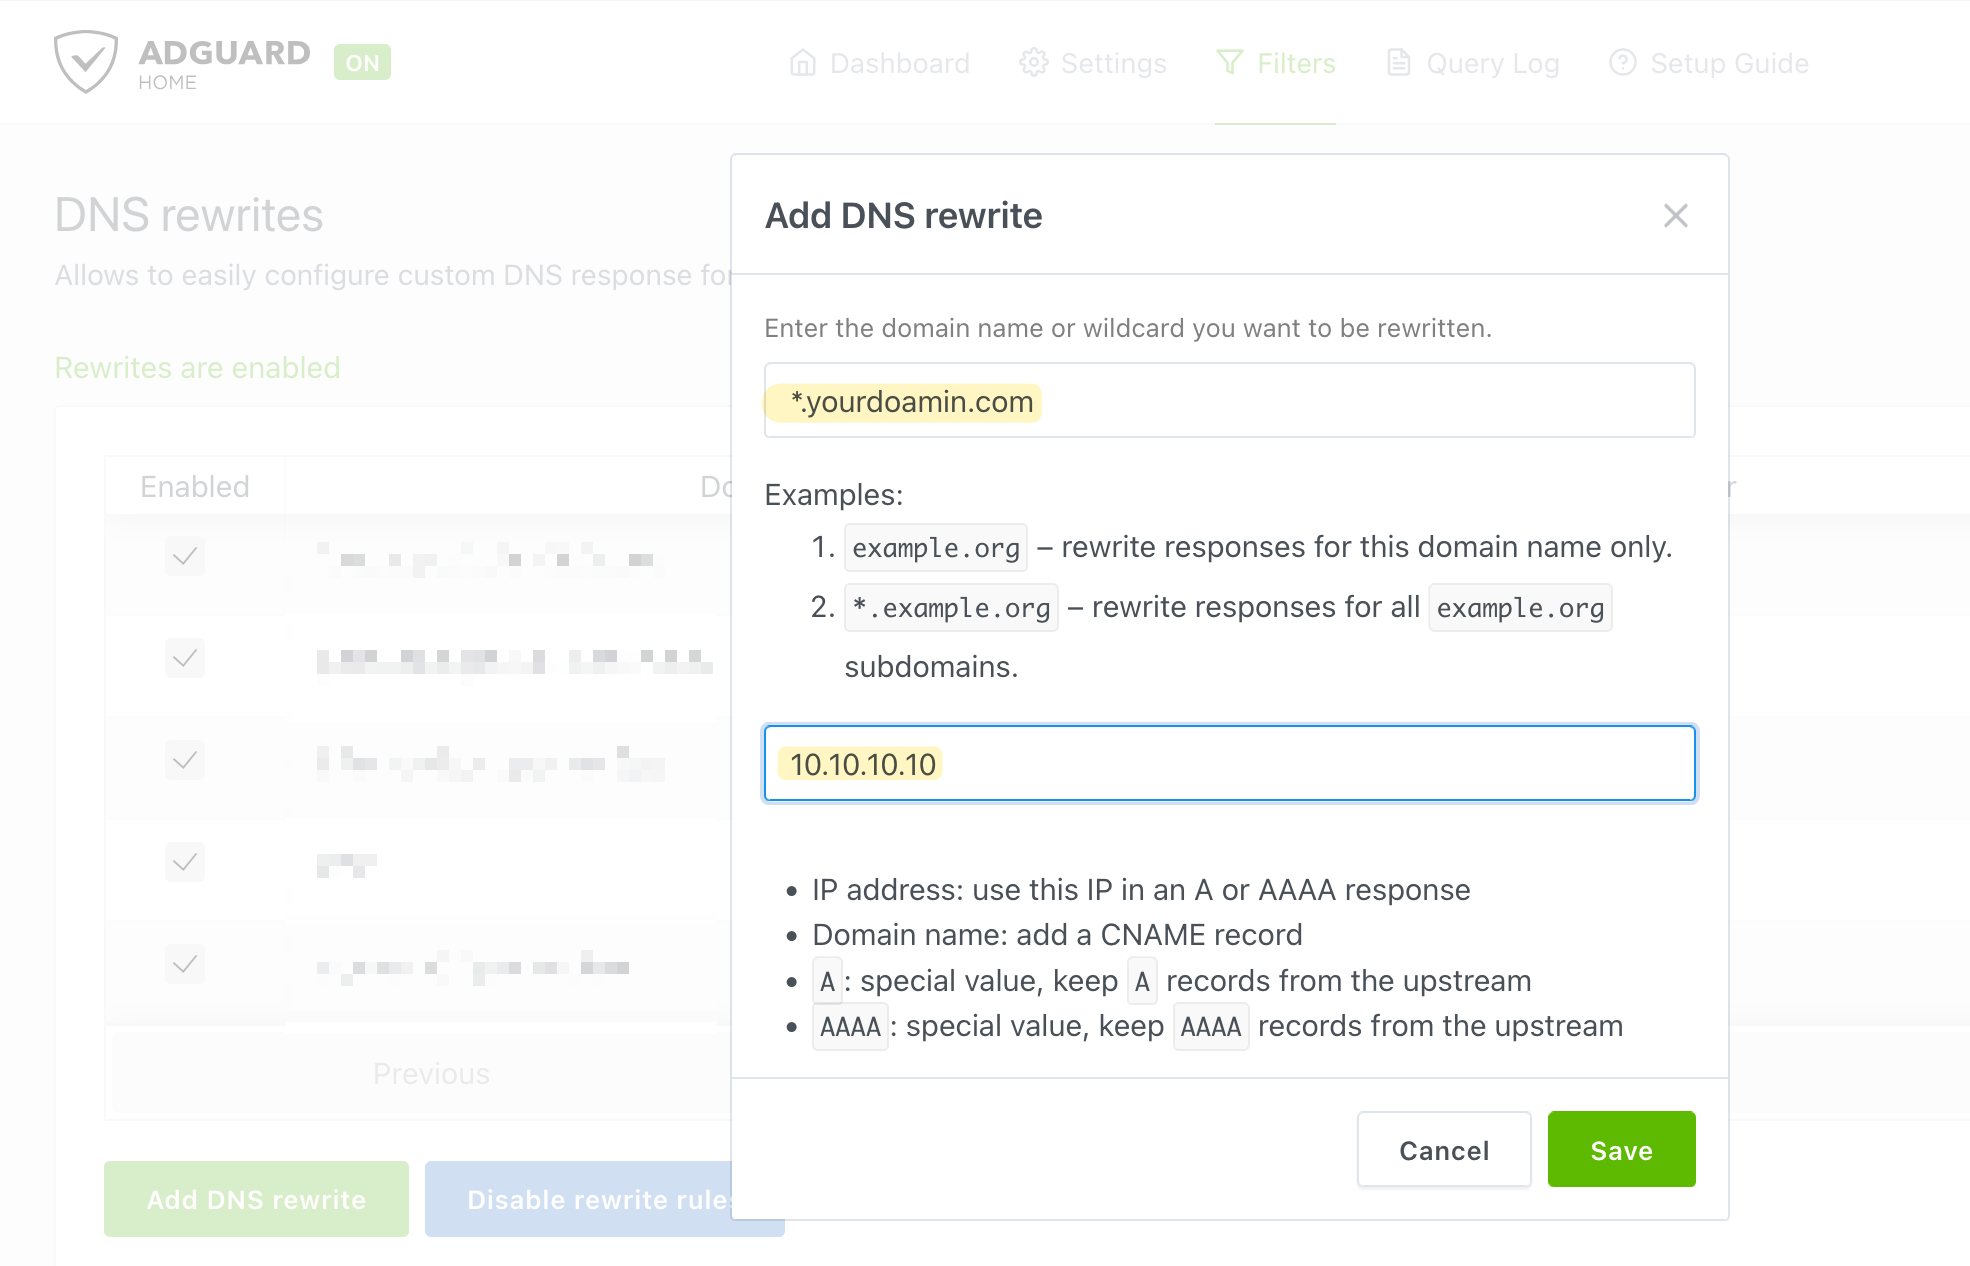
As you can see in the screenshot above, it's just two fields, the domain and the IP. That single entry covers every subdomain, so any service you add to the Caddyfile will resolve correctly without touching DNS again.
How It All Works Together
When you visit https://netbox-lab.yourdomain.com in your browser, here is what happens behind the scenes.
Caddy receives the request and checks if it already has a valid SSL certificate for that domain. If it doesn't, it reaches out to Let's Encrypt to request one. Let's Encrypt responds with a DNS-01 challenge, which essentially asks Caddy to prove it controls the domain by creating a specific DNS record. Caddy uses the Cloudflare API token to create that record automatically on your behalf. Let's Encrypt checks the record, verifies ownership, and issues the certificate. All of this happens in seconds the first time you visit the domain.
Once the certificate is in place, Caddy forwards your request to the backend service defined in the Caddyfile, in this case, whatever IP and port you pointed it to. From that point on, every request to that domain goes through Caddy, which handles the SSL termination and proxies the traffic to the right place.
Caddy also takes care of renewing certificates before they expire, so you never have to think about it again. Add a new block to the Caddyfile, reload Caddy, and the same process repeats for the new domain.
Managing Multiple Caddy Instances with Ansible
In my lab, I have two Caddy instances set up exactly the same way for redundancy. When I say redundancy, I mean that if my primary Caddy instance goes down for whatever reason, I can just update the DNS rewrite in AdGuard to point to the secondary Caddy instance instead. Since both instances run the exact same Caddyfile, everything works without any additional changes. I also run a secondary AdGuard instance, so I could point that one directly to the secondary Caddy server. That way, even if the primary AdGuard or the primary Caddy goes down, the secondary pair takes over and nothing breaks.
The only thing that differs between the Caddy instances is the Caddyfile. I could update them manually every time I make a change, but that's not ideal and easy to forget.
Instead, I use a simple Ansible playbook to keep both instances in sync. The playbook copies the Caddyfile to both servers and reloads Caddy automatically.
The inventory file defines both Caddy instances, and the Caddyfile lives under vars/Caddyfile in the playbook directory.
#hostfile.yml
all:
  children:
    caddy:
      hosts:
        caddy-01:
          ansible_host: 10.10.0.10
        caddy-02:
          ansible_host: 10.10.0.11
- name: Caddyfile update
hosts: caddy
become: yes
tasks:
- name: Copy Caddyfile
copy:
src: vars/Caddyfile
dest: /etc/caddy/Caddyfile
owner: root
group: root
mode: '0644'
- name: Reload Caddy
systemd:
name: caddy
state: reloadedWhenever I need to add or change a service, I update that single file and run the playbook. Both instances get updated at the same time without any manual SSH or copy-pasting.
The vars/Caddyfile is just a regular Caddyfile with all your service blocks defined.
References
https://akashrajpurohit.com/blog/setup-caddy-with-automatic-ssl-certificates-with-cloudflare/