
Overview
In this blog post, we will go through how to create a simple Ansible Playbook to configure a couple of Cisco routers. This post is aimed at absolute beginners who are looking into using Ansible for Network Automation.
Ansible can help create and manage configuration changes centrally by pushing them out to all/or some devices and requires no extra software to be installed on the devices. One of Ansible's greatest strengths is idempotence where the same configuration is maintained even if we run the playbook multiple times.
Diagram
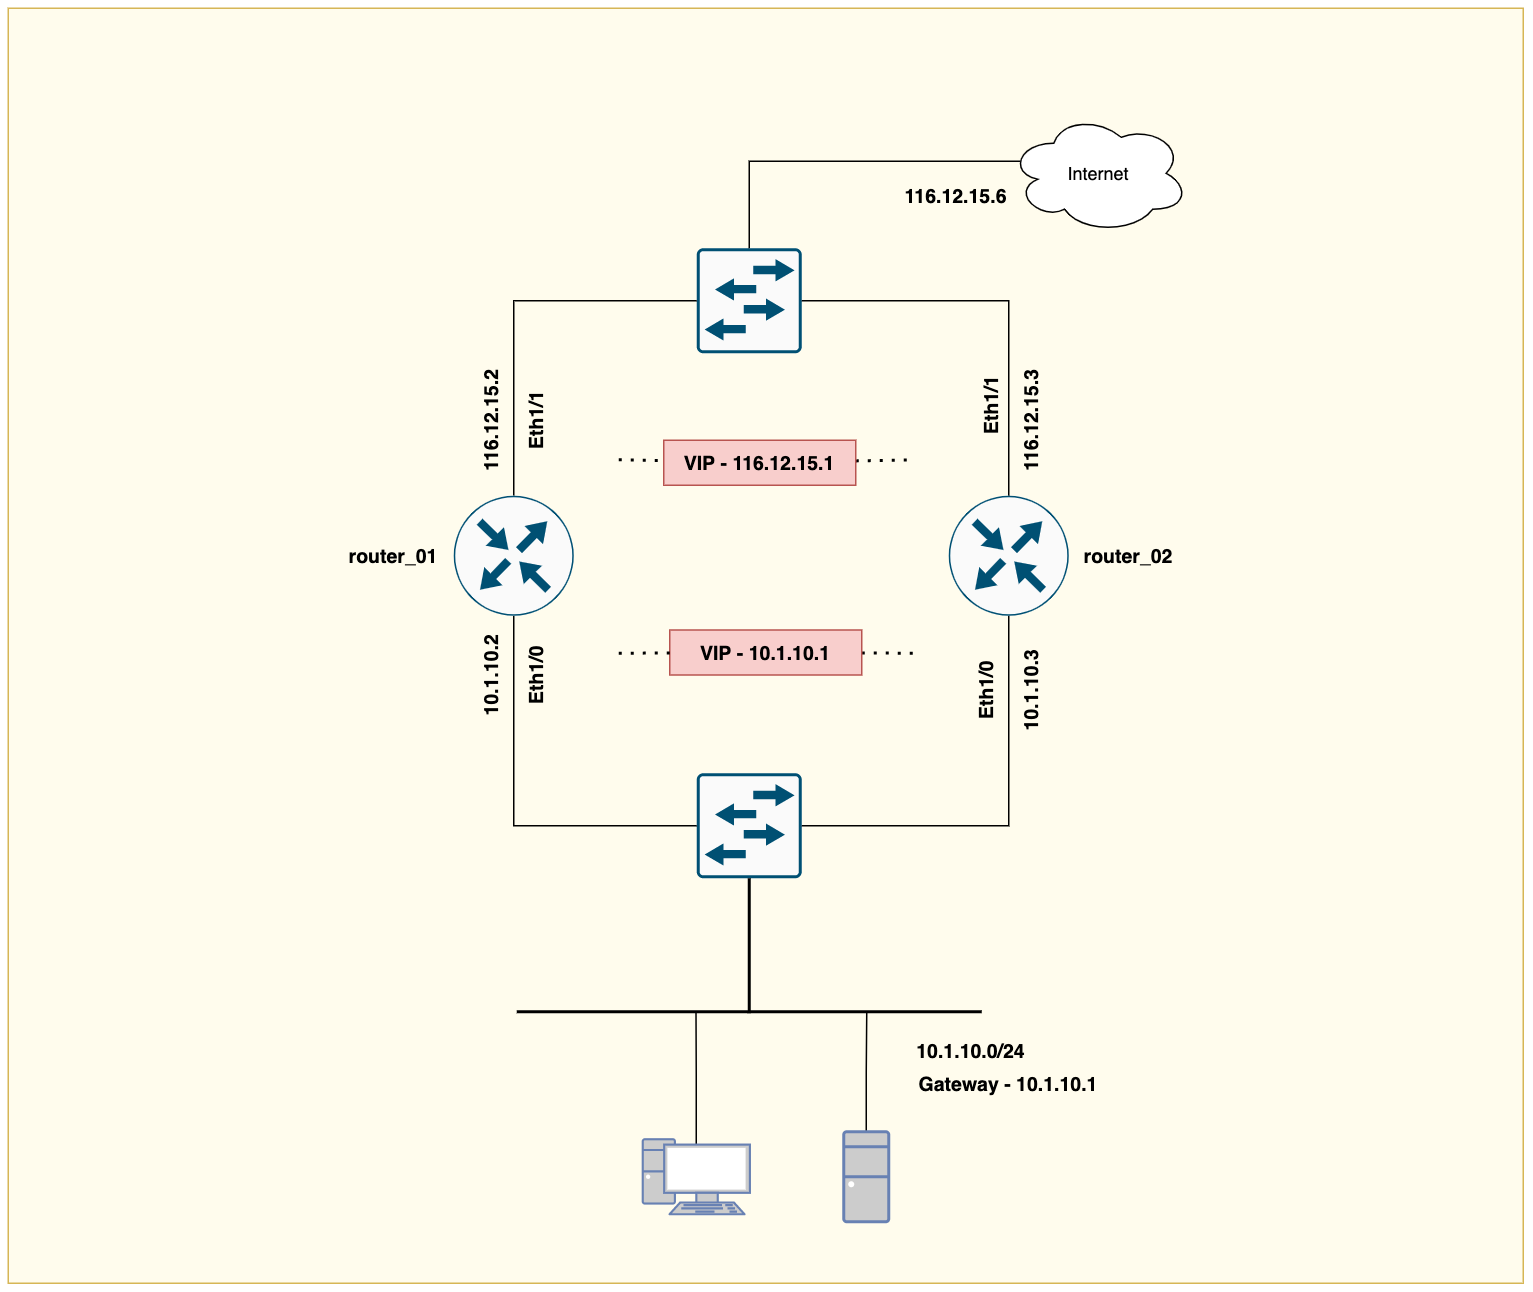
The example is based on the following diagram. Our goal here is to configure both router_01 and router_02 using Ansible. The configuration includes enabling the port, adding a description and IP, static default route and finally configuring HSRP.
Prerequisite
Before we start using Ansible, we need to ensure that Ansible can successfully establish an SSH connection to the devices. Configuring username, password and management IP are some of the prerequisites before running Ansible successfully.
The following are the minimum required configurations on the routers.
! Domain name
ip domain name packet.lan

crypto key generate rsa modulus 2048

! Management IP
interface Ethernet0/0
 ip address 10.10.50.11 255.255.0.0

! Credentials
username cisco secret 5 $1$7N0G$fy9z7Y4r6wcK85fIu9l6A1
enable secret 5 $1$IaTK$uOsFMhKhHz/CVwf3XAt4T/

! AAA
line vty 0 4
 login local
 transport input ssh
File Structure
I've created the following directories and files in my project folder called ansible. We will break them down one by one shortly.
sureshv@mac:~/Documents/ansible|⇒  tree
.
├── ansible.cfg
├── inventory
│   ├── group_vars
│   │   └── routers.yml
│   ├── host_file.ini
│   └── host_vars
│       ├── router_01.yml
│       └── router_02.yml
└── playbook.yml

3 directories, 6 files
ansible.cfg
Certain settings in Ansible are adjustable via a configuration file ansible.cfg I always prefer to create a new ansible.cfg file on the directory that I'm working on rather than editing the default file which is located at /etc/ansible/. The configuration file that is located in the current working directory always takes precedence over the default file.
I've made the following changes to the config file to suit my lab environment.
host_key_checking- I set the host key check to false, otherwise, Ansible will complain that the host key is not trusted.inventory- Referencing the location of the inventory file
[defaults]
host_key_checking = False
inventory = /Users/sureshv/Documents/ansible/inventory/host_file.ini
Ansible Inventory File host_file.ini
An inventory file is a configuration file that defines the hosts and the mapping of hosts into groups. The hosts are the devices that we want Ansible to manage. The default inventory file is located at /etc/ansible/hosts.
You can specify a different inventory file at the command line using the -i <path> option or reference it in the ansible.cfg file as we did in this example.
In our example, I've added both router_01 and router_02 to a group called routers and added their IPs to the inventory file called host_file.ini
#host_file.ini
[routers]
router_01 ansible_host=10.10.50.11
router_02 ansible_host=10.10.50.12
Variables
Now that we have defined our inventory, where do we specify the variables such as interface names, IP addresses, usernames, passwords etc? Although you can store variables directly in the main inventory file, storing them on a separate host and group variables files may help you organize your variables more easily.
Ansible loads host and group variable files by searching paths relative to the inventory file or the playbook file.
For example, router_01 belongs to the group routers so, if our inventory file is located at /Documents/ansible/inventory it will use variables in YAML files at the following locations.
/Documents/ansible/inventory/host_vars/router_01.yml #host_vars
/Documents/ansible/inventory/grouop_vars/routers.yml #group_vars
So, we specify variables specific to a particular device under host_vars such as IP address, hostname etc. We can also specify variables that are common to a group of devices under group_vars such as DNS servers, NTP servers, banners etc.
host_vars router_01.yml
Here we specify variables that are unique to router_01 only
---
interfaces:
  - name: Ethernet1/0
    description: LAN
    enabled: true
    ip: 10.1.10.2
    mask: 255.255.255.0
    hsrp_pri: 110
    vip: 10.1.10.1
  - name: Ethernet1/1
    description: WAN
    enabled: true
    ip: 116.12.15.2
    mask: 255.255.255.248
    hsrp_pri: 110
    vip: 116.12.15.1
host_vars router_02.yml
Here we specify variables that are unique to router_02 only
---
interfaces:
  - name: Ethernet1/0
    description: LAN
    enabled: true
    ip: 10.1.10.3
    mask: 255.255.255.0
    hsrp_pri: 101
    vip: 10.1.10.1
  - name: Ethernet1/1
    description: WAN
    enabled: true
    ip: 116.12.15.3
    mask: 255.255.255.248
    hsrp_pri: 101
    vip: 116.12.15.1
group_vars routers.yml
Here we specify variables that are common for both routers. Although usernames and passwords are self-explanatory, let's break them down one by one.
---
ansible_connection: ansible.netcommon.network_cli
ansible_network_os: cisco.ios.ios
ansible_become: yes
ansible_become_method: enable
ansible_user: cisco
ansible_password: Cisco123
ansible_become_password: Cisco123

default_route: 116.12.15.6- ansible_connection - Ansible uses the ansible-connection setting to determine how to connect to a remote device. When working with network devices, we need to set this to an appropriate network connection option, so Ansible treats the remote node as a network device with a limited execution environment. Without this setting, Ansible would attempt to use ssh to connect to the remote and execute the Python script on the network device, which would fail because Python generally isn’t available on network devices.
- ansible_network_os - Informs Ansible which Network platform these hosts correspond to. This is required when using the
ansible.netcommon.*connection options. - ansible_become - Cisco uses the concept of enable mode which is the highest privilege level available. You need to be in the enable mode to configure almost all the configuration items.
- ansible_become_method - This informs Ansible to go into privilege mode (enable) before executing the task
playbook.yml
The final piece to the puzzle is the actual playbook. You can find all the available cisco ansible modules here - https://docs.ansible.com/ansible/latest/collections/cisco/ios/index.html
Let's look at our playbook and decipher all the different values.
---
- name: "EVE PRO Lab"
  hosts: routers
  gather_facts: no

  tasks:
    - name: Interfaces status
      cisco.ios.ios_interfaces:
        config:
        - name: "{{ item.name }}"
          description: "{{ item.description }}"
          enabled: "{{ item.enabled }}"
      with_items: "{{ interfaces }}"
      tags:
      - interface

    - name: L3 Interfaces
      cisco.ios.ios_l3_interfaces:
        config:
        - name: "{{ item.name }}"
          ipv4:
          - address: "{{ item.ip  }} {{ item.mask  }}"
      with_items: "{{ interfaces }}"
      tags:
      - interface

    - name: HSRP
      cisco.ios.ios_config:
        lines:
        - standby 1 ip {{ item.vip }}
        - standby 1 priority {{ item.hsrp_pri }}
        - standby 1 preempt delay minimum 120
        - standby 1 timers 1 3
        parents: interface {{ item.name }}
      when: item.vip is defined
      with_items:
        - "{{ interfaces }}"
      tags:
      - hsrp

    - name: Static Route
      cisco.ios.ios_static_routes:
          config:
          - address_families:
            - afi: ipv4
              routes:
              - dest: 0.0.0.0/0
                next_hops:
                - forward_router_address: "{{ default_route }}"
                  name: default
      tags:
      - route
Running the above playbook results in the following configurations being generated and pushed to the devices.
#router_01

interface Ethernet1/0
 description LAN
 ip address 10.1.10.2 255.255.255.0
 standby 1 ip 10.1.10.1
 standby 1 timers 1 3
 standby 1 priority 110
 standby 1 preempt delay minimum 120
!
interface Ethernet1/1
 description WAN
 ip address 116.12.15.2 255.255.255.248
 standby 1 ip 116.12.15.1
 standby 1 timers 1 3
 standby 1 priority 110
 standby 1 preempt delay minimum 120

 ip route 0.0.0.0 0.0.0.0 116.12.15.6 name default
#router_02
interface Ethernet1/0
description LAN
ip address 10.1.10.3 255.255.255.0
standby 1 ip 10.1.10.1
standby 1 timers 1 3
standby 1 priority 101
standby 1 preempt delay minimum 120
!
interface Ethernet1/1
description WAN
ip address 116.12.15.3 255.255.255.248
standby 1 ip 116.12.15.1
standby 1 timers 1 3
standby 1 priority 101
standby 1 preempt delay minimum 120
ip route 0.0.0.0 0.0.0.0 116.12.15.6 name default"{{ ........ }}"
Any values that you see inside the "{{ }}" curly braces are variables. The following image is my poor attempt to visualize how the variables are obtained from the var files (host_vars or group_vars).
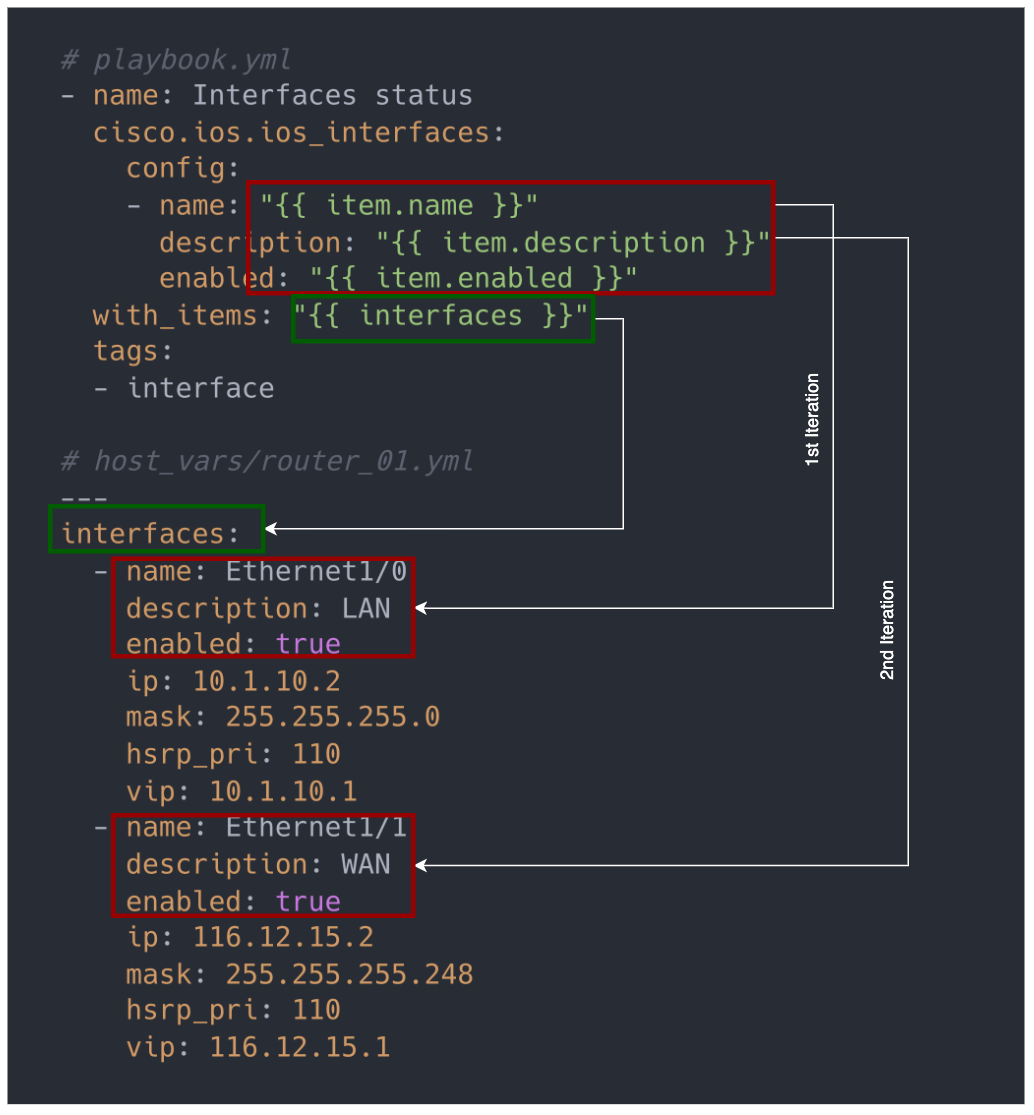
When you run the playbook, Ansible will obtain the value of the variables from the host and group var files. We have two interfaces under the parent variable interfaces.
On the first iteration, "{{ item.name }}" becomes Ethernet1/0, "{{ item.description }}" becomes LAN and "{{ item.enabled }}" becomes true
On the second iteration, "{{ item.name }}" becomes Ethernet1/1, "{{ item.description }}" becomes WAN and "{{ item.enabled }}" becomes true
Moving on, I have four tasks in this playbook. Let's break them down one-by-one.
- Interfaces status (cisco.ios.ios_interfaces) - This is where we define things such as port-status (shut/no-shut), description, speed, duplex, MTU etc. You can't however, assign an IP using this module.
- L3 Interfaces (cisco.ios.ios_l3_interfaces) - We can use the L3 module to assign the IP address to an interface.
- HSRP (cisco.ios.ios_config) - Ansible doesn't have a module to configure HSRP so, we will need to use the generic
ios_configmodule to send raw CLI commands. - Static Route (cisco.ios.ios_static_routes) - We can configure static routes using this module.
when statements
You must have noticed that I have a when statement on Task-3 (HSRP), what does it do? Suppose, you want to configure another L3 interface without HSRP configuration on it, how do we tell Ansible, not to run any HSRP commands on that particular interface? That's where when conditional comes into play.
In a nutshell, we are instructing Ansible that 'do this particular task when this condition is true'Let's look at the following example to demonstrate this. I've added a third interface to router_01.yml file (Ethernet1/2) and don't want to use any HSRP configurations for it. Let's run the playbook again, we would expect Ansible to skip configuring HSRP on that interface because the when condition evaluates to false (aka, vip is not defined under this interface)
#router_01.yml
---
interfaces:
  - name: Ethernet1/0
    description: LAN
    enabled: true
    ip: 10.1.10.2
    mask: 255.255.255.0
    hsrp_pri: 110
    vip: 10.1.10.1
  - name: Ethernet1/1
    description: WAN
    enabled: true
    ip: 116.12.15.2
    mask: 255.255.255.248
    hsrp_pri: 110
    vip: 116.12.15.1
  - name: Ethernet1/2 #new interface without HSRP
    description: TEST
    enabled: true
    ip: 192.168.10.1
    mask: 255.255.255.0
As you can see below, Ethernet1/2 don't have hsrp_pri and vip parameters. So, when you run the playbook, Ansible will look at the when condition that says, run this job only 'if vip is defined'. Since Ethernet1/2 don't have that, Ansible won't configure HSRP on that specific interface.

As you can see above, the task was skipped on Ethernet1/2
tags
If you have a large playbook, it may be useful to run only specific parts of it instead of running the entire playbook. You can do this with Ansible tags. You can use tags to execute or skip selected tasks.
- Add tags to your tasks
- Select or skip tags when you run your playbook by using the
--tagsargument.
For example, let's say we've added another static route and want to run the playbook to push the new static route to the devices. If you run the playbook without any tags, it will run all of your four tasks. It is not a big deal with just a few devices, but if you have a larger playbook, it will take a long time to run the entire playbook.
To demonstrate this, let's run the playbook with just the route tag.
sureshv@mac:~/Documents/ansible|⇒  ansible-playbook playbook.yml --tags route

PLAY [EVE PRO Lab] ************************************************************************************************************

TASK [Static Route] ***********************************************************************************************************
ok: [router_02]
ok: [router_01]

PLAY RECAP ********************************************************************************************************************
router_01                  : ok=1    changed=0    unreachable=0    failed=0    skipped=0    rescued=0    ignored=0
router_02                  : ok=1    changed=0    unreachable=0    failed=0    skipped=0    rescued=0    ignored=0
As you can see above, only the tasks with the route tag has been run (A single task)
Encrypting sensitive data with Ansible Vault
Ansible Vault is a feature of ansible that allows you to keep sensitive data such as passwords or keys in encrypted files, rather than as plaintext in playbooks or roles. These vault files can then be distributed or placed in source control such as Git.
To demonstrate this, let's encrypt the passwords that are located in the group_var file. At the moment, the file looks like the following.
#/Documents/ansible/inventory/grouop_vars/routers.yml
---
ansible_connection: ansible.netcommon.network_cli
ansible_network_os: cisco.ios.ios
ansible_become: yes
ansible_become_method: enable
ansible_user: cisco
ansible_password: Cisco123
ansible_become_password: Cisco123

default_route: 116.12.15.6
As you can see above, the password is in clear text. Let's encrypt it by creating a vault-encrypted file in the same directory as routers.yml file.
To do this, I'm creating a new directory called routers under group_vars and move routers.yml into it. I will also create the vault file in the same routers directory.
In this vault file, define the sensitive variables that used to be in the group_vars/routers.yml file. You can use the same variable names, but prepend the string vault_ to indicate that these variables are defined in the vault-protected file.
# Creating a vault file
sureshv@mac:~/Documents/ansible/inventory/group_vars/routers|⇒  ansible-vault create vault
New Vault password:
Confirm New Vault password:

# Viewing the vault file using 'ansible-vault view vault' command
---
vault_ansible_password: Cisco123
Our new file structure and routers.yml file would look like the following.
.
├── ansible.cfg
├── inventory
│   ├── group_vars
│   │   └── routers
│   │       ├── routers.yml
│   │       └── vault
│   ├── host_file.ini
│   └── host_vars
│       ├── router_01.yml
│       └── router_02.yml
└── playbook.yml

4 directories, 7 files
---
ansible_connection: ansible.netcommon.network_cli
ansible_network_os: cisco.ios.ios
ansible_become: yes
ansible_become_method: enable
ansible_user: cisco
ansible_password: "{{ vault_ansible_password }}"
ansible_become_password: "{{ vault_ansible_password }}"
default_route: 116.12.15.6If somebody were to look at the vault file without knowing the vault password, it would look like this.
$ANSIBLE_VAULT;1.1;AES256
65346333323636343932306562633761643765396133646362636531646631383035626261393766
3939313537373564636161356661326662393533383263310a613038363232626231356132636532
63303633626163653264386263646166643032323933313839616435323164383834616139353338
3562636235333638360a326136313265353261303131383963333764306431663665396533356334
39343733303965323664346265386436346130363164343738643961633033306433323965356536
6364386232306237306562306239343237386536613263313365
Every time you run the playbook, you will be prompted to enter the vault password to decrypt the vault file.
sureshv@mac:~/Documents/ansible|⇒  ansible-playbook playbook.yml --ask-vault-pass
Vault password:
References
https://docs.ansible.com/ansible/latest/collections/cisco/ios/index.html
https://docs.ansible.com/ansible/latest/network/user_guide/network_best_practices_2.5.html