
As a Network Engineer who's spent a considerable amount of time configuring OSPF directly on Cisco Routers using the CLI, I couldn't help but wonder if there was a more efficient way to tackle it. Being familiar with Ansible, I thought it was high time to put it to use for simplifying my OSPF configurations. And I must say, the experience has been both fascinating and rewarding.
In this blog post, we'll explore the ins and outs of using Ansible to configure OSPF on Cisco routers. To keep the playbook as simple and accessible as possible, I've chosen not to cover advanced features like NSSA, stub areas, and other OSPF complexities. My aim is to provide a clear and concise learning experience, ensuring that readers can easily grasp the basics of OSPF configuration using Ansible, and subsequently build on this foundation to explore more advanced concepts as desired.
Please note that although the primary focus is on configuring OSPF, it's important to note that the Ansible playbook also takes care of configuring the interfaces and IP addresses. This means that beyond the initial setup of prerequisites, such as the management IP addresses, usernames/passwords, and hostnames, we are leveraging Ansible to automate the rest of the configuration process.
But why though?
You must be wondering why I would go through the pain of using Ansible when I can simply configure OSPF via the CLI. Why should I choose Ansible over the tried-and-true direct configuration method? Well, there are a few reasons.
- I was already familiar with configuring routers directly, so I wanted to take a new approach and expand my skill set.
- I saw this as an excellent learning experience to dive into Ansible, a tool that's been gaining popularity amongst network engineers.
- With Ansible, I could prepare the configurations, IP schema, and other crucial aspects before even bringing the routers online. Talk about being proactive!
- And finally, on a lighter note, why spend 1-hour configuring routers directly when you can spend two days troubleshooting Ansible?
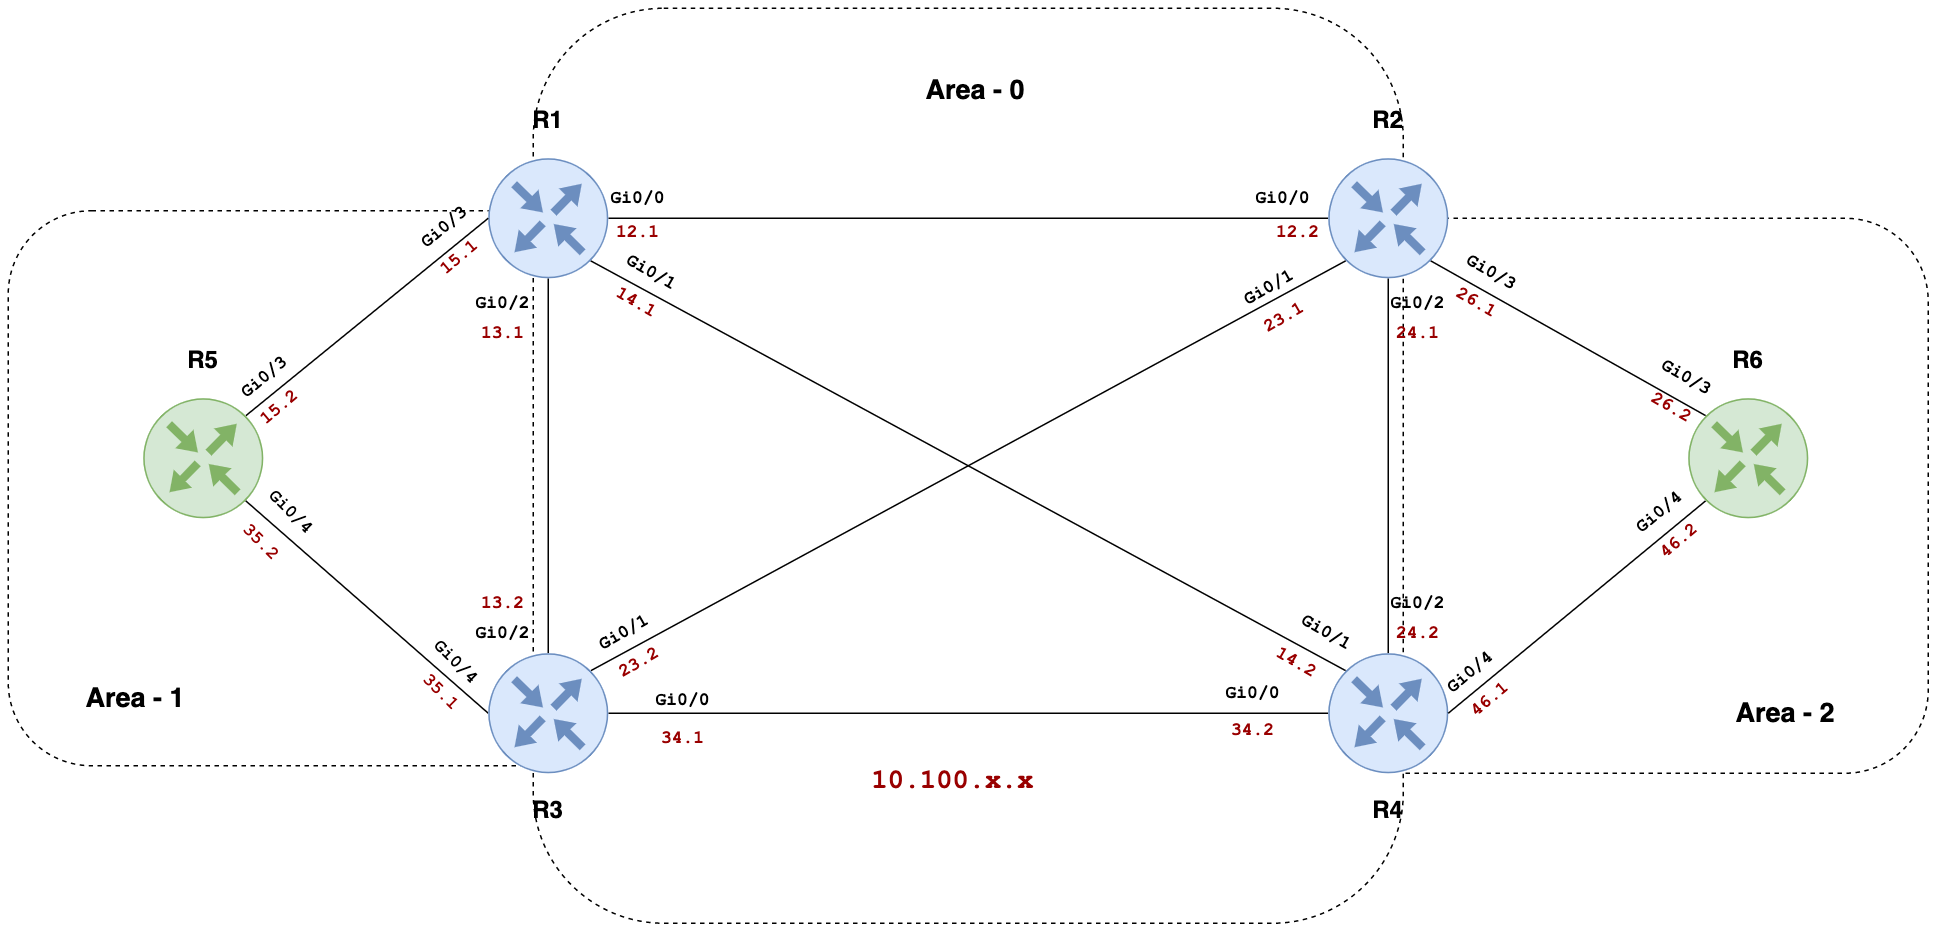
Diagram
Before we dive into the Ansible configuration, it's essential to set the stage with a clear understanding of the network topology we'll be working with. In our example, we'll be configuring OSPF for a network that consists of six routers, organized into three OSPF areas.
To make it easy for you to follow along with the OSPF configuration process, I have created a GitHub repository that contains all the necessary Ansible playbooks and files. You can clone my repo by visiting this link. Once you have cloned the repository, you'll be able to follow the steps discussed in this blog post to configure OSPF on your Cisco routers using Ansible.
If you're not familiar with Git or need a refresher, don't worry! I've got you covered with a comprehensive Git tutorial that will walk you through the basics and help you get up to speed. You can check out my Git tutorial here. By following this tutorial, you'll be well-equipped to clone my repo and make the most out of the OSPF configuration process.
Inventory Files and Group Variables
Inventory File
An inventory file in Ansible is a simple text file that lists the target devices on which you want to run your playbook. It allows you to group devices based on specific criteria, making it easier to target and manage your network infrastructure. In our OSPF configuration example, we have an inventory file that contains a group named routers and the IP addresses of our Cisco routers.
[routers]
router_01 ansible_host=10.10.50.31
router_02 ansible_host=10.10.50.32
router_03 ansible_host=10.10.50.33
router_04 ansible_host=10.10.50.34
router_05 ansible_host=10.10.50.35
router_06 ansible_host=10.10.50.36
Group Variables
Group variables provide a way to define and manage variables specific to a group of devices in your inventory. The group variables contain information such as the connection type, network OS, and authentication details required to connect to the devices in the routers group.
You can store group variables in the group_vars directory within your Ansible project, typically in a YAML file named after the group you're targeting.
In our OSPF configuration example, we can create a group_vars directory and a file named routers.yml inside it. The file should contain the group variables specific to the routers group.
---
ansible_connection: ansible.netcommon.network_cli
ansible_network_os: cisco.ios.ios
ansible_become: yes
ansible_become_method: enable
ansible_user: admin
ansible_password: Cisco123
ansible_become_password: Cisco123The Variable File - A Centralized Approach to Configuration
One of the many advantages of using Ansible for OSPF configuration on Cisco routers is the ability to centralize all necessary information, such as IP addresses, area info, router_id, and interface status, in a single file. In our case, we'll be using a vars.yml file to store this data.
As you will see, this file contains all the critical information for each router in a well-structured, easy-to-read format. By maintaining all the data in one place, we can simplify the configuration process and easily make changes when needed. This approach is far more efficient than managing raw CLI configs, where information is scattered across different files or sections.
---
router_01:
  router_id: "1.1.1.1"
  interfaces:
    - { interface: "GigabitEthernet0/0", desc: "R2", ip: "10.100.12.1", mask: "255.255.255.0", area: 0, passive: false, enabled: true }
    - { interface: "GigabitEthernet0/1", desc: "R4", ip: "10.100.14.1", mask: "255.255.255.0", area: 0, passive: false, enabled: true }
    - { interface: "GigabitEthernet0/2", desc: "R3", ip: "10.100.13.1", mask: "255.255.255.0", area: 0, passive: false, enabled: true }
    - { interface: "GigabitEthernet0/3", desc: "R5", ip: "10.100.15.1", mask: "255.255.255.0", area: 1, passive: false, enabled: true }
    - { interface: "Loopback0", desc: "Router ID", ip: "1.1.1.1", mask: "255.255.255.255", area: 0, passive: true, enabled: true }
router_02:
  router_id: "2.2.2.2"
  interfaces:
    - { interface: "GigabitEthernet0/0", desc: "R1", ip: "10.100.12.2", mask: "255.255.255.0", area: 0, passive: false, enabled: true }
    - { interface: "GigabitEthernet0/1", desc: "R3", ip: "10.100.23.1", mask: "255.255.255.0", area: 0, passive: false, enabled: true }
    - { interface: "GigabitEthernet0/2", desc: "R4", ip: "10.100.24.1", mask: "255.255.255.0", area: 0, passive: false, enabled: true }
    - { interface: "GigabitEthernet0/3", desc: "R6", ip: "10.100.26.1", mask: "255.255.255.0", area: 2, passive: false, enabled: true }
    - { interface: "Loopback0", desc: "Router ID", ip: "2.2.2.2", mask: "255.255.255.255", area: 0, passive: true, enabled: true }
router_03:
  router_id: "3.3.3.3"
  interfaces:
    - { interface: "GigabitEthernet0/0", desc: "R4", ip: "10.100.34.1", mask: "255.255.255.0", area: 0, passive: false, enabled: true }
    - { interface: "GigabitEthernet0/1", desc: "R2", ip: "10.100.23.2", mask: "255.255.255.0", area: 0, passive: false, enabled: true }
    - { interface: "GigabitEthernet0/2", desc: "R1", ip: "10.100.13.2", mask: "255.255.255.0", area: 0, passive: false, enabled: true }
    - { interface: "GigabitEthernet0/4", desc: "R5", ip: "10.100.35.1", mask: "255.255.255.0", area: 1, passive: false, enabled: true }
    - { interface: "Loopback0", desc: "Router ID", ip: "3.3.3.3", mask: "255.255.255.255", area: 0, passive: true, enabled: true }
router_04:
  router_id: "4.4.4.4"
  interfaces:
    - { interface: "GigabitEthernet0/0", desc: "R3", ip: "10.100.34.2", mask: "255.255.255.0", area: 0, passive: false, enabled: true }
    - { interface: "GigabitEthernet0/1", desc: "R1", ip: "10.100.14.2", mask: "255.255.255.0", area: 0, passive: false, enabled: true }
    - { interface: "GigabitEthernet0/2", desc: "R2", ip: "10.100.24.2", mask: "255.255.255.0", area: 0, passive: false, enabled: true }
    - { interface: "GigabitEthernet0/4", desc: "R6", ip: "10.100.46.1", mask: "255.255.255.0", area: 2, passive: false, enabled: true }
    - { interface: "Loopback0", desc: "Router ID", ip: "4.4.4.4", mask: "255.255.255.255", area: 0, passive: true, enabled: true }
router_05:
  router_id: "5.5.5.5"
  interfaces:
    - { interface: "GigabitEthernet0/3", desc: "R1", ip: "10.100.15.2", mask: "255.255.255.0", area: 1, passive: false, enabled: true }
    - { interface: "GigabitEthernet0/4", desc: "R3", ip: "10.100.35.2", mask: "255.255.255.0", area: 1, passive: false, enabled: true }
    - { interface: "Loopback0", desc: "Router ID", ip: "5.5.5.5", mask: "255.255.255.255", area: 1, passive: true, enabled: true }
router_06:
  router_id: "6.6.6.6"
  interfaces:
    - { interface: "GigabitEthernet0/3", desc: "R2", ip: "10.100.26.2", mask: "255.255.255.0", area: 2, passive: false, enabled: true }
    - { interface: "GigabitEthernet0/4", desc: "R4", ip: "10.100.46.2", mask: "255.255.255.0", area: 2, passive: false, enabled: true }
    - { interface: "Loopback0", desc: "Router ID", ip: "6.6.6.6", mask: "255.255.255.255", area: 2, passive: true, enabled: true }

# Set variables for the current host
interfaces: "{{ vars[inventory_hostname].interfaces }}"
router_id: "{{ vars[inventory_hostname].router_id }}"
Let's take a look at router_01 as an example. For each router, we define a router_id and a list of interfaces. The interfaces are described using a dictionary that includes the interface name, description, IP address, subnet mask, OSPF area, passive status, and enabled status.
By structuring the data in this way, we can easily access the specific information required for each router when working with the Ansible playbook. This is done using the last two lines.
# Set variables for the current host
interfaces: "{{ vars[inventory_hostname].interfaces }}"
router_id: "{{ vars[inventory_hostname].router_id }}"
These lines create variables interfaces and router_id for the current host being processed, making it straightforward to configure each router based on the information provided in the vars.yml file.
Playbook Overview
A playbook is a fundamental concept in Ansible that acts as a script for automation. It is a YAML file that contains a list of tasks that Ansible will execute on the specified hosts. Playbooks allow us to define and manage the desired state of our systems in a human-readable format, making it easier to automate complex tasks and ensure consistency across our network.
In our OSPF configuration example, we'll be using a playbook containing several tasks to automate the process. The tasks in the playbook are designed to configure the interface status, L3 interfaces, OSPF interface settings, and OSPF process configurations. We'll be leveraging the Cisco IOS modules available in Ansible, such as cisco.ios.ios_interfaces, cisco.ios.ios_l3_interfaces, cisco.ios.ios_ospf_interfaces, and cisco.ios.ios_ospfv2 to accomplish these tasks.
---
- name: "OSPF"
  hosts: routers
  gather_facts: no
  vars_files:
    - vars.yml

  tasks:
    - name: Interfaces status
      cisco.ios.ios_interfaces:
        config:
        - name: "{{ item.interface }}"
          description: "{{ item.desc }}"
          enabled: "{{ item.enabled }}"
      loop: "{{ interfaces }}"

    - name: L3 Interfaces
      cisco.ios.ios_l3_interfaces:
        config:
        - name: "{{ item.interface }}"
          ipv4:
          - address: "{{ item.ip  }} {{ item.mask  }}"
      loop: "{{ interfaces }}"

    - name: OSPF interface config
      cisco.ios.ios_ospf_interfaces:
        config:
          - name: "{{ item.interface }}"
            address_family:
              - afi: ipv4
                process:
                  id: 1
                  area_id: "{{ item.area }}"
                network:
                  point_to_point: "{{ true if item.passive == false else omit }}"
      loop: "{{ interfaces }}"

    - name: OSPF process config
      cisco.ios.ios_ospfv2:
        config:
          processes:
            - router_id: "{{ router_id }}"
              process_id: 1
              passive_interfaces:
                interface:
                  set_interface: True
                  name: "{{ interfaces | selectattr('passive', 'equalto', true) | map(attribute='interface') | list }}"
Let's break down the playbook task by task.
1. Play Definition
- name: "OSPF"
  hosts: routers
  gather_facts: no
  vars_files:
    - vars.yml
Here, we define the play with the name "OSPF" and target the routers group from the inventory. We disable fact-gathering with gather_facts: no to speed up the playbook execution. The vars_files directive imports the vars.yml file to make the defined variables available for this play.
2. Interface Status
- name: Interfaces status
    cisco.ios.ios_interfaces:
      config:
      - name: "{{ item.interface }}"
        description: "{{ item.desc }}"
        enabled: "{{ item.enabled }}"
    loop: "{{ interfaces }}"
This task iterates over each interface defined in the interfaces variable, configuring the interface name, description, and enabling or disabling the interface using the cisco.ios.ios_interfaces module.
3. L3 Interface Configurations
- name: L3 Interfaces
    cisco.ios.ios_l3_interfaces:
      config:
      - name: "{{ item.interface }}"
        ipv4:
        - address: "{{ item.ip  }} {{ item.mask  }}"
    loop: "{{ interfaces }}"
This task configures the IPv4 addresses and subnet masks for each interface using the cisco.ios.ios_l3_interfaces module.
4. OSPF Interface Configuration
- name: OSPF interface config
    cisco.ios.ios_ospf_interfaces:
      config:
        - name: "{{ item.interface }}"
          address_family:
            - afi: ipv4
              process:
                id: 1
                area_id: "{{ item.area }}"
              network:
                point_to_point: "{{ true if item.passive == false else omit }}"
    loop: "{{ interfaces }}"
This task configures OSPF on each interface using the cisco.ios.ios_ospf_interfaces module. It sets the OSPF process ID, area ID, and configures the interface as point-to-point if the passive attribute is set to false.
5. OSPF Process
- name: OSPF process config
    cisco.ios.ios_ospfv2:
      config:
        processes:
          - router_id: "{{ router_id }}"
            process_id: 1
            passive_interfaces:
              interface:
                set_interface: True
                name: "{{ interfaces | selectattr('passive', 'equalto', true) | map(attribute='interface') | list }}"
This task configures the OSPF process using the cisco.ios.ios_ospfv2 module. It sets the router ID, process ID, and configures passive interfaces by filtering interfaces with the passive attribute set to true.
Verification
For brevity, I will show you the output from router_01 (R1) only. After running the playbook, you can verify the configuration changes by checking the running configuration and OSPF-related show commands on R1.
router_01#show ip ospf neighbor

Neighbor ID     Pri   State           Dead Time   Address         Interface
3.3.3.3           0   FULL/  -        00:00:36    10.100.13.2     GigabitEthernet0/2
4.4.4.4           0   FULL/  -        00:00:37    10.100.14.2     GigabitEthernet0/1
2.2.2.2           0   FULL/  -        00:00:36    10.100.12.2     GigabitEthernet0/0
5.5.5.5           0   FULL/  -        00:00:34    10.100.15.2     GigabitEthernet0/3
interface Loopback0
description Router ID
ip address 1.1.1.1 255.255.255.255
ip ospf 1 area 0
!
interface GigabitEthernet0/0
description R2
ip address 10.100.12.1 255.255.255.0
ip ospf network point-to-point
ip ospf 1 area 0
!
interface GigabitEthernet0/1
description R4
ip address 10.100.14.1 255.255.255.0
ip ospf network point-to-point
ip ospf 1 area 0
!
interface GigabitEthernet0/2
description R3
ip address 10.100.13.1 255.255.255.0
ip ospf network point-to-point
ip ospf 1 area 0
!
interface GigabitEthernet0/3
description R5
ip address 10.100.15.1 255.255.255.0
ip ospf network point-to-point
ip ospf 1 area 1router ospf 1
router-id 1.1.1.1
passive-interface Loopback0Closing Up
In conclusion, the benefit of using Ansible for network automation lies in its ability to centralize and simplify configuration management. If you need to change an IP address or modify any other configuration parameters, all you have to do is update the vars.yml file. There's no need to log in to the CLI on each device and manually make changes.
Your entire network topology, including IP addresses, OSPF areas, and interface settings, is modelled within the vars.yml file. By updating this single file, you can easily propagate changes throughout your network using the Ansible playbook, ensuring consistency and reducing the risk of human error.