In this blog post, we will learn how to configure Remote Access VPN with Cisco AnyConnect. The configuration steps are very straightforward however, there are many ways you can implement this such as SSL vs IPSec, full-tunnel vs split-tunnel and local-user account vs Radius/LDAP.
Our ultimate goal here is to provide remote users with a way to connect to internal applications securely while working remotely.
ASA Initial Configurations
interface GigabitEthernet0/0
 nameif OUTSIDE
 security-level 0
 ip address 10.10.20.33 255.255.0.0
!
interface GigabitEthernet0/1
 nameif INSIDE
 security-level 100
 ip address 172.16.10.1 255.255.255.0

route OUTSIDE 0.0.0.0 0.0.0.0 10.10.0.1 1
Since I created the topology in a lab, I'm using a private IP on the OUTSIDE interface. In the real world, that will most likely be a public IP address.
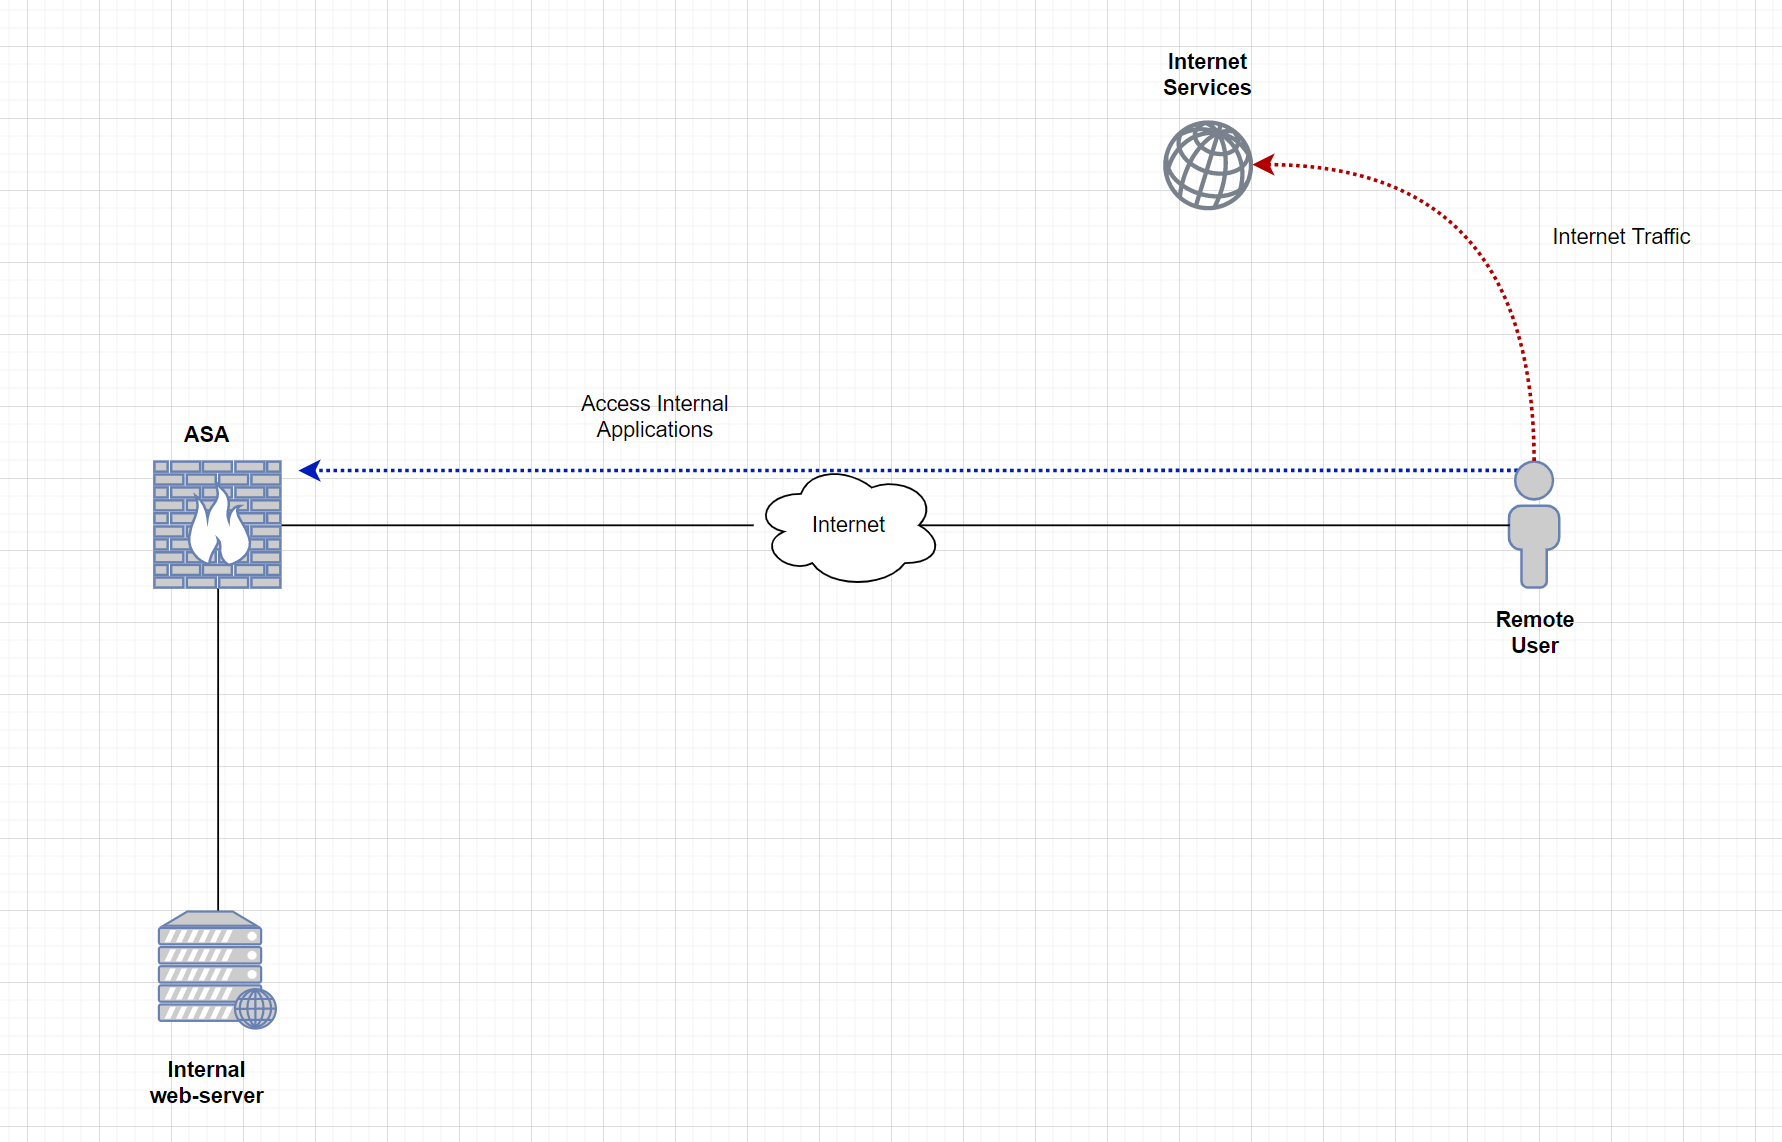
AnyConnect Full-Tunnel Configurations
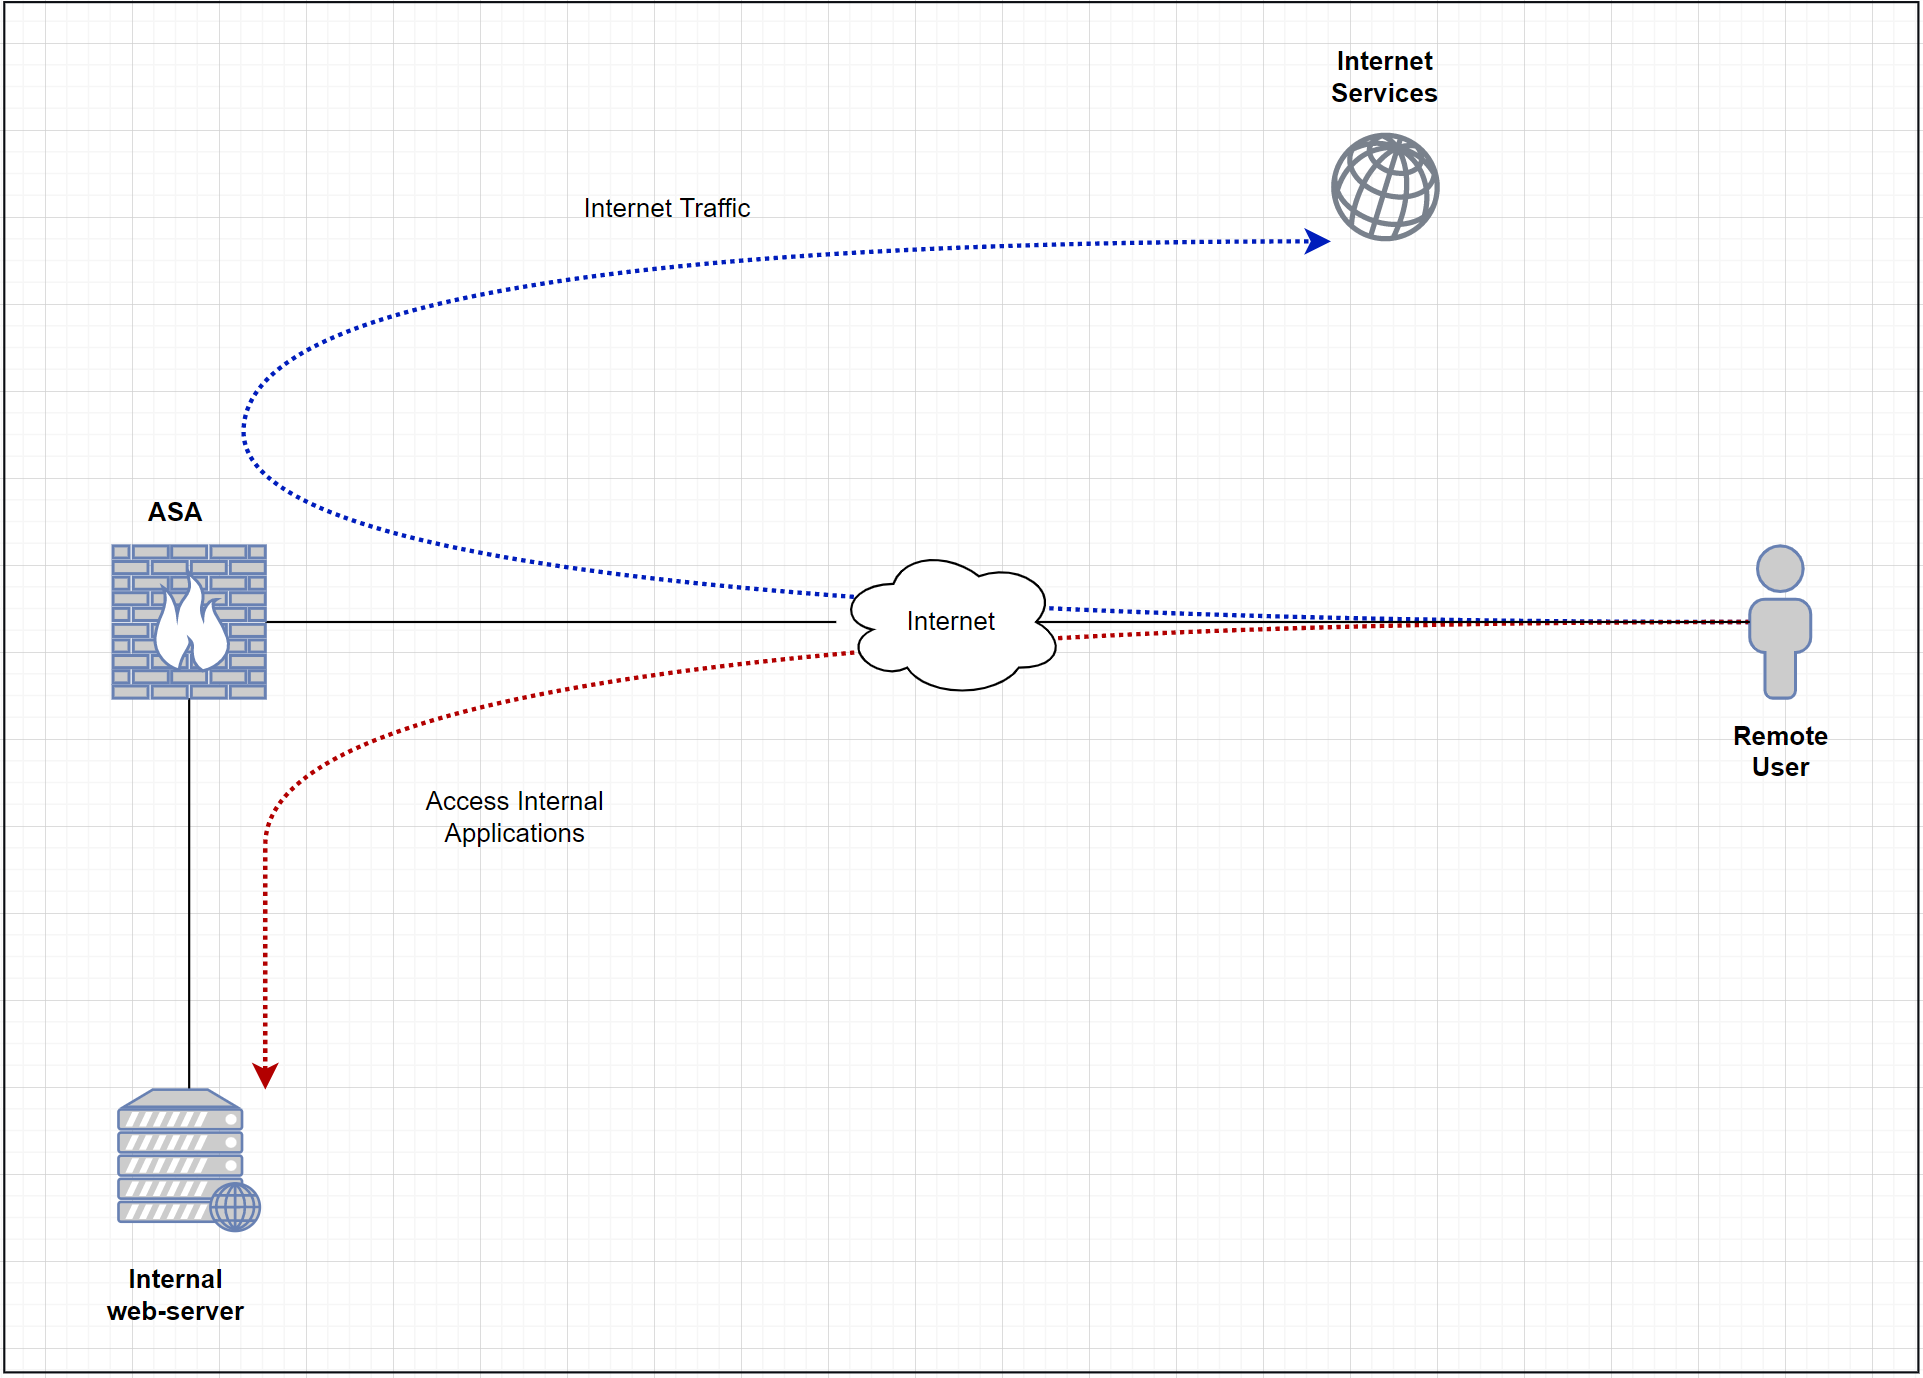
What does full-tunnel even mean? Well, with this deployment, all of the user traffic is sent to the ASA (including Internet traffic) and then Internet-based traffic breaks out to the Internet from the head office. The advantage of full-tunnel is that we can monitor and control the traffic that goes out to the Internet from corporate devices. Some of the downsides are increased latency and a high load on the ASA as all the traffic needs to traverse the firewall.
Diagram - Full-tunnel
Step 1 - AnyConnect image
The first step is to upload the required images into the ASA. It is required to have the web-deploy AnyConnect images on the ASA so, the remote users can download and install them on their machines. Different packages are available for each Operating system. In this example, I'm only using the package for Windows. The files can be downloaded from the Cisco website. I'm going to copy the images from an FTP server to the ASA.
If you have HA deployment with two firewalls, you must upload images to both of them individually. The images are not synced across the HA deployment.
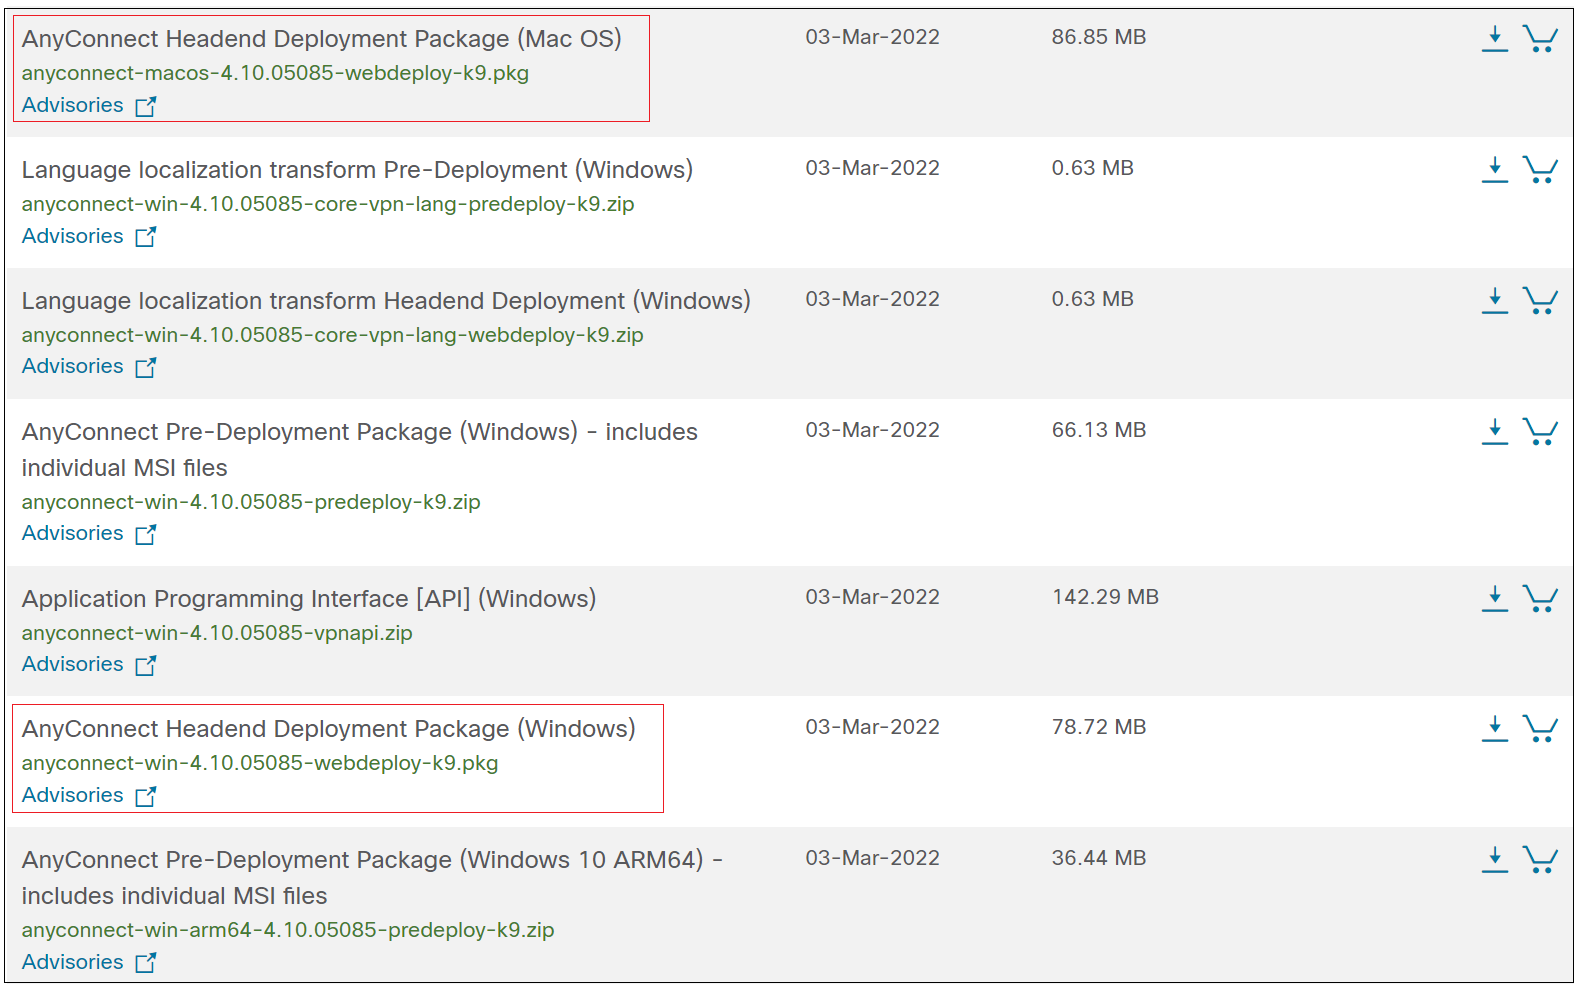
Headend Deployment Package vs Pre-Deployment Package
- Headend Package - The package can be uploaded into the ASA so, the remote users can download and install it on their client machines.
- Pre-Deployment Package - This is the
.exeexecutable file so, the AnyConnect client can be installed manually on each machine. (.dmgfor macOS)
asa-01# copy ftp://ftp-user:Password123@10.10.0.10/anyconnect-win-4.8.03052-webdeploy-k9.pkg disk0:/anyconnect-win-4.8.03052-webdeploy-k9.pkg

Address or name of remote host [10.10.0.10]?

Source username [ftp-user]?

Source password [Cisco123]?

Source filename [anyconnect-win-4.8.03052-webdeploy-k9.pkg]?

Destination filename [anyconnect-win-4.8.03052-webdeploy-k9.pkg]?

Accessing ftp://ftp-user:Cisco123@10.10.0.10/anyconnect-win-4.8.03052-webdeploy-k9.pkg...!!!!!!!!!!!!!!!!
Writing file disk0:/anyconnect-win-4.8.03052-webdeploy-k9.pkg...
!!!!!!!!!!!!!!!!!!!!!!!!!!!!!
72771616 bytes copied in 7.500 secs (10395945 bytes/sec)
asa-01# dir
Directory of disk0:/
23 -rwx 0 17:53:32 Nov 26 2020 use_ttyS0
26 drwx 4096 08:45:58 Apr 14 2022 smart-log
24 drwx 4096 08:45:02 Apr 14 2022 log
60 drwx 4096 08:46:02 Apr 14 2022 coredumpinfo
62 -rwx 72771616 08:57:50 Apr 14 2022 anyconnect-win-4.8.03052-webdeploy-k9.pkg
2 file(s) total size: 72771616 bytes
8571076608 bytes total (8476569600 bytes free/98% free)Step 2 - Create a pool of IP
The next step is to define what IP range will be used for the AnyConnect clients. When the users are connected to the VPN, their laptops will receive an IP within this range. I'm also going to create an object which will later use in NAT and ACLs.
ip local pool anyconnect-subnet 10.1.1.5-10.1.1.250 mask 255.255.255.0

object network anyconnect-subnet
 subnet 10.1.1.0 255.255.255.0
Step 3 - User accounts
For now, I'm going to use local user authentication. Later in this article, we can go through other options such as LDAP and Radius. I'm going to create a test user called anyconnect-user and set the service-type to remote-access.
username anyconnect-user password Cisco123
username anyconnect-user attributes
 service-type remote-access
aaa authentication ssh console LOCAL
aaa authorization exec LOCAL With aaa authorization exec LOCAL configured, when the remote-access user tries to SSH into the ASA, the access is denied and a console message will be generated as shown below.
[ anyconnect-user ] You do NOT have Admin Rights to the console !Step 4 - Configure Group Policy
Two of the core components of the AnyConnect VPN are group-policy and tunnel-group. Group policy is where we define parameters for the AnyConnect client to use such as DNS server, domain name and full/split-tunnel ACLs.
There are many other options available under group-policy to tune and tweak the login behaviour such as vpn-idle-timeout, vpn-session-timeout and vpn-simultaneous-logins.
group-policy ANYCONNECT-GROUP-POLICY internal
group-policy ANYCONNECT-GROUP-POLICY attributes
 dns-server value 8.8.8.8
 vpn-tunnel-protocol ssl-client
 default-domain value packet.lan
Step 5 - Configure Tunnel-group
Let's create a tunnel-group and bind the group-policy and the VPN pool we created earlier.
tunnel-group ANYCONNECT-TUNNEL-GROUP type remote-access
tunnel-group ANYCONNECT-TUNNEL-GROUP general-attributes
 address-pool anyconnect-subnet
 default-group-policy ANYCONNECT-GROUP-POLICY
tunnel-group ANYCONNECT-TUNNEL-GROUP webvpn-attributes
 group-alias Packetswitch-VPN enable
Step 6 - Enable webvpn
The final step is to enable webvpn in the OUTSIDE interface so, the ASA will start listening on port 443 and accepts the connection coming from the clients.
webvpn
 enable OUTSIDE
 anyconnect image disk0:/anyconnect-win-4.8.03052-webdeploy-k9.pkg 1
 anyconnect enable
 tunnel-group-list enable
Step 6 - ACLs to allow the traffic.
I created an ACL to allow all the traffic coming from the AnyConnect VPN subnet as shown below. Please remember the ACL is applied to the OUTSIDE interface where the VPN terminates.
access-list OUTSIDE_TO_IN extended permit ip object anyconnect-subnet any

access-group OUTSIDE_TO_IN in interface OUTSIDE
Step 7 - NAT rules
This is one of the most important (and confusing) steps, please refer to the diagram below.
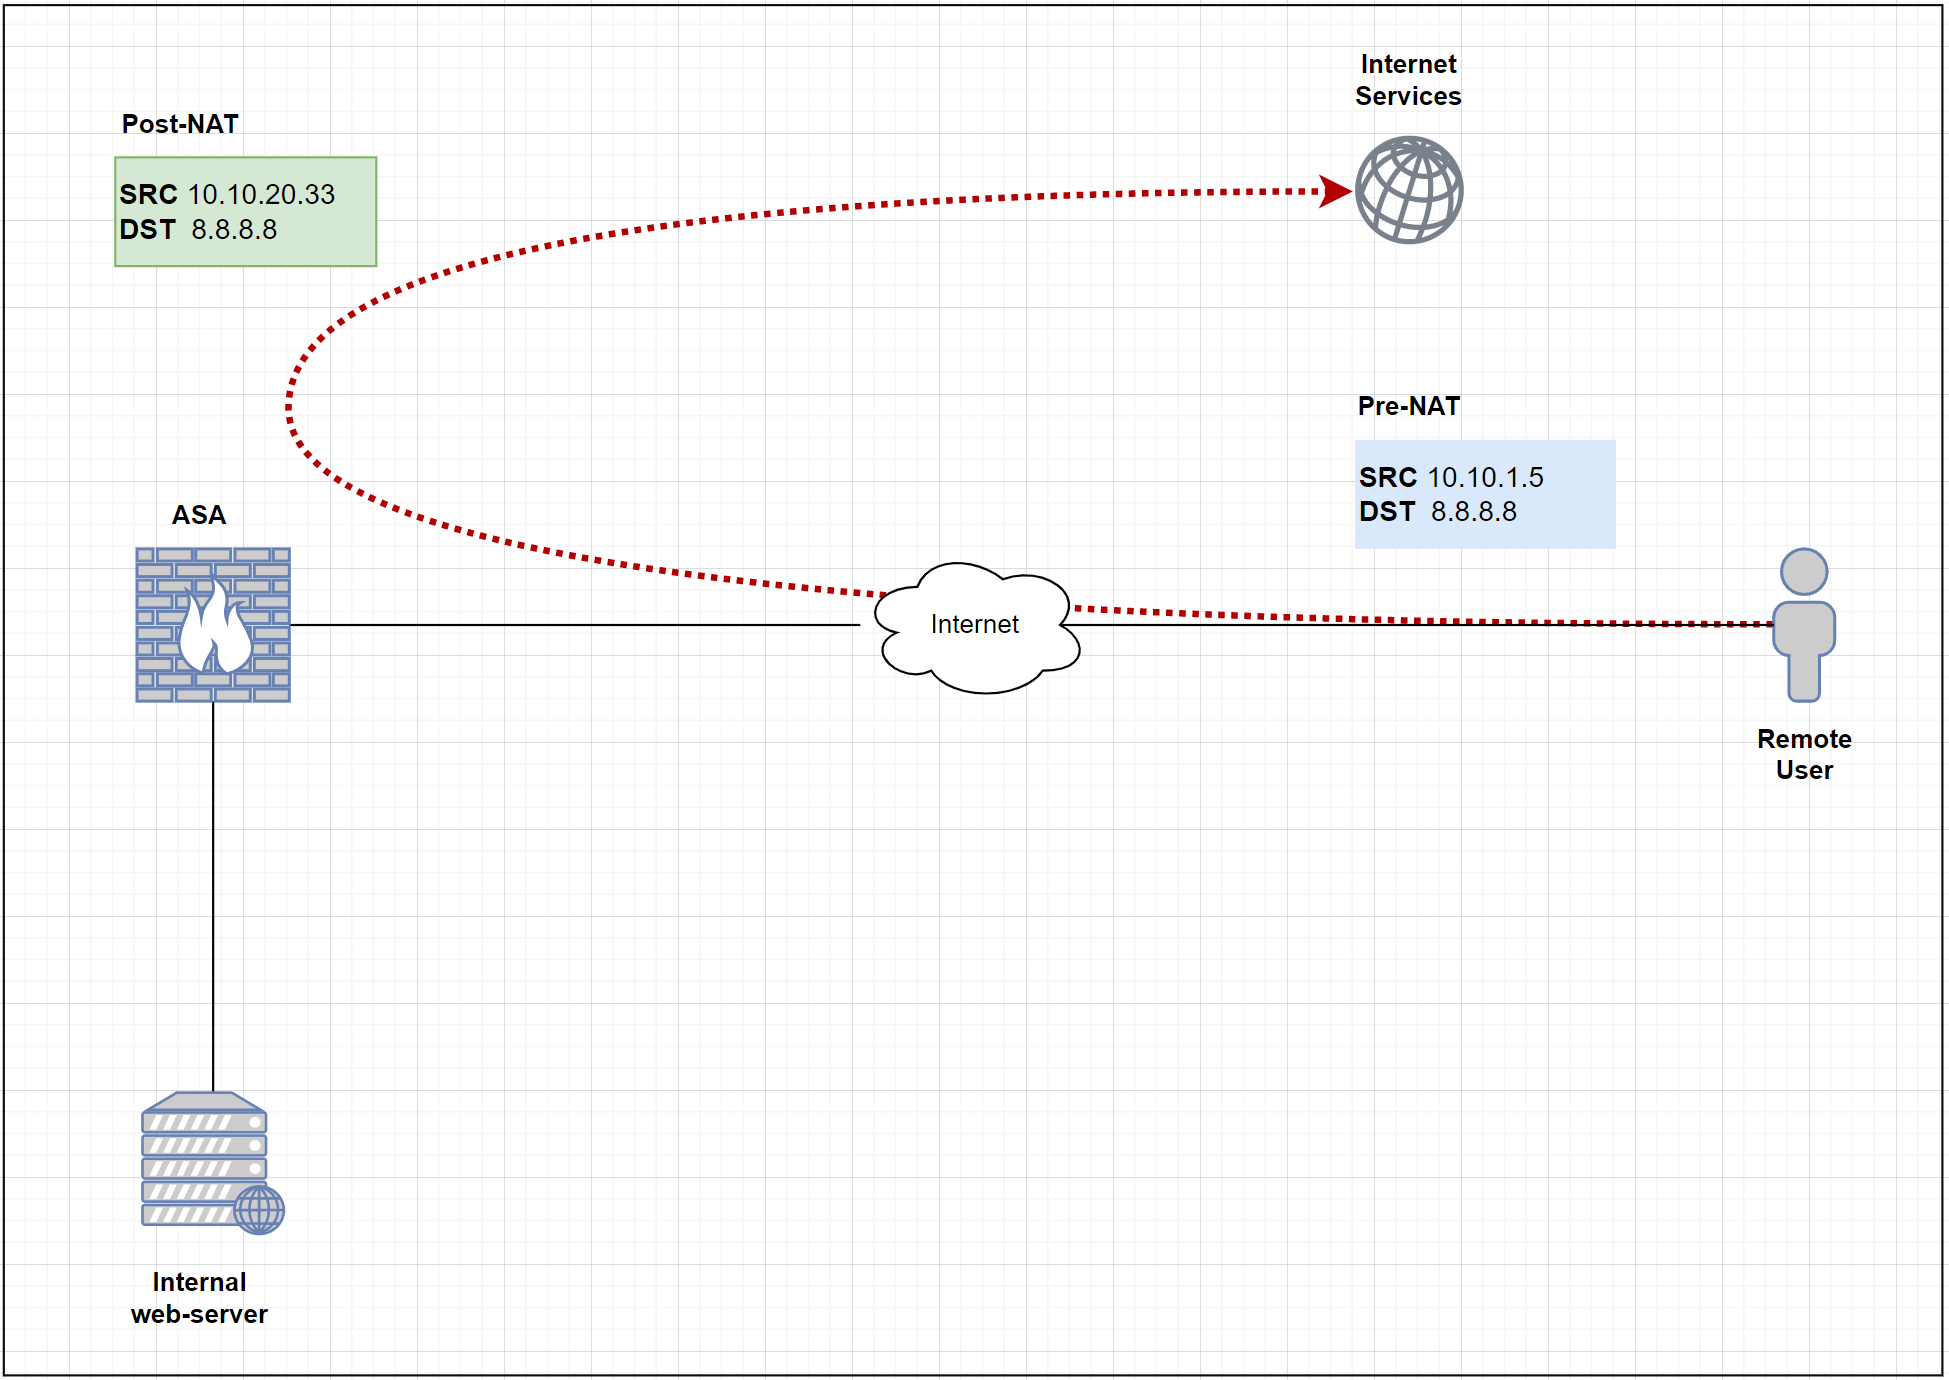
Since we are using a full-tunnel configuration, all the traffic has to traverse the ASA including the Internet traffic. In order for the Internet traffic to work properly, we must have a NAT policy on the ASA to translate the Source IP of the VPN traffic to the publically routable address.
object network anyconnect-subnet
 subnet 10.1.1.0 255.255.255.0
 nat (OUTSIDE,OUTSIDE) dynamic interface
If you want to learn more about Cisco ASA NAT, please check out my blog post here:
 Suresh Vinasiththamby
Step 8 - Hairpin / U-Turn Traffic
As we've seen in the previous step, Internet-bound traffic arrives and leaves on the same OUTSIDE interface. By default, this is not allowed and the traffic will be denied. So, we will need to allow the intra-interface traffic as shown below.
Please note that this step is not required if you are using a split-tunnel configuration.
same-security-traffic permit intra-interfaceVerification and testing
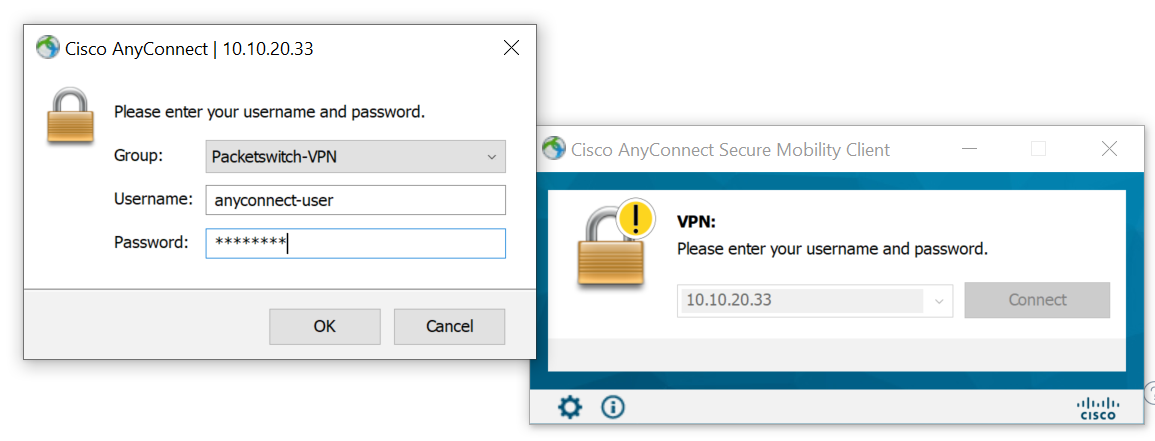
Now that we've completed all the required steps, it's time for us to test. Let's try and connect to the VPN and ping one of the internal servers 172.16.10.10 and 8.8.8.8
C:\Users\vsurr>ping 172.16.10.10

Pinging 172.16.10.10 with 32 bytes of data:
Reply from 172.16.10.10: bytes=32 time=1ms TTL=64
Reply from 172.16.10.10: bytes=32 time<1ms TTL=64
Reply from 172.16.10.10: bytes=32 time<1ms TTL=64

C:\Users\vsurr>ping 8.8.8.8

Pinging 8.8.8.8 with 32 bytes of data:
Reply from 8.8.8.8: bytes=32 time=16ms TTL=116
Reply from 8.8.8.8: bytes=32 time=16ms TTL=116
Reply from 8.8.8.8: bytes=32 time=13ms TTL=116

Excellent, as we can see that the remote client can reach both internal and external resources. You can also see above that the ASA is pushing a default route back to the client (full-tunnel)
Cisco AnyConnect SSL certificates
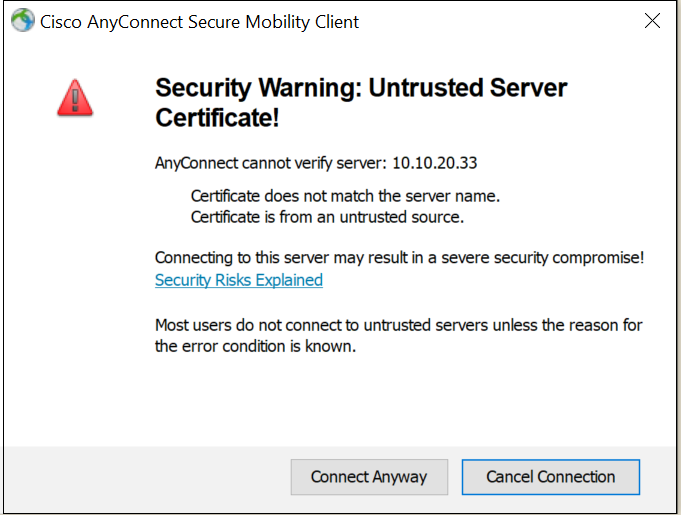
You might notice that when you try to connect to the VPN, it gives us a certificate warning message. Well, this is expected as we are using a self-signed certificate at this point which is not trusted by my laptop.
To fix the issue, we have two options
- Import a certificate signed by the internal CA and install the internal CA certificate on all the laptops. (Not commonly used)
- Get an SSL certificate signed by a public CA (DigiCert, Verisign, Godaddy etc)
It is recommended to obtain a certificate from a public CA as the clients are already configured to trust them. I will show you how to generate the CSR, get the CSR signed by CA, and import the signed certificate back into the ASA alongside the Root CA certificate.
The process is well explained here - https://www.cisco.com/c/en/us/support/docs/security-vpn/public-key-infrastructure-pki/200339-Configure-ASA-SSL-Digital-Certificate-I.html
Step 1 - Generate CSR
The first step is to generate a CSR (Certificate Signing Request), a CSR is basically a PKCS10 formatted message that contains public key and identity information. If you are using ASDM to generate the CSR then a Trustpoint is automatically created. However, if you are using the CLI as shown below, the Trustpoint must be created manually. Let's create a Trustpoint called VPN-CERT to hold the identity certificate.
asa-01(config)# crypto key generate rsa label VPN-CERT-KEYPAIR modulus 2048
INFO: The name for the keys will be: VPN-CERT-KEYPAIR
Keypair generation process begin. Please wait...
asa-01(config)# crypto ca trustpoint VPN-CERT
asa-01(config-ca-trustpoint)# enrollment terminal
asa-01(config-ca-trustpoint)# fqdn vpn.packetswitch.co.uk
asa-01(config-ca-trustpoint)# subject-name CN=vpn.packetswitch.co.uk,O=Packetswitch,C=UK,St=London,L=London
asa-01(config-ca-trustpoint)# keypair VPN-CERT-KEYPAIR
asa-01(config-ca-trustpoint)# exitasa-01(config)# crypto ca enroll VPN-CERT
WARNING: The certificate enrollment is configured with an fqdn
that differs from the system fqdn. If this certificate will be
used for VPN authentication this may cause connection problems.
Would you like to continue with this enrollment? [yes/no]: yes
% Start certificate enrollment ..
% The subject name in the certificate will be: CN=vpn.packetswitch.co.uk,O=Packetswitch,C=UK,St=London,L=London
% The fully-qualified domain name in the certificate will be: vpn.packetswitch.co.uk
% Include the device serial number in the subject name? [yes/no]: no
Display Certificate Request to terminal? [yes/no]: yes
Certificate Request follows:
-----BEGIN CERTIFICATE REQUEST-----
MIIDGDCCAgACAQAwgY4xDzANBgNVBAcTBkxvbmRvbjEPMA0GA1UECBMGTG9uZG9u
MQswCQYDVQQGEwJVSzEVMBMGA1UEChMMUGFja3V0c6dpdGNoMR8wHQYDVQQDExZ2
cG4ucGFja2V0c3dpdGNoLmNvLnVrMSUwIwYJKoZIhvcNAQkCFhZ2cG4ucGFja2V0
c3dpdGNoLmNvLnVrMIIBIjANBgkqhkiG9w0BAQEFAAOCAQ8AMIIBCgKCAQEAn7XX
aWL2dgmFkSkMhNkT/ay4DPgqx5Z9RZ1hrq9ypq0Dn3ojcf+3dOsFkuH9MsWQw6nU
SK/GxFBIzqs8ArCJugX7ZSPPTqDOtdNQdZyCYAJw/KPh/Pir10QH7UrorYZQUWs1
36pUJyBvZF4Cp+ufLVWtJ9ncPIA/Vy9hBdA22ncG40RFCf/039A5VLhZT0eSVTGf
WIvXhQBSbkAs9BjcoDfPBl5oVgZ4hF9oU4NdacxDOoQugPRE14IM1AVuvfANt4Kp
v4EpnUqYDFtdLqUHwatGM0jWf3CqDeCSDW4ZKmp/ORs3qsxOqVsoLH/5efu0U4VB
Hb4JXnNBpUslX4fONwIDAQABoEQwQgYJKoZIhvcNAQkOMTUwMzAOBgNVHQ8BAf8E
BAMCBaAwIQYDVR0RBBowGIIWdnBuLnBhY2tldHN3aXRjaC5jby51azANBgkqhkiG
9w0BAQUFAAOCAQEAIUZlrC065sHlg5YTZtHpNmehnwNmXi1MyvBfKtIewI4H+L2w
O+BfGWwRhP1HjmJRbwN5OyrCs9SWqOyZn/CLpkBPAfA3tQBAeRQxfL8rw4zJe/Fr
fbteqwTZd9PW6viQxeG5up/hm15Is/BpRhJ/K/cdYjNrBUa0WaqPyqGQk4g/9Hn7
fPfbudrO9jmiJf2r8n1bsIC6DVnG+u/E4hbt9NXaAghFT+o/O3WdIo9+s+c997+P
G8jwpgMvdIHGlihHhTxdM9Y4byqzpeT987Tw+aY+p+4sSRvrVJ1j5hTG8oyigsVn
AbrvBGQi8m5UdwcErmDuGIUnI4n5quX5MWPYIg==
-----END CERTIFICATE REQUEST-----
Redisplay enrollment request? [yes/no]: no
asa-01(config)# exit
asa-01# Step 2 - Get the CSR signed by the CA
The next step is to get the SCR signed by the CA. As I mentioned above, it can either be a public CA (Digicert, Godaddy) or an internal CA (ADCS, OpenSSL)
Step 3 - Import the Signed Certificate back to the ASA
The next step is to import the signed certificate into the Trustpoint that was created in step 1.
asa-01(config)# crypto ca import VPN-CERT certificate
WARNING: The certificate enrollment is configured with an fqdn
that differs from the system fqdn. If this certificate will be
used for VPN authentication this may cause connection problems.

Would you like to continue with this enrollment? [yes/no]: yes

% The fully-qualified domain name in the certificate will be: vpn.packetswitch.co.uk


Enter the base 64 encoded certificate.
End with the word "quit" on a line by itself

-----BEGIN CERTIFICATE-----
MIIDhDCCAmwCFEJDkOmzkApyuPo8SQLB+NQZby/XMA0GCSqGSIb3DQEBCwUAMG4x
CzAJBgNVBAYTAlVLMQ8wDQYDVQQIDAZMb25kb24xDzANBgNVBAcMBkxvbmRvbjEZ
MBcGA1UECgwQUGFja2V0c3dpdGNoIEx0ZDELMAkGA1UECwwCSVQxFTATBgNVBAMM
DFBhY2tldHN3aXRjaDAeFw0yMjA0MTQxMzI1MzdaFw0yMzA0MTQxMzI1MzdaMIGO
MQ8wDQYDVQQHEwZMb25kb24xDzANBgNVBAgTBkxvbmRvbjELMAkGA1UEBhMCVUsx
FTATBgNVBAoTDFBhY2tldHN3aXRjaDEfMB0GA1UEAxMWdnBuLnBhY2tldHN3aXRj
aC5jby51azElMCMGCSqGSIb3DQEJAhYWdnBuLnBhY2tldHN3aXRjaC5jby51azCC
ASIwDQYJKoZIhvcNAQEBBQADggEPADCCAQoCggEBAJ+112li9nYJhZEpDITZE/2s
uAz4KseWfUWdYa6vcqatA596I3H/t3TrBZLh/TLFkMOp1EivxsRQSM6rPAKwiboF
+2UjzzagzrXTUHWcgmACcPyj4fz4q9dEB+1K6K2GUFFrNd+qVCcgb2ReAqfrny1V
rSfZ3DyAP1cvYQXQNtp3BuNERQn/9N/QOVS4WU9HklUxn1iL14UAUm5ALPQY3KA3
zwZeaFYGeIRfaFODXWnMQzqELoD0RNeCDNQFbr3wDbeCqb+BKZ1KmAxbXS6lB8Gr
RjNI1n9wqg3gkg1uGSpqfzkbN6rMTqlbKCx/+Xn7tFOFQR2+CV5zQaVLJV+HzjcC
AwEAATANBgkqhkiG9w0BAQsFAAOCAQEAVMT6tj+XuuB1AU+sQWYDiBYC26uVbAYM
8g6lKCv27Vtrf6P33JlKO3I0fh8Znko7VoridcEtPlxpZlHwK772sXfXhKl7Q6iB
bbkzXcyP9e1VPv33/TUIEmR/JRlyJ5pSQdOtA/7ymkfeyrjAHylpDO1izDnOnNGN
w80nB8FwkrivnoKAZMaUHlROlpdIvGc7GX2OjIQGx5tCU96fL9HZejKui5Vms8Lg
GbllIT7XrBR6brGTHVTP98rg5XFBalIX6STp1Mxs4Z2BmCV1Ht8iBgyskLlXB92o
M1h96GEWkyRuzRSqSoWBxabh9Xu3r4kQMZTUcB3qfXt7rZ5NdsohoQ==
-----END CERTIFICATE-----
quit
INFO: Certificate successfully imported
Step 4 - Import the Root CA certificate into the ASA
It is also important to import the Root CA certificate into the ASA (The CA who signed the CSR) I'm going to add the Root CA certificate into another Trustpoint (container) called VPN-ROOT-CA
asa-01(config)# crypto ca trustpoint VPN-ROOT-CA
asa-01(config-ca-trustpoint)# enrollment terminal
asa-01(config-ca-trustpoint)# exit
asa-01(config)# crypto ca authenticate VPN-ROOT-CA
Enter the base 64 encoded CA certificate.
End with the word "quit" on a line by itself
-----BEGIN CERTIFICATE-----
MIIDvTCCAqWgAwIBAgIUSAvPFHCLocMk7aTIJvKMmUS3em4wDQYJKoZIhvcNAQEL
BQAwbjELMAkGA1UEBhMCVUsxDzANBgNVBAgMBkxvbmRvbjEPMA0GA1UEBwwGTG9u
ZG9uMRkwFwYDVQQKDBBQYWNrZXRzd2l0Y2ggTHRkMQswCQYDVQQLDAJJVDEVMBMG
A1UEAwwMUGFja2V0c3dpdGNoMB4XDTIyMDQxNDEyNTE1OFoXDTIzMDQxNDEyNTE1
OFowbjELMAkGA1UEBhMCVUsxDzANBgNVBAgMBkxvbmRvbjEPMA0GA1UEBwwGTG9u
ZG9uMRkwFwYDVQQKDBBQYWNrZXRzd2l0Y2ggTHRkMQswCQYDVQQLDAJJVDEVMBMG
A1UEAwwMUGFja2V0c3dpdGNoMIIBIjANBgkqhkiG9w0BAQEFAAOCAQ8AMIIBCgKC
AQEAwnZxBwx71Cp6cqu4nuh8z0awpEJEkIpxIT36pW7ZuWAwCcO9NpjgRl3q9jbz
xhRdbAGO35rG17/CrwhO7FQ6tb4mgE3sHTizmPxYeohUU7B6tNhOUPu1dWoNd6Gp
rnkih1fMIossps+YDAayKQV5IjdXADSGu/kQUVXdKfoC+uwb6q1BP3q5MXJQGydx
S3+dptkwRqrVvuRHG7Rk0hk28ONKJs//SxOe/dhLZf6qRGL6P1xw4JRtv+bh9Hit
RjBswmXXvBA0e+r6UFf/codbSmsWlCETnrz3qVuD08hnNFgGUC/+HtnNcMNoKGy+
TGIGgZyuuknWqi3lF7r9iGJz/QIDAQABo1MwUTAdBgNVHQ4EFgQUC1edLfqGZW4l
gVQXTIBSNudFCjMwHwYDVR0jBBgwFoAUC1edLfqGZW4lgVQXTIBSNudFCjMwDwYD
VR0TAQH/BAUwAwEB/zANBgkqhkiG9w0BAQsFAAOCAQEAd7kIOiaC7JZ1j2gXTMOV
Z/ATaUtiwfN9bAxLbih60YCAA/Qb3/BCHTygJ8wFJqgj6kSW0BnBCyswXuv8soIq
UCS9w22Cx2zEpww5OKfMXFMp4Sa6j4KzZ0Llurq6hxA51n55B10chha9/QgT4q3E
z5uS51uIbSjaOl2CgEROQy4sjfoL/6xyukgSDGS3ASkDhMVYuLbS56LuaRBDqOij
o+Kt54fGJ8dWeVBsdRN+9RQb8uOIw0P2uZonLnhzdTFdz/WfsFR8TZWGk5c/fhb8
BOzP2WKmfE0ueEeItNvXx5REg/i8kGlL6HG7DA+7lQd0vnl9gddNfbuaw4vxC2za
jQ==
-----END CERTIFICATE-----
quit
INFO: Certificate has the following attributes:
Fingerprint: 2dc02952 2961a933 fb177f7c 28105fd8
Do you accept this certificate? [yes/no]: yes
Trustpoint CA certificate accepted.
% Certificate successfully importedStep 5 - Apply the identity certificate to the interface
The final step is to apply the newly installed identity certificate to the OUTSIDE interface.
ssl trust-point VPN-CERT OUTSIDE Verification and testing
As you can see below, we can see both the CA and identity certificates in the ASA.
asa-01# show crypto ca certificate
Certificate
Status: Available
Certificate Serial Number: 424390e9b3900a72b8fa3c4902c1f8d4196f2fd7
Certificate Usage: General Purpose
Public Key Type: RSA (2048 bits)
Signature Algorithm: SHA256 with RSA Encryption
Issuer Name:
cn=Packetswitch
ou=IT
o=Packetswitch Ltd
l=London
st=London
c=UK
Subject Name:
hostname=vpn.packetswitch.co.uk
cn=vpn.packetswitch.co.uk
o=Packetswitch
c=UK
st=London
l=London
Validity Date:
start date: 13:25:37 UTC Apr 14 2022
end date: 13:25:37 UTC Apr 14 2023
Storage: config
Associated Trustpoints: VPN-CERT
CA Certificate
Status: Available
Certificate Serial Number: 480bcf14708ba1c324eda4c826f28c9944b77a6e
Certificate Usage: General Purpose
Public Key Type: RSA (2048 bits)
Signature Algorithm: SHA256 with RSA Encryption
Issuer Name:
cn=Packetswitch
ou=IT
o=Packetswitch Ltd
l=London
st=London
c=UK
Subject Name:
cn=Packetswitch
ou=IT
o=Packetswitch Ltd
l=London
st=London
c=UK
Validity Date:
start date: 12:51:58 UTC Apr 14 2022
end date: 12:51:58 UTC Apr 14 2023
Storage: config
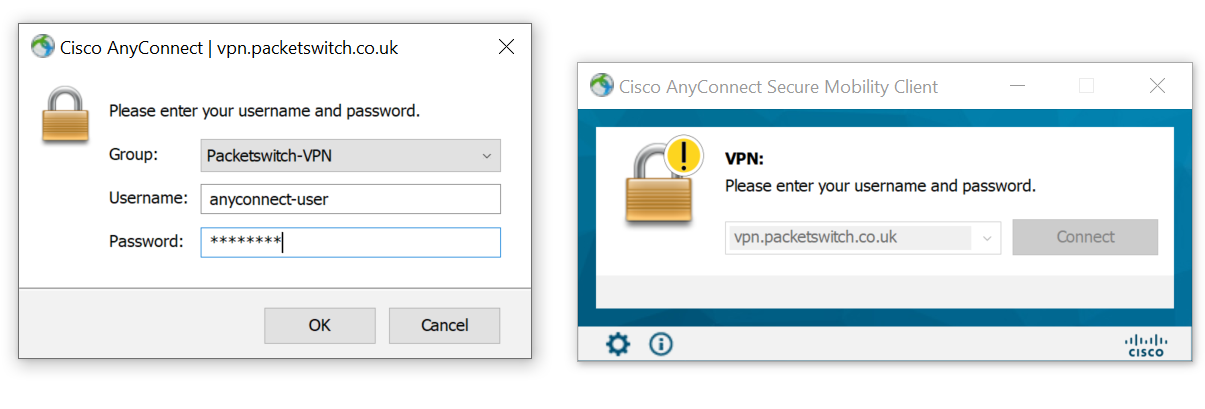
Associated Trustpoints: VPN-ROOT-CA If I try to connect to the VPN now, there will be no errors.
AnyConnect Split-Tunnel Configurations
In a split-tunnel configuration, we can define routes that should traverse via the VPN tunnel and everything else can bypass the tunnel and go directly to the Internet. In this example, let's say we only want to send 172.16.10.0/24 subnet via the VPN tunnel.
Step 1 - Define an ACL
The first step is to define an ACL by including the subnets that should traverse via the VPN tunnel.
access-list SPLIT-TUNNEL-ACL standard permit 172.16.10.0 255.255.255.0Step 2 - Add the ACL to the group-policy
The next and final step is to add the ACL we created in the previous step to the group-policy.
group-policy ANYCONNECT-GROUP-POLICY attributes
 split-tunnel-policy tunnelspecified
 split-tunnel-network-list value SPLIT-TUNNEL-ACL
Verification
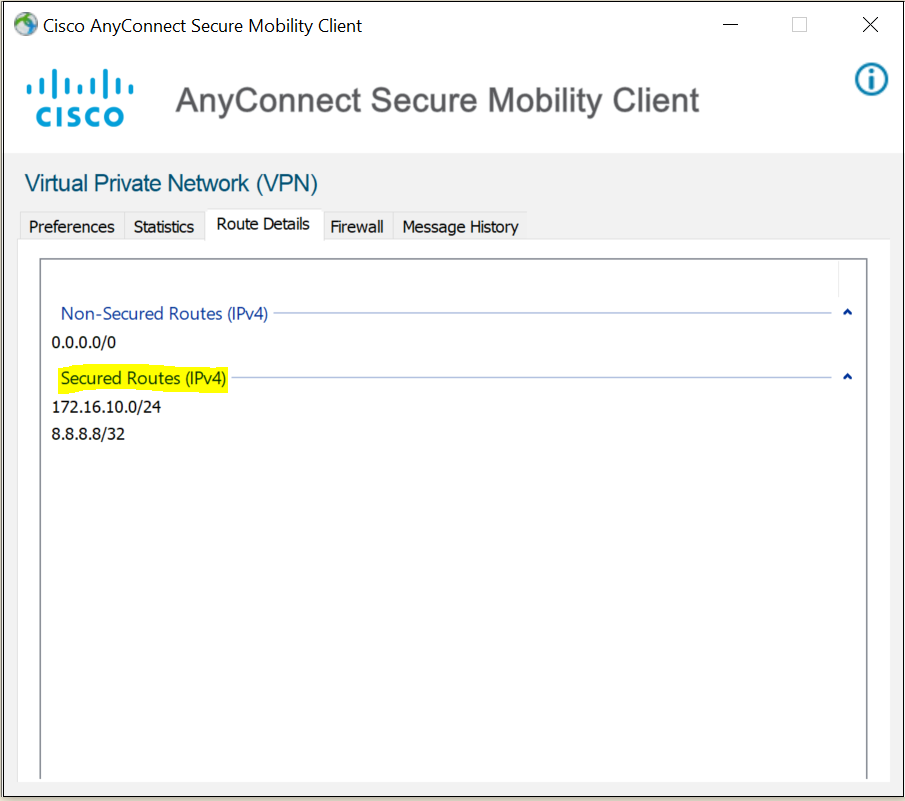
As you can see below only the routes we specified are routed via the Tunnel. Please note that 8.8.8.8 is also part of the VPN tunnel because that is the DNS server configured for the AnyConnect clients.
AnyConnect External Authentication via LDAP
In the previous examples, we were using locally configured user accounts for VPN login. Of course, this is not scalable if you have even 20+ users. It will become an issue for managing the users and their passwords in the ASA.
In this example, we will learn how to use LDAP to authenticate the users against Active Directory.
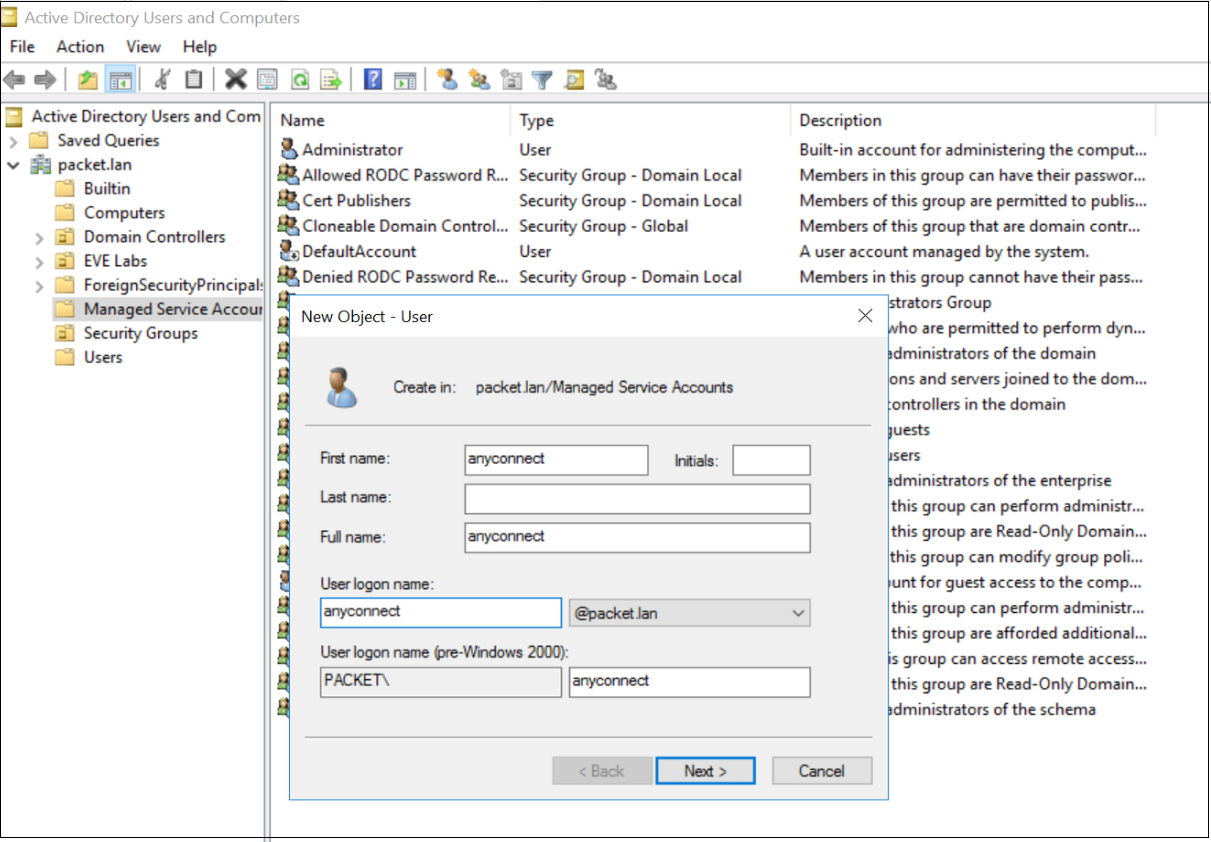
I'm going to create a service account on AD for the ASA to use. The account is only used to browse the AD.
We can use the dsquery command in the AD to find base DN and login DN information. We will then use this information to configure the LDAP server in the ASA. Once the LDAP server is configured, we need to apply that to the Tunnel-group configured in the earlier steps.
C:\Users\Administrator>dsquery user -name anyconnect
"CN=anyconnect,CN=Managed Service Accounts,DC=packet,DC=lan"
aaa-server LDAP-SERVER protocol ldap
aaa-server LDAP-SERVER (OUTSIDE) host 10.10.0.20
ldap-base-dn DC=packet,DC=lan
ldap-scope subtree
ldap-naming-attribute sAMAccountName
ldap-login-password *****
ldap-login-dn CN=anyconnect,CN=Managed Service Accounts,DC=packet,DC=lan
server-type microsofttunnel-group ANYCONNECT-TUNNEL-GROUP general-attributes
authentication-server-group LDAP-SERVER LOCALLOCAL keyword at the end means that if the LDAP server is unreachable then the LOCAL user database on the ASA will be used.
You can use the test aaa authentication command to test whether the authentication is working correctly. Now users who are part of Active Directory can log in with their AD credentials.
asa-01#test aaa authentication LDAP-SERVER
Server IP Address or name: 10.10.0.20
Username: anyconnect
Password: Cisco123
INFO: Attempting Authentication test to IP address (10.10.0.20) (timeout: 12 seconds)
INFO: Authentication SuccessfulAnyConnect External Authentication via Radius (ISE)
If you have Cisco ISE in your environment, you can then use ISE as a Radius server for authentication. I'm going to configure the Radius server in the ASA and also going to remove LDAP from the Tunnel-group and add ISE into it.
aaa-server ISE protocol radius
aaa-server ISE (OUTSIDE) host 10.10.0.100
 key cisco123
asa-01(config)# tunnel-group ANYCONNECT-TUNNEL-GROUP general-attributes
asa-01(config-tunnel-general)# no authentication-server-group LDAP-SERVER LOCAL
asa-01(config-tunnel-general)# authentication-server-group ISE LOCAL asa-01# test aaa-server authentication ISE
Server IP Address or name: 10.10.0.100
Username: net-admin
Password: ********
INFO: Attempting Authentication test to IP address (10.10.0.100) (timeout: 12 seconds)
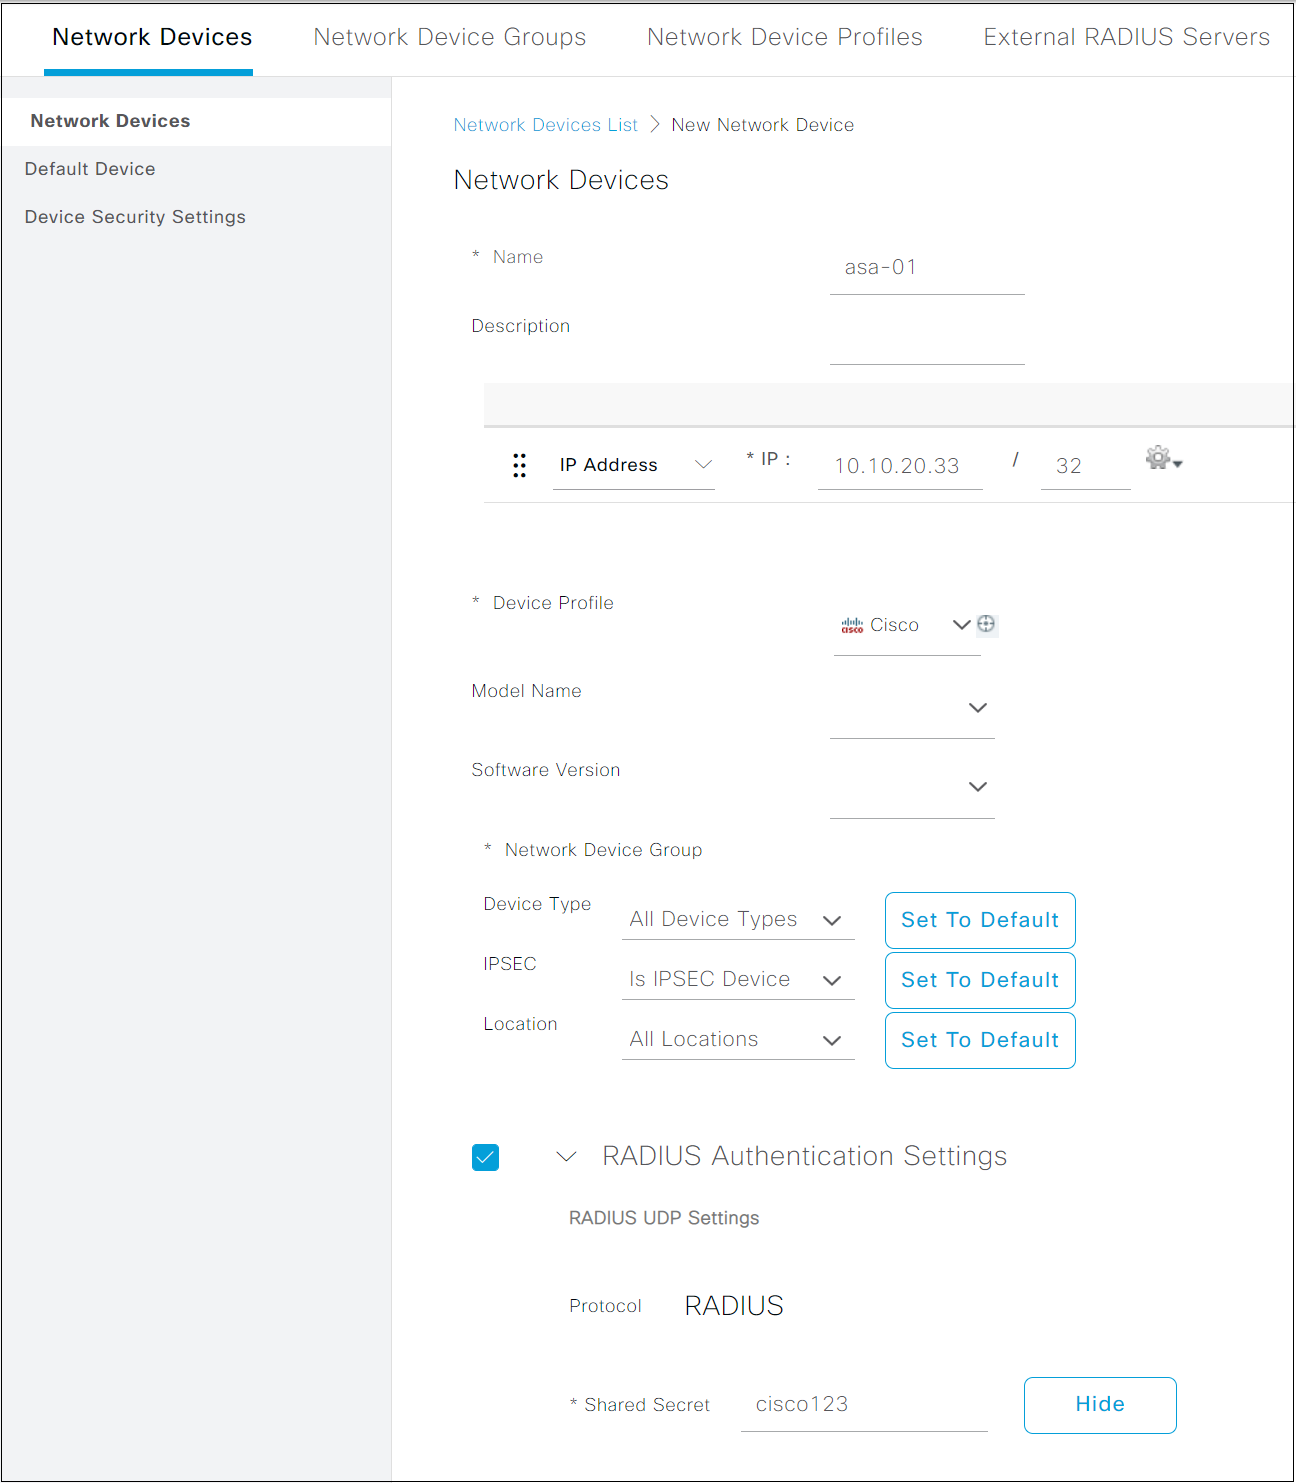
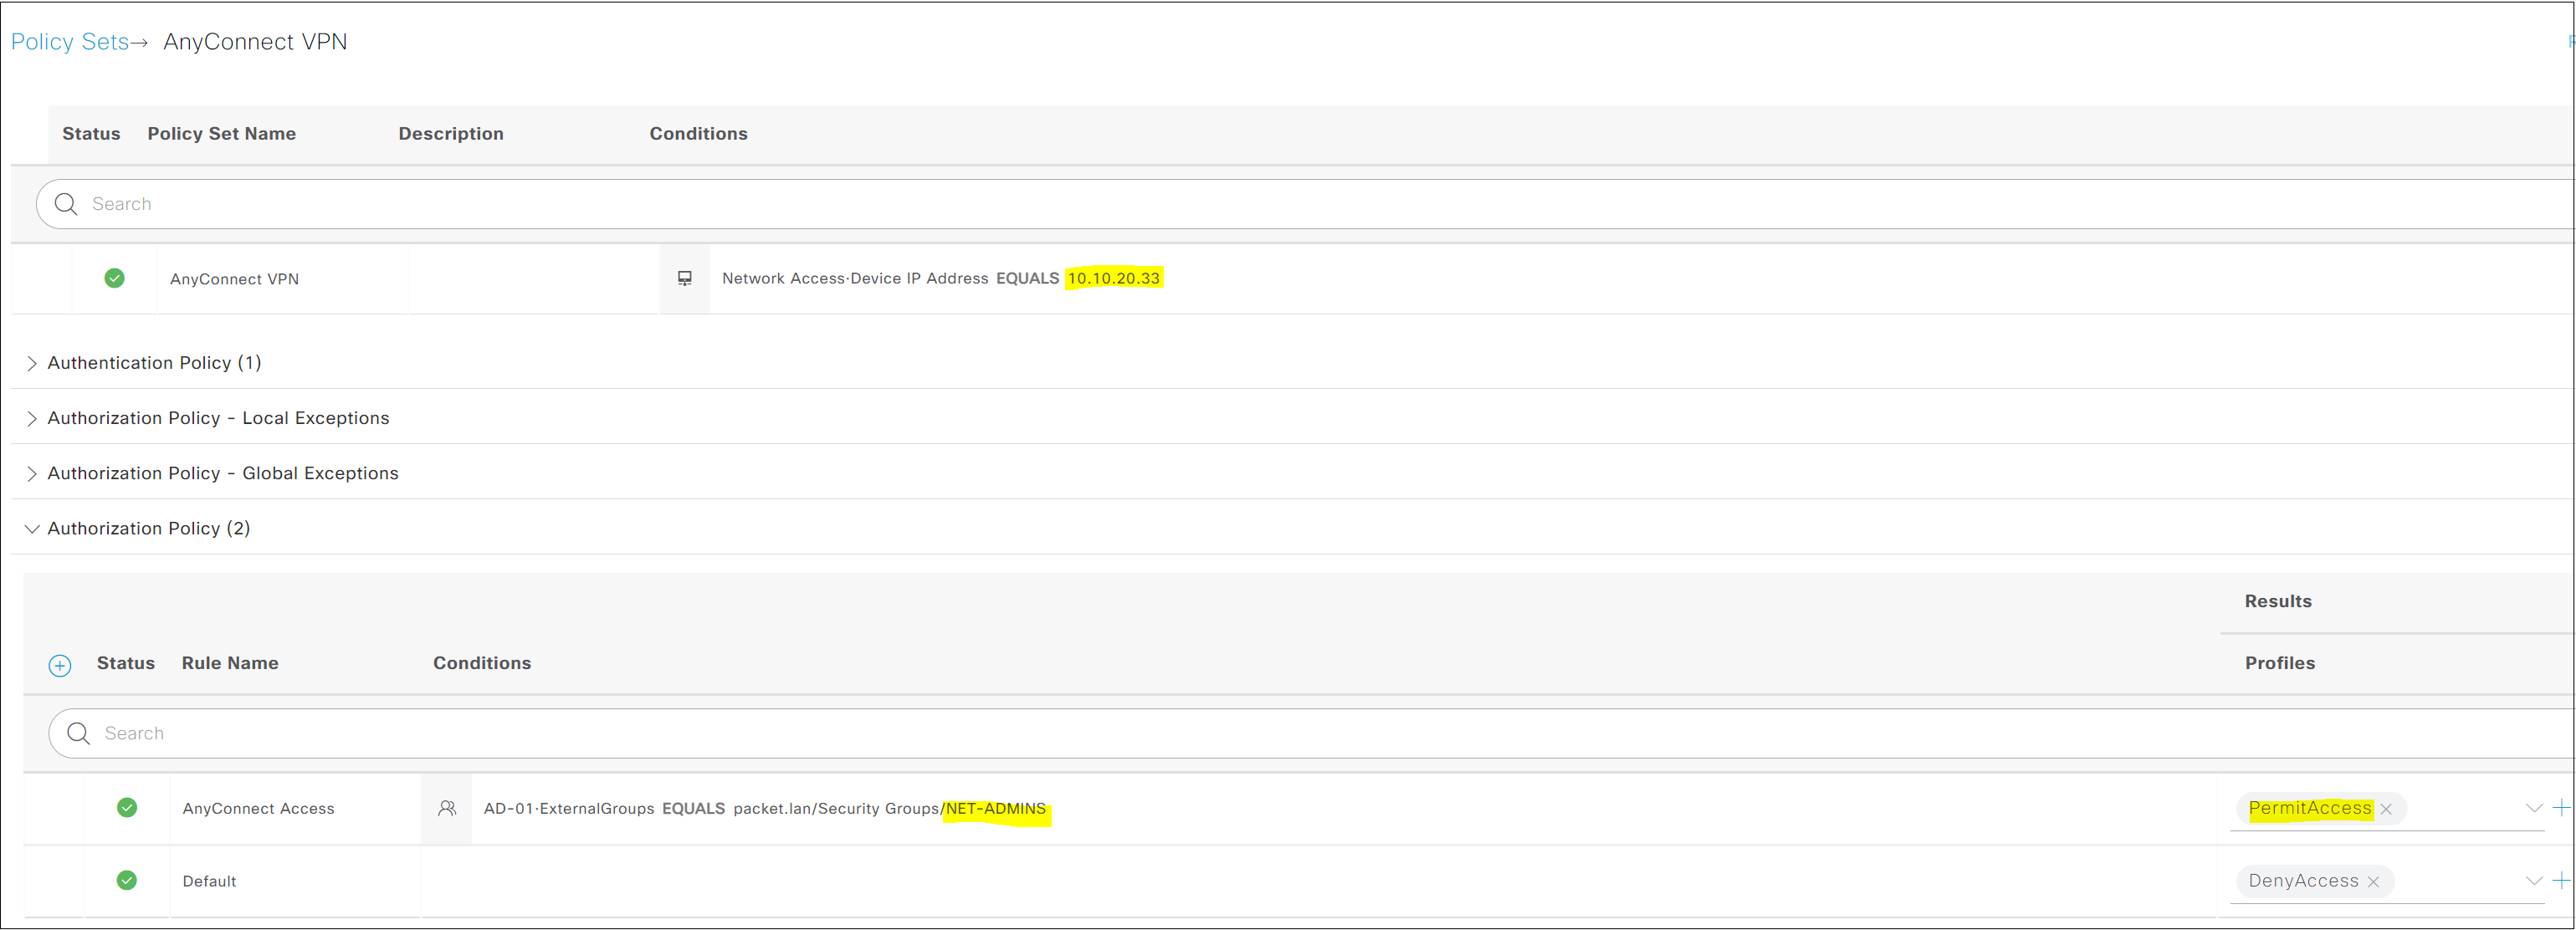
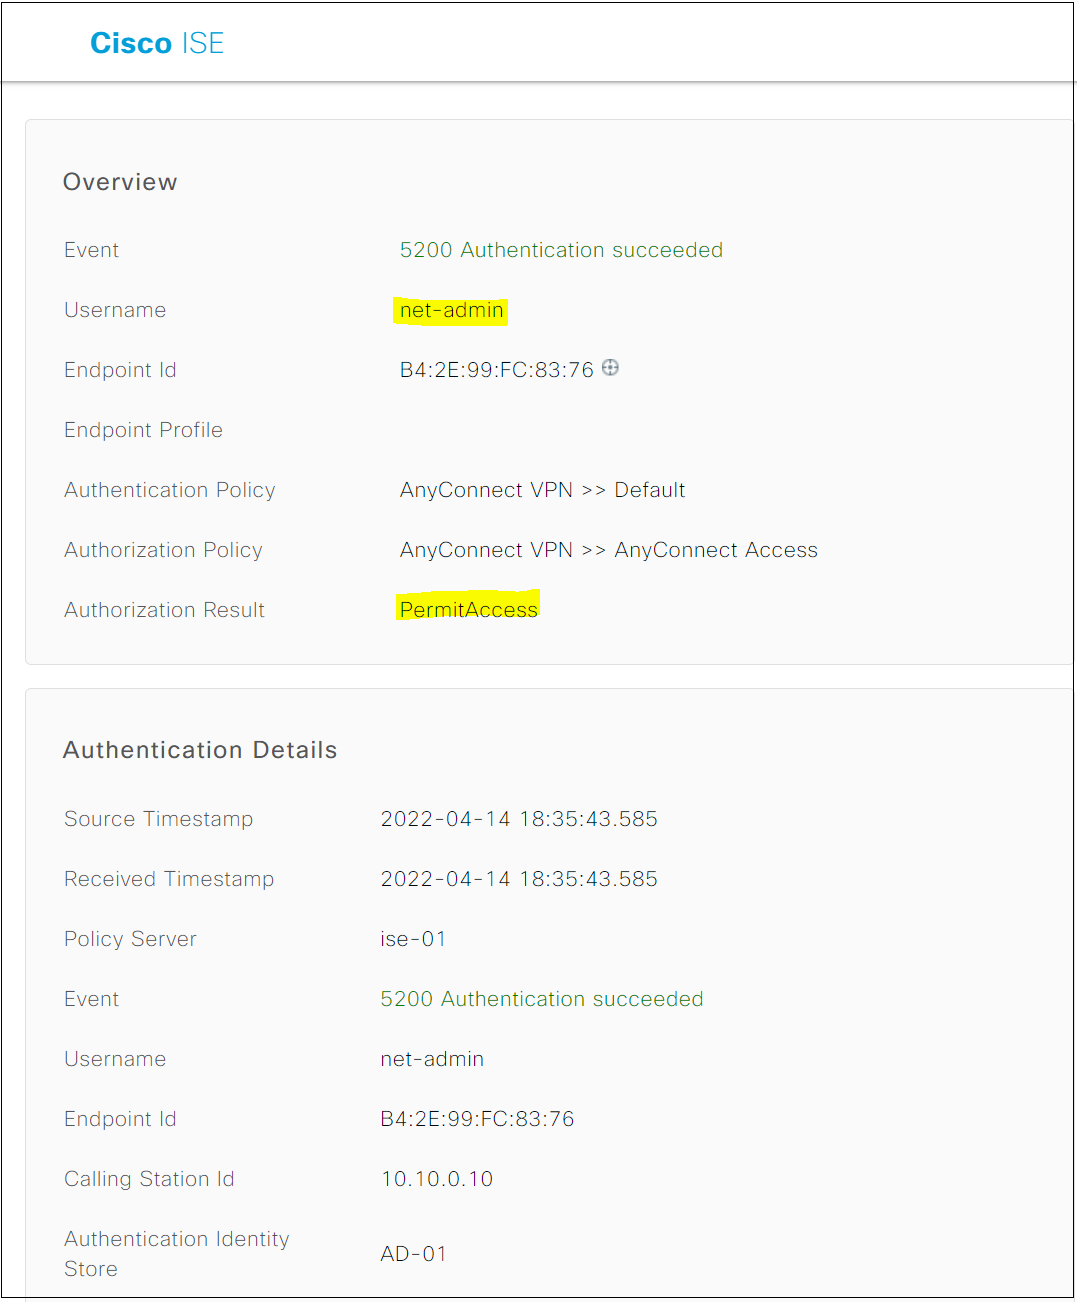
INFO: Authentication SuccessfulISE configurations are not the scope of this article but I will just post a few screenshots here. You will start by adding the ASA as a Network Device and then create a Policy Set to provide authentication/authorization.
Did you find this blog post helpful for starting out with AnyConnect? I tried to cover as much as I could, please let me know in the comments if you would like me to add anything more to this.