
Why do we need First Hop Redundancy Protocols?
Almost all the connected end devices such as laptops, printers, televisions etc are configured with a default gateway to reach remote subnets. In your home network, the default gateway is your ISP-provided Wi-Fi router. If that router goes down, you can no longer access the Internet. Similarly, in an enterprise, if you have a single router as the gateway and that single router goes down, the hosts/services will not be able to communicate with the remote subnets.
For an enterprise, an outage like this can result in lost revenue. How can we have a redundant router that takes over the role of the failed router? This is where FHRP comes into play, FHRP protocols provide a mechanism for two or more devices to work together and failover if one of them goes down.
Key Points to remember
- The routers share a virtual IP address in a subnet, defined by FHRP
- Hosts use the Virtual IP Address as their default gateway
- Only one FHRP router performs all the packet forwarding, the other ones passively wait to take over in the event the active router goes down
- Both routers exchange information frequently and agree as to which one does what at any given time
FHRP Protocols
- HSRP - Developed by Cisco, Active/standby mechanism
- VRRP - RFC 5798 standard, Active/standby mechanism
- GLBP - Developed by Cisco, Active/active mechanism
HSRP (Hot Standby Routing Protocol)
HSRP enables two or more devices to work together in a group, sharing a single virtual IP address. The virtual IP address is configured in each host as a default gateway address.
In an HSRP group, one router is elected to handle all requests sent to the virtual IP address. With HSRP, this is called an Active router.
An HSRP group has one active router, at least one standby router, and perhaps many listening routers.
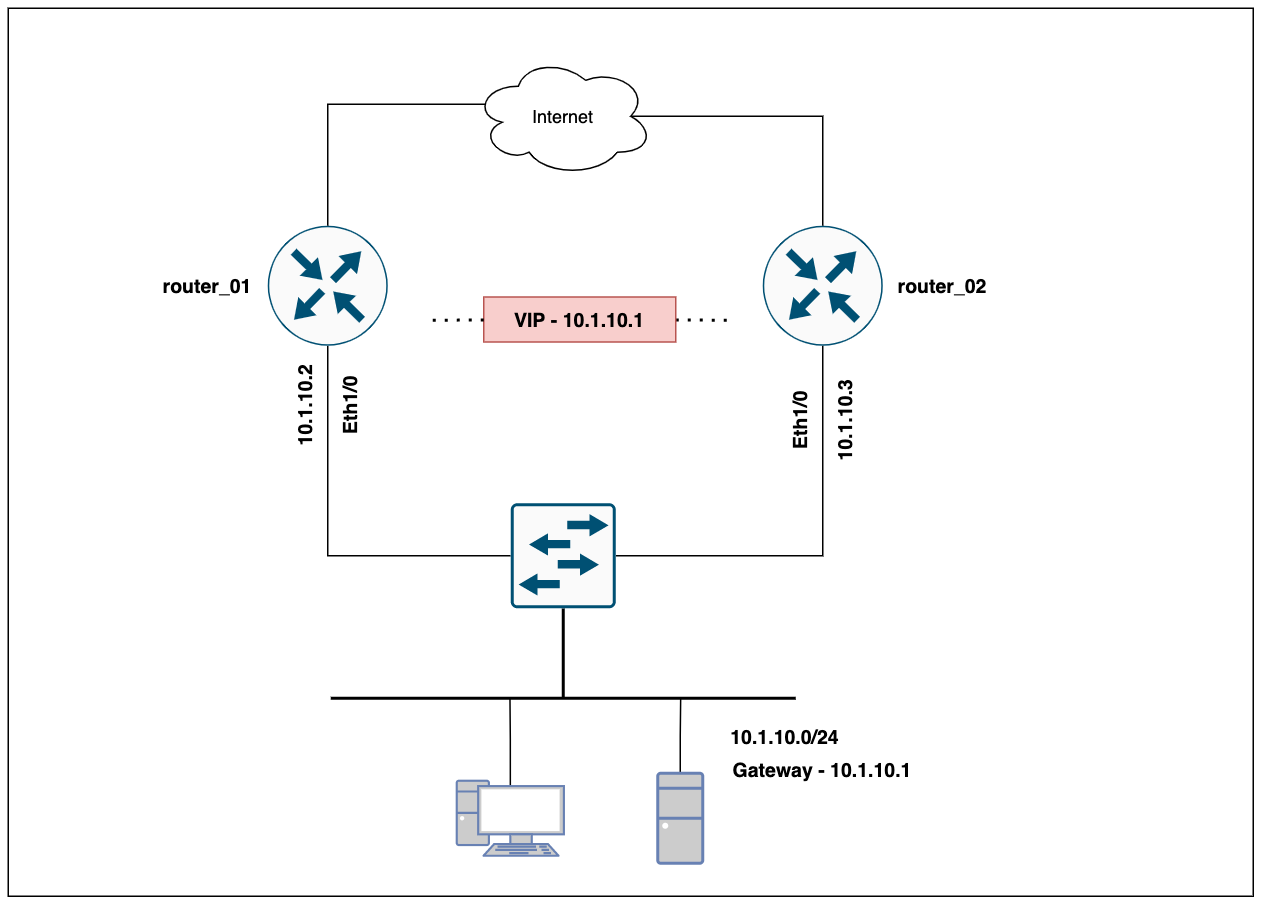
HSRP Configuration Example
Configuration
You only need two lines of config on each of the routers to get HSRP up and running as shown below.
I'm using 10.1.10.0/24 as the LAN subnet and 10.1.10.1 as the HSRP virtual-address.
router_01#
interface Ethernet1/0
 description LAN
 ip address 10.1.10.2 255.255.255.0
 standby 1 ip 10.1.10.1
 standby 1 priority 110
router_02#
interface Ethernet1/0
description LAN
ip address 10.1.10.3 255.255.255.0
standby 1 ip 10.1.10.1
standby 1 priority 101- standby 1 - This line of command is referring to the HSRP group number which can be anything between 0 - 255. The IP address is referring to the Virtual IP that the hosts will use as their default gateway
- priority - The router with the higher priority becomes the active router in that HSRP group. In our example, router_01 has a higher priority of 110.
Verification Commands
Now that we have configured HSRP, let's verify to make sure it does work as expected. You can use the following commands to verify and check the status of HSRP.
show standby brief
router_01#show standby brief
                     P indicates configured to preempt.
                     |
Interface   Grp  Pri P State   Active          Standby         Virtual IP
Et1/0       1    110   Active  local           10.1.10.3       10.1.10.1
router_01
router_02#show standby brief
                     P indicates configured to preempt.
                     |
Interface   Grp  Pri P State   Active          Standby         Virtual IP
Et1/0       1    101   Standby 10.1.10.2       local           10.1.10.1
router_02
show standby all
router_01#show standby all
Ethernet1/0 - Group 1
  State is Active
    2 state changes, last state change 1d18h
  Virtual IP address is 10.1.10.1
  Active virtual MAC address is 0000.0c07.ac01
    Local virtual MAC address is 0000.0c07.ac01 (v1 default)
  Hello time 3 sec, hold time 10 sec
    Next hello sent in 0.224 secs
  Preemption disabled
  Active router is local
  Standby router is 10.1.10.3, priority 101 (expires in 9.056 sec)
  Priority 110 (configured 110)
  Group name is "hsrp-Et1/0-1" (default)
router_01
router_02#show standby all
Ethernet1/0 - Group 1
  State is Standby
    10 state changes, last state change 00:14:06
  Virtual IP address is 10.1.10.1
  Active virtual MAC address is 0000.0c07.ac01
    Local virtual MAC address is 0000.0c07.ac01 (v1 default)
  Hello time 3 sec, hold time 10 sec
    Next hello sent in 0.960 secs
  Preemption disabled
  Active router is 10.1.10.2, priority 110 (expires in 10.080 sec)
  Standby router is local
  Priority 101 (configured 101)
  Group name is "hsrp-Et1/0-1" (default)
router_02
Failover Test
Powering off the Primary Router
I'm going to run continuous ping from one of the end devices and power off the primary router to see what happens.
test_pc> ping 116.12.15.6 -t
84 bytes from 116.12.15.6 icmp_seq=29 ttl=63 time=0.712 ms
84 bytes from 116.12.15.6 icmp_seq=30 ttl=63 time=0.770 ms
84 bytes from 116.12.15.6 icmp_seq=31 ttl=63 time=1.398 ms
116.12.15.6 icmp_seq=32 timeout
116.12.15.6 icmp_seq=33 timeout
116.12.15.6 icmp_seq=34 timeout
116.12.15.6 icmp_seq=35 timeout
84 bytes from 116.12.15.6 icmp_seq=36 ttl=63 time=341.967 ms
84 bytes from 116.12.15.6 icmp_seq=37 ttl=63 time=0.863 ms
84 bytes from 116.12.15.6 icmp_seq=38 ttl=63 time=0.900 ms
84 bytes from 116.12.15.6 icmp_seq=39 ttl=63 time=0.924 ms
As you can see above, we've lost 4 pings during the failover. We can also see that router_02 is the active router for HSRP now.
router_02#show standby brief
Interface   Grp  Pri P State   Active          Standby         Virtual IP
Et1/0 1 101 Active local unknown 10.1.10.1Preemption
Following our previous example, if we restore power to the primary and bring it back online, would it take over the active role? Let's check it out.
Looking at the show output from the primary router it is clear that router_02 is still functioning as active. This is the default behaviour without preemption.
router_01#show standby brief
                     P indicates configured to preempt.
                     |
Interface   Grp  Pri P State   Active          Standby         Virtual IP
Et1/0       1    110   Standby 10.1.10.3       local           10.1.10.1
Et1/1       1    110   Standby 116.12.15.3     local           116.12.15.1
We need to enable preemption if we want the primary router to always take over the active role. Let's configure preemption on both routers and test it. I'm also going to set the delay to 120 seconds so, when the primary router comes back online, it will wait 120 seconds before taking over the active role.
interface Ethernet1/0
 standby 1 preempt delay minimum 120
Once you configured preemption you will notice the Pletter between the Pri and State which indicates that preemption is indeed enabled.
router_01#show standby brief
                     P indicates configured to preempt.
                     |
Interface   Grp  Pri P State   Active          Standby         Virtual IP
Et1/0       1    110 P Active  local           10.1.10.3       10.1.10.1
HSRP Timers
HSRP uses two types of timers, the default HSRP timers are:
- Hello time - 3 Seconds
- Hold time - 10 Seconds
By default, the routers will say hello to each other once every three seconds. The hello packet contains information regarding their status. The hold timer on the other hand tells the standby router to take over if it hasn't received a hello packet from the active router in 10 seconds. So, by default, the standby router takes over the active role after 10 seconds. You can lower the timers if you want by using the following command.
I'm going to use 1 second for the hello timer and 3 seconds for the hold timer.
interface Ethernet1/0
 standby 1 timers 1 3
As you can see below, we've only lost 2 pings whereas, with the default timers, we've lost 4 pings.
test_pc> ping 116.12.15.6 -t

84 bytes from 116.12.15.6 icmp_seq=1 ttl=63 time=2.117 ms
84 bytes from 116.12.15.6 icmp_seq=2 ttl=63 time=1.268 ms
84 bytes from 116.12.15.6 icmp_seq=3 ttl=63 time=1.000 ms
84 bytes from 116.12.15.6 icmp_seq=4 ttl=63 time=0.865 ms
84 bytes from 116.12.15.6 icmp_seq=5 ttl=63 time=0.917 ms
84 bytes from 116.12.15.6 icmp_seq=6 ttl=63 time=0.873 ms
116.12.15.6 icmp_seq=7 timeout
116.12.15.6 icmp_seq=8 timeout
84 bytes from 116.12.15.6 icmp_seq=9 ttl=63 time=1.430 ms
84 bytes from 116.12.15.6 icmp_seq=10 ttl=63 time=0.944 ms
84 bytes from 116.12.15.6 icmp_seq=11 ttl=63 time=0.784 ms
Closing thoughts
As you have seen, configuring HSRP only requires a few lines of configuration. You can fine-tune the timer to suit your environment. I will cover VRRP and GLBP in the upcoming posts.
References