

This post is part of an ongoing series on Ansible, and you can find all the other posts in the series here.
I'm writing this post as part of my Ansible for Network Engineers series. But if you've just stumbled across this post without reading the previous parts, you should still be able to follow along. I won't go into detail on everything we've already covered, such as inventory, variables, loops, and handlers, but I'll point you to the relevant parts where it helps.
Earlier in the series, we built the OSPF topology below using Cisco routers, and we've also looked at configuring OSPF on Juniper. Now it's Arista's turn. The reason I keep coming back to this OSPF topology is that it's a great way to cover a lot of topics in one go. With six routers and three OSPF areas, we get to work with interfaces, IP addressing, OSPF areas, passive interfaces, and router IDs, and it gives us a good excuse to use a range of different modules and config commands along the way. It also makes it really easy to compare how each vendor does things differently, since the network itself stays exactly the same.
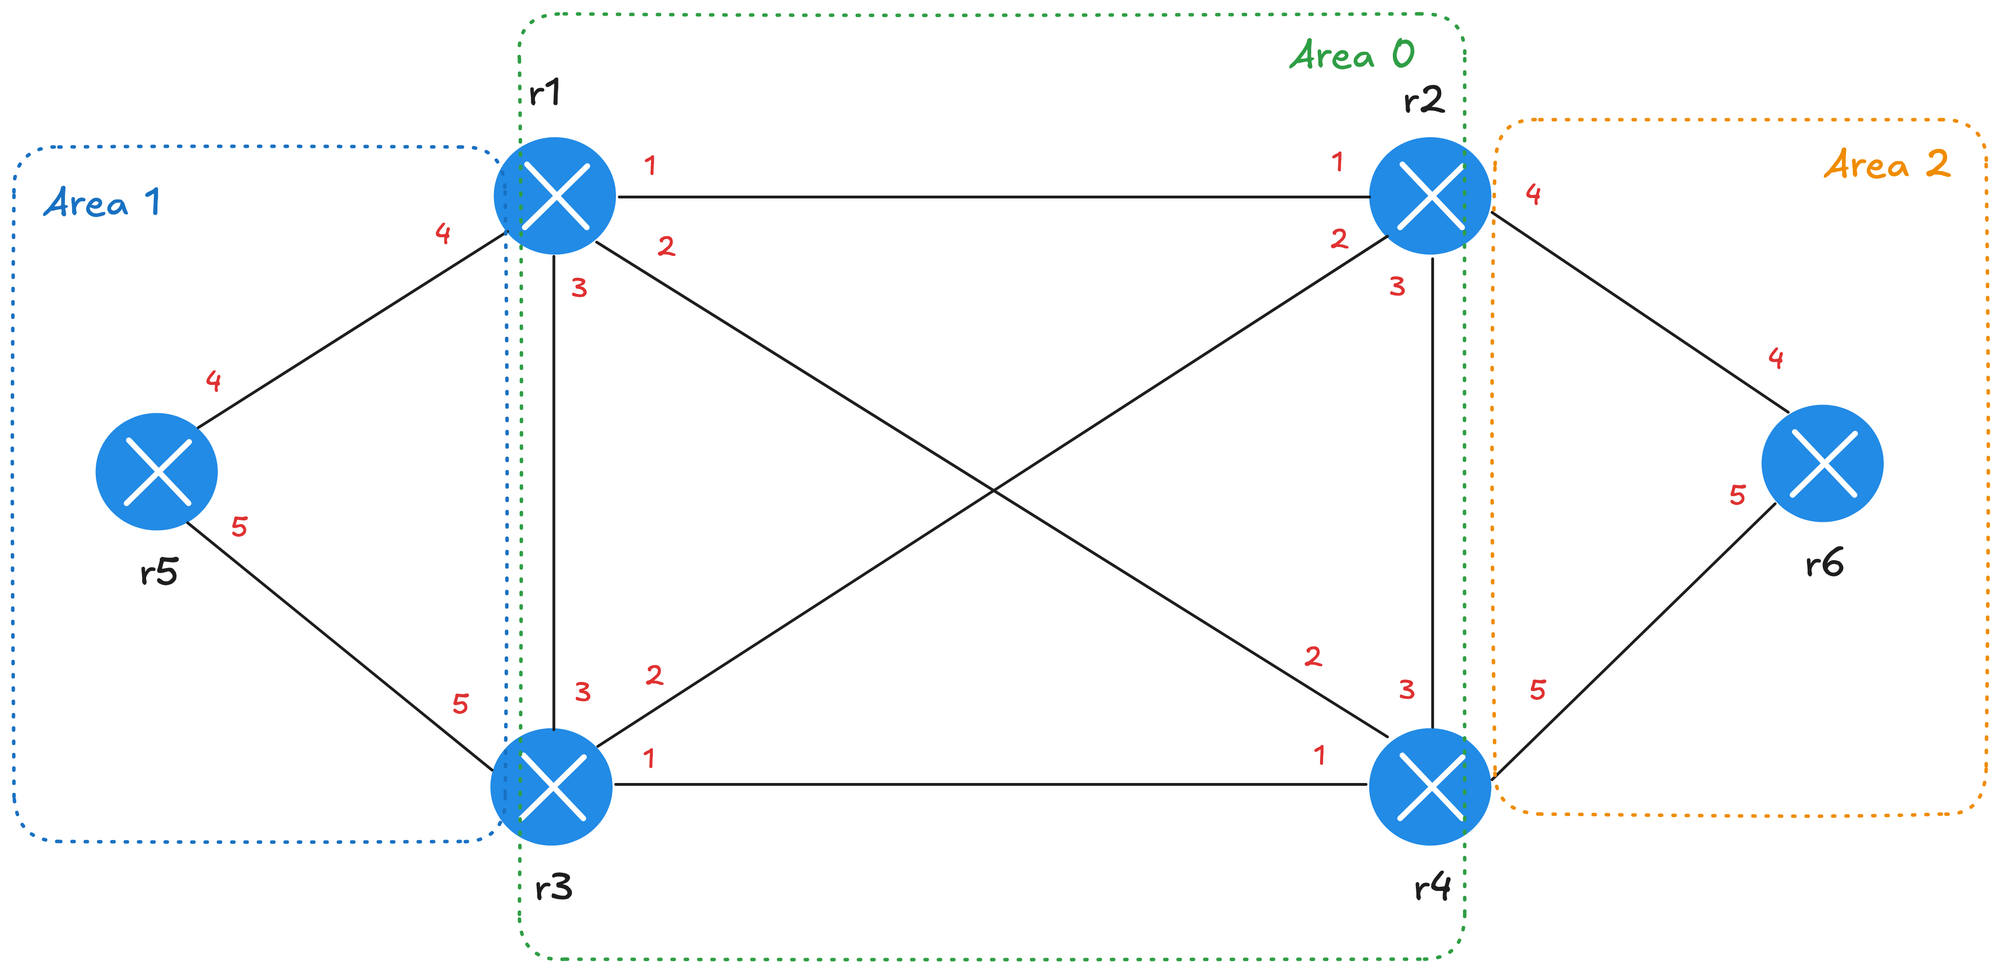
Lab Topology
For this lab, I'm using Containerlab to run six Arista cEOS routers. If you haven't come across it before, Containerlab is a tool that lets you build network labs using containers. You describe the devices and the links between them in a simple YAML file, and Containerlab spins up the whole lab with a single command. I've written a dedicated post on getting started with Containerlab, so feel free to check it out if you'd like to learn more.
Here's the Containerlab topology file for this lab.
name: ospf_lab_arista

mgmt:
  network: mgmt
  ipv4-subnet: 192.168.202.0/24

topology:
  kinds:
    arista_ceos:
      image: ceos:4.34.2

  nodes:
    r1:
      kind: arista_ceos
      mgmt-ipv4: 192.168.202.101
    r2:
      kind: arista_ceos
      mgmt-ipv4: 192.168.202.102
    r3:
      kind: arista_ceos
      mgmt-ipv4: 192.168.202.103
    r4:
      kind: arista_ceos
      mgmt-ipv4: 192.168.202.104
    r5:
      kind: arista_ceos
      mgmt-ipv4: 192.168.202.105
    r6:
      kind: arista_ceos
      mgmt-ipv4: 192.168.202.106

  links:
    # Area 0
    - endpoints: ["r1:eth1", "r2:eth1"]   # 10.100.12.x
    - endpoints: ["r1:eth2", "r4:eth2"]   # 10.100.14.x
    - endpoints: ["r1:eth3", "r3:eth3"]   # 10.100.13.x
    - endpoints: ["r2:eth2", "r3:eth2"]   # 10.100.23.x
    - endpoints: ["r2:eth3", "r4:eth3"]   # 10.100.24.x
    - endpoints: ["r3:eth1", "r4:eth1"]   # 10.100.34.x
    # Area 1
    - endpoints: ["r1:eth4", "r5:eth4"]   # 10.100.15.x
    - endpoints: ["r3:eth5", "r5:eth5"]   # 10.100.35.x
    # Area 2
    - endpoints: ["r2:eth4", "r6:eth4"]   # 10.100.26.x
    - endpoints: ["r4:eth5", "r6:eth5"]   # 10.100.46.x
The IP addresses and links are exactly the same as in the Cisco lab. The only difference is the interface names. In the topology file, cEOS interfaces are written as eth1, eth2, and so on, but on the routers themselves, they show up as Ethernet1, Ethernet2, and so on. So in our Ansible files, we'll use the Ethernet names.
Once the lab is up, each router only has a basic config from Containerlab, with a hostname, a management IP, and a user called admin. There's no interface or routing config at all, so Ansible will configure everything else.
Setting Up the Project
I've created a new project directory called ansible_ospf_arista for this part. Just like in the previous parts, I'm using uv to manage the Python environment. If you are new to uv, please check out my other post here.
uv init --python 3.12
uv add ansible paramiko

source .venv/bin/activate
The Arista collection, arista.eos, comes with the ansible package, so there's nothing else to install.
ansible.cfg and Inventory
The ansible.cfg file is the same as in the previous parts.
[defaults]
inventory = inventory.yml
host_key_checking = False
The inventory has a single group called routers, with all six routers and their management IPs.
---
all:
  children:
    routers:
      hosts:
        r1:
          ansible_host: 192.168.202.101
        r2:
          ansible_host: 192.168.202.102
        r3:
          ansible_host: 192.168.202.103
        r4:
          ansible_host: 192.168.202.104
        r5:
          ansible_host: 192.168.202.105
        r6:
          ansible_host: 192.168.202.106
Group Variables
The connection settings go in group_vars/routers.yml.
---
ansible_network_os: arista.eos.eos
ansible_connection: ansible.netcommon.network_cli
ansible_user: admin
ansible_password: admin
ansible_become: true
ansible_become_method: enable
For now, we're connecting to the routers over SSH using network_cli, which is the same connection we've used for Cisco throughout the series. admin / admin is the default login Containerlab sets up for cEOS, so update it if yours is different.
The last two lines control the privilege level Ansible runs at. In most cases, when you log in to an Arista router, you start in user EXEC mode, at privilege level 1, where you can run most show commands, but you can't make any changes. ansible_become: true and ansible_become_method: enable tell Ansible to run enable after logging in, which moves it up to privileged EXEC mode, at privilege level 15. Of course, if you use TACACS+ or RADIUS, you can configure them to put the user straight into privilege level 15 when they log in, in which case you won't need these two lines.
Checking the Connection
Before writing any config, let's make sure Ansible can connect to every router and run commands. Create a playbook called check_exec.yml.
---
- name: Check exec connectivity to the Arista routers
  hosts: routers
  gather_facts: false

  tasks:
    - name: Run a few show commands
      arista.eos.eos_command:
        commands:
          - show privilege
          - show hostname
      register: output

    - name: Display the output
      ansible.builtin.debug:
        msg:
          - "{{ output.stdout_lines[0] }}"
          - "{{ output.stdout_lines[1] }}"
show privilege shows which privilege level Ansible is running at, and show hostname confirms it's connected to the right router.
ansible-playbook check_exec.yml
PLAY [Check exec connectivity to the Arista routers]

TASK [Run a few show commands] *******************
ok: [r4]
ok: [r5]
ok: [r1]
ok: [r3]
ok: [r2]
ok: [r6]

TASK [Display the output] ************************
ok: [r1] => {
  "msg": [
    [
      "Current privilege level is 15"
    ],
    [
      "Hostname: r1",
      "FQDN:     r1"
    ]
  ]
}
...

PLAY RECAP ***************************************
r1 : ok=2 changed=0 unreachable=0 failed=0 skipped=0 rescued=0 ignored=0
...
r6 : ok=2 changed=0 unreachable=0 failed=0 skipped=0 rescued=0 ignored=0
All six routers responded, and Ansible is running at privilege level 15, so it'll be able to make changes. To see what difference the become settings make, I removed ansible_become from group_vars and ran the playbook again.
TASK [Display the output] ************************
ok: [r1] => {
  "msg": [
    [
      "Current privilege level is 1"
    ],
    [
      "Hostname: r1",
      "FQDN:     r1"
    ]
  ]
}
This time, Ansible is only at privilege level 1. The show commands still work, since they don't need full privileges, but anything that makes changes, like the playbook we're about to write, would fail. So make sure ansible_become is back in group_vars before moving on.
Modelling the Network in host_vars
Before writing any playbooks, we need to decide how to describe our network to Ansible. This is often called the data model, and it's one of the most important parts of any automation project. If you get it right, the playbooks become simple and reusable, and making a change usually means editing a few lines of data, rather than touching the playbook at all.
Why host_vars?
Ansible lets you store variables for each device in a directory called host_vars. Each device gets its own file, named after the device in the inventory, so r1 gets host_vars/r1.yml, r2 gets host_vars/r2.yml, and so on. When a playbook runs against r1, Ansible automatically loads the variables from r1.yml, without us having to reference the file anywhere.
This is a good fit for our network, since every router has different interfaces, IP addresses, and areas. Things that are the same for every router, like the username and password, go in group_vars instead, which we've already set up.
What Each Router Needs
If we think about what makes each router different from an OSPF point of view, it really comes down to two things.
- The router ID - A single value for each router. So it's a simple variable,
router_id. - The interfaces - Each router has several, and each one has its own settings. So it's a list,
interfaces, where each item describes one interface.
For each interface, we store five things.
- name - The interface name, such as
Ethernet1orLoopback0. - description - The name of the router on the other end of the link. It goes into the interface description on the router, which makes the config easier to read, and it also tells us who the neighbor should be.
- ip - The IP address with its prefix length, such as
10.100.12.1/24. - area - The OSPF area the interface belongs to. I've written the areas in dotted format, such as
0.0.0.0, since that's how EOS shows them in the running config. - passive - Whether OSPF should be passive on the interface, meaning it advertises the network, but doesn't try to form neighbors on it. The loopback is the only passive interface on each router, since there are no OSPF neighbors behind it.
Notice that we're not writing any Arista commands in these files. We're only describing what the network should look like, such as "Ethernet1 has this IP address and is in area 0". It's up to the playbook to turn that into the right commands for the device. This is why the same structure worked for our Cisco lab, with only the interface names changed.
It also means each piece of information only lives in one place. For example, the passive value controls two things in our playbook, whether the interface is passive, and whether it's set up as a point-to-point link. If we ever want to add a new interface, we just add a new item to the list, and the playbook takes care of the rest.
The host_vars Files
Here are the files for all six routers. Each one follows exactly the same structure, and only the values change.
host_vars/r1.yml
---
router_id: 1.1.1.1
interfaces:
  - name: Ethernet1
    description: r2
    ip: 10.100.12.1/24
    area: 0.0.0.0
    passive: false
  - name: Ethernet2
    description: r4
    ip: 10.100.14.1/24
    area: 0.0.0.0
    passive: false
  - name: Ethernet3
    description: r3
    ip: 10.100.13.1/24
    area: 0.0.0.0
    passive: false
  - name: Ethernet4
    description: r5
    ip: 10.100.15.1/24
    area: 0.0.0.1
    passive: false
  - name: Loopback0
    description: Router ID
    ip: 1.1.1.1/32
    area: 0.0.0.0
    passive: true
host_vars/r2.yml
---
router_id: 2.2.2.2
interfaces:
  - name: Ethernet1
    description: r1
    ip: 10.100.12.2/24
    area: 0.0.0.0
    passive: false
  - name: Ethernet2
    description: r3
    ip: 10.100.23.1/24
    area: 0.0.0.0
    passive: false
  - name: Ethernet3
    description: r4
    ip: 10.100.24.1/24
    area: 0.0.0.0
    passive: false
  - name: Ethernet4
    description: r6
    ip: 10.100.26.1/24
    area: 0.0.0.2
    passive: false
  - name: Loopback0
    description: Router ID
    ip: 2.2.2.2/32
    area: 0.0.0.0
    passive: true
host_vars/r3.yml
---
router_id: 3.3.3.3
interfaces:
  - name: Ethernet1
    description: r4
    ip: 10.100.34.1/24
    area: 0.0.0.0
    passive: false
  - name: Ethernet2
    description: r2
    ip: 10.100.23.2/24
    area: 0.0.0.0
    passive: false
  - name: Ethernet3
    description: r1
    ip: 10.100.13.2/24
    area: 0.0.0.0
    passive: false
  - name: Ethernet5
    description: r5
    ip: 10.100.35.1/24
    area: 0.0.0.1
    passive: false
  - name: Loopback0
    description: Router ID
    ip: 3.3.3.3/32
    area: 0.0.0.0
    passive: true
host_vars/r4.yml
---
router_id: 4.4.4.4
interfaces:
  - name: Ethernet1
    description: r3
    ip: 10.100.34.2/24
    area: 0.0.0.0
    passive: false
  - name: Ethernet2
    description: r1
    ip: 10.100.14.2/24
    area: 0.0.0.0
    passive: false
  - name: Ethernet3
    description: r2
    ip: 10.100.24.2/24
    area: 0.0.0.0
    passive: false
  - name: Ethernet5
    description: r6
    ip: 10.100.46.1/24
    area: 0.0.0.2
    passive: false
  - name: Loopback0
    description: Router ID
    ip: 4.4.4.4/32
    area: 0.0.0.0
    passive: true
host_vars/r5.yml
---
router_id: 5.5.5.5
interfaces:
  - name: Ethernet4
    description: r1
    ip: 10.100.15.2/24
    area: 0.0.0.1
    passive: false
  - name: Ethernet5
    description: r3
    ip: 10.100.35.2/24
    area: 0.0.0.1
    passive: false
  - name: Loopback0
    description: Router ID
    ip: 5.5.5.5/32
    area: 0.0.0.1
    passive: true
host_vars/r6.yml
---
router_id: 6.6.6.6
interfaces:
  - name: Ethernet4
    description: r2
    ip: 10.100.26.2/24
    area: 0.0.0.2
    passive: false
  - name: Ethernet5
    description: r4
    ip: 10.100.46.2/24
    area: 0.0.0.2
    passive: false
  - name: Loopback0
    description: Router ID
    ip: 6.6.6.6/32
    area: 0.0.0.2
    passive: true
r1 to r4 each have three links in area 0, the backbone, and one link to either area 1 or area 2, which makes them Area Border Routers. r5 and r6 only have links in a single area, so I've put their loopbacks in that same area, area 1 for r5, and area 2 for r6.
The Playbook
Now that we have our data, let's write the playbook that turns it into config on the routers. Create a new file called ospf.yml.
---
- name: Configure OSPF on Arista
  hosts: routers
  gather_facts: false

  tasks:
    - name: Enable IP routing
      arista.eos.eos_config:
        lines:
          - ip routing
      notify: Save config

    - name: Configure interfaces
      arista.eos.eos_interfaces:
        config:
          - name: "{{ item.name }}"
            description: "{{ item.description }}"
            enabled: true
            mode: "{{ omit if item.name.startswith('Loopback') else 'layer3' }}"
      loop: "{{ interfaces }}"
      loop_control:
        label: "{{ item.name }}"
      notify: Save config

    - name: Configure IP addresses
      arista.eos.eos_l3_interfaces:
        config:
          - name: "{{ item.name }}"
            ipv4:
              - address: "{{ item.ip }}"
      loop: "{{ interfaces }}"
      loop_control:
        label: "{{ item.name }}"
      notify: Save config

    - name: Configure OSPF process
      arista.eos.eos_ospfv2:
        config:
          processes:
            - process_id: 1
              router_id: "{{ router_id }}"
              passive_interface:
                interface_list: "{{ interfaces | selectattr('passive') | map(attribute='name') | join(' ') }}"
      notify: Save config

    - name: Configure OSPF on interfaces
      arista.eos.eos_ospf_interfaces:
        config:
          - name: "{{ item.name }}"
            address_family:
              - afi: ipv4
                area:
                  area_id: "{{ item.area }}"
                network: "{{ 'point-to-point' if not item.passive else omit }}"
      loop: "{{ interfaces }}"
      loop_control:
        label: "{{ item.name }}"
      notify: Save config

  handlers:
    - name: Save config
      arista.eos.eos_config:
        save_when: modified
The playbook has five tasks and one handler. Let's go through each of them.
Enabling IP Routing
On cEOS, IP routing is turned off by default and there's no resource module for this setting, so we use eos_config, which simply sends the lines we give it, just like typing them on the CLI.
Configuring the Interfaces
The second task uses eos_interfaces to set the description on each interface, and make sure it's enabled. We use loop to run the task once for each interface in our interfaces list, and item refers to the interface we're working on in that iteration. So item.name is the interface name, and item.description is its description.
loop_control with label only changes what's shown in the output. Without it, Ansible would print the entire item for every iteration, with the IP, area, and everything else. With label, it only shows the interface name, which keeps the output much easier to read.
The interesting option here is mode. On Arista, every Ethernet interface starts out as a switchport, like a port on a switch, so it can't have an IP address. Setting mode to layer3 turns it into a routed port, which is the same as running no switchport on the CLI.
Loopback interfaces don't have a mode, though, so we can't set it for them. To handle this, we use a short condition.
mode: "{{ omit if item.name.startswith('Loopback') else 'layer3' }}"
If the interface name starts with Loopback, the value is omit, which is a special Ansible value that tells the module to leave the option out completely, as if we'd never written it. For every other interface, the value is layer3.
Configuring the IP Addresses
The third task uses eos_l3_interfaces to configure the IP address on each interface, again looping over our list. We can pass the address with its prefix length, such as 10.100.12.1/24, exactly as it is in host_vars.
Configuring the OSPF Process
The fourth task uses eos_ospfv2 to create OSPF process 1, set the router ID, and configure the passive interfaces. This task doesn't need a loop, since each router only has one OSPF process.
To build the list of passive interfaces, we use a chain of filters.
interface_list: "{{ interfaces | selectattr('passive') | map(attribute='name') | join(' ') }}"
- selectattr('passive') - Keeps only the interfaces where
passiveistrue. - map(attribute='name') - Takes just the name of each of those interfaces.
- join(' ') - Joins the names into a single string, separated by spaces, since the module expects a string here.
In our network, this gives us Loopback0 on every router. But if we ever mark another interface as passive in host_vars, it'll be added automatically, without changing the playbook.
You might have noticed that this task comes before the next one, which enables OSPF on the interfaces. That's on purpose. As soon as OSPF is enabled on an interface, the router starts the OSPF process, and if there's no router ID configured yet, it picks one by itself, usually the highest IP address on a loopback. Changing the router ID after that doesn't take effect until the OSPF process is restarted. We actually ran into this in the Cisco lab, so configuring the process and the router ID first avoids the problem completely.
Configuring OSPF on the Interfaces
The last task uses eos_ospf_interfaces to add each interface to its OSPF area, and set the network type.
network: "{{ 'point-to-point' if not item.passive else omit }}"
Every link in our network connects exactly two routers, so we set the network type to point-to-point. For the loopback, which is passive, we use omit again, so the network type is left out.
You might be wondering why we set the passive interfaces with eos_ospfv2, rather than here. eos_ospf_interfaces does have a passive_interface option, but according to its documentation, it only works for OSPFv3, which is used for IPv6. For OSPFv2, passive interfaces are configured under the OSPF process, which is what we did in the previous task.
Saving the Config
Just like Cisco, any changes we make on Arista only go into the running config, and they'd be lost if the router rebooted. So every task has notify: Save config, which tells Ansible to run the Save config handler at the end of the play, but only if that task actually changed something.
The handler uses eos_config with save_when: modified, which saves the running config to the startup config, but only if they're different. A handler only runs once per router, at the end of the play, no matter how many tasks notified it.
Running in Check Mode
Before making any changes, let's run the playbook in check mode against r1. With --check, Ansible runs every task without actually changing anything on the router, and tells us whether each task would make a change.
In check mode, Ansible runs without making any changes on the devices. Modules that support check mode report the changes they would have made. Modules that do not support check mode report nothing and do nothing.
ansible-playbook ospf.yml --check --limit r1
PLAY [Configure OSPF on Arista] ******************

TASK [Enable IP routing] *************************
changed: [r1]

TASK [Configure interfaces] **********************
changed: [r1] => (item=Ethernet1)
changed: [r1] => (item=Ethernet2)
changed: [r1] => (item=Ethernet3)
changed: [r1] => (item=Ethernet4)
changed: [r1] => (item=Loopback0)

TASK [Configure IP addresses] ********************
changed: [r1] => (item=Ethernet1)
...
changed: [r1] => (item=Loopback0)

TASK [Configure OSPF process] ********************
changed: [r1]

TASK [Configure OSPF on interfaces] **************
skipping: [r1] => (item=Ethernet1)
...
skipping: [r1] => (item=Loopback0)
skipping: [r1]

RUNNING HANDLER [Save config] ********************
ok: [r1]

PLAY RECAP ***************************************
r1 : ok=5 changed=4 unreachable=0 failed=0 skipped=1 rescued=0 ignored=0
The first four tasks show changed, which is what we'd expect on a fresh router. The handler ran too, since those tasks reported changed, but it shows ok, because nothing was actually changed on r1, so there was nothing to save.
The last task was skipped, but the output doesn't tell us why. To see more detail, we can add -v.
ansible-playbook ospf.yml --check --limit r1 -v
TASK [Configure IP addresses] ********************
changed: [r1] => (item=Ethernet1) => {..., "commands": ["interface Ethernet1", "ip address 10.100.12.1/24"], ...}
...

TASK [Configure OSPF process] ********************
changed: [r1] => {..., "commands": ["router ospf 1", "passive-interface Loopback0", "router-id 1.1.1.1", "exit"]}

TASK [Configure OSPF on interfaces] **************
skipping: [r1] => (item=Ethernet1) => {..., "msg": "remote module (arista.eos.eos_ospf_interfaces) does not support check mode"}
...
With -v, each task also shows the commands it would send to the router, so we can see exactly what would change. For example, the OSPF process task would create process 1, set the router ID to 1.1.1.1, and make Loopback0 passive.
We can also see why the last task was skipped. eos_ospf_interfaces doesn't support check mode, so Ansible doesn't run it at all. Not every module supports check mode, so it's always worth running your playbook with --check first, rather than assuming every task will be checked.
In the next section, we'll pair --check with --diff, to see the differences between the current config and the new one.
Pairing Check Mode with Diff
So far, check mode has told us which tasks would make a change, and -v has shown us the commands. Now, let's add --diff, which shows the differences between the current config and the new config, for modules that support it.
ansible-playbook ospf.yml --check --diff --limit r1
PLAY [Configure OSPF on Arista] ******************

TASK [Enable IP routing] *************************
--- system:/running-config
+++ session:/ansible_179405766163-session-config
-no ip routing
+ip routing
changed: [r1]

TASK [Configure interfaces] **********************
changed: [r1] => (item=Ethernet1)
...
changed: [r1] => (item=Loopback0)

TASK [Configure IP addresses] ********************
changed: [r1] => (item=Ethernet1)
...
changed: [r1] => (item=Loopback0)

TASK [Configure OSPF process] ********************
changed: [r1]

TASK [Configure OSPF on interfaces] **************
skipping: [r1] => (item=Ethernet1)
...
skipping: [r1]

RUNNING HANDLER [Save config] ********************
ok: [r1]

PLAY RECAP ***************************************
r1 : ok=5 changed=4 unreachable=0 failed=0 skipped=1 rescued=0 ignored=0
Only the first task shows a diff. It tells us that no ip routing would be removed, and ip routing would be added, so IP routing would be turned on. None of the resource modules show anything with --diff, so for those, -v is still the way to see what would change. Running with --check --diff -v gives you both in one go.
The diff for eos_config is interesting, though. It compares system:/running-config with something called session:/ansible_...-session-config. That's because eos_config uses an EOS feature called a configuration session. Rather than typing the commands straight into the running config, it loads them into a separate session first, and compares the session with the running config. In check mode, the session is then thrown away, so nothing changes on the router. This is how eos_config can show an accurate diff without touching the running config. We'll look at configuration sessions in more detail later.
To sum up, here's what each option gives us with this playbook.
- --check - Shows which tasks would make a change.
- --check -v - Also shows the commands each resource module would send.
- --check --diff - Also shows a diff, but only for
eos_config.
Running the Playbook
Now that we're happy with the check mode results, let's run the playbook for real against all six routers.
ansible-playbook ospf.yml
PLAY [Configure OSPF on Arista] ******************

TASK [Enable IP routing] *************************
changed: [r1]
changed: [r4]
changed: [r3]
changed: [r5]
changed: [r2]
changed: [r6]

TASK [Configure interfaces] **********************
changed: [r3] => (item=Ethernet1)
changed: [r1] => (item=Ethernet1)
...
changed: [r6] => (item=Loopback0)

TASK [Configure IP addresses] ********************
changed: [r3] => (item=Ethernet1)
changed: [r5] => (item=Ethernet4)
...
changed: [r6] => (item=Loopback0)

TASK [Configure OSPF process] ********************
changed: [r5]
changed: [r2]
changed: [r4]
changed: [r3]
changed: [r1]
changed: [r6]

TASK [Configure OSPF on interfaces] **************
changed: [r5] => (item=Ethernet4)
changed: [r4] => (item=Ethernet1)
...
changed: [r6] => (item=Loopback0)

RUNNING HANDLER [Save config] ********************
changed: [r4]
changed: [r2]
changed: [r3]
changed: [r1]
changed: [r5]
changed: [r6]

PLAY RECAP ***************************************
r1 : ok=6 changed=6 unreachable=0 failed=0 skipped=0 rescued=0 ignored=0
r2 : ok=6 changed=6 unreachable=0 failed=0 skipped=0 rescued=0 ignored=0
r3 : ok=6 changed=6 unreachable=0 failed=0 skipped=0 rescued=0 ignored=0
r4 : ok=6 changed=6 unreachable=0 failed=0 skipped=0 rescued=0 ignored=0
r5 : ok=6 changed=6 unreachable=0 failed=0 skipped=0 rescued=0 ignored=0
r6 : ok=6 changed=6 unreachable=0 failed=0 skipped=0 rescued=0 ignored=0
Every task shows changed on all six routers, since they all started with a blank config. This time, the last task ran as well. At the end, the handler ran on every router and saved the config, since every task on every router notified it.
If we run the playbook a second time, everything shows ok, and the handler doesn't run at all, since nothing changed.
PLAY [Configure OSPF on Arista] ******************

TASK [Enable IP routing] *************************
ok: [r5]
ok: [r2]
...

TASK [Configure interfaces] **********************
ok: [r5] => (item=Ethernet4)
ok: [r3] => (item=Ethernet1)
...

TASK [Configure IP addresses] ********************
ok: [r4] => (item=Ethernet1)
...

TASK [Configure OSPF process] ********************
ok: [r2]
ok: [r1]
...

TASK [Configure OSPF on interfaces] **************
ok: [r5] => (item=Ethernet4)
...

PLAY RECAP ***************************************
r1 : ok=5 changed=0 unreachable=0 failed=0 skipped=0 rescued=0 ignored=0
r2 : ok=5 changed=0 unreachable=0 failed=0 skipped=0 rescued=0 ignored=0
r3 : ok=5 changed=0 unreachable=0 failed=0 skipped=0 rescued=0 ignored=0
r4 : ok=5 changed=0 unreachable=0 failed=0 skipped=0 rescued=0 ignored=0
r5 : ok=5 changed=0 unreachable=0 failed=0 skipped=0 rescued=0 ignored=0
r6 : ok=5 changed=0 unreachable=0 failed=0 skipped=0 rescued=0 ignored=0
This shows that the playbook is idempotent. The config on every router already matches what's in host_vars, so Ansible doesn't need to change anything.
Verification
Let's log in to the routers and check that everything is working. First, on r1.
r1#show ip ospf neighbor
Neighbor ID     Instance VRF      Pri State      Dead Time   Address         Interface
2.2.2.2         1        default  0   FULL       00:00:31    10.100.12.2     Ethernet1
4.4.4.4         1        default  0   FULL       00:00:30    10.100.14.2     Ethernet2
3.3.3.3         1        default  0   FULL       00:00:37    10.100.13.2     Ethernet3
5.5.5.5         1        default  0   FULL       00:00:35    10.100.15.2     Ethernet4
r1 has a FULL adjacency with all four of its neighbors, three in area 0, and r5 in area 1.
Next, let's check that the config was saved. EOS has a handy command called show running-config diffs, which shows any differences between the running config and the startup config.
r1#show running-config diffs
r1#
The output is empty, which means the running and startup configs are the same, so the handler saved everything.
Finally, let's check end-to-end reachability from r5, which is in area 1.
r5#show ip ospf neighbor
Neighbor ID     Instance VRF      Pri State      Dead Time   Address         Interface
1.1.1.1         1        default  0   FULL       00:00:29    10.100.15.1     Ethernet4
3.3.3.3         1        default  0   FULL       00:00:30    10.100.35.1     Ethernet5

r5#ping 6.6.6.6 source 5.5.5.5
PING 6.6.6.6 (6.6.6.6) from 5.5.5.5 : 72(100) bytes of data.
80 bytes from 6.6.6.6: icmp_seq=1 ttl=62 time=3.47 ms
80 bytes from 6.6.6.6: icmp_seq=2 ttl=62 time=0.848 ms
80 bytes from 6.6.6.6: icmp_seq=3 ttl=62 time=0.750 ms
80 bytes from 6.6.6.6: icmp_seq=4 ttl=62 time=0.754 ms
80 bytes from 6.6.6.6: icmp_seq=5 ttl=62 time=0.794 ms

--- 6.6.6.6 ping statistics ---
5 packets transmitted, 5 received, 0% packet loss, time 13ms
r5 has FULL adjacencies with r1 and r3, and it can reach r6's loopback. Since r5 is in area 1, and r6 is in area 2, this ping has to cross the backbone, area 0, which confirms OSPF is working across all three areas.
Switching to eAPI
So far, Ansible has been connecting to our routers over SSH, using network_cli. It logs in, runs commands, and reads the output, just like we would. Arista also has its own API, called eAPI, and Ansible can use it instead of SSH.
eAPI runs over HTTPS. Instead of logging in and typing commands, Ansible sends the commands to the router in an HTTPS request, and the router sends the results back as structured data. It's built for automation, so Ansible doesn't have to deal with things like prompts and screen output, the way it does over SSH.
Enabling eAPI
eAPI needs to be enabled on the routers. Containerlab enables it for cEOS by default, and you can check it with the following command.
r1#show management api http-commands
r1#show management api http-commands
Enabled: Yes
HTTPS server: running, set to use port 443
HTTP server: shutdown, set to use port 80
Local HTTP server: shutdown, no authentication, set to use port 8080
Unix Socket server: shutdown, no authentication
VRFs: default
Hits: 4
Last hit: 0:00:34 ago
Bytes in: 643
Bytes out: 1204
Requests: 4
Commands: 8
Duration: 0.136 seconds
SSL Profile: none
FIPS Mode: No
QoS DSCP: 0
Session Timeout: 1440 minutes
Log Level: none
CSP Frame Ancestor: None
TLS Protocols: 1.0 1.1 1.2 1.3
User  Requests Bytes in Bytes out Last hit
----- -------- -------- --------- -----------
admin        4      643      1204 0:00:34 ago
If it's not enabled on your routers, you can turn it on with the following commands.
configure
management api http-commands
   no shutdown
end
Updating group_vars
To switch to eAPI, we only need to change the connection settings in group_vars/routers.yml. The playbooks stay exactly the same.
---
ansible_network_os: arista.eos.eos
ansible_connection: ansible.netcommon.httpapi
ansible_httpapi_use_ssl: true
ansible_httpapi_validate_certs: false
ansible_user: admin
ansible_password: admin
ansible_become: true
ansible_become_method: enable
There are three changes here.
- ansible_connection - Changed from
network_clitohttpapi, which tells Ansible to talk to the routers through their API, rather than SSH. - ansible_httpapi_use_ssl - Tells Ansible to use HTTPS, rather than plain HTTP.
- ansible_httpapi_validate_certs - cEOS uses a self-signed certificate, which Ansible wouldn't trust by default, so we turn off certificate validation. This is fine in a lab, but in production, you'd want to use proper certificates and leave validation turned on.
The username, password, and become settings stay the same.
Testing eAPI
Let's run our connectivity check again.
ansible-playbook check_exec.yml
PLAY [Check exec connectivity to the Arista routers]

TASK [Run a few show commands] *******************
ok: [r1]
ok: [r3]
ok: [r2]
ok: [r5]
ok: [r4]
ok: [r6]

TASK [Display the output] ************************
ok: [r1] => {
  "msg": [
    [
      "Current privilege level is 15"
    ],
    [
      "Hostname: r1",
      "FQDN:     r1"
    ]
  ]
}
...
We get exactly the same result as before, with every router at privilege level 15. There's one small difference, though. The ansible-pylibssh not installed, falling back to paramiko warning we've been seeing on every run is gone. That warning only appears for SSH connections, so this confirms Ansible isn't using SSH anymore.
Making a Change over eAPI
Running show commands is one thing, but let's make sure we can also make changes over eAPI. In host_vars/r1.yml, I changed the description of Ethernet1 from r2 to r2-via-eapi, and ran the OSPF playbook against r1.
ansible-playbook ospf.yml --limit r1 -v
TASK [Enable IP routing] *************************
ok: [r1] => {"changed": false}

TASK [Configure interfaces] **********************
changed: [r1] => (item=Ethernet1) => {..., "commands": ["interface Ethernet1", "description r2-via-eapi"], ...}
ok: [r1] => (item=Ethernet2) => {..., "changed": false, "commands": [], ...}
ok: [r1] => (item=Ethernet3) => {..., "changed": false, "commands": [], ...}
ok: [r1] => (item=Ethernet4) => {..., "changed": false, "commands": [], ...}
ok: [r1] => (item=Loopback0) => {..., "changed": false, "commands": [], ...}

TASK [Configure IP addresses] ********************
ok: [r1] => (item=Ethernet1) => {..., "changed": false, "commands": [], ...}
...

TASK [Configure OSPF process] ********************
ok: [r1] => {..., "changed": false, "commands": []}

TASK [Configure OSPF on interfaces] **************
ok: [r1] => (item=Ethernet1) => {..., "changed": false, "commands": [], ...}
...

RUNNING HANDLER [Save config] ********************
changed: [r1] => {"changed": true}

PLAY RECAP ***************************************
r1 : ok=6 changed=2 unreachable=0 failed=0 skipped=0 rescued=0 ignored=0
Only Ethernet1 changed, and the only commands sent were interface Ethernet1 and the new description. Every other interface and task shows ok, with an empty commands list, since nothing else needed changing. The handler then saved the config, since one task reported changed.
So everything we did over SSH works over eAPI too, without changing a single line in the playbook. We'll stick with eAPI for the rest of the Arista posts.
Getting Structured Output
Since we're using eAPI now, Arista can send us the output of a show command as structured data, rather than plain text. We looked at this in the structured output part of the series, using | json with SSH. With eAPI, we can ask for the output in JSON as an option on each command.
Let's use this to list the OSPF neighbors on every router. Create a new playbook called ospf_neighbors.yml.
---
- name: Get OSPF neighbors over eAPI
  hosts: routers
  gather_facts: false

  tasks:
    - name: Run show ip ospf neighbor as JSON
      arista.eos.eos_command:
        commands:
          - command: show ip ospf neighbor
            output: json
      register: ospf_output

    - name: Display each neighbor
      vars:
        neighbors: "{{ ospf_output.stdout[0]['vrfs']['default']['instList']['1']['ospfNeighborEntries'] }}"
      ansible.builtin.debug:
        msg: "{{ item.routerId }} on {{ item.interfaceName }} is {{ item.adjacencyState }}"
      loop: "{{ neighbors }}"
      loop_control:
        label: "{{ item.routerId }}"
In the first task, instead of just writing the command, we give eos_command two options for it.
- command - The command to run.
- output - The format we want the output in.
jsonasks the router to return it as structured data, which is the same as adding| jsonto the command on the CLI.
We register the result as ospf_output, and the structured data ends up in ospf_output.stdout[0], since it's the output of the first, and only, command.
The neighbors are a few levels down in the data, under the VRF, default, and the OSPF instance, 1, in a list called ospfNeighborEntries. That's quite a long path, so in the second task, we use vars to give it a shorter name, neighbors. Then we loop over the list, and print a line for each neighbor, with its router ID, the interface it's on, and the state of the adjacency.
ansible-playbook ospf_neighbors.yml
PLAY [Get OSPF neighbors over eAPI] **************

TASK [Run show ip ospf neighbor as JSON] *********
ok: [r1]
ok: [r5]
...

TASK [Display each neighbor] *********************
ok: [r1] => (item=2.2.2.2) => {
  "msg": "2.2.2.2 on Ethernet1 is full"
}
ok: [r1] => (item=4.4.4.4) => {
  "msg": "4.4.4.4 on Ethernet2 is full"
}
ok: [r1] => (item=3.3.3.3) => {
  "msg": "3.3.3.3 on Ethernet3 is full"
}
ok: [r1] => (item=5.5.5.5) => {
  "msg": "5.5.5.5 on Ethernet4 is full"
}
...
ok: [r5] => (item=1.1.1.1) => {
  "msg": "1.1.1.1 on Ethernet4 is full"
}
ok: [r5] => (item=3.3.3.3) => {
  "msg": "3.3.3.3 on Ethernet5 is full"
}
...

PLAY RECAP ***************************************
r1 : ok=2 changed=0 unreachable=0 failed=0 skipped=0 rescued=0 ignored=0
...
r6 : ok=2 changed=0 unreachable=0 failed=0 skipped=0 rescued=0 ignored=0
I've trimmed the output to r1 and r5, but every router reports what we'd expect. r1 to r4 each have four neighbors, and r5 and r6 each have two, all in the full state, and each one is on the interface we described in host_vars.
Since the router gives us the data as a list of neighbors, each with its own keys, we don't need any parsers or templates. We can use it straight away, just like any other variable, which makes it really easy to build checks on top of it.
Backing Up the Config
Just like ios_config and junos_config, the eos_config module has a backup option, which saves a copy of the router's running config to the control node.
Create a new playbook called backup.yml.
---
- name: Back up the Arista config
  hosts: routers
  gather_facts: false

  vars:
    backup_dir: "{{ playbook_dir }}/backups"

  tasks:
    - name: Create the backup directory
      ansible.builtin.file:
        path: "{{ backup_dir }}"
        state: directory
      delegate_to: localhost
      run_once: true

    - name: Back up the config
      arista.eos.eos_config:
        backup: true
        backup_options:
          dir_path: "{{ backup_dir }}"
          filename: "{{ inventory_hostname }}.cfg"
Since both tasks use the same path, I've put it in a variable called backup_dir. It's built from playbook_dir, a built-in variable that contains the path to the directory the playbook is in, so the backups always end up inside our project.
The first task creates the backups directory, using the file module. With state: directory, it creates the directory if it doesn't exist, and does nothing if it does. The directory needs to be created on the control node, rather than on the routers, so we use delegate_to: localhost. And since all six routers save their backups to the same directory, we only need to create it once, which is what run_once: true does.
The second task takes the backup.
- backup - Setting this to
truesaves a copy of the running config to the control node. - dir_path - The directory to save the backups in.
- filename - The name of the file for each router. Using
inventory_hostnamegives each router its own file, such asr1.cfg.
If you leave out backup_options, Ansible saves the backups in a directory called backup, with a timestamp in each filename, so you get a new file every time you run the playbook.
ansible-playbook backup.yml
PLAY [Back up the Arista config] *****************

TASK [Create the backup directory] ***************
changed: [r1 -> localhost]

TASK [Back up the config] ************************
changed: [r3]
changed: [r4]
changed: [r2]
changed: [r5]
changed: [r1]
changed: [r6]

PLAY RECAP ***************************************
r1 : ok=2 changed=2 unreachable=0 failed=0 skipped=0 rescued=0 ignored=0
r2 : ok=1 changed=1 unreachable=0 failed=0 skipped=0 rescued=0 ignored=0
...
r6 : ok=1 changed=1 unreachable=0 failed=0 skipped=0 rescued=0 ignored=0
The first task only ran once, for r1, and was delegated to localhost, which is why r1 shows one more task in the PLAY RECAP than the other routers. The backup task shows changed on every router, even though nothing changed on the routers themselves. That's because a new backup file was written on the control node.
We now have a backup for each router in the backups directory.
ls backups
r1.cfg  r2.cfg  r3.cfg  r4.cfg  r5.cfg  r6.cfg
Each file contains the router's full running config.
! Command: show running-config
! device: r1 (cEOSLab, EOS-4.34.2F-43232954.4342F.1 (engineering build))
!
no aaa root
!
username admin privilege 15 role network-admin secret sha512 ...
!
management api http-commands
   no shutdown
!
...
hostname r1
!
...
You can even see management api http-commands with no shutdown near the top, which is the eAPI config we checked earlier.
Configuration Sessions
Earlier, we saw that the diff from eos_config compared the running config with something called a session. On Arista, a configuration session lets you make changes in a separate copy of the config, without touching the running config straight away. You start one with configure session <name>, make your changes, and review them with show session-config diffs. When you're happy, you commit the session, and the changes are applied to the running config all at once. If you change your mind, you can abort it, and nothing is changed. This is exactly what eos_config does behind the scenes, which is why it can show us an accurate diff, even in check mode.
Configuration sessions also support a commit timer, which works a lot like commit confirmed on Junos. If you commit a session with commit timer, followed by a time, the changes are applied straight away, but EOS rolls them back automatically when the timer runs out, unless you confirm them by committing the session again.
Using the Commit Timer with Ansible
Unfortunately, eos_config doesn't have an option for the commit timer. I checked the module's documentation, and the only session-related options are for the diff and for replacing the whole config. But since the commit timer is just a few CLI commands, we can send them ourselves with eos_command, and then ask whether to confirm the change, just like we did with commit confirmed on Junos.
Let's add a new NTP server to all six routers. Create a new playbook called commit_timer.yml.
---
- name: Make a change with a commit timer
  hosts: routers
  gather_facts: false

  vars:
    session_name: ntp_change

  tasks:
    - name: Add an NTP server with a commit timer
      arista.eos.eos_command:
        commands:
          - "configure session {{ session_name }}"
          - ntp server 10.10.10.40
          - commit timer 00:02:00

    - name: Ask whether to keep the change
      ansible.builtin.pause:
        prompt: "Check the routers. Type yes to keep the change, anything else to let it roll back"
      register: answer

    - name: Confirm the change
      arista.eos.eos_command:
        commands:
          - "configure session {{ session_name }} commit"
      when: hostvars[ansible_play_hosts[0]]['answer']['user_input'] == 'yes'
Since both tasks need to use the same session, I've put its name in a variable called session_name.
The first task opens a configuration session called ntp_change, adds the NTP server, and commits the session with a two-minute timer. The change is applied straight away, but EOS will roll it back when the timer runs out, unless we confirm it.
The second task pauses the playbook, so we can log in to the routers and check that everything is fine. Whatever we type is saved in the answer variable.
The last task confirms the change by committing the session again, but only if we typed yes. The pause task only runs on the first router in the play, so answer only exists on that router. To make sure every router uses the same answer, we read it from the first router with hostvars[ansible_play_hosts[0]], which we covered in the Juniper part. Let's run the playbook.
ansible-playbook commit_timer.yml
PLAY [Make a change with a commit timer] *********

TASK [Add an NTP server with a commit timer] *****
ok: [r2]
ok: [r1]
ok: [r3]
ok: [r5]
ok: [r4]
ok: [r6]

TASK [Ask whether to keep the change] ************
[Ask whether to keep the change]
Check the routers. Type yes to keep the change, anything else to let it roll back:
While the playbook is waiting, let's check r1.
r1#show running-config section ntp
ntp server 10.10.10.40

r1#show configuration sessions
Maximum number of completed sessions: 1
Maximum number of pending sessions: 5
Merge on commit is disabled
Autosave to startup-config on commit is disabled

Session with pending commit timer: ntp_change
Time left until commit timer expiry: 1m47s

  Name          State           User    Terminal
  ---------- --------------- ---------- --------
  ntp_change    committed
The NTP server is already in the running config, and show configuration sessions shows that ntp_change has a pending commit timer, with just under two minutes left. Let's go back to the playbook and type yes.
ok: [r1]

TASK [Confirm the change] ************************
ok: [r4]
ok: [r2]
ok: [r3]
ok: [r5]
ok: [r1]
ok: [r6]

PLAY RECAP ***************************************
r1 : ok=3 changed=0 unreachable=0 failed=0 skipped=0 rescued=0 ignored=0
r2 : ok=2 changed=0 unreachable=0 failed=0 skipped=0 rescued=0 ignored=0
...
r6 : ok=2 changed=0 unreachable=0 failed=0 skipped=0 rescued=0 ignored=0
The confirm task ran on all six routers. If we check r1 again, the session is no longer listed, so there's no pending timer, and the NTP server is still there.
r1#show running-config section ntp
ntp server 10.10.10.40

r1#show configuration sessions
Maximum number of completed sessions: 1
Maximum number of pending sessions: 5
Merge on commit is disabled
Autosave to startup-config on commit is disabled

  Name    State       User    Terminal
  ---- ----------- ---------- --------
If we had typed anything other than yes, the confirm task would have been skipped, and EOS would have rolled the change back by itself once the two minutes were up.
You might have noticed that every task shows ok, rather than changed, even though we made a real change. That's because eos_command is mainly meant for show commands, so it has no way of knowing whether a command changed anything, and always reports ok. This also means it won't notify a handler, so the change isn't saved to the startup config.
Closing Up
As you can see, building this network on Arista wasn't very different from building it on Cisco or Juniper. The data model in host_vars is the same, the playbook follows the same steps, and the only real differences are the module names and a few platform-specific settings, such as turning on IP routing, and changing the interfaces from switchports to routed ports. That's one of the nice things about describing your network as data. Once you have a good data model, switching vendors mostly means swapping out the modules.
That said, every vendor, and every module, has its own quirks. Some modules support check mode and some don't, some show a diff and some only show the commands, and some options only work in certain cases, like the passive interface option in eos_ospf_interfaces, which only works for OSPFv3. So it's always worth reading the module documentation, and testing your playbooks in a lab before running them against a real network.