Netpicker brings together configuration backups, security and compliance checks, and automation in one place. It supports over 150 network vendors, including Cisco, Juniper, Arista, Palo Alto, Fortinet and many more. It also integrates well with other tools like Netbox, Nautobot, and Infrahub for inventory management, and Slurp’it for network discovery. All of these features, including backups, integrations, and automation, are available in the free version. The paid version adds features such as RBAC, approvals, detailed logging, support, and workflows for teams that need more control.
In our previous introductory post, we looked at what Netpicker is, how to set it up, and how it can back up configurations across multiple vendors. In this post, we'll focus on Netpicker Automation and how to use the Netpicker plugin with Netbox, so let's get to it.
Netpicker has partnered with me for this post, and they also support my blog as a sponsor.
Prerequisites
This post assumes you already have a functioning Netpicker and NetBox instances. If you're completely new to Netpicker, check out the introductory post first, where we covered the basics like installation and initial setup. For this example, we’re using NetBox Community version 4.3.5 and Netpicker version 2.4.0.
If you are running an older version of Netpicker and want to upgrade, you can do this by running the following commands.
docker compose down
mv docker-compose.yml docker-compose.yml.bak
git pull
docker compose up -d
Wait a few minutes for the containers to start up, then you should be able to log in. As with any upgrade, make sure you take backups, especially if this is running in production.
Inventory and Backup Overview
To follow along with this post, you need to have some devices already added to Netpicker or imported from NetBox. If you already have devices in NetBox, it is easier to import them rather than add them manually.
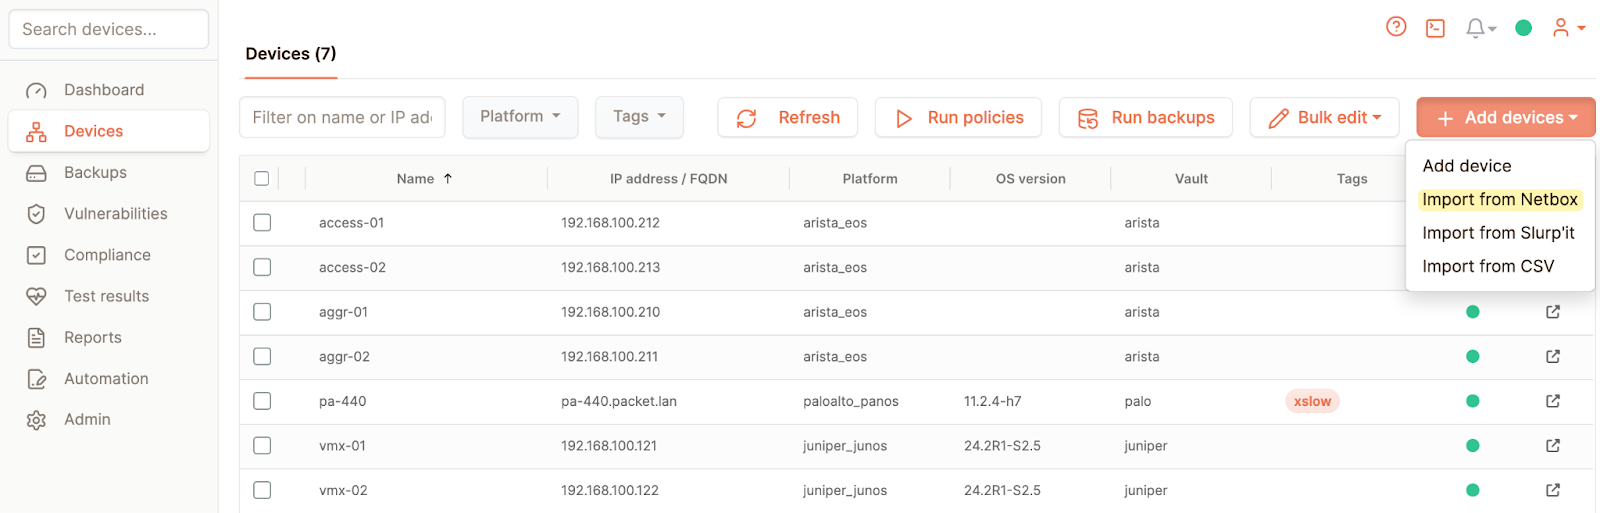
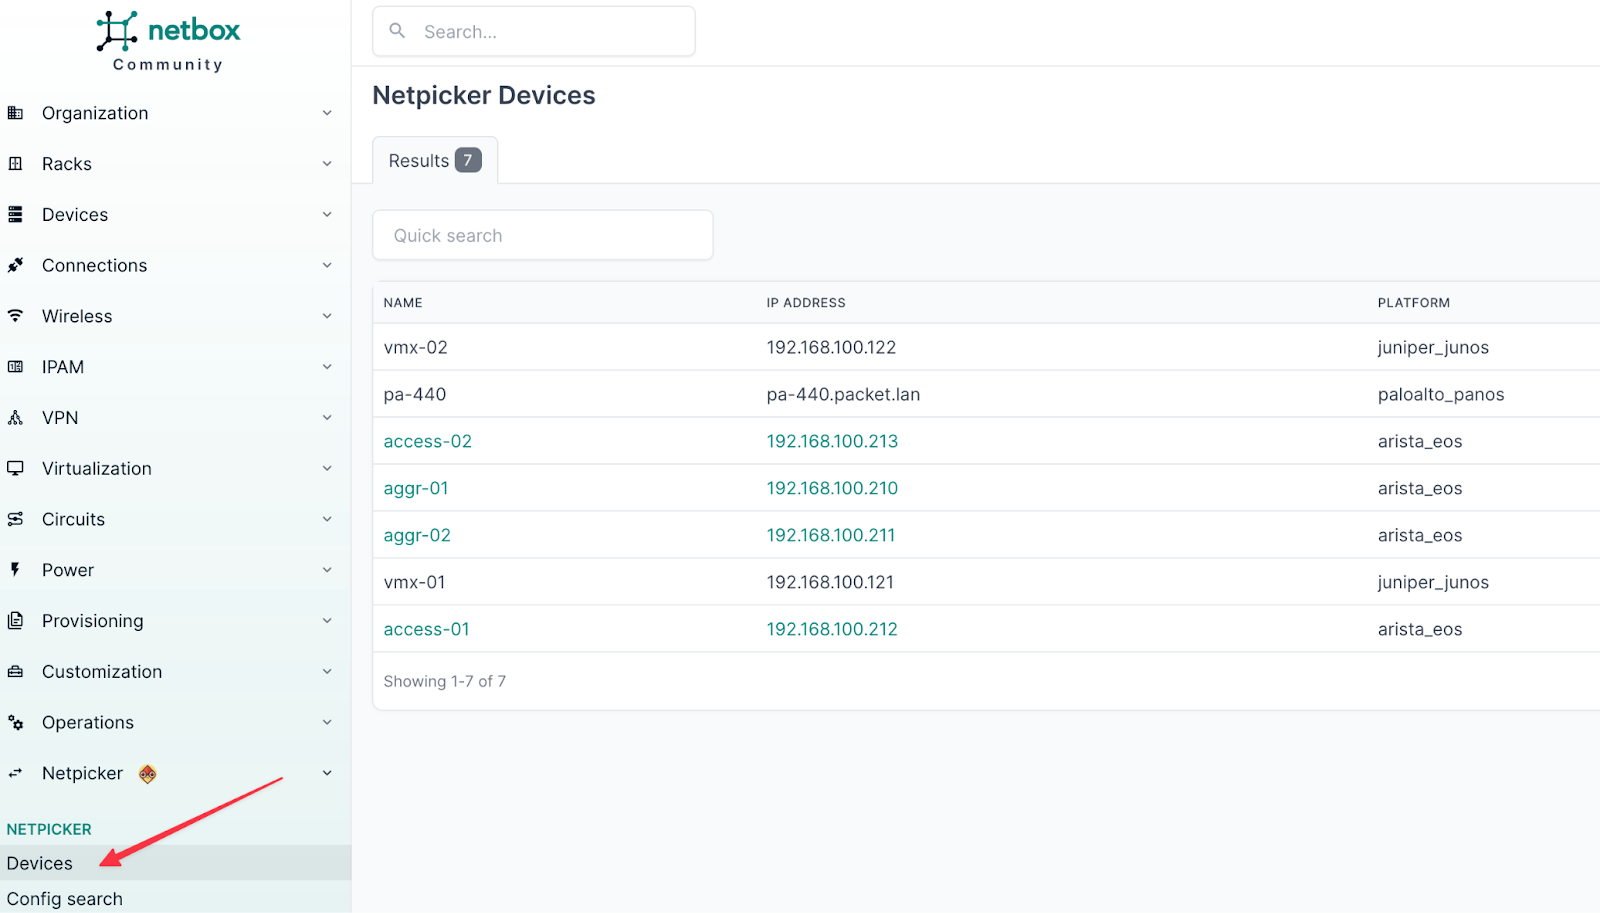
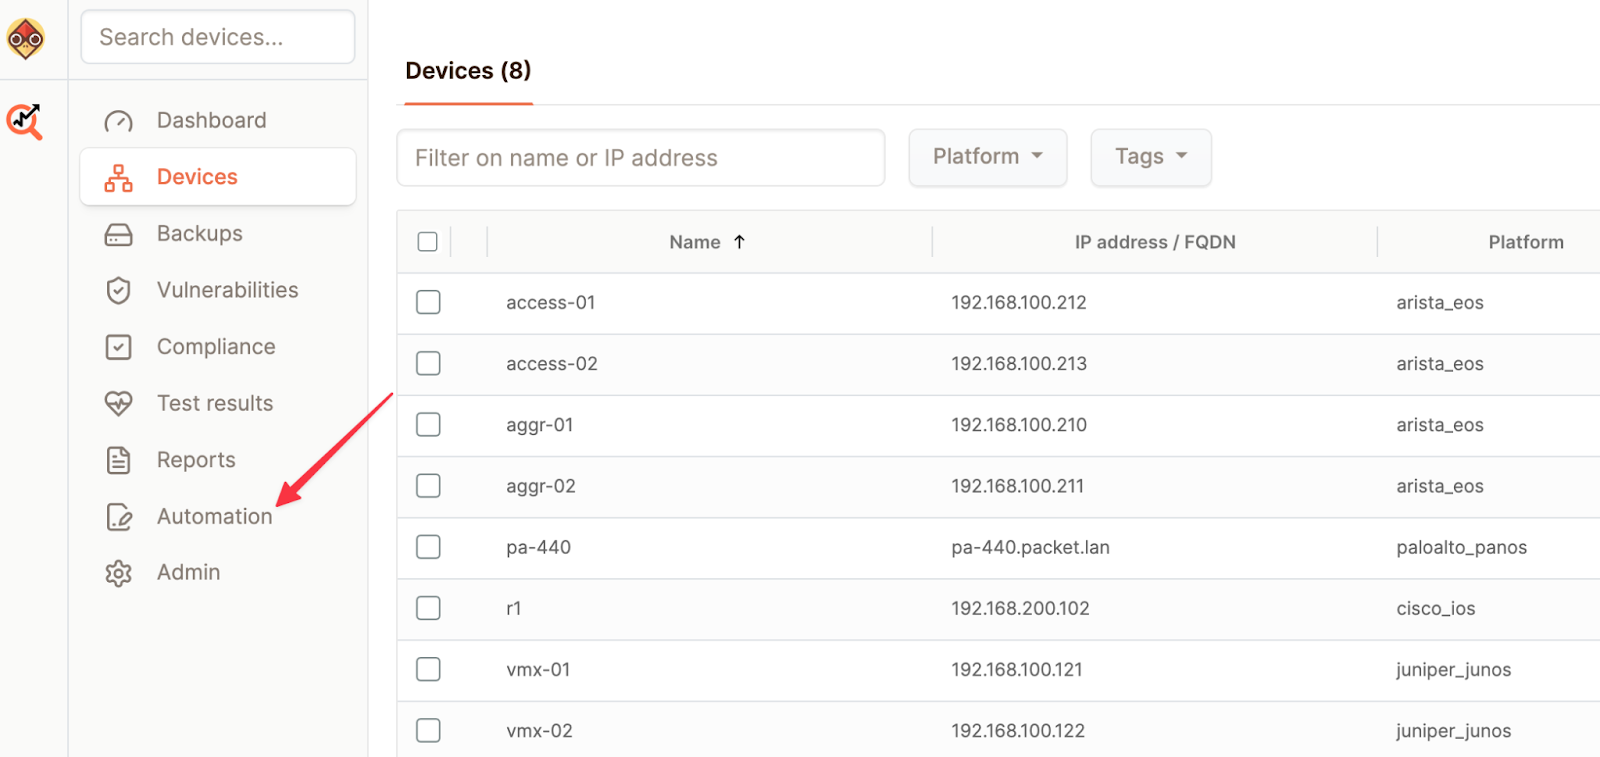
As you can see in the figure above, we have seven devices in Netpicker, and Netpicker takes scheduled backups from all of them. You can add more devices or import them from Netbox by selecting the Add devices button in the top right corner.
Of course, we can view the backups and the diffs directly from Netpicker. But one of the goals of this post is to view those same backups and diffs directly from NetBox.
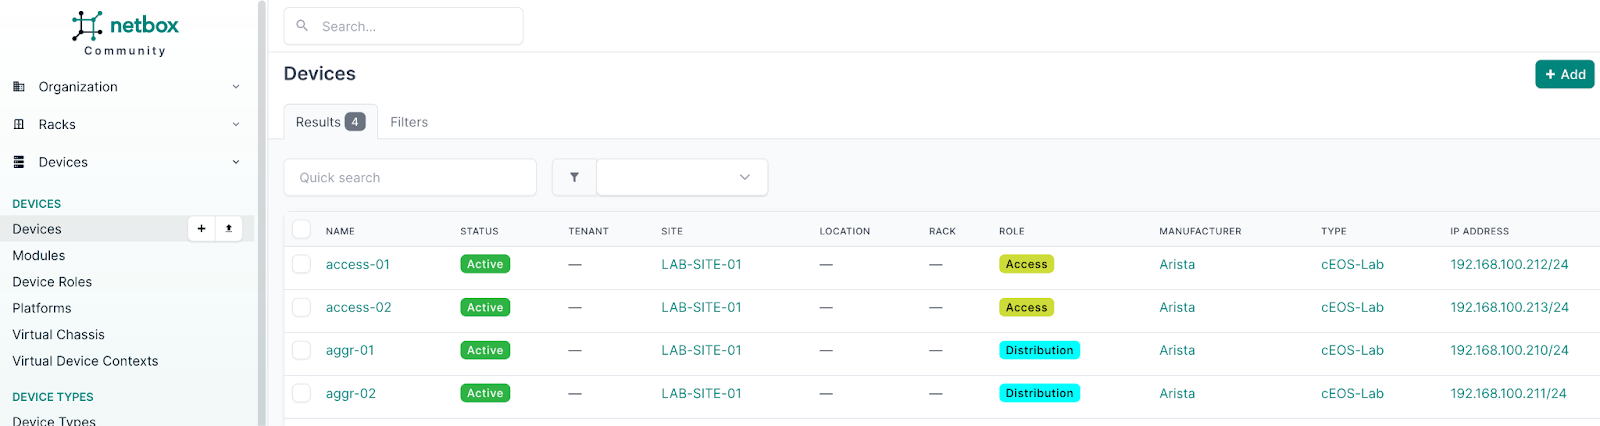
Netpicker still runs the backups, but the Netpicker NetBox Plugin connects to the Netpicker instance, retrieves the backups, and presents them to you from within the NetBox interface. Out of the seven devices, the first four were imported from NetBox. If we head over to NetBox, we should see the four devices listed there as well.
Netpicker NetBox Plugin
Now that we have the basics covered, let's look at how to add the Netpicker NetBox plugin. There are two high-level steps.
- First, we need to install the plugin on NetBox.
- Once that's done, we connect the Netpicker instance to the plugin by providing the IP or FQDN and an API key.
Plugin Installation
In our setup, NetBox is running as a set of Docker containers. If you're also using the Docker deployment method, there's a helpful guide on how to install plugins in that environment. The process is easy to follow. You update the netbox-docker configuration to include the plugin, rebuild the containers, and you're good to go. If you're unsure or run into any issues, the official NetBox documentation has clear instructions and examples that are worth checking out. Here is a quick overview of how to add the Netpicker plugin to Netbox.
If you're starting from scratch, clone the NetBox Docker repository.
git clone -b release https://github.com/netbox-community/netbox-docker.gitIf you already have NetBox running with Docker, just navigate to your existing NetBox directory. Following the official guide, we create a few additional files to install the Netpicker plugin in our Docker-based NetBox setup. We start by creating a file called plugin_requirements.txt and add the plugin name at the root level.
netpicker-netbox-pluginNext, create a custom Dockerfile called Dockerfile-Plugins. This is based on the official NetBox image. In this file, we copy the plugin requirements, install the plugin, and replace the default configuration files with our own.
FROM netboxcommunity/netbox:v4.3-3.3.0

COPY ./plugin_requirements.txt /opt/netbox/
RUN /usr/local/bin/uv pip install -r /opt/netbox/plugin_requirements.txt

COPY configuration/configuration.py /etc/netbox/config/configuration.py
COPY configuration/plugins.py /etc/netbox/config/plugins.py
We then update docker-compose.override.yml to build the image using this custom Dockerfile and make sure all relevant containers use the new image.
services:
  netbox:
    image: netbox:latest-plugins
    pull_policy: never
    ports:
      - 8000:8080
    build:
      context: .
      dockerfile: Dockerfile-Plugins
  netbox-worker:
    image: netbox:latest-plugins
    pull_policy: never
  netbox-housekeeping:
    image: netbox:latest-plugins
    pull_policy: never
Next, in the configuration/plugins.py file, we enable the plugin by adding it to the PLUGINS_CONFIG list.
# Add your plugins and plugin settings here.
# Of course uncomment this file out.

# To learn how to build images with your required plugins
# See https://github.com/netbox-community/netbox-docker/wiki/Using-Netbox-Plugins

PLUGINS = ["netpicker"]

# PLUGINS_CONFIG = {
#   "netbox_bgp": {
#     ADD YOUR SETTINGS HERE
#   }
# }
Finally, we rebuild the containers and start everything back up. With that, the Netpicker plugin is now active in the NetBox interface.
docker compose build --no-cache
docker compose up -d
Plugin Configuration
Now that the plugin is installed, we need to configure it by pointing it to the Netpicker instance. From the NetBox UI, navigate to Netpicker > Settings, then input the API URL (IP or FQDN), the tenant name, and the API token.
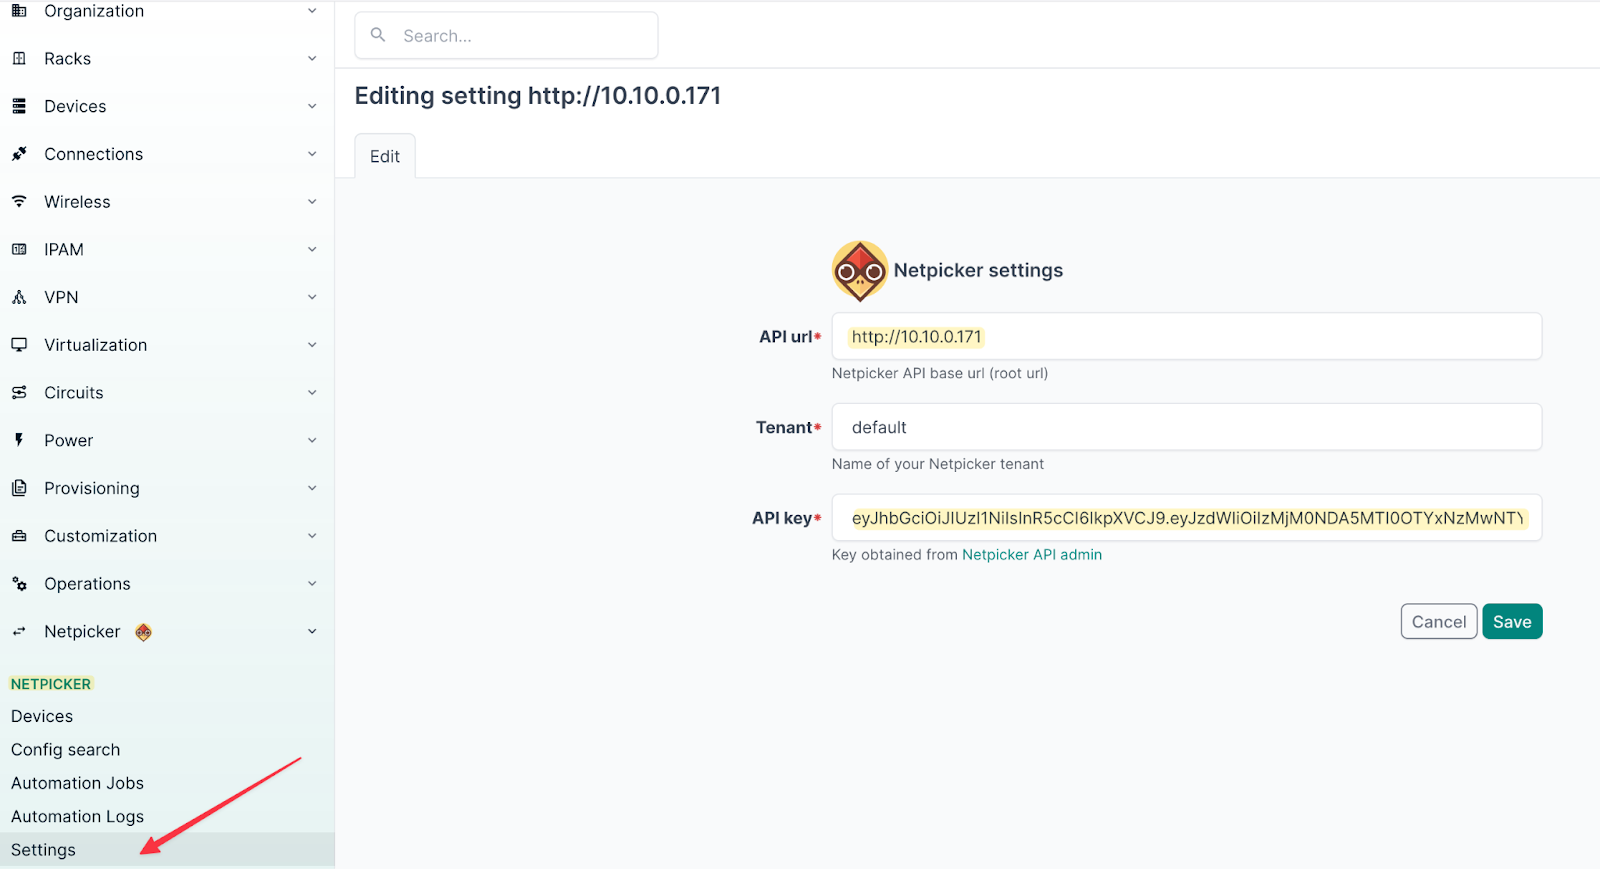
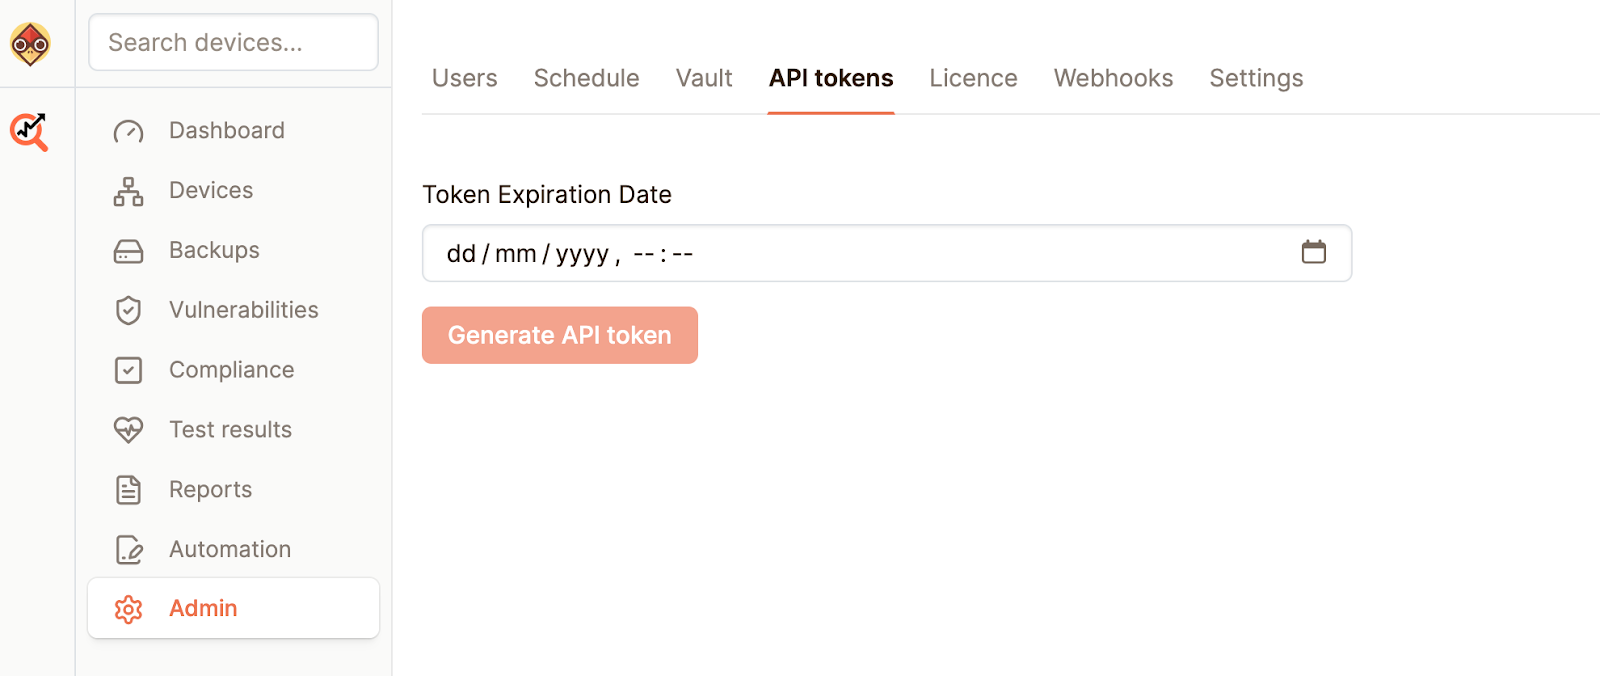
You can generate the API token by going to Netpicker > Admin in your Netpicker instance and creating a token there.
Once that's done, save the settings and that’s it. Simple as that.
Using the Plugin
If you now open the Devices tab under Netpicker, you'll see a list of all devices currently managed by your Netpicker instance. What’s interesting here is how the plugin highlights the relationship between Netpicker and NetBox. Devices that exist in both Netpicker and NetBox are shown in green and are clickable. These are linked to the corresponding device entries in NetBox. On the other hand, devices that only exist in Netpicker still show up in the list, but they are not clickable, which makes sense, since NetBox does not know of them.
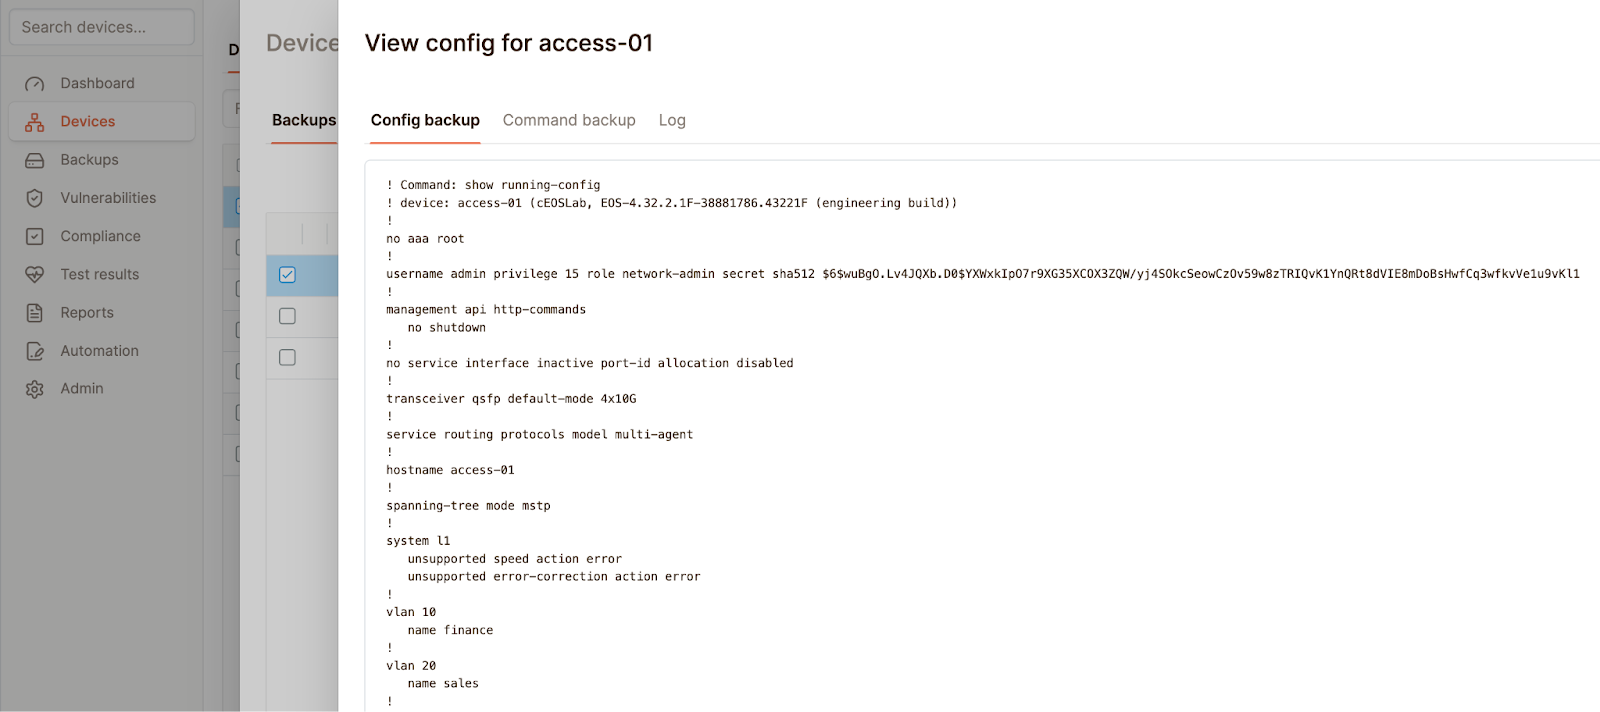
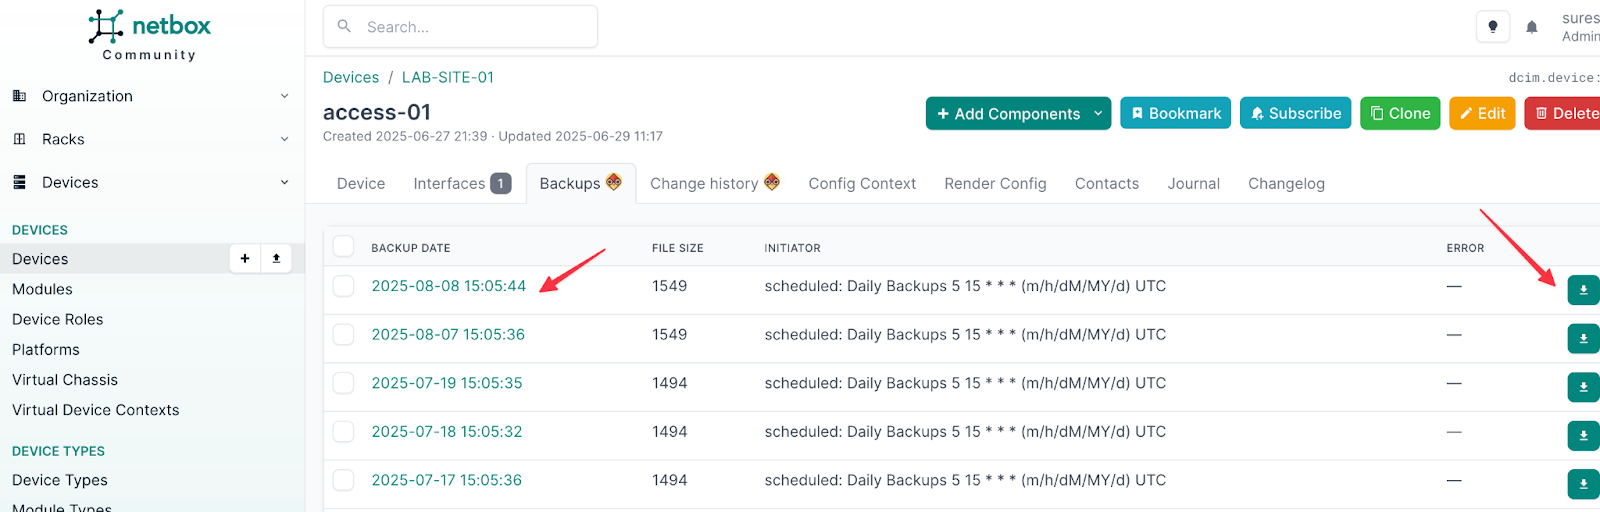
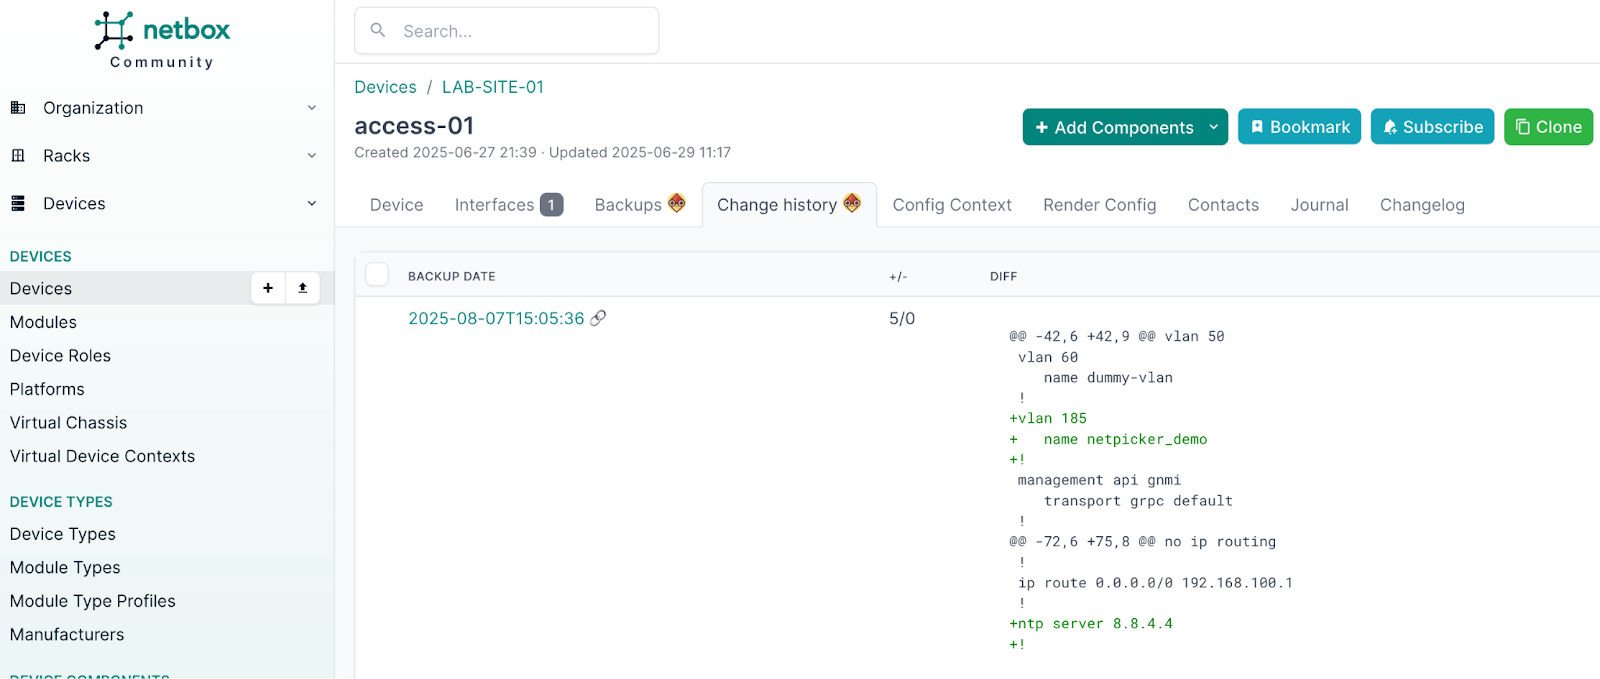
You can click on one of the linked devices, like access-01, and it takes you directly to the device page in NetBox. You’ll notice two new tabs appear - Backups and Change History. Under these tabs, you can view the configuration backups pulled from Netpicker, download them and also see diffs between versions.
Netpicker Automation
So far, we have looked at how the NetBox Netpicker plugin works. Now, let’s go through another feature in Netpicker called Automation. You can access the automation feature by selecting the Automation tab on the left side pane.
With Netpicker automation, you can run configuration commands on your devices. In the Automation section, you simply select the devices and run jobs on them. These jobs can be written in Python and let you send CLI commands directly to the devices.
A Simple Automation Job
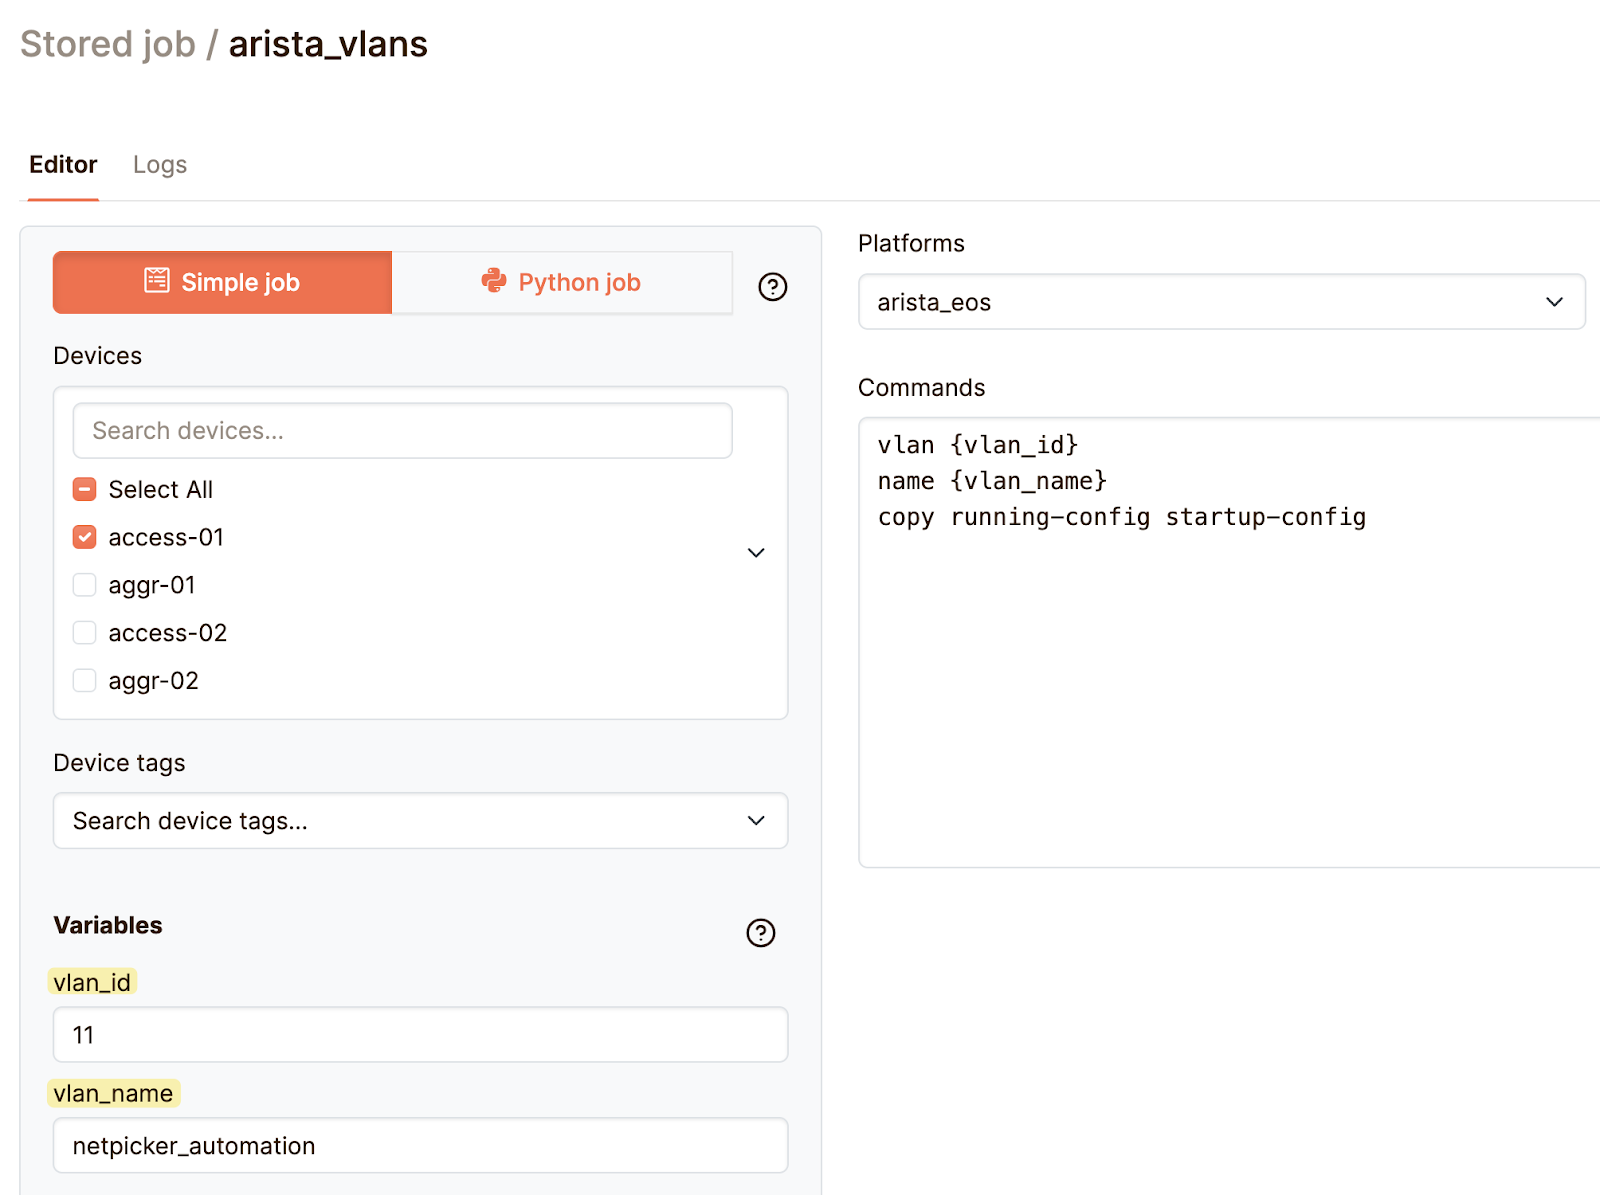
Let’s look at a simple example of creating a job that can provision VLANs across multiple devices. First, go to the Automation tab on the left pane and create a new job. You will see two options - Simple job or Python job, and you can choose either one.
We’ll start with a simple job. To create a VLAN, we already know the exact commands we need to use, including saving the running configuration to the startup configuration. You can also select a platform or multiple platforms; for this example, we’ll choose arista_eos. Once you add the commands, click Save, and you’ll be prompted to enter a name for the job.
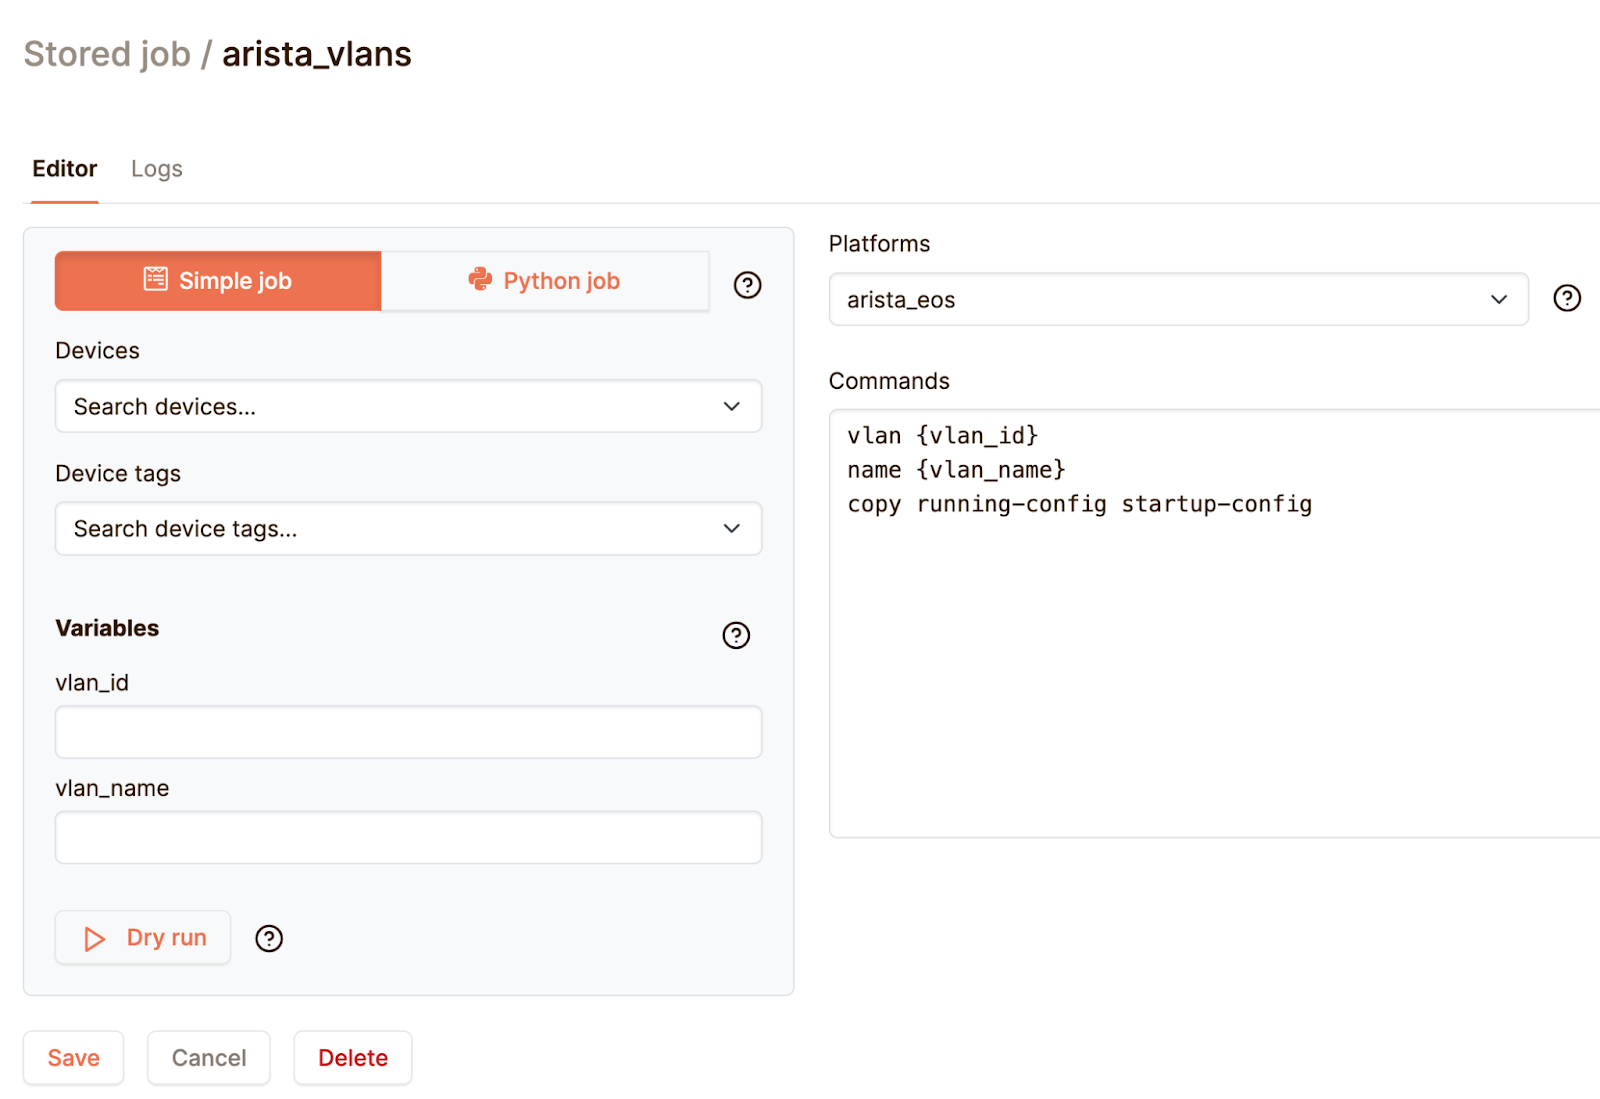
In the commands, you’ll notice the use of curly braces like {vlan_id} and {vlan_name}. These are variables, and in the Variables section, you can set them up so that values like VLAN ID and VLAN name can be entered when running the job. This makes the job reusable.
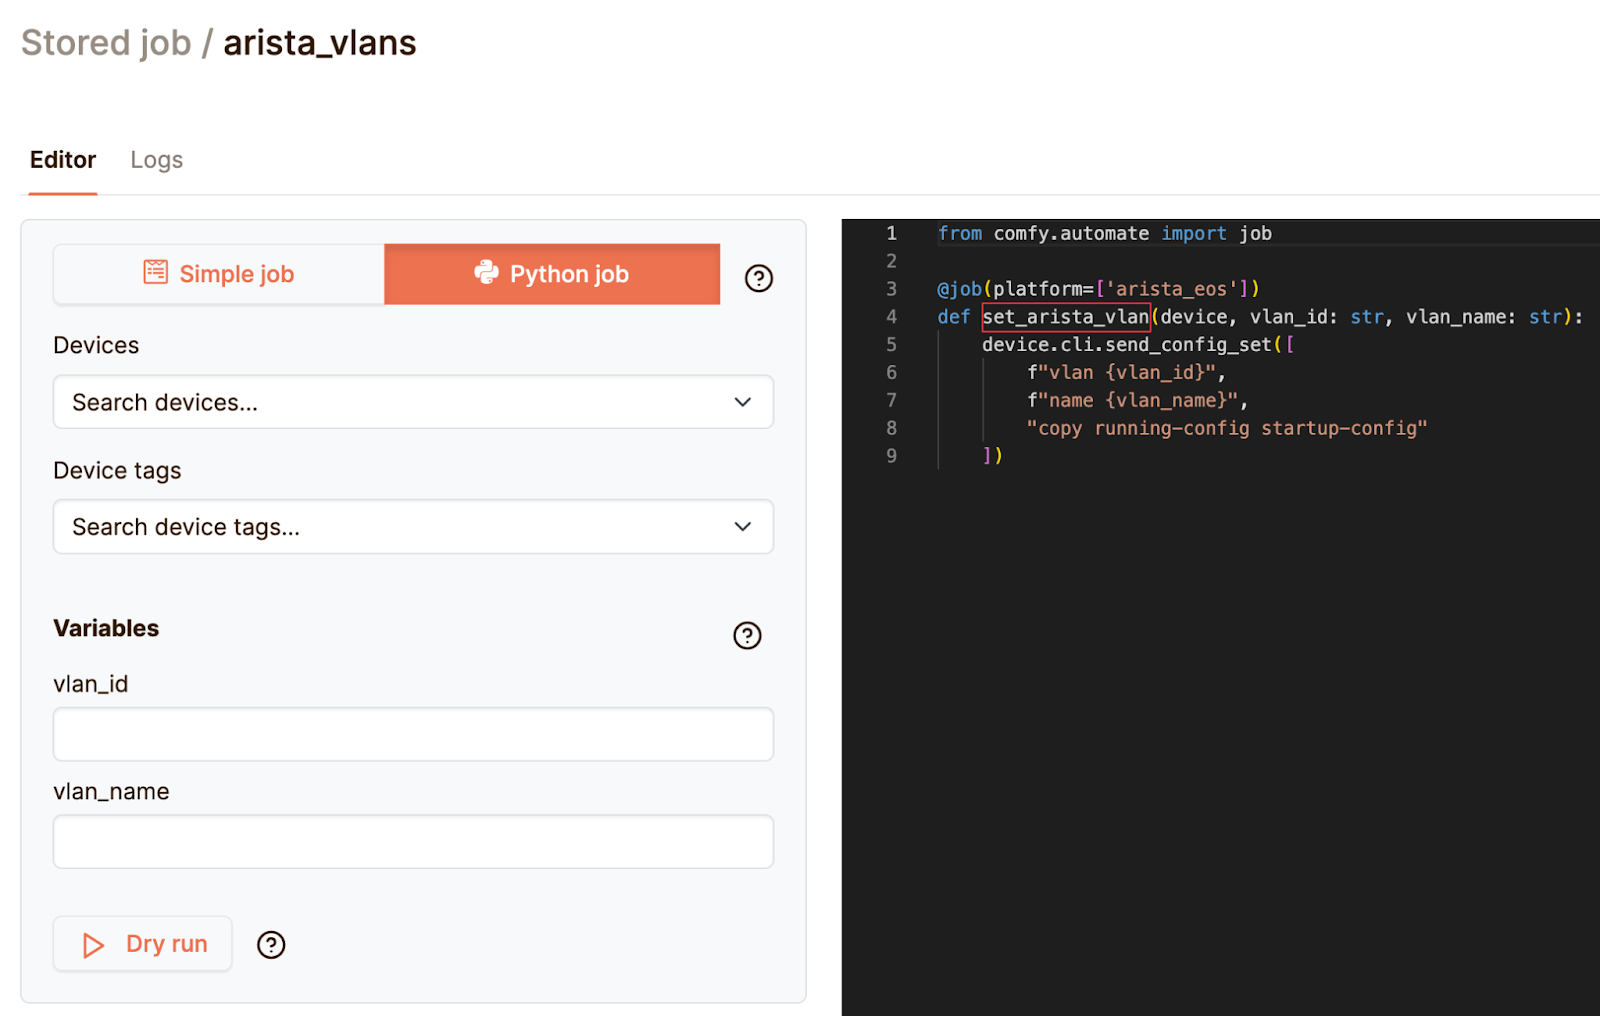
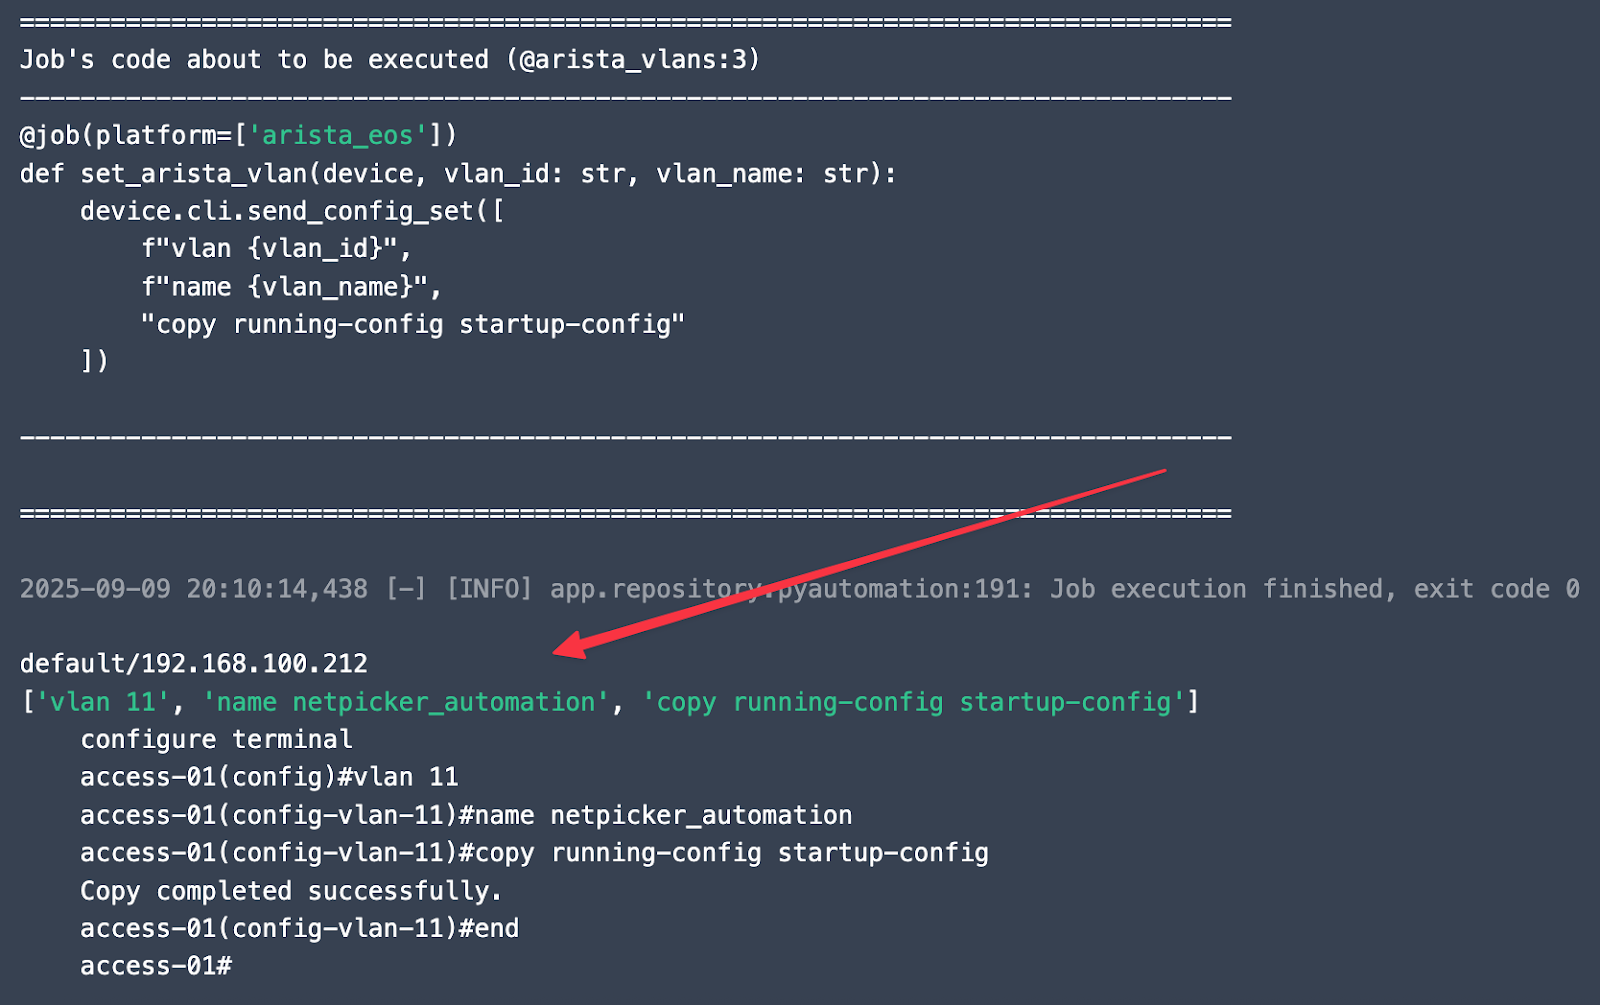
After saving, if you switch to the Python job tab, you’ll see the same job represented as Python code. You may want to consider adjusting the function name, as it may default to a generic one. In this case, we changed it to set_arista_vlan. The platform is automatically carried over from the previous step, so you don’t have to redefine it.
Now, if you want to configure a VLAN across multiple switches, all you need to do is open the job we just created, select the devices (in this case, access-01), fill in the variables, and run it. For this example, we are creating VLAN 11 with the name netpicker_automation.
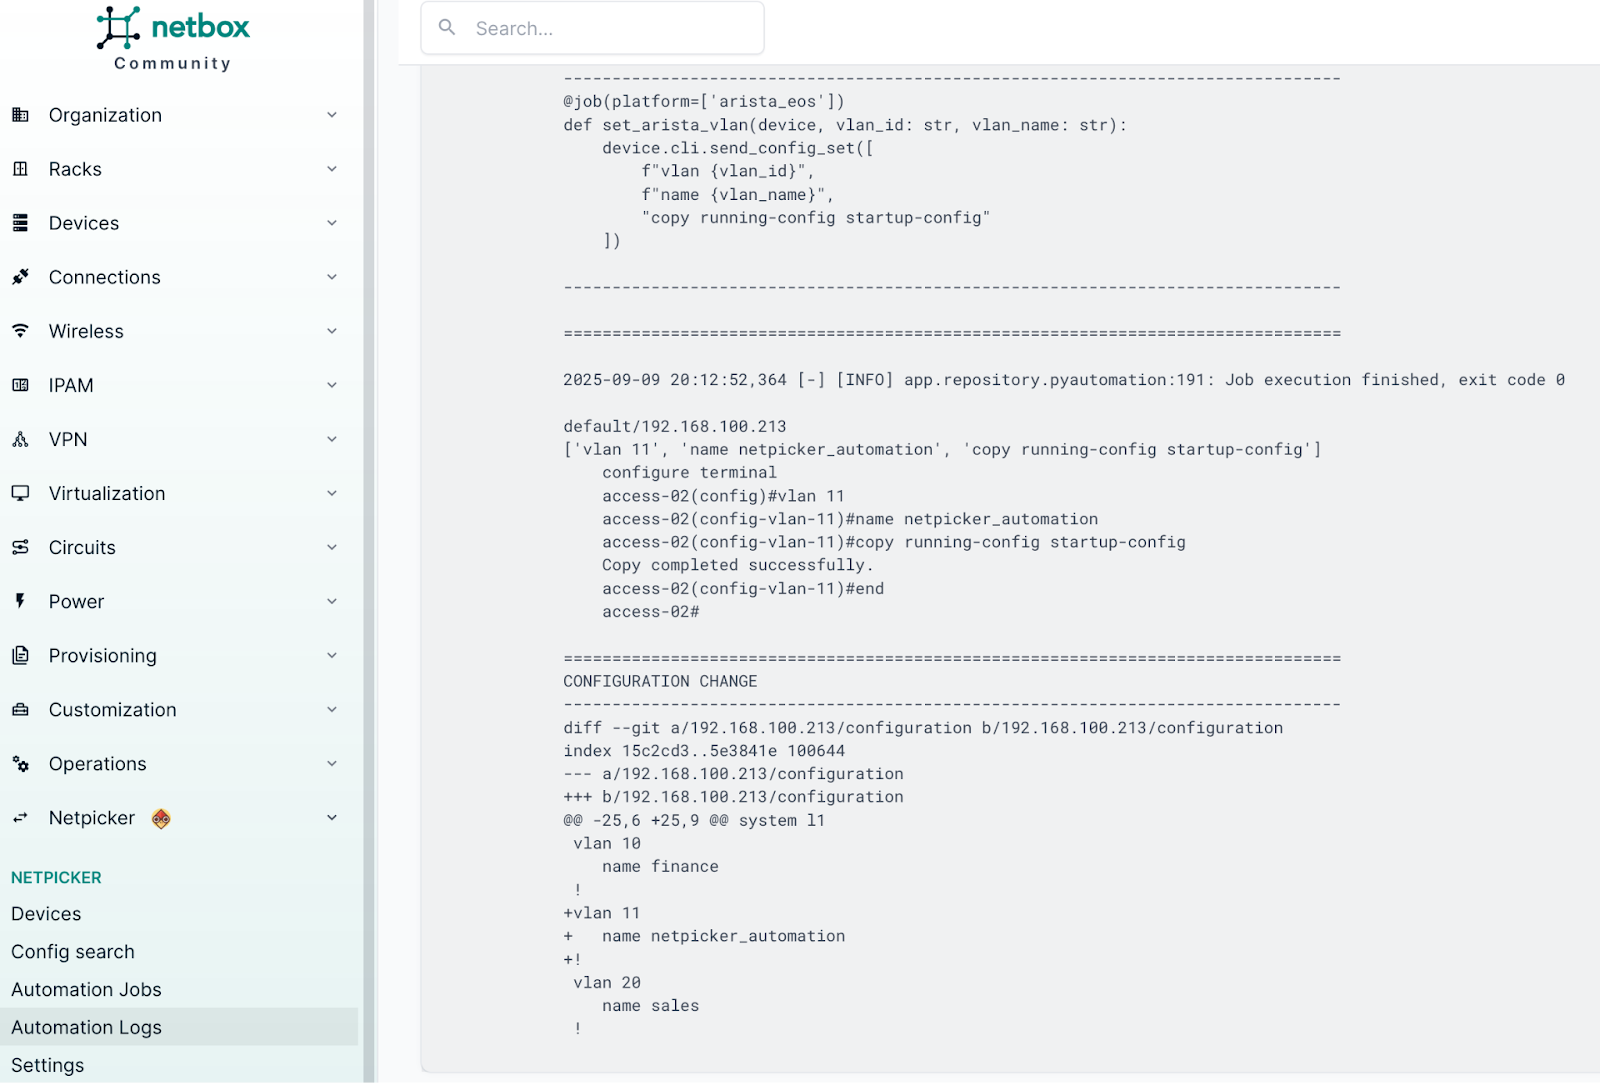
You can also choose Dry run to preview which devices will be targeted and what commands will be sent. Once you run the job, it will be scheduled immediately. If you head over to the job logs, you’ll see the status first marked as pending and then updated to success. In the job logs, you’ll find the exact commands that were executed and the CLI output from the device.
What makes this even better is that Netpicker automatically takes a backup before and after the change and shows you the diff, so you know exactly what was modified.
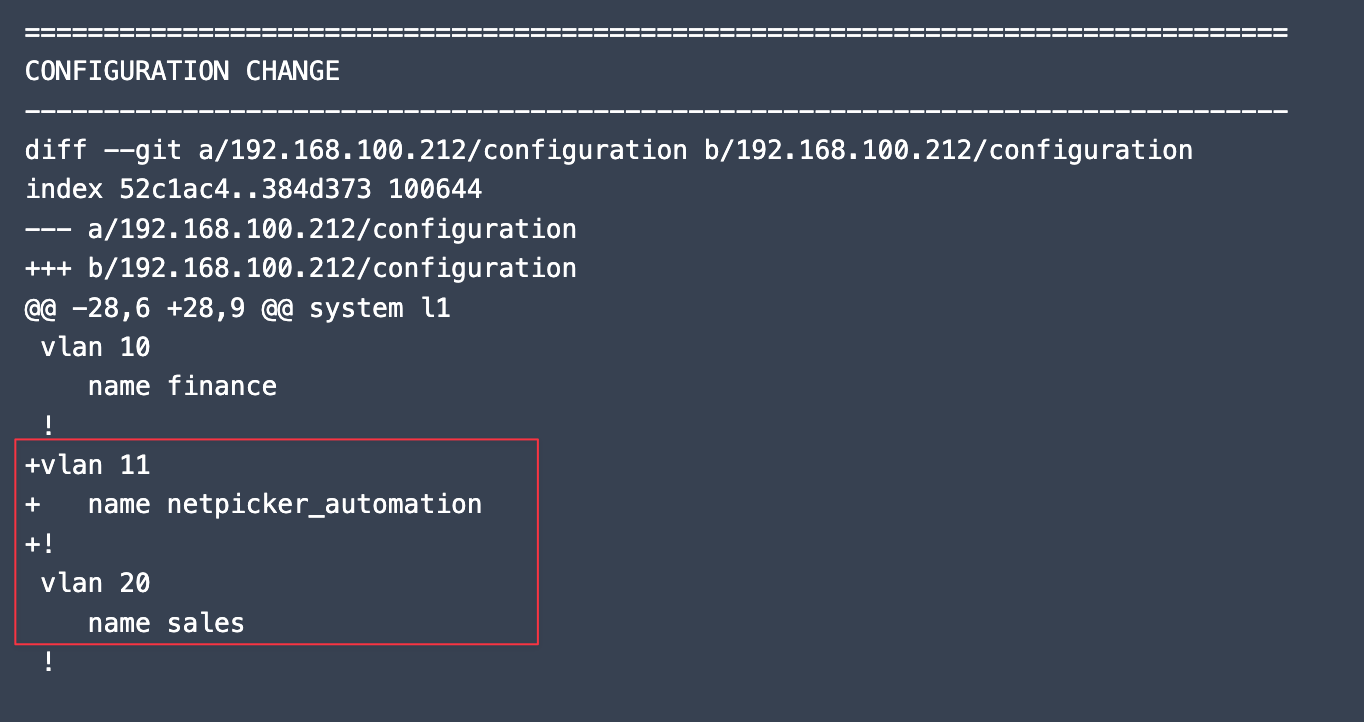
Here is how it looks in the Netpicker interface, where you can see the configuration diff highlighted clearly.
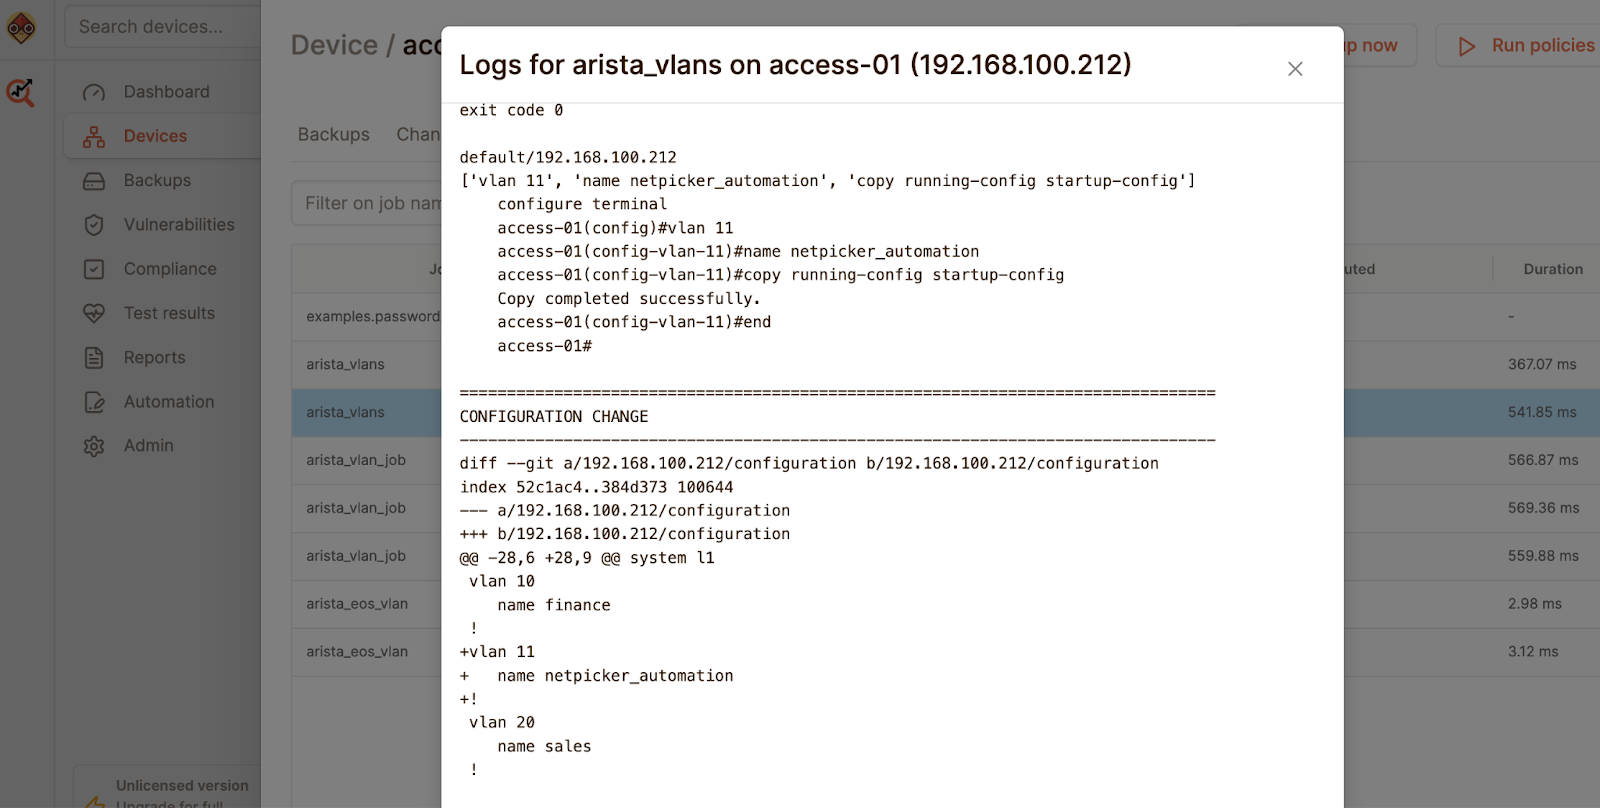
The same view is also available directly from NetBox.
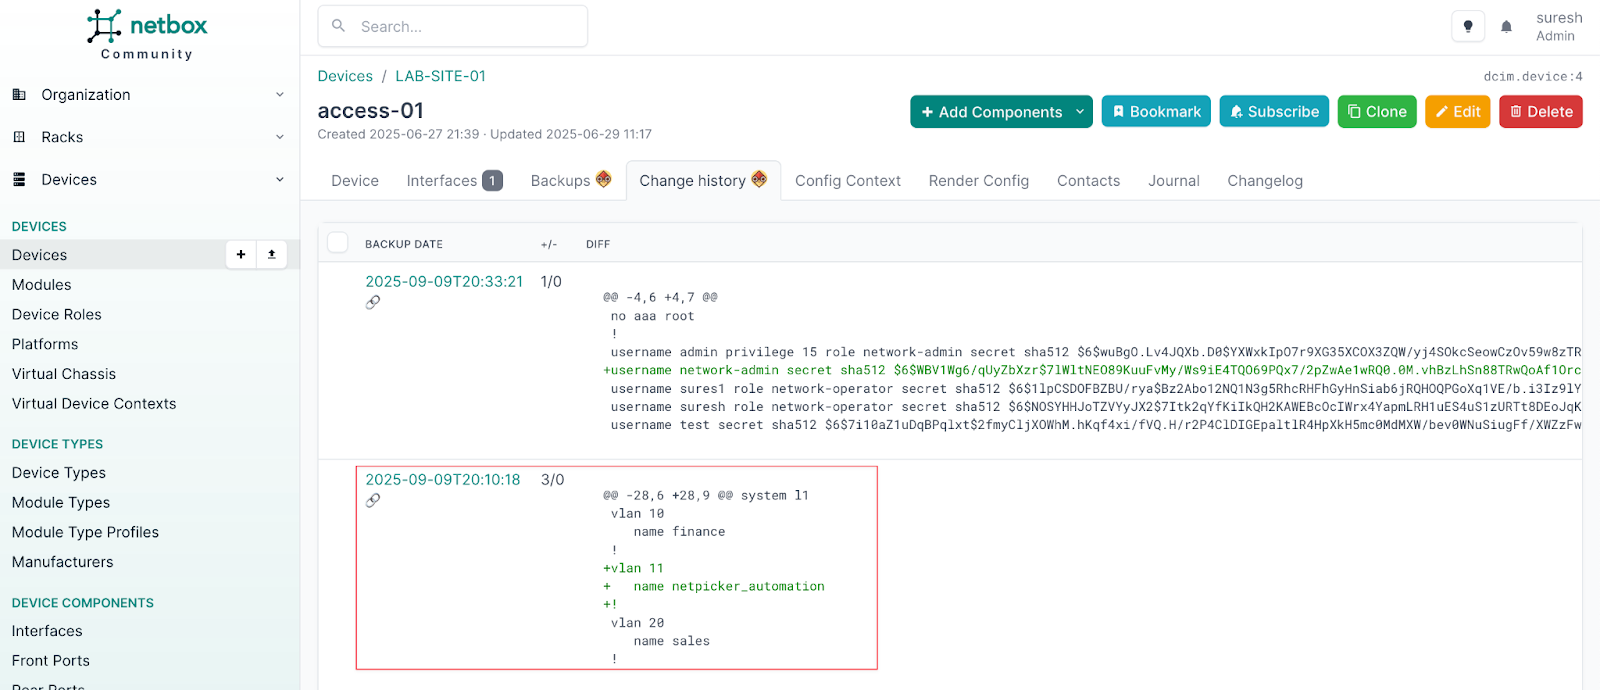
Now, if we head over to the device access-01, we can see that the VLAN has been created.
access-01#show vlan 11
VLAN  Name                             Status    Ports
----- -------------------------------- --------- -------------------------------
11    netpicker_automation             active
Automating Password Rotation
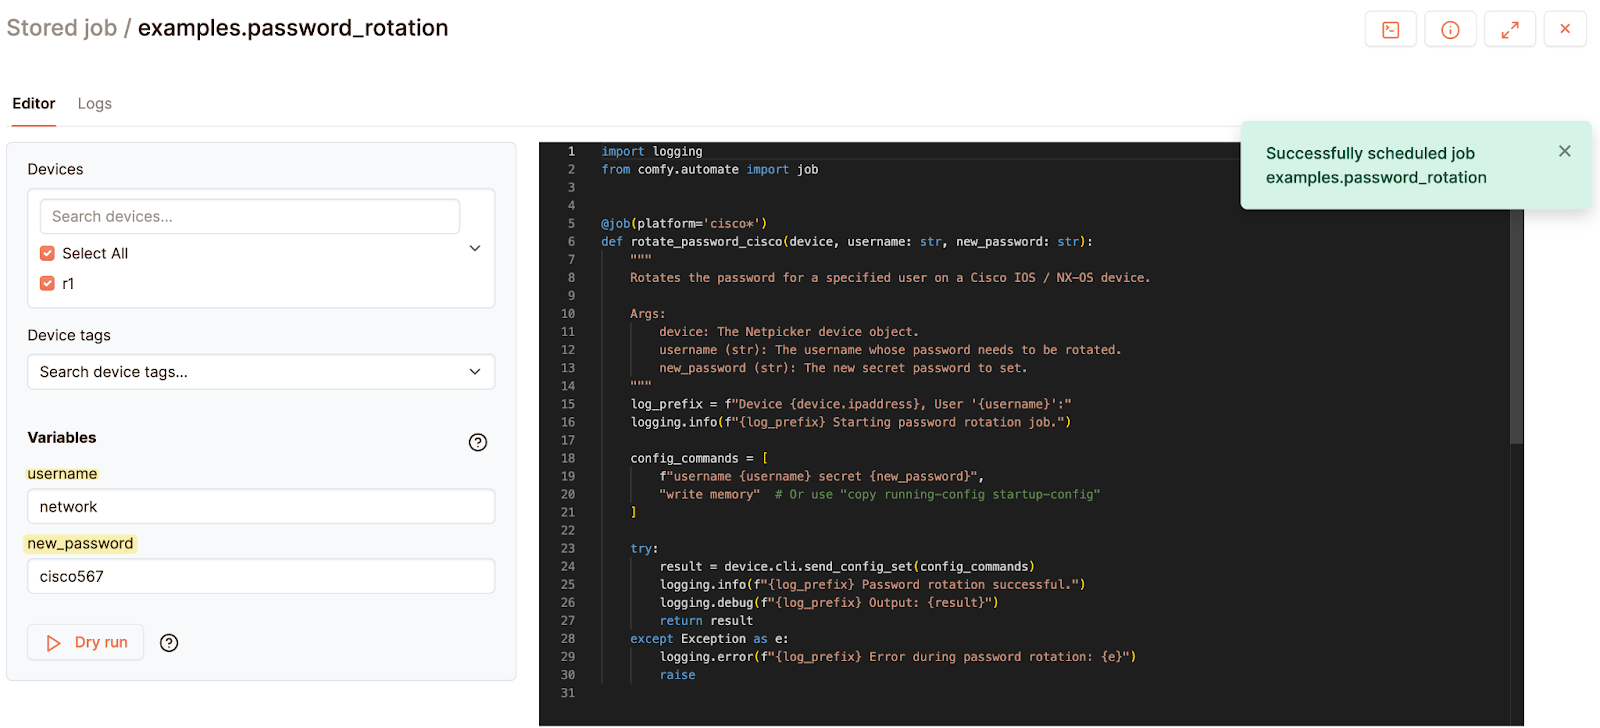
Netpicker also comes with a few pre-defined jobs that show the kind of flexibility it offers. One of the common tasks for network engineers is rotating local passwords. Even if you are using remote authentication like TACACS+, you still need to maintain a local password for emergencies, and usually these passwords need to be rotated regularly. Doing this manually can take a lot of time, but with Netpicker Automation, you can create a simple job to change passwords across multiple devices in just a few steps.
Let’s move away from the Arista example we used earlier and look at a Cisco device. I added a device called r1, which has a local user named network. In this case, we used a pre-defined job to update the password for that user. All we had to do was select the device, provide the username and the new password as variables, and run the job.
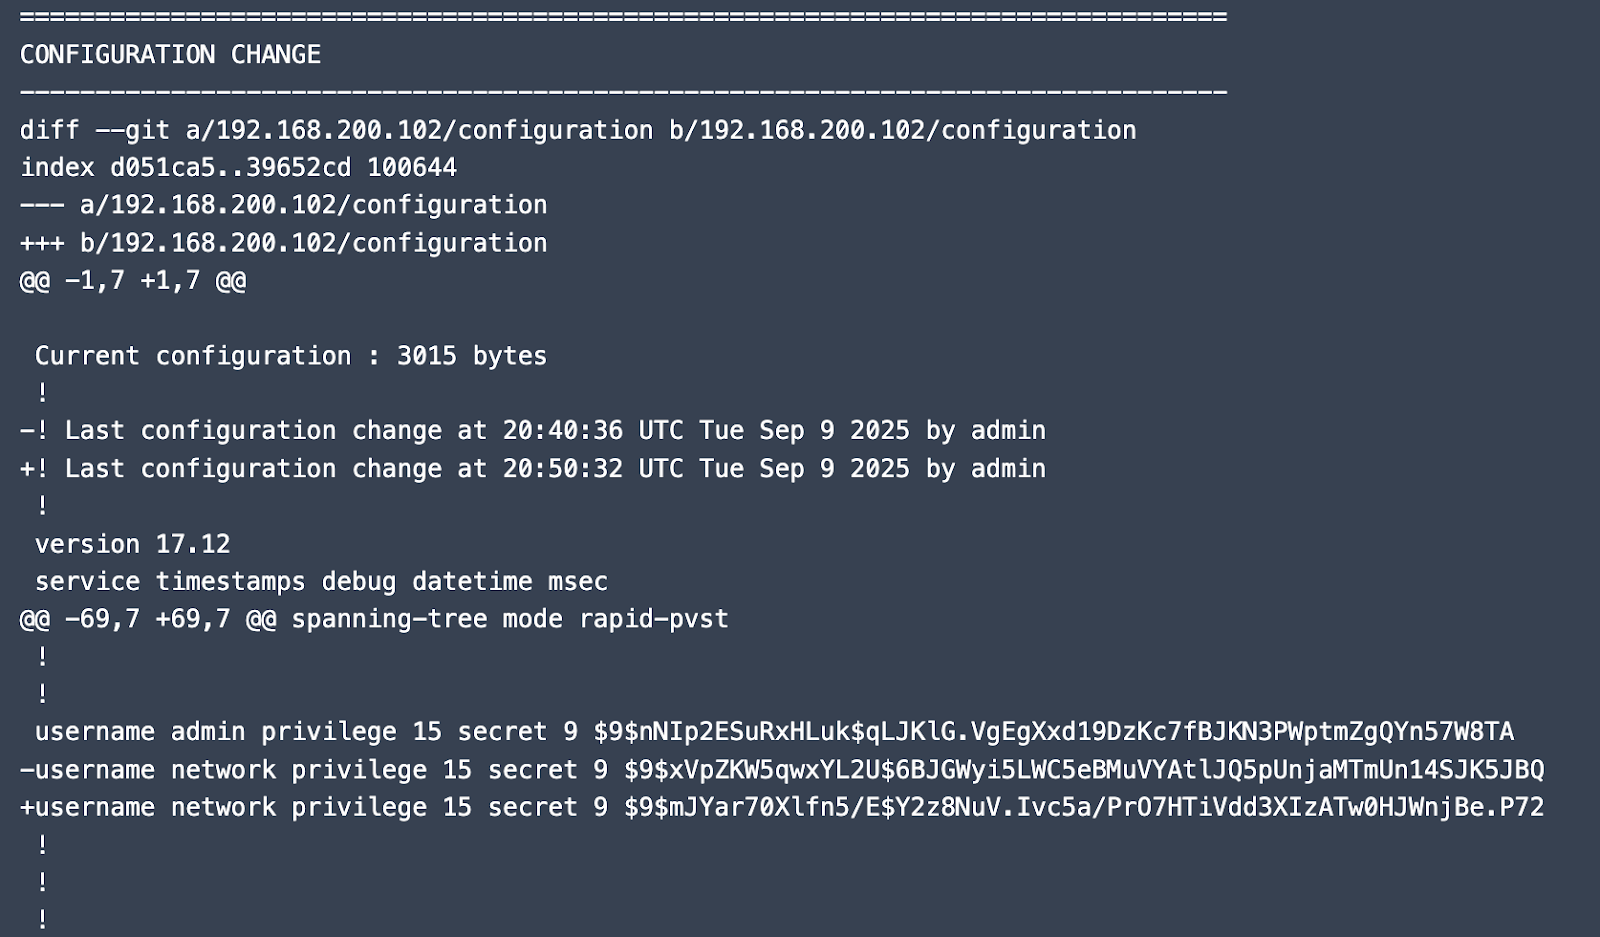
As with any automation job in Netpicker, a backup was taken before and after the change, and the diff clearly showed that the local password for the network user had been updated.
Netpicker Automation from Netbox
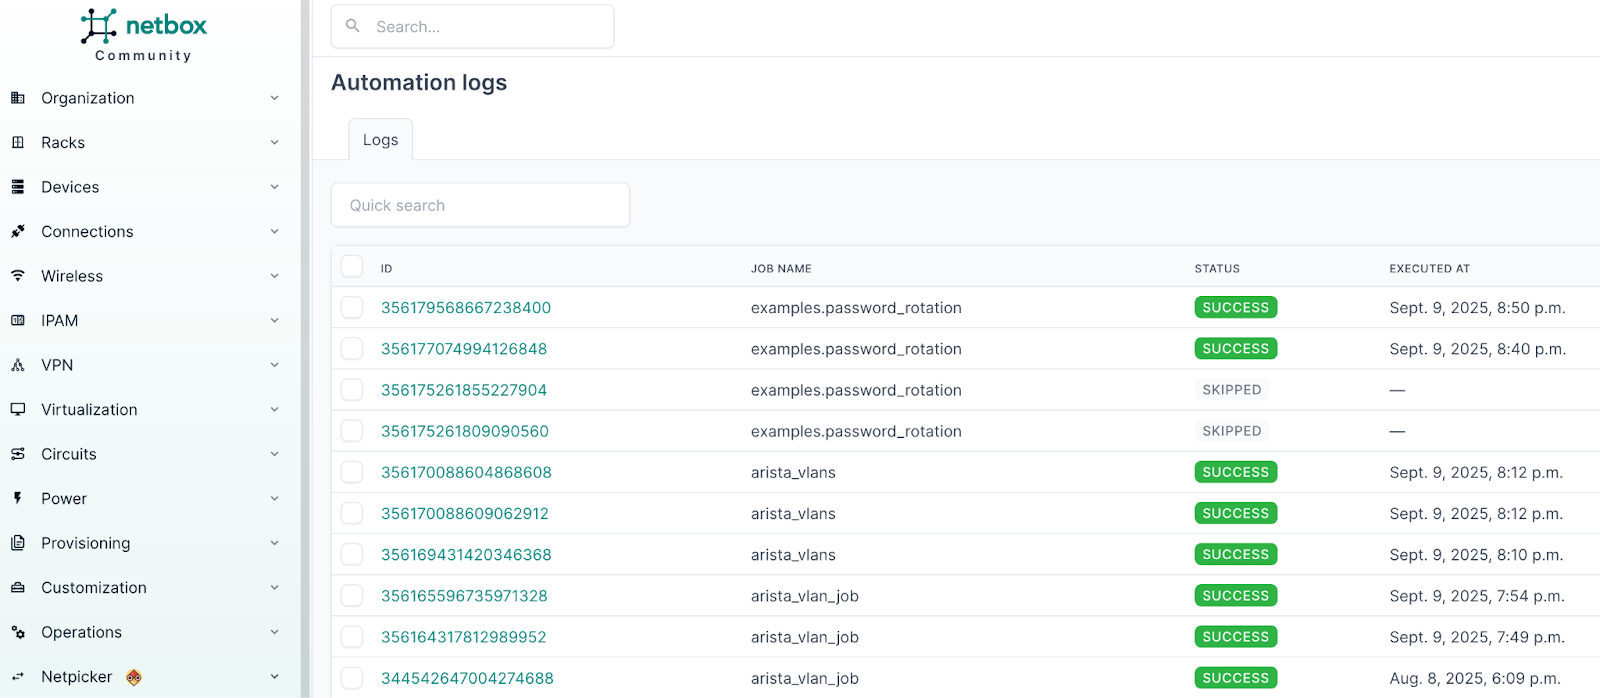
Similar to how you can view backups directly from NetBox, you can also execute automation jobs and check their status without leaving the NetBox interface. Under the Automation Jobs section, you’ll see a list of all available jobs.
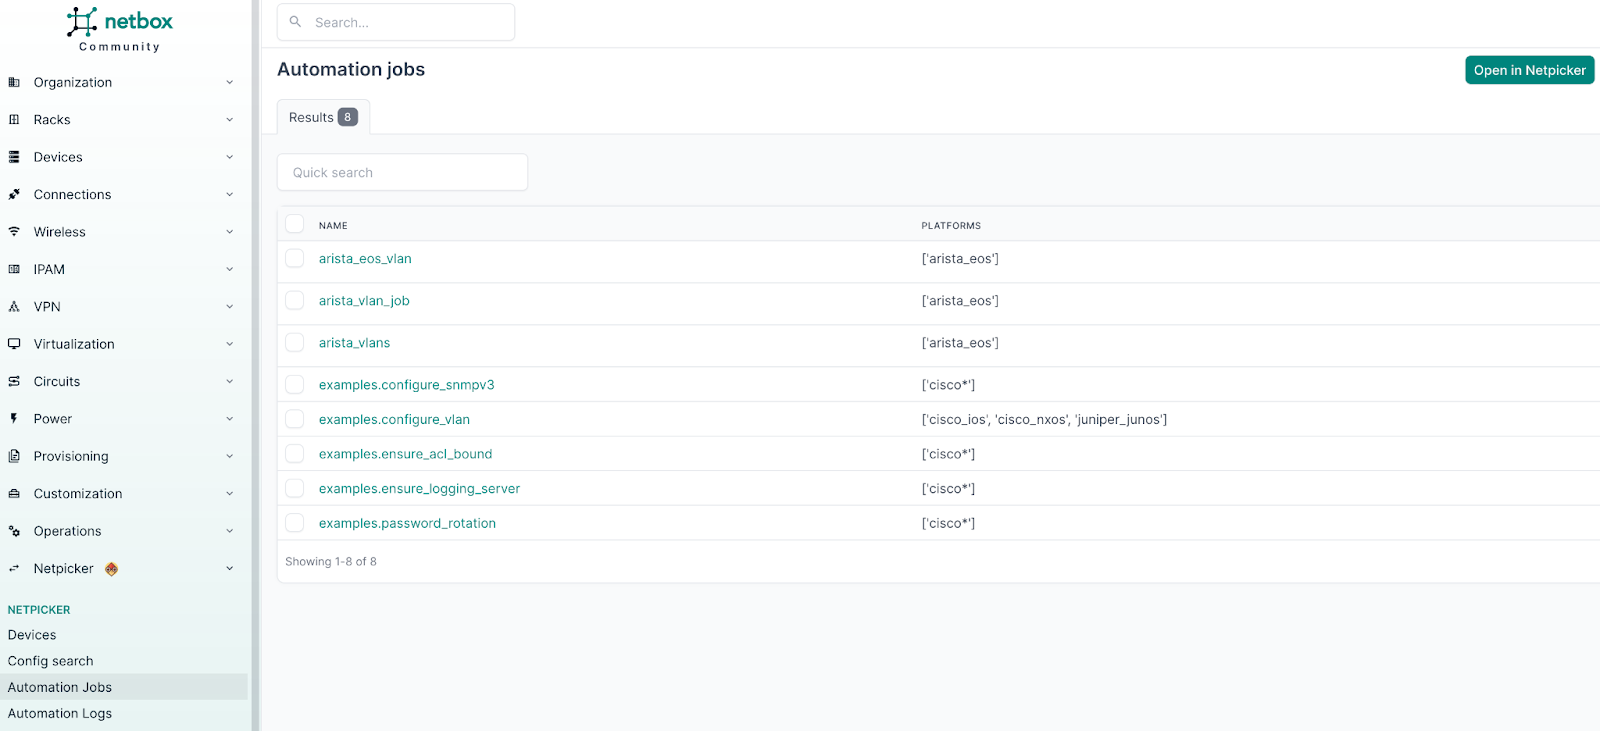
Once a job is executed, you can also view the status of the job and the logs directly from Netbox.
This tight integration means you don’t have to switch tools to manage your devices, run automation, or review logs. Everything is accessible in one place inside Netbox, making it much easier to work with.
You can also use the data stored in NetBox within your automation jobs. We’ll cover this in more detail in a future post.
Closing Up
To wrap up, the Netpicker plugin for NetBox makes it easy to bridge your source of truth with backups and automation. Instead of switching between different tools, you can view device backups directly in Netbox, making it more convenient for day-to-day operations.
The automation feature takes things further by letting you run repeatable jobs across multiple devices. Whether it’s creating VLANs, rotating passwords, or pushing configuration updates, you can save a lot of time and reduce human error. The fact that Netpicker takes automatic backups before and after each change, along with showing you the diffs, adds a layer of safety and visibility that’s hard to achieve manually.
This becomes even more useful for teams who are just starting to explore automation. You don’t need to build everything from scratch with scripts and frameworks. Instead, you can start small with simple jobs, expand into Python-based ones as needed, and gradually adopt automation in your workflows.
Everything we covered in this post, from backups to automation, is part of the free version of Netpicker. If you are looking for more advanced features like RBAC, approvals, logging, workflows, and dedicated support, those are available in the paid version. This way, you can start small at no cost and expand as your needs grow.