In the previous two posts, we covered PanOS REST API fundamentals and GET requests. In this post, we will look into how to configure resources using POST/PUT requests.
Create an Address Object
Let's start from the basics and configure an Address Object using the API. I'm going to use the Python Requests module to make the API call. You don't necessarily need to use Python for this to work, feel free to use any other platform you prefer (Postman, Ansible, CURL)
import requests
import json

# Disable self-signed warning
requests.packages.urllib3.disable_warnings()


location = {'location': 'device-group', 'device-group': 'lab', 'name': 'google_dns'}
headers = {'X-PAN-KEY': 'YOUR_API_KEY'}
api_url = "https://Firewall_IP/restapi/v10.2/Objects/Addresses"

body = json.dumps(
    {
        "entry":
        {
            "@name": "google_dns",
            "ip-netmask": "8.8.8.8",
        }
    }
)

r = requests.post(api_url, params=location, verify=False, headers=headers, data=body)
print(r.text)When you run the script, you will see the below message as an output which indicates that the object has been created successfully. You can also log in to the firewall to verify that the new object indeed exists.
{"@status":"success","@code":"20","msg":"command succeeded"}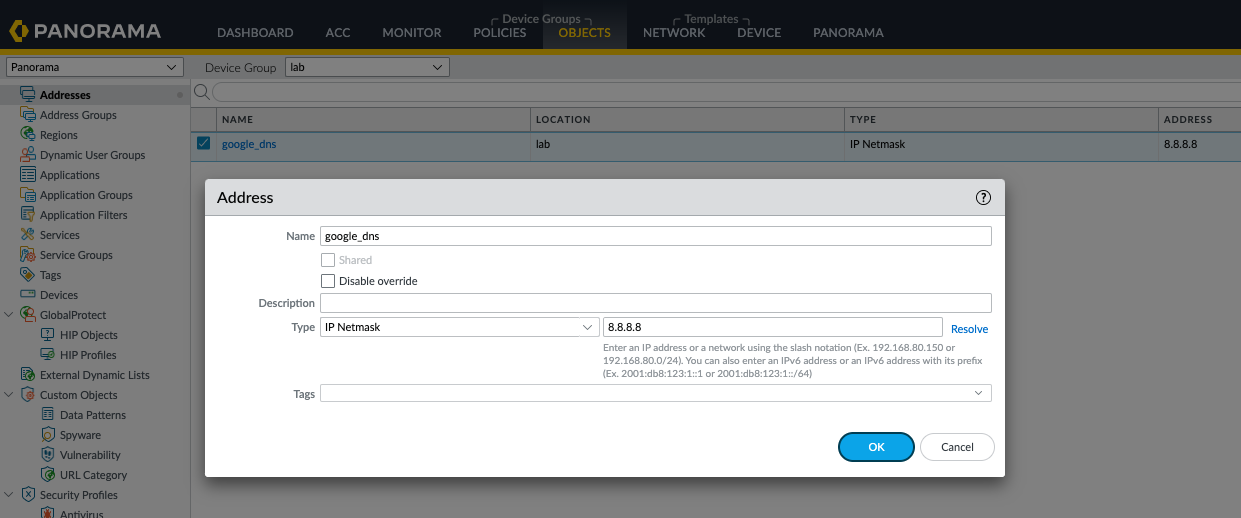
Modifying an existing address object
Suppose you want to add a description to the same object that we created earlier, how would you do it? Let's add a description field and re-run the script.
body = json.dumps(
    {
        "entry":
        {
            "@name": "google_dns",
            "ip-netmask": "8.8.8.8",
            "description": "Google DNS Server"
        }
    }
)

r = requests.post(api_url, params=location, verify=False, headers=headers, data=body)
print(r.text)
{"code":6,"message":"Object Not Unique","details":[{"@type":"CauseInfo","causes":[{"code":8,"module":"panui_mgmt","description":"Object Not Unique: Object already exists."}]}]}As you can see above, the error says the object already exists because the POST request will try to 'create' an address object from scratch rather than amending it. To amend an existing item, we need to use the PUT request.
PUT Request
I've amended line #23 to use PUT instead of POST, running the script results in the object being modified.
import requests
import json

# Disable self-signed warning
requests.packages.urllib3.disable_warnings()


location = {'location': 'device-group', 'device-group': 'lab', 'name': 'google_dns'}
headers = {'X-PAN-KEY': 'API_KEY'}
api_url = "https://Firewall_IP/restapi/v10.2/Objects/Addresses"

body = json.dumps(
    {
        "entry":
        {
            "@name": "google_dns",
            "ip-netmask": "8.8.8.8",
            "description": "Google DNS Server"
        }
    }
)

r = requests.put(api_url, params=location, verify=False, headers=headers, data=body)
print(r.text)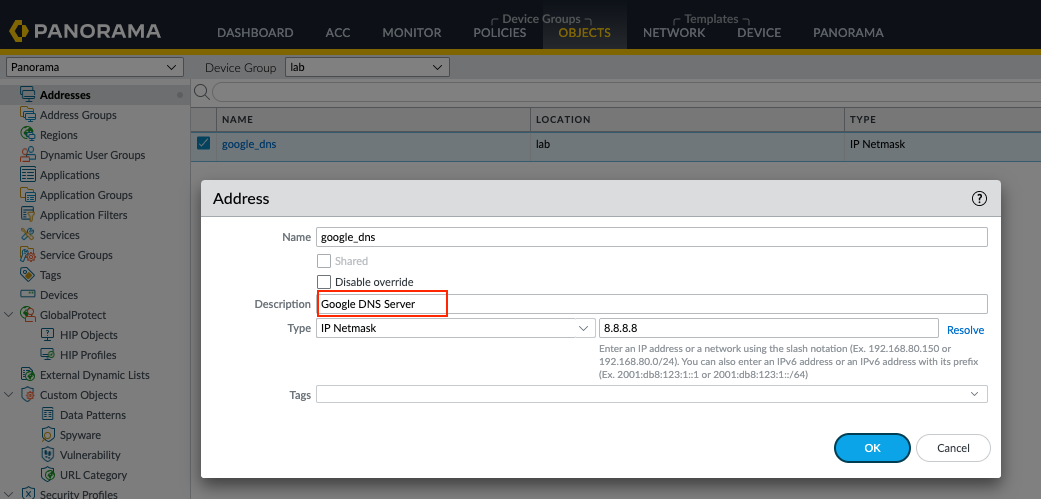
Security Policy
Now that we are comfortable with creating objects, let's try and create a Security Policy using the API.
If you are unsure about which parameters to use with the request, you can navigate to https://firewall_ip/restapi-doc where all the required resources are well documented for each resource.

Now that we know exactly what parameters to use, let's put together a script to test security policy creation with the POST request.
For this example, I'm simply creating a test policy called allow_users_to_internet as shown below.
import requests
import json

# Disable self-signed warning
requests.packages.urllib3.disable_warnings()


location = {'location': 'device-group', 'device-group': 'lab', 'name': 'allow_users_to_internet'}
headers = {'X-PAN-KEY': 'API_KEY'}
api_url = "https://Firewall_IP/restapi/v10.2/Policies/SecurityPreRules"

body = json.dumps(
    {
        "entry":
        {
            "@name": "allow_users_to_internet",
            "from": {
                "member": ['any']
            },
            "to": {
                "member": ['any']
            },
            "source": {
                "member": ['10.10.10.0/24']
            },
            "destination": {
                "member": ['any']
            },
            "application": {
                "member": ['ssl']
            },
            "service": {
                "member": ['application-default']
            },
            "action": 'allow',
            "log-start": "no",
            "log-end": "yes"
        }
    }
)

r = requests.post(api_url, params=location, verify=False, headers=headers, data=body)
print(r.text)
{"@status":"success","@code":"20","msg":"command succeeded"}
As you can see above, the policy has been successfully created on the firewall.
Closing thoughts
PanOS REST API is extremely powerful as you can create almost all the resources with it. The API documentation is also great compared to other vendors so, you are less likely to go wrong with it.
 Suresh Vina