In this blog post, let's look at a very simple Network CI/CD pipeline that manages my Containerlab network topology and configurations. We'll start with the benefits of using CI/CD, cover some basic terminology, and then go through an example.
To give an overview, I use Containerlab to deploy my network labs and Nornir to deploy the configurations. Before CI/CD, my typical workflow involves using containerlab commands to manage the topology. Once the lab is up and running, I use Python to run the Nornir script. This works well because I'm the only one using it. However, I ideally want to put all the configurations into a Git repo to track my changes over time. I also want to test my code (to ensure there are no syntax errors, for example) and automatically push the updates to the devices.
Here is the project repo if you want to clone it and follow along.


What Exactly is CI/CD?
CI/CD stands for Continuous Integration and Continuous Delivery. In simple terms, it means automatically testing and delivering your code. With Continuous Integration (CI), every time you make a change to your code, it's tested automatically to catch any errors early. Continuous Deployment (CD) then takes your tested code and deploys it to your devices automatically. This process helps you quickly find and fix problems and ensures your changes are delivered smoothly.
Why Do You Need CI/CD in Your Network?
Imagine you have a network lab setup within your company where several colleagues use the same lab for learning or testing your network. You might have a server running Containerlab (it could also be EVE-NG or CML) and all the config files stored on that server. Without CI (git), I could make changes to the topology and push those changes. These changes might work or they might break something. The next day, someone else could come in and notice something has changed, but without version control, they wouldn’t know exactly what I changed.
At a minimum, you need to put everything into version control to track changes. Once you do that, there are still some problems to fix. How do we know the changes we make won’t break something? How do we ensure we are following best practices when managing the code or the config files? Finally, every time we make changes and push them to the git repo, we also want to deploy those changes automatically (CD).
This is where the CI/CD workflow fits in. With CI, every change you make is tested automatically to ensure it doesn't break anything. With CD, once the changes are tested, they are automatically deployed to your network devices. This process ensures that everyone using the lab is aware of changes, the changes are tested before deployment, and the network remains stable and up-to-date.
Prerequisites
This blog post assumes you are familiar with Containerlab, Nornir, and basic Python. If you’re not familiar with these, you can check out my other intro blog posts below. Even if you are new to Containerlab or Nornir, you can still follow along. The concepts and steps we cover will help you understand how to set up a simple Network CI/CD pipeline.
 Suresh Vina
 Suresh Vina
 Suresh Vina
What's Our Goal Here?
Our goal is to put our project into GitLab (you can sign up for free at gitlab.com) so, the configs are version-controlled. Once that's done, we can bring up the lab. Once the lab is up and running, there are two possible scenarios moving forward, we might make changes to either the Containerlab topology file or the Nornir files (Python script, hosts/groups/defaults file).
If we make changes to the topology file, we want to create a feature branch (instead of working directly on the main/master branch) and push it to GitLab. As soon as we do this, GitLab will run a specific job that uses yamllint. yamllint is a tool that checks YAML files for syntax errors and formatting issues. Once the test passes, we can merge the feature branch with the master branch. When we do this, the pipeline will run another job that will redeploy the lab and automatically run the Nornir script.
If we make changes only to the Nornir files, we don't want to redeploy the lab again. We just want to run a job that executes a Python script to push the new configurations.
It might seem a bit confusing at first, but when we look at the example, it should start to make sense.
GitLab
GitLab is a web-based DevOps platform that provides a Git repository manager with built-in CI/CD capabilities. It is similar to GitHub but includes integrated tools for the entire software development lifecycle.
GitLab CI/CD automates the build, test, and deployment processes. It uses a .gitlab-ci.yml file in your repository to define the pipeline stages and jobs.
GitLab Runner
GitLab Runner is an application that processes the jobs defined in the CI/CD pipeline. It can run on various platforms, including Linux, Windows, and macOS, and is essential for executing the CI/CD jobs. In our setup, we will use GitLab Runner to manage our Containerlab and Nornir tasks.
For my example, I have a single Ubuntu VM that runs my Containerlab topology and also acts as a GitLab runner. Installing the runner is straightforward as shown below.
curl -L "https://packages.gitlab.com/install/repositories/runner/gitlab-runner/script.deb.sh" | sudo bash
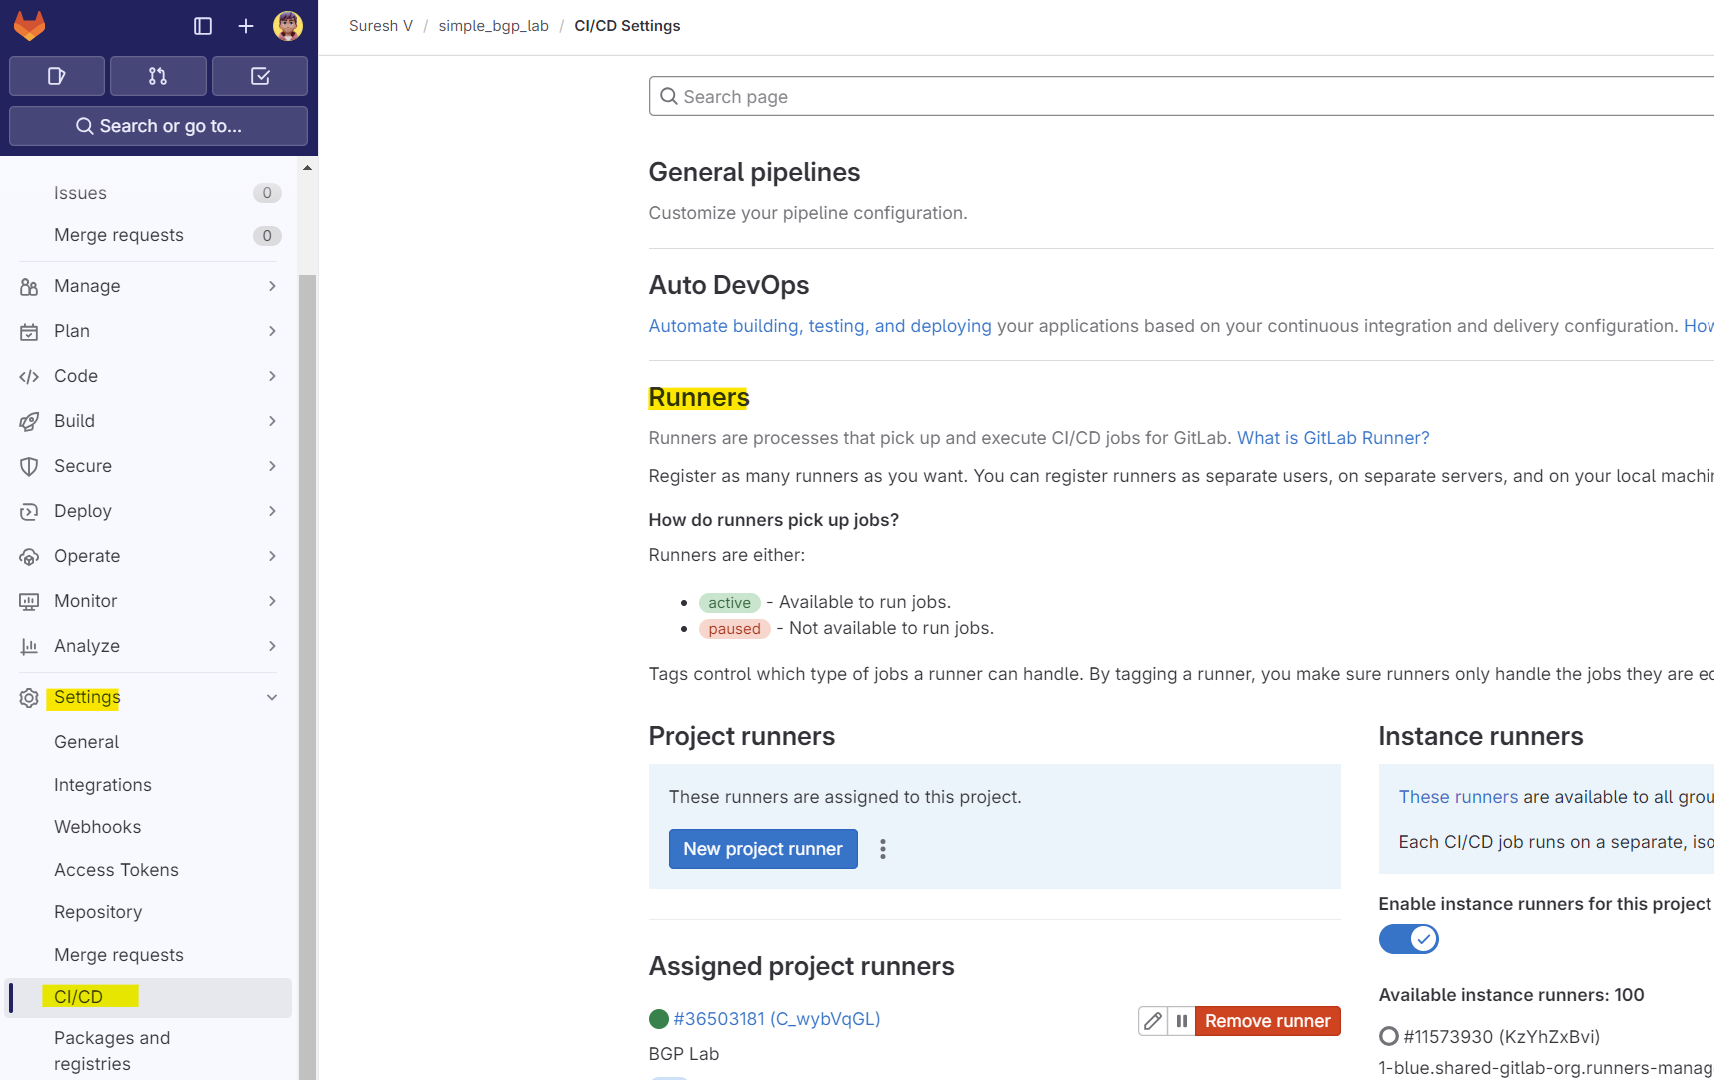
sudo apt-get install gitlab-runnergitlab-runner register --url https://gitlab.com --token <YOUR_TOKEN>gitlab-runner runYou can get the token by navigating to Settings > CI/CD > Runners in your GitLab project. This setup will allow the runner to execute CI/CD jobs defined in your project.
shell executor for this example. The Shell executor is a simple executor that you use to execute builds locally on the machine where GitLab Runner is installed. It supports all systems on which the Runner can be installed.Suresh Vina
GitLab CI File
The GitLab CI file, named .gitlab-ci.yml, defines the CI/CD pipeline configuration for your project. It contains the instructions for the GitLab Runner on how to build, test, and deploy your code. This file is written in YAML format and specifies various stages and jobs in your pipeline.
To set up your pipeline, all you need to do is place the .gitlab-ci.yml file in the root of your repository. Here is a very simple, generic example of what the file might look like.
#.gitlab-ci.yml

stages:
  - test
  - deploy

test:
  stage: test
  script:
    - echo "Running tests"
  only:
    - branches

deploy:
  stage: deploy
  script:
    - echo "Deploying application"
  only:
- master- The
testjob runs a basic test script during the test stage. - The
deployjob runs a basic deploy script during the deployment stage, but only for the master branch.
Understanding Stages, Jobs, and Pipelines
Stages represent the phases of your CI/CD process. Each stage can include multiple jobs that run in parallel during the stage.
Jobs are individual tasks that are executed in stages. They perform specific actions, such as running tests, deploying code, or cleaning up resources. Each job is defined by its script, which outlines the commands to be executed.
Pipelines are the overall workflows that connect multiple stages and jobs. A pipeline orchestrates the sequence of stages, ensuring each stage runs only after the previous one is completed successfully.
Explaining Our GitLab CI File
Our .gitlab-ci.yml file defines the CI/CD pipeline for managing our network lab project. Please check my Gitlab repo for the up-to-date CI file - https://gitlab.com/vsurresh/simple_bgp_lab/-/blob/main/.gitlab-ci.yml
---
stages:
  - test
  - deploy
  - configure
  - destroy

run_tests:
  stage: test
  tags:
    - lab
  script:
    - echo "Running Tests"
    - yamllint -c .yamllint.yaml .
  variables:
    GIT_CLEAN_FLAGS: none

deploy_lab:
  stage: deploy
  tags:
    - lab
  script:
    - echo "Deploying lab using containerlab"
    - cd clab
    - sudo containerlab deploy -t bgp.yaml
  after_script:
    - sleep 30
  when: manual

re_deploy_lab:
  stage: deploy
  tags:
    - lab
  script:
    - echo "Re-deploying lab using containerlab"
    - cd clab
    - sudo containerlab destroy -t .bgp.yaml.bak --cleanup
    - sudo containerlab deploy -t bgp.yaml
  after_script:
    - sleep 30
  rules:
    - if: '$CI_COMMIT_BRANCH == "main"'
      changes:
        - clab/bgp.yaml
  variables:
    GIT_CLEAN_FLAGS: none

run_nornir_script:
  stage: configure
  tags:
    - lab
  script:
    - echo "Running Nornir script"
    - cd nornir_files
    - pyenv local nornir
    - python render_configs.py
  rules:
    - if: '$CI_COMMIT_BRANCH == "main"'
      changes:
        - nornir_files/**
        - clab/bgp.yaml
  variables:
    GIT_CLEAN_FLAGS: none

destroy_lab:
  stage: destroy
  tags:
    - lab
  script:
    - echo "Destroying lab using containerlab"
    - cd clab
    - sudo containerlab destroy -t .bgp.yaml.bak --cleanup
  when: manual
  variables:
    GIT_CLEAN_FLAGS: none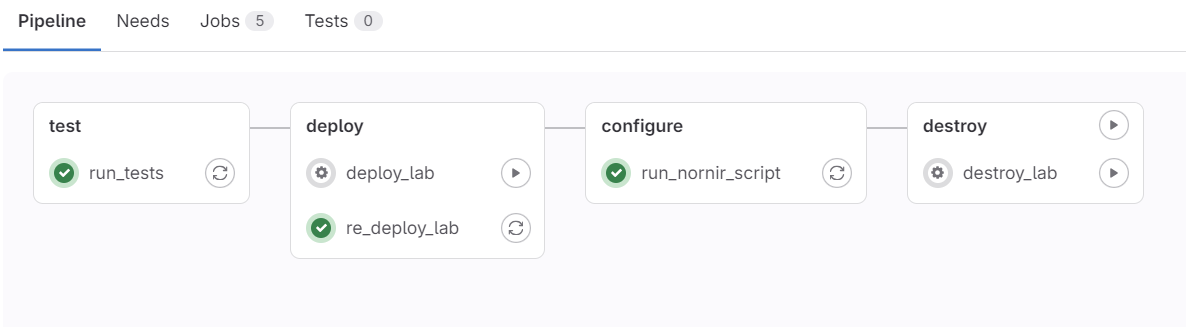
test stage
In the test stage, the run_tests job lints the YAML files using yamllint to ensure there are no syntax errors. To exclude files created by Containerlab from linting, we use a custom configuration file .yamllint.yaml
extends: default

ignore: |
  clab/clab-bgp
deploy stage
The deploy stage includes two jobs. First, the deploy_lab job manually deploys the lab environment using Containerlab, setting up the network topology as defined in the bgp.yaml file. I made this a manual step because there would be times when I reboot my VM and want to deploy the lab manually.
The re_deploy_lab job handles redeployment when changes are detected in the main branch, specifically to the topology file bgp.yaml. So, for example, if I make a change to the topology file (bgp.yaml) by adding a new device or changing a link, the pipeline automatically destroys the old lab, deploys the new one and pushes the configs to all the devices.
rules:
  - if: '$CI_COMMIT_BRANCH == "main"'
    changes:
      - clab/bgp.yaml
In between the jobs, Gitlab pulls the repo which in turn removes any untracked files. To prevent the runner fetching the repo and removing files created by Containerlab, we set the variable GIT_CLEAN_FLAGS: none. With this flag, the files created by Containerlab are preserved.
Additionally, the after_script adds a 30-second delay to allow devices to come online after deployment. Please keep in mind that we only need one of the jobs to deploy the lab.
sudo containerlab destroy -t .bgp.yaml.bak --cleanup - When you deploy a lab with Containerlab, it creates a backup topology file that was used to deploy the lab. If you update the topology file (bgp.yaml) and then try to destroy the lab using the modified file, it will result in an error due to the changes. To avoid this, we use the backup file (.bgp.yaml.bak) that Containerlab automatically creates during deployment. Thanks to Roman for this helpful tip.configure stage
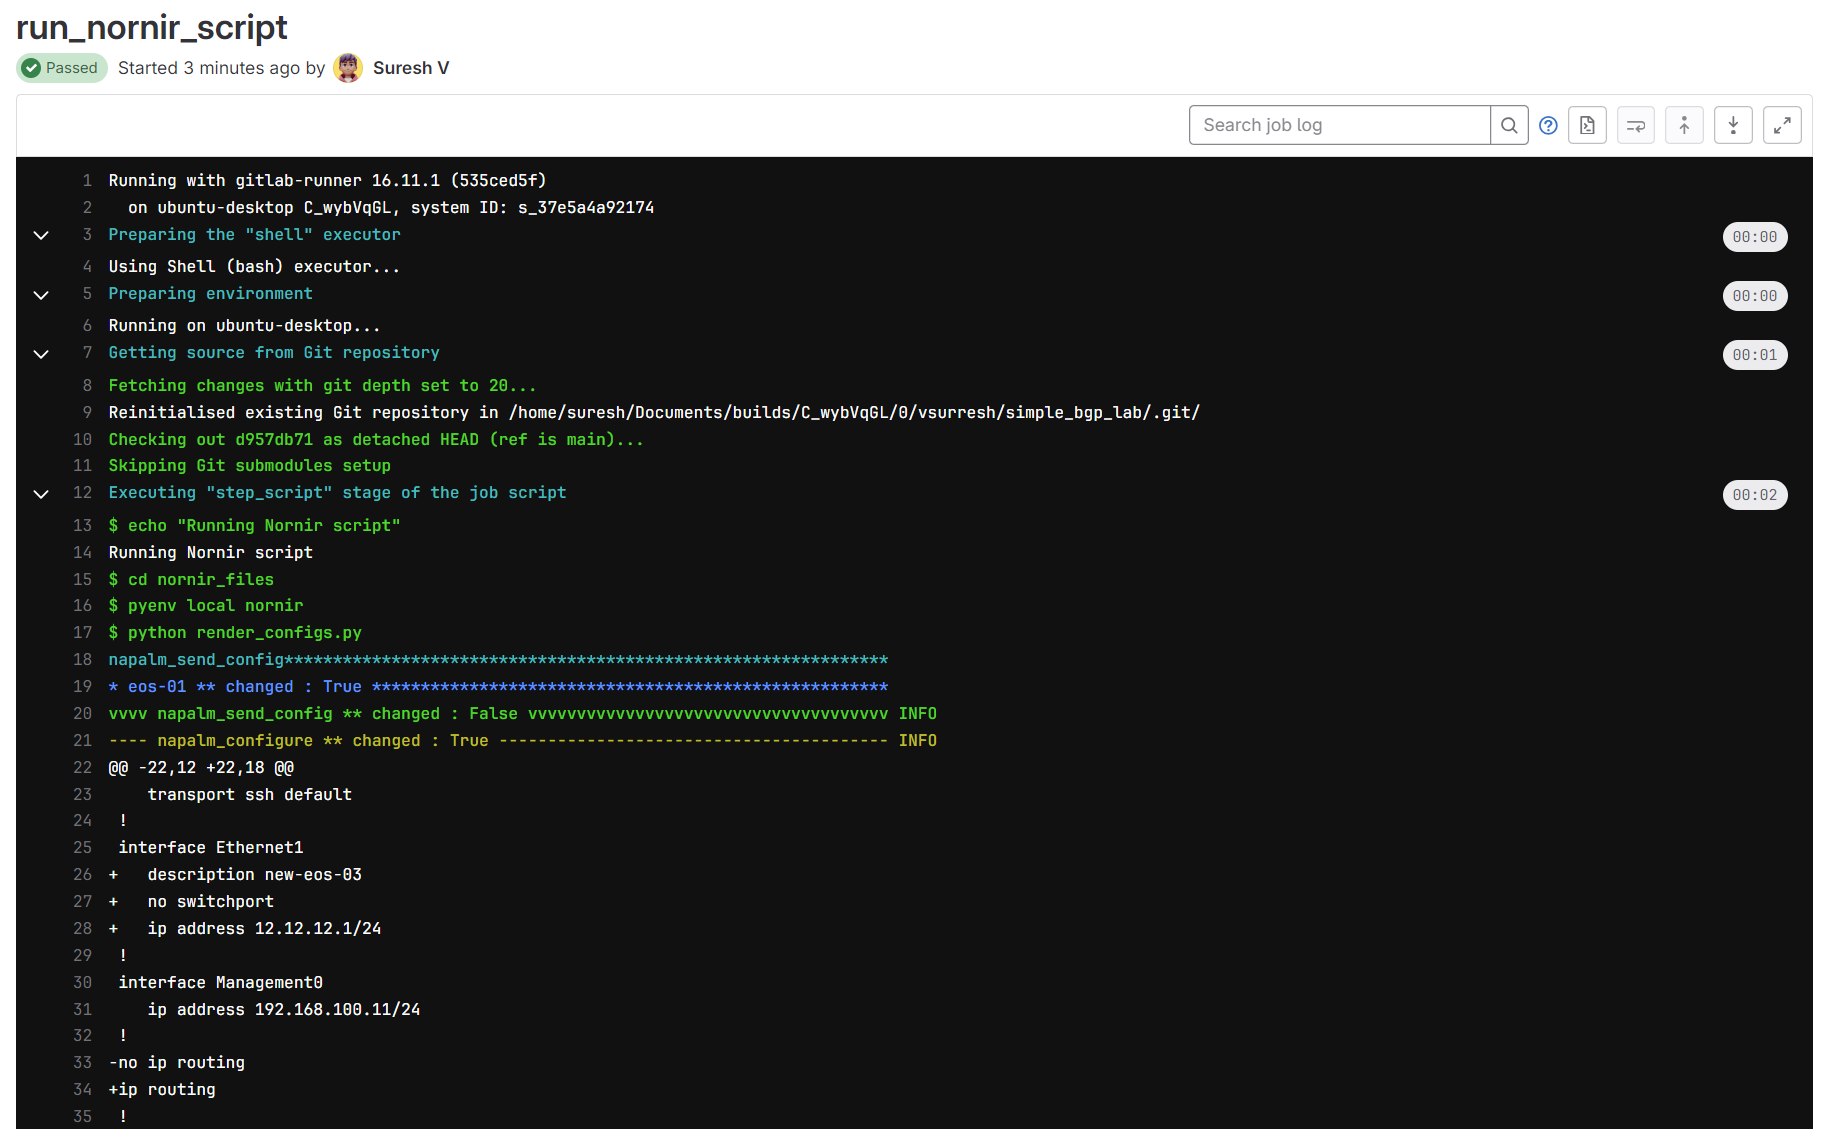
In the configure stage, the run_nornir_script job runs Nornir scripts to apply configurations to the network devices. This job is triggered when there are changes to nornir files or the topology file in the main branch.
run_nornir_script:
  stage: configure
  tags:
    - lab
  script:
    - echo "Running Nornir script"
    - cd nornir_files
    - pyenv local nornir
    - python render_configs.py
  rules:
    - if: '$CI_COMMIT_BRANCH == "main"'
      changes:
        - nornir_files/**
        - clab/bgp.yaml
  variables:
    GIT_CLEAN_FLAGS: none
I'm also using pyenv to manage Python virtual environments. This helps keep my project dependencies isolated and consistent. In the script, pyenv local nornir sets the Python environment to one where I've already installed the necessary modules from requirements.txt
Suresh Vina
If you don't have the required modules installed, you should run pip install -r requirements.txt in your environment. This ensures you have all the dependencies needed to run the Nornir scripts. Keep this in mind as you follow along.
destroy stage
Finally, the destroy stage includes the destroy_lab job, which manually destroys the lab setup using Containerlab.
destroy_lab:
  stage: destroy
  tags:
    - lab
  script:
    - echo "Destroying lab using containerlab"
    - cd clab
    - sudo containerlab destroy -t .bgp.yaml.bak --cleanup
  when: manual
  variables:
    GIT_CLEAN_FLAGS: none
In the destroy_lab job, the when: manual setting means that this job doesn't run automatically as part of the pipeline. Instead, you trigger it manually whenever you need to destroy the lab environment.
One practical use case for this is if you're planning to go on holiday or need to shut down your VM. You can manually run this job to destroy the Containerlab topology, ensuring that all resources are cleaned up before you leave.
Some Scenarios
1 - Updating the Readme file
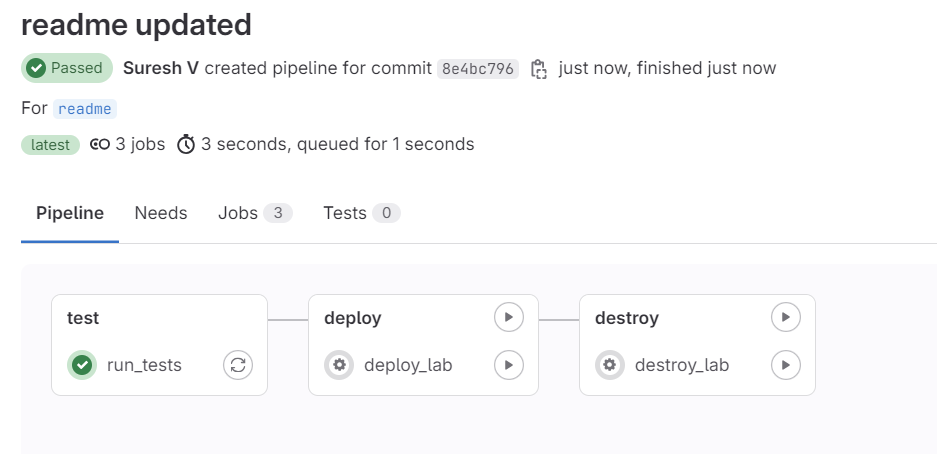
Let's say our lab is up and running, and everything looks good. Now, suppose someone made a change to the Readme file and pushed it to GitLab, then merged it with the main branch. We don't want to redeploy the lab for a documentation change, right?
To handle this, we still run the test stage but skip the other stages. I start by creating a new branch called readme, making a small change to the readme file, and pushing it to GitLab. At this stage, the pipeline runs, but only the test stage. After merging this branch to the main branch, it runs the test stage again, and that's all.

Below, you can see the pipeline only ran the test stage (before merging)
test job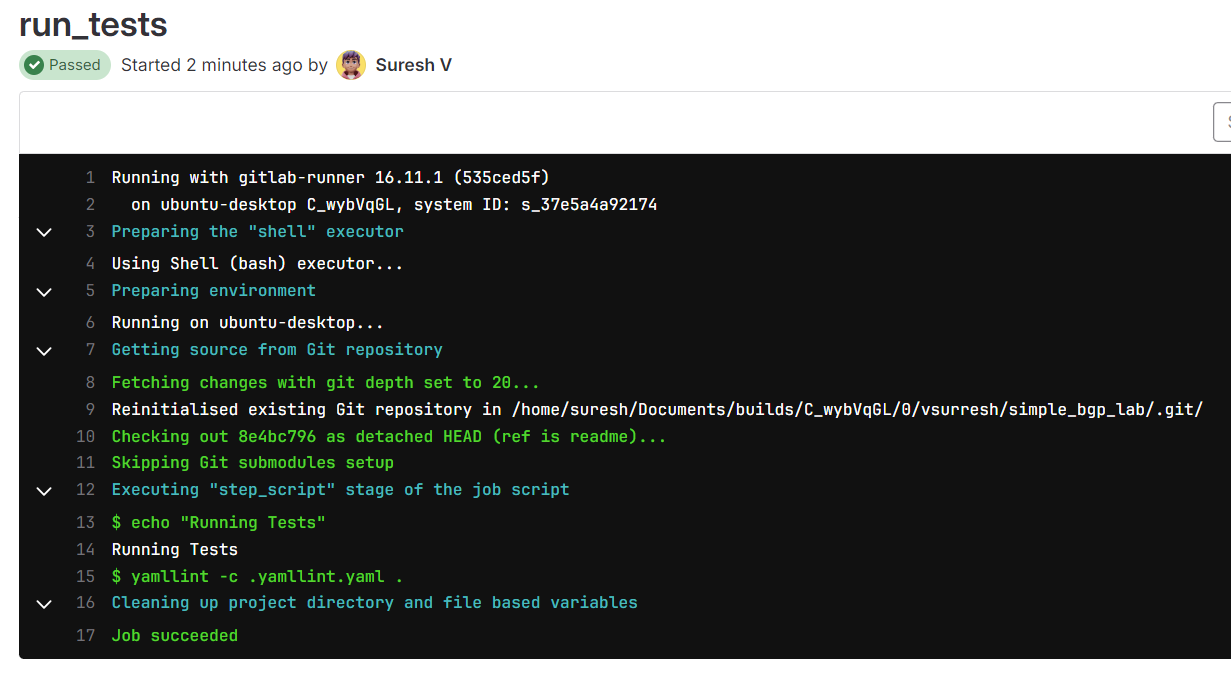
I then merged the branch with the main which in turn ran the same test again. Before merging, you also get a visual clue that the tests were passed.
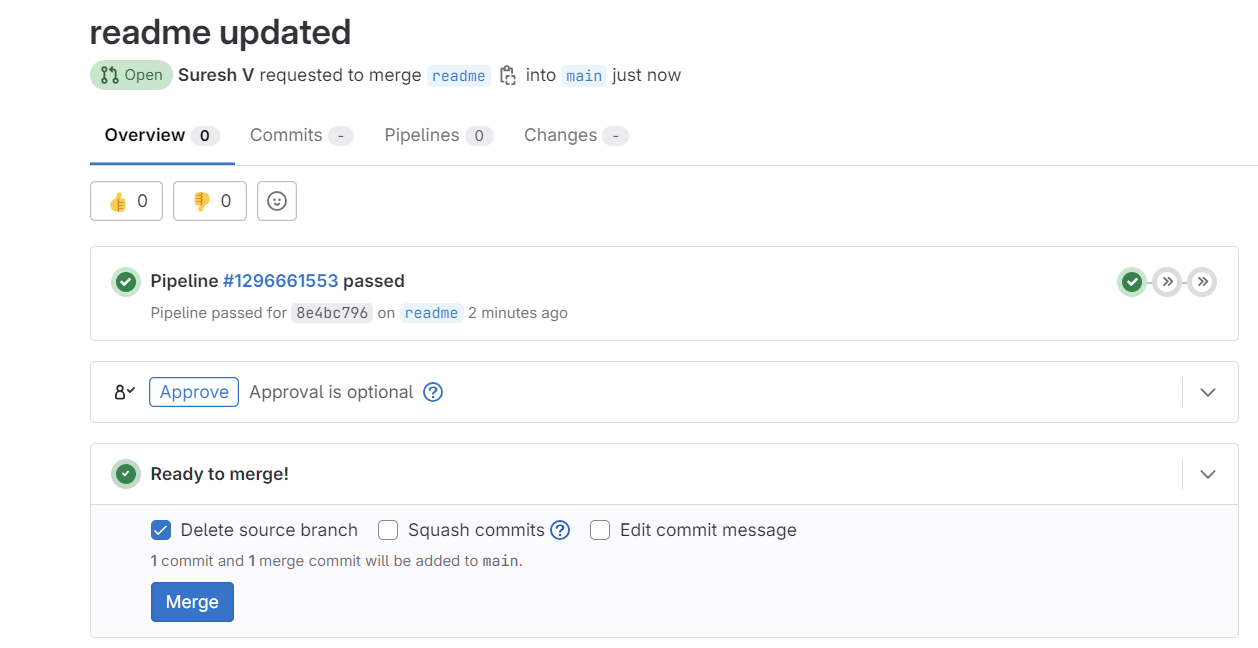
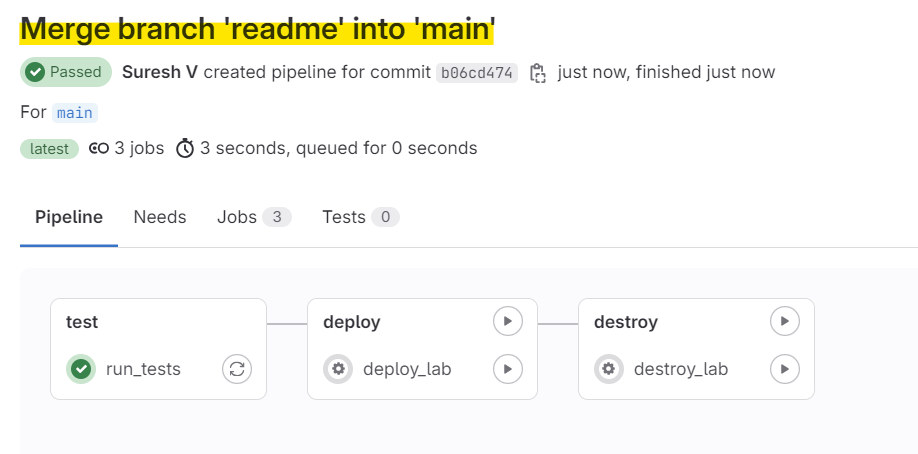
test stage re-runsExactly what we wanted, right? The lab was intact.
Suresh Vina
2 - Make changes to the nornir_files
In our second example, let's make some changes to the Nornir files. This could be the Python script, host file, or anything related to Nornir. For simplicity, I'll change the description in one of the interfaces. Once the changes are made, I'll push them to a new branch, just like before.
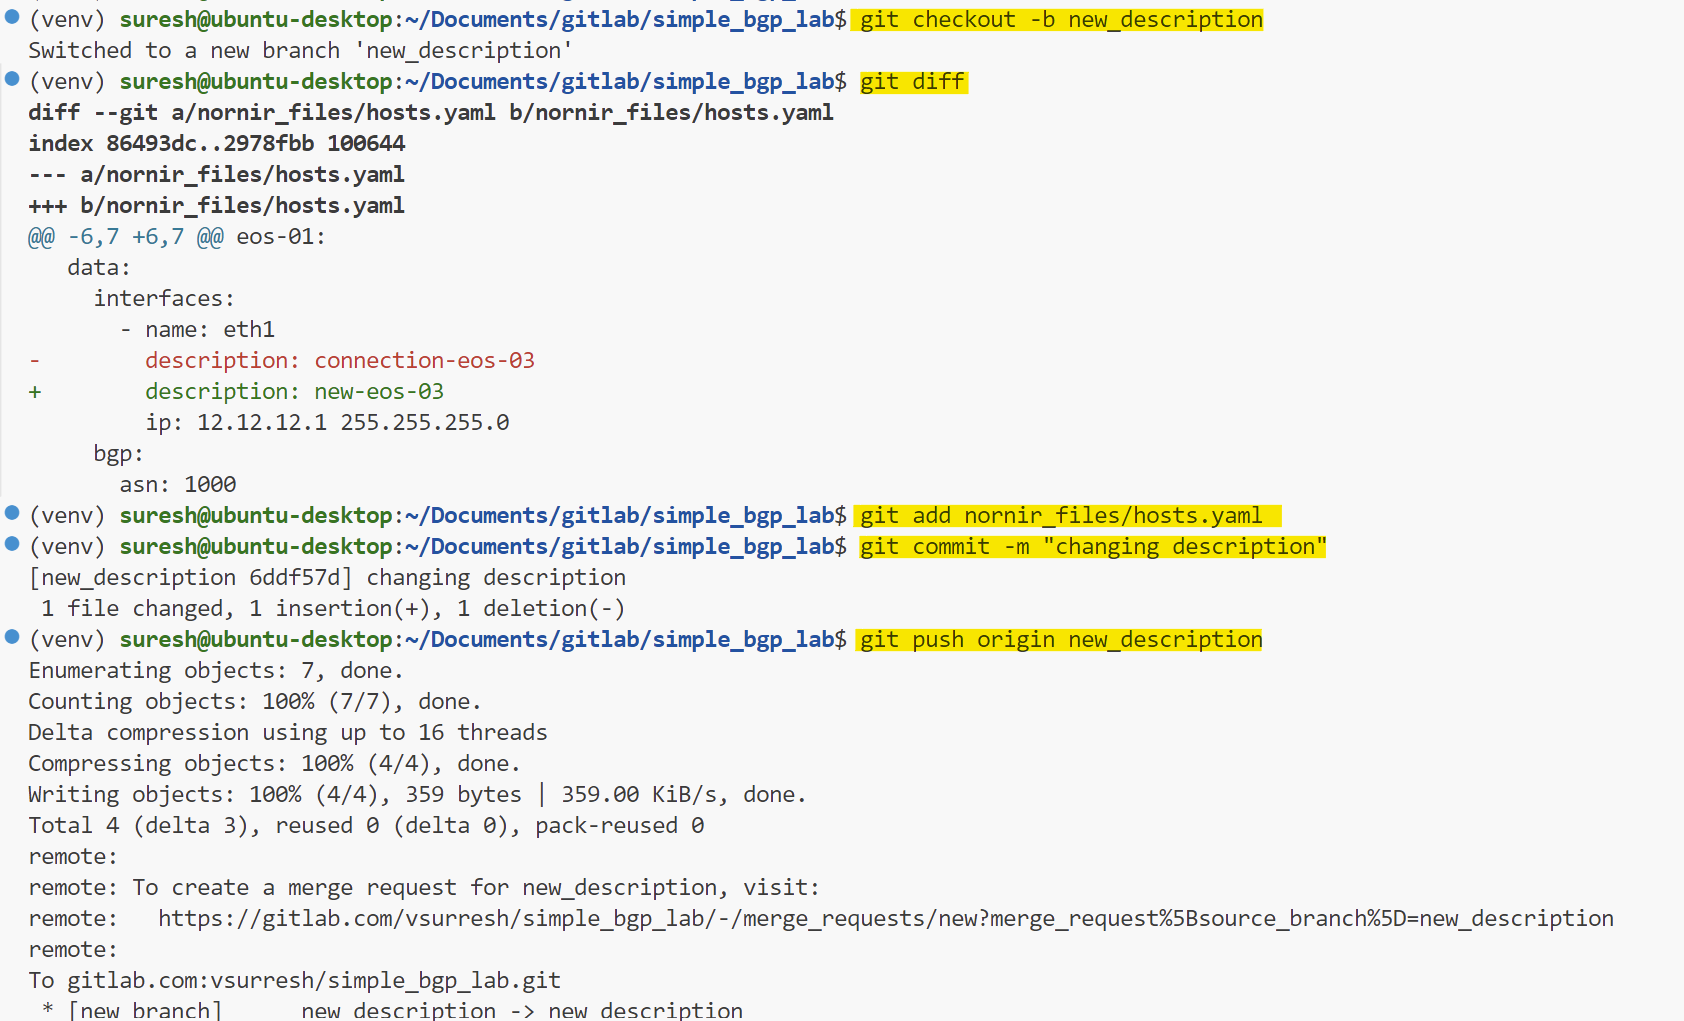
As we mentioned before, the pipeline won't run the changes until we merge the branch into the main branch. This ensures that only validated changes are applied to the lab environment.
test job before merging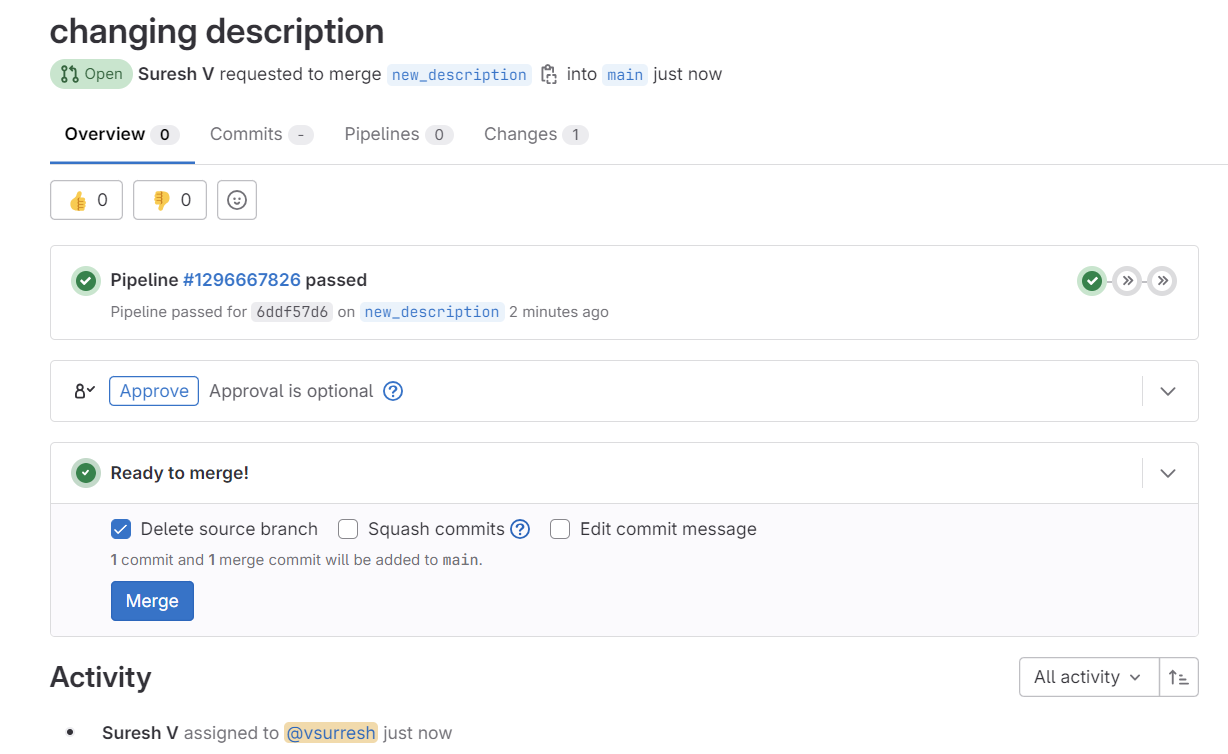
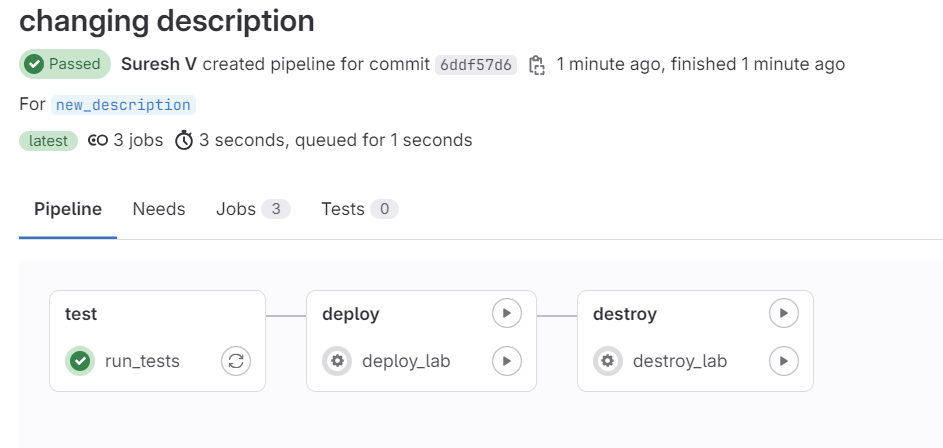
Now the big difference is, as soon as I merge, it runs both the test stage and the configure stage. (it still won't touch the containerlab containers because we didn't change the lab topology)
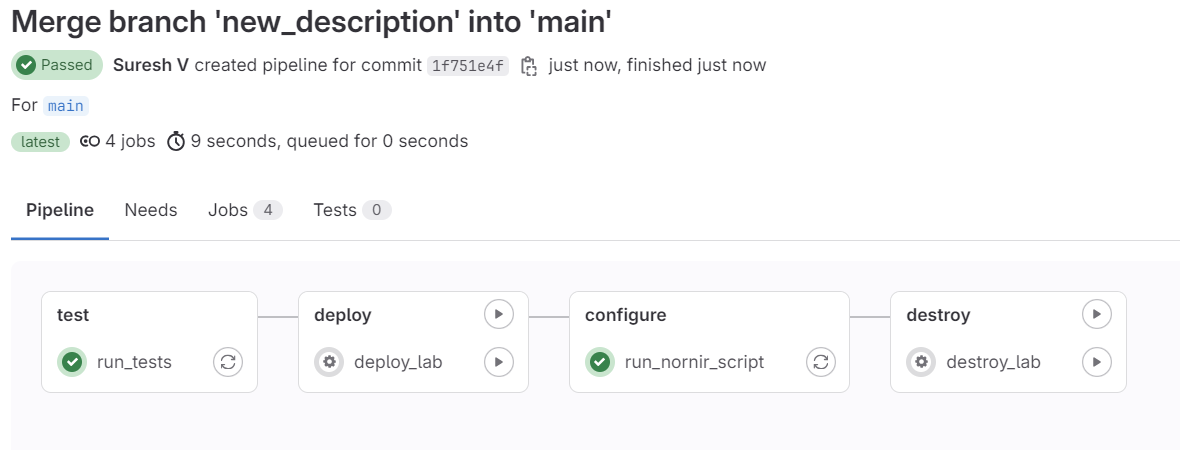
test and configure after merging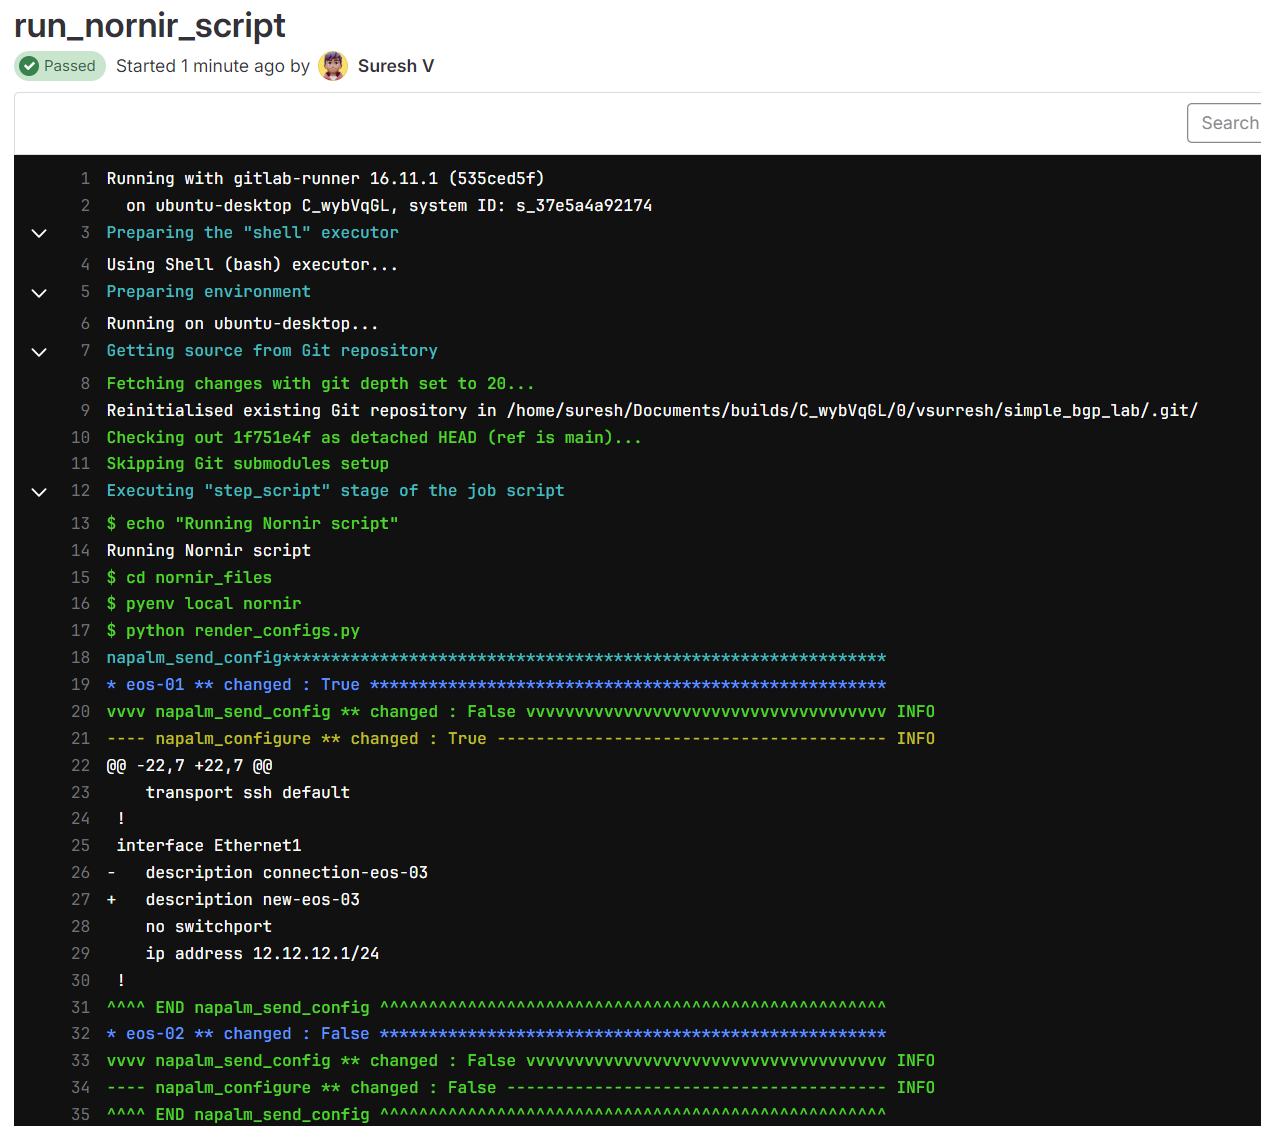
3 - Redeploy the lab
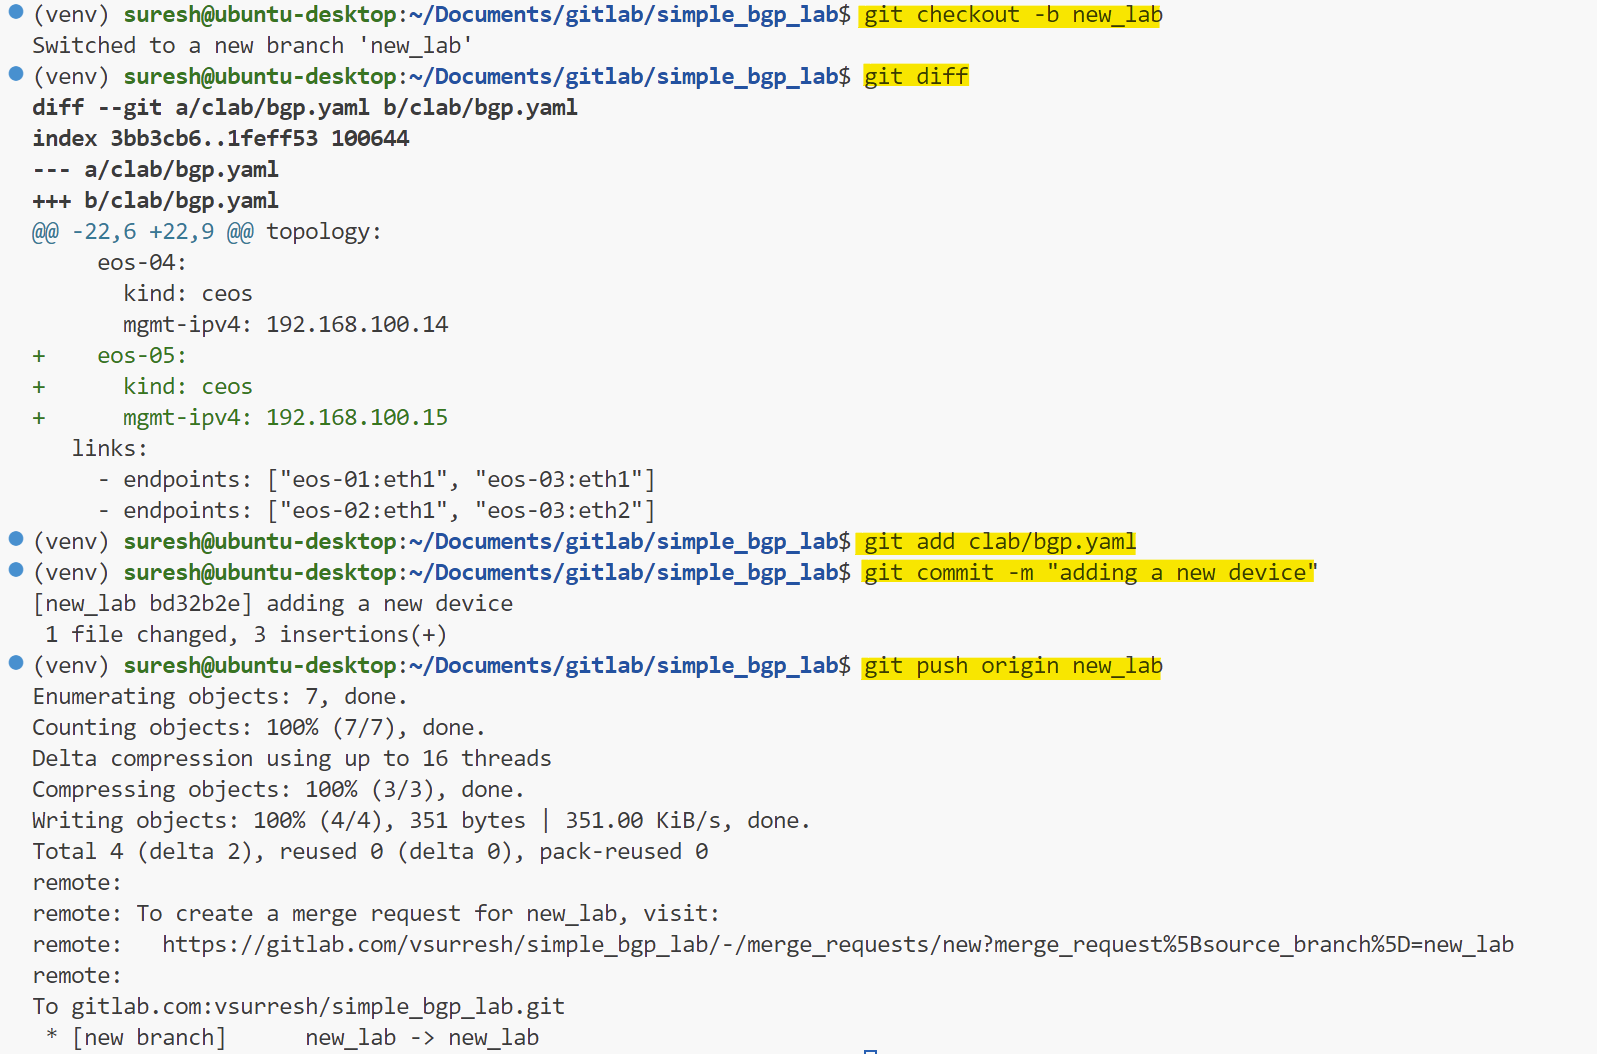
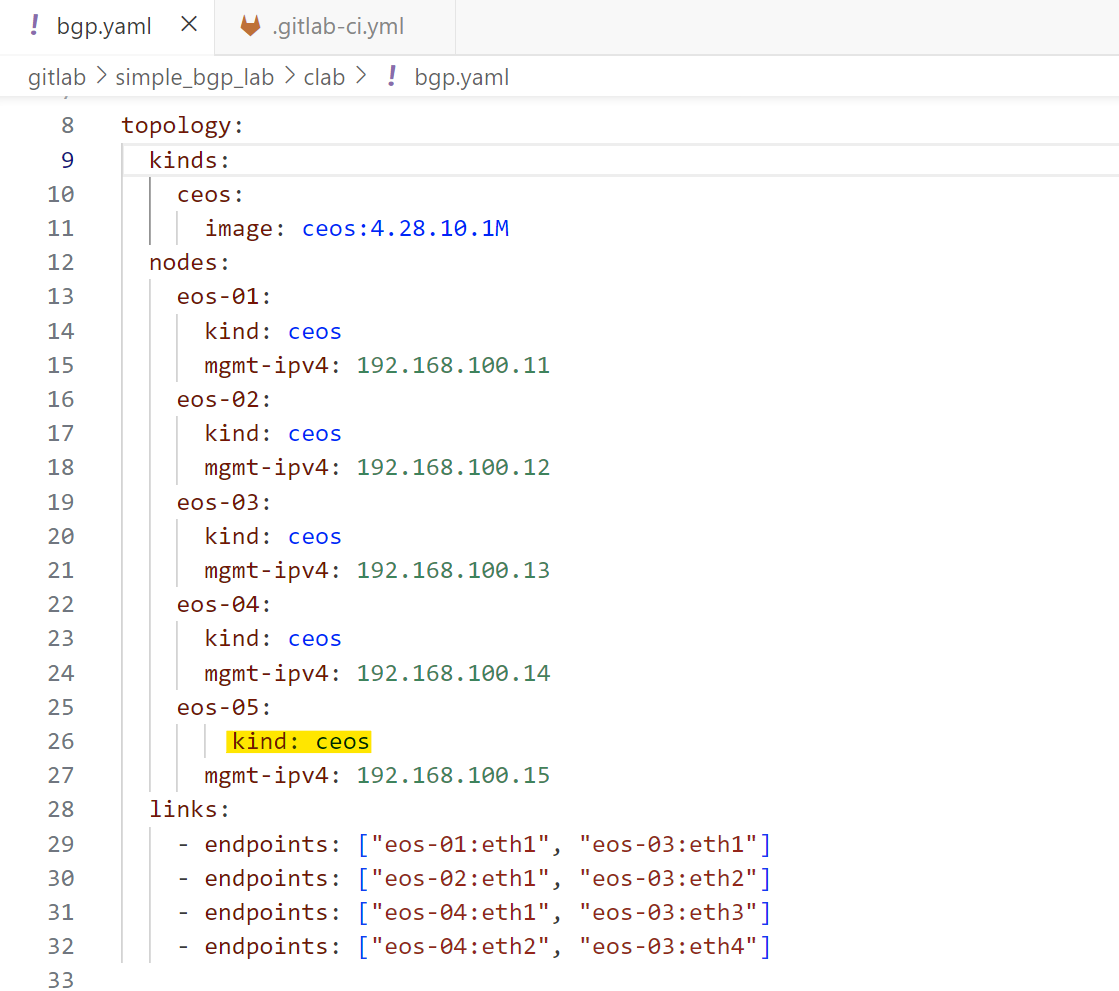
In our third example, let's say I add a new device to the topology file. With Containerlab, any changes to the topology file require the lab to be redeployed. When this happens, the pipeline should run the re_deploy_lab job followed by the run_nornir_script job, in that specific order. Remember, we have a rule associated with re_deploy_job says if there is a change to the clab/bgp.yaml file, this job should run.
This ensures the new topology is deployed correctly and the configurations are applied to the devices. Let's try it and see how the pipeline handles this change.
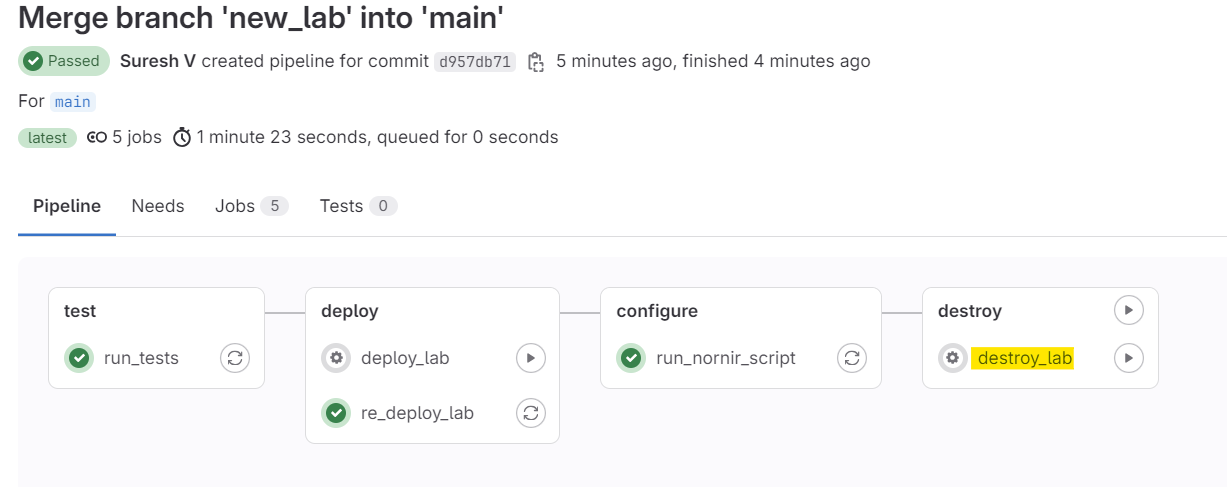
As always, before merging the branch, it runs the test stage. Here is what happens after I merge the new branch to the main branch.
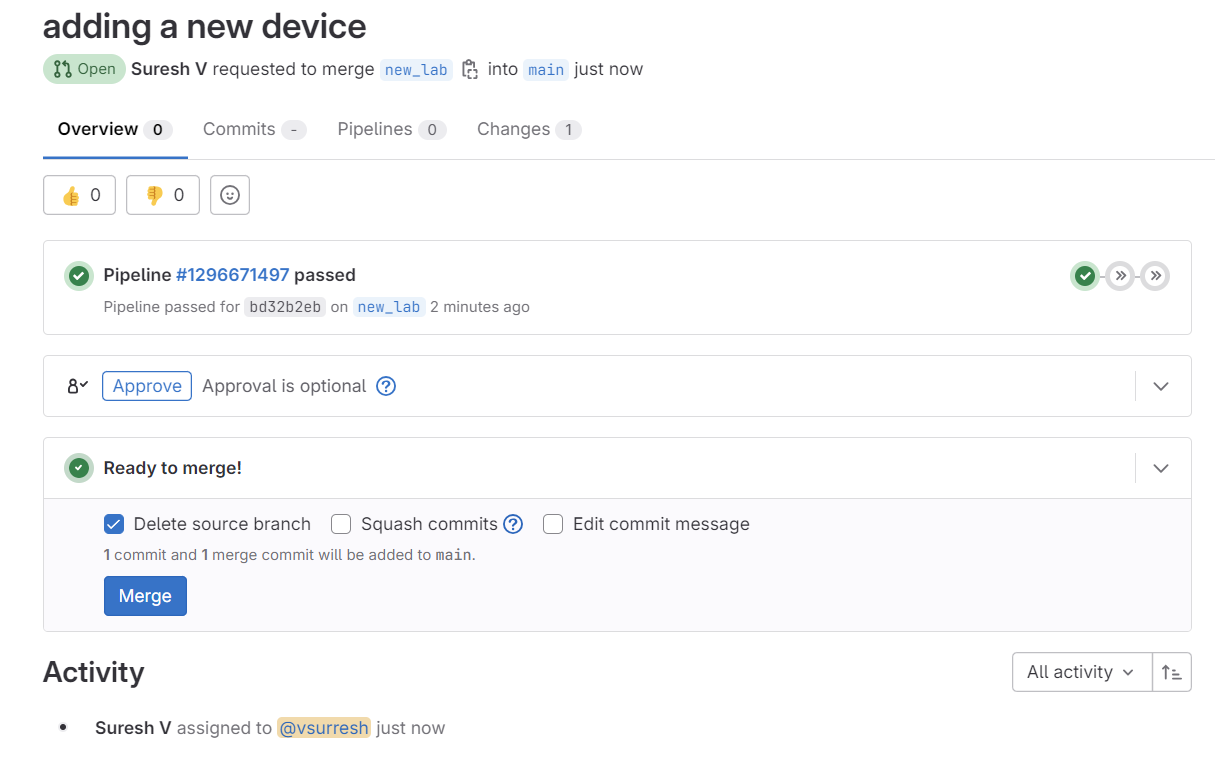
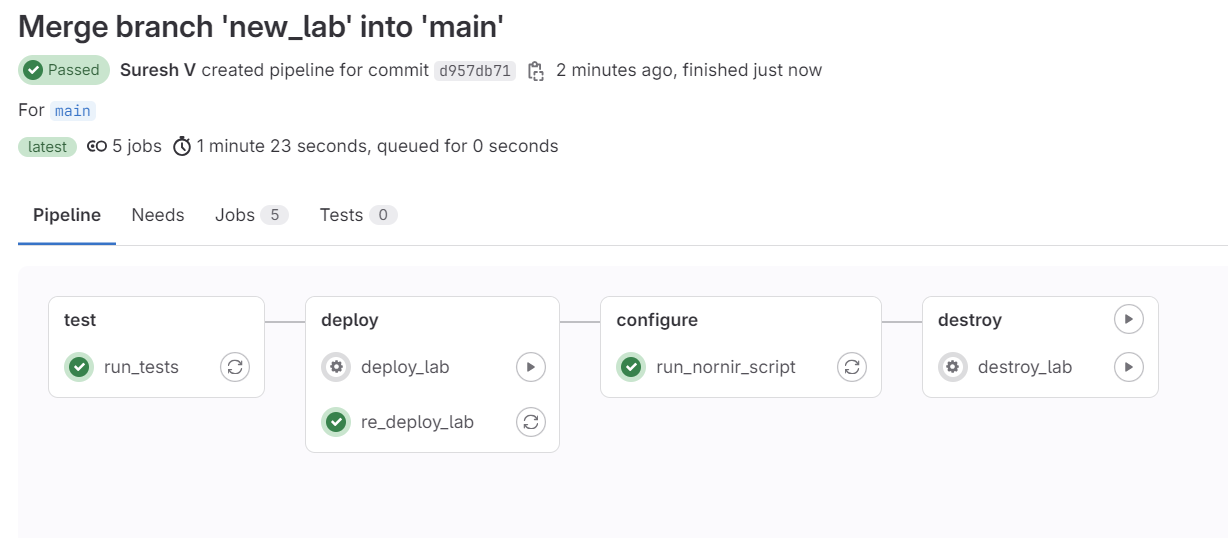
test, deploy and configure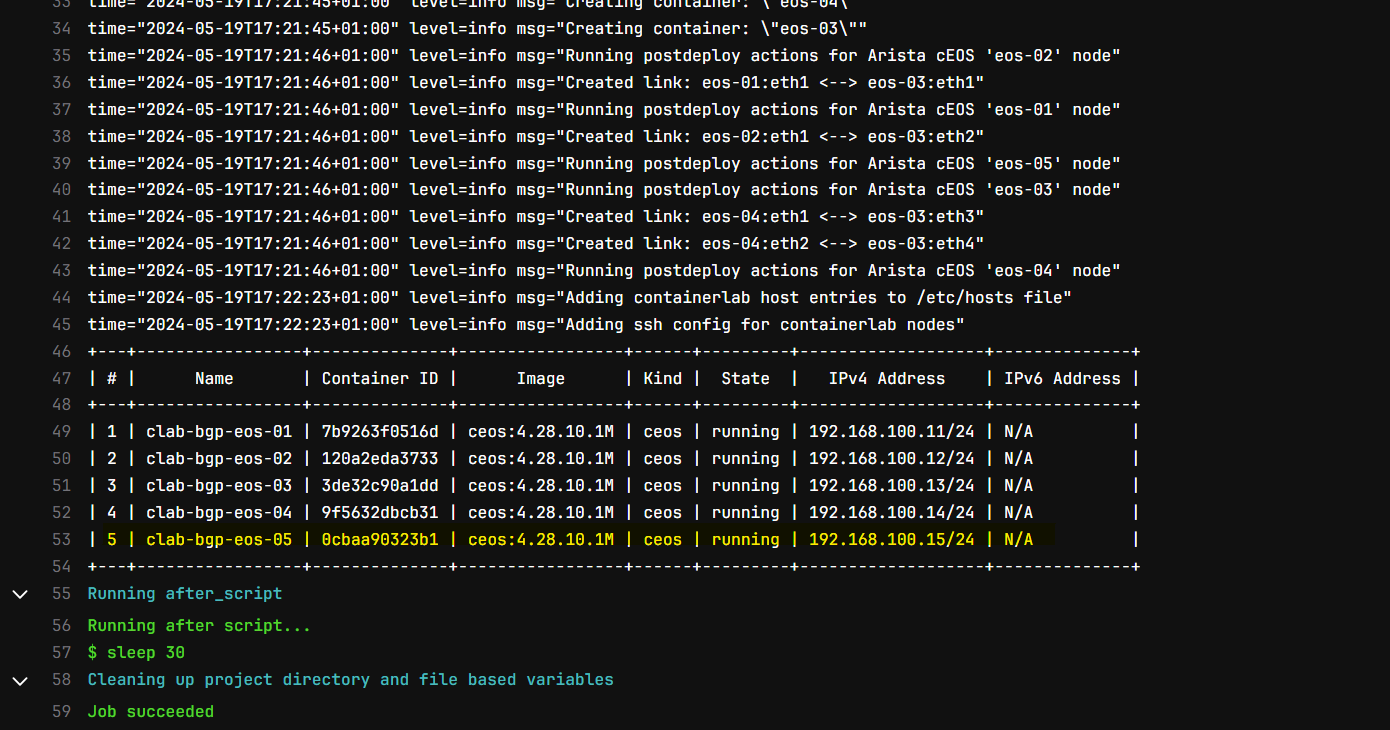
As expected, it first runs the test job, then re_deploy_lab and then finally the nornir_script job in that specific order.
here is a short video
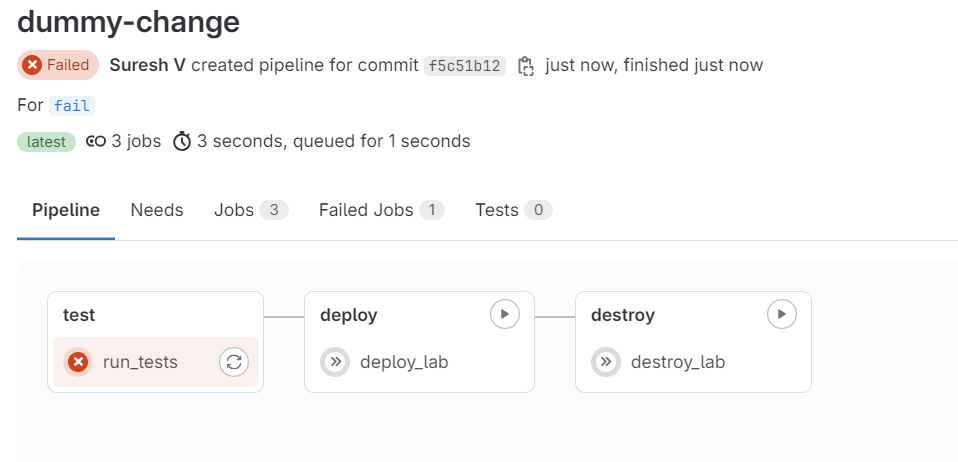
4 - Failing test
In our final example, let's demonstrate what happens if someone makes a syntax error or doesn't follow YAML best practices, like using incorrect indentation. As usual, I created a branch, made some dummy changes, and pushed the branch to GitLab. This triggers the pipeline and runs the 'test' stage. If the changes have errors, the 'test' stage will fail, indicating that the modifications are not good. This helps catch issues early, ensuring only valid configurations are merged into the main branch.
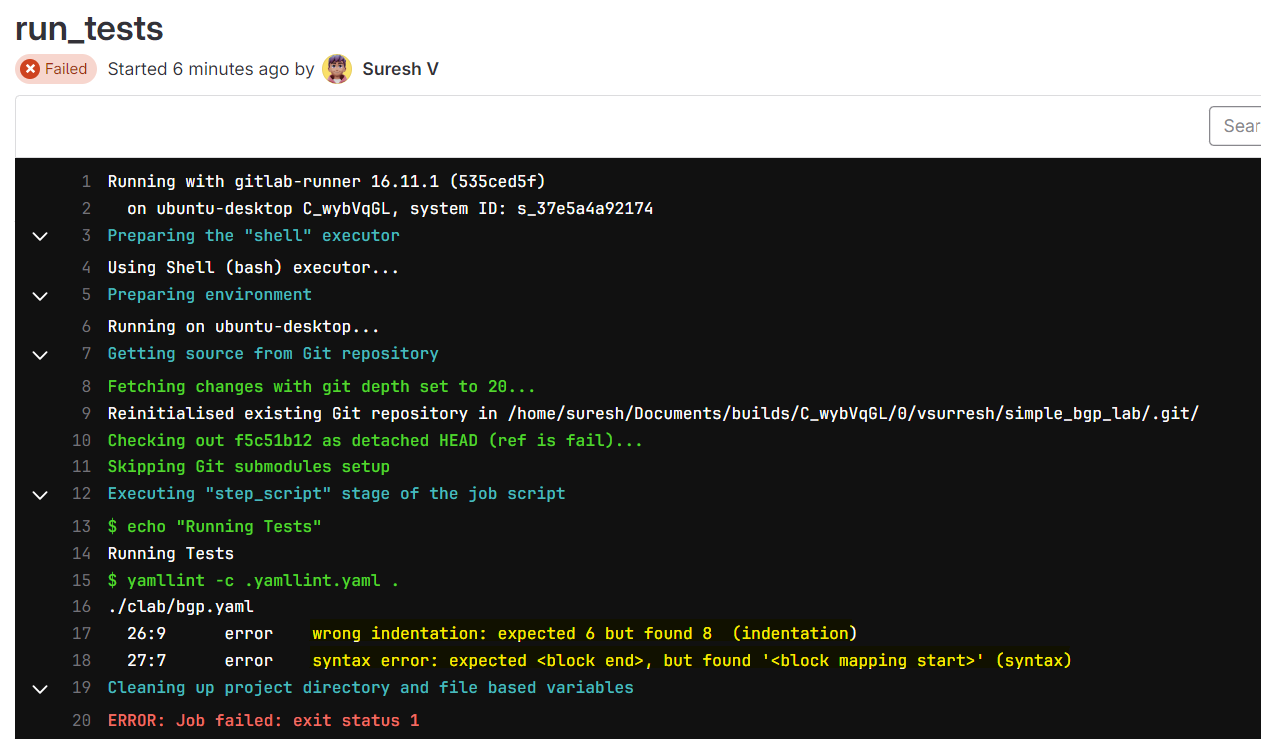
With comprehensive testing, we can catch any issues before pushing the changes to the live devices. This ensures that only valid and well-structured configurations are deployed.
Destroying the Labs
Destroying the lab is simple. Just go to the pipeline and manually run the destroy job. This will clean up all the resources created by Containerlab.
destroy stage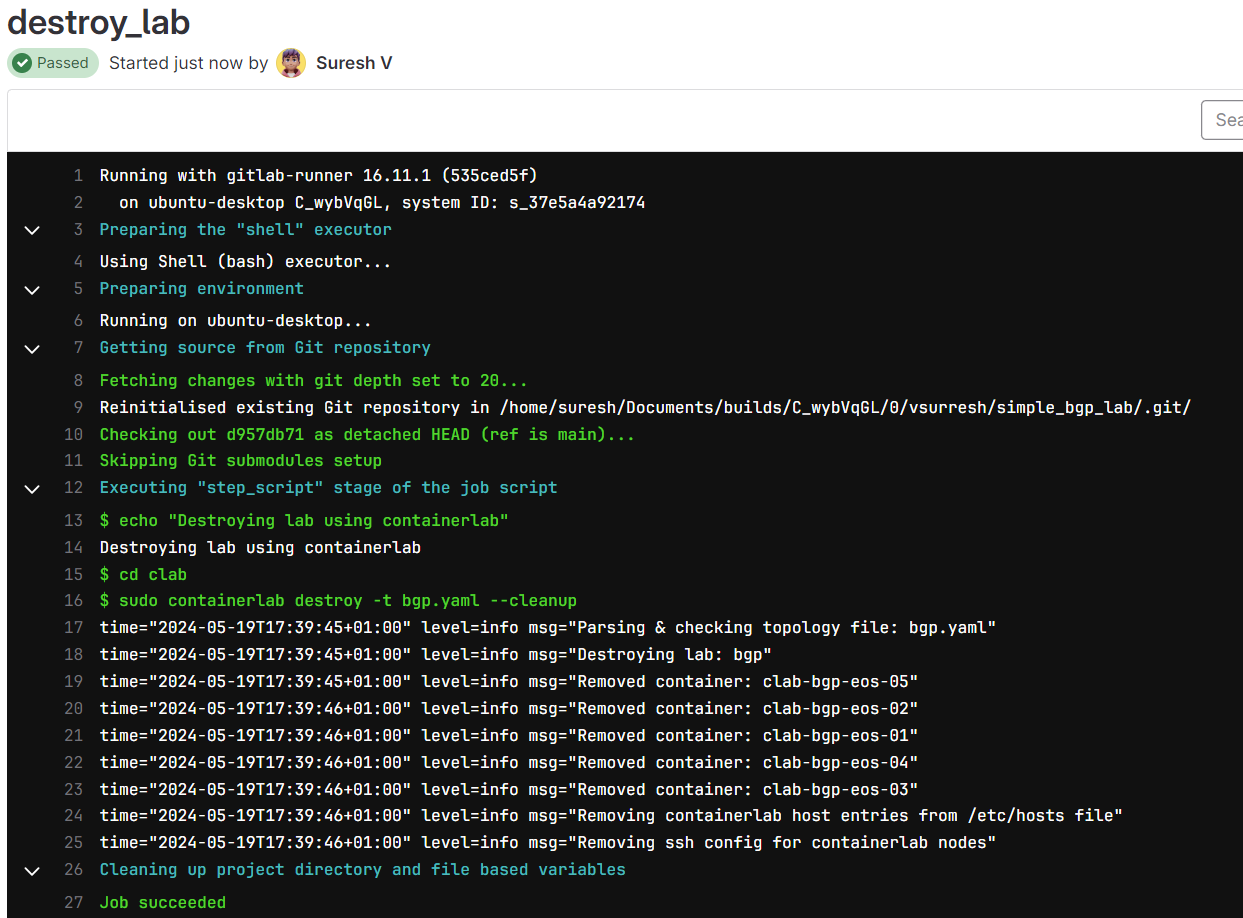
Closing Thoughts
I hope you now understand the basics of setting up a simple Network CI/CD pipeline with GitLab, Containerlab, and Nornir. I didn't dive deep into how GitLab works since it could take an entire blog post. Please let me know in the comments if you would like a detailed guide on GitLab CI/CD. Your feedback is always welcome.
Feel free to experiment with these examples and see how they can be adapted to your specific needs.