
In my previous two posts, we covered what Pytest is, what it is traditionally used for, and how we can use it to test your network, checking things like BGP peer status, interface states, and so on. So far, we have looked at how to run these tests using the Pytest CLI command in the terminal.
In this post, we will look at Netpicker, a tool that takes the same Pytest tests and gives you a GUI to run and manage them, instead of relying on the command line.
What is Netpicker?
Netpicker is a tool that brings together config backups, security/compliance checks, and automation in one place. It supports 180+ network vendors, including Cisco, Juniper, Arista, Palo Alto, and Fortinet, and integrates well with tools like NetBox, Nautobot, and Infrahub for inventory, and Slurp'it for network discovery.
Under the hood, Netpicker uses pytest for its testing engine, but wraps it in a web GUI, so instead of running tests from the terminal, you run and manage them from a browser. This means you can run the same kind of pytest tests we covered in the previous two posts, things like checking BGP peer status or interface states, but now through a UI instead of the CLI.
We have already covered the Netpicker basics in previous posts, things like installation, how to use it, and how to take scheduled backups. In this post, our focus is purely on pytest and network testing, so if you are completely new to Netpicker, I highly recommend checking out the previous posts below.
 Suresh Vinasiththamby
 Suresh Vinasiththamby
Pytest Quick Recap
Pytest is a Python testing framework. When we use it for network testing, we write tests that check whether a device is in the state we expect it to be in. For example, we want all BGP peers to be in the Established state, if not, fail the test. We want the software version to be x.x, if not, fail the test. And so on.
Typically, this means maintaining a device inventory and credentials somewhere in your code, then running the tests from the CLI or scheduling them with cron. You can also use something like NetBox or Infrahub as your inventory source if you want to keep that separate from your test code.
For some teams, this setup can be not ideal. Keeping inventory and credentials in code, and relying on the CLI or cron to run tests, works fine for one or two people, but it does not scale well across a team. There is no shared view of results, no easy way for someone less comfortable with the CLI to trigger a test, and no central place to see what passed or failed.
This is where Netpicker helps. It gives you a GUI to manage your device inventory and credentials in one place, so you are not hardcoding them or scattering them across scripts. You can run the same pytest tests we have been writing, but trigger them from the browser, schedule them, and see the results clearly without digging through terminal output. It also means anyone on the team can run or check tests, not just the person who wrote them.
A Simple Example
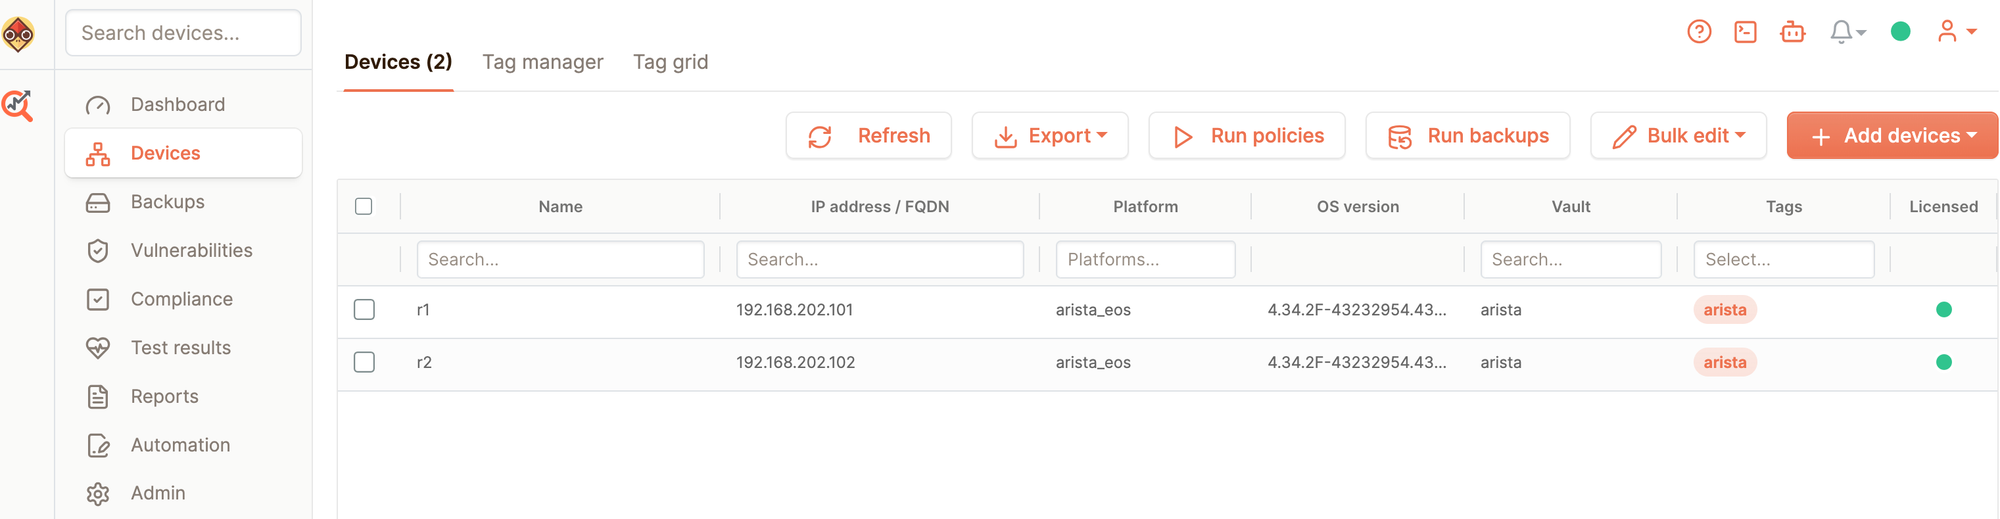
Let's start with a simple example. I added two Arista devices, r1 and r2, added their credentials to the vault, and tagged both devices with arista.
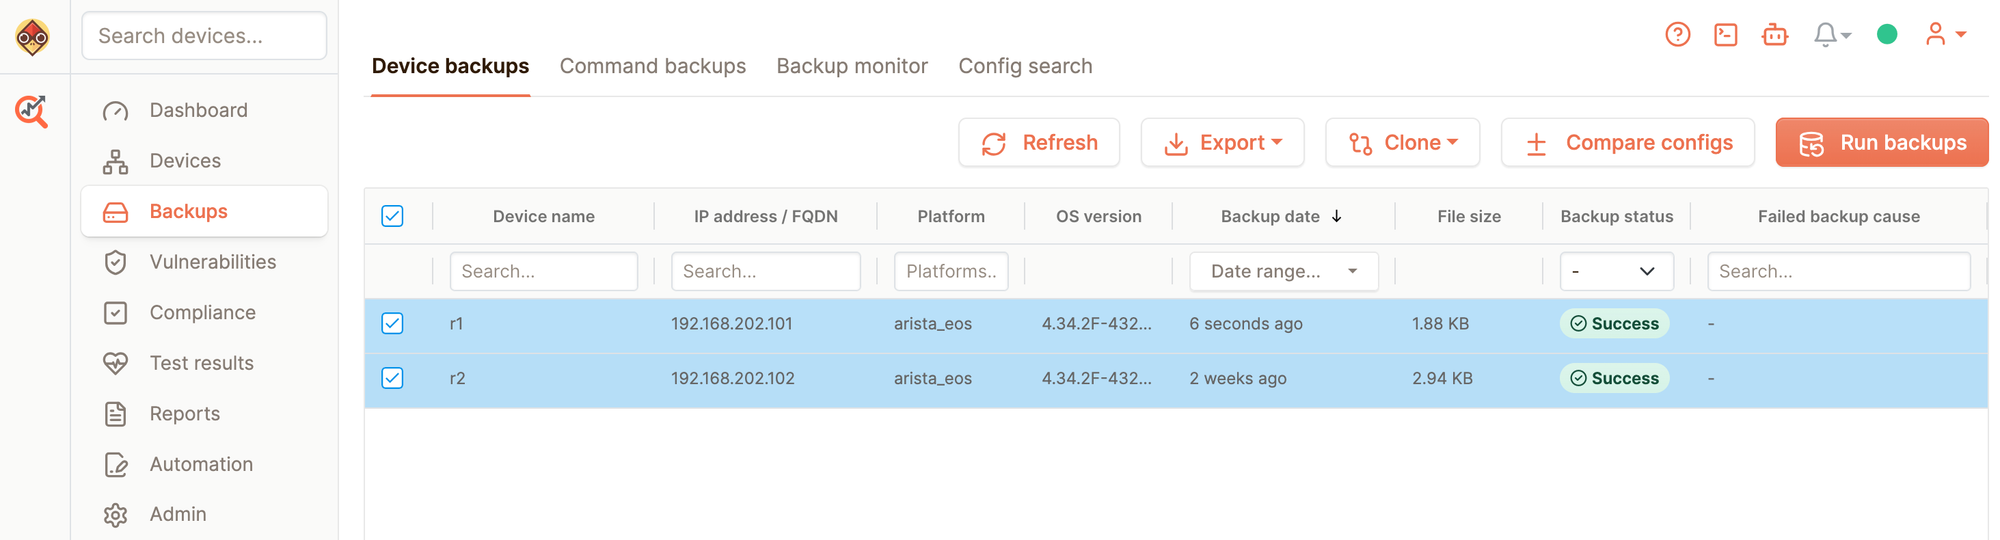
To make sure Netpicker can connect to the devices and that the credentials we added are correct, head over to Backups, select the devices, and run the backups. If the backups come back successful and you can view them, you are good to go.
How Netpicker Runs Your Tests?
In Netpicker, you create a Policy, and inside that policy you create Rules. A rule is a Python function, essentially your pytest test, decorated with a severity level such as @medium, and it defines which platform it applies to. For example:
@medium(
    name='rule_startup_config',
    platform=['arista_eos']
)
def rule_startup_config(configuration, commands, device):
    """Verify the running config is saved to startup (show running-config diffs is empty)."""
    output = device.cli('show running-config diffs')
    assert output.strip() == '', f'Running config not saved to startup:\n{output}'
This particular rule checks that the running config matches the startup config on Arista devices. Once the rule is created, you add devices to it, r1 and r2 in this case, so Netpicker knows which devices to run this check against.
When the policy runs, each rule is evaluated against its assigned devices, and you get a pass or fail result per device.
Creating the First Test
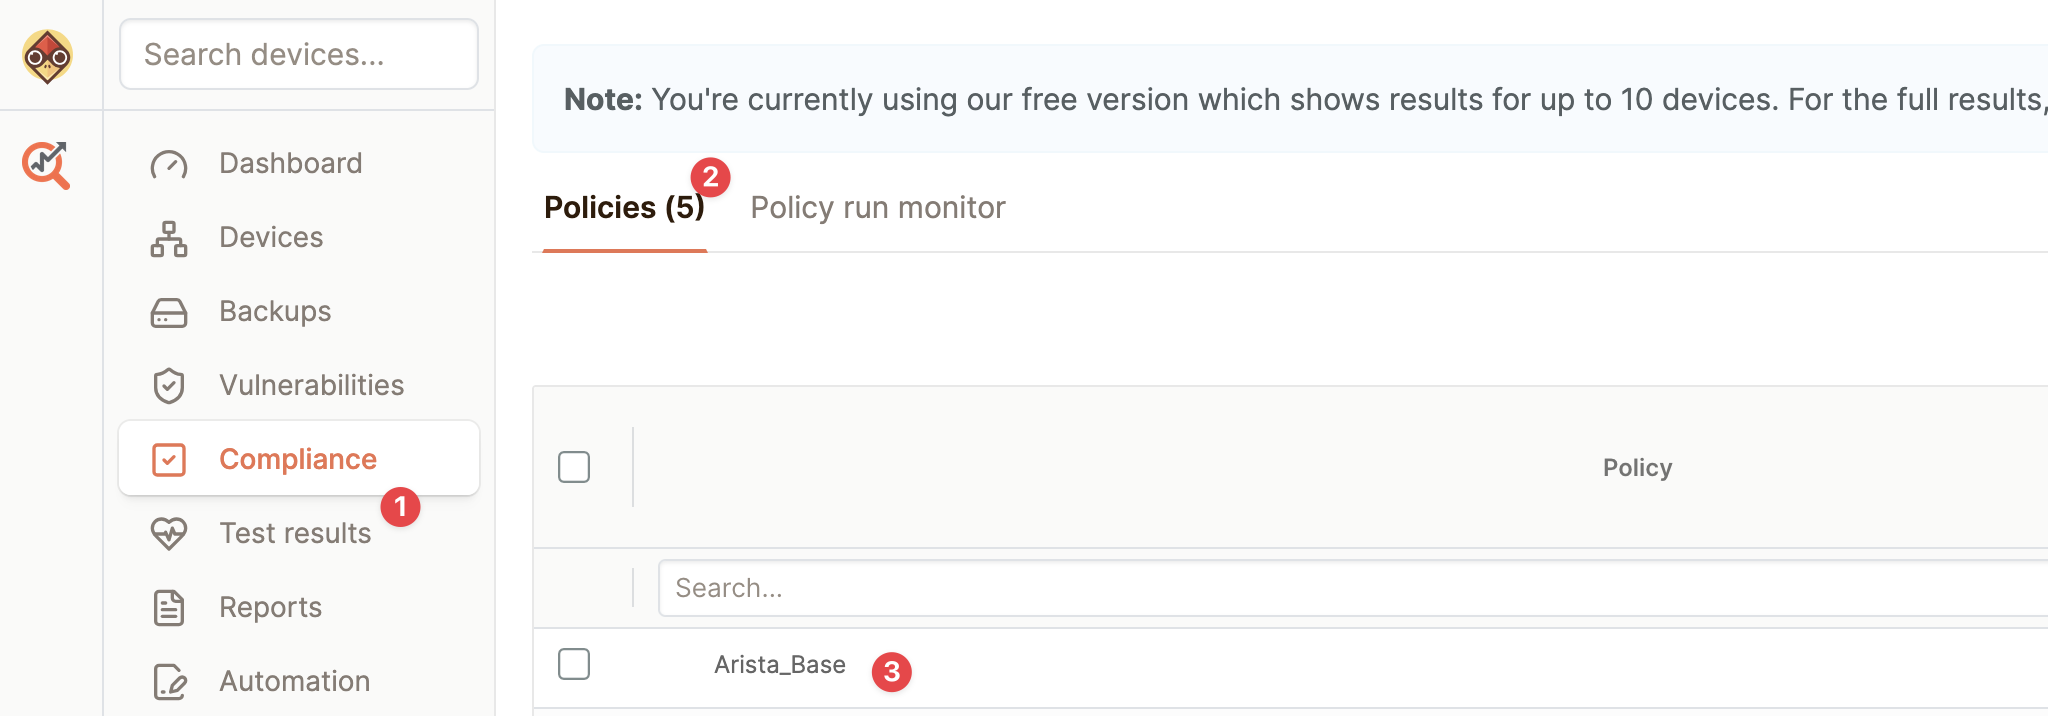
To start, let's create a policy called Arista_Base, and a rule inside it. To create this, head over to Compliance in the left-hand menu. From there, click Policies and create a new policy, in this case, Arista_Base.
Once the policy is created, open it and go to Rules. Click to add a new rule, give it a name and paste in the Python code shown above. (You can also use the built-in AI to create this, but more on this later)
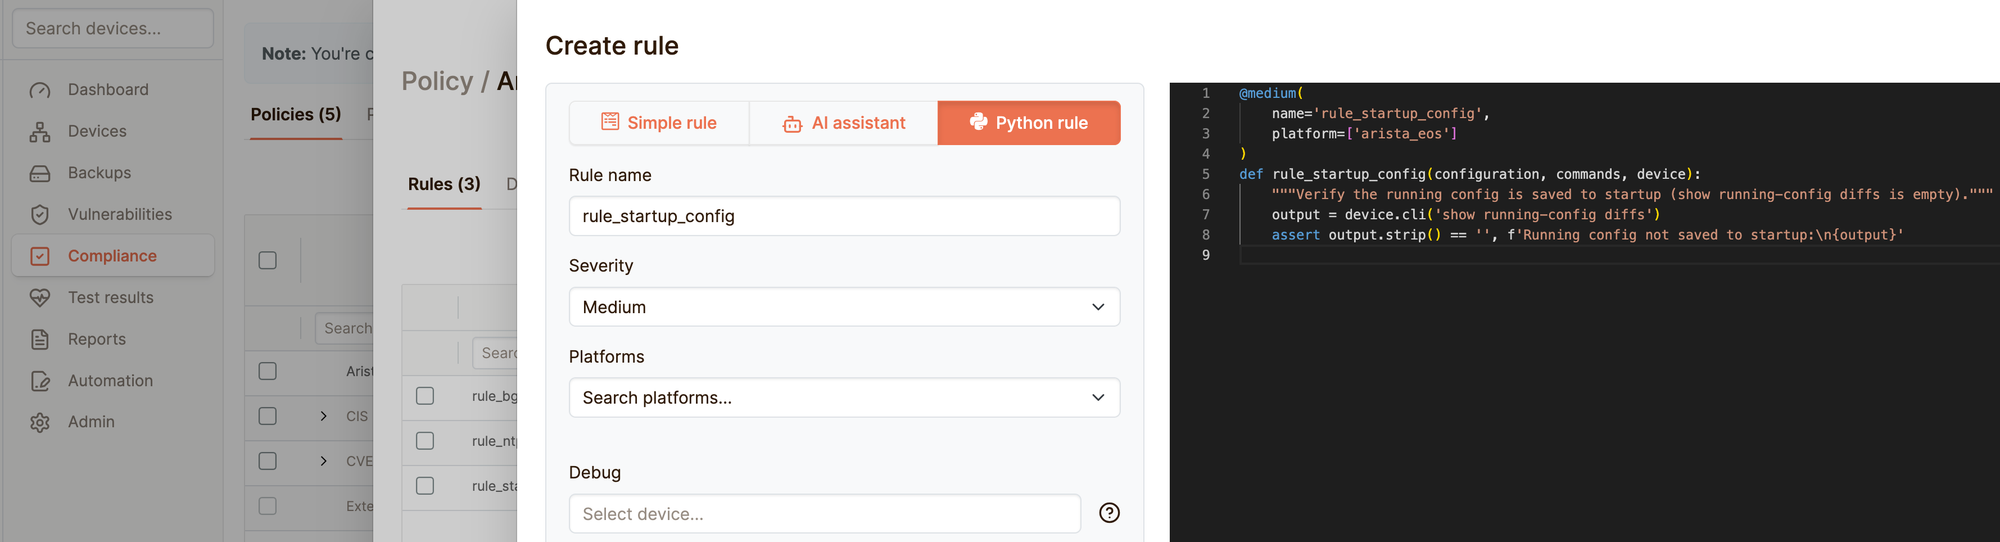
Notice the platform field, we will set this to arista_eos this tells Netpicker the rule only applies to arista_eos devices. When we added r1 and r2 to the rule, we selected the same platform, so Netpicker knows to run this rule against them.
Now, let's explain what this particular test actually checks. On Cisco and Arista devices, we have the concept of running config and startup config. The running config is what is active on the device right now, and the startup config is what gets loaded when the device boots. Whenever we make a change, we need to save the running config to startup.
It is easy to forget this step. If you make a change and forget to save it, the device is running with your intended config, but if it reboots for any reason, it comes back up with the old startup config, and your change is gone.
To catch this, we can write a rule that checks for any difference between the running and startup config. On our devices, this is what we see:
r1#show running-config diffs
r1#

r2#show running-config diffs
r2#
Both outputs are empty, meaning there is no difference between running and startup config. So in our case, the test should pass.
Running the Tests and Results
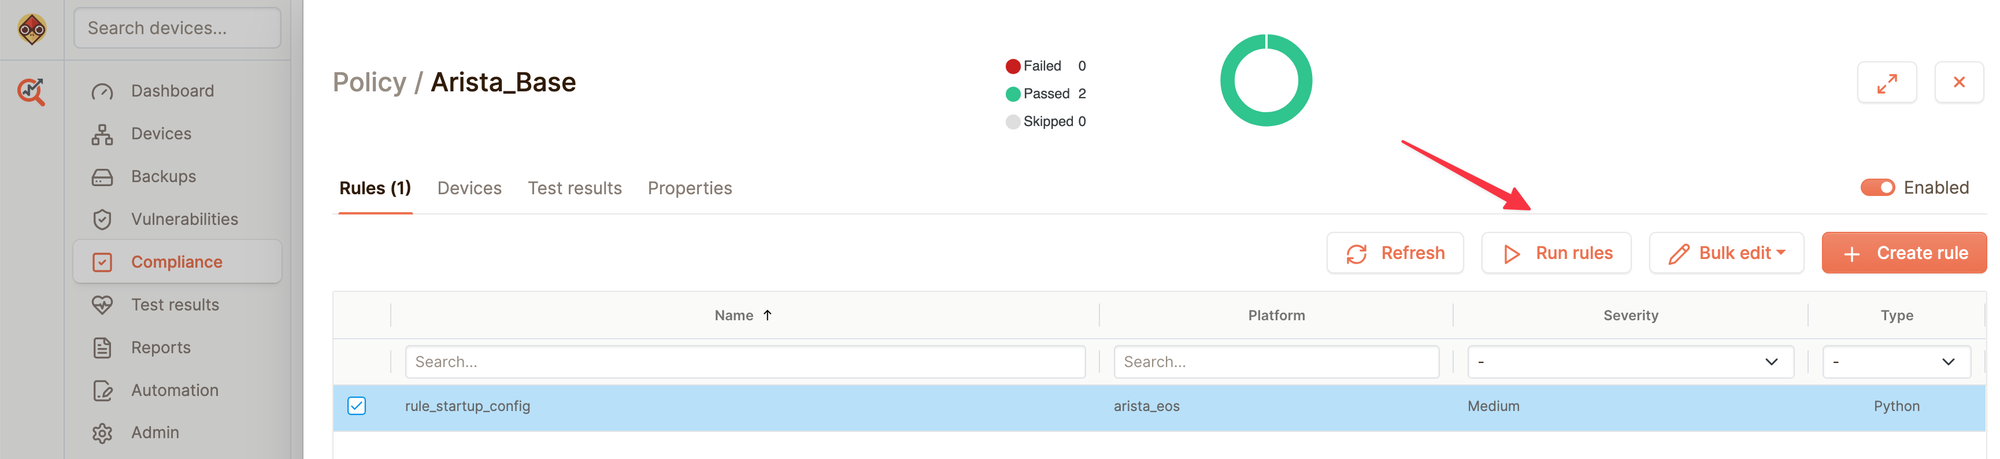
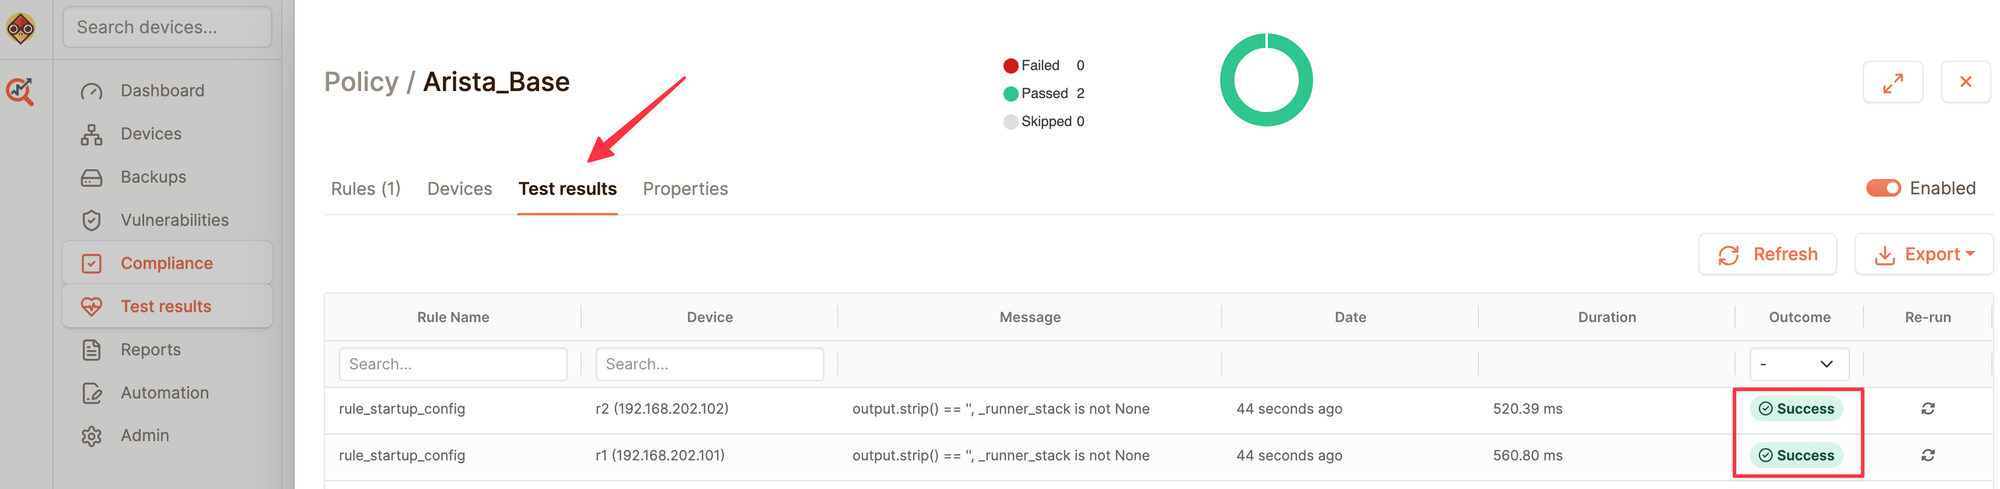
You can run a rule by selecting it and clicking Run rules. Once the run completes, you can view the results under the Test results tab.
At the moment, the test passes on both r1 and r2, as we would expect, since neither device has a difference between its running and startup config.
Failing a Test
Now let's make the test fail. I'm going to add a config change on r2, but not save it.
r2#conf ter
r2(config)#ntp server 100.1.1.1
r2(config)#exit
r2#
r2#show run diffs
--- flash:/startup-config
+++ system:/running-config
@@ -72,6 +72,7 @@
 ip route vrf management 0.0.0.0/0 192.168.202.1
 !
 ntp server 1.1.1.1
+ntp server 100.1.1.1
 !
 route-map next-hop-self-ipv4 permit 10
    match route-type external
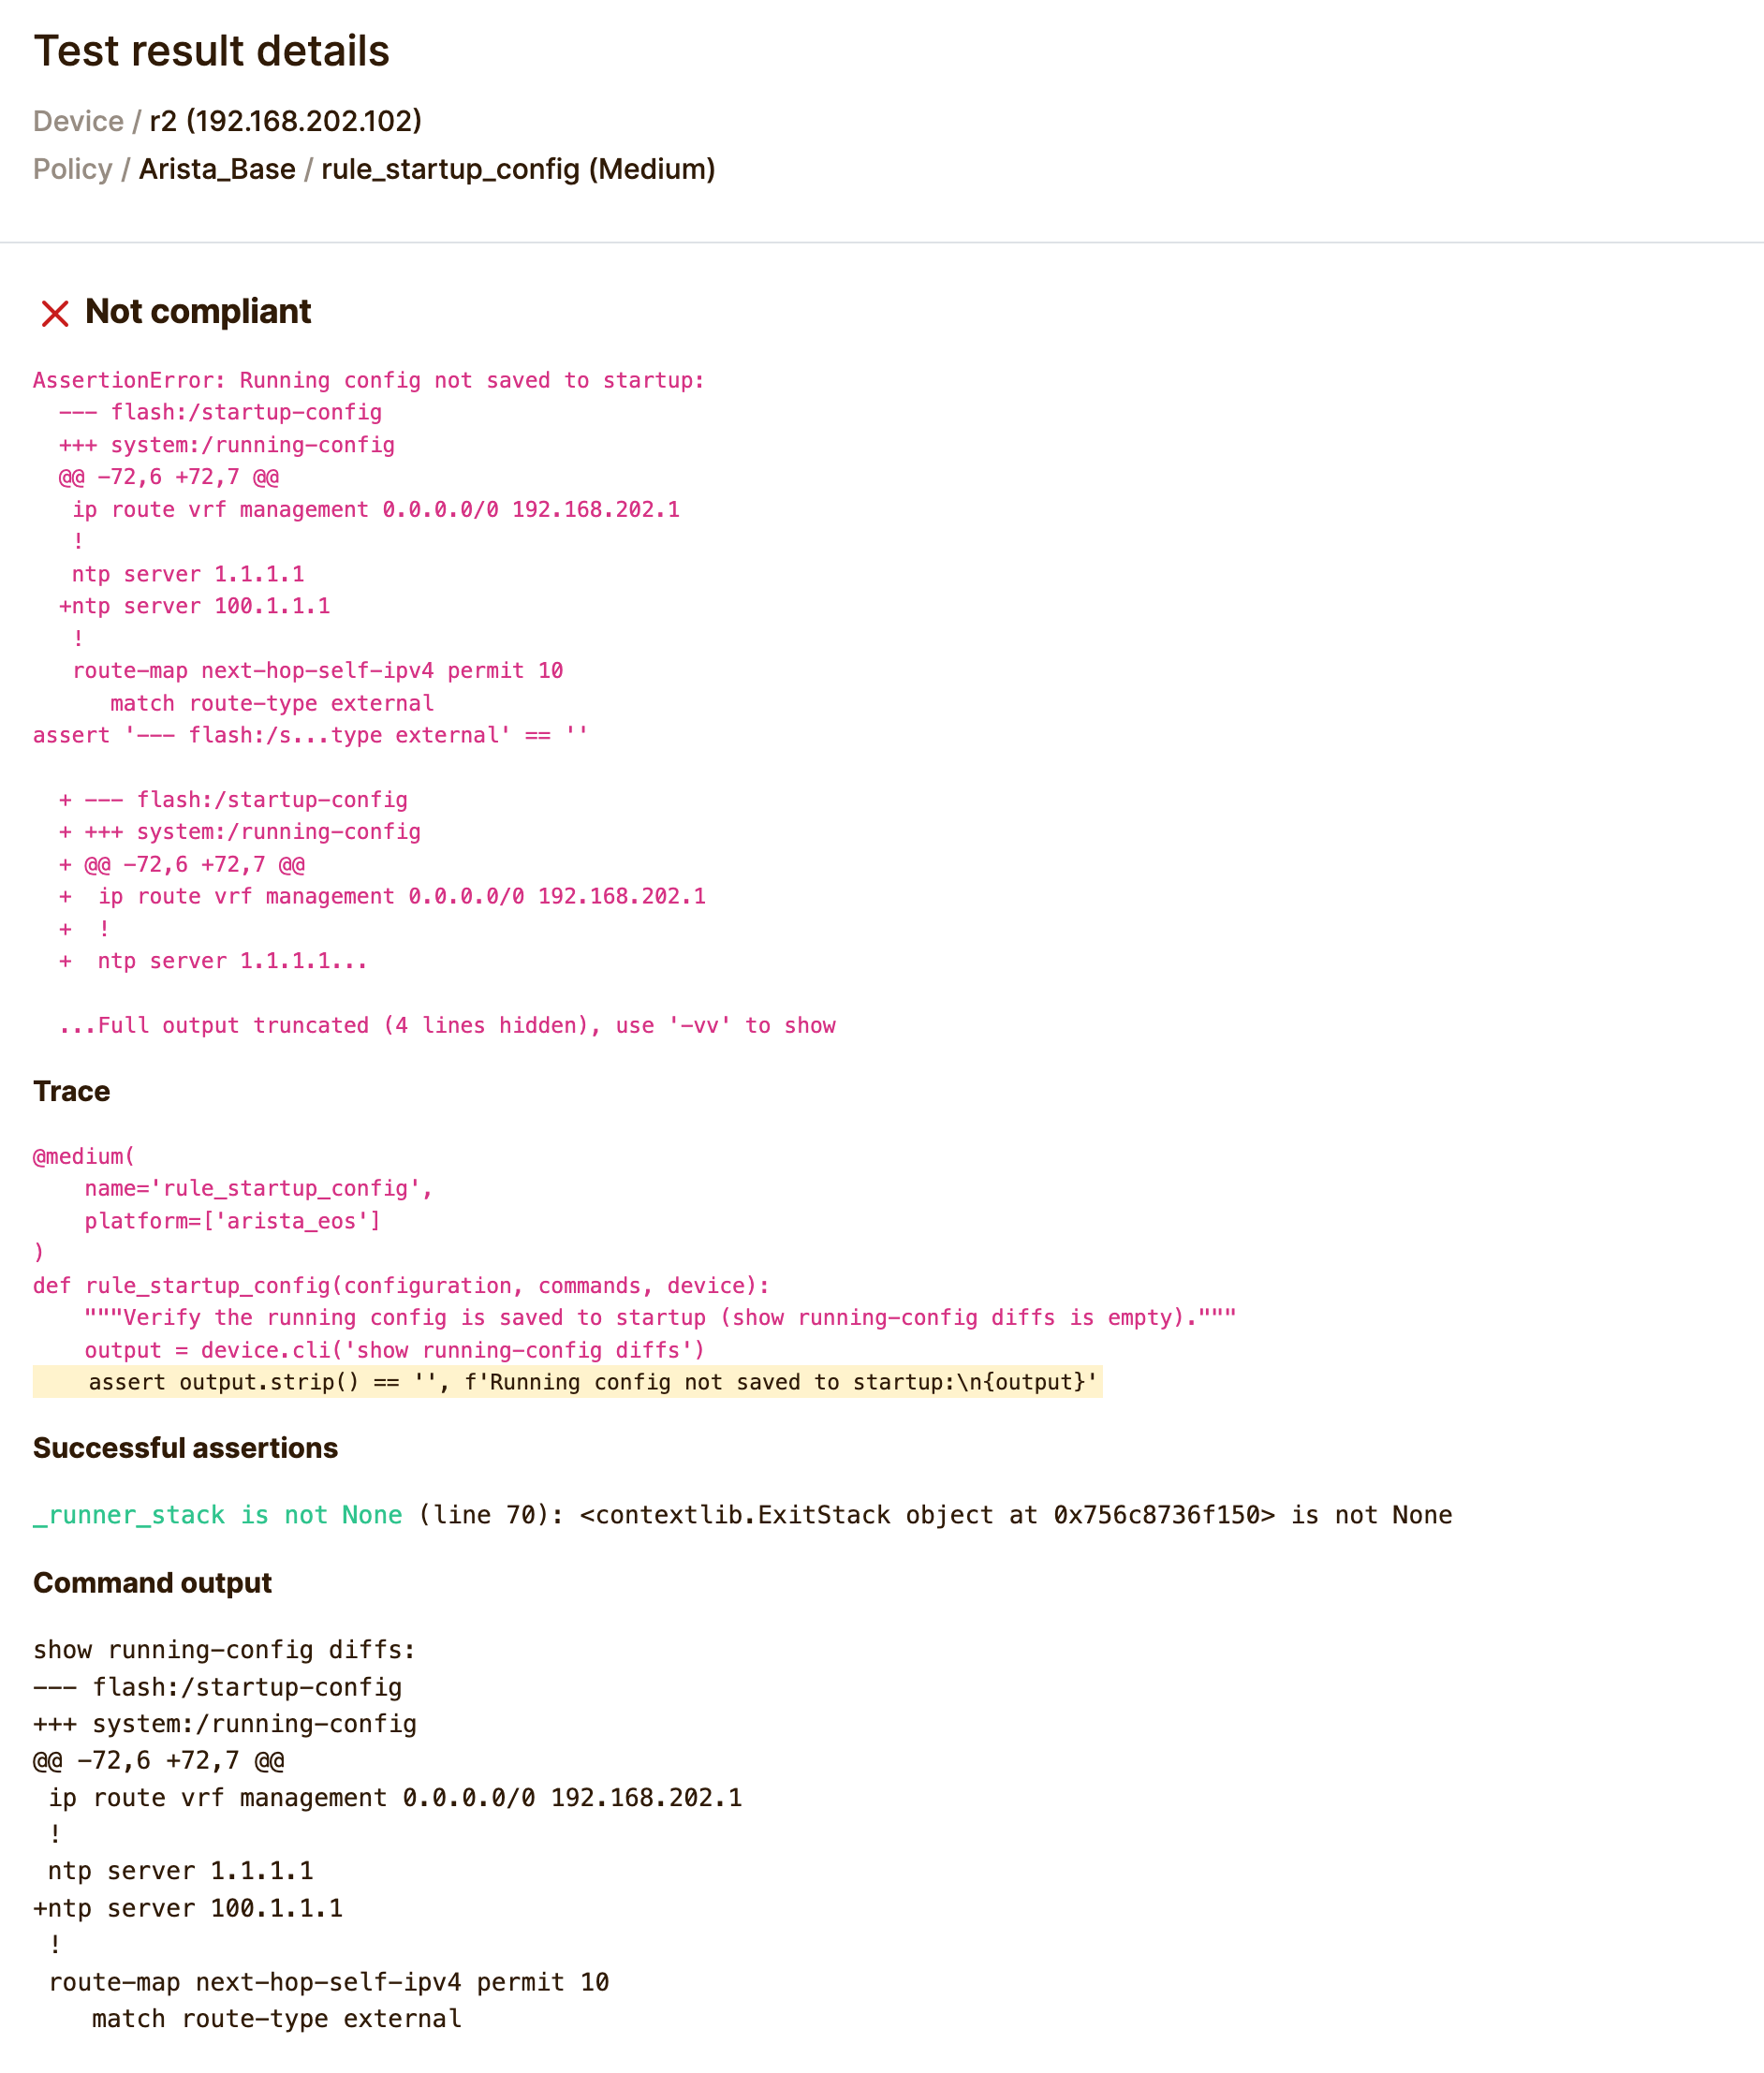
If we re-run the test, r2 now fails, since the running config no longer matches the startup config.

You can also click into the failed result to see exactly why it failed in more detail. This shows the full diff between the running and startup config, the exact line that triggered the assertion, and the raw command output from the device, so you do not have to guess or log into the device yourself to confirm what changed.
If you were doing this manually, you would need to log into r1 and r2 one by one, run show running-config diffs, and read through the output yourself to spot any differences. This works fine for two devices, but it does not scale. If you have fifty devices, you are not doing this by hand every day.
With Netpicker, the same check runs across every device tagged with the right platform, automatically, and on a schedule if you want. Instead of checking each device manually, you get one dashboard showing which devices passed and which failed, with the exact diff already pulled out for you.
It also removes the need to keep test scripts, credentials, and device lists in your own code or cron jobs. The policy, the rule, and the devices it applies to all live in one place, and anyone on the team can see the results without needing CLI access or knowing Python.
Checking BGP Peer State
We will now add another test to check BGP. This time, instead of checking config diffs, we want to verify that all BGP peers on a device are in the Established state.
import json

@medium(
    name='rule_bgp_peers_established',
    platform=['arista_eos']
)
def rule_bgp_peers_established(configuration, commands, device):
    """Verify all BGP peers are in the Established state."""
    output = device.cli('show ip bgp summary | json')
    data = json.loads(str(output))
    vrfs = data.get('vrfs', {})
    not_established = []
    for vrf_name, vrf_data in vrfs.items():
        for peer_ip, peer_data in vrf_data.get('peers', {}).items():
            state = peer_data.get('peerState')
            if state != 'Established':
                not_established.append(f"{peer_data.get('description', peer_ip)} ({peer_ip}) - {state}")
    assert not not_established, f'BGP peers not Established: {", ".join(not_established)}'
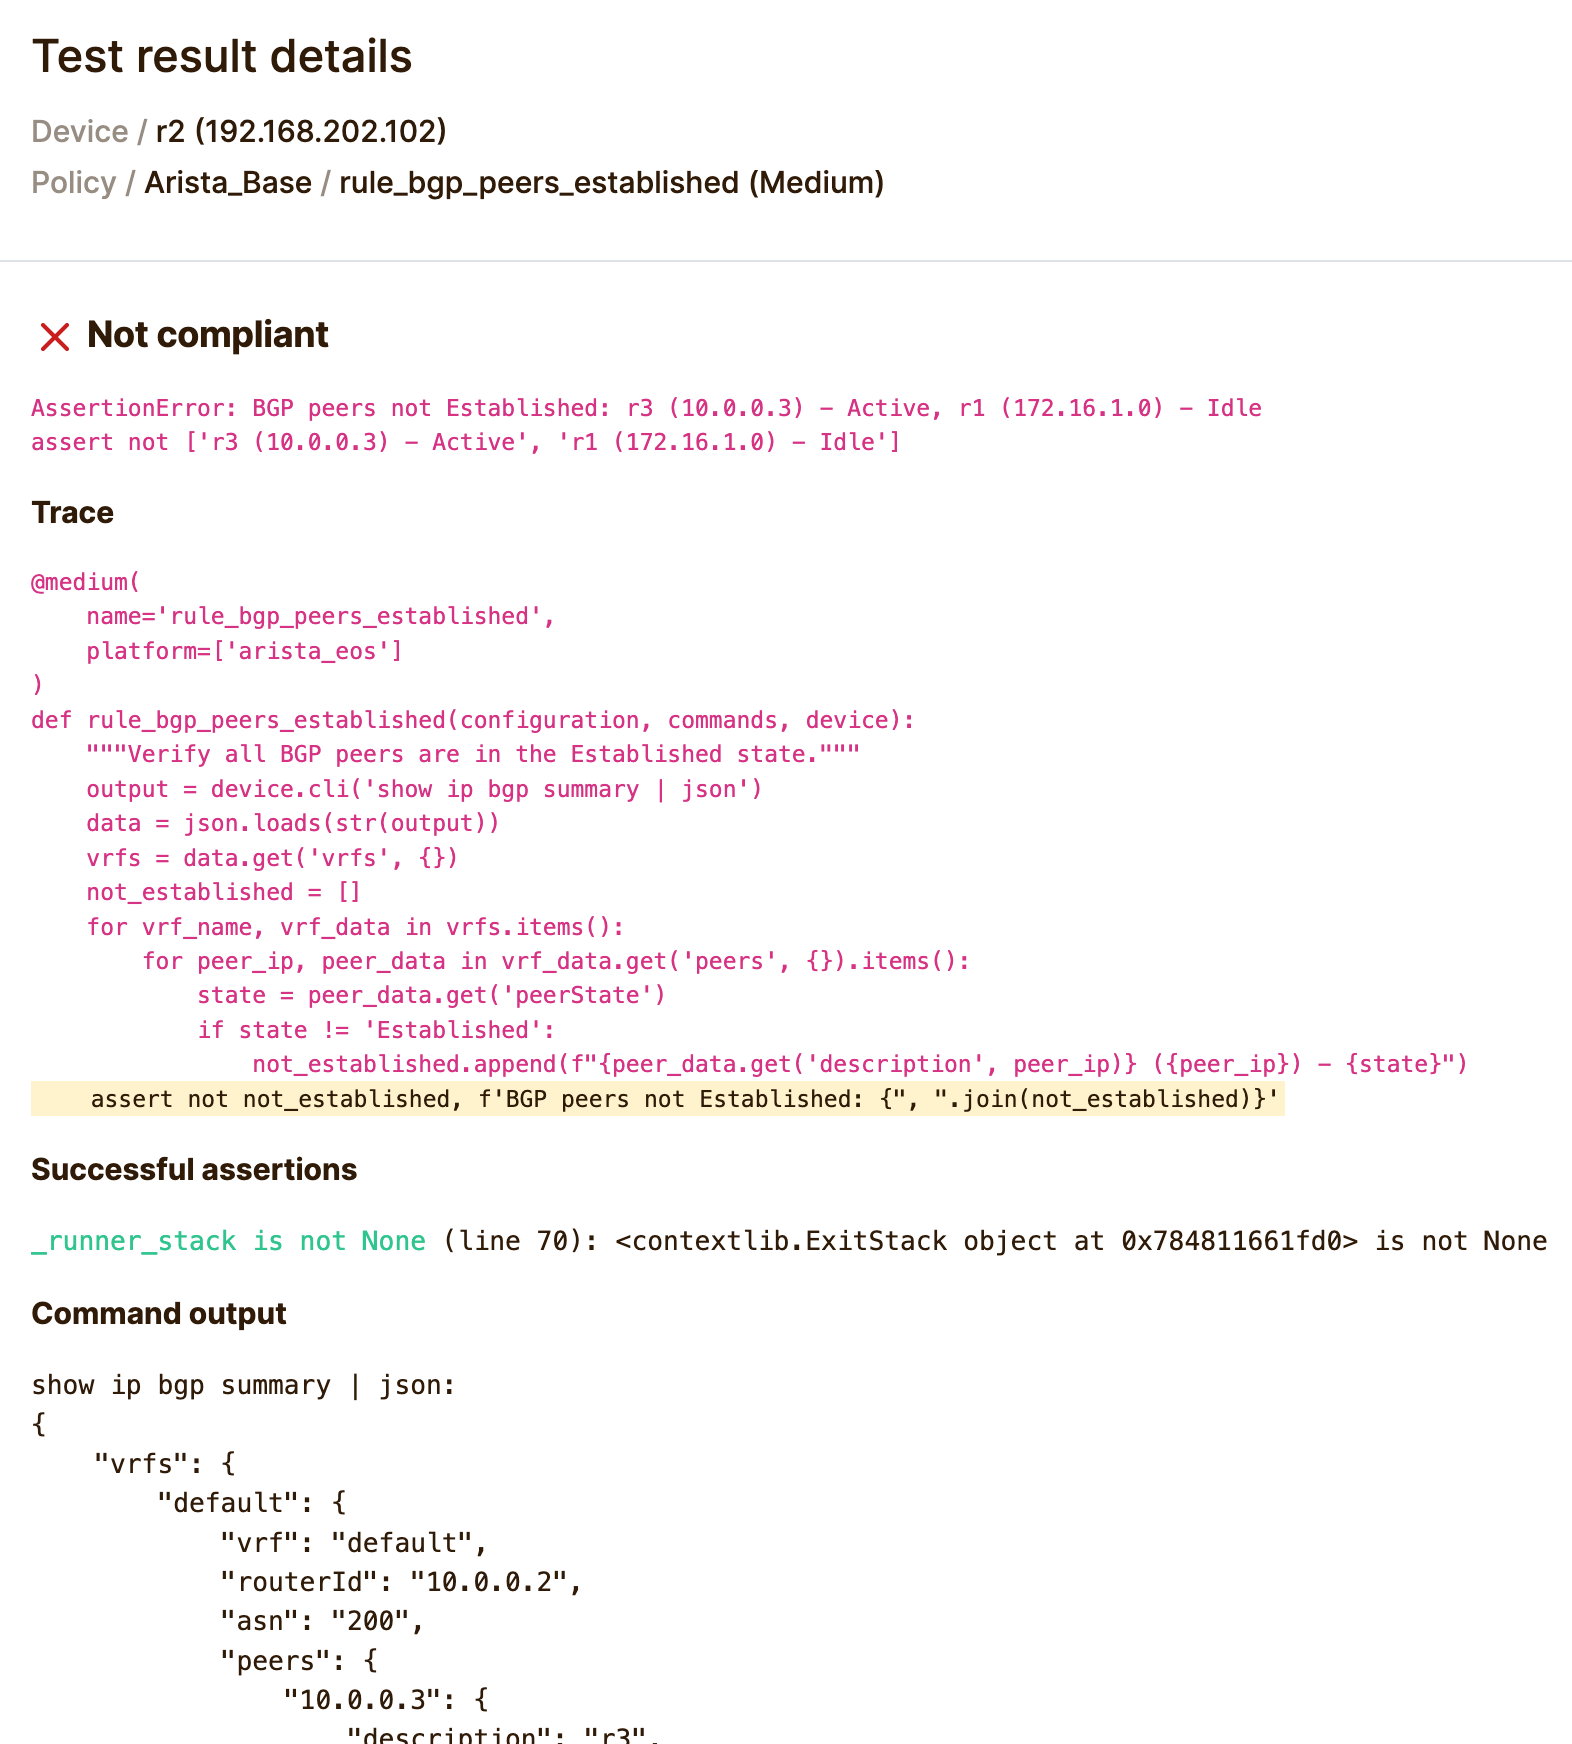
This rule pulls the BGP summary in JSON format (using the CLI command show ip bgp summary | json), loops through every peer across all VRFs, and fails if any peer is not in the Established state. The failure message lists exactly which peers are down, so you do not have to dig through the full output to find the problem.
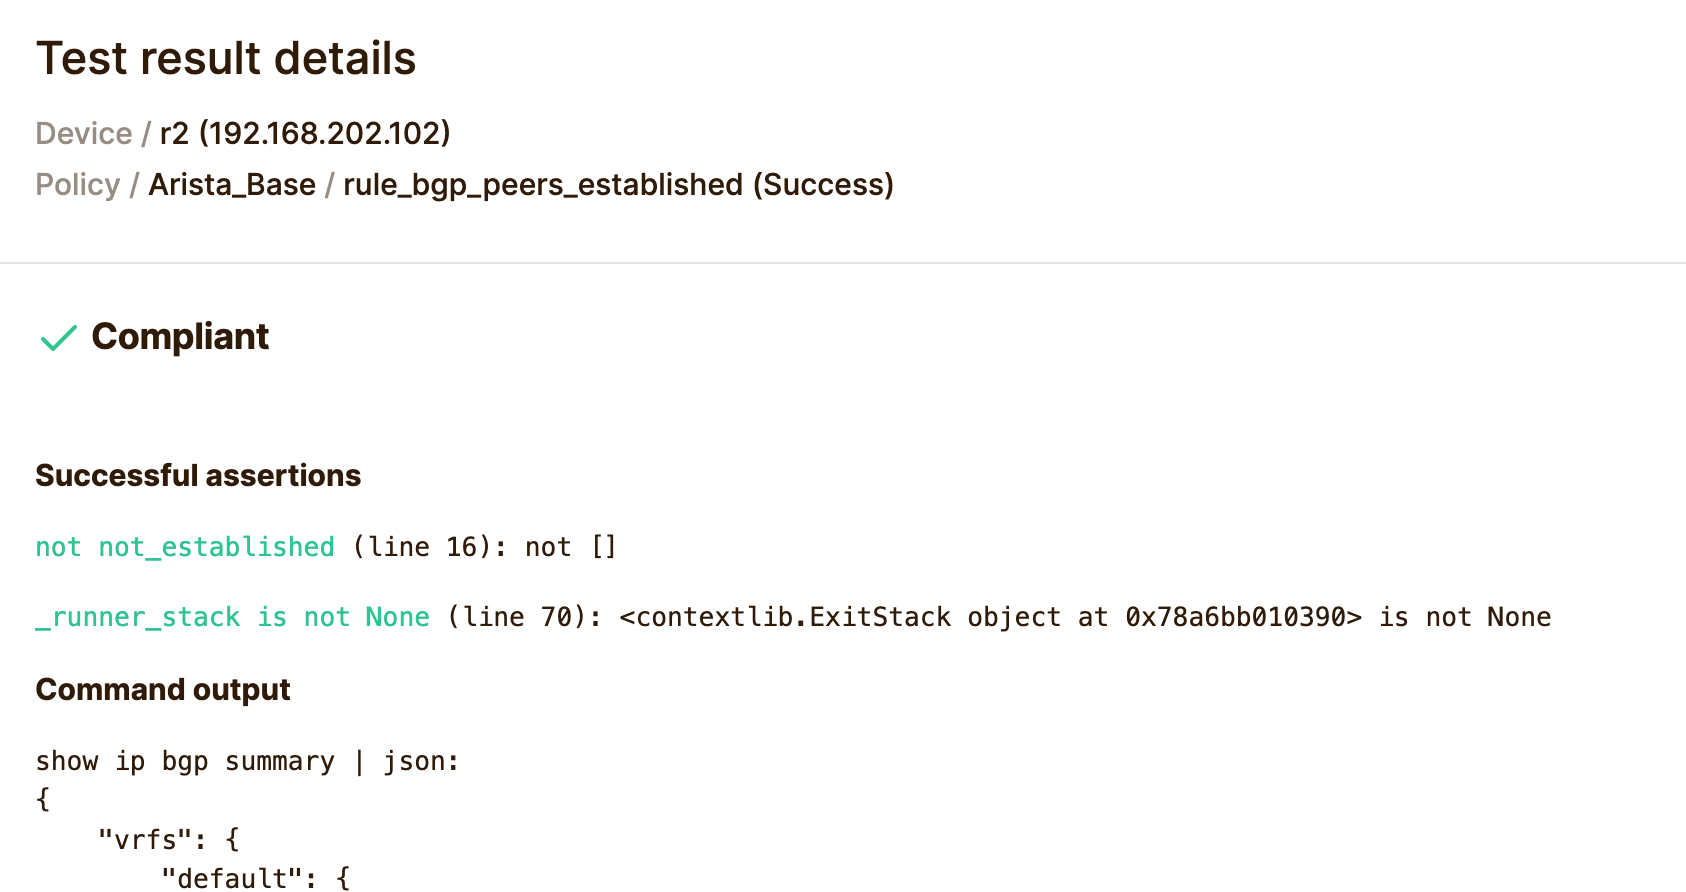
If all the peers are up, as you can see below, the test will pass with flying colours.
Scheduling the Tests
Running tests manually is fine when you are testing things out, but the real benefit comes from scheduling them to run automatically. This way, you do not have to remember to check your devices, Netpicker checks them for you and flags anything that fails.
To set this up, go to Admin and add a new schedule. Give it a name, in this case auto_checks, and set the task to Run policies.
You can narrow down which devices this applies to either by selecting specific devices or by using device tags, arista in our case, so it only runs against devices with that tag. You can also choose which policies and rules to run, here we selected the Arista_Base policy, with both rule_startup_config and rule_bgp_peers_established.
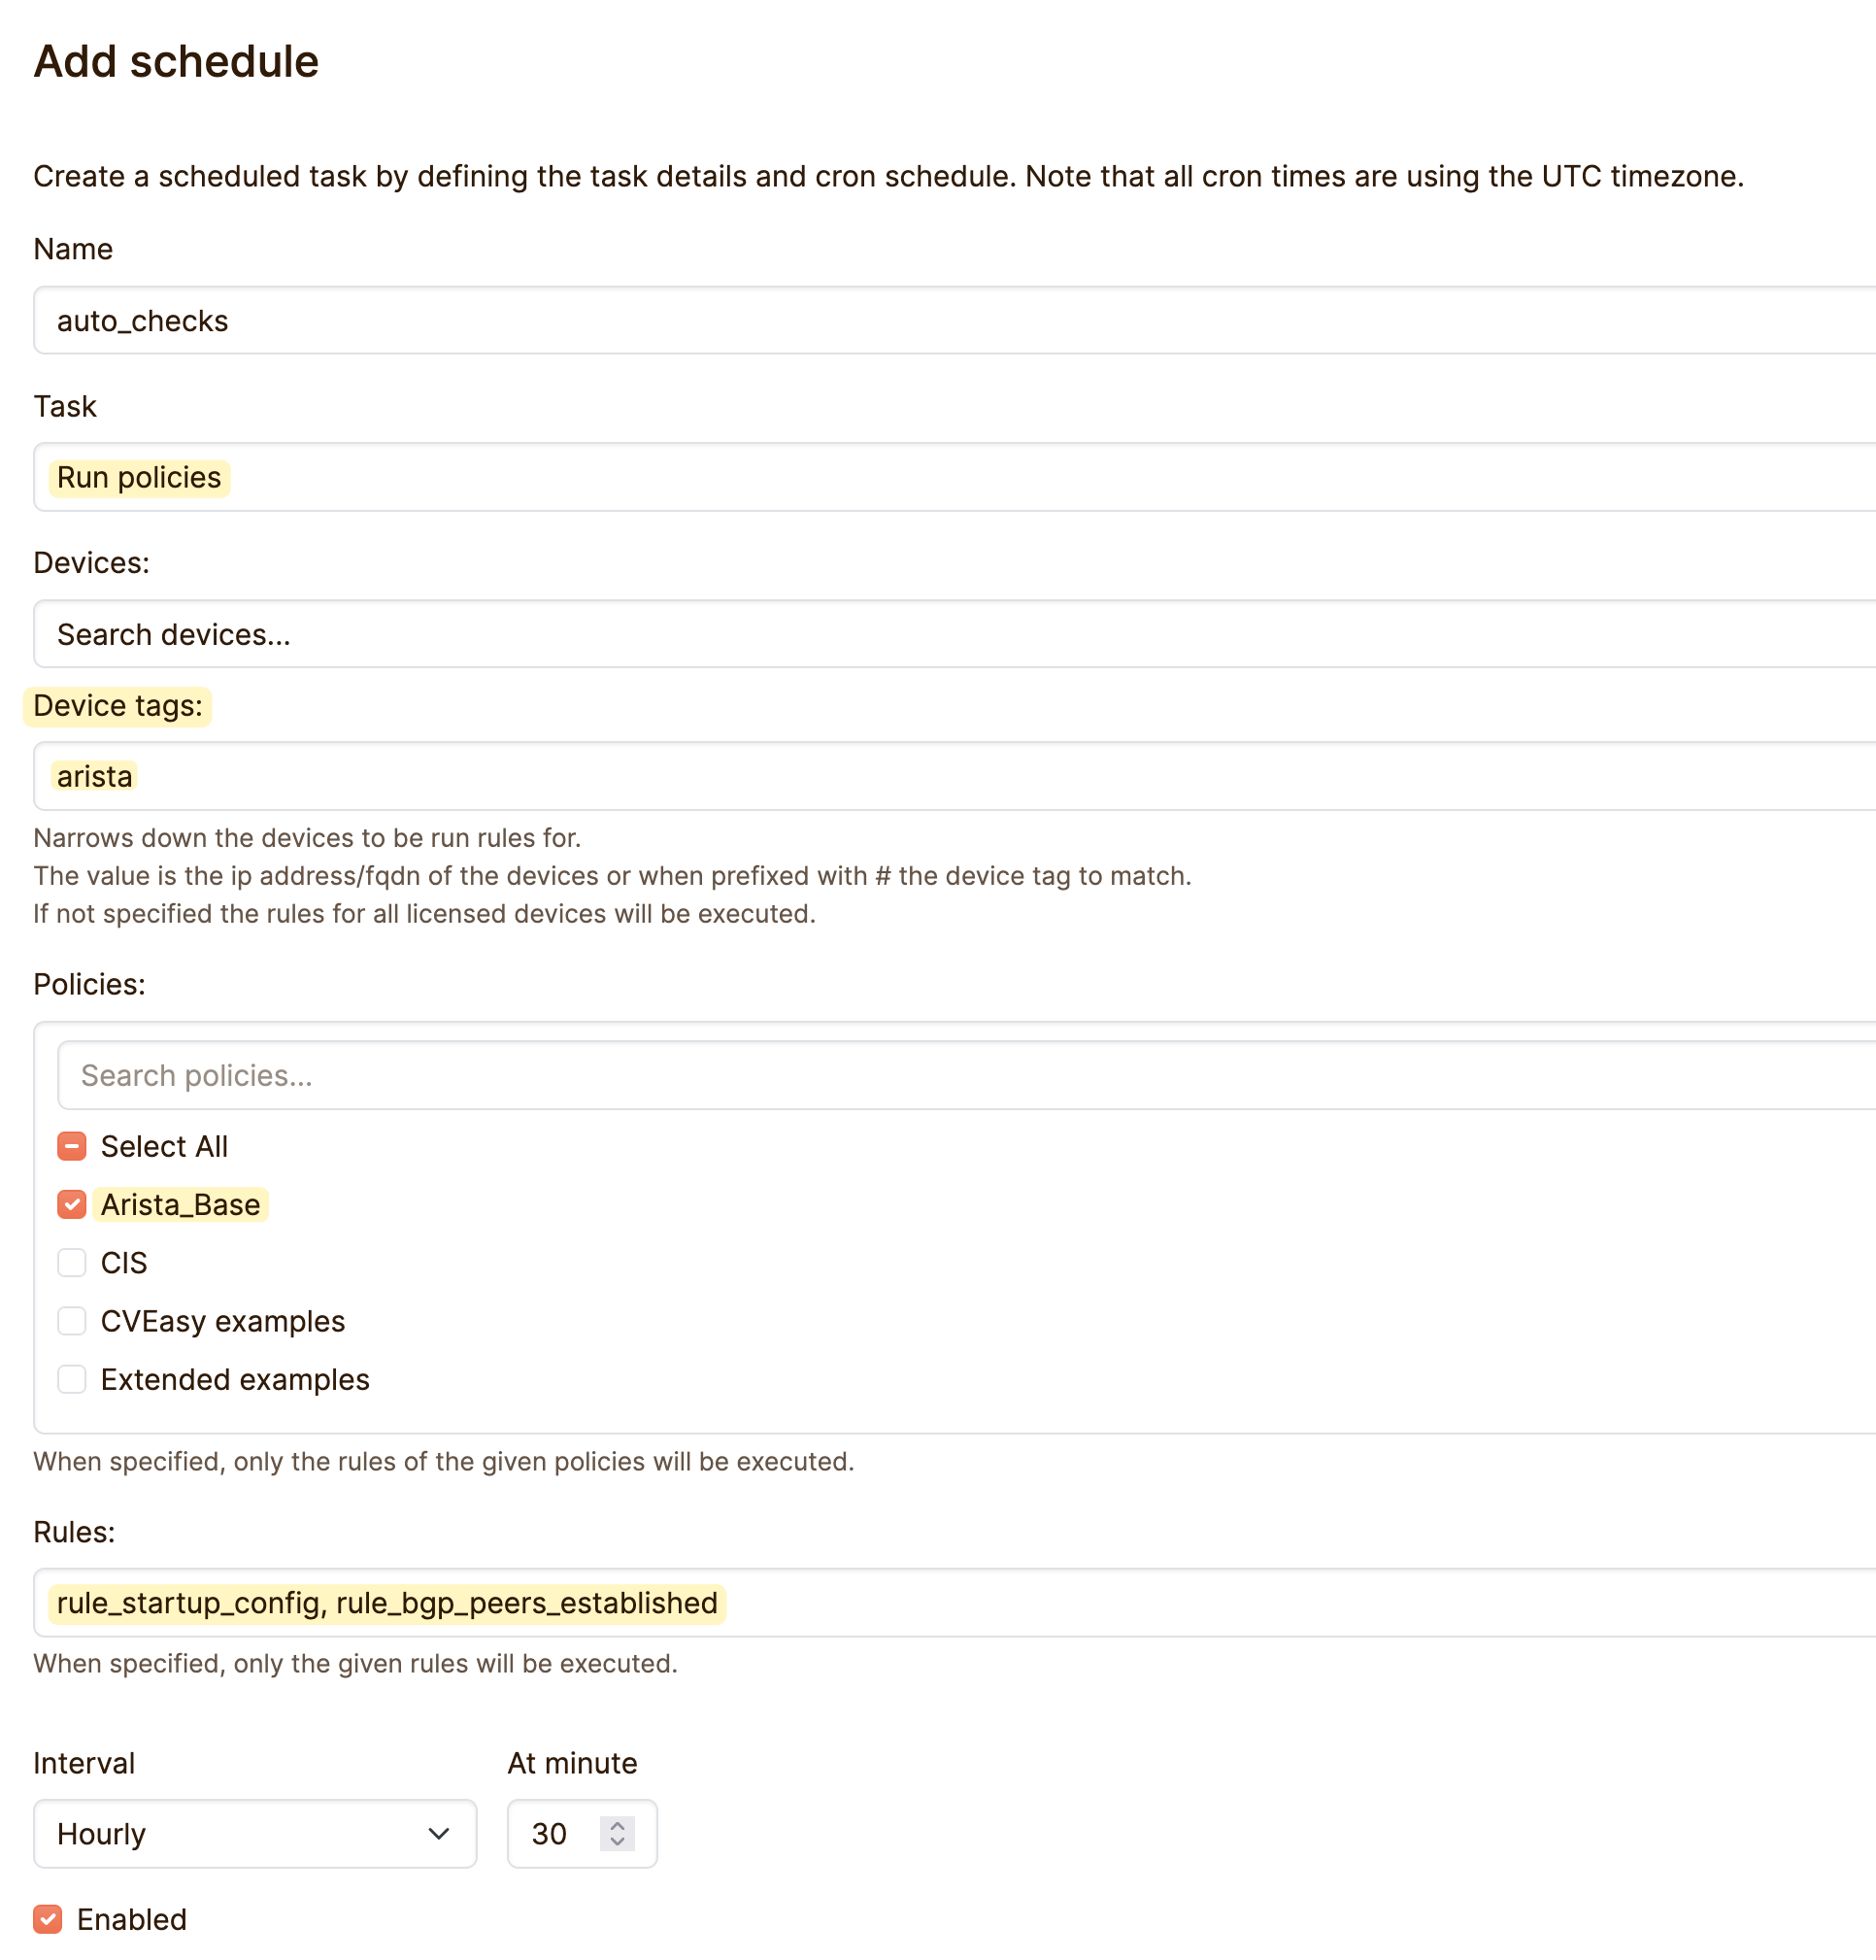
Finally, set the interval, hourly, daily, and so on, and the specific time it should run. In this example, it is set to run hourly at minute 30. Once enabled, Netpicker will run these checks automatically in the background, and any failures will show up in Test results without you having to trigger anything yourself.
I waited for it to run, and as expected, the number of runs shows 1.

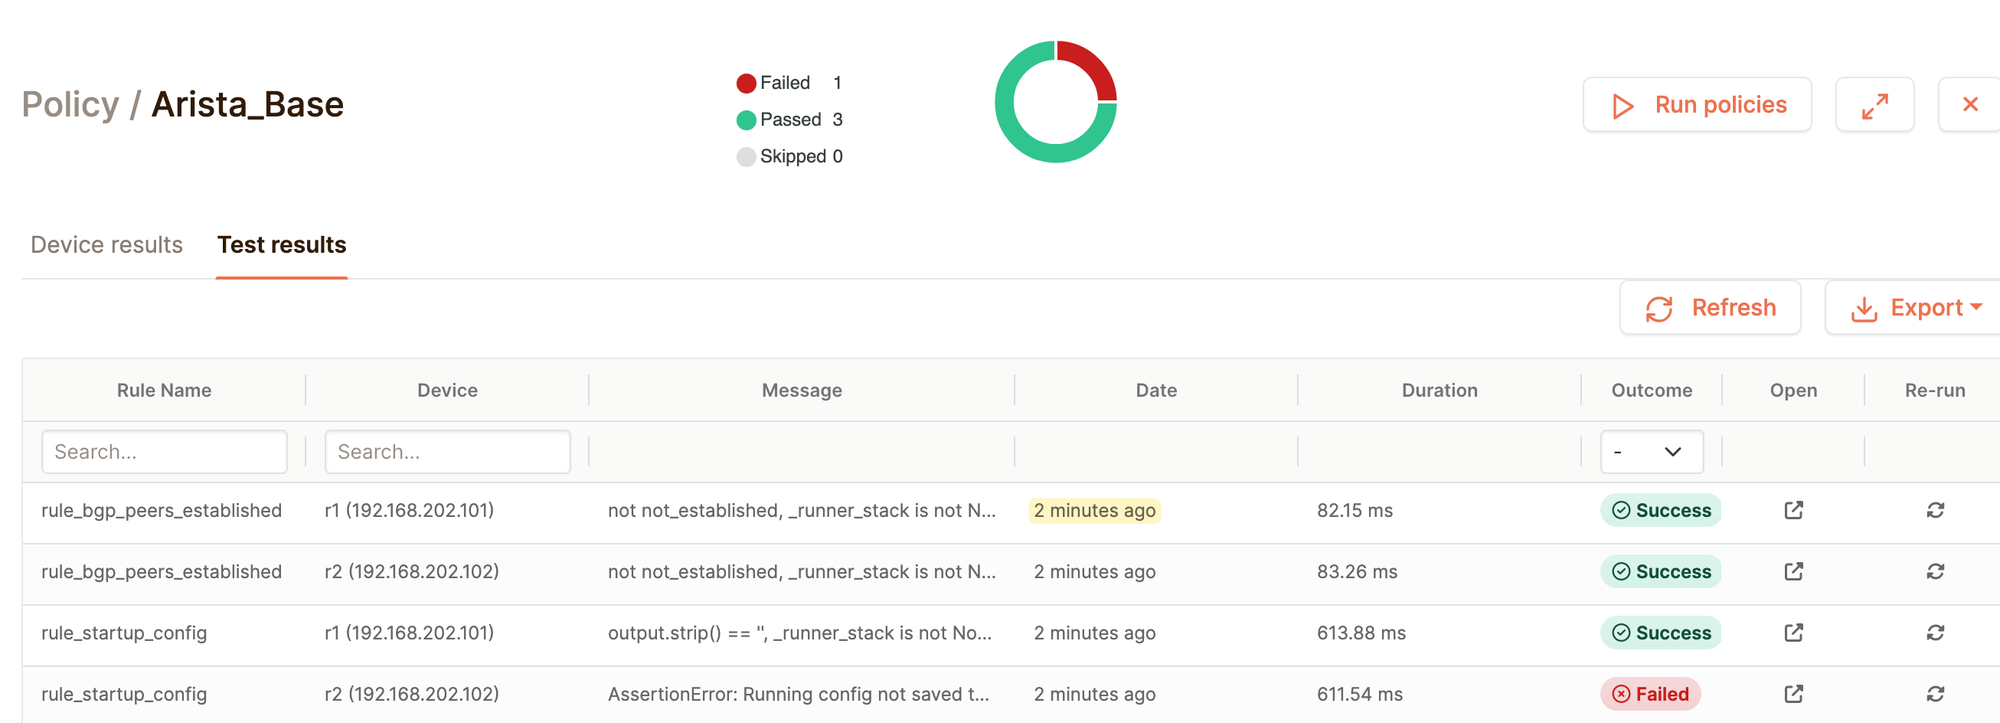
The test results also confirm this, showing both rules ran 2 minutes ago, with rule_startup_config still failing on r2, since we never saved the config change we made earlier.
Netpicker AI Agent
Netpicker also has an AI agent built in, and I decided to put it to the test. I asked it, "I already have a rule to test BGP status, can you create similar rule to check if NTP server is configured on Arista devices?" without giving it any code or specifics.
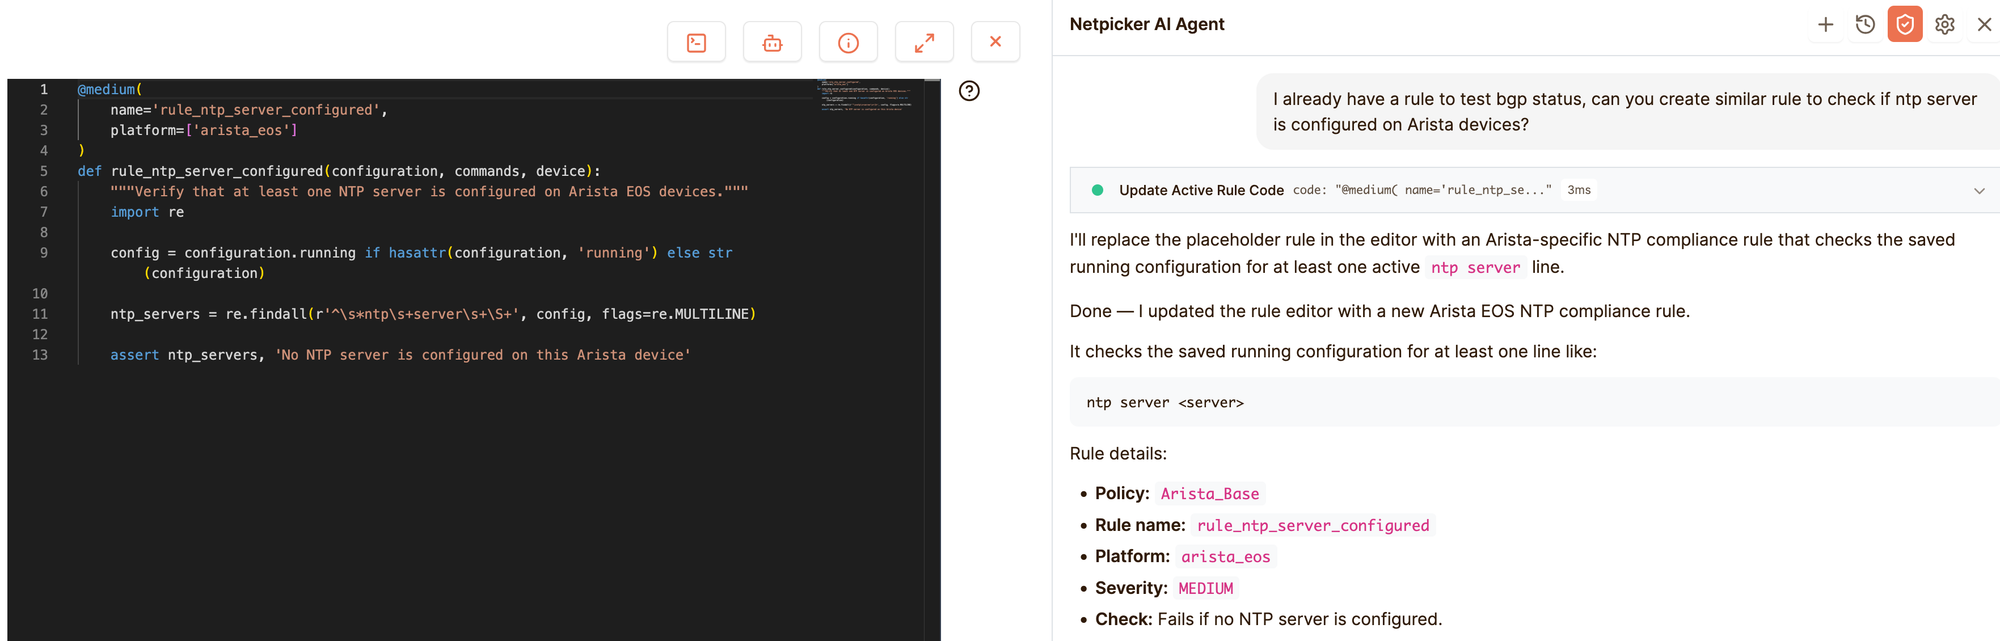
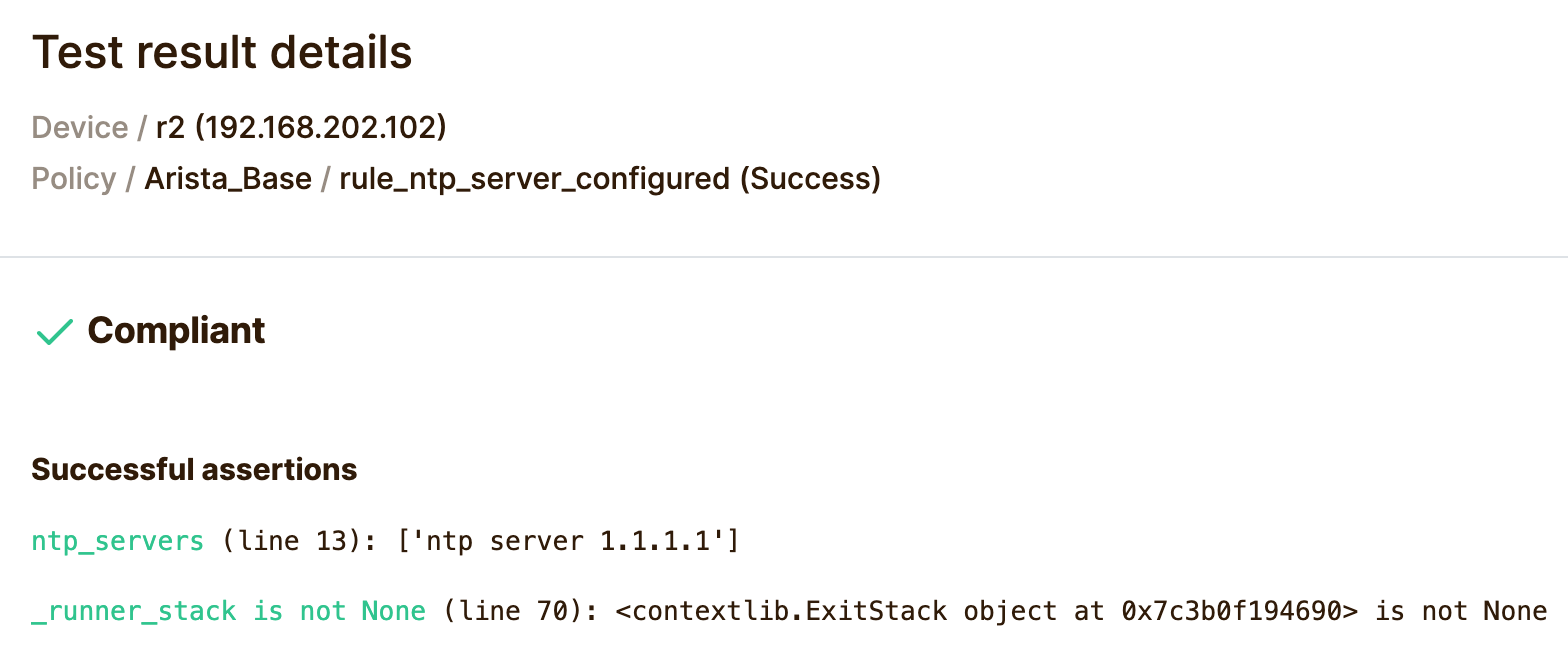
It picked up on the existing rule structure, replaced the placeholder in the rule editor, and generated a check that looks for at least one ntp server line in the running config, failing the rule if none is found. It also filled in the rule name, platform, and severity automatically, matching the style of the rules already in the Arista_Base policy.
I think this is genuinely useful, it saves you from writing boilerplate every time you want a new check, and it picks up on the conventions you are already using. That said, I would still read through the generated code before running it against production devices, the same way you should with anything AI generates.
Closing up
That is pretty much it for this post. We went from writing pytest tests in the terminal to running the same checks through Netpicker's GUI, scheduling them to run automatically, and even letting the built-in AI agent write a new rule for us.
If you are already comfortable with pytest and just want a way to manage tests, devices, and results without living in the CLI, Netpicker is worth a look. I will keep exploring more of its features and cover them in future posts, so stay tuned for that. If you have any questions, drop a comment below.