
There were many situations in the past where I had to quickly set up a Syslog server or a Radius server to test and troubleshoot an issue on my Network. I usually end up downloading Ubuntu/CentOS ISO, adding it to VirtualBox, configuring the IP and then installing the required packages. This can be time consuming and repetitive.
Recently, I came across a great piece of an application called 'Vagrant' which helps spinning up packaged Linux virtual machines feel like a breeze. As I mentioned earlier, conventionally, we will use tools like VMware workstation or Virtual Box to perform such tasks but it can take quite take a while to create, modify or destroy them. Vagrant can do all of these tasks with just a few commands.
What is Vagrant?
Vagrant helps build and manage virtual machine environments in a single workflow with a focus on automated provisioning. Vagrant comes with out of the box support for VirtualBox, a free, local virtualisation environment product. Both Vagrant and VirtualBox work well on Windows, Mac and Linux.
Vagrant Installation
You can download and install Vagrant by navigating to https://www.vagrantup.com/downloads and selecting your OS. The installation process is well documented on the above link.
Setting up Vagrant and launching the first server
1. To get started with your first virtual server, you only need two commands vagrant init and vagrant up
To demonstrate this, I'm going to create a new folder calledvagrant_project where you will keep your Vagrantfile and any provisioning instructions.
Vagrantfile is to describe the type of machine required for a project, and how to configure and provision these machines. The Vagrantfile allows you to mark the root directory of your project. Many of the configuration options in Vagrant are relative to this root directory ('vagrant_project' in our case)C:\Users\vsurr\Documents>dir
Volume in drive C has no label.
Volume Serial Number is 9A37-9F5F
Directory of C:\Users\vsurr\Documents
26/12/2021 14:58 <DIR> .
26/12/2021 14:58 <DIR> ..
24/08/2020 14:52 <DIR> vagrant_project2. Open CMD or PowerShell window, then navigate to thevagrant_project folder we just created. Add a Linux distro of your choice using vagrant init IMAGE_NAME command. I'm going to choose CentOS 8 image for this example, In Vagrant, the image is called 'Box'.
C:\Users\vsurr\Documents\vagrant_project>vagrant init centos/8

A `Vagrantfile` has been placed in this directory. You are now
ready to `vagrant up` your first virtual environment! Please read
the comments in the Vagrantfile as well as documentation on
`vagrantup.com` for more information on using Vagrant.
3. Boot your CentOS server by using the command vagrant up
This is what happens behind the scenes:
- Vagrant downloaded a pre-built CentOS 8 VM image
- Loaded the image into VirtualBox with the configuration defined in the
Vagrantfilewhich is in the folder we just created. (More on this later) - Booted the CentOS 8 VM
C:\Users\vsurr\Documents\vagrant_project>vagrant up
Bringing machine 'default' up with 'virtualbox' provider...
==> default: Box 'centos/8' could not be found. Attempting to find and install...
    default: Box Provider: virtualbox
    default: Box Version: >= 0
==> default: Loading metadata for box 'centos/8'
    default: URL: https://vagrantcloud.com/centos/8
==> default: Adding box 'centos/8' (v2011.0) for provider: virtualbox
    default: Downloading: https://vagrantcloud.com/centos/boxes/8/versions/2011.0/providers/virtualbox.box
Download redirected to host: cloud.centos.org
    default:
    default: Calculating and comparing box checksum...
==> default: Successfully added box 'centos/8' (v2011.0) for 'virtualbox'!
==> default: Importing base box 'centos/8'...
==> default: Matching MAC address for NAT networking...
==> default: Checking if box 'centos/8' version '2011.0' is up to date...
==> default: Setting the name of the VM: vagrant_project_default_1640531849511_19532
==> default: Clearing any previously set network interfaces...
==> default: Preparing network interfaces based on configuration...
    default: Adapter 1: nat
==> default: Forwarding ports...
    default: 22 (guest) => 2222 (host) (adapter 1)
==> default: Booting VM...
==> default: Waiting for machine to boot. This may take a few minutes...
    default: SSH address: 127.0.0.1:2222
    default: SSH username: vagrant
    default: SSH auth method: private key
    default:
    default: Vagrant insecure key detected. Vagrant will automatically replace
    default: this with a newly generated keypair for better security.
    default:
    default: Inserting generated public key within guest...
    default: Removing insecure key from the guest if it's present...
    default: Key inserted! Disconnecting and reconnecting using new SSH key...
==> default: Machine booted and ready!
==> default: Checking for guest additions in VM...
    default: No guest additions were detected on the base box for this VM! Guest
    default: additions are required for forwarded ports, shared folders, host only
    default: networking, and more. If SSH fails on this machine, please install
    default: the guest additions and repackage the box to continue.
    default:
    default: This is not an error message; everything may continue to work properly,
    default: in which case you may ignore this message.
==> default: Rsyncing folder: /cygdrive/c/Users/vsurr/Documents/vagrant_project/ => /vagrant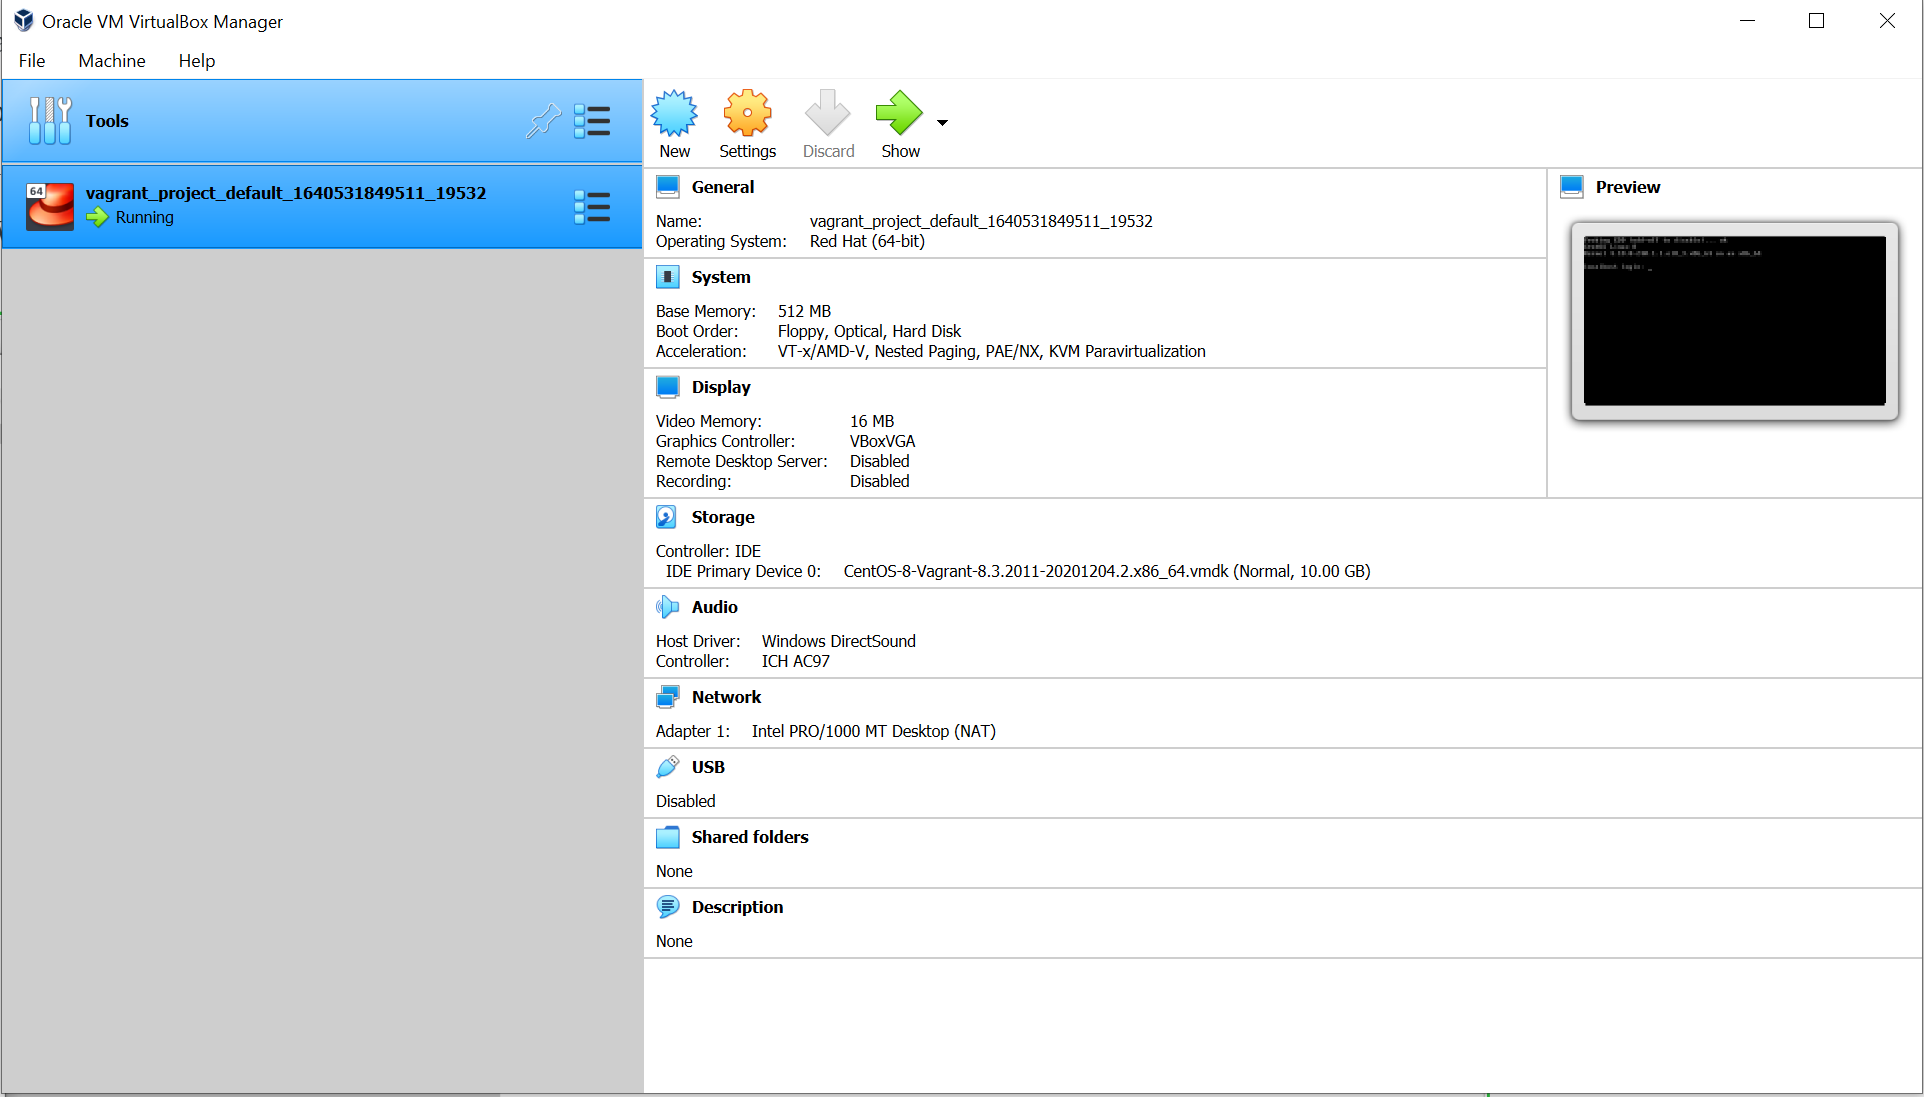
4. As you can see above, the server is up and running. You can SSH to the server by using vagrant ssh command.
C:\Users\vsurr\Documents\vagrant_project>vagrant ssh
[vagrant@localhost ~]$
[vagrant@localhost ~]$ hostnamectl
   Static hostname: localhost.localdomain
         Icon name: computer-vm
           Chassis: vm
        Machine ID: eb185d65193a42638ad6f638300fd3c8
           Boot ID: 2d16eeb1a2fd48ac8054f0fa08c58beb
    Virtualization: oracle
  Operating System: CentOS Linux 8
       CPE OS Name: cpe:/o:centos:centos:8
            Kernel: Linux 4.18.0-240.1.1.el8_3.x86_64
      Architecture: x86-64
Managing Vagrant VMs are very easy and straightforward
vagrant haltto shut down the VM.vagrant upto bring it back up again.vagrant reloadis required for changes made in Vagrantfile to take effectvagrant destroyto completely remove the VM from VirtualBox.
Vagrant Network Interface Management
Vagrant offers the following three Networking options
- Port Forwarding
- Private Network (isolated host-only network)
- Public Network (bridged)
Port Forwarding / Forwarded Ports
Vagrant port forwarding allows you to access a port on your host machine (Windows in our example) and have all the traffic forwarded to a port on the guest machine (CentOS 8)
In our example, SSH port forwarding is automatically configured for us. Port 22 on CentOS is reachable by connecting to the host machine on port 2222.
We can also explicitly configure port forwarding for different services by editing the Vagrantfile and adding forwarded port configuration
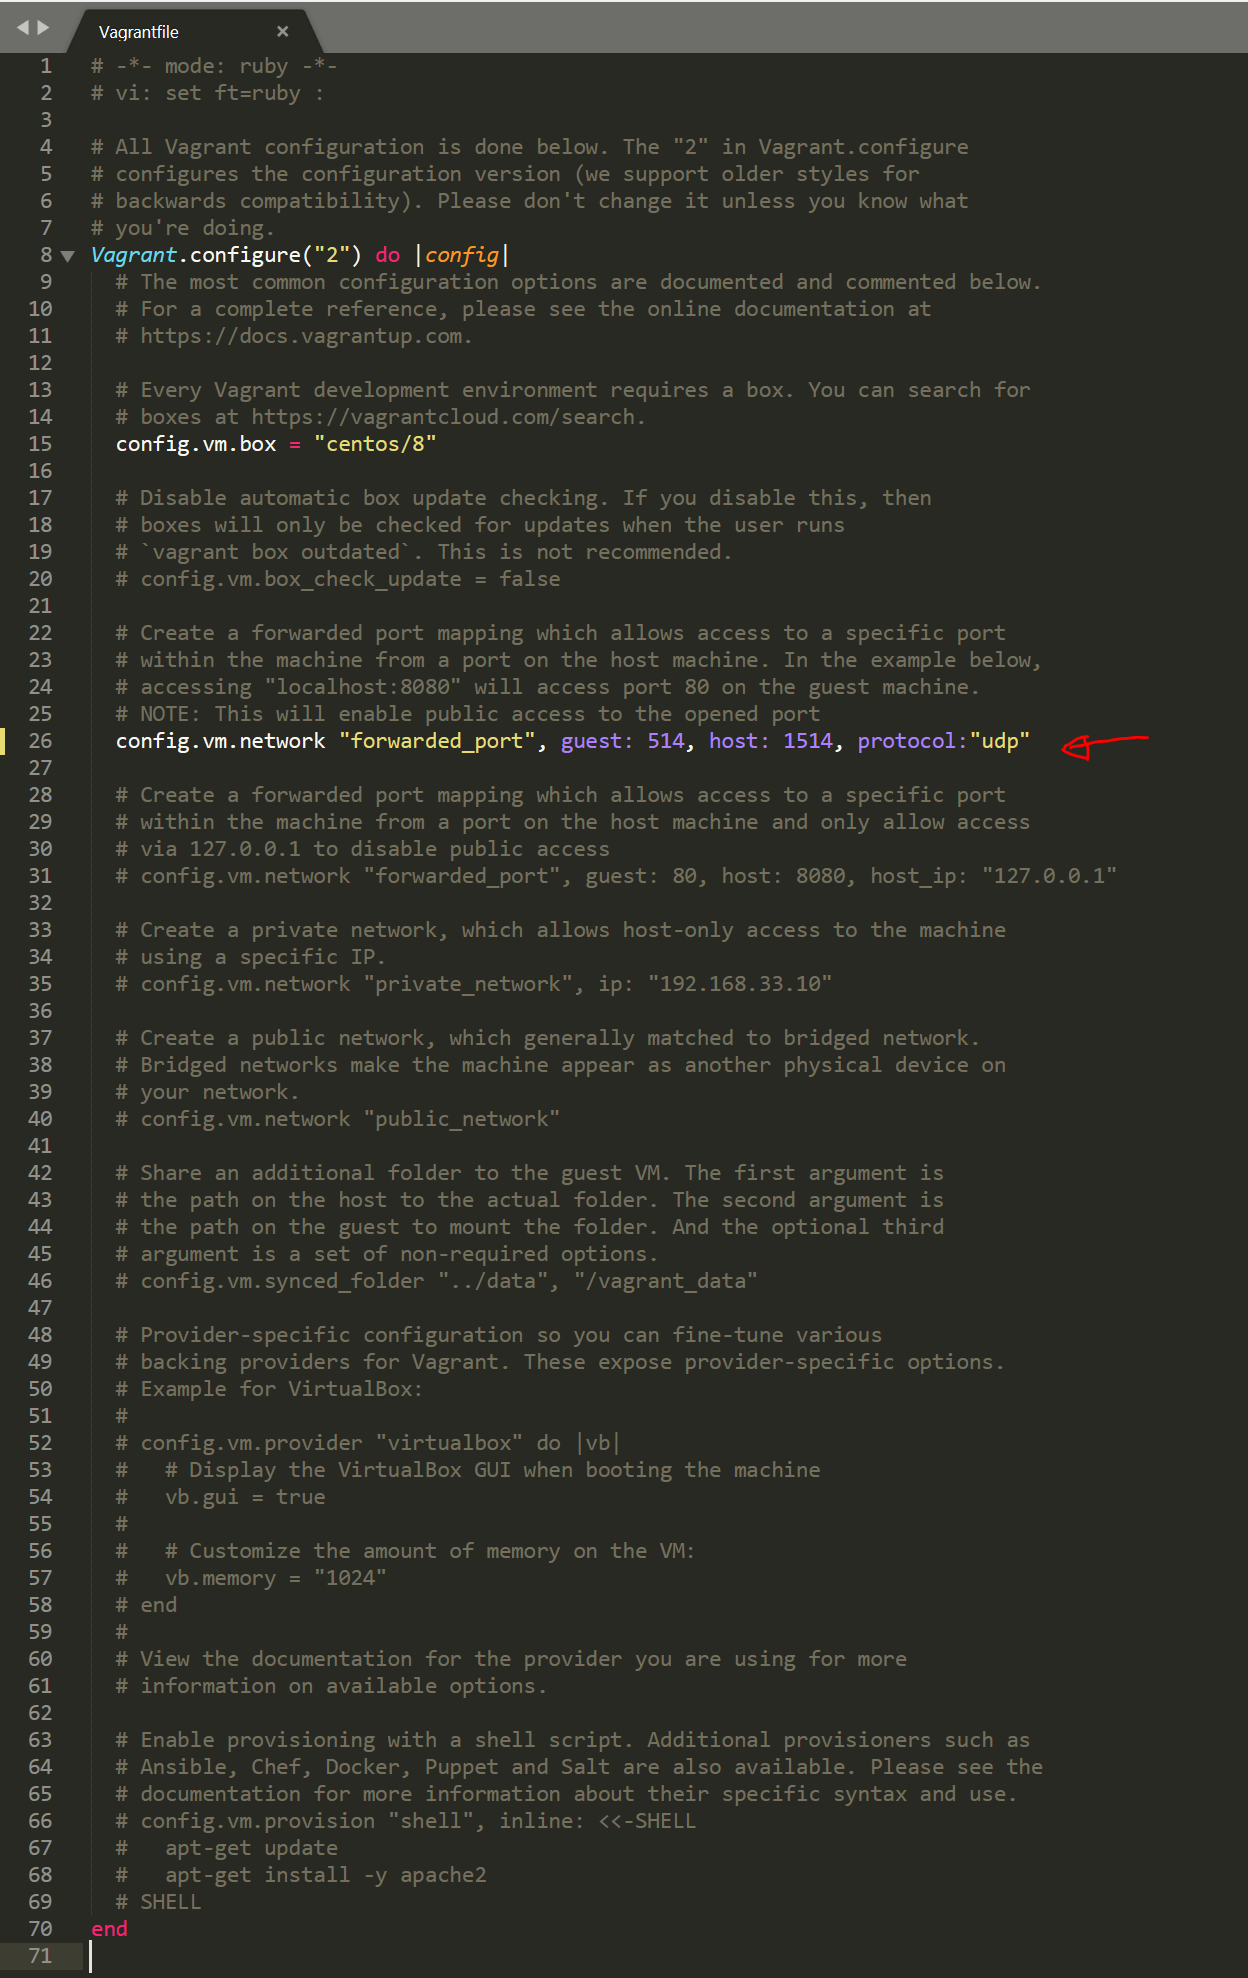
The configuration expects two parameters, the port on the guest and the port on the host. Let's say we have a syslog server running on CentOS 8 and we want to forward UDP port 1514 on the Host machine to UDP port 514 on the Guest machine.
protocol option to use UDP based port forwarding instead of TCP (The default is TCP)- Go to
vagrant_projectfolder and open theVagrantfile - Find the following line and uncomment it.
- Edit the line
vagrant reload
Vagrant.configure("2") do |config|
  config.vm.network "forwarded_port", guest: 514, host: 1514, protocol:"udp"
end
C:\Users\vsurr\Documents\vagrant_project>vagrant reload
==> default: Attempting graceful shutdown of VM...
==> default: Checking if box 'centos/8' version '2011.0' is up to date...
==> default: Clearing any previously set forwarded ports...
==> default: Clearing any previously set network interfaces...
==> default: Preparing network interfaces based on configuration...
    default: Adapter 1: nat
==> default: Forwarding ports...
    default: 514 (guest) => 1514 (host) (adapter 1)
    default: 22 (guest) => 2222 (host) (adapter 1)
==> default: Booting VM...
==> default: Waiting for machine to boot. This may take a few minutes...
    default: SSH address: 127.0.0.1:2222
    default: SSH username: vagrant
    default: SSH auth method: private key
==> default: Machine booted and ready!
==> default: Checking for guest additions in VM...
    default: No guest additions were detected on the base box for this VM! Guest
    default: additions are required for forwarded ports, shared folders, host only
    default: networking, and more. If SSH fails on this machine, please install
    default: the guest additions and repackage the box to continue.
    default:
    default: This is not an error message; everything may continue to work properly,
    default: in which case you may ignore this message.
==> default: Rsyncing folder: /cygdrive/c/Users/vsurr/Documents/vagrant_project/ => /vagrant
==> default: Machine already provisioned. Run `vagrant provision` or use the `--provision`
==> default: flag to force provisioning. Provisioners marked to run always will still run.
As you can see above on the output, port forwarding for UDP port 514 is now configured.
Private Network
Private Network or Host-only networking is an isolated virtual network where the network is completely contained within the host system and not accessible from other systems. This Network is created using a Virtual Network Adapter that is only visible to the host system.
DHCP
The easiest way to use a Private Network is to allow the IP to be assigned via DHCP. The important thing to note here is that the Private Network itself functions as the DHCP server.
Vagrant.configure("2") do |config|
  config.vm.network "private_network", type: "dhcp"
end
Static IP
You can also specify a static IP address for the VM which I'm going to use in this example. Comment the line we created in the previous step for configuring port forwarding and uncomment the following line. I'm going to randomly choose the 172.16.10.x network.
Vagrant.configure("2") do |config|
  config.vm.network "private_network", ip: "172.16.10.10"
end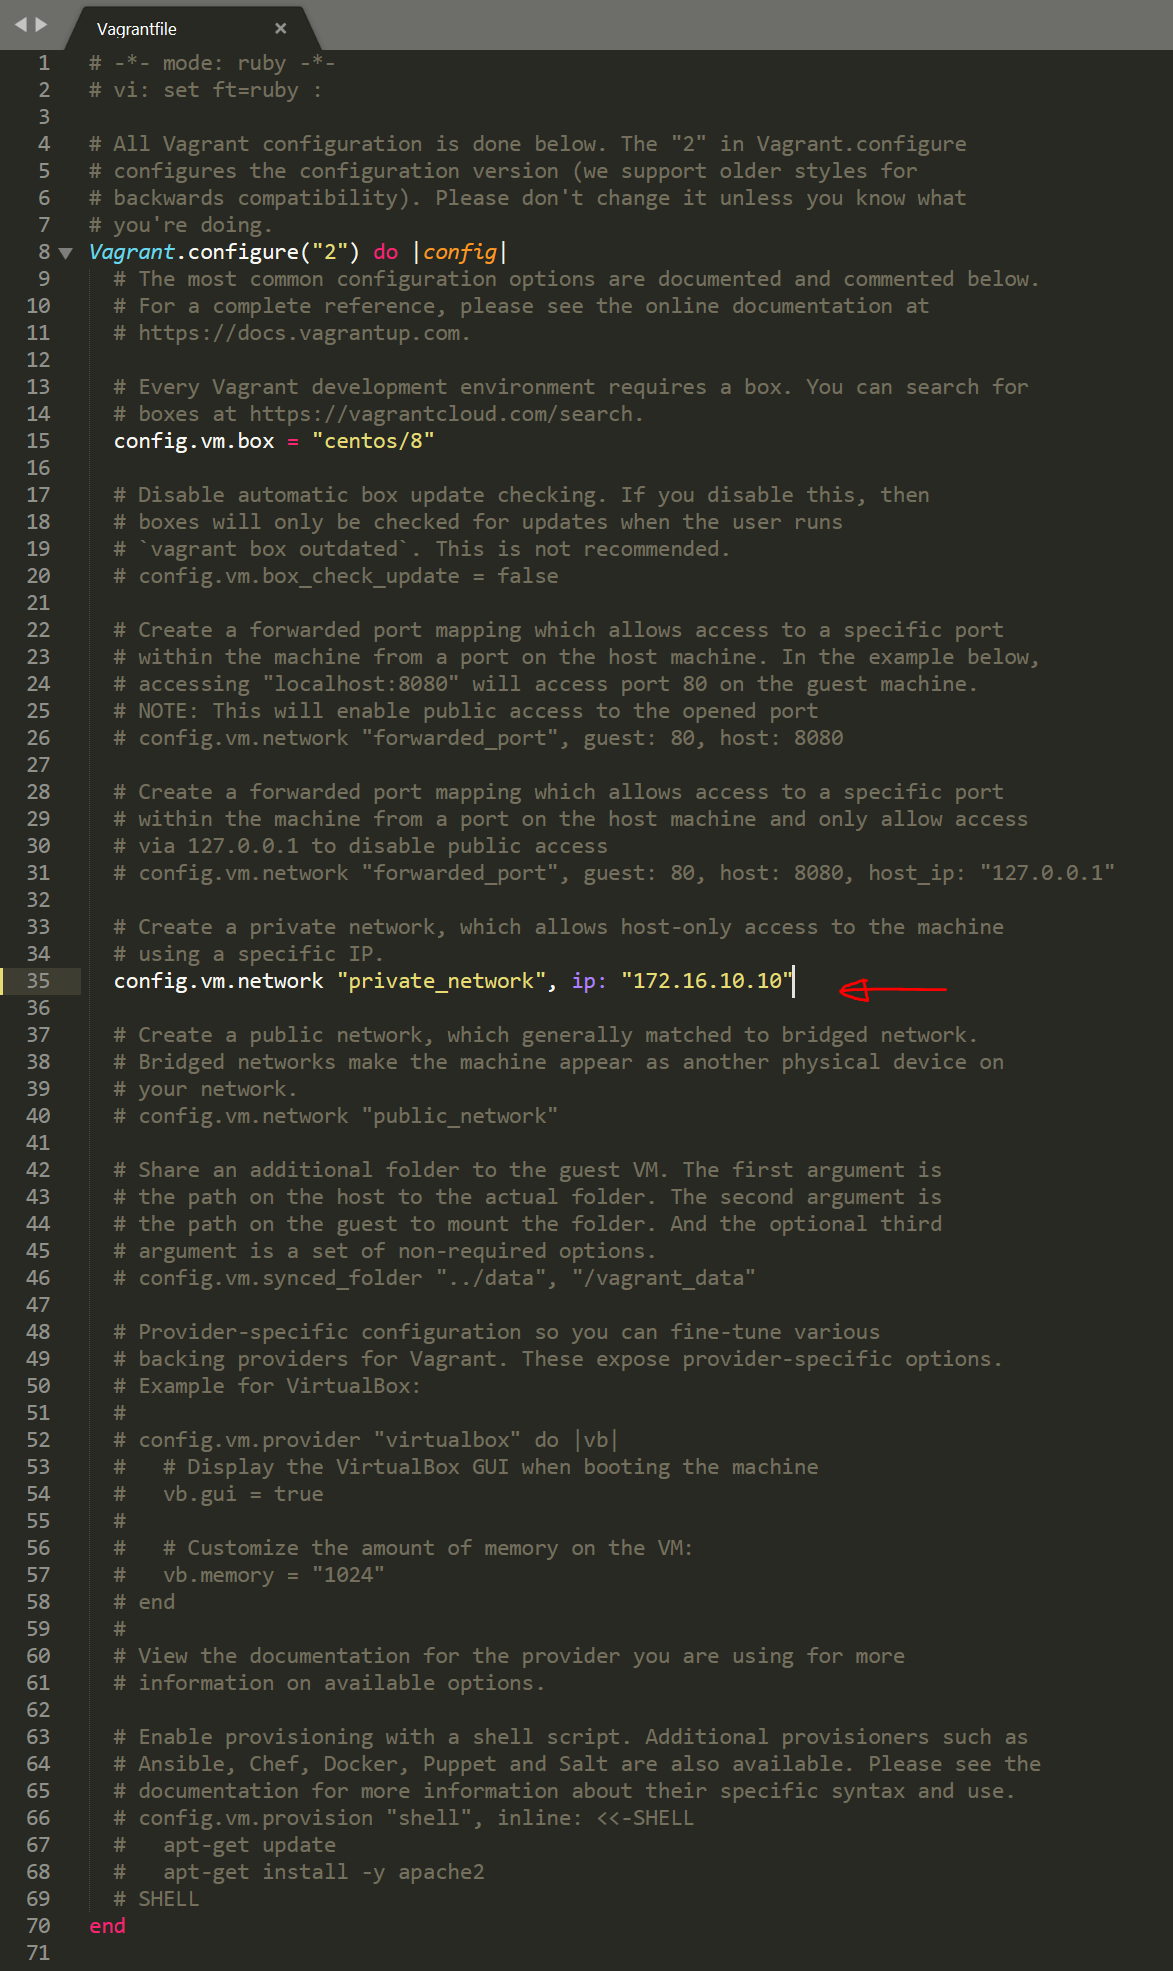
As you can see below, the VM is now reachable via the IP we specified (only from the host machine)
C:\Users\vsurr\Documents\vagrant_project>ping 172.16.10.10

Pinging 172.16.10.10 with 32 bytes of data:
Reply from 172.16.10.10: bytes=32 time<1ms TTL=64
Reply from 172.16.10.10: bytes=32 time<1ms TTL=64
Reply from 172.16.10.10: bytes=32 time<1ms TTL=64
Reply from 172.16.10.10: bytes=32 time<1ms TTL=64
Public Network / Bridged Network
The name Public Network can be very misleading especially for us Network Engineers as this has nothing to do with the Public IPs so, I'm going to use the word Bridged Network moving forward.
Public Networks will be replaced by bridged in the future releases of Vagrant.Default Network Interface - If more than one network interface is available on the host machine, Vagrant will ask you to choose which interface the virtual machine should bridge to. A default interface can be specified by adding a :bridge clause to the network definition. Since I have two NICs on my Windows machine, I'm going to specify the NIC in the Vagrantfile to avoid getting any prompts during the boot.
DHCP vs Static - You can either use DHCP (most likely provided by your ISP router) or a static IP which should be the same as your host machine subnet.
I'm going to use DHCP for this example. The IP address of my host machine (Windows) is 192.168.0.50 which is provided by my Virgin ISP router. So, the VM should get an IP on the same subnet.
Comment the line we created in the previous step for configuring private network and uncomment the following lines. Please amend the NIC name to match yours.
config.vm.network "public_network", bridge: "Intel(R) Ethernet Controller (2) I225-V"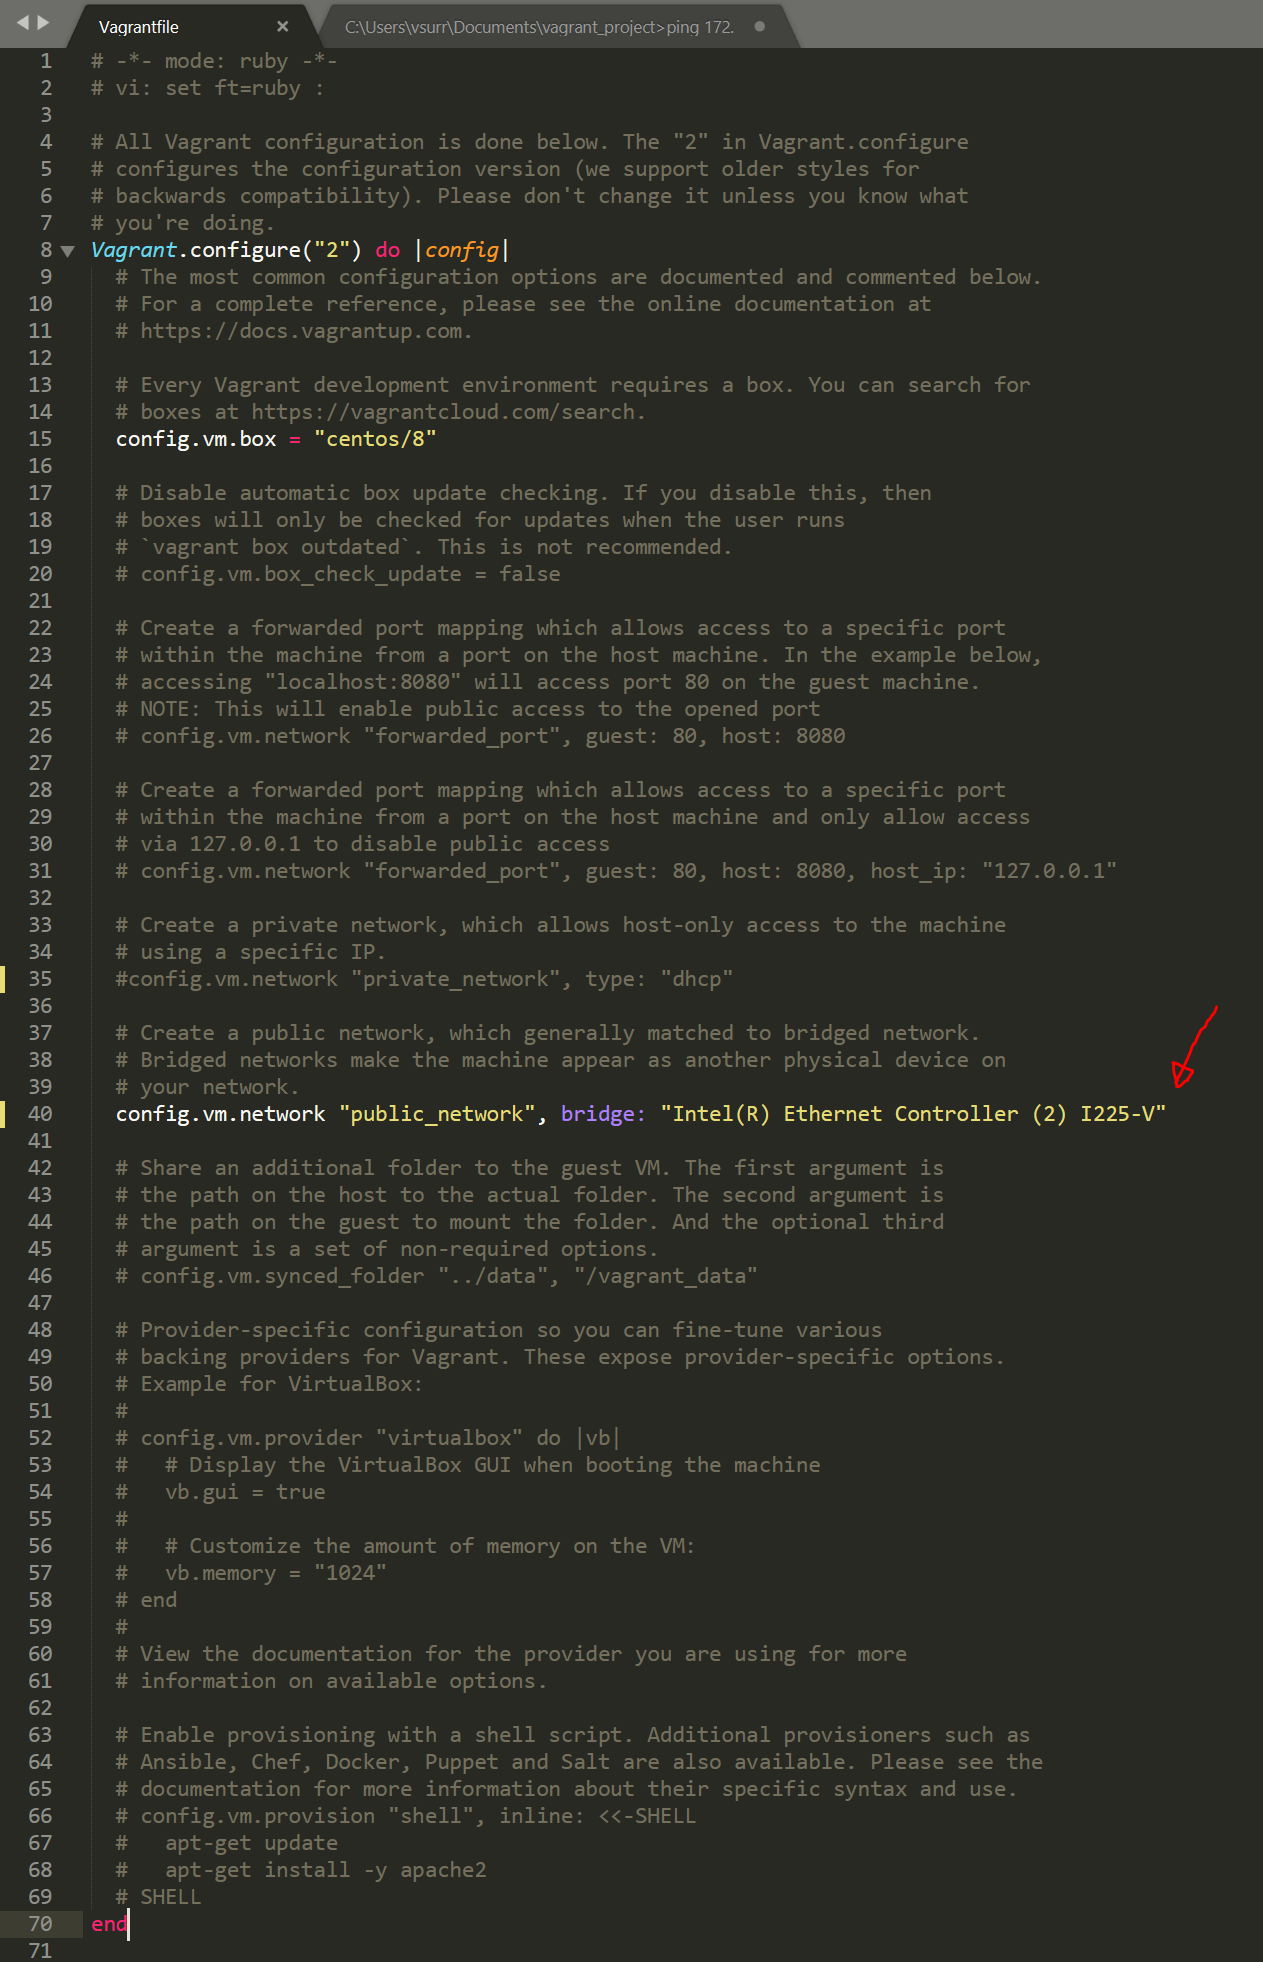
As you can see below, eth1 is assigned with the IP address of 192.168.0.54 and the VM can reach out to the Internet.
eth0 attached to the virtual machine to be a NAT device. eth0 as NAT is a fundamental requirement for Vagrant functionality. Therefore, any private or bridged networks are added as additional network devices and exposed to the virtual machine as “eth1,” “eth2,” and so on.C:\Users\vsurr\Documents\vagrant_project>vagrant ssh
Last login: Sun Dec 26 16:50:05 2021 from 10.0.2.2
[vagrant@localhost ~]$ ip ad
1: lo: <LOOPBACK,UP,LOWER_UP> mtu 65536 qdisc noqueue state UNKNOWN group default qlen 1000
link/loopback 00:00:00:00:00:00 brd 00:00:00:00:00:00
inet 127.0.0.1/8 scope host lo
valid_lft forever preferred_lft forever
inet6 ::1/128 scope host
valid_lft forever preferred_lft forever
2: eth0: <BROADCAST,MULTICAST,UP,LOWER_UP> mtu 1500 qdisc fq_codel state UP group default qlen 1000
link/ether 52:54:00:27:8b:50 brd ff:ff:ff:ff:ff:ff
inet 10.0.2.15/24 brd 10.0.2.255 scope global dynamic noprefixroute eth0
valid_lft 86376sec preferred_lft 86376sec
inet6 fe80::5054:ff:fe27:8b50/64 scope link
valid_lft forever preferred_lft forever
3: eth1: <BROADCAST,MULTICAST,UP,LOWER_UP> mtu 1500 qdisc fq_codel state UP group default qlen 1000
link/ether 08:00:27:fa:15:f3 brd ff:ff:ff:ff:ff:ff
inet 192.168.0.54/24 brd 192.168.0.255 scope global dynamic noprefixroute eth1
valid_lft 86376sec preferred_lft 86376sec
inet6 fe80::a00:27ff:fefa:15f3/64 scope link
valid_lft forever preferred_lft forever
[vagrant@localhost ~]$ ping 8.8.8.8
PING 8.8.8.8 (8.8.8.8) 56(84) bytes of data.
64 bytes from 8.8.8.8: icmp_seq=1 ttl=55 time=21.7 ms
64 bytes from 8.8.8.8: icmp_seq=2 ttl=55 time=23.8 ms
64 bytes from 8.8.8.8: icmp_seq=3 ttl=55 time=31.4 ms
64 bytes from 8.8.8.8: icmp_seq=4 ttl=55 time=21.3 ms
64 bytes from 8.8.8.8: icmp_seq=5 ttl=55 time=20.5 msClosing up on Vagrant Networking
Each of the networking options comes with its own set of pros and cons. Port forwarding is very easy to set up but you need to explicitly configure each forwarded port. I personally tend to use a bridged network most of the time so, the VM is reachable from my entire home network. A private network is more suitable if security is a must and the VM should be isolated.
Vagrant Synced folders
Synced folders enable Vagrant to sync a folder on the host machine (Windows) to the guest machine, allowing you to continue working on your project's files on your host machine, but use the resources in the guest machine.
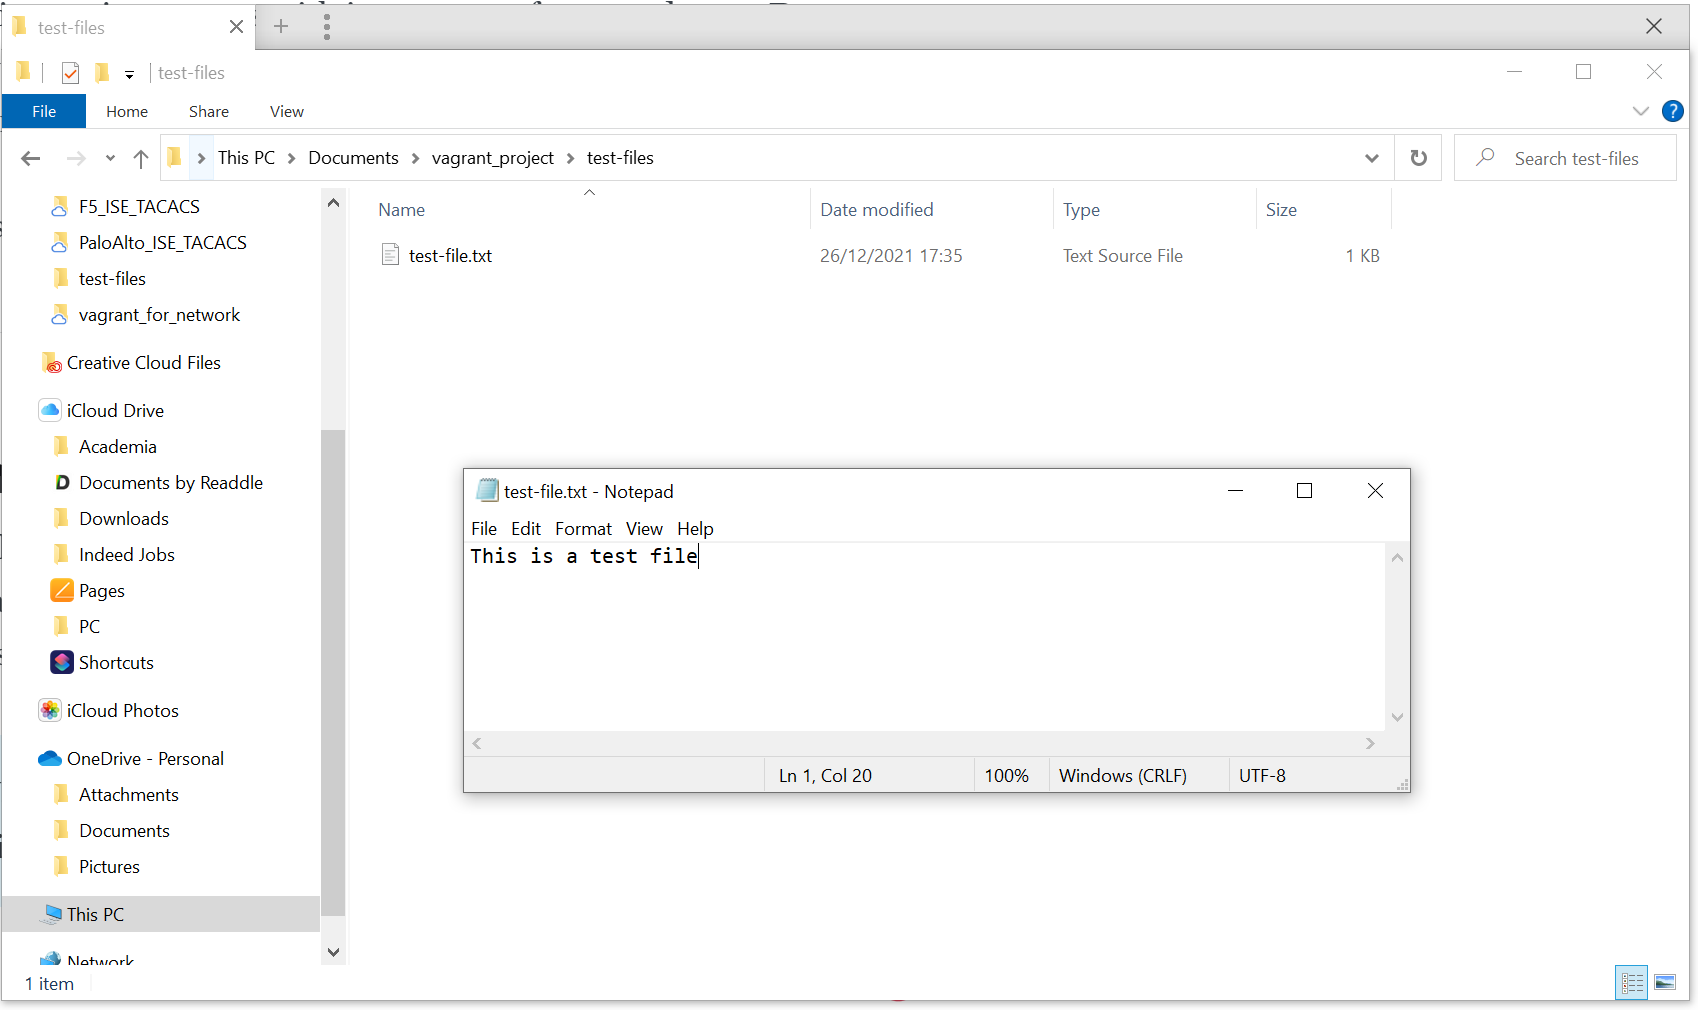
/vagrant directory on the Guest machine. I created a folder and a test-file within the vagrant_project folder which should show up on our VM.
C:\Users\vsurr\Documents\vagrant_project>vagrant ssh
Last login: Sun Dec 26 17:38:35 2021 from 10.0.2.2

[vagrant@localhost ~]$ cd /vagrant/
[vagrant@localhost vagrant]$ ls
test-files  Vagrantfile

[vagrant@localhost vagrant]$ cd test-files/
[vagrant@localhost test-files]$ ls
test-file.txt

[vagrant@localhost test-files]$ cat test-file.txt
This is a test file
[vagrant@localhost test-files]$
Custom Synced Folders
Synced folders are configured within your Vagrantfile using the config.vm.synced_folder method.
config.vm.synced_folder "C:/my_project_files", "/home/vagrant/my_synced_folder"The first parameter is a path to a directory on the host machine. The second parameter must be an absolute path of where to share the folder within the guest machine. This folder will be created if it does not exist. I created a folder called my_project_files in C: drive and added as a synced folder which shows up on the VM.
C:\Users\vsurr\Documents\vagrant_project>vagrant ssh
[vagrant@localhost ~]$ cd ~
[vagrant@localhost ~]$ ls
my_synced_folder
[vagrant@localhost ~]$ cd my_synced_folder/
[vagrant@localhost my_synced_folder]$ ls
cisco-switch-config.txt
Synced Folder gotchas
- Please ensure to use forward slash
/instead of backslash for the source folder even though windows use the backslash.\is the escape character for most programming languages which causes the following character to get ignored.C:\my_project_filesbecomesC:y_project_files - I was getting an error
mount: unknown filesystem type 'vboxsf'trying to use the custom synced folder so, had to install a plugin using the commandvagrant plugin install vagrant-vbguest --plugin-version 0.21 - even after the plug-in is installed, I couldn't get the custom synced folder working with CentOS 8 so, had to use CentOS 7.
==> default: Mounting shared folders...
    default: /home/vagrant/my_synced_folder => C:/my_project_files
Vagrant was unable to mount VirtualBox shared folders. This is usually
because the filesystem "vboxsf" is not available. This filesystem is
made available via the VirtualBox Guest Additions and kernel module.
Please verify that these guest additions are properly installed in the
guest. This is not a bug in Vagrant and is usually caused by a faulty
Vagrant box. For context, the command attempted was:

mount -t vboxsf -o uid=1000,gid=1000,_netdev home_vagrant_my_synced_folder /home/vagrant/my_synced_folder

The error output from the command was:

mount: unknown filesystem type 'vboxsf'

C:\Users\vsurr\Documents\vagrant_project>vagrant plugin install vagrant-vbguest --plugin-version 0.21
Installing the 'vagrant-vbguest --version '0.21'' plugin. This can take a few minutes...
Fetching micromachine-3.0.0.gem
Fetching vagrant-vbguest-0.21.0.gem
Installed the plugin 'vagrant-vbguest (0.21.0)'!

C:\Users\vsurr\Documents\vagrant_project>vagrant reload
==> default: Attempting graceful shutdown of VM...
==> default: Checking if box 'centos/7' version '2004.01' is up to date...
==> default: Clearing any previously set forwarded ports...
==> default: Clearing any previously set network interfaces...
==> default: Preparing network interfaces based on configuration...
    default: Adapter 1: nat
    default: Adapter 2: bridged
==> default: Forwarding ports...
    default: 22 (guest) => 2222 (host) (adapter 1)
==> default: Booting VM...
==> default: Waiting for machine to boot. This may take a few minutes...
    default: SSH address: 127.0.0.1:2222
    default: SSH username: vagrant
    default: SSH auth method: private key
==> default: Machine booted and ready!
[default] No Virtualbox Guest Additions installation found.

[........]

Complete!
Copy iso file C:\Program Files\Oracle\VirtualBox\VBoxGuestAdditions.iso into the box /tmp/VBoxGuestAdditions.iso
Mounting Virtualbox Guest Additions ISO to: /mnt
mount: /dev/loop0 is write-protected, mounting read-only
Installing Virtualbox Guest Additions 6.1.30 - guest version is unknown
Verifying archive integrity... All good.
Uncompressing VirtualBox 6.1.30 Guest Additions for Linux........
VirtualBox Guest Additions installer
Copying additional installer modules ...
Installing additional modules ...
VirtualBox Guest Additions: Starting.
VirtualBox Guest Additions: Building the VirtualBox Guest Additions kernel
modules.  This may take a while.
VirtualBox Guest Additions: To build modules for other installed kernels, run
VirtualBox Guest Additions:   /sbin/rcvboxadd quicksetup <version>
VirtualBox Guest Additions: or
VirtualBox Guest Additions:   /sbin/rcvboxadd quicksetup all
VirtualBox Guest Additions: Building the modules for kernel
3.10.0-1127.el7.x86_64.
Redirecting to /bin/systemctl start vboxadd.service
Redirecting to /bin/systemctl start vboxadd-service.service
Unmounting Virtualbox Guest Additions ISO from: /mnt
==> default: Checking for guest additions in VM...
==> default: Configuring and enabling network interfaces...
==> default: Rsyncing folder: /cygdrive/c/Users/vsurr/Documents/vagrant_project/ => /vagrant
==> default: Mounting shared folders...
    default: /home/vagrant/my_synced_folder => C:/my_project_files

C:\Users\vsurr\Documents\vagrant_project>vagrant ssh
[vagrant@localhost ~]$ cd ~
[vagrant@localhost ~]$ ls
my_synced_folder
[vagrant@localhost ~]$ cd my_synced_folder/
[vagrant@localhost my_synced_folder]$ ls
cisco-switch-config.txt
[vagrant@localhost my_synced_folder]$
Thank you for reading, as always your comments and feedbacks are always welcome.